
MADCD10 - Cd player/recorder MADISON - Free user manual and instructions
Find the device manual for free MADCD10 MADISON in PDF.
| Brand | Madison |
| Model | MADCD10 |
| Product type | CD player/recorder |
| Dimensions (W x D x H) | 200 x 295 x 140 mm |
| Approximate weight | 2 kg |
| Power supply | 110-240 V, 50/60 Hz, 20 W |
| Supported audio formats | CD Audio, MP3, WMA |
| USB player | Yes, FAT32 up to 16 GB |
| FM radio | 87-108 MHz, 10 presets |
| Audio output | Stereo RCA (L/R) |
| Remote control | Yes, with 2 AA batteries included |
| Playback functions | Play, pause, stop, next/previous track, fast forward/reverse |
| FM tuning | Automatic, semi-automatic, manual |
| Display | LED |
| Care and cleaning | Clean with a soft dry cloth. Do not use liquids. |
| Laser safety | Class I laser, do not open the device |
| Protection | Do not expose to moisture, excessive heat, or vibrations |
| Spare parts | Remote control, batteries, FM antenna, RCA audio cable included |
| Repairability | No user-serviceable parts. Refer all servicing to qualified personnel. |
| Power consumption | 20 W |
| Signal-to-noise ratio | > 85 dB |
| Frequency response | 20 Hz - 20 kHz (+/- 2 dB) |
Frequently Asked Questions - MADCD10 MADISON
User questions about MADCD10 MADISON
0 question about this device. Answer the ones you know or ask your own.
Ask a new question about this device
Download the instructions for your Cd player/recorder in PDF format for free! Find your manual MADCD10 - MADISON and take your electronic device back in hand. On this page are published all the documents necessary for the use of your device. MADCD10 by MADISON.
USER MANUAL MADCD10 MADISON
Congratulations to the purchase of your new CD player.
WARNING

CAUTION DO NOT OPEN THE HOUSING SHOCK HAZARD
EXPLANATION OF SIGNS

The triangle containing a lightning symbol is used to indicate whenever your health is at risk (due to electrocution, for example).

An exclamation mark in a triangle indicates particular risks in handling or operating the appliance.

Class I protection: Connect only to an earthed mains outlet

The product is for indoor use only

In accordance with the requirements of UK standards

This marking indicates that this product should not be disposed with other household wastes throughout the EU. To prevent possible harm to the environment or human health from uncontrolled waste disposal,
recycle it responsibly to promote the sustainable reuse of material resources. To return your used device, please use the return and collection systems or contact the retailer where the product was purchased. They can take this product for environmentally safe recycling.

LASER CLASS I: SAFETY INFORMATION
A laser warning sign is located on the back of the appliance and inside the CD compartment. Do not remove these warning signs. Do not attempt to open the appliance or access its internal components.
Never look directly into the laser beam, as laser radiation can cause eye damage.
IMPORTANT SAFETY INSTRUCTIONS AND WARNINGS
This equipment is designed and manufactured to meet international safety standards. However, like any electrical device, proper care is essential to ensure optimal performance and safety. Please retain these safety and operating instructions for future reference.
- Do not expose this appliance to dripping or splashing liquids. Avoid placing objects filled with liquids, such as vases or glasses, on or near the appliance.
- Avoid installing the unit in locations exposed to direct sunlight, near heat-emitting appliances like electric heaters, or on top of other stereo equipment that generates significant heat.
- Do not place the unit in enclosed spaces that block ventilation, overly dusty areas, places subject to constant vibration, or humid or moist environments.
- Keep all sources of open flames, such as lit candles, away from the unit.
- Before powering on for the first time, ensure the power cord is properly installed and fully uncoiled.
- Ensure that all electrical connections (including mains plugs, extension leads, and connections between pieces of equipment) are made in accordance with the manufacturer's instructions.
- Turn off and unplug the mains plug before making or changing any connections.
- If in doubt about the installation, operation, or safety of your equipment, consult your dealer.
DO NOT overheat the unit, as it may cause damage and reduce the lifespan of the equipment. - DO NOT listen at very high volumes, as this can permanently damage your hearing.
- DO NOT leave the equipment switched on when unattended. Always switch it off using the equipment's switch.
- For safety reasons, do not remove any covers or screws or attempt to access the product's interior. Doing so may expose you to dangerous voltage and void your warranty.
- Refer any servicing to qualified and authorized service personnel. There are no user-serviceable parts inside this unit.
- Batteries (battery pack or installed batteries) should not be exposed to excessive heat, such as sunshine, fire,
or the like.
- ESD Remark: : If the unit malfunctions due to electrostatic discharge, reset it by disconnecting the mains power from the wall outlet for 5 minutes, then reconnect it to resume normal operation
DISCONNECT DEVICE: The power outlet must be installed near the equipment and be easily accessible.
CONTENTS OF THE CARTON:
CD Player
Remote Control
- 2 x AA Batteries
FM Antenna
RCA Audio Cable
- User Guide
FRONT PANEL
- ON/OFF
- USB Input for MP3 & WMA Audio File Playback
- LED Display
- Previous Track Select
- Next Track Select
- Stop Current Track
- Open/Close the CD Disc tray
- CD/FM Input Select
- Play/pause
REAR PANEL
- L/R Analogue Audio Output (RCA)
- FM Radio Antenna
- AC Power Input
REMOTE CONTROL
OPEN/CLOSE : Opens and closes the CD tray.
SCAN: Scans FM stations and automatically saves them.
CD/USB: Selects CD or USB input.
CD: Selects CD mode.
FM: Selects FM tuner mode.
NUMERIC BUTTONS 1-9: Directly selects a song or radio station preset.
NUMERIC BUTTON 10+: Selects tracks exceeding number 10.
FAST FORWARD/REWIND / : Controls playback speed or scans frequencies in FM mode.
PLAY/PAUSE/STOP / /: Controls playback in CD mode.
MUTE: Mutes or unmutes the sound.
VOLUME + / - Adjusts the volume.
CHANNEL/TRACK +/- /: Selects the next or previous station preset in FM mode or the next or previous track in CD/USB mode.
RESET: Returns to factory settings.
OSD: No function.
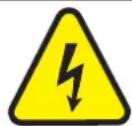
INSTALLING THE BATTERIES IN THE REMOTE CONTROL
Remove the battery cover from the back of the remote control as shown and insert 2x AA size batteries ensuring correct polarity
RECOMMENDATIONS FOR BATTERIES

This symbol indicates that used batteries should not be disposed of with household waste but deposed correctly in accordance with your local regulations.
Batteries shall not be exposed to excessive heat such as sunshine, fire or the like.
When the internal batteries are not to be used, remove them to avoid damage caused by battery leakage or corrosion.
ATTENTION: Danger of explosion if battery is incorrectly placed. Only replace by the same or equivalent type.
WARNING : Do not swallow the battery. Danger of chemical burns. Keep new and old batteries out of the reach of children.
If the battery compartment doesn't close properly, stop using the product and keep it out of the reach of children.
If you are in doubt whether the batteries have been swallowed or introduced into any other part of the body, contact immediately a doctor.
REMOTE CONTROL :
- Ensure AA batteries are correctly installed in the remote control.
- Point the remote directly at the micro system within a 7-meter range.
- Remove the batteries if the remote control will not be used for long periods to prevent leakage.
- Do not store the remote control in dusty, humid, or moist conditions or in direct sunlight.
- The CD player supports 12cm and 8cm Compact Discs but is not compatible with DVDs or SACDs.
- Supported audio file types: CD Audio, MP3 Audio (MPEG 1 & 2), and WMA Audio.
Basic operation steps :
- Press ON on the remote control to turn the system on.
- Press the INPUT button repeatedly until 'CD' appears on the front panel display.
- Press the Eject button (▲) on the remote control or front panel to open the CD tray.
- Place a disc into the CD tray with its printed side facing up, and press the Eject button (▲) again to close the CD tray.
To play a Compact Disc :
- Press the Play button (▶) on the remote control or front panel and the CD will begin playing from track 1 of the disc.
To pause playback :
- Press the Pause button (||) on the remote control or front panel and the CD will pause.
- Press the Play () again to resume playback or the disc for the same position from where it was paused.
To stop playback :
- Press the Stop button (■) on the remote control or front panel and the CD will stop. Pressing the Play button (▶) will resume playback from the beginning (track1) of the disc.
To play a desired track:
- During playback, press the CHANNEL/TRACK / button on the remote control to select the desired track.
- Press one of the numeric buttons (1~9) on the remote control to directly access your desired track.
To select particular part of a track:
- During playback, press and hold the FWD button (▶) or RWD button (↔) on the remote control to scan the current track to the desired part.
LISTENING TO THE FM RADIO
- To listen to FM radio, press the FM button until a station frequency appears. The radio operates on FM frequencies between 87MHz and 107MHz.
- The system supports fully automatic, semi-automatic, and manual tuning modes for radio stations.
- Press ON on the remote control to turn the system on.
- Press the FM button until a radio station frequency appears on the front panel display.
TUNING THE RADIO
There are 3 tuning modes for FM modes.
Full Automatic Tune :
- Whilst in radio mode, press the 'AUTO' button on the remote control, the system will automatically search for and save presets for all strong station frequencies found.
Semi Automatic Tune :
- Whilst in radio mode, press and hold the « « » or « » button on the remote control or front panel and the radio will scan to the nearest strong station frequency in whichever direction you selected.
Manual Tune :
- Whilst in radio mode, press the or button on the remote control or front panel and the radio frequency will change by 1 step at a time. Press the or button until you find your desired frequency.
Saving Radio Presets :
- In Full automatic & semi-automatic tuning mode, strong radio station frequencies will be saved automatically. Manual tuning will auto save the frequency when you stop pressing “← » or « →” for more than 2 second, then save it from station 1 to 10. You can select a station by pressing the "Channel/track / button on the remote control.
USB INPUT:
This system supports audio files stored on USB sticks formatted to FAT32 with a maximum capacity of 16GB.
- Compatible audio formats include MP3 (MPEG 1 & 2, audio layer 3) and WMA (Windows Media Audio).
BASIC OPERATION
- Press ON on the CD player front panel to turn the system on.
- While in any input mode, insert a compatible USB flash memory drive into the USB input on the front panel of the CD Player section. To select USB playback mode, press the USB input on the remote control or front panel.
To play an audio track:
- Press the Play button (▶) on the remote control or front panel and the CD will begin playing from track 1 of the USB stick.
To pause playback :
- Press the Pause button (||) on the remote control or front panel and the track will pause.
- Press the Play () again to resume playback of the track for the same position from where it was paused.
To stopPlayback:
- Press the Stop button (■) on the remote control or front panel and the track will stop. Pressing the Play button (▶) will resume playback from the beginning (track1) of the USB stick.
To play a desired track:
- During playback, press the backward/forward skip buttons (▶/▶) button on the front panel or on the remote control.
- Press one of the numeric buttons (1 ~ 9) on the remote control to directly access your desired track.
To select a particular part of a track:
- During playback, press and hold the FWD button () or RWD button () on the remote control to scan the current track to the desired part.
To remove the USB memory stick:
- Press the Stop button (■) on the remote control or front panel and the track will stop. Then it is safe to remove the USB stick from the front panel USB input.
EXTERNAL CONNECTIONS
The system has a stereo RCA line output compatible with amplifiers or receiver sound systems.
BASIC OPERATION
- Connect a pair of RCA stereo cables from the line input jacks of your home audio amplifier or receiver to the red and white « LINE OUT » jacks on the rear panel of the CD player section of this system.
- You can now select either the CD player or USB Inputs as your desired output source only, however the volume will now be controlled by your external home amplifier or receiver. Follow your manufacturer's instructions for further information on the use of this setup.
TROUBLESHOOTING GUIDE
If you encounter issues, such as no sound, skipping tracks, or interference, refer to the troubleshooting guide to resolve common problems.
| PROBLEM POSSIBLE CAUSE SOLUTION | ||
| Remote Control : | ||
| Remote Control not working | Batteries are exhausted Replace with new batteries | |
| The remote control is too far away from the main system, controlling angle is too large, or there is an obstacle in between. | Operate the remote within the recommended operative range. | |
| CD Player Section : | ||
| No Sound | There is no disc. Load a disc. | |
| The disc is not loaded with the printed side up. | Load it with the printed side up. | |
| It is in pause mode. Cancel the pause mode. | ||
| The disc is dirty or scratched. Clean it or load another disc. | ||
| Skipping sound or track The disc is dirty or scratched. Clean it or load another disc. | ||
| FM Radio : | ||
| Not receiving stations | The antenna is disconnected. Connect the antenna. | |
| The broadcast frequency is not set properly | Set the broadcast frequency properly | |
| Not receiving the preset station | An incorrect station frequency has been memorized. | Memorize the correct station frequency. |
| The preset memory was cleared because the AC input cord has been disconnected for more than a few days. | Memorize the station again. | |
| Interference | Noise related to the influence of an electric appliance. | Turn off unnecessary nearby appliances. |
| Noise related to a nearby TV set. Install the system further away from the TV set. | ||
| USB Input : | ||
| No tracks available to play | No files are on the USB stick. Add files to the USB stick. | |
| The USB stick is not formatted using FAT32 file system. | Reformat the USB stick using FAT32 file system. | |
| The files on the USB stick are not MP3 audio format. | Add MP3 audio files to the USB stick. | |
SPECIFICATIONS
Input voltage : 110-240V\~/50/60Hz
Power consumption. 20W
Tuner Frequency Range : . FM : 87-108MHz
Signal to Noise Ratio : >85dB
Frequency response 20Hz-20KHz+2dB
Dimensions : L200 x W295 x H140mm
MANUEL D'UTILISATION
AVERTISSEMENTS

ATTENTION NE PAS OUVRIR LE BOITIER RISQUE DE CHOC ELECTRIQUE
EXPLICATION DES SYMBOLES

RECOMMANDATIONS POUR LES PILES

MANUAL DE INSTRUCTIUNI
VERTIZARE

ATENTIE
NU DESCHIDETI CARCASA
PERICOL DE ELECTROCUTARE

Download the manual in other languages
Assembled in PRC · Designed by LOTRONIC S.A.
Rue F. Englert 17·Bt 2·B-1480 Tubize
www.lotronic.net


- WARNING
- CAUTION DO NOT OPEN THE HOUSING SHOCK HAZARD
- EXPLANATION OF SIGNS
- LASER CLASS I: SAFETY INFORMATION
- IMPORTANT SAFETY INSTRUCTIONS AND WARNINGS
- CONTENTS OF THE CARTON:
- FRONT PANEL
- REAR PANEL
- REMOTE CONTROL
- INSTALLING THE BATTERIES IN THE REMOTE CONTROL
- RECOMMENDATIONS FOR BATTERIES
- REMOTE CONTROL :
- Basic operation steps :
- To play a Compact Disc :
- To pause playback :
- To stop playback :
- To play a desired track:
- To select particular part of a track:
- LISTENING TO THE FM RADIO
- TUNING THE RADIO
- Full Automatic Tune :
- Semi Automatic Tune :
- Manual Tune :
- Saving Radio Presets :
- USB INPUT:
- BASIC OPERATION
- To play an audio track:
- To stopPlayback:
- To select a particular part of a track:
- To remove the USB memory stick:
- EXTERNAL CONNECTIONS
- TROUBLESHOOTING GUIDE
- SPECIFICATIONS
- MANUEL D'UTILISATION
- AVERTISSEMENTS
- ATTENTION NE PAS OUVRIR LE BOITIER RISQUE DE CHOC ELECTRIQUE
- EXPLICATION DES SYMBOLES
- RECOMMANDATIONS POUR LES PILES
- MANUAL DE INSTRUCTIUNI
- VERTIZARE
- ATENTIE
- NU DESCHIDETI CARCASA
- PERICOL DE ELECTROCUTARE
Brand : MADISON
Model : MADCD10
Category : Cd player/recorder