WL 30 - Light therapy BEURER - Free user manual and instructions
Find the device manual for free WL 30 BEURER in PDF.
| Product type | Wake-up light with light therapy |
| Brand | Beurer |
| Model | WL 30 |
| Dimensions (W × H × D) | 120 × 145 × 120 mm |
| Weight | Approx. 430 g |
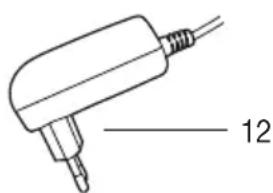
| Main power supply | Power adapter 100-240 V / 50-60 Hz / 0.4 A |
| Backup batteries | 4 AA batteries (not included for continuous operation, only backup) |
| Safety class | II |
| Usage | Indoor only |
| Radio frequency range | FM 86.9 – 108.0 MHz |
| Maximum light intensity | 50 lux |
| Main functions | Sunrise simulation, sunset simulation, alarm with sound, radio, 4 natural sounds, night light, snooze function, sleep timer |
| Wake-up sounds | Beep, radio, 4 natural sounds (birdsong, frogs, rain, wind) |
| Display | LED display with 3 brightness levels, blue or orange colors, auto mode |
| Adjustable sunrise/sunset duration | 15, 20, 40, 60, 80, 100 or 120 minutes |
| Snooze | 10 minutes repeat |
| Sleep timer for radio/sounds | 15, 20, 40, 60, 80, 100 or 120 minutes |
| Box contents | WL30 lamp, power adapter, 4 AA batteries, instruction manual |
| Care and cleaning | Clean with a dry cloth, do not use abrasive cleaners |
| Safety | Use only the supplied adapter, do not use if damaged, keep out of reach of children, do not expose to moisture |
| Reset | Insert a pointed object into the Reset hole on the back |
Frequently Asked Questions - WL 30 BEURER
User questions about WL 30 BEURER
0 question about this device. Answer the ones you know or ask your own.
Ask a new question about this device
Download the instructions for your Light therapy in PDF format for free! Find your manual WL 30 - BEURER and take your electronic device back in hand. On this page are published all the documents necessary for the use of your device. WL 30 by BEURER.
USER MANUAL WL 30 BEURER
Instructions for use....10 - 16
F Lumière de réveil
Thank you for choosing one of our products. Our name stands for high-quality, thoroughly tested products for applications in the areas of heat, gentle therapy, blood pressure/diagnosis, weight, massage and air. Please read these instructions for use carefully and observe the information they contain.
With kind regards,
Your Beurer team
Included in delivery
Beurer Wake-up Light WL30
Power supply unit
- 4 x AA battery
These instructions for use
Signs and symbols
The following symbols appear in the instructions for use and on the type plate:

WARNING Warning instruction indicating a risk of injury or damage to health.

IMPORTANT Safety note indicating possible damage to the device/accessory.

Note Note on important information.
1. Safety notes

WARNING
- Only operate the device with the power supply unit provided and the mains voltage specified on the power supply unit.
- Do not operate the device if it is visibly damaged.
- In the event of defects or operational faults, switch the device off immediately and disconnect it from the mains socket.
- Do not pull on the mains cable or on the device to disconnect the power supply unit from the socket.
- Never plug in or unplug the power supply unit when you have wet hands.
- Never hold or carry the device by the mains cable.
- Keep packaging material away from children (risk of suffocation).
- Arrange the mains cable so that no-one will trip over it.
- Never use the device in proximity to moisture.
2. Intended use
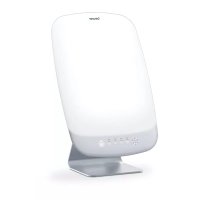
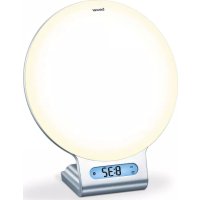
The WL30 Wake-up Light wakes you from sleep in a gentle and natural manner. The LED light gradually becomes brighter like a rising sun, allowing your eyes to slowly accustom to the light conditions and your body to gently prepare itself for waking up. The light intensity can be set to your personal preferences. Along with the simulated sunrise, you can set an acoustic alarm to help you wake up. Choose between the radio, a beep or four natural sounds.
The Wake-up Light provides a rested and pleasant start to your day.
Device functions:
Clock display
- Wake-up function with simulated sunrise and alarm
- Simulated sunset
- Simulated sunrise
Radio
4 natural sounds
Goodnight function
LED light can be used as a lamp

WARNING
- This device is not intended for use by people (including children) with restricted physical, sensory or mental skills or a lack of experience and/or a lack of knowledge, unless they are supervised or instructed in the use of the device by a person who is responsible for their safety.
Children should be supervised around the device to ensure they do not play with it. - The device is only intended for the purpose described in these instructions for use. The manufacturer is not liable for damage resulting from improper or careless use.
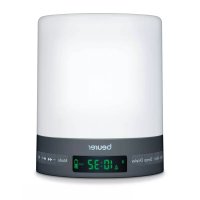
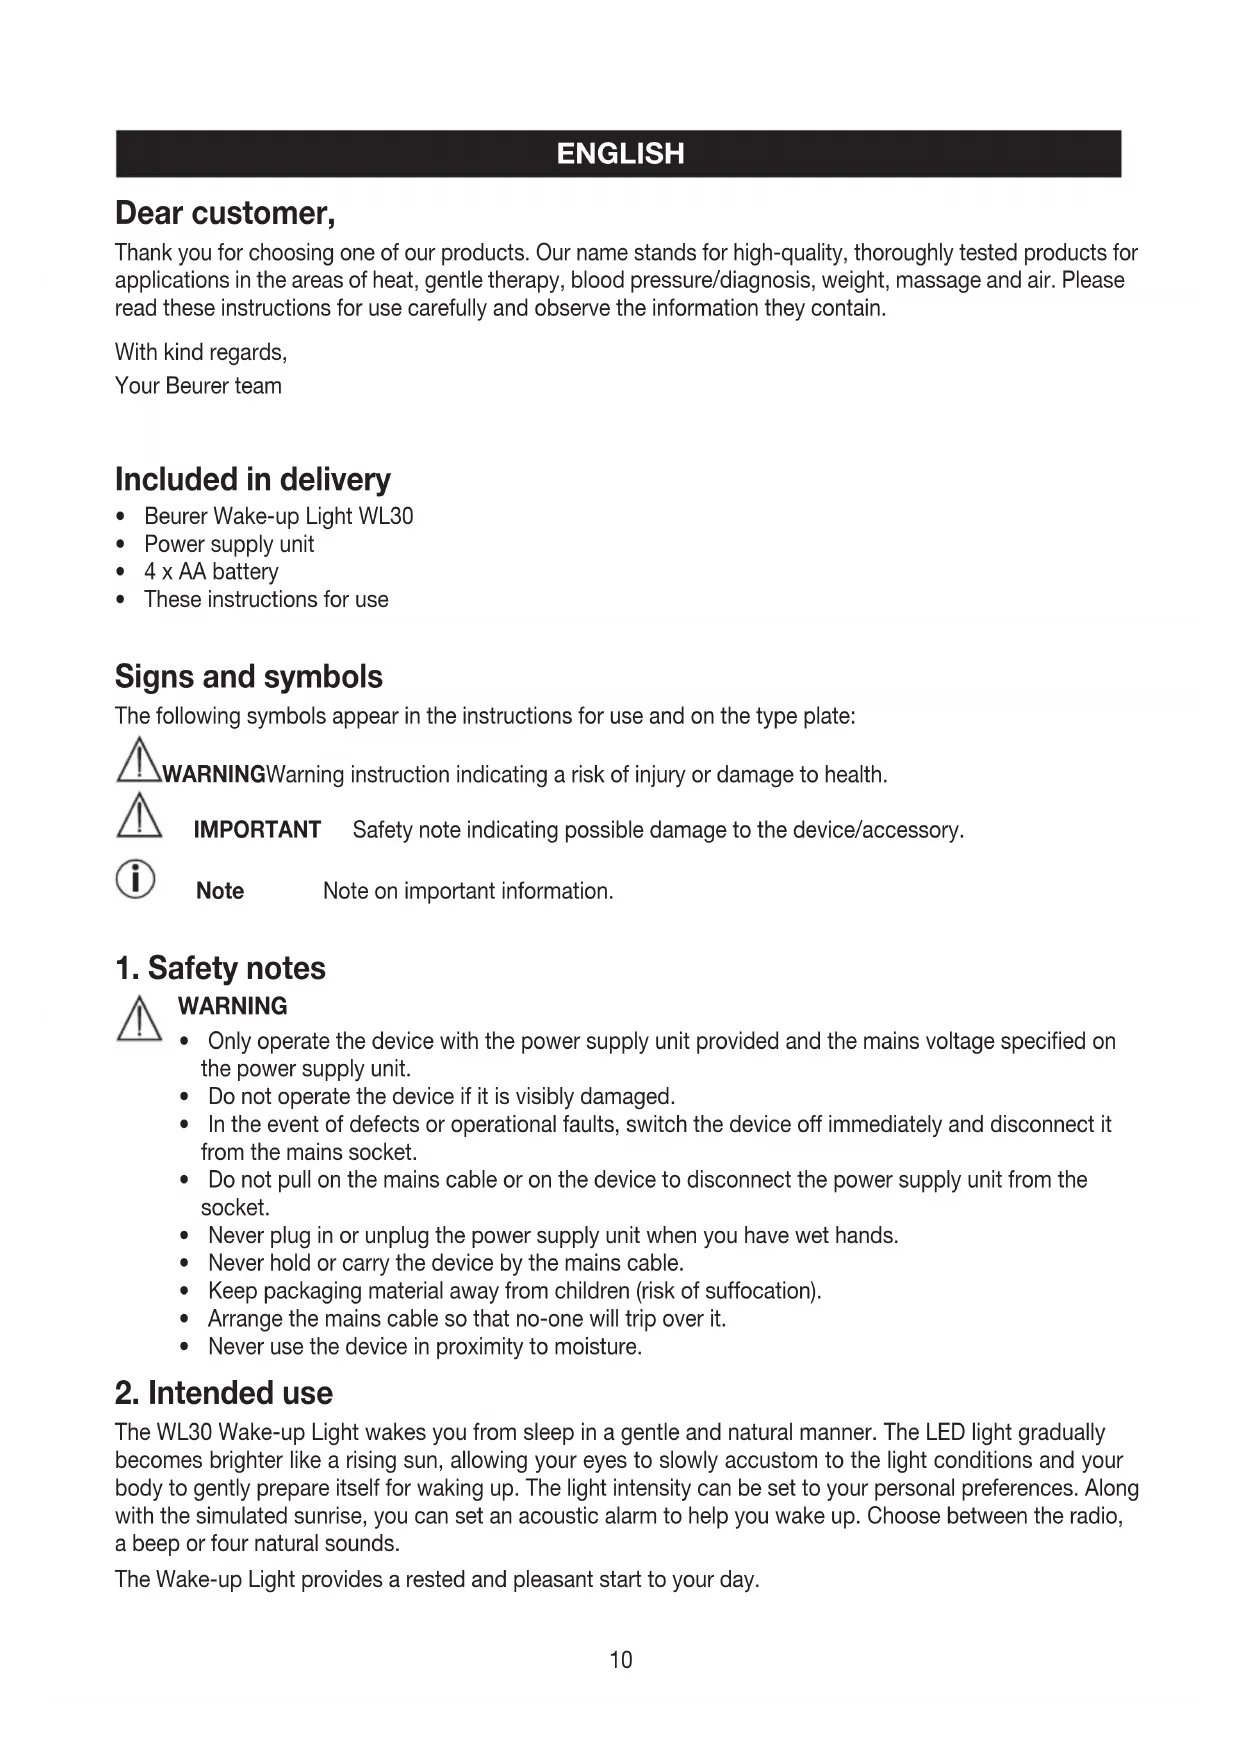
3. unit description
- LED light
- Time control button (for setting the time)
- Alarm control button (for setting the alarm time)
- Volume control button (for adjusting the volume)
- Snooze button (for activating the snooze function)
- Radio control button (for activating and adjusting the radio)
- Display control button (for adjusting the display brightness and colour)
- Light control button (for adjusting the light intensity)
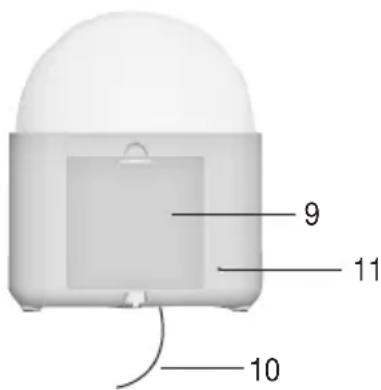
- Battery compartment with cover
- External aerial (for radio reception)
- Reset-Hole Resetting the device to factory settings
- Mains plug
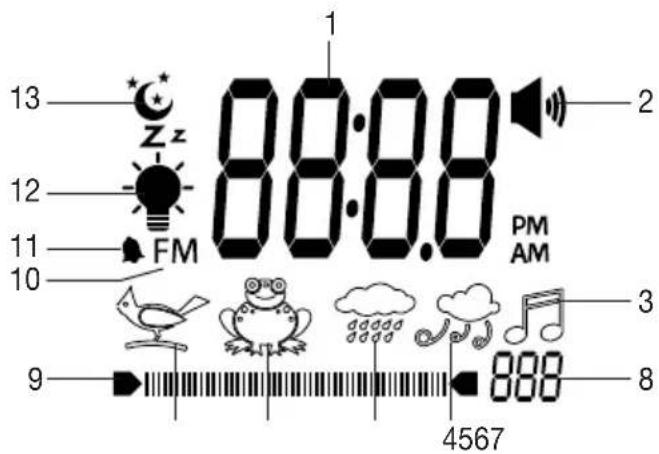
Display description
- Time/alarm time or radio frequency
- "Beep" alarm
- Radio symbol
- "Wind" sound
- "Rain shower" sound
- "Frog croak" sound
- "Birdsong" sound
- Volume or light intensity setting
- Volume or light intensity display
- Radio frequency symbol
- Alarm symbol
- Light symbol
- Moon symbol
5. Initial use
- Remove the packaging material.
- Check that all parts listed are present.
- Check the device, mains plug and cable for damage.
- Place the device on a firm, even surface.
- Plug the power supply connector into the power supply socket on the underside of the device.
- Insert the mains plug into a suitable socket. The time will start to flash and you can set the hour format.
- Position the device approx. 40~cm from your head.
- Remove the battery compartment cover on the rear of the device and insert the batteries according to the correct polarity. The batteries supply power to the device in the event of a power failure. The batteries are not intended to be used as a permanent power supply.
6. Operation
Setting the time
| • Press the time control button. The 12-hour format will flash. | 12:H |
| You can now choose between 12 and 24-hour format. • To select the hour format, move the time control button up or down. Confirm the hour format by pressing the time control button. | 24:H |
| The hour setting will flash on the display. • To set the hour, move the time control button up or down. Confirm the hour by pressing the time control button. Tip: to navigate through the hours or minutes more quickly, press and hold the control button up or down. | 12: |
| The minute setting will flash on the display. • To set the minute, move the time control button up or down. Confirm the minute by pressing the time control button. | 00 |
| The time is now set. | 12:00 |

Note The time set will only appear on the device if the "setting the time" process has been completed in full.
Setting and activating the alarm
| • Press the alarm control button. | 12: |
| The hour setting will flash on the display. • To set the hour, move the alarm control button up or down. Confirm by pressing the alarm control button. | 18: |
| The minute setting will flash on the display. • To set the minute, move the alarm control button up or down. Confirm by press-ing the alarm control button. | 10: |
| One of the alarm sound symbols will flash on the display. You can choose between four natural sounds (birdsong, frog croak, rain shower or wind), the radio and a beep as the alarm sound. • To select the alarm sound, move the alarm control button up or down. Confirm by pressing the alarm control button. | 42 |
| The volume setting for the alarm will appear on the display. • To set the alarm volume, move the volume control button up or down Confirm by pressing the alarm control button. | 5 |
| A number will flash on the display. This number indicates the period of time (in minutes) before the wake-up time over which the light will gradually start to become brighter (simulated sunrise). The sunrise duration can be set to 15, 20, 40, 60, 80, 100 or 120 minutes. • To set the sunrise duration, move the alarm control button up or down. Confirm by pressing the alarm control button. | 15: |
| The light symbol will flash on the display. • You can move the alarm control button up or down to switch the sunrise function on or off. Confirm by pressing the alarm control button. | |
| If you have switched the sunrise function on, the light intensity setting will appear on the display. • To set the sunrise brightness, move the light control button up or down. Confirm by pressing the alarm control button. | 5 |
| The alarm symbol will flash on the display. • To activate the alarm, press the alarm control button. |
Deactivating the alarm

Note To deactivate the alarm, press the alarm control button eight times. The alarm symbol will appear on the display. Move the alarm control button down (the alarm symbol will disappear) and confirm by pressing the alarm control button.
Snoopze function
When the alarm goes off, you can stop it temporarily by pressing the snooze button. The alarm will then go off again ten minutes later. To switch off the alarm clock for 24 hours, press any button on the device.
Light function
You can also use the device as a normal lamp.
| ·Press the light control button. The light will switch on. | |
| ·To set the light intensity, move the light control button up or down. | ■■■■■■ 5 |
| ·To switch the light off, press the light control button. |
Radio function
| • Press the radio control button. The radio frequency currently set will appear on the display. | 86.9 |
| • To set the radio frequency, move the radio control button up or down. Tip: to start the automatic station scan, press and hold the radio control button up or down briefly and then release it again. | 95.5 |
| • To set the radio volume, move the volume control button up or down. | 6 |
| • To switch the radio off, press the radio control button. | |
Natural sound function
You can also play a natural sound on the device independently of the alarm function.
| • Press and hold the alarm control button for two seconds. A natural sound will flash on the display. (example shown here = birdsong) | |
| • To select a natural sound, move the alarm control button up or down. Confirm by pressing the alarm control button. | |
| • To set the natural sound volume, move the volume control button up or down. | |
| • To switch the natural sound off, press the alarm control button. | |
Sunrise function
You can also use the simulated sunrise function on the device independently of the alarm function.
| Press and hold the light control button and the alarm control button simultaneously for two seconds. The light symbol, alarm symbol and a flashing number (example shown here = 15 minutes) will appear on the display. | 15 |
| The flashing number indicates the sunrise duration in minutes. The sunrise duration can be set to 15, 20, 40, 60, 80, 100 or 120 minutes. • To set the sunrise duration, move the alarm control button up or down. Confirm by pressing the alarm control button. | |
| The current time will appear on the display. The sunrise function is now activated. The light will gradually become brighter over the set period of time. | 12:18 |
| • To cancel the function early, press the light control button twice. | |
Sunset function
With this function, the light gradually dims until it goes out completely (simulated sunset). You can choose the time period after which the light automatically switches off. This function is ideal for when you are going to sleep.
| • Press the light control button. The light will switch on. | |
| • To set the light intensity move the light control button up or down. | ● 6 |
| • Press and hold the light control button for two seconds. A moon symbol and a flashing number of minutes will appear on the display. | ● 15 |
| The number of minutes indicates the sunset duration. The duration can be set to 15, 20, 40, 60, 80, 100 or 120 minutes. • To select the duration, move the light control button up or down. Confirm by pressing the light control button. | ● 40 |
| The moon symbol will flash on the display next to the time. The light will now gradually dim over the set period of time and automatically go out at the end. • To cancel the function early, press the light control button. | |
Goodnight function
This function automatically switches off the radio or a natural sound after a set period of time.
| • Start the radio or natural sound function. | |
| • Press and hold the volume control button for two seconds. A moon symbol and flashing number of minutes will appear on the display. | 15 |
| The flashing number of minutes indicates the period of time (in minutes) after which the radio or natural sound will automatically be switched off. This can be set to 15, 20, 40, 60, 80, 100 or 120 minutes. • To set the time, move the volume control button up or down. Confirm by pressing the volume control button. | 60 |
| The moon symbol will flash on the display. The radio or natural sound will automatically be switched off once the set period of time is up. | 6 |
| • To cancel the function early, press the volume control button. | |
Display illumination
| The display has three brightness levels. • To change the display brightness, move the display control button up or down. | |
| The display can be illuminated in either blue or orange. • To change the colour of the display illumination, press the display control button. | |
| The device offers an auto function. With this function, the display is illuminated in blue from 0:00 to 11:59 AM and in orange from 0:00 to 11:59 PM. • To activate the auto function, press and hold the display control button briefly. Auto will appear on the display. | Auto |
| • To switch off the auto function, move the display control button up or down. | |
Resetting the device to factory settings
To reset the device to the factory settings, press in the reset button on the rear of the device using a sharp object.
7. Cleaning and maintenance
- Clean the device with a dry cloth.
- Do not use any abrasive cleaning products.
- Protect the device from knocks, damp, dust, chemicals, drastic changes in temperature, and nearby sources of heat (ovens, heaters).
8. Disposal
Observe the local regulations for material disposal. Dispos of the unit in accordance with EC Directive 2002/96/EC - WEEE (Waste Electrical and Electronic Equipment). If you have any questions, please contact the local authorities responsible for waste disposal.

9. Technical Data
Dimensions: 120 × 145 × 120 ~mm
Weight: approx. 430g
Voltage supply: 100-240 V; 50/60 Hz; 0.4 A


Radio frequency range: 86.9-108.0 MHz FM
Illuminance: 50 lux
FRANÇAIS
Chere cliente, cher client,
Dnana30n padnoacToT:YKB 86,9-108,0 M
CnJa cBeTa: 50 Jk
10. rapaHTnA
Mby npedocabJem rapaHTno Ha depeKtbi MaTePnaIOB u n3roTOBneHnHa cpoK 24 Meca ca o H
PpOdaJxN Upe3 po3HnHyIO CeTb
Iapantna He paocpactpaHreTc:
Ha cIyau yIep6a, Bbl3BaHHoro HeIpaBnIbHbIM IcIIOJIb3OBAHHeM
- Ha 6bICTpon3HaUNBAUüneCyaCTN(JaMNoUKN-NUCTOUYHKn CBeta)
- Ha depeKtbl, O KOTOpbIX NOKyNaTeJIb 3HaJI B MOMENT NOKyKNI
- Ha cnyuàn co6ctbeHHoB BnHbI NOKyNaTeJIa.

AB02
ToBap cepTnФицирован: paHNoPpHemHK c cyHkCnei 6yDnIbHnKa n MЯrKOrO np6yXdEHNa CBeTOM - OOO "BCU MnpaTeKc", No POCC DE .AB 02.B04771, cpoK DeiCTBnC 15.06.2011 no 14.06.2014 rr.
Cpok 3KcnpIyatauINn3deJIny: MNHmym 3 roda
Фирma n3roTOBnteIb: BoIpep r6x, CoJINHrep wTpaccce 218, 89077-UM, FepMaHnA
Фирma-ИМнорТер: OOO BOUIPEP, 109451 r. MockBa, yI.IpepeBa,62, kOpn.2, oФис 3
CepBnchbIeHTp: 109451 r. MockBa, yI. IpeepBa, 62, Kopn. 2, TeI(ΦaKc) 495-658 54 90