IL 60 - Light therapy BEURER - Free user manual and instructions
Find the device manual for free IL 60 BEURER in PDF.
| Product type | Inhaler (nebulizer) for respiratory light therapy |
| Brand | Beurer |
| Model | IL 60 |
| Dimensions (L x H x D) | 110 x 62 x 47 mm |
| Weight | 222 g |
| Power supply | Adapter 100-240 V~, 50-60 Hz, 0.5 A ; output 5 V, 2 A |
| Battery | Li-Ion 3.7 V, 2570 mAh, rechargeable via micro-USB |
| Battery life | Approx. 30 minutes per charge (operating cycle 30 min / pause 30 min) |
| Nebulizer filling capacity | 2 ml min. - 6 ml max. |
| Medication delivery rate | Approx. 0.25 ml/min |
| Operating pressure | Approx. 0.25 - 0.5 bar |
| Noise level | ≤ 45 dBA |
| Main functions | Nebulization of liquid medications for respiratory tract treatment ; inhalation via mouthpiece, adult/child mask or nasal piece |
| Included accessories | Nebulizer, compressed air tube, mouthpiece, adult mask, child mask, nasal piece, spare filter, USB cable, power adapter, storage and transport bag |
| Care and cleaning | Clean with hot water after each use ; disinfect with white vinegar and distilled water (soak 30 min) ; do not wash in dishwasher or immerse the device |
| Filter replacement | Every 100 hours of use or 1 year ; use only original Beurer filter |
| Safety | Safety class 2 device, type BF ; do not use without filter, do not open, do not expose to moisture ; automatic shutdown after 30 min of continuous operation |
| Spare parts and repairability | Yearpack (ref. 163.904) contains mouthpiece, nasal piece, adult/child masks, nebulizer, tube, filter ; repairs only by customer service or authorized dealer |
| Operating conditions | Temperature +10°C to +40°C, relative humidity 10% to 95%, atmospheric pressure 700-1060 hPa |
| Expected lifespan | 400 hours |
| Warranty | Compliant with European Directive 93/42/EEC (medical devices) |
Frequently Asked Questions - IL 60 BEURER
User questions about IL 60 BEURER
0 question about this device. Answer the ones you know or ask your own.
Ask a new question about this device
Download the instructions for your Light therapy in PDF format for free! Find your manual IL 60 - BEURER and take your electronic device back in hand. On this page are published all the documents necessary for the use of your device. IL 60 by BEURER.
USER MANUAL IL 60 BEURER
natural_image
Medical device labeled 'beaver' connected to a tubing (no additional text or symbols visible)D Inhalator
Gebrauchsanweisung ...... 2–13
GB Nebuliser
Instructions for use .....14–24
F Inhalateur
Mode d'emploi ..... 25–36
E Inhalador
Instrucciones de uso .... 37–48
Inalatore
Istruzioni per l'uso ....49–59
TR Enhalatör
Kullanım kılavuzu....60–70
RUS Ингалятор
Инструкция по
применению ....71–83
PL Inhalator
Instrukcja obsługi 84–94
ELECTROMAGNETIC COMPATIBILITY INFORMATION 95-97
DEUTSCH
Inhaltsverzeichnis
text_image
Technical diagram of a mechanical device with numbered parts labeled 1 through 6text_image
Technical diagram showing labeled parts of a medical or industrial device with numbered components18
5. Inbetriebnahme
Aufstellen
natural_image
Line drawing of hands holding a mechanical component with an arrow indicating direction (no text or symbols)natural_image
Line drawing of a plug inserted into a socket with a wire, showing electrical cable (no text or symbols)- Getting to know your device 14
- Signs and symbols 14
- Warnings and safety notes....15
- Description of the device and accessories ..... 17
- Initial use.... 18
- Operation.... 18
- Changing the filter 20
- Cleaning and disinfection.... 20
- Disposal.... 22
- Troubleshooting.... 22
- Technical specifications 23
Included in delivery
See Description of the device and accessories, page 17.
- Nebuliser
- Atomiser
- Compressed air hose
- Mouthpiece
- Adult mask
- Children's mask
- Nosepiece
- Replacement filter
- Micro USB cable
- Mains adapter
- Storage bag
- Carrying bag
• These instructions for use
1. Getting to know your device
Dear customer,
Thank you for choosing one of our products. Our brand stands for well-engineered, quality made products; driven by innovation and safety. Our product range encompasses a wealth of products for health and well-being in the heat, weight, blood pressure, body temperature, pulse, gentle therapy, massage and air sectors.
Please read these instructions for use carefully and keep them for later use. Be sure to make them accessible to other users and observe the information they contain.
With kind regards,
Your Beurer team
Application area
This nebuliser is an inhalation device for atomising liquids and liquid medication (aerosols) and for the treatment of the upper and lower airways.
By nebulising and inhaling the medication prescribed/recommended by your doctor, you can prevent diseases affecting the airways, or in the case that you contract such an illness, you can alleviate symptoms and speed up your recovery. Ask your doctor or pharmacist for further information about the potential applications.
The device is suitable for domestic use. Inhaler medication should only be used following instructions to do so from a doctor. Ensure you are calm and relaxed when inhaling the medication and breathe slowly and deeply to ensure that the medication reaches right down to the lower bronchi. Breathe out normally.
The device does not need to be calibrated.
Once it has been properly prepared, the device can be used again. Preparation involves replacing all the accessories, including the atomiser and air filter, and disinfecting the surface of the device using a standard disinfectant. Please note that all accessories should be replaced if the device is used by more than one person.
2. Signs and symbols
The following symbols appear in these instructions for use.

Warning
Warning instruction indicating a risk of injury or damage to health.

Important
Safety note indicating possible damage to the device/accessory.

Note
Note on important information.
The following symbols are used on the packaging and on the type plate for the device and accessories.
 | Application part, type BF |
 | Observe the instructions for use |
 | Protection class 2 device |
 | Manufacturer |
 | On |
 | Off |
 | Serial number |
| 30 ON/30 OFF | 30 minutes of operation, then 30 minutes break before operating again. |
| IP 22 | Protected against solid foreign objects 12.5 mm in diameter and larger, and against drops of water when the housing is angled up to 15° |
| CE0123 | The CE labelling certifies that the product complies with the essential requirements of Directive 93/42/EEC on medical devices. |
3. Warnings and safety notes

Warning
- Before use, ensure that there is no visible damage to the device or accessories. If you have any doubts, do not use the device and contact your retailer or the specified Customer Service address.
- In the event of device faults, please see Chapter "10. Troubleshooting".
- The device is not a substitute for medical consultation and treatment. Always consult your doctor first if you are experiencing any pain or are suffering from an illness.
- If you have health concerns of any kind, consult your GP.
-
Please note the general hygiene measures when using the atomiser.
-
You should always follow the instructions of your doctor regarding the type of medication to use, the dosage, and the frequency and duration of inhalation.
- Only use medication prescribed or recommended by your doctor or pharmacist.
Please note:
For treatment, only use parts indicated by your doctor according to the particular diagnosis.
- Check whether there are contraindications for use with the usual systems for aerosol treatment on the medication instruction leaflet.
- If the device does not work properly, or you feel unwell or experience pain, stop using it immediately.
- Keep the device away from your eyes when it is in use, as the mist of medication could be harmful.
- Changes to the device are not permitted.
- Never use the device near flammable gases, oxygen or nitrogen oxide.
- This device is not intended for use by children or people with restricted physical, sensory (e.g. reduced sensitivity to pain) or mental skills or a lack of experience and/or lack of knowledge, unless they are supervised by a person who is responsible for their safety or are instructed by such a person in how to use the device.
- Check in the medicine package leaflet for possible contraindications for use with common aerosol therapy systems.
- The device must be switched off and the plug pulled out before every cleaning and/or maintenance procedure.
- Keep packaging material away from children (risk of suffocation).
- To avoid the risk of entanglement and strangulation, store cables and air lines out of the reach of small children.
- Do not use any additional parts that are not recommended by the manufacturer.
- The device must only be connected to the mains voltage that is specified on the type plate.
- Never submerge the device in water and do not use it in the bathroom. Under no circumstances may liquid enter the device.
- Protect the device from heavy impact.
- Never touch the micro USB cable with wet hands, as you could get an electric shock.
- Do not pull the mains adapter out of the socket using the micro USB cable.
- Do not crush or bend the micro USB cable, pull it over sharp-edged objects or leave it dangling down, and protect it from sources of heat.
- We recommend that the micro USB cable is completely unrolled to avoid dangerous overheating.
- If the micro USB cable or the mains adapter of this device is damaged, it must be disposed of. Please contact Customer Services or the retailer.
- If the device is opened, there is a risk of electric shock. Disconnection from the power supply network is only guaranteed if the adapter is unplugged and the micro USB cable has no other power connection.
- Making modifications to the device or accessories is not permitted.
- If the device has been dropped, exposed to high levels of moisture or suffered any other damage, it must no longer be used. If in doubt, contact Customer Services or the retailer.
- The IH 60 nebuliser may only be operated with compatible Beurer atomisers and with the appropriate Beurer accessories. The use of atomisers and accessories made by other companies may result in less efficient treatment and could damage the device.
- Keep the device and accessories out of the reach of children and pets.

Important
- Power cuts, sudden interference or other unfavourable conditions could lead to the device becoming inoperable. We therefore recommend that you obtain a replacement device or medication (the latter should be agreed with your doctor).
- Should you require an adapter or extension lead, this must meet the applicable safety requirements. The power limit and the maximum output specified on the adapter must not be exceeded.
-
Do not store the device or the power cable near to sources of heat.
-
Do not use the device in a room in which a spray has previously been used. Air the room before carrying out the treatment.
- Never use the device if it is making an abnormal sound.
- For hygiene reasons, it is essential that every user uses their own accessories.
• Always disconnect the mains adapter from the device after use. - Store the device in a location protected against climatic influences. The device must be stored in the environmental conditions specified.

Notes on handling batteries
- If your skin or eyes come into contact with fluid from a rechargeable battery cell, flush out the affected areas with water and seek medical assistance.
- Choking hazard! Small children may swallow and choke on rechargeable batteries. Store rechargeable batteries out of the reach of small children.
- Protect batteries from excessive heat.
- Risk of explosion! Never throw batteries into a fire.
- Do not disassemble, split or crush the rechargeable batteries.
- Only use chargers specified in the instructions for use.
- Batteries must be charged correctly prior to use. The instructions from the manufacturer and the specifications in these instructions for use regarding correct charging must be observed at all times.
- Fully charge the battery prior to initial use (see Chapter 5).
- In order to achieve as long a battery service life as possible, fully charge the battery at least twice per year.
General notes

Important
• The device is only to be used:
- On humans
- For the purpose for which it is designed (aerosol inhalation) and in the manner specified in these instructions for use.
- Any form of improper use can be dangerous.
- In the event of an acute emergency, the provision of first aid has top priority.
- Apart from the medication, only use distilled water or a saline solution. Other liquids may cause a fault in the nebuliser or atomiser.
- This device is not intended for commercial or clinical use; it is designed exclusively for self-treatment in a private home.
Prior to initial use

Important
- Remove all packaging material before using the device.
- Protect the device against dust, dirt and humidity and never cover the device while it is in use.
- Do not operate the device in a very dusty area.
- Switch the device off immediately if it is faulty or not working properly.
- The manufacturer is not liable for damage resulting from improper or careless use.
Repairs
i Note
- Under no circumstances should you open or repair the device yourself, as faultless functionality can no longer be guaranteed thereafter. Failure to comply will result in voiding of the warranty.
• The device is maintenance-free. - For repairs, please contact Customer Services or an authorised retailer.
4. Description of the device and accessories
Overview of nebuliser

text_image
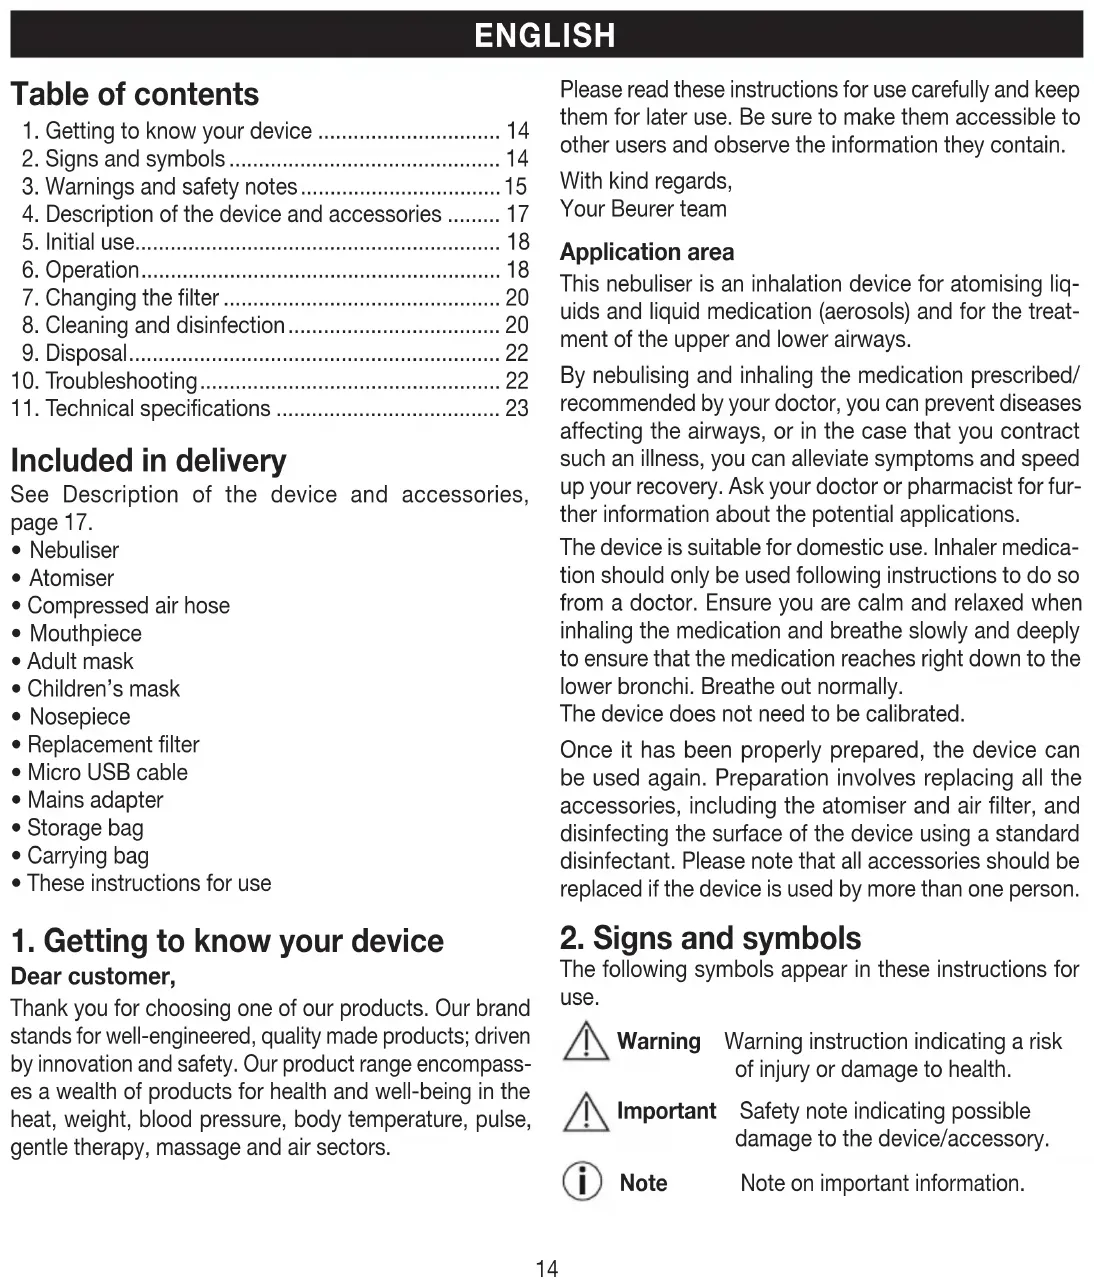
1 On/Off switch 2 Battery status indicator 3 Micro USB port 4 Holder for atomiser 5 Filter cap with filter 6 Hose connectorOverview of atomiser and accessories
text_image
8 Compressed air hose 9 Atomiser 10 Medication container 11 Atomiser insert 12 Mouthpiece 13 Adult mask 14 Children's mask 15 Nosepiece 16 Replacement filter 17 USB power mains part 18 USB cable5. Initial use
Setting up the device
Take the device out of the packaging. Place the device on a flat surface.
Before using the device for the first time
i Note
- Clean and disinfect the atomiser and accessories before using them for the first time. See “Cleaning and disinfection” on page 20.
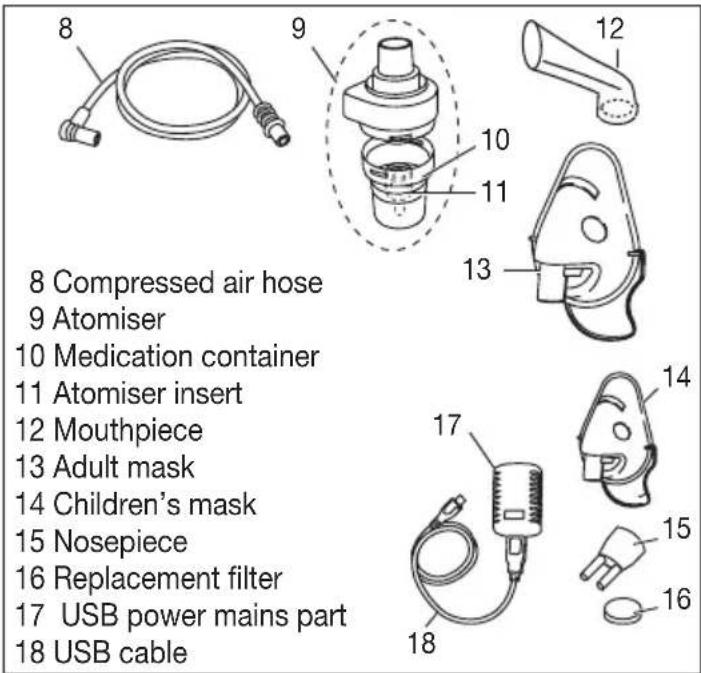
- Connect the compressed air hose [8] to the bottom of the medication container [10].
natural_image
Line drawing of hands holding a mechanical component with an arrow indicating direction (no text or symbols)- Connect the other end of the compressed air hose [8] to the nebuliser hose connection [6] by turning it slightly.
natural_image
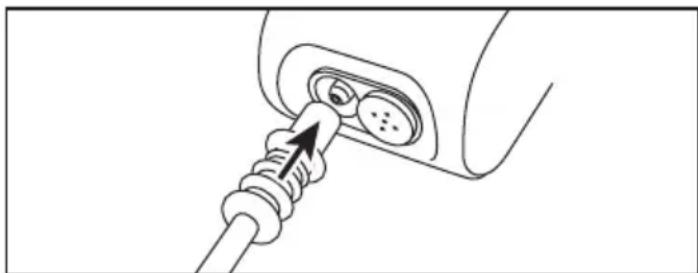
Line drawing of a plug inserted into a socket, showing wire routing (no text or symbols)Charging the nebuliser battery
To charge the nebuliser battery, proceed as follows:
- Plug the micro USB cable included in delivery into the micro USB port on the nebuliser as shown.
- Plug the other end of the micro USB cable into the USB port on the mains adapter and insert the mains adapter into the socket.
i Note
During the charging procedure, between one (battery almost empty) and four (battery fully charged) LEDs on the battery status indicator [2] flash according to the battery charge status. As soon as the battery is fully charged, all four LEDs are permanently illuminated.
Switching on the nebuliser
To turn on the nebuliser, proceed as follows:
- Press the ON/OFF button on the nebuliser. The ON/OFF button illuminates blue. The nebuliser is now operational. The battery must be sufficiently charged for the nebuliser to function correctly.
i Note
The blue LEDs on the battery status indicator show the current battery state.
| 1 blue LED flashes = Battery is almost flat, nebuliser will soon switch off. |
| 1 blue LED lights up = Battery capacity 25% |
| 2 blue LEDs light up = Battery capacity 50% |
| 3 blue LEDs light up = Battery capacity 75% |
| 4 blue LEDs light up = Battery capacity 100% |
6. Operation
Important
- For hygiene reasons, it is essential to clean the atomiser [9] and the accessories after each treatment and to disinfect them after the last treatment of the day.
- The accessories may only be used by one person; use by several people is not recommended.
-
If the treatment involves inhaling several different medications one after the other, please be aware that the atomiser [9] must be rinsed under warm tap water following every usage. See “Cleaning and disinfection” on page 20.
-
Please observe the notes on changing the filter in these instructions for use.
- Check that hose connectors are firmly attached to the nebuliser [6] and the atomiser [9] before each use of the device.
- Before use, check the device is working correctly by briefly switching on the nebuliser (together with the connected atomiser, but without medication). If air comes out of the atomiser [9], the device is working.
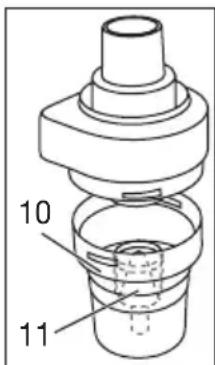
6.1 Inserting the atomiser insert
- Open the atomiser [9] by twisting the top anticlockwise against the medication container [10]. Place the atomiser insert [11] into the medication container [10].
- Ensure that the cone for administering medication fits well on the cone for the air duct inside the nebuliser.
6.2 Filling the atomiser
- Fill with an isotonic saline solution or pour the medication directly into the medication container [10]. Avoid overfilling. The maximum recommended filling quantity is 6 ml.
- Use medication only as instructed by your doctor and ask about the appropriate inhalation period and quantity for you.
- If the prescribed quantity of medication is less than 2 ml, top this up to at least 2 ml with isotonic saline solution. Dilution is also necessary with viscous medications. Here too, please observe the instructions of your doctor.
text_image
10 116.3 Closing the atomiser
- Close the atomiser [9] by twisting the top clockwise against the medication container [10]. Ensure that the connection is correct.
6.4 Connecting accessories to the atomiser
- Connect the atomiser [9] to the desired accessory (mouthpiece [12], adult mask [13], children's mask [14] or nosepiece [15]).
i Note
The most effective form of nebulisation is by using the mouthpiece. Nebulisation using a mask is only recommended if it is not possible to use a mouthpiece (e.g. for children who are not yet able to inhale medication using a mouthpiece).
If you are using the adult mask [13], you can secure it to your head with the adult mask strap. There is also a strap for the children's mask [14].
- Before the treatment, pull the atomiser upwards out of the holder [4].
- Start the nebuliser using the On/Off switch [1].
- Spray mist pouring out of the atomiser indicates that the device is operating correctly.
6.5 Treatment
- When inhaling, sit upright and relaxed at a table and not in an armchair to avoid compressing the airways and therefore impairing the effectiveness of the treatment.
- Breathe in the atomised medication deeply.

Important
The device is not suitable for continuous operation; after 30 minutes of operation it must be switched off for 30 minutes.

Note
During the treatment, hold the atomiser straight (vertically), otherwise the atomisation will not work and faultless functionality is not guaranteed.

Important
Essential oils, cough syrups, gargling solutions and drops to be used as a rub or in a steam bath are wholly unsuitable for inhalation using a nebuliser. These additions are often viscous and can impair the correct functioning of the device and therefore the effectiveness of the application in the long-term. For individuals with a hypersensitive bronchial system, medications containing essential oils may under certain conditions cause an acute bronchospasm (a sudden cramp-like restriction of the bronchi with
shortness of breath). Consult your doctor or pharmacist in relation to this matter.
6.6 Stopping inhalation
Once the mist is only coming out in an irregular flow or if the sound changes when inhaling, you can stop the treatment.
- Switch off the nebuliser after treatment using the On/Off switch [1] and disconnect it from the mains.
- Place the atomiser [9] back in its holder [4] after the treatment.
6.7 Cleaning
See "Cleaning and disinfection" on page 20.
7. Changing the filter
In normal operating conditions, the air filter must be replaced after approx. 100 operating hours or one year. Please check the air filter regularly (after 10–12 nebulisation procedures). Replace the used filter if it is very dirty or clogged. If the filter has become damp, it must also be exchanged for a new filter.

Important
- Do not attempt to clean the used filter and reuse it.
- Only use the manufacturer's original filter, otherwise your nebuliser may become damaged and sufficiently effective treatment cannot be guaranteed.
- Do not repair or maintain the air filter while it is in use.
- Never operate the device without a filter.
To replace the filter, proceed as follows:

Important
- First switch the device off and disconnect it from the mains.
-
Allow the device to cool down.
-
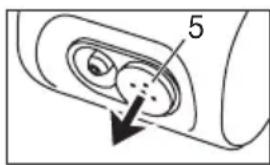
Pull off the filter cap [5] towards the front.
text_image
5i Note
If the filter remains in the device after the cap has been removed, take the filter out of the device, e.g. with tweezers or similar.
- Re-insert the filter cap [5] with a new filter.
- Ensure that it is securely in place.
8. Cleaning and disinfection
Atomiser and accessories

Warning
Adhere to the following hygiene instructions to avoid health risks.
- The atomiser [9] and accessories are designed for multiple use. Please note that different areas of application involve different requirements in terms of cleaning and hygienic preparation.
Notes:
- Do not clean the atomiser or the accessories mechanically using a brush or similar device, as this could cause irreparable damage and it will mean that the best treatment results can no longer be guaranteed.
- Please consult your doctor about the additional requirements in terms of the hygienic preparation required (hand care, handling of medication/inhalation solutions) for high-risk groups (e.g. patients with cystic fibrosis).
- Ensure thorough drying after each cleaning or disinfection process. Residual moisture or wetness can represent an increased risk of bacterial growth.
Preparation
- Immediately after each treatment, all parts of the atomiser [9] and the accessories used must be cleaned of residual medication and contamination.
- To do this, dismantle the atomiser [9] into its individual parts.
- Remove the mouth piece [12], the mask [13, 14] or the nosepiece [15] from the atomiser.
- Dismantle the atomiser by twisting the top anticlockwise against the medication container [10].
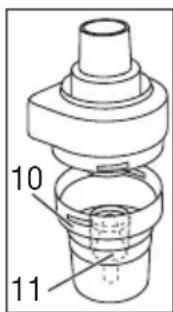
text_image
10 11- Remove the atomiser insert [11] from the medication container [10].
- Reassembly is carried out in reverse order.
Cleaning

Important
The device must be switched off, disconnected from the mains and allowed to cool down each time before cleaning.
The atomiser and the accessories used such as the mouthpiece, mask, etc. must be washed with hot but not boiling water after each use. Dry the parts carefully using a soft cloth. Put the parts together again when they are completely dry and place them in a dry, sealed container or disinfect them.
When cleaning, ensure that any residue is removed. Never use any substances for cleaning that could potentially be toxic if they came into contact with the skin or mucous membranes, or if they were swallowed or inhaled.
Use a soft, dry cloth and non-abrasive cleaning products to clean the device.
Do not use any abrasive cleaning products and never submerge the device in water.

Important
- Ensure that no water gets inside the device.
- Do not clean the device or accessories in the dishwasher.
- Do not touch the device with wet hands when it is plugged in and do not allow water to spray on the device. Only operate the device if it is completely dry.
- If liquid penetrates the device this could cause damage to the electrics or other nebuliser parts and lead to a malfunction.
Condensation, hose care
Condensation may form in the hose depending on the ambient conditions. It is essential to remove the moisture to prevent bacterial growth and ensure proper treatment. To do so, proceed as follows:
- Remove the compressed air hose [8] from the atomiser [9].
- The hose must remain connected to the nebuliser [6].
- Operate the nebuliser until the moisture is removed by the air passing through.
- In the event of heavy contamination, replace the hose.
Disinfection
Please carefully observe the points below when disinfecting your atomiser and accessories. We recommend disinfecting the individual parts on a daily basis after the last usage as a minimum measure.
(All you need for this is a little white vinegar and distilled water.)
- First, clean the atomiser and accessories as described in the “Cleaning” section.
- Place the disassembled nebuliser, mouthpiece, and nosepiece in boiling water for five minutes.
- For the remaining accessories, use a vinegar solution consisting of 14 vinegar and 34 distilled water. Make sure that the volume is sufficient to fully submerse the parts, such as the atomiser, mask and mouthpiece, in the solution.
- Leave the parts in the vinegar solution for 30 minutes.
- Rinse the parts with water and dry them carefully with a soft cloth.

Important
Do not boil or autoclave the compressed air hose or the masks.
- Put the parts together again when they are completely dry and place them in a dry, sealed container.

Note
- Please ensure that the parts are completely dried after cleaning, otherwise the risk of bacterial growth is increased.
- Use cold disinfection solution in accordance with the manufacturer's instructions.
Drying
- Place the individual parts on a clean, dry and absorbent surface and leave them to dry completely (at least 4 hours).
Durability of materials
- As with any plastic parts, atomisers and their accessories are affected by a certain amount of wear and tear when used and hygienically prepared on a frequent basis. Over time, this can lead to a change in the aerosol, which can have a negative effect on the efficiency of the treatment. We therefore recommend that you replace the atomiser and other accessories after a year.
- The following point should be observed when selecting the cleaning product or disinfectant: only use a mild cleaning product or disinfectant in the concentration and volume prescribed by the manufacturer.
Storage
- Do not store in damp conditions (such as in a bathroom) and do not transport with any damp items.
- When storing and transporting, protect from prolonged direct sunlight.
- The accessories can be stowed securely in the accessory compartment. Store the device in a dry place, ideally in the original packaging.
9. Disposal
For environmental reasons, do not dispose of the device in the household waste.
Please dispose of the device in accordance with EC Directive – WEEE (Waste Electrical and Electronic Equipment). If you have any questions, please contact the local authorities responsible for waste disposal.
The empty, completely flat rechargeable batteries must be disposed of through specially designated collection boxes, recycling points or electronics retailers. You are legally required to dispose of the rechargeable batteries. The codes below are printed on rechargeable batteries
containing harmful substances: Pb = Battery contains lead, Cd = Battery contains cadmium Hg = Battery contains mercury

- Troubleshooting
| Problem/ question | Possible cause/remedy |
| The atomiser produces no or too little aerosol. | 1. Too much or too little medication in the atomiser. Minimum: 2 ml, Maximum: 6 ml. |
| 2. Check nozzle for blockages. Clean nozzle if necessary (e.g. by rinsing out). Then start using the atomiser again. IMPORTANT: Carefully pierce the fine holes from the underside of the nozzle only. | |
| 3. Atomiser not held vertically. | |
| 4. Unsuitable medication fluid added for nebulisation (e.g. too viscous). The medication fluid should be prescribed by the doctor. | |
| The output is too low. | Kinked hose, clogged filter, too much inhalation solution. |
| What medications are suitable for inhaling? | Please consult your doctor in relation to this matter. As a rule, all medication that is suitable and approved for device inhalation can be inhaled. |
| There is inhalation solution residue in the atomiser. | This is normal and is due to technical reasons. Stop inhalation once the atomiser starts to make a notably different sound. |
| What should be taken into account when using the device with infants and children? | 1. On infants and children, the mask should cover the mouth and nose to ensure effective inhalation. |
| 2. On children, the mask should also cover both the nose and mouth. It is not a good idea to carry out nebulisation on someone who is sleeping, as in this case not enough of the medication will reach the lungs. | |
| Note: Inhalation should only be carried out under the supervision of an adult and with their assistance and the child should not be left alone. | |
| Inhalation using the mask takes longer. | This is due to technical reasons. You breathe less medication per breath through the holes of the mask than via the mouthpiece. The aerosol is mixed with ambient air via the holes. |
| Why should the atomiser be replaced regularly? | There are two reasons for this:1. To ensure a therapeutically effective particle spectrum, the nozzle hole must not exceed a specific diameter. Due to mechanical and thermal stresses, the plastic is subject to a certain degree of wear. The atomiser insert [11] is particularly sensitive. This can also alter the composition of the aerosol droplets, which directly affects the effectiveness of the treatment.2. Regularly changing the atomiser is also recommended for hygiene reasons. |
| Should each person have their own atomiser? | Yes, this is absolutely essential for hygiene reasons. |
- Technical specifications
| Type | IH 60 |
| Dimensions(W x H x D) 110 x 62 x 47 mm | |
| Weight | 222 g |
| Operating pressure Approx. 0.25 to 0.5 bar | |
| Atomiser filling volume | Min. 2 mlMax. 6 ml |
| Medication flow rate Approx. 0.25 ml/min. | |
| Sound pressure Max. 45 dBA(acc. to DIN EN 13544-1 section 26) | |
| Mains connection Input: 100 – 240 V~; 50 – 60 Hz; 0.5 AOutput: 5 V ——; 2 A | |
| Expected service life | 400 h |
| Operating conditions | Temperature: +10 °C to +40 °CRelative humidity: 10% to 95%Ambient pressure: 700 – 1060 hPa |
| Storage and transportation conditions | Temperature: -20 °C to +60 °CRelative humidity: 10% to 95%Ambient pressure: 700 – 1060 hPa |
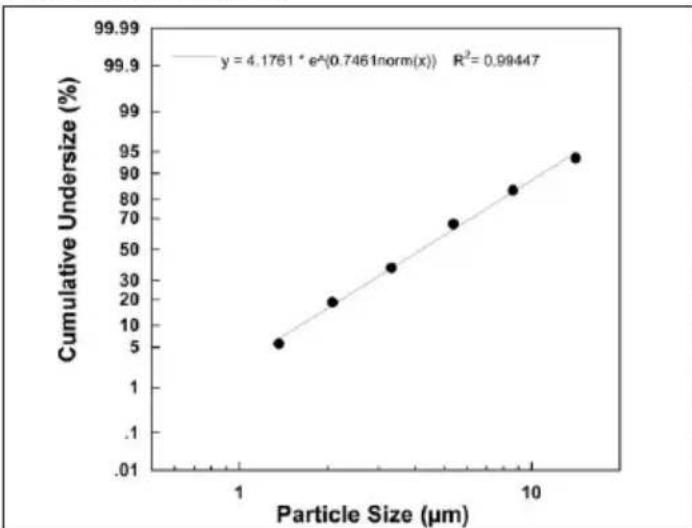
| Aerosol properties | 1) Aerosol delivery: 0.15 ml2) Aerosol delivery rate: 0.03 ml/min3) Particle size (MMAD): 4.12 μm |
| Battery: | |
| Capacity | 2570 mAh |
| Nominal voltage | 3.7 V |
| Type designation | Li-Ion |
Subject to technical changes.
The serial number is located on the device or in the battery compartment.
Particle size diagram
scatter
| Particle Size (µm) | Cumulative Undersize (%) | | ------------------ | ------------------------ | | 1 | 5 | | 2 | 20 | | 3 | 35 | | 5 | 70 | | 8 | 85 | | 12 | 95 |Measurements were performed using a sodium fluoride solution with a "Next Generation Impactor" (NGI).
The diagram may therefore not be applicable to suspensions or highly viscous medications. You can obtain more detailed information from the manufacturer of your medication.
Replacement items
| Designation Material REF | ||
| Year pack (contains mouth-piece, nosepiece, adult mask, children's mask, atomiser, compressed air hose, filter) | PP/PVC | 163.904 |
i Note
If the device is not used according to the instructions specified, perfect functionality cannot be guaranteed! We reserve the right to make technical changes to improve and develop the product. This device and its accessories comply with the European standards EN60601-1, EN60601-1-2 and EN13544-1 and are subject to particular precautions with regard to electromagnetic compatibility. Please note that portable and mobile HF communication systems may interfere with this device. More details can be requested from the stated Customer Services address or found at the end of the instructions for use. This device meets the requirements of European Directive 93/42/EEC for medical devices, as well as those of the Medizinproduktegesetz (German Medical Devices Act).
ELECTROMAGNETIC COMPATIBILITY
- The device complies with the currently valid requirements relating to electromagnetic compatibility and is suitable for use in all buildings including those designated for private residential purposes. The radio frequency emissions of the device are extremely low and are very unlikely to cause interferences with other devices in the vicinity.
- We recommend never placing the device on top of or near to other devices. If interference does occur with your other electrical devices, move the device or connect it to a different mains socket.
- Radio devices can have an influence on the operation of the device.
FRANÇAIS
Table des matières
Remarques relatives aux batteries
natural_image
Line drawing of hands holding a mechanical component with an arrow indicating direction (no text or symbols)natural_image
Line drawing of a plug inserted into a socket, showing a cable and plug connector (no text or symbols)natural_image
Line drawing of hands holding a mechanical component with an arrow indicating direction (no text or symbols)natural_image
Line drawing of a plug inserted into a socket, showing a cable and plug connector (no text or symbols)natural_image
Line drawing of hands holding a mechanical component with an arrow indicating direction (no text or symbols)natural_image
Line drawing of a plug inserted into a socket, showing wire routing (no text or symbols)text_image
Technical diagram of a mechanical device with numbered parts labeled 1 through 6text_image
Diagram of medical or laboratory equipment with numbered parts labeled 14, 15, 16, and 175. Çalıştırma
Kurulum
natural_image
Line drawing of hands holding a mechanical component with an arrow indicating direction (no text or symbols)natural_image
Line drawing of a plug inserted into a socket, showing a cable and plug connector (no text or symbols)(WEEE - Waste Electrical and Electronic Equipment) uygun olarak bertaraf edin.
natural_image
Line drawing of hands holding a mechanical component with an arrow indicating direction (no text or symbols)natural_image
Line drawing of a plug inserted into a socket, with an arrow pointing to the socket (no text or symbols)text_image
Technical diagram of a mechanical device with numbered parts labeled 1 through 6text_image
Diagram of a medical or laboratory device with numbered parts labeled 14, 15, 16, and 17.5. Uruchomienie
Instalacja
natural_image
Line drawing of hands assembling a mechanical component with an arrow indicating upward motion (no text or symbols)natural_image
Line drawing of a plug inserted into a socket, showing wire routing (no text or symbols)| Guidance and manufacturer's declaration – electromagnetic emissions | ||
| The IH 60 is intended for use in the electromagnetic environment specified below. The customer or the user of the IH 60 should assure that it is used in such an environment | ||
| Emission test Compliance Electromagnetic environment – guidance | ||
| Emissions RF CISPR 11 | Group 1 | The IH 60 uses RF energy only for its internal function. Therefore, its RF emissions are very low and are not likely to cause any interference in nearby electronic equipment. |
| RF Emissions CISPR 11 | Class B The IH 60 is suitable for use in all establishments including domestic and those directly connected to the public low-voltage power supply network that supplies buildings used for domestic purposes. | |
| Harmonic emissions IEC 61000-3-2 | Class A | |
| Voltage fluctuations/flicker emissions IEC 61000-3-3 | Complies | |
Table 2
| Guidance and manufacturer's declaration – electromagnetic immunity | |||
| The IH 60 is intended for use in the electromagnetic environment specified below. The customer or the user of the IH 60 should assure that it is used in such an environment. | |||
| Immunity test | IEC 60601 Test level | Compliance level | Electromagnetic environment – guidance |
| Electrostatic dischargesIEC 61000-4-2 | ±8 kV contact±15 kV air | ±8 kV contact±15 kV air | Floors should be wood, concrete or ceramic tile.If floors are covered with synthetic material, the relative humidity should be at least 30 %. |
| Electrical fast transient/burstIEC 61000-4-4 | Power supplylines :±2 kVinput/output lines:±1 kV | Power supplylines :±2 kV | Mains power quality should be that of a typical commercial or hospital environment. |
| SurgeIEC 61000-4-5 | line(s) to line(s): ±1 kVline(s) to earth: ±2 kV100 kHz repetition frequency | line(s) to line(s): ±1 kV | Mains power quality should be that of a typical commercial or hospital environment. |
| Voltage dips, short interrup - tions and voltage variations on power supply input linesIEC 61000-4-11 | 0% 0.5 cycleAt 0°, 45°, 90°, 135°, 180°,225°, 270° and 315°0% 1 cycleAnd70% 25/30 cyclesSingle phase: at 00% 300 cycle | 0% 0.5 cycleAt 0°, 45°, 90°, 135°, 180°,225°, 270° and 315°0% 1 cycleAnd70% 25/30 cyclesSingle phase: at 00% 300 cycle | Mains power quality should be that of a typical commercial or hospital environment. |
| Power frequency (50/60Hz)magnetic fieldIEC 61000-4-8 | 30 A/m50Hz/60Hz | 30 A/m50Hz/60Hz | Power frequency magnetic fields should be at levels characteristic of a typical location in a typi - cal commercial or hospital environment. |
| NOTE: UT is the a.c. mains voltage prior to application of the test level. | |||
Table 3
| Guidance and manufacturer's declaration – electromagnetic immunity | |||
| The IH 60 is intended for use in the electromagnetic environment specified below.The customer or the user of the IH 60 should assure that it is used in such an environment. | |||
| Immunity test IEC 60601test level | Compliancelevel | Electromagnetic environment – guidance | |
| Conduced RFIEC61000-4-6 | 150kHz to80MHz:3Vrms6 Vrms(inISMand amateurradio bands)80% Am at1kHz | 150kHz to80MHz:3Vrms6 Vrms (inISMand amateurradio bands)80% Am at1kHz | Portable and mobile RF communications equipment should be used no closer to any part ofthe IH 60 including cables, than the recommended separation distance calculated from theequation applicable to the frequency the transmitter.Recommended separation distance: d = 0.35 d = 1.2 80 MHz to 800 MHz d = 1.2 800 MHz to 2.7 GHz d = 2,3 Where P is the maximum output power rating of the transmitter in watts (W) according to thetransmitter manufacturer and d is the recommended separation distance in metres (m).Field strengths from fixed RF transmitters, as determined by an electromagnetic site survey, ^a should be less than the compliance level in each frequency range. ^b Interference may occur in the vicinity of equipment marked with the following symbol:[IMAGE] |
| Radiated RFIEC61000-4-3 | 10V/m80% Am at1kHz | 10V/m80% Am at1kHz | |
| NOTE 1 At 80 MHz and 800 MHz, the higher frequency range applies.NOTE 2 These guidelines may not apply in all situations. Electromagnetic propagation is affected by absorption and reflection from struc-tures, objects and people. | |||
| ^a Field strengths from fixed transmitters, such as base stations for radio (cellular/cordless) telephones and land mobile radios, amateur radio,AM and FM radio broadcast and TV broadcast cannot be predicted theoretically with accuracy. To assess the electromagnetic environmentdue to fixed RF transmitters, an electromagnetic site survey should be considered. If the measured field strength in the location in which theIH 60 is used exceeds the applicable RF compliance level above, the IH 60 should be observed to verify normal operation. If abnormal per-formance is observed, additional measures may be necessary, such as re-orienting or relocating the IH 60. ^b Over the frequency range 150 kHz to 80 MHz, field strengths should be less than 3 V/m. | |||
Table 4
| Recommended separation distances between portable and mobile RF communications equipment and the IH 60 | ||||
| The IH 60 is intended for use in an electromagnetic environment in which radiated RF disturbances are controlled. The customer or the user of the IH 60 can help prevent electromagnetic interference by maintaining a minimum distance between portable and mobile RF communications equipment (transmitters) and the IH 60 as recommended below, according to the maximum output power of the communications equipment. | ||||
| Rated maximum output power of transmitter (W) | Separation distance according to frequency of transmitter (m) | |||
| 150 kHz to 80 MHz (out ISM and amateur radio bands) d = 1.2 | 150 kHz to 80 MHz (out ISM and amateur radio bands) d = 0.6 | 80 MHz to 800 MHz d = 1.2 | 800 MHz to 2.7 GHz d = 2.3 | |
| 0.01 0.12 0.06 0.12 | 0.23 | |||
| 0.1 0.38 0.19 0.38 | 0.73 | |||
| 1 1.2 0.6 1.2 2.3 | ||||
| 10 3.8 1.9 3.8 7.3 | ||||
| 100 | 12 | 6 | 12 | 23 |
| For transmitters rated at a maximum output power not listed above, the recommended separation distance d in metres (m) can be estimated using the equation applicable to the frequency of the transmitter, where P is the maximum output power rating of the transmitter in watts (W) according to the transmitter manufacturer.NOTE 1 At 80 MHz and 800 MHz, the separation distance for the higher frequency range applies.NOTE 2 These guidelines may not apply in all situations. Electromagnetic propagation is affected by absorption and reflection from struc - tures, objects and people. | ||||
Table 5
| Radiated RFIEC61000-4-3(Test specifications for ENCLOSURE PORTIMMUNITY to RF wireless communications equipments | Test Frequency(MHz) | Band a)(MHz) | Service a) Modulation b) | Modulation b)(W) | Distance(m) | IMMUNITYTEST LEVEL(V/m) |
| 385 380 -390 | TETRA 400 Pulse | modulation b)18 Hz | 1.8 | 0.3 27 | ||
| 450 380 -390 | GMRS 460,FRS 460 | FM c) ± 5 kHzdeviation1 kHz sine | 2 | 0.3 28 | ||
| 710 | 704 -787 | LTE Band13.17 | Pulse modulation b)217 Hz | 0.2 | 0.3 9 | |
| 745 | ||||||
| 780 | ||||||
| 810 | 800 -960 | GSM 800/900,TETRA 800,iDEN 820,CDMA 850,LTE Band 5 | Pulse modulation b)18 Hz | 2 | 0.3 28 | |
| 870 | ||||||
| 930 | ||||||
| 1720 | 1700 - 1990 | GSM 1800;CDMA 1900;GSM 1900;DECT;LTE Band 1, 3, 4, 25;UMTS | Pulse modulation b)217 Hz | 2 | 0.3 28 | |
| 1845 | ||||||
| 1970 | ||||||
| 2450 2400 -2570 | Bluetooth, WLAN,802.11 b/g/n,RFID 2450,LTE Band 7 | Pulse modulation b)217 Hz | 2 | 0.3 28 | ||
| 5240 | 5100 -5800 | WLAN 802.11a/n | Pulse modulation b)217 Hz | 0.2 | 0.3 9 | |
| 5240 | ||||||
| 5785 | ||||||
| NOTE: If necessary to achieve the IMMUNITY TEST LEVEL, the distance between the transmitting antenna and the ME EQUIPMENT or ME SYSTEM may be reduced to 1 m. The 1 m test distance is permitted by IEC 61000-4-3. | ||||||
| a) For some services, only the uplink frequencies are included.b) The carrier shall be modulated using a 50 % duty cycle square wave signal.c) As an alternative to FM modulation, 50 % pulse modulation at 18 Hz may be used because while it does not represent actual modulation, it would be worst case. | ||||||
| The MANUFACTURER should consider reducing the minimum separation distance, based on RISK MANAGEMENT, and using higher IMMUNITY TEST LEVELS that are appropriate for the reduced minimum separation distance. Minimum separation distances for higher IMMUNITY TEST LEVELS shall be calculated using the following equation:E=6/d Where P is the maximum power in W, d is the minimum separation distance in m, and E is the IMMUNITY TEST LEVEL in V/m. | ||||||
Distributed by: Beurer GmbH • Söflinger Str. 218 • 89077 Ulm, Germany • www.beurer.com www.beurer-gesundheitsratgeber.com • www.beurer-healthguide.com

Donawa Lifescience Consulting Srl Piazza Albania, 10, 00153 Rome, Italy

Globalcare Medical Technology Co., Ltd. 7th Building, 39 Middle Industrial Main Road, European Industrial Zone, Xiaolan Town 528415 Zhongshan City, Guangdong Province, P.R.C.
CE0123