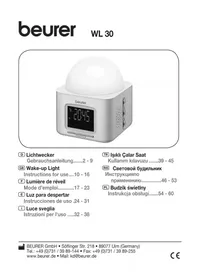
WL 50 - Light therapy BEURER - Free user manual and instructions
Find the device manual for free WL 50 BEURER in PDF.
| Product type | Wake-up light with dawn and dusk simulation |
| Brand | Beurer |
| Model | WL 50 |
| Dimensions | Ø 10.5 x 13.2 cm |
| Weight | approx. 540 g |
| Light source | LED (energy efficiency class G) |
| Light intensity (white) | 800 lux at 10 cm |
| Brightness levels (white) | 3 |
| Ambient light | RGB (automatic or manual color change) |
| Power supply | Power adapter 5 V DC, 1 A (included); rechargeable lithium-ion battery 2000 mAh |
| Battery life (music) | up to 5 hours |
| FM radio | 87.5 - 108 MHz, 30 presets |
| Bluetooth | Bluetooth Classic 4.0 |
| Speaker | 5 W |
| Main functions | Alarm (2 independent), Snooze (8 min), Sleep (15/30/60 min), Bedside lamp (3 levels), Ambient light |
| Display | 24h time, adjustable brightness (100%, 50%, off) |
| Inputs | Micro USB (charging), AUX 3.5 mm |
| Package contents | Wake-up light, USB adapter, micro USB cable, AUX cable (antenna), instruction manual |
| Cleaning and care | Clean with a dry cloth; do not immerse |
| Safety | Protection class II, indoor use only |
| Warranty | See provided document |
Frequently Asked Questions - WL 50 BEURER
User questions about WL 50 BEURER
0 question about this device. Answer the ones you know or ask your own.
Ask a new question about this device
Download the instructions for your Light therapy in PDF format for free! Find your manual WL 50 - BEURER and take your electronic device back in hand. On this page are published all the documents necessary for the use of your device. WL 50 by BEURER.
USER MANUAL WL 50 BEURER
Read these instructions for use carefully and keep them for later use, be sure to make them accessible to other users and observe the information they contain.

WARNING
- The device is only intended for domestic/private use, not for commercial use.
-
This device may be used by children over the age of 8 and by people with reduced physical, sensory or mental skills or a lack of experience or knowledge, provided that they are supervised or have been instructed on how to use the device safely, and are fully aware of the consequent risks of use.
Children must not play with the device. -
Under no circumstances should you open or repair the device yourself, as faultless functionality can no longer be guaranteed thereafter. Failure to comply will invalidate the warranty.
- Cleaning and user maintenance must not be performed by children unless supervised.
- Dispose of the USB mains adapter or micro USB cable if they have been damaged.
Dear customer,
Thank you for choosing a product from our range. Our name stands for high-quality, thoroughly tested products for applications in the areas of heat, weight, blood pressure, body temperature, pulse, gentle therapy, massage, beauty, air and baby.
With kind regards,
Your beurer team
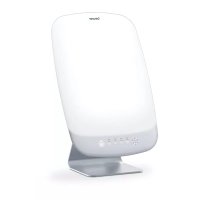
Getting to know your device
The beurer WL 50 wake up light allows you to wake up and fall asleep gently and naturally. The LED light gradually becomes brighter like a rising sun, allowing you to slowly become accustomed to the light conditions and gently preparing your body for waking up.
You can also set a wake-up melody that is played following the simulated sunrise and provides an acoustic aid to help you wake up. Besides an alarm tone, you can also choose the radio or various sounds. The beurer WL 50 wake up light not only provides a rested and pleasant start to your day but also helps you drift comfortably off to sleep thanks to a simulated sunset with melody.
Functions:
- "Alarm" wake-up function (simulated sunrise: wake up light gradually becomes brighter over a set period of time; music can also help you to wake up)
- "Sleep" function (simulated sunset: wake up light gradually dims and switches off automatically after a preset time; music can also help you to fall asleep)
- Light function (white light/night lamp)
- Mood light with fixed colours
- Time shown on the display
FM radio with max. 30 memory spaces for radio - Alarm tone, 2 wake-up melodies, 1 sleep melody
- Own music can be played via Bluetooth® or via AUX input
Table of contents
- Included in delivery 30
- Signs and symbols 31
- Intended use 33
4.Warnings and safety notes 33 - Device description.. 35
-
Initial use 36
-
Usage 38
- Cleaning and maintenance 46
9.What if there are problems? 47 - Disposal 48
- Technical specifications.. 48
12.WARRANTY 50
1. Included in delivery
Check that the exterior of the cardboard delivery packaging is intact and make sure that all contents are present. Before use, ensure that there is no visible damage to the device or accessories and that all packaging material has been removed. If you have any doubts, do not use the device and contact your retailer or the specified Customer Service address.
1 x Wake up light 1 x USB mains adapter 1 x Micro USB cable
1 x AUX cable (antenna) 1 x Instructions for use
2. Signs and symbols
The following symbols are used on the device, in these instructions for use, on the packaging and on the type plate for the device:
| ! | Warning Warning instruction indicating a risk of injury or damage to health |
| ! | Important Safety note indicating possible damage to the device/accessory |
| i | Product information Note on important information |
| Read the instructions | |
| Disposal in accordance with the Waste Electrical and Electronic Equipment EC Directive – WEEE | |
| Manufacturer | |
| CE | This product satisfies the requirements of the applicable European and national directives |
| UKCA | United Kingdom Conformity Assessed Mark |
| 20PAP | Dispose of packaging in an environ mentally friendly manner |
| For indoor use only | |
| Protection class 2 | |
| EAC | The products demonstrably meet the requirements of the Technical Regulations of the EAEU. |
| VI | Energy efficiency level 6 |
| LED | Replacement of the light source is not possible |
3. Intended use

WARNING
The device may only be used for the purpose for which it is designed and in the manner specified in the instructions for use. Any form of improper use can be dangerous. The manufacturer is not liable for damage resulting from improper or incorrect use.
4.Warnings and safety notes

WARNING
- Keep packaging material away from children (risk of suffocation).
- Only operate the device with the mains adapter provided and at the mains voltage specified on the mains adapter.
- Place the device on a firm, even surface.
- The device must be placed near an easily accessible socket while charging.
- Before use, inspect the device and accessories for visible damage. If you have any doubts, do not use the device and contact your retailer or the specified Customer Service address.
- Keep the device, mains adapter and mains cable away from water.
- Never plug in or unplug the mains adapter when you have wet hands.
- In the event of defects or operational faults, switch the device off immediately and disconnect it from the mains socket.
- Arrange the mains cable so that it is not a trip hazard.

IMPORTANT
- Protect the device from impacts, moisture, dirt, marked temperature fluctuations and direct sunlight.
- Do not drop the device.

WARNING
Notes on handling batteries
- If your skin or eyes come into contact with fluid from a rechargeable battery cell, flush out the affected areas with water and seek medical assistance.
- If the battery leaks, put on protective gloves and clean the battery compartment with a dry cloth.
- Protect batteries from excessive heat.
- Risk of explosion! Never throw batteries into a fire.
- Do not disassemble, split or crush the batteries.
- Only use chargers specified in the instructions for use.
- Batteries must be charged correctly prior to use. The instructions from the manufacturer and the specifications in these instructions for use regarding correct charging must be observed at all times.
- Fully charge the battery prior to initial use (see Chapter 6).
- In order to achieve as long a battery service life as possible, fully charge the battery at least twice per year.
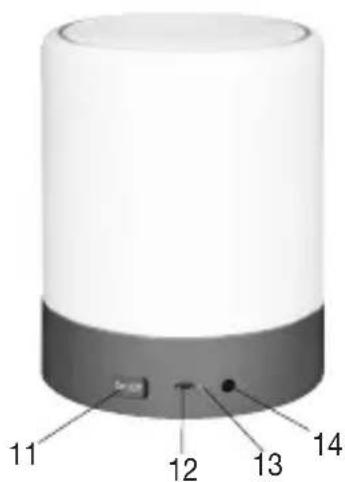
5. Device description
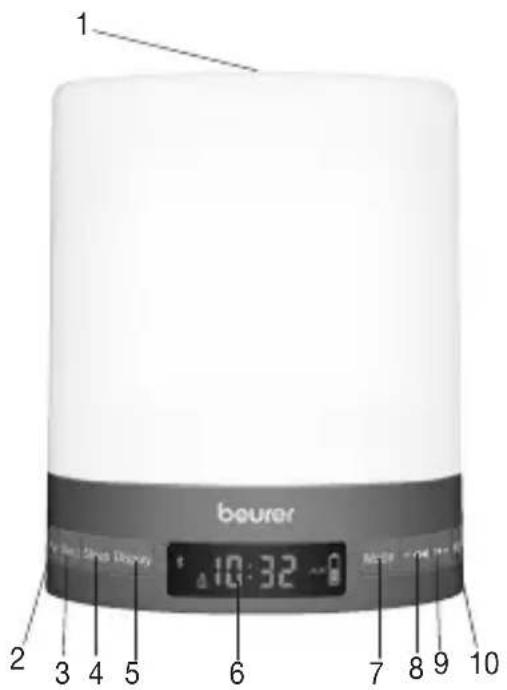
1 Sensor surface
2 Alarm1 button
3 Alarm2 button
4 Sleep button
5 Display button
6 Display
7 Mode button
8 -按钮
9 + button
10 OK button
11 On|Off switch
12 Micro USB connection
13 Charging LED
14 AUX connection
Display
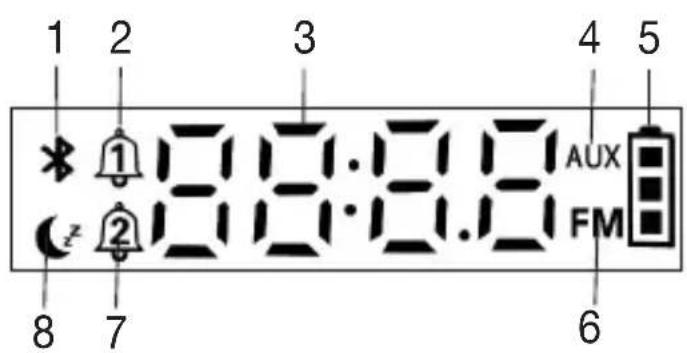
1 Bluetooth®
2 Alarm memory space 1
3 Time/Radio frequency/Melody selection
4 AUX mode
5 Battery state
6 Radio mode
7 Alarm memory space 2
8 "Sleep" function
6. Initial use
First steps
- Remove the packaging material.
- Check that all parts listed are present.
- Check the device, USB mains adapter, micro USB cable and AUX cable for damage.
- Place the device on a firm, even surface.

Note
You can operate the wake up light with the USB mains adapter via the socket, or use the battery.
Operation with USB mains adapter
- Place the device near an easily accessible socket.
- Connect the USB mains adapter to the micro USB cable.
- Insert the micro USB cable into the micro USB port on the rear of the device.
- Insert the USB mains adapter into a suitable socket. The AUX cable functions as an antenna.
- Slide the On | Off switch on the rear of the device to the "On" position.
- The time 00:00 is shown on the device display. The device is now ready for use.
Battery use / Charging the battery
- Before using the device with the battery, you must charge the battery.
- Connect the USB mains adapter to the micro USB cable.
- Insert the micro USB cable into the micro USB port on the rear of the device.
- Insert the USB mains adapter into a suitable socket. Whilst charging, the small red light next to the micro USB port on the rear of the device will light up.
- As soon as charging is complete, the small red light next to the micro USB port will go out. A complete charging process lasts for approx. 4 hours.
- Pull the USB mains adapter and the USB cable out of the socket and the device. The device can now be operated with the battery.
- Slide the On | Off switch on the rear of the device to the "On" position.
- The time 00:00 is shown on the device display, along with the current battery state

Note
The currently displayed battery state may vary depending on the mode being used.
7. Usage
7.1 Setting the time
To set the time on the device, proceed as follows:
-
When you slide the On | Off switch on the device to the "On" position for the first time, the hour will automatically flash in the display. If the device is already in operation, press and hold the Mode button for two seconds.
-
The hour flashes on the display.
Use the - and + buttons to set the hour. Use the OK button to confirm.
- The minute flashes on the display.
Use the - and >> + buttons to set the minute. Use the OK button to confirm.
- The time has now been set and will be displayed permanently.

Note
The time can also be set automatically from your smartphone via Bluetooth 量
7.2 "Alarm" wake-up function

Note
The device features two alarm memory spaces that can be configured individually.
To set the alarm on the device, proceed as follows:
- Press and hold either the Alarm1 or Alarm2 button for two seconds, depending on which alarm memory space you would like.
- The alarm hour flashes on the display.
Use the - or + button to set the alarm hour. Use the OK button to confirm.
- The alarm minute flashes on the display.
Use the - or + button to set the alarm minute. Use the OK button to confirm.
- Use the - or + button to set the desired alarm tone. Use the OK button to confirm.
DAY = Wake-up melody 1 (Melody with bird calls)
BELL = Wake-up melody 2 (Chimes)
BEEP = Beep
= Radio (most recently set radio station)
No tone
- Use the - or + button to set the desired sunrise duration. Use the OK button to confirm.
5-30 = 30-minute sunrise duration
5-20 = 20-minute sunrise duration
5- 10 = 10-minute sunrise duration
5-00 = No sunrise
The simulated sunrise starts before the set alarm in order to prepare the body for waking up. During the simulated sunrise, the mood light first switches from red to yellow, and finally to white. The alarm sounds at the actual wake-up time.
- The alarm is activated. Either pr appears in the display (depending on the selected alarm memory space).
Activating the alarm
To activate the alarm, press the Alarm1 or Alarm2 button on the wake up light. Either ① or ② appears in the display (depending on the selected alarm memory space).

Note
The alarm cannot be set whilst the modes are being used (Bluetooth®, radio and AUX).
Deactivating the alarm
To deactivate the alarm, press the Alarm1 or Alarm2 button on the wake up light until either ① or ② (depending on the selected alarm memory space) goes out.
Activating the snooze function
When the alarm sounds, touch the sensor surface (speaker surface on the top of the device) for 1 second to snooze the alarm. When snooze function is activated, a light red light appears. The snooze duration is 8 minutes. After 8 minutes the alarm will sound again.
Switching off the alarm
When the alarm sounds, touch the sensor surface (speaker surface on the top of the device) for 3 seconds, or press the Alarm1 or Alarm2 button, to switch off the alarm.
If you touch the sensor surface, the alarm will go off automatically at the same time the following day. If you press alarm Alarm1 or Alarm2 button, then the alarm won't go off any more. To activate the alarm, press the Alarm1 or Alarm2 button on the wake up light. Make sure that 1 or 2 is visible in the display. Only then will the alarm sound on the following day at the set alarm time.
7.3 "Sleep" function
The "Sleep" function is ideal for helping you fall asleep. A simulated sunset can be set here. With this function, the light gradually dims after a set period of time. For added relaxation, you can pair the simulated sunset with sounds of the sea, the radio or your own music.
To switch on the "Sleep" function on the wake up light, proceed as follows:
- Select the desired musical accompaniment to falling asleep with the Mode button. If you do not wish to have any musical accompaniment, skip this step.
BLUE = Music via Bluetooth®
F = Radio
= Sleep melody (sounds of the sea)
- button = sounds of the sea off
-
- button = sounds of the sea on Use the OK button to confirm.
FLUX = Music via an external audio source connected to the AUX input (e.g. MP3 player, smartphone or CD player)
- Press the Sleep button.
- The light will switch on and 15 will appear in the display. Set the desired sunset duration (15, 30 or 60 minutes) using the Sleep button. During the simulated sunset, the mood light first switches from white to yellow, and finally to red. The sleep function symbol appears on the display.
- The selected music is switched off automatically after the set sunset has elapsed.
- To cancel the sleep function early, press and hold the Sleep button for 2 seconds. The sleep function symbol C disappears from the display.
7.4 Light/night lamp
The device features a night lamp with three brightness levels.
- To switch on the night lamp, briefly tap the sensor surface (speaker surface on the top of the device).
- To set the light's brightness level, tap the sensor surface (speaker surface on the top of the device) again.
- To switch the night lamp off again, press the sensor surface (speaker surface on the top of the device) for longer (approx. 2 seconds).
7.5 Mood light
The wake up light can also be used as a mood light. The mood light comes in the following colours:
White (3 brightness levels) -> Yellow -> Blue -> Green -> Red -> Mood light with change of colour -> Off
- To switch on the mood light on the wake up light, briefly tap the sensor surface (speaker surface on the top of the device).
- To switch between the different mood lights, tap the sensor surface (speaker surface on the top of the device) again.
- To switch themood light off again, press the sensor surface (speaker surface on the top of the device) for longer (approx. 2 seconds).
7.6 Radio
The device has max. 30 memory spaces for radio stations.
- To switch on the radio, press the Mode button twice. The current radio frequency will appear on the display.
- To begin or stop the automatic station search, press the OK button. Any stations found are automatically saved.
- To switch between the individual stored stations, briefly press the - or + button.
- To set the volume, press and hold the - or the + button(U0-30).
- To switch the radio off, press the Mode button until the time appears on the display.

Note
To improve reception, plug the AUX cable into the AUX port or the micro USB cable into the USB port. The AUX cable or micro USB cable acts as an antenna.
7.7 Setting the display brightness
The device has three display brightness levels.
- To set the display brightness, press the Display button.
100% -> 50% -> display off
7.8 Activating/deactivating Bluetooth®
To play your own music on the wake up light via Bluetooth®, you must first activate Bluetooth®. To activate Bluetooth® on the wake up light, proceed as follows:
-
Press the Mode button. BLUE appears in the display, and starts to flash.
-
The wake up light can now be connected with other devices (e.g. smartphone) via Bluetooth®. Once a device is connected to the wake up light via Bluetooth®, an acoustic signal will sound on the wake up light, and the Bluetooth® symbol will light up. If Bluetooth® has been disconnected, the acoustic signal on the wake up light will sound again and the Bluetooth® symbol goes out.
-
To deactivate Bluetooth® on the wake up light, press the Mode button until the time appears in the display. The Bluetooth® symbol goes out.
-
To switch between individual songs stored on the connected device on the wake up light, briefly press the - or + button.
-
To set the volume on the wake up light, press and hold the - or the + button (U 0-30).
-
Press the Mode button to exit Bluetooth mode again.
7.9 AUX connection
You can connect an external audio source (e.g. MP3 player, smartphone or CD player) to the wake up light via the AUX input.
- Connect the supplied AUX cable to an audio source (e.g. smartphone).
- Insert the other end of the AUX cable into the AUX input on the rear of the wake up light.
- Press the Mode button three times. RUX appears in the display. The external audio source is now connected to the wake up light.
- The music settings can only be adjusted on the paired device, not on the wake up light itself. It is also possible to adjust the volume on the wake up light.
- Press the Mode button to exit RUX mode again.
7.10 Switching off the wake up light

Note
All saved data is lost when the wake up light is switched off.
- To switch off the wake up light, slide the On | Off switch on the rear of the device to the "Off" position.
8. Cleaning and maintenance
- Clean the device with a dry cloth.
-
Do not use any abrasive cleaning products.
-
Ensure that no water enters the device. If this should happen, only reuse the device once it has fully dried out.
- Never immerse the device, USB mains adapter, micro USB charging cable or AUX cable in water or other liquids.
- Protect the device from impacts, moisture, dust, chemicals, marked temperature fluctuations and nearby sources of heat (ovens, heaters).
9. What if there are problems?
| Problem Possible cause Solution | ||
| Device does not light up | ON/OFF button switched off Switch on the ON/OFF button. | |
| No electricity Correctly connect the mains part/charge the battery. | ||
| No electricity The mains part/the battery is faulty.Contact Customer Services or your retailer. | ||
| LEDs have reached the end of their service life. For repairs, please contact Customer Services or an authorised retailer. | ||
| LEDs faulty. | ||
You can find further information and a list of frequently asked questions (FAQs) about this product at www.beurer.com.
10. Disposal
For environmental reasons, do not dispose of the device in the household waste at the end of its useful life. Dispose of the device at a suitable local collection or recycling point in your coun
try. Observe the local regulations for material disposal. Dispose of the device in accordance with EC Directive – WEEE (Waste Electrical and Electronic Equipment). If you have any questions, please contact the local authorities responsible for waste disposal.

11. Technical specifications
| Model WL 50 | |
| Dimensions Ø 10,5 x 13,2 cm | |
| Weight approx. 540 g | |
| Light LED technology | |
| Light intensity (white light) 800 Lux (at a distance of approx. 10 cm) | |
| Light levels (white light) 3 levels | |
| Mood light Automatic and manual RGB colour change | |
| Snooze time 8 minutes | |
| Display illumination 100%, 50%, off | |
| Time 24 h, adjustable | |
| Alarm | 2 alarm times |
| Charging function | USB charging function |
| Battery | Lithium-ion, 2000 mAh; 3.7 V; 7.4 Wh |
| Music playback time | Up to approx. 5 hours |
| Radio | 87,5 - 108 MHz; max. 30 memory spaces |
| Speaker | 5 watts |
| Mains part | Manufacturer: ShenZhenShi Hua Yi Teng Technology Co., LTD Model no.: HYT-0501000EW / HYT-0501000KW |
| Supply | Input: 100-240 V AC 50/60 Hz Output: 5,0 V DC 1,0 A 5,0 W |
| Average active efficiency | ≥ 75,44% |
| No-load power consump- tion | ≤ 0,07 W |
| Mains part protection class | Protection class II |
| Frequency band 2402 MHz to 2480 MHz | |
| Transmission power (dBm) 2 dBm | |
The wake up light uses Bluetooth® Classic, compatible with Bluetooth® 4.0 smartphones/ tablets
This product contains a light source with energy efficiency class G
Subject to technical changes.
We hereby confirm that this product complies with the European RED Directive 2014/53/EU. The CE Declaration of Conformity for this product can be found under: https://www.beurer.com/web/we-landingpages/de/cedclarationofconformity.php.
12. WARRANTY
Further information on the warranty and warranty conditions can be found in the warranty leaflet supplied.
FRANÇAIS

Chere cliente, cher client,
Remarques relatives aux batteries
--- = Aucune sonnerie
The Bluetooth® word mark and logos are registered trademarks owned by Bluetooth SIG, Inc. and any use of such marks by Beurer GmbH is under license. Other trademarks and trade names are those of their respective owners.

Beurer GmbH · Söflinger Str. 218 · 89077 Ulm (Germany) www.beurer.com · www.beurer-gesundheitsratgeber.com www.beurer-healthguide.com