DR 3431 - Steam cleaner CLATRONIC - Free user manual and instructions
Find the device manual for free DR 3431 CLATRONIC in PDF.
| Brand | Clatronic |
| Model | DR 3431 |
| Product Type | Steam Cleaner |
| Power Supply | 230 V ~ 50 Hz |
| Total Power | 1500 W |
| Operating Pressure | Not specified |
| Maximum Steam Output | 25 g/min |
| Water Tank Capacity | 550 ml |
| Net Weight | 2.35 kg |
| Included Accessories | Measuring cup, washable mop pad, sliding device for carpets, fixing screw |
| Mop Pad Material | Machine washable textile at 60°C |
| Preheat Time | Approximately 30 seconds |
| Steam Flow Adjustment | Yes, via dial |
| Use on Carpets/Rugs | Yes, with sliding device |
| Tank Type | Removable |
| Recommended Water | Distilled water to prevent limescale |
| Cleaning the Appliance | With a slightly damp cloth |
| Mop Pad Maintenance | Machine wash at 60°C, no fabric softener, do not tumble dry |
| Safety | Overheat protection (automatic shut-off if water runs out) |
| Storage | Foldable handle for space-saving storage |
| Warranty | According to manufacturer's conditions |
| Cable Length | Not specified |
Frequently Asked Questions - DR 3431 CLATRONIC
User questions about DR 3431 CLATRONIC
0 question about this device. Answer the ones you know or ask your own.
Ask a new question about this device
Download the instructions for your Steam cleaner in PDF format for free! Find your manual DR 3431 - CLATRONIC and take your electronic device back in hand. On this page are published all the documents necessary for the use of your device. DR 3431 by CLATRONIC.
USER MANUAL DR 3431 CLATRONIC
Overview of the Components.. 3
Illustrations A-E Page 4
Instruction Manual. 24
Technical Data Page 26
Disposal 26
JEZYK POLSKI
Spis tres'ci
TexhiHn npameTp.. 36
PYCCKM
Coedpkzhanne
Ob3op DeTalei np6opa . 3
PncyHKn A-E. cTp. 4
PykoBODCTBO no 3KcIpyatau.. ctp. 37
TexHHueckne daHHbIe. 39
WAARSCHUING: Verbrandingsgevaar!
ATTENTION:Surcharge:
Thank you for choosing our product. We hope you will enjoy using the appliance.
Symbols in these Instructions for Use
Important information for your safety is specially marked. It is essential to comply with these instructions in order to avoid accidents and prevent damage to the machine:
WARNING:
This warns you of dangers to your health and indicates possible injury risks.
CAUTION:
This refers to possible hazards to the machine or other objects.
i NOTE:
This highlights tips and information.
General Safety Instructions
Read the operating instructions carefully before putting the appliance into operation and keep the instructions including the warranty, the receipt and, if possible, the box with the internal packing. If you give this device to other people, please also pass on the operating instructions.
- The appliance is designed exclusively for private use and for the envisaged purpose. This appliance is not fit for commercial use. Do not use it outdoors. Keep it away from sources of heat, direct sunlight, humidity (never dip it into any liquid) and sharp edges. Do not use the appliance with wet hands. If the appliance is humid or wet, unplug it immediately.
- When cleaning or putting it away, switch off the appliance and always pull out the plug from the socket (pull the plug itself, not the lead) if the appliance is not being used and remove the attached accessories.
- Do not operate the machine without supervision. If you leave the room you should always turn the device off. Remove the plug from the socket.
- The device and the mains lead have to be checked regularly for signs of damage. If damage is found the device must not be used.
- Do not try to repair the appliance on your own. Always contact an authorized technician. To avoid the exposure to danger, always have a faulty cable be replaced only by the manufacturer, by our customer service or by a qualified person and with a cable of the same type.
- Use only original spare parts.
- Pay careful attention to the following "Special Safety Instructions".
Children and Frail Individuals
- In order to ensure your children's safety, please keep all packaging (plastic bags, boxes, polystyrene etc.) out of their reach.
WARNING!
Caution! Do not allow small children to play with the foil as there is a danger of suffocation!
- This device is not intended to be used by individuals (including children) who have restricted physical, sensory or mental abilities and/or insufficient knowledge and/or experience, unless they are supervised by an individual who is responsible for their safety or have received instructions on how to use the device.
Children should be supervised at all times in order to ensure that they do not play with the device.
Special safety instructions
Symbols on the unit

Danger of scalding due to escaping steam
WARNING: Danger of burns!
- When refilling, always pull the power plug from the socket.
-
Do not touch the hot surfaces. If you would like to change the accessories, please wait until the device has cooled down.
-
Never direct the steam jet towards people, animals or electric devices (e.g. into the oven).
- Do not overfill! Do not exceed the maximum filling level for the water!
- Only operate the appliance with water in the tank.
- The device must not be used to clean electrical equipment or installations.
- Please do not add anti-liming agents, solvents, alcohol or cleaning agents as these may damage the device or have a dangerous effect.
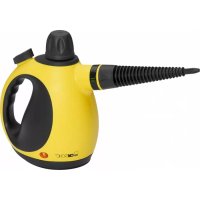
Overview of the Components
1 Handle
2 On/off switch
3 Unlock buttons
4 Steam controller
5 Carrying handle
6 Status indicator
7 Base
8 Hook for cable storage
9 Water tank plug
10 Water tank
11 Connector
12 Mains power cable
13 Hook for cable storage
14 Measuring beaker
15 Carpet glider
16 Floor cloth
Not shown:
Screw (in the bag with the instruction manual)
Unpacking the Device
- Remove the main device and accessories from the box.
- Also remove any packaging materials that may be present.
- Check the scope of delivery.
- Fold out the handle (1) until it audiably clicks into place.
NOTE:
The handle can be folded up again for transport (Fig. E). To do so, press the two release buttons (3). The appliance can be easily lifted with the carrying handle (5).
Install the Base (Fig. A)
NOTE:
Look carefully at the holes (7) on the appliance foot and the foot socket of the appliance. They must lie directly above one another.
- Insert the unit all the way to the base.
- Insert the fixing screw into the hole of the base seat and tighten it with a Phillips screwdriver.
Initial Operation
Install the Floor Cloth (Fig. B)
- Place the base (7) in the center of the floor cloth.
- Attach the floor cloth with the Velcro straps to the base.
- Press to close the cord clip and at the same time tighten the cover with the cord.
- Loosen the cord and the Velcro straps to remove the cloth.

WARNING: There is a danger of injury!
Wait until the appliance has cooled before removing the steam pad.
Fill in Water (Fig. C)
NOTE:
The maximum filling capacity is 550ml
- Recommendation: Use distilled water to prevent calcification.
- You can also remove the water tank from the unit for filling.
- Open the water tank plug (9) and fill the water tank with water. Use the supplied measuring cup (14) to avoid damaging the unit.
- Close the water tank again.
Electrical Connection
- Before inserting the plug into the socket. Make sure that the mains voltage to be used matches that of the device. You can find this information on the nameplate.
- Connect the device to a duly installed protective contact socket.
Connected Wattage
The station has a total maximum wattage of 1500W

CAUTION: Overload!
- If you use extension leads, these should have a cable cross-section of at least 1.5mm^2
- Do not use any multiple sockets, as this device is too powerful.
Using the Device

CAUTION:
Before you begin cleaning you should test the materials to be cleaned as to their suitability for cleaning with steam. Do not hold the steam nozzle for too long and too close in one position.
Operate the unit
- Fill water into the water tank.
- Attach the floor cloth.
- Place the unit onto the carpet glider (15) (Fig. D) to clean carpets.
- Connect the appliance to a properly installed earthed socket.
- Turn the steam volume control (4) clockwise as far as it will go, up to the maximum setting.
i NOTE:
If the steam volume control is not on the maximum setting, the steam volume is too low.
- Press the on/off switch (2) to switch on the appliance. The mains power indicator (6) lights up. The appliance is ready for use after approx. 30 seconds. The pump begins to work.
- Set the required steam volume with the steam volume control.
- Slowly push the unit over the areas to be cleaned.
Filling the Water Tank during Operation
No steam will be discharged if the water tank is empty. The water has to be filled up as follows:
- Press the on/off switch (2) to switch the unit off.
- Remove the mains plug from the socket!
- Fill fresh water into the tank as described in the chapter "Fill in Water (Fig. C).
- Reconnect to the mains power supply and press the On/Off button to switch the unit on.
When you have finished using the device
- Press the on/off switch (2).
- Remove the mains plug from the socket!
- Let the unit cool down completely.
- Detach the floor cloth from the base.
- Empty the water tank.
Cleaning and Storage
WARNING:
- Always remove the mains plug before cleaning the device.
- Under no circumstances should you immerse the device in water for cleaning purposes. Otherwise this might result in an electric shock or fire.
CAUTION:
- Do not use a wire brush or any abrasive items.
-
Do not use any acidic or abrasive detergents.
-
Before the device is put away or cleaned it must have completely cooled down.
- Clean the unit only with a slightly damp cloth.
- You can wash the floor cloth at 60^ in a washing machine. Do not dry the floor cloth in a clothes dryer.
- To save space, store with the handle folded in (Fig. E).
Technical Data
Model: DR 3431
Power supply: 230 V ~, 50 Hz
Power consumption: 1500 W
Protection class:
Max. steam capacity: 25 g/min
Tank capacity: 550 ml
Net weight: 2.35 kg
The right to make technical and design modifications in the course of continuous product development remains reserved.
This device has been tested according to all relevant current CE guidelines, such as electromagnetic compatibility and low voltage directives, and has been constructed in accordance with the latest safety regulations.
Disposal
Meaning of the "Dustbin" Symbol
Protect our environment: do not dispose of electrical equipment in the domestic waste.
Please return any electrical equipment that you will no longer use to the collection points provided for their disposal.
This helps avoid the potential effects of incorrect disposal on the environment and human health.
This will contribute to the recycling and other forms of reutilisation of electrical and electronic equipment.
Information concerning where the equipment can be disposed of can be obtained from your local authority.
Instrukcja obslugi
BctaHOBHeHHOCHOBn (MaI.A)
I PNUMITKA.
PnDnBtBCrdo OTBopIB (7) Ha hIXi npNCTpOio pO3'Emy HnHIXI.BoHH NOBVHHI 6yTN po3TaUOBaHI 6e3nocepEnb0 OHN HA ONHM.
- BctaHOBiB npinad Ha ochoby do ynopy.
- BCTABTE TBHNTI KCAJIY O TBOPI HA OCHOITa 3AKpyTITb ix BIKpyTKIO BIPo6HnTBA Phillips.
BvB Eeknnyatauio
BcTaHOBHeHHaKaHHHoi HacaKn nIiNn (MaI.B)
- NocTaBte OCHOby (7) B CEHTp HacaKn dIy nIiNtorm.
2.Пд' endaHte Hacay du npiIIOr Do OCHOBn peMIncmaN 3 JINnyKamn.
3.ПпгИСИТьnpицінкуshнupa,úбЗakрИи II,ODHOCHO npITNCKAQUKpUHKy shypom. - Ⅲo6 3nAHTn Hacaiky, po3MOTaIte Ka6eNb i po3CTe6HITb peMHci.
IIOPEPEDXEHHHe6e3neKa nowkOxHb!
Iepw HIX BmMaTn npoknaKy dny nap, 3aueKaTe,doNOK npicptpi oxoHone.
DaaBHHBaOaMaI.C
I PIMITKA.
- MakcimalbHn 06'EM BODI cTahOBHTb 550 M.
- PeKoMeHDoBaHO BnOKOpNCTOBaTn DnCTnIbObaHy BOy, 06 yHnKHyTN BaNHyBaHH.
-
ⅢOb HAnITN BDOy, MoXHa TaKoX 3HrT N EMHICTb IIN BOI 3 npNJady.
-
BiKpnIte KpUkky EMHocTi IaBODn (9) Ta HAIInTe BDOy. KopNCTyIteCra MIpOIO YauKIOIO 3 KOMNJIeKTy NOCTaHaHHA (14), Uo6 yHnKHyTn NcyBaHHa PpIpaNy.
- 3akpiTe emHicTb DnB ODoN.
EneKtpnHe nipKIOUeHHa
- Pered TMM, lo NOCTaBnTn BnTKy Do po3eTKN, nepeBipraI-Te BiNDobHicTB HAnpyr Mepexi HAnpyr npnAky. Dahi Bn 3naJeTe Ha 3abOcbkY TabnCiJ.
-Плкшчыпралад по розКТЗ 3хаснIM KOHTaKToM Ha Шо наlexь Встановlaма.
BctaHOBHeHOTyXHicTh
B liiomy npiaa moke npauhoatn 3 notykhicTIO do 1500 Bt.
YBAΓA. ΠepeHaBaHTaXeHHA:
- Kkuo Bn KopcTyeTcE ka6eIaM nIra IIOOBKeHHa MepeXi JxNBHeHNa, BOH IOBHHi MaTN nepepi 3 OHaJI-MeHs1,5 MM2.
He KopnctyTecpa0eTkAMN,IO MCTaTBdeKInbKa rH3n, TOMyIPOITyXHcTbnapOBOrO OHNuBaHu 3aHaTO BeINkaDnLboro.
EkcnnyataucipnpnaNy
YBAGA.
Ipeep TmJK noaTu npauo 3 npuJaOM, nepeBipTe yci MaTepiAni, kI Bi 6yDte YnCTNTn, haix 3daTHicTB dIpaNapOBoro YmUeHnHa. HkONn He TpMaJte CoNTO 3 npOIO DOBmYac a6o 3aHaTo 6n3bKO do NOBepxHi Ha ODHomy Micui.
KopncTyBaHH npHnadom
- Hanobhitb BOIOE MHiCTb Ia BOnI.
2.Пд'еднaiteТКанннHyHacdkyДгпднoI. - BctahOBiB npnnaH ha HacaKy dny KINIMa (15) (MaI.D), 06 nouNCTNTN KINIMN.
4.Пд'бдайтпсгдд Дэнгхь Всановл致电а EM HeHoi po3eTkn.
5.Поверніт bperулготорibи napи(4)do kiHza 3a roDHHNKOBIO CTpiIKNOHa MaKcMaJIbHni piBeHb.
ITPIMITKA.
Kpo perynTop pibn napn 3haxoDttbcn He Ha MaKcMajbHomy pibhi, noaapa npn 6yde 3aHaTTO cna6ka.
- 云b yBIMKHyTN pncTpi,HaTNCHTb nepEMKaay yBIMKHeHHy/BmKHeHHa (2).3acBtntbciaHnKATOp XnBHeHHa (6).Pn6n3Ho uepe30 ckyH npctpi roTOBn do BnKopCTaHH. Hacoc noHne npauOBaTH.
- 3a donomoro nperynnapipn BCTAHOBITb noTpi6Hni piBHe npn.
- 506 npinpaTn neBHy dIyHky, noBijbNo nepemiuYte nHi npnilad.
HANOBHeHH EMHocTi IaI BODn iI cac po60Tu npuiJaD
Kuio emHicb Ira BOINIPOOXHn,napn He 6yne.BcBomy pa3i doabAeHHBOINIPOBOUNTBcTAKIM YHOM:
- HatnciB nepemKau BMK./BMK. (2), 06 BmKhTu npnna.
- BntarHtB Bunky 3 po3eKn!
- HanobHITb EMHcTb DnBBoDy cnoci6, onncAHn y poaJini "OdaBaHHaBOu (MaI.C)".
4.ПiIcHaiTe KaBJIb KINBHeHHa MepeKHa HATNCHTb nepemkau BMK/BmK.(2),UO6YbIMKHyTn npuJa.
3aikueHHn npaui
- HatnchItb nepemKau BKN./BIMK.(2).
- BntarHnItb BnIky 3 po3eTkn!
3.Пилад Мае NOBHCITIO OXONOHUTN. - Bi'εdhaite TkahHHy Hacay dny niJnorn BiO cHOBN.
5.CnopoxhHtBemHicThdIa BOuN.
UHn i 36epiraHn
PONEPEDKEHNA
- Péné ou nuiéenhm i TexhuiHm 06cnyroByBaHHm 3a-BKdN BNTIHTB BNJKy 3 pO3eTKn.
B XODHMy pa3i He onyckaIte npnnaI dIra OunueHH B BOy. Ie MoKe npNBe3TN Do ydApy cTpyMOM a6o do nOxKexN.
YBAGA.
- He BnKOpNCToBvIe IpoTHeIzITKn a6o IHnx a6pa3NB-Hnx ppeMTeB.
- He BnKOpIcTObYIte roCTpIX a6o a6pa3mBHX 3ac06iB DnA OHHJIeHHJ.
Ipeed TMMK npmbatn npnaI dnn 36epiraHn a6o NOaTN IORO OUYeHHN, IOMY CIId DaTN MOXMBiCTb IOBHICTHO OCTIRHyTN.
- UnctItb npinapd tInbk 3neKa BONoro IO raHcpKOIO.
TkaHHHy hacaIky dny nIIOI mOxHa npaTy npaIbHi MaunHpi np TempepaIpyi 60^ .He KopcIyTeCnOM'kUyBaem.He cyuItb TkaHHHy hacaKy dny nIIOHn B cyuJIbHm MaunHi.
-ДЯЗаоцаджehнЯMICZ36epiAte npictpi3i cknadeHIOpykoI(mAn.E).
TexhiHni napametpn
Modenb: DR 3431
PoaHnJXMBJIeHHa: 230B\~,50T
CnoxnbannnoTyXnOCTi: 1500BT
Irpyna enektpo6e3neuHocti:
MakcimmaIbHa noaHa nap: 25 r/xB
O6'EM emHOCTi 550 M
Bara HrTo: 2,35 Kr
IpaBOHaTexHHi3MiHN Ta 3MiHn yDn3aHi 36epiraetbca Ipo- DOBx npOueCy po3pO6Kn npOdykTy.
Ley npnad 6yno nepebipeho 3riDHO BCix BiNobiHnx,
akTyalbHnx DnpekTINB CE, HapnKnad 0do eNeKtpomarHHTHOI
cymichOCTa Hn3bKObONTHOI DnpekTINB, Ta 36yDoBaHO 3 a
HOBITHM NIOJXeHHMn TexHki 6e3neKn.
PykoBoCTBO no 3Kcnnyatau
Cnacn6o 3a Bb6op Hauero npodykta. Hadeemc, OH Bam noHpabITc.
CIMBOJI npHMeHReMbE B daHHOM pyKOBoDCTBe NOJIb3OBaTeN
BaxhIe peKOMHeDauHn DnI OBeCneueHn BaSeI 6eOnac-HocTn 0bO3NaHeHb IIO OC6eHHOMy. O6a3aTeJIbHO CneNyTe 3TNM peKOMHeDauHm, YTO6bl PpeOTbPaTb HeCHactHbI CNyHa NII NIOJOMKy H3dJIINr:

PENEYIPPEXDEHNE:
IpeDynpexJaet 6o anachocTn Dnra 3doPobbny BO3MOxHOM pncke npuyehn TpaBmbl.

BHIMAHHE:
Yka3bIbaet Ha BO3MOXHyTO ONaCHOCtB IIN 3dEINN INpyTNX OKpyKaIOUx INpeDMETOB.

IPIMMEAHNA:
Jaet CoBtI INHOpMaJIIO.
06une yka3aHnno texhne 6e3onachoctn
IpeepnHauanom 3KcPnyataun npinbopa BHIMaTeNbno npo- nHTaIe npinaraemyIO INCTpyKUIO NO 3KcPnyataunn COxpaHInTe ee B HadeXHom MeCTe, BMECTe C rapaHTnHBIM TaHOHom, KACCOBbIM YekOM I, IO BO3MOXHOCTN, KAPTOHN KOPO6KOJ C yNAKOBOHbIM MaTePNAnOM. Ecn daete KOMy-No6o NOnObl-3OBaTbCnPbOpom, O8a3aTeNbHO daIte BnpuJaCy daHHyo INHCTpyKUIO NO 3KcPnyataunn.
Пльзутесь пибором только чаньим обраими и по
надашиени. Пибор не р dedнаЗаундя коммерч
скою лсплььзовannah. He пьзутесь пибором по
OTКрытбIM Небом. Рapedхаягупсбор OT кары,
прых солочьхлчey, ВлaxхостTN (НВ Кем сCityаe
He norpykaite erO B body) и удамOB оctpbie угbl.
He рпкасайесь к пьбору влaxkhblm pykamn.Есни
прбор улaxkhниси hamok, ТуТ Хе Вblte ВИNKу ИЗ
pozeTkN.
- Pocne 3KcIpyatauM,MOHTaKe npHnAdnEeHCTke INIIOLOmKe pnp6opa Bcerda BbIHMaTe BuKy n3 po3ETKn (TJHnTE 3a BNkY, a He 3a Ka6eJIb).
He octabIyTe BkIIOueHHbIe 3JeKToPnp6Opbl 6ez npncMoTpa.BbIXOJa n3 NOMEuHnB CBeTa BbIKIOuaTe np6Op.BbIHbTe wTeKepe n3 po3eKn.
- Pn6bOp n Ka6eBcTeBOro NtTaHnHa Heo6xOuMo peyIpaH0 06cneIOBaTb Ha HAnuYe CteIoB NOBpeXdEHHa. Pn 6hApUxKeHHN NOBpeXdEHHa NOlb3OBaTbca Pn6bOpom 3aIpeuAETcR.
HnB Koem cnyuae He pemOHpyuTe npbOp camocTcTEnbHO,a obaauiTeCb B TakOM cnyuae 3a NOMOUsbK CneuaNCTy, MHeIOUeM CyOBETCTByOUsn IOnyck.13
co6paXeHn 6e3oNaChOCTn,3aMeHa cTeBOrO shHypa Ha paBHO3NaHbI dOnyCKaETcra TOnbKO uepe3 3aBOIN3- rTOBHTeJIb, HauSy cepBnCHyIO MaCTepCKyIO NII COOTBeTCTByUoJero KBaJIInΦuIpuOBaHORO CneuaJIInCTa.
VicnoJb3yIteToJIbKOOpnHaHbHbIe3aIHaCTN.
- PtoKaJyIcTa, co6JIouJaTe HIXKeCneJeUOJIe "CneuHaJIbHbIe yka3aHnI NO TexHnke 6e3oNaChOCTn".
TeHn nIuHa HyKDaIOUeNCa B npncMOrpe
- 13 coo6paekhen 6e3onacnoctn dny deTeH He ocTabIyIe IexKaTb ynaKOBky (IIaCTNKOBbie MeuK, KapTOH, neHONpACT n T.D.) 6e3 npncMOtpa.

PENEYIPPEXDEHNEI
He no3BOJnTe DeTmIrpaTb c nOIN3TNHeHOBOn nIEHKO. Onachocb ydyub!
3TOT np6bOp He npEHa3HaueH IIN NOIb3ObaHnIuamn (BkIIOyAJeTei) C ORpAHueHHbIMN Pm3UHeckMIM, CEHCOPHBIM NIN yMCTBeHHbIMN CNOOC6HOCTaMn IIN IIN UaMn, He IMeOUIIMN ONbTa N/IN NHEo6XoDMbIX 3HaHMI. NCKIOUHeHne COCTABJIHOT Cnyan, KOrda OHn HaxoJATCR IOI pncMOrpoM Iua, OTBeTCTBeHHoro 3a IN 6be30NaCHOCTb, INI KOITDa OT 3TOI Iua POJIyHeHbI Yka3AHn IIO NOIb3OBAHnIO np6bOpom.
Heo6xoJIMO npncmatpnbatb 3a DeTbMn, YTO6bI y6eINTbCBA TOM, YTO OH He IpraiOT C npnbopom.
CneuaHbIe yka3aHnNo TeHXnKe 6e3oNaChOCTn
CnmbonbHa yctpoiCTBe

OnachocTb ownapBaHHB bIXoJHm napom

PENEYIPPEXDEHNE:Onachoctb oxora!
-
PpeI TEM KAK DOINITb BOIDI B pe3epByap o6a3aTeIbHO BbIHbTe BNIKy N3 p03eTKI.
He npikacaiTecb K ropyM dTeaM. Ppecd Cmehoi Hacaok daIte 3JIeKTPoPi6Opby NIOHOCbIO OCTbITb. -
Hn B Koem cnyae He HanpaBnaIte CtpyIO ropAero npa Ha IIOeien, XINBOTbIX INN 3JKeTPOpPi6Opbl (K npIMepy Ha JAMNOChN B DxyXOBKe).
He npenonnTb! He hainBaTe Body Bbiue MaKcMaIbHoro ypOBHa!
BkIouaIte npIbOpToJIbKO pIIN HAIIuHIM BOJI B 6aUKe.
3aPpeaaeTcNcnoIb3oBaTbnapooOHTneJIbIINCTKN 3NeKtponpnpobovnEKeKtponpOBOdkn.
He do6abTne B Bodny HnKaknx CpeCTB dny ydaenHn HAKIN, pactbOpTeNei, anKOrOJI NII MOnOuNX CpeCTB, 3TO MOKeT NcnpTtB np6op nI IN OKa3aTbCBApeHbIM!
063op detae np6opa
1 Pyka
2IpeeknHouataBbKn/BykN
3 KhoNkIOcBO6OxKeHnI
4 Perynnapapa
5 Puyka dIJI nepeHocKn
6 INHINKATOP COCTOHN
7 OCHOBAHHe
8 KpOchok dJa Ka6eJIa
9 Bvnka BoDnHOro 6aNka
10 BoJHoi 6aOc
11 CoeHnHtB
12 Cetebo KaebJIb nTaHn
13 KpIouok IJNA Ka6eJIa
14 Mepka
15 HacdaKa dJa KOBPOB
16 Hacaika nla rnaKoro nona
He nokaaHbI:
BnHT (B naketeC pykoBODCTBOM no 3KcNpyTaUIM)
PacnaKOBka npnbopa
- BbHbTe n3 KapToHHoN Kopo6Kn 3NeKtpOnpN6Op N npHaJnEeXHOCTN.
- YdaJIte C hIX OCTaTK ynaKoONOHOro MaTePnAna.
PpOBepeTekOMJIeKTHOCTbIOCTaBKN. - Pa3BepHnTe pyKy (1) Do cIbIshmOrO uenka npu yCTaHOBKe Ha MecTo.

ПИМЕЧАнЯ:
Puykmoxho CHOBACNOKHTB TpAHCnOpTnpOBKn (pnc.E).
TTOHAKMITE DBe KHOKNOCBO6OKeHn3. Pn6bop
MOXHO NIKPONDHMATb 3a pykny npehockn5
YcTaHOBka OCHOBaHnA (PNC.A)

ПИМЕЧАнЯ:
BHHMaTeIbHO OcMOTpIe OTBepCTn7 (7) Ha HOxKe pnp6opa nHa HOxHOM rHe3Je np6opa. OHn DoJNkHbI paCnOraTbcr TOHNO Dpyr Hnd pYrom.
1.ПONHOCTbBO BCTaBBTe yCTpoIcTBO BO OCHOBAHne.
2. BCTaBbTe KpEnEkhIi BNHT B OTBepCTMe B CeIe OCHOBaHn I 3aTAHHe erO KpeCTOBo OTBePTKoI.
IodrotOBka K BKNIOHcEHNO
YcTaHOBKa HacaKn DnIg IaKnX nONoB (pnc.B)
- Bctabte OCHOBAHne (7) B ceHTp HacaKn nIra IaKnx noNoB.
2.Пикpenite HacaknyДгЯпдкИХ ПОЛВ K OCHOBAHIO PnI NOMOUI NOLOCKJINyueK. - Haxmnte ⅡI 3akpbITnI 3axmma IHHpy a OndOBpeMeHHO npTAHNTe KpbILKU IHHypom.
4.ДЯСНТЯнHACaДКиOcnaБteUHypnPacuEnITE NIOOCKN-IMnPyKIN.

PENEYIPPEXJEHNE:Onactbnope3aTbcra!
Ipeed CHaTneM npoBn HAKJaKn DoKdntEcB OCTbIBAHn np60pa.
3aonHHeNHe BOoI (pnc.C)

PIMMEAHNA:
- MakcmaIbHbI o6bEm BoDbI paBEN 550 M.
- PekomeHdaIyra: IcnoIb3yIte DnCTnIIpOBaHHy BOy dIpy npdeoTbpauEHHN Oba3OBAHNA HAKINN.
-
Bódayoh 6aok TaKKe MoXHo CHMaTb DnA 3anONHeHnB Odoi.
-
OTKpoIte BOJHOH 6aOK (9) n HaneIe T e Hero BOy. IJI npEIOTbpaUeHH NOBpeXdEHn YcTPOIcTB aNcIOJIb3yIte npIIraeMyo MepHyIO EMKocTb (14).
2.3akpoitE BoaHNo 6aouK
PoiKJIIOUeHHe K 3JIeKTPoCeTeN
-Перед TemΚak BCTaBntB BnIky Bpo3eTky,у6eIITecbTom,чTO HanpЯЖене cTeN COOTBeTCTByET HanpЯЖENIOpa60tby np60pa.
Информацию К зTomу НхоДиТСЯ на ТИПОВУ ТбИЧЕ npiбopa.
BkIIOHHTe np6Op B 3a3emneHHyIO po3ETky C HAnpRaeHeHcEM cTeN yCTaHOBNEHHyIO B COOTBeTCTBnC npeDnncAHnA-MN.
Iotppe6nemMOuHocTb
B obse CIOXHOCTN yCTPOICTBO MOKET NOTpe6JIaTb IO 1500 BAATT.

BHIMAHHE: Neperpy3ka:
- Пи пььзовимудпинтеловим Кабеляслдпгдзгдзгдзгдзгдзгдзгдзгдзгдзгдзгдзгдзгдзгдзгдзгдзгдзгдзгдзгдзгдзгдзгдзгдзгдзгдзгдзгдзгдзгдзгдзгдзгдзгдзgdm15mm2.
He npIb3yItec pa3BeTbIeJIbHbIMn ITeIeCJIbHbIMnp3eTKaMn, TAK KAK 3OT npIbOp IMeET CNIuKOM BbICoKYIO MOUHOCTb.
PoiIb3OBAHnE npH6Opom

BHIMAHINE:
IpeepaHauanompa6oTbHeo6xOIMnIpOBepntb,DOnyctMaJIINuCTka napOMcoOTBcTByIOux MaTePnaNoB.HNKOrda He depXHTe cOIIpnp6opa CNIshKOM DoIro HaI ODNIM MeCTOM.
IcnoIb3OBAHHe yCTpoIcTBA
- Haneite Bovy B BoDnoB 6aOk.
-
YctaHOBITE Hacdky DnI rnaKnx nonOB.
3.ДячNTKIOKBPOB yCTaHOBHTe HacayI KOBPOB (15) (pnc.D).
4.Поdkнчnte пиборкправлбуyctaHOьнгнho рo3etKe c 3a3emneHnEM. -
ПовернITE ретулгов几乎所有。(4) по чавочи STpeJIke Do yNopa, COOTBETCTByHouIero MaKcIMaJIbHOI BELINCHIE.
ITPIMMEAHNA:
EcnnpeyIyTop oBbema npa He haxoJITcHa MaKcImaJIbHOB BeJIuHHe,notOK npa 6ydt He6OJIbUIM.
- Haxmte nepeKIOuateNB (2), YTO6bI BKNIOHTb np6op. 3aropntcHnDnKaTOp cTeBOrO 3JIeKTpOnNTAHN (6). Pnp-6Op 6ydt roTOB K paOte npImepHO uepe3 30 cekynd. Hacoc hauHET pa6oty.
- YctaHOBInTe peryIaTOpOM o6bema napa HxKbI NOtOK napa.
8.CJIeKa npKMaTe yCTpoIcTBO K o6pa6aTbIbAemOn NOBepXHOCTN.
3aONJIHeHHe BOJHoro 6aUka BO BpeMa pa6oTbI
PnOnyTOWeHm BOJHOrO 6aKa nappeCTaET BbInyckatbC. DOniBaHne BObI B pe3epByap DoJIxHO npOn3BOuNTbcra CNeDyUoM O6pa30M:
- Haxmte Ha nepekloateIb Bkl/Bbl (2) Ira BblnueHna yctpoictBa.
- BbHbTe wTekep n3 po3eTKI!
- HanneTe UcTyo BDOy BBOJHOBaOK, KaONcaHOBaPazJe "3aONJIHeHMe BOoI (pnc.C).
4.BkIIOHTe yCTPOINCTBO B POSEKny Hn HAXMNTe Ha nepeKIOH OaTeJIb BKn/BbIKN (2)DnB KNIIOHEnHy YCTPOINCTBa.
OKOHyHne pa6oTbI
- Haxmnte nepeknoateBbKn/Bbkn (2).
- BbHbTe UTeKepeu3 po3eTKI!
3.ДаTe yCToPcTbY NOJHOCTbO OCTbITb. - CHIMITE HacaIky IaI rIaIKx IOIOB C OCHOBAHNA.
- OnyctoWite BoJHOH 6aOH.
OuInctKa I XpaHene
IPEyIPEXDEHNE:
-ПередчNTКОВСERTДАБИHMаTe WTeNCEЛьHyIO BUNKy.
Hn B KOem cIyae He OKyHaIe Ia YIcTkn npIbOp B BOy. 3To MoKET 6bITb PnUHoi 3JIeKTpNecKOro yDapa nn noXapa.
BHIMAHINE:
He nCnOJIb3yIte npOBuHbIe UETKIN JIN dpyTne capanaHO-UINE pIepdMeTbI.
He nIb3yTe CnIbHbIe IIN capanaouue YnCTraue cpeDCTBa.
HeobxOIMO NOIHOCTbIO OCTyNTb PnI6Op, npexJe YEM Bby6yndeYbnpaTb ero Ha MeTO uINuNCHNTb erO.
- PpOtnpaIte yCtpoICTBO CJIeKa BnAkaHIO TKAHbIO.
HacaKy dIra rnaKnx noOB moXHO mbITb Nocydomo-eyHo MaunHe npi TemnepaType 60^ . He nCnoJIb3yIte yMaHTeNb dIra BObl. He cyuInTe hacaKy dIra rnaKnx noOB B cyuNKe dIra 6eJbI oDexbl.
ДяэкOHOMM MeCTa xpaHHTe np6Op co CIOXKeHHo pyKoI (pnc.E).
TexHnueckne daHHbIe
MoeB: DR 3431
3JIeKtpoNTaHHe: 230B\~,50T
Iotpe6jemaMoHocb: 1500BaTT
Klacc 3aunTbI:
MaKc. konHueCTBO npa: 25r/MnH.
Obbem bayka: 550 mI
Bec HeTTo: 2,35 K
CoxpaHeNo npaBo Ha texHnueckne IN KOHCTpyKUHOHHbIe n3-MeHeHnB pamkax npoDoJkaIOuJeNcpa3pa6OToN npOdykTa.
3To H3deneHne npoJIO BCE Heo6XoDnMbIe n AkTyaJIbHbIe npOBepKn, npEtnncAHBIE dInpeKTHBOI CE, K npIM. Ha 3JIeKTPO-MaHHTHyO COBmecTmOCt b N COOTBETCTBNE Tpe6OBAHnM K H3KOBOLbTHOI TexHnke, OHO 6blIO TAKKe CCKOH-CTpyINpOBAHO IN NOcTpoEOH C yYeTOM IocNeHnx Tpe6OBAHn IO TexHnke 6e3OnacCHOtN.


CLATRONIC
INTERNATIONAL GMBH
D-47906 Kempen/Germany - Industriering Ost 40
Internet: http://www.clatronic.de·email: info@clatronic.de