
VIaggio1 DuoFix K TT - Car seat PEG PEREGO - Free user manual and instructions
Find the device manual for free VIaggio1 DuoFix K TT PEG PEREGO in PDF.
| Product type | Car seat group 1 (9-18 kg) |
| Approval standard | UN/ECE R44/04 |
| Attachments | ISOFIX + Top Tether or 3-point seat belt |
| Installation position | Forward facing only |
| Number of recline positions | 5 positions |
| Headrest adjustment | 7 positions |
| Safety harness | 5-point, height adjustable |
| Reducer cushion | Included, for small children |
| Cover material | Washable fabric |
| Optional accessories | Clima Cover, Travel Bag, Cup holder |
| After-sales service | Peg Perego S.p.A., tel. 0039/039/60.88.213 |
| Recommended lifespan | 7 years after manufacturing date |
| Cleaning | Brush, wash according to label, no chlorine or tumble drying |
| Country of manufacture | Italy |
Frequently Asked Questions - VIaggio1 DuoFix K TT PEG PEREGO
User questions about VIaggio1 DuoFix K TT PEG PEREGO
0 question about this device. Answer the ones you know or ask your own.
Ask a new question about this device
Download the instructions for your Car seat in PDF format for free! Find your manual VIaggio1 DuoFix K TT - PEG PEREGO and take your electronic device back in hand. On this page are published all the documents necessary for the use of your device. VIaggio1 DuoFix K TT by PEG PEREGO.
USER MANUAL VIaggio1 DuoFix K TT PEG PEREGO
UNIVERSAL CATEGORY 9-18 Kg Y BELTED

IT- Il seggiolino auto "Viaggio1 Duo-Fix KTT" viene fissato in auto con la cintura di sicurezza a tre punti.
EN-The "Viaggio1 Duo-Fix KTT" car safety seat is attached to the car using a three-point seat belt.
FR-Le siège-auto "Viaggio1 Duo-Fix KTT" se fixe dans la voiture à l'aide de la ceinture de sécurité à trois points.
DE-Der Autokindersitz "Viaggio1 Duo-Fix KTT" wird mit dem Sicherheitsgurt an drei Stellen im Auto befestigt.
ES- La silla de auto "Viaggio1 Duo-Fix KTT" se instala en el coche con el cinturón de seguridad de tres+puntos.
PT·Acadeira para automóvel "Viaggio1 Duo-Fix KTT" é fixada no automóvel com o cimento de segurarca emTRS pontos.
NL-Het autozitje "Viaggio1 Duo-Fix KTT" wordt met een driepuntsveiligheidsgordel in de auto vastgezet.
DK. Autostolen "Viaggio1 Duo-Fix KTT" spændes fast i bilen med trepunkts-sikkerhedsselen.
FI- Auton "Viaggio1 Duo-Fix KTT" -turvaistuin kiinnitetaan autoon kolmipisteisella turvavyolla.
CZ-Autosedacku "Viaggio1 Duo-Fix KTT" je nutné v auté pripevnit pomoci tribodového bezpečnostniho pásu.
SK-Autosedačka "Viaggio1 Duo-Fix KTT" musi byt v automobile pripevná pomocou trojbodového bezpečnostného pásu.
HU·A "Viaggio1 Duo-Fix KTT" autós gyerekúlest harom pontosBiztonsági ovvel kell az autóban roqzǐnteni.
SL-Avtosedez "Viaggio1 Duo-Fix KTT" se pritrdi v avtomobil s tritočkovnim varnostnim pasom.
RU·ABTOMO6nIbHoe Kpecno "Viaggio1 Duo-Fix KTT" KpeNTcB aBTOMo6nIe npn NOMOu pEmH 6e3OnaCHOCTN C 3 ToKamn KpeJIeHn.
TR-"Viaggio1 Duo-Fix KTT" araba增長 koltugu uç ayir noktada emniyet kemeri ile araca baglanir.
HR/SRB/MNE/BiH. Auto sjedalica "Viaggio1 Duo-Fix K TT" se pričvršćuje u vozilu sigurnosnim pojasom s tri točke.
EL-To kaioqa autokivntou "Viaggio1 Duo-Fix KTT" oTepeewetai oTo autokivnto eTn Gwn aoopaiaac Tpiw onueiW.
"Viaggio1 Duo-Fix KTT" 2022AR.
UNIVERSAL CATEGORY 9-18 Kg Y ISOFIX & TOP TETHER


IT- Il seggiolino auto "Viaggio1 Duo-Fix KTT" si aggancia in auto con ilsystema ISOFIX.
EN- The "Viaggio1 Duo-Fix KTT" car seat is secured in vehicles with the ISOFIX system.
FR-Le siege-auto «Viaggio1 Duo-Fix KTT» se fixe dans le vehicule grâce au système ISOFIX.
DE- Autokindersitz,Viaggio1 Duo-Fix KTT" wird mit dem ISOFIX-System auf dem Autositz befestigt.
ES-La silla de auto "Viaggio1 Duo-Fix KTT" se engancha en el automóvil con el sistema ISOFIX.
PT-Acadeira auto "Viaggio1 Duo-Fix KTT" acopla-se ao automóvel com o Sistema ISOFIX.
NL-Het autozitje "Viaggio1 Duo-Fix K TT" wordt in de automet het ISOFIX-systeme bevestigd.
DK- Autostolen "Viaggio1 Duo-Fix KTT" monteres i
Read carefully for proper use of your new PegPerego car seat:Viaggio 1 Duo-Fix KTT.
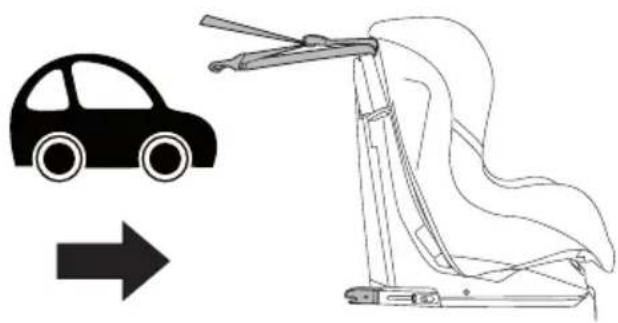
Viaggio 1 Duo-Fix K TT is the latest PegPerego car seat for children weighing 9-18 kg. It is type approved under European standard ECE R44/04. Viaggio 1 Duo-Fix K TT uses the ISOFIX attachment system with Top Tether, in compliance with the most up-to date European Directives, as a guarantee of utmost safety and reliability. All recently produced vehicles are equipped by law both with the ISOFIX anchor, placed where the backrest meets the seat, and with the TOP TETHER hook. This is normally located on the shelf behind the rear seat in minivan vehicles (photo A), behind the rear seat in hatchbacks (photo B), or in the trunk in SUVs / off-road vehicles (photo C):
In order to prevent an unsuitable (i.e. non Top Tether) anchor being used, the vehicle's TT hook is generally marked by a label bearing the following logo:

For more information and greater safety, consult your vehicle's instruction and maintenance booklet. Ensure the car seat is securely fastened using the Top Tether. This not only guarantees utmost safety in the event of collision, but also maximum child stability during normal use. Please remember that if necessary Viaggio 1 Duo-Fix KTT can also be fastened using the standard three-point seatbelts available by law on any vehicle.
Thank you for choosing a Peg-Perego product.
Product characteristics Car seat, Group 1, "Universal" category with vehicle seatbelt
- Type approved under European standard ECE R44/04, for children of weight from 9 to 18kg (1 to 4 years approx).
- Suitable for installation on most, but not all vehicle seats.
- The car seat can be correctly installed if the vehicle's use and maintenance manual indicates compatibility with "Universal" Group 1 restraint systems.
- This car seat is classed as "Universal" in compliance with stricter type approval criteria than previous models that do not have type approval labels.
- The car seat can only be used in type approved vehicles, fitted with static or inertia-reel three-point seatbelts, approved under regulation UN/ECE no. 16 or equivalent standards.
- It must not be used with two-point or lap seatbelts.
Car seat, Group 1, "Universal" category, with Isofix & Top Tether, class A
- Type approved under European standard ECE R44/04, for children of weight from 9 to 18kg (1 to 4 years approx).
Suitable for installation on most, but not all vehicle seats. - The car seat can be correctly installed if the vehicle's use and maintenance manual indicates compatibility with "Universal", Group 1, class A, ISOFIX restraint systems.
- This car seat is classed as "Universal" in compliance with stricter type approval criteria than previous models that do not have type approval labels.
IMPORTANT
"Viaggio 1 Duo-Fix KTT Group 1 must be installed in a forward-facing position.
- Do not install "Viaggio 1 Duo-Fix K TT" on rearward- or sideways-facing vehicle seats.
We recommend that you always use the rear seat
on the opposite side to the driver's seat.
- When fitted on the vehicle's front seat, the car seat should be positioned as far as possible from the dashboard.
- The item is given a serial number.
- If you have any difficulty fitting Viaggio 1 Duo-Fix KTT in your vehicle, lift up or remove the vehicle's headrests.
- Do not use without the Top Tether. The Top Tether is essential in order to guarantee complete safety.
WARNING
-
Read the instructions carefully before use and keep them in the holder provided for future reference. Failure to closely follow the car seat installation instructions will put your child at risk.
-
The assembly and installation of Viaggio 1 Duo-Fix K TT must be conducted by adults. The assembly and installation procedures must be carried out without the child in the car seat.
-
When travelling in the vehicle, never hold the child in your arms and never put him/her anywhere but in the car seat. In the event of sudden braking, even at low speeds, the child might easily be flung forward.
-
Avoid inserting fingers into the mechanisms.
-
When travelling take special care to make sure that luggage or other objects do not injure the child in the car seat in the case of accidents.
-
Do not use installation methods different from those indicated. This would result in the risk of detachment from the seat.
-
Ensure that the vehicle's three-point seatbelt fixing the car seat is always taut and not twisted. It should be replaced in the case of heavy stress as a result of an accident.
-
Never leave the child unattended in the car seat: watch over him/her even when he/she is sleeping.
-
Never remove the child from the car seat while the vehicle is in motion.
Make sure that the car seat is not blocked by a mobile part of the vehicle seat or by a door.
- Adjust the height and tension of the shoulder straps
ensuring that they are snug to the child's body without constricting him/her too much. Check that the harness is not twisted and that the child does not release it.
- This car seat is not intended for prolonged periods of sleeping.
- Do not leave the car seat in the vehicle when exposed to the sun. Some parts might heat up and be harmful to the delicate skin of the child - check before placing the child in the seat.
- Do not use the car seat without its fabric cover; this must not be replaced with one not approved by the manufacturer since it is an integral part of the car seat and the safety system.
- Do not use the car seat without the protective shoulder pads as they are an integral part of the car seat and the safety system.
- If in doubt refer to the manufacturer or retailer of the car seat.
- Do not remove the adhesive and stitched labels since this might make the product non compliant with legal requirements.
- Do not use the car seat if it has signs of breakage or missing parts, is second hand, or if it has been subjected to violent stress in an accident, because it might have suffered extremely dangerous structural damage.
- Do not modify the product.
- For any repairs, replacement parts and information about the product, contact the after-sales assistance service. Contact information is provided on the last page of this manual.
- The car seat should always be secured in the vehicle, even when the child is not present. In the event of sudden braking, it could injure the passengers.
- Do not use this car seat after 7 years from the date of production indicated on the structure. The natural ageing of the materials may mean that it is no longer compliant with standards.
- Do not use accessories not approved by the manufacturer or by the competent authorities.
Instructions for use
UNIVERSAL CATEGORY - Belted
Fastening with seatbelts
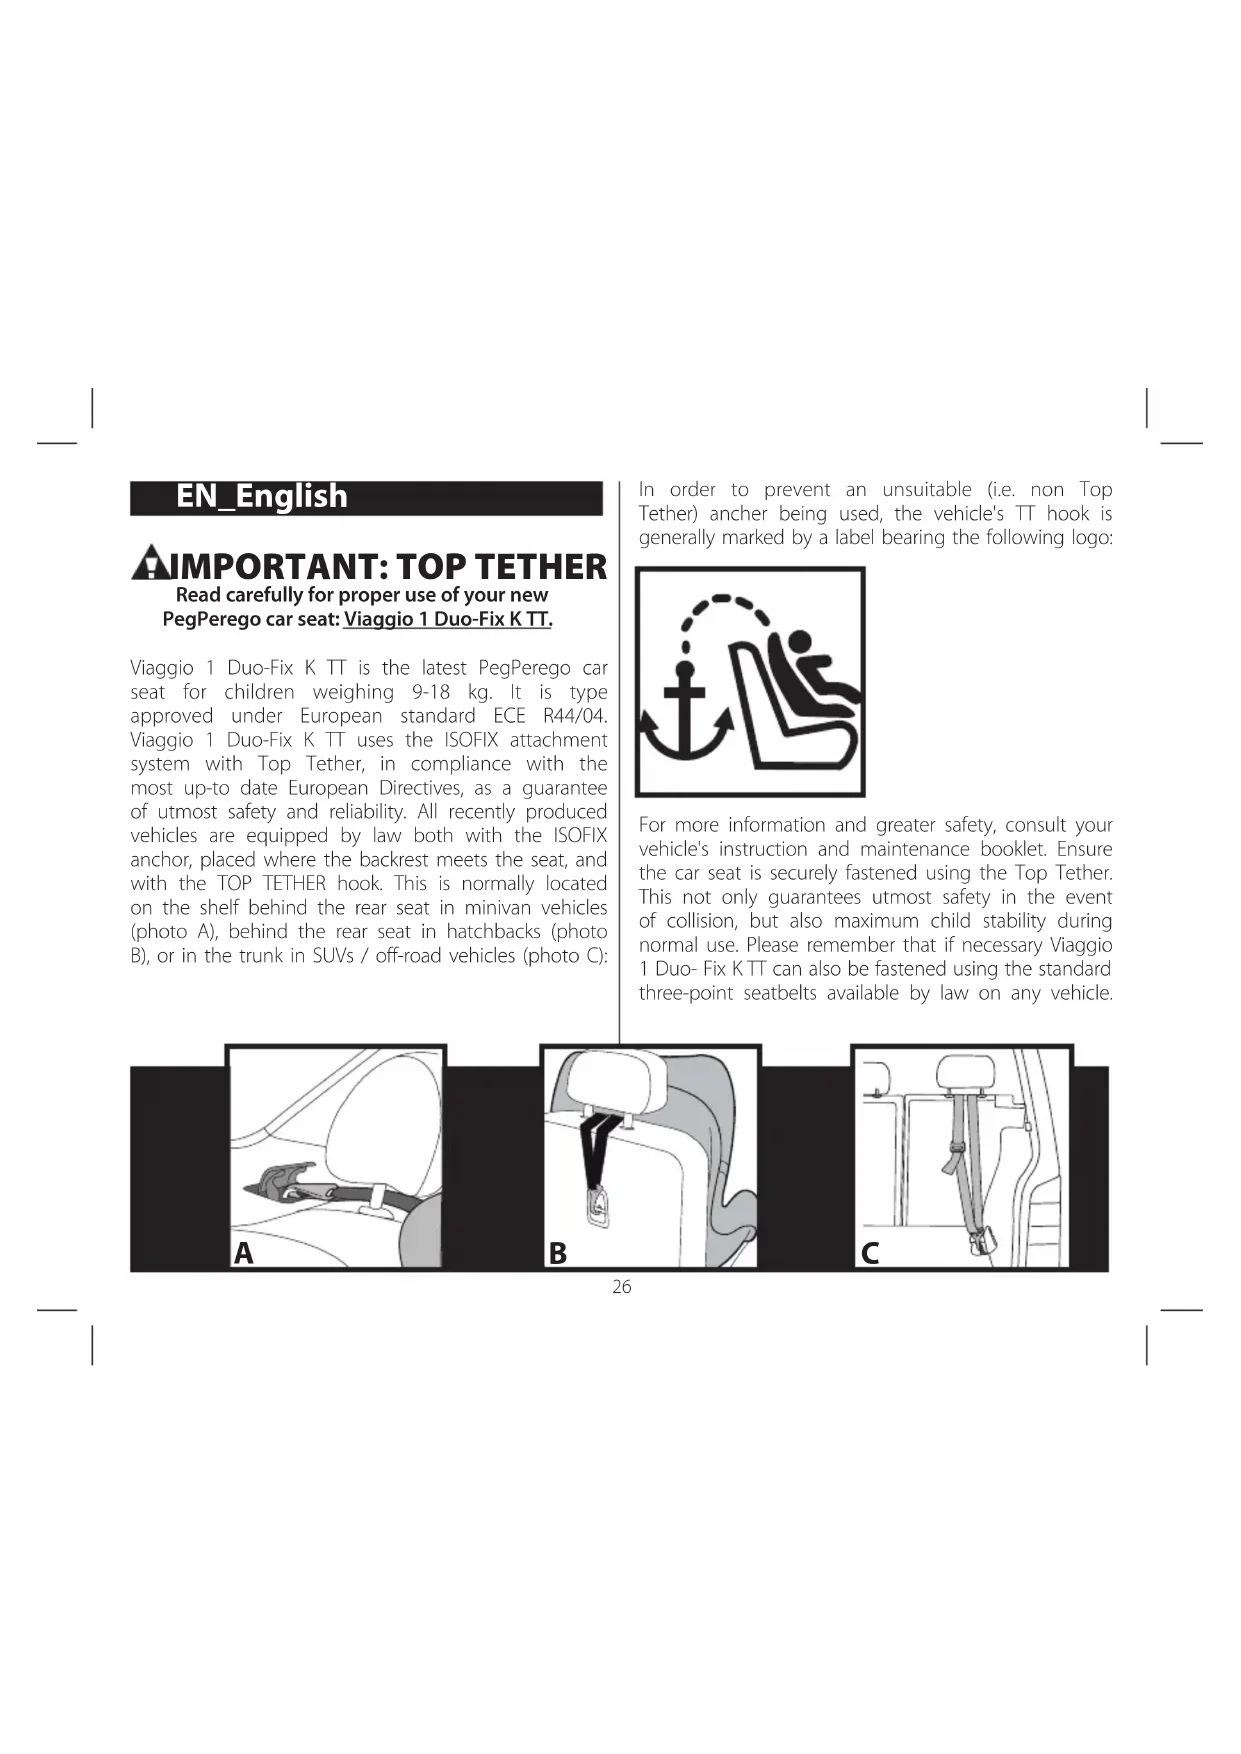
- Place the Viaggio 1 Duo-Fix KTT car seat in a forward-facing position, as shown in the figure.
- To make it easier to pass the vehicle's seatbelts through the back of the car seat, it is necessary to recline the seat as far as possible by operating the handle, as shown in the figure.
- Pass the vehicle's seatbelt between the frame and the body of the car seat.
- The lap strap must pass through the lower opening marked in red. Fasten the seatbelt, ensuring that it clicks into place.
- Check that the lap strap has passed through the lower openings marked in red and tighten it.
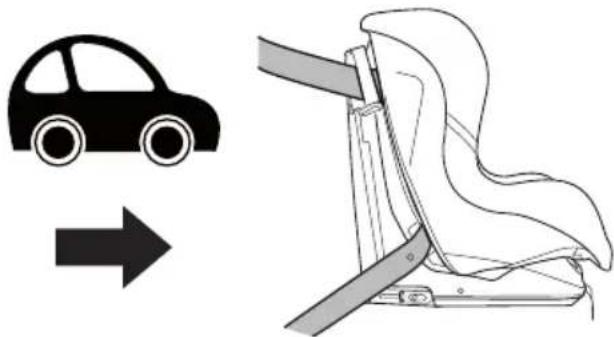
6- Bring the car seat back to the upright position by pulling the handle below the seat (Fig. a) and pushing the car seat as shown in the figure (Fig. b). - To finish securing the car seat to the vehicle, use the Steady Fix device: open the hook and pass the diagonal strap through it, ensuring that it is taut and not twisted (Fiq. a). Close the tongue (Fiq. b).
- 10MPORTANT: Take hold of the seatbelt and pull it firmly upwards to fit the Viaggio 1 Duo-Fix KTT more closely to the seat of the vehicle (Fig. c).
Once the procedure is complete, it is possible to recline the car seat to the desired position (see point 2).
Instructions for use UNIVERSAL CATEGORY - Isofix & Top Tether
Fastening with Isofix & Top Tether
- Recline the car seat to the lowest position by operating the handle, as shown in the figure.
- Press the adjuster located inside the base, as shown in the figure, to extract the Isofix connectors.
- Open the rear panel and extract the Top Tether (T). When the Top Tether hook is not in use, place it back inside the panel and fasten it as shown.
- To fasten the car seat's ISOFIX connectors to the vehicle seat's ISOFIX anchors, press sideways on both sides of the body until they click into position, as shown in the figure.
IMPORTANT: Ensure the car seat is securely fastened by checking that the indicators to the sides of the car seat's Isofix connectors become green on both sides, as shown in the figure.
- For the car seat to adhere completely to the vehicle seat, pull the base's front strap towards you and at the same time push the car seat against the vehicle seat, as shown in the figure (arrow B).
IMPORTANT: When finished, move the car seat to ensure the Isofix connectors are securely fastened.
- To unfasten the car seat's ISOFIX connectors from the vehicle seat's ISOFIX anchors, press the button sideways on both sides (Arrow A). The car seat's ISOFIX connectors will unfasten automatically.
Slip the ISOFIX connectors back into place by pulling the base's front belt towards you (Arrow B).
TOP TETHER HOOK
IMPORTANT: There are three main variations to the Top Tether hook.
-
Type A:
-
Lift the headrest and slip the straps underneath.
-
Fasten the TT hook of the straps to the clearly visible vehicle hook, as shown in the figure.
Tighten the belt and check belt tension is correct using the mechanism highlighted in green.
IMPORTANT: To fit the belts correctly, tighten them firmly.
16-Type B:
-
Lift the headrest and slip the straps underneath.
-
Fasten the TT hook to the vehicle anchor, placed on the rear of the vehicle's backrest, as shown in the figure.
Tighten the belt and check belt tension is correct using the mechanism highlighted in green.
IMPORTANT: To fit the belts correctly, tighten them firmly.
17-Type C:
-
Lift the headrest and slip the straps underneath.
-
Fasten the TT hook of the straps to the vehicle hook, placed in the boot. This is generally marked by the Top Tether symbol, as shown in the figure. Lift the cover and fasten.
IMPORTANT: To fit the belts correctly, tighten them firmly.
For any other fastening system, consult your vehicle's instruction booklet.
How to secure your child in the Viaggio 1 Duo-Fix KTT car seat
-
Before placing the child in the car seat, release the harness by pushing the red button on the crotch strap buckle.
-
Lift the harness and attach the buckles to the elastic bands on the sides.
-
Place the child in the car seat and arrange the harness over the child's shoulders and waist, as shown in the picture.
-
Lock the harness by overlapping the tougues and inserting them into the buckle of the crotch strap until they click into place.
-
The child is now sitting correctly with the harness fastened properly.
-
Finally, tighten the shoulder straps until they are snug to the child's body by pulling the central adjustment strap towards you as shown in the figure, taking care not to over-tighten the straps.
IMPORTANT: leave minimal slack (the space of a finger) between the strap and the child's chest.
- To slacken the straps, press the button at the centre of the car seat and at the same time pull the straps towards you.
IMPORTANT: Hold the straps under the shoulder pads and pull, as shown in the picture.
-
The car seat has a booster cushion which is only suitable for small babies and for when the harness is at the first level. When the child is older, remove the booster cushion.
-
To remove the booster cushion, slide it out of the side straps.
How to adjust the height of the headrest
The headrest must be adjusted to match the child's
height. There are 7 positions.
- To change from a lower position to a higher one: pull the tongue in the upper central part of the headrest upwards. The headrest will move at the same time. To change from a higher position to a lower one: pull the tongue in the upper central part of the headrest upwards and, at the same time, push the headrest down to the desired position.
When you have finished, try moving the headrest to check it is properly locked into place.
-
To determine the best shoulder strap position, bear in mind that the child's shoulders must be just below the shoulder strap guides.
-
10MPORTANT: The straps must not be too high or too low with respect to the child's shoulders;
-
The Viaggio 1 Duo-Fix KTT car seat can be reclined into 5 positions.
To recline the seat, pull the lever under the seat (fig. a) and adjust the seat to the desired position (fig. b).
Removing the soft cover
To remove the soft cover of the Viaggio 1 Duo-Fix KTT car seat:
- Remove the booster cushion, where present (point 24).
Unfasten the harness (point 17).
-
Open the rear panel.
-
Unfasten the straps from the rear latch plate.
-
Unfasten the straps on the rear and slip them out from the front.
-
Unfasten the shoulder pads from the rear and slip them off the straps from the front.
-
Slip off the adjuster strap (fig. a) and then remove the headrest from above (fig. b).
-
Release the crotch strap from below the body (fig. a) and slide the strap out through the crotch strap cover (fig. b).
-
Slip the strap out through the opening in the soft cover and remove the soft cover, as shown in the figure.
Soft cover maintenance
Brush the fabric parts to remove dust.
- When washing, closely follow the instructions stated on
the label sewn into the cover.
- Do not use chlorine bleach.
- Do not iron.
- Do not dry clean.
- Do not remove stains with solvents.
- Do not tumble dry.
Replacing the soft cover of Viaggio 1 Duo-Fix KTT
To replace the soft cover of the Viaggio 1 Duo-Fix KTT car seat:
- From below, slip the straps back in through the opening in the fabric.
- Reinsert the crotch strap into the soft cover.
- Fasten the crotch strap back onto the body.
- Fasten the tongue to the crotch strap opening.
- Put the soft cover in place, starting at the seat and moving upwards, paying attention to the sides of the backrest.
- Slip the soft cover over the headrest, ensuring the red tongue passes through the opening in the fabric.
- Slip the shoulder pads back onto the straps
- Insert the straps though the soft cover, starting with the buckles.
- Lengthen the straps and insert them through the body of the car seat (the straps in the upper hole and the buckles in the lower one).
- Fasten them correctly on the rear, as shown in the figure.
- Fasten the harness at the front (point 20).
IMPORTANT: the straps must not be twisted.
-
ATTENTION: The central adjustment strap must pass between the body and the plastic shield, as shown.
-
Open the rear panel and fasten the straps onto the rear latch plate.
- For infants, reposition the booster cushion.
Accessories
- Clima Cover Car Seat: washable cover in Tencel, a natural heat-regulating fiber that regulates body
moisture (warm in winter and cool in summer) (Fig. A).
-
Travel Bag Car Seat: practical travel bag that keeps the car seat clean and protected (Fig. B).
-
Car Seat Cup Holder: practical and removable cup holder, to keep baby's drink to hand (Fig. C).
Serial numbers
-
The following information can be found under the seat of the Viaggio 1 Duo-Fix K TT: product name, production date and serial number.
-
The type approval label can be found behind the backrest of the Viaggio 1 Duo-Fix KTT.
50-Harness production date
In the event of problems with the product, these details will be of use to customers.
Product cleaning
- This product requires minimal maintenance. Cleaning and maintenance must only be carried out by adults.
It is advisable to keep all the moving parts clean. - Clean the plastic parts periodically with a damp cloth. Do not use solvents or similar substances.
- Brush the fabric parts to remove dust.
- Do not clean the polystyrene shock absorbing device with solvents or other similar products.
- Protect the product from atmospheric agents: humidity, rain or snow. Extended exposure to sunshine can cause colour changes in many materials.
- Store the product in a dry environment.
How to read the type approval label
This paragraph explains how to interpret the type approval label (orange label).
- The label is double because this car seat is type approved for two types of installation in vehicles:
- ISOFIX attachment systems (the term SEMI-UNIVERSAL class A indicates compatibility of the car seat with vehicles fitted with this system).
- Attachment system with static or inertia-reel three-point seatbelts (the term UNIVERSAL indicates compatibility of the car seat with vehicles fitted with this type of seatbelt).
The top of the label displays the trademark of the
manufacturing company and the name of the product.
The letter E in a circle indicates the European type approval mark and the number indicates the country that issued the type approval (1: Germany, 2: France, 3: Italy, 4: The Netherlands, 11: Great Britain, and 24: Ireland).
Type approval number: if it starts with 04 this indicates the fourth amendment (the one currently in force) of Regulation R44.
Reference standard: UN/ECE R44/04.
- Production serial number: on issue of type approval, each car seat is personalized with its own number.
PEG-PEREGO S.p.A.

Peg-Perego S.p.A. is an ISO 9001 certified company. This certification is a guarantee for customers and consumers of the transparency and trustworthiness of the company's procedures and working methods. Peg Perego can make changes
at any time to the models described in this publication for technical or commercial reasons. Peg Perego is at the disposal of its customers and consumers to ensure that all their demands and queries are fully satisfied. It is a key part of our policy to ensure we are always aware of our customers' views and requirements. We would therefore be very grateful if, after using a Peg Perego product, you take the time to fill in our CUSTOMER SATISFACTION QUESTIONNAIRE, making a note of any comments or suggestions you might have. You can find the questionnaire on the Peg Perego website: www.pegperego.com
Peg-Perego after-sales service
Peg-Perego after-sales service If any parts of the item get lost or damaged, only use genuine Peg Perego spare parts. For any repairs, replacements, information on the products and sales of genuine spare parts and accessories, contact the Peg Perego Assistance Service and state the serial number of the product, if present.
tel. 0039/039/60.88.213 fax 0039/039/33.09.992
IMPORTANT: as variantes de engate dosCNTOS
WAARSCHUWING: TOP TETHER
Belted UNIVERSALKATEGORI
OuIaTKe TkaHeBbIe BCTaBKn OT nbln;
- PnC TnKpe ToHc CneDyTe HNCTpyKzIaM Ha 3TKeTke, BwHToB WexON N3DeJIY.
HeOTBeINBaIeBxIOpKe;
HeIaBbTeyTIOROM;
HeYnCTInTe CyXm CnOCOBm BXMnCTKe; HeNCNoJIb3yInTe paCTBOpNTeIb IIN BbIEDeHnI nTHe;
He cyuHnTe B CyuNKe dIa 6eIbA C BpaUOUMcB 6apa6aHOM.
KaK cHOBa HaeTeb 06uBky Viaggio1 Duo-Fix KTT
Yro6bHaTeBobNkByTeTCKoroABTOKpecnaViaggio1 Duo-Fix KTT:
- BBeIte CHN3y B OTBepCTne B TkaHn peMeWKN 6e3onacHOCTN;
BBeItepeMeHb,IpoxOraMIMeKdYHOraMn,BTKaHb KOpnyCa; - npncterHnte ero K Kopnyc y ABTOKpeCna;
- npnterHnTe A3bHOK K OTBepCTNIO B pemHe,
npoXoJHemMekHyHOramN;
- HadeBaTe 06nBky, HauHna C cnDeHb, N nepemeeaCb BBepx, Obpaaa BnHaHnHa Ha oPmy CnIHKn;
- HaJeHbTe NoIgroNObHnK, OpaTnB BHMaHne Ha KpaChbI Ra3bYOk, KOtOpBn DoJIKeH IpOHTn B npope3b TKaH;
HaedeHbTe PneueBbe HaKnaKn Ha peMHN 6e30NaCHOCTN; - BCTaBbTe peMHn 6e3oNaCHOCTN B O6NBky, HauHna C npJKe;
42-BbITAHHTe pEMHn H BCTaBtE INX B KOpNyc CnIDeHbA (peMHN B BepxHee OTBepCTne, npJkky B HnKHee); - npabnblho 3aueenB INx C3aN, KaK noka3aHO Ha pncyHKe;
3aennte cnepepn pemn 6e0nacnoctn (nykT20). BHIMAHNE! Pemewkn He doJXHbI 6bITb nepeKpyueHbl.
44.BHIMAHHE! ZeHTpAlbHbI peRyIIpOBOUHyI pEmeH bONJKeH npOXoINtB MeKdY KOpIyCOM IN PaCTIKOBbIM UNTKOM, KaK NOKa3aHO Ha PNCyHke. - OTKPOIte KpbIaKy c3aIIN 3aIeNITe peMHn 3a 3aHIOCKo6y;
yCTaHOBNTe nepexoHyIO DeTaNb,ecn pebeHOK eue MaJIeHbKNI.
Akceccyapbl (npoiaotca OTdeIbHo)
46.Clma Cover Car Seat: CTnpaembYeXoNn3 BnCKO3HOrO BOLOKHa TOpROBm MapKn Tencel, HaTypaIbHOrO TENoIpeRyInpUioero BOLOKHa C KOHTPOJEM BNAAKHOCT Tena (TeTnoe 3nMoN n npoxnaHoeJeTOM)(Pnc.A).
Travel Bag Car Seat: npaKTnHcA CmKa DnnyTeueCTBn NOMoAeT COepeXaTb ABTOMOuNbHOe cnDeHbe B uHcTote n o6ecneuBaet erO 3auNTy (pnc.B).
47.Car Seat Cup Holder: npaKTnHbI CbEMHbI DePkaTeJIb CTaKaHnKA, KOToBb INo3BOJnE T BcERda DePkaTb HAnrTOK dJa pe6eHk aNd pyKoI (pnc. C).
CepniHbIe Homepa
48.ПОД сиденимViaggio!Duo-Fix KTT haxoNTcR cNeyuOuaHnΦopMaUra:Ha3BaHne yCTpoIcTb,daTa
eTOI3TOTOBJIeHnI CepnHbI HOMep.
- Pto3aIn cinnKn CndeHbY Viaggio1 Duo-Fix KTT HaxoJntc Ta6nUka cepTnФkaUm:
50-Data n3rOToBJIeHnpeMHra.
3Tn daHhble Heo6xOJIMO yKa3bIbA Tb B IIO6bl XpeTeH3nX.
UncTka u3dEInna
Bahe n3denn HeydaetcB HecnoxHOM yxoJe. OnerpaunuNCTKN I yXoDa DOnKbI BblIOJIHrTb TOJbKO B3POCNbIe.
- PekomeHnyetc coepkaTb B uCTOTE BCE IINJyUneCn YACTN.
-PernoDnueckn OunuAte TnaCTMaCCOBbIe deTaNn BnaXHO TpRKnO, He NOJIb3yIITecb paCTBOpNTeJAMN IN CXODHbIMN BEUcTBAmN.
- Noucntte uetkoTkaHbIe yactn, UTObI ydaNTb
He ynaponorloaouee yctpoictbo n3 noInCTnpoJa pactBopnteJIIMn nn CXOJHbIMn C HMMN BeueCTBaMn.
3aunntte n3dene ot atmocephbx ocakOB -BObl, CHera nn DoxJr. IocToHHa N npOOnKHTenbHa NIOBepKeHHOCt b CONHeHbIM Lyyam MOKeT Bbi3BaTb LBeTOBble 3MeHeHn MHOrNX MaTePnaNoB.
XpaHnTe H3dJIe B CyXOM MeCTe.
Kak yntaTB Ta6nuky ceptnФkaun
B 3TOM npaparpafe MbI oobcHIM, KaK YITaTB TaBNIUYKe cepTNΦkauu (Ta6NnUka opaHxEBOrO UBeTa).
TabnUkaIMeetDBOHOnpa3Mep,NOTOMyTO 3TO DetCKoe ABTOKpeCNO cepTINuPobAoHO nI INONb3OBaHHBABTOMO6Ne DByMa CNOCoBaM:
CnCTema KpenneHn IAsoFIX (HaJnncb "NOLY- YHNBEPCALbHAR knacca A"yka3bBaet Ha COBmecTmOcTb aBTOKpeCJIa C aBTOMO6NJIMN, OCHaueHHbIMN ETOI CNCTeMOJ).
CnCTema KpennHe Ha TpexToeHOM pEmHe 630nacHOCT (TaTNUHOM N C HamaTbIbAIOUIM UcTPOINCTBOM),-(HaNncb "YHNBEPCAInbHAJ yKa3BaIEaT HA COMBECTIMOCb aBTOKpeCna C abTOMO6UNRMI,OCHAUEHHbIMN 3TOI CNCTEMOI).
Habepxy 3TNKEKynka3Ha MapKaΦnPmbi
IPOON3BOOINTeI NaHa3BaHne yCTpOINCTBa.
- BykBa E B Kpyre: yka3bIbaeT Ha To, YTO daHHa MapKa cepTnФuIpObaHa B EC, a HOMep o6o3HauaET CTpaHy, BbIaBswyO cepTnФiKAt (1:FepMaHna, 2:ΦpaHcua, 3:ItAnia, 4:HnepePnAdbI, 11:BeNko6pTuHna 24:IrpNaHnIa.
Homep ceTnKauNTo,TO OH HauHaetcHa 04, O3HauaET YeTBeTpYIO (HbHe DeIeCTByIOUyIO)peJaKuHO HOpMaTHBHO Tpe6ObaHnR44.
HopMaTnBHO-cnpaBOUHbIe JOKyMeHTbI: UN/ECE R44/04. - CKB03H0I cepHHbI HOMep npOyKta: nepcoHaJIbHbI IIN KaKIOrO aBTOKpeCna - NOCNE BblNyCKa cepTnΦHKaTa KaKIOe KpeCNO DOJXHO IMEt b CBOI CO6CTBeHHbI HOMep.
PEG-PEREGO S.p.A.

Peg-Perego S.p.A. ceptnfniunpoBaHa no ISO 9001.CeptnfniKaunraI rapaHTnpyet 3aKa3uKam n Notpe6bTeJAM, qTO KOMpaHnRA paObaTae, coBLOdAЯ pInuHcNbl fnaChOCTn I DOBepria. KompaHnRA Peg-Perego MeeT npabo
BHOCHTB B IIO60I MOMENT N3MeHeHNA MOneIN, ONiCaHHbIe B HAcTOraIeM N3DaHN, NO PnUHaAM TexNueCKoro INN KOMMePueCKoro XapaKTePa. PegPerego HaxoJITcK YcIyram CBOx KJIeHTOB DnI POIHO yOBoNETBPoeHRA CEx IN Tpe6oBaHNI. IOTOMY, INHAC OCh EOpH BaxHo 3HaTb MHeHne HaIXK JIneHTOB. PoTOMY, MB BydEm Bam np3HaTeNbHbI, ecNJN NocNE iCNoB3OBAHn HAweo N3dEINB bI 3AnONHte AHKETY OB yOBONETBOPEHHOCTI NOTPEBNTEJI, KOtopyMOKHO HauTI NaHaWeem CaIte B INTEpHete, BbICKa3bIBaR CBON 3aMeuHn INI peKOMeHdaun. WwW.pegperego.com
Cnyk6a o6cnykubannja Peg-Perego
B cnyuae yte npn npn akceccyapOB, npmehnToIbko fnpmeHHbe 3aNaChBe qactn npOn3BOcTBAKOMnAHn Peg Perego. Ira BbInonHeHpeMOHTa, 3aMeHb 3aNaCHbx qacte n NNoLyeHnINHopMaunO6yctpOCTBe opaanTeB Cnyk6y
nocJIpeoJaXHOrO o6CnyXBaHnIg Peg Perego,
cooBnB, npr erO HanuHn, cepnHbH Homep npOyKta:
Cpok cnjxkb:3 roda
TapaHTnHbI cPOK: 12 MecaueB
ten.: 0039/039/60.88.213
0aKc 0039/039/33.09.992
e-mail assistenza@pegperegoo.it
caNTBUNHTepHeTe:www.pegperegco.com
U3roToBnteB:PEGPEREGOS.P.A.
(Per Perero C.I.A.) Apec: Via de Gasperi 50 - 20862
ARCORE (MB), Italy (Bna de Γαncepn 50,
KATHROPIA UNIVERSAL Belted
Eykataoatao n oE autokivnto uE zwvc aσφaλεία
- EpapuooTe to kaioa Viaggio 1 Duo-Fix KTT oTo Kaioa tou autokivntou npoc tn opa npelaac tou oxmuotoc otwcaipvetai otny Eikova.
- Tia va DIEUKOUVETn DIIEUON TWV WvWv aopaaleiac TOU oxmuTOC OTO NIOw Mepoc TOU KAIOmuToc, Eiva anapaiTnva YEiPete TN OeON TOU KAIOmuToc OTNV NIO xaunNtEeN MIcovTAC To POXLO, ONIWc paivetai OTNV EIKova.
- Nepaote nizwn aopaaiaac tou autokivntou, avapeo
OTo OkeleTo KaI To Owua Tou KaBioaTOc.
- H koiiaikn zovn npenei va nepaoe ie oea otic yamnae eooyec nou enianmaivotai ano to kokkivo xpwma. Pooosote tn zovn oto kaioqa mexpi va akouoete evav eappo nxo.
- EEvEe To n Koiaakn Gwn Exe Iepaoe Ieaa otic yaunAec eoOxEc, Nou Etniogauovtai an to KOKKIO XpuKa kai TeVTwote Tnv.
- Φερτην πλατη του καθιαματος Οτην σρθία θεοι Πραβώντας τη λαβή κατω από το καθιαμα (Eik. a) και Απρώνοντας το παιδικό καθιαμα σπως φαῖνται Θτην εικόνα (Eik. b).
- Tia va oloknpwoete Tnv Ekyataotaon OTO autokivnto, xpoiopoioinote Tn diatae n steady fix: aoiete to aykiotpo kai nepaote tn diaywvia cwn eleyxovtac otivai Tevtweyn kai oxi npepdeevn (Eik.a). Kleiote To yawooidi aopaaieiac (Eik.b).
- AHMANTIKO: Niadte tn Cwn kai tpaBnTe Tny u e duvaon npoc ta naW, yia va kavete to Viaggio 1 Duo-Fix KTT va epantetai nepioootepo oTn theou autokivntou (Eik.c).
Apou ookpwoeTe Tn diaokaia mnpie va yeipete Tn thoan tou kaioaatoc autokivntou otn theon nou eithupeite (B. Brna 2, npanavw).
Odyiec xphong
KATHROPIA UNIVERSAL Isofix Kai Top Tether
EykataoTaon o autokivnto e Isofix
- Tonoθeɪntəte to káθioμa otnv πio xαμnλn θeən πieCovtac to μoχλó, oniwc paivetal otnv eikova.
- Niote To loxlo mpoosta oTo eowteipko Tnc, baoc, onwc otnv Eikova, ia va byaete touc ouvdeouc, isofix.
11-AvoIETe To kanaki OTo Niou mepoc kai ByaTc Tc Zwec Top Tether (TT).OTav to aykiotpo TT ev xpnoiioietai, eNavatoOneTrnote to eOa otn 0upida kai ouvdeote to onuc qaiivetai OTny Eikova. - Tia va kaoupiwote ta oneia otnpiecns ISOFIX tou kaioaato cota avtoia oneia otooxync ISOFIX
Tou kaioaTOC autOKIVTOU, NIOE TPOC TA NAYIA KAI OTIC DUO PAeupc TOU OwauTOC MExPI VA AKOoETE Evav EAappo nxo, ONWC paivetai OTNV EIKova.
JMMANTIKO: Ia va eEyEe oTo KaBIOua ExeI ykataoTaei owot, BeaIWthei oTo iO deiktec oTa naiivTuv aykiopwU IsofIXou NaIDKOu KaBIOmuTOc EXOVYIVEI Ppaioi KAIOTIC duo NLEUPc, ONWCOTNV EIKOVA.
13-1a va evapuoei TEAEIA to naIdiko kaioa oTo Kaioa tou autokivntou,tpaBnTe Tnv mpoota wvntc Baoc npoc to epoc oac kai tautoxpvwC niote To naikko kaioa npoc to kaioa tou autokivntou, Otwc otyn Eikova (Belaoc B).
AHMANTIKO: TTo TEoC Tc δiaikagiac, μετakivnoTe To naikiKO kaioya yia va βeβaiωte 0t oTepeωθnKav o uδεοoi Isofix.
- Tia va EekoupiwaeTe Ta oneia otnpieCn ISOFIX ano ta avtioiXa oneia unodoxnc ISOFIX tou kaioaatoc autokivntou, nieote To koumi npoc Ta naayia kai oticduo nleupec (BaoC,A).Ta oneia otnpieCn Tou naikou kaioaatoc ISOFIX Eekoupiwovuv autoaTWC
a a a a a a a a a a a a a a a a a a a a a a a a a a a a a a a a a a a a a a a a a a a
aogisglg aolg aolg oao 1alag 8. .aasalao nla jalal ggi 8. ylll yll lgl . 4yall ggl 9o yll jalal aeao jalal pcc glc laol yol . .ayllwyl abawlg Laijiaipacg oywl
gaii j 150j 150j 150j 150j 150j 150j 150j 150j 150j 150j 150j 150j 150j 150j 150j 150j 150j 150j 150j 150j 150
.Peg-Perego 1000000000000000000000000000000000000000000
e"alol" aai1.1 aogaoi. 1uwwjol31 Jla821 20
18 9 JJg JLaECE R44/04 a gjg jll e g jg. .Lgai 4g ai i yao c g jy jolg S LgS J Sg.
J511
J 3
JL L J
JL L J
JL L J
JL L J
JL L J
JL L J
JL L J
JL L J
JL L J
JL L J
JL L J
JL L J
JL L J
JL L J
JL L J
JL L J
JL L J
JL L J
JL L J
JL L J
JL L L
JL L J
JL L J
JL L J
JL L J
JL L J
JL L J
JL L J
JL L J
JL L J
JL L J
JL L J
JL L J
JL L J
JL L J
JL L J
JL L J
JL L J
JL L J
JL L J
JL L I
JL L I
JL L I
JL L I
JL L I
JL L I
JL L I
JL L I
JL L I
JL L I
JL L I
JL L I
JL L I
JL L I
JL L I
JL L I
JL L I
JL L I
JL L I
JL L I
JL L l
JL L l
JL L l
JL L l
JL L l
JL L l
JL L l
JL L l
JL L l
JL L l
JL L l
JL L l
JL L l
JL L l
JL L l
JL L l
JL L l
JL L l
JL L l
JL L l
JL L I
Isofix&Top Tether 10
Isofix&Top Tether
Jg.111111111111111111111111111111111111111111111111
Ls,23456789
Isofix 23456789
Toper 23456789
Toper TT 23456789
(Tether TT 23456789
)
J 10000000000000000000000000000000000000000000000000000000000000000000000000000000000000000000
Jabll 2000000000000000000000000000000000000000000000000000000000000000000000000000000000000
TOPTETHER 3 Top Tether aJyTt ctt ttaa aA Aegil15
. 1
.
.
.
.
.
.
.
.
.
.
.
.
.
.
.
.
.
.
.
.
.
.
.
.
.
.
.
.
.
.
.
.
.
.
.
.
.
.
.
.
.
.
.
.
.
.
.
.
.
.
.
.
.
.
.
.
.
.
.
.
.
.
.
.
.
.
.
.
.
.
.
.
.
.
.
.
.
.
.
.
.
.
.
.
.
.
.
.
.
.
.
.
.
.
.
.
.
.
.
.
.
.
.
.
.
.
.
.
.
.
.
.
.
.
.
.
.
.
.
.
.
.
.
.
.
.
.
.
.
.
.
.
.
.
.
Begill16
16
16
16
16
16
16
16
16
16
16
16
16
16
16
16
16
16
16
16
16
16
16
16
16
16
16
16
16
16
16
16
16
16
Lgblgblgblgblgblgblgblgblgblgblgblgblgblgblgblgblgblgblgblgblgblgblgblgblgblgblgblgblgblgblgblgblgblgblgblgblgblgblgblgblgblgblgblgblgblgblgblgblgblgblgglgglglglglglglglglglglglglglglglglglglglglglglglglglglglglglglglglglglglglglglglglglglglglglglglglglglglglglglglglglglglglglglglglglglglglglglglglglglglglglglglglglglglglglglglglglglglglglglglglglglglgl
Viaggio 1 JIabJU JIJI JIJI JIJI JIJI JIJI JIJI JIJI JIJI JIJI JIJI JIJI JIJI JIJI JIJI JIJI JIJI JIJI JIJI JIJI JIJI JIJI JIJI JIJI JIJI JIJI JIJI JIJI JIJI JIJI JIJI JIJI JIJI JIJI JIJI
Viaggio 1 Duo-Fix sLsUJd JbUJd sLc
:KTT
ogssJgoc JLa 1oJoo Joo Joo
+
:
aaijLlJyRgRgRgRgRgRgRgRgRgRgRgRgRgRgRgRgRgRgRgRgRgRgRgRgRgRgRgRgRgRgRgRgRgRgRgRgRgRgRgRgRg
Jell all jolw wolw yacgall slj 81
a 15
Jnne jie ghe
g_1( x) = ( 1 + ax) - ( 1 - ax) - 2ax
a2 = 12 a3 = 2
(,)Lol
S OBC = S COD + S BOC - S BOC
aIgJgJgJgJgJgJgJgJgJgJgJgJgJgJgJgJgJgJgJgJgJgJgJgJgJgJgJgJgJgJgJgJgJgJgJgJgJgJgJgJgJgJgJgJgJgJgJgJgJgJg
Viaggio 1 Duo-Fix KTT Jabll aas s oLc a
(1)24.
JyLj 4a
LJIuIuR44aLJI
.ECE R44/04:
Jlalb0 15 J8 2e0 J5 22g g:LiJ JwUul
aall jaoi ic a yoljy
.PEG-PEREGOS.p.A
L. Peg-Perego S.p.A 5
ISO 9001 g281 o0g y c a 5
y Lg wllg xoal lilwoldo 5
45 wlll jg aag aag aag
Peg Perego
aagagagagagagagagagagagagagagagagagagagagagagagagagagagagagagagagagagagagagagagagagagagagagagagagagagagagagagagagagagagagagagagagagagagagagagagagagagagagagagagagagagagagagagagagagagagagagagagagagag
Peg-Perego aSjolallo Lo aoss
Ee 100000000000000000000000000000000000000000000000000000000000000000000000000000000000000
Viaggio 1 Duo-JalabXyJbIaIaIaIaIaIaIaIaIaIaIaIaIaIaIaIaIaIaIaIaIaIaIaIaIaIaIaIaIaIaIaIaIaIaIaIaIaIaIaIaIaIaIaIaIaIaIaIaIaIaI
Jg jLj 100
Viaggio 1 aaiiiaaiy jaii
. Duo-Fix KTT
JLab2L yol31 0LwI wio o p> Cui: cui·50
Cill yLss, gab aJl Jell doa o Logell ao
call a,b,c
1 1
UNIECER44/04Universal Class A
Declaration of conformity
Product name
VIAGGIO 1 DUO-FXK
VIAGGIO DUO-FIX KISOFIX
VIAGGIO DUO-FIX KTT BELTED
VIAGGIO 1 DUO-FK KTT ISOFIX
Product reference number
IMDA*
IMOT
Reference Standards (origin)
UNI ECE R44/04 (EU) Universal UNI ECE R44/04 Semiuniversal Class A (in combinazione con base isofix 0+1 IAKISN00 - in combination with Isofix base 0+1 IAKISN00 - avec Isofix base 0+1 IAKISN00)
UNIECER44/04UniversalClassA
Declaration of conformity
PegPerego S.p.A, declares, under its own responsibility, that the item in question has undergone a series of internal tests and has been certified by external independent laboratories, in compliance with current legislation.
Date and place of issue
Arcore, January 2012
PegPerego S.p.A.
via De Gasperi, S0
20862 Arcore (M3), TALY
FR Francais
UNIECE R44/04 Universal Class A
Declaration du conformite
UNIECE R44/04 Universal Class A
UNIECE R44/04 Universal Class A


- UNIVERSAL CATEGORY 9-18 Kg Y BELTED
- UNIVERSAL CATEGORY 9-18 Kg Y ISOFIX & TOP TETHER
- Thank you for choosing a Peg-Perego product.
- Product characteristics Car seat, Group 1, "Universal" category with vehicle seatbelt
- Car seat, Group 1, "Universal" category, with Isofix & Top Tether, class A
- IMPORTANT
- WARNING
- Fastening with seatbelts
- Instructions for use UNIVERSAL CATEGORY - Isofix & Top Tether
- TOP TETHER HOOK
- How to secure your child in the Viaggio 1 Duo-Fix KTT car seat
- How to adjust the height of the headrest
- When you have finished, try moving the headrest to check it is properly locked into place.
- Removing the soft cover
- Soft cover maintenance
- Replacing the soft cover of Viaggio 1 Duo-Fix KTT
- IMPORTANT: the straps must not be twisted.
- Accessories
- Serial numbers
- Product cleaning
- How to read the type approval label
- PEG-PEREGO S.p.A.
- Peg-Perego after-sales service
- WAARSCHUWING: TOP TETHER
- Belted UNIVERSALKATEGORI
- KaK cHOBa HaeTeb 06uBky Viaggio1 Duo-Fix KTT
- Akceccyapbl (npoiaotca OTdeIbHo)
- CepniHbIe Homepa
- UncTka u3dEInna
- Kak yntaTB Ta6nuky ceptnФkaun
- Cnyk6a o6cnykubannja Peg-Perego
- KATHROPIA UNIVERSAL Belted
- Eykataoatao n oE autokivnto uE zwvc aσφaλεία
- Odyiec xphong
- KATHROPIA UNIVERSAL Isofix Kai Top Tether
- EykataoTaon o autokivnto e Isofix
- .PEG-PEREGOS.p.A
- Declaration of conformity
- Product reference number
- Date and place of issue
- FR Francais
- Declaration du conformite
Brand : PEG PEREGO
Model : VIaggio1 DuoFix K TT
Category : Car seat