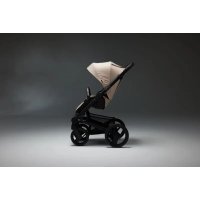
Nexo - Stroller Mutsy - Free user manual and instructions
Find the device manual for free Nexo Mutsy in PDF.
| Product Type | Stroller |
| Brand | Mutsy |
| Model | Nexo |
| Maximum child weight | 15 kg |
| Recommended age | From birth to 15 kg |
| Safety standard | EN 1888:2012 |
| Chassis material | Aluminum |
| Front wheels | Swivel with locking |
| Rear wheels | Fixed with pedal brake |
| Number of handlebar positions | 3 |
| Backrest | Adjustable with reclined position |
| Leg rest | Adjustable |
| Canopy | Adjustable with zippered extension |
| Safety harness | 5-point, 3 shoulder strap positions |
| Storage basket | Maximum capacity 5 kg |
| Car seat compatibility | Mutsy Safe2go, Maxi-Cosi, Kiddy, Cybex, BeSafe (via adapters) |
| Included accessories | Canopy, front bumper bar, rain cover (optional) |
| Chassis maintenance | Teflon spray on mechanisms |
| Wheel maintenance | Non-acidic Vaseline, no oil |
| Cleaning removable fabrics | Machine wash at 30°C, wool program, no bleach |
| Warranty | 2 years |
Frequently Asked Questions - Nexo Mutsy
User questions about Nexo Mutsy
0 question about this device. Answer the ones you know or ask your own.
Ask a new question about this device
Download the instructions for your Stroller in PDF format for free! Find your manual Nexo - Mutsy and take your electronic device back in hand. On this page are published all the documents necessary for the use of your device. Nexo by Mutsy.
USER MANUAL Nexo Mutsy
www.mutsy.com/nlnl/service/garantee
Introduction 14
Warnings 14
Guarantee 16
Maintenance and points for attention 17
Contents of the box 17
Summery of parts: part of the drawing 18
Orientation 18
The frame. 18
The wheels. 19
The brake 19
The push bar 19
The pushchair seat 19
The Safe2go car seat 22
The Maxi-Cosi car seat 23
Kiddy/Cybex car seats 24
BeSafe car seats 24
Introduction
- To get the best out of this product, we recommend careful use and maintenance. Read these instructions for use carefully before you start using the pushchair and keep the instructions for future reference.
- If you have any questions, comments, problems or complaints, please contact your retailer.
- If you want to know what accessories are available for this product or if you want to stay informed of new Mutsy products then go to www.mutsy.com.

WARNING
-IMPORTANT: Keep these instructions for future reference
- WARNING: Failure to observe the instructions for use may put your child's safety at serious risk.
-WARNING: You are responsible for your child's safety.
-WARNING: The pram is suitable for infants from birth up to 15kg
- WARNING: For infants from 0 to 6 months, the pram must be set to baby position.
- WARNING: For infants from 0 to 6 months, the seating surface must be set to a flat position.
- WARNING: For infants from 0 to 6 months, the backrest must be set to the fully reclined position.
- WARNING: For infants from 0 to 6 months, the padded crotch strap of the safety belt must be mounted in the rear opening of the seat.
- WARNING: For infants from 0 to 6 months, the shoulder straps must be mounted in
the lowest opening of the backrest.
- WARNING: For infants from 6 months and up to 15kg , the pram must be removed from the baby position.
- WARNING: In both lying position and sitting position, the pram seat is suitable for infants from 6 months and up to 15kg .
- WARNING: A car seat combined with the frame is no replacement for a cot or bed. If your child needs to sleep, place it in a suitable pram, bed or cot.
- WARNING: When using a BeSafe car seat make sure the pushchair seat is assembled.
- WARNING: A shopping basket is located between the wheels underneath the frame. The maximum permissible weight for this basket is 5kg .
- WARNING: Overloading can result in a dangerous, unstable situation.
- WARNING: Bags, accessories or both, other than recommended by the manufacturer, can, when placed on the product, result in an unstable pram. Exclusively use original Mutsy accessories.
- WARNING: Shopping bags or other heavy objects must not be hung on the push bar due to the risk of toppling.
- WARNING: Never leave the child in or near the pushchair unsupervised.
- WARNING: Do not allow your child to play with the pram. Doing so can result in dangerous situations.
- WARNING: Keep children away from the frame when folding up or unfolding the frame, to avoid fingers getting trapped.
- WARNING: Before use of the pram, check that the frame including the push bar has been unfolded and secured correctly and completely.
- WARNING: Before use of the pram, check that the frame has been unfolded and secured both correctly and completely.
- WARNING: Before use with the car seat, always check whether the attachment points of the adapters have been secured correctly.
- WARNING: Always check that the accessories have been secured properly before you start using the pram.
-WARNING: Only use the pram for one child at a time. - WARNING: Before placing or lifting your child, always check whether the brakes on the frame have been applied.
- WARNING: Always use the safety harness when you use the pushchair seat.
- WARNING: Always secure your child with the 5-point safety harness combined with the strap running between the legs.
- WARNING: You must take your child from the pram before lifting the pram or using stairs, escalators or lifts.
- WARNING: You need to tilt the pram on its rear wheels if you want to get on or get off the kerb.
-WARNING: Always apply the brakes when parking the pram.
-WARNING: This product is not suitable for running or skating. -
WARNING: Only use replacement parts supplied and/or recommended by Mutsy.
-
The Mutsy Nexo has been approved according to the EN 1888 norm of 2012.
Guarantee
All Mutsy products come with a two-year guarantee, which starts on the day of purchase. In the event of a manufacturing fault, Mutsy will work with its retailers to provide a solution. Manufacturing faults will be repaired under the guarantee. The guarantee does cover exchanges or returns of Mutsy products.
The guarantee will only be honoured if you can provide the following at the store at which the product was purchased:
-a completed guarantee card
-a copy of the purchase receipt
-a clear description of the defect
- your product
The guarantee card can be found on:
www.mutsy.com/gben/service/warranty
This card must be completed correctly and submitted digitally. You will also need to enter the serial number. This number can be found on a white sticker on the product; it is usually located on the underside.
The guarantee does not apply:
-if the problem concerns fabric discolouration
- if the fabric has been damaged by water
- in relation to damage caused by the use of non-original Mutsy accessories.
-if you cannot provide the purchase receipt
- if you have used the product incorrectly or unreasonably
- in relation to regular wear and tear that occurs as a result of day-to-day use
- in the event of damage caused by bad maintenance, neglect or an accident
-
if damage has been caused as a result of modifications to the product that have been carried out by the consumer, without permission from the manufacturer
-
if the damage is not reported promptly (within 2 months)
Mutsy provides no guarantee in relation to shrinkage or defects concerning the fabric elements that have been caused as a result of cleaning.
Safety is a priority for Mutsy. We therefore fulfil the highest safety standards:
- Europe: EN 1888
-UK: BS EN 1888
Canada:SOR/85-379 - US: 16 CFR 1227
-AS/NZS 2088:2013
For questions or comments, please contact us via: www.mutsy.com/gben/contact
Maintenance and points for attention
The frame
- Regularly check the locking mechanism of the frame. After cleaning you can spray some Teflon spray on it and rub it with a soft cloth. This also applies to other moving parts.
The wheels
- To let the wheels run smoothly the wheel axles must regularly be cleaned and lubricated with acid-free vaseline. The wheels can never be lubricated with oil.
The fabrics
The upholstery of the pram is not removable.
- You can treat stains on the outer fabric or lining of non-removable fabric parts with some liquid bleach-free soap. Always treat the whole area.
- Removable fabric parts can be washed in the washing machine at 30^ with a wool wash programme. Wash without bleach and do not tumble-dry. Do not iron and do not dry-clean. Close all zips, velcro parts and pressing studs before washing.
-
All Mutsy fabrics have been tested on water resistance however if the pram gets really wet, the water can penetrate the inner and outer fabrics and leave circles behind. To prevent this we recommend you to always use the rain covers in case of wet weather.
-
Always let a wet pram dry with a fully unfolded hood.
- Even though Mutsy fabrics are selected with the utmost care and are tested on colour fastness, the fabrics can discolour. Mutsy shall not be liable for any possible discolouration.
Contents of the box
-1 frame with pushchair seat and basket
-2 front wheels
-2 rear wheels
-1 hood
-1 bumper bar
Summary of parts: part of the drawing
- push bar
- height adjustment button push bar
- upper frame unlocking buttons
- lower frame unlocking buttons
- fastening adjustment backrest
- hood
- upper fabric fastening of seat
- bumper bar
- bumper bar release button
- lower fabric fastening of seat
- hinge point seat
- leg support
- folding safeguard
- rear wheel release button
- brake pedal
- swivelling wheel locking
- adjustment strap
Orientation
- References in the text to the front, rear, left or right side of the pram are described from the perspective of a user walking behind the pram.
The frame
Unfold the frame (a,b)
- Keep children away from all moving parts when unfolding.
- Press the unfolding safeguard inwards (a1) and lift the upper frame up until the lower support clicks into place. Move the push-bar backwards until you hear a second click. (b)
- Before use always check that the pram has been unfolded and secured correctly.
Fold the frame (c,d)
- Stand behind the frame and put the frame on the brake. Put the height adjustment buttons (c1) of the push bar in the lowest position. Pull the release buttons of the upper frame (c2) towards you on both sides and turn the push bar forwards until the push bar is on the lower support. (c3) -Pinch the lower frame unlocking buttons and fold the frame. (d)
- The folding safeguard locks automatically when the product is folded up.
- You can carry the frame from the push bar when the folding safeguard has been locked.
The wheels
Assemble the rear wheels (e)
- Slide the axle of the rear wheel in the rear wheel casing until you hear a click.
Pull the wheel to check that it has been attached firmly.
Disassemble the rear wheels (f)
- Press the button at the back side of the rear wheel casing and take the wheel off the frame
Assemble the front wheels (g)
- Slide the axle of the front wheel upwards in the front wheel casing until you hear a click.
Pull the wheel to check that it has been attached firmly.
Disassemble the front wheels (g)
- Push the button on the back side of the front wheel (g1) and pull the wheel from the front wheel casing. (g2)
The swivelling wheels (h)
- Turn the ring above the front wheel outwards on both sides in order to block the swivel setting. The swivelling wheels will automatically be locked when the wheels are placed in the rear direction.
- Turn the ring above the front wheel on both sides inwards to unlock the swivelling wheels.
The brake (i)
- Push the brake pedal downwards with your foot to block the rear wheels.
- Push the brake pedal upwards with your foot to unblock the rear wheels.
The push bar (j)
- The push bar has three different height positions. Press the height adjustment buttons (j1) and move the push-bar higher or lower while keeping the buttons depressed.
- Release the button when the push bar is in the desired position.
The pushchair seat (0 months up to 15kg )
- The pushchair seat is suitable for children from 0 months and upwards, up to 15kg . The back support and leg support are adjustable. Make sure that the frame has been fully unfolded and the brake is blocked during all actions indicated below.
The baby position (0 to 6 months) (t)
Infants younger than 6 months must be strolled in a flat fully reclined position. To do so, you must set the pram seat in the baby position. This position makes the reclining angle flat and ensures more comfort and safety. The baby position has four aspects:
- The seat needs to be set into the flat fully reclined position; A double strap is located at both sides of the seat. Pull the outer strap downwards until the top press-stud (t1) is visible. Push the seat slightly higher to create more room. Now fasten the press-stud. The seat is now in the reclined position.
- The backrest must be set in the fully reclined position. See 'Adjusting the backrest'.
- The padded crotch strap of the safety belt must be mounted in the rear opening of the seat. See 'The 5-point safety belt'.
- The shoulder straps must be mounted in the under most openings of the backrest. See 'The 5-point safety belt'.
The pram seat must be removed from the baby position for infants from 6 months and up to 15kg
- The seat needs to be set be set into the sitting position. Pull the outer strap partially out of the upholstery to loosen the press-stud (t2). Loosen the press-stud. Push the seat down completely.
- The backrest can be set to any desirable position. See 'Adjusting the backrest'.
- The padded crotch strap of the safety belt must be mounted in the foremost opening of the seat. See 'The 5-point safety belt'.
- The shoulder straps must be mounted in one of the top three pairs of openings of the backrest. See 'The 5-point safety belt'.
Adjust the back support (m)
- The button for adjusting the back support is located at the rear of the back support.
- Pinch the button and continue pressing it while moving the back support backwards to lower the back support. Release the button when the back support has reached the desired position.
- Pinch the button and continue pressing it while moving the back support forwards to bring the back support in an upright position. Release the button when the back support has reached the desired position.
Adjust the leg support (n)
- Lift the leg support to place it upwards.
- Pull the tube (n1) at the bottom of the leg rest to lower it again.
Attach and remove bumper bar (o)
- To secure the front bumper, press the ends of the bumper into the recesses (o1) intended for this purpose on the frame until you hear a click.
- Press the unlock buttons (o2) on the inside of the bumper bar to remove the bumper bar from the frame.
Place the hood (p)
- Press the clips of the hood on the correct location on the frame. The hood is fixed on the tubes of the frame. (p1)
- Subsequently, attach the fabric of the hood to the top of the back support using the studs. (p2)
Adjust the hood (q)
- Hold the front hood bar in the centre and move it forwards or rearwards to adjust the hood (q1)
-
Open the zipper in the centre of the opened hood in order to enlarge it. (q2)
-
Close the zipper to again reduce the hood.
- Pull the flap on the front side of the hood outwards to additionally enlarge the hood. Push the flap inwards to again reduce the hood.
Remove the hood (r)
- Release the studs at the top of the seat (r1). Then press the lip (r2) at the bottom of the clips of the hood inwards and remove the hood.
Assemble the rain cover on the pushchair (s)
- Make sure that the hood of the pushchair is in the upright position.
- Possibly open the zipper in the rain cover to adapt it to the enlarged hood of the pushchair.
- Place the rain cover from top to bottom over the pushchair and make sure that the rain cover is attached well behind the back support and over the footrest.
The 5-point safety harness (u)
- Place your child in the pushchair and make sure that the legs of your child are placed on each side of the leg piece.
- Make sure that the hip and shoulder belt is positioned correctly over your child and place both plastic clamps in the central part of the harness attached to the leg piece.
- In order to adapt the length of the shoulder belts, you release the shoulder protection from the belt by pulling the Velcro loose. The straps of the belt are now free in order to adapt the length. You adapt the
length by sliding the straps over the shoulder belts until both shoulder belts properly harness your child. Slide the strap down to make the belt longer. Move the strap upwards to make the belt shorter. This will create a loop in the belt. Hold on to the strap and pull the clamps to take the loop out of the belt again. Attach the shoulder protection to the belt again on both sides after adjustment by pressing the velcro together again.
- The back support contains three positions for the shoulder belts. Release both shoulder belts by inserting the fastening rings at the rear of the back support through the openings. Look for the fastening ring through the fabric (v1). Tilt it and push it through the opening. (v2)
- Move the attachment rings through the desired openings so that the shoulder belts are positioned properly.
- In order to adjust the position of the leg piece, open the upholstery under the seat by pulling the velcro loose. The fastening ring of the leg piece is located at the bottom of the seat between the seat and the elastic. You can tilt the fastening ring with your hand and push it through the opening to adjust it.
- Regularly check the length and position of the belts and adjust, where necessary.
Safe2go car seat (up to 13 kg)
- Make sure that the frame has fully been unfolded and the brake blocked during all actions indicated below.
The car seat can be combined with the pushchair seat.
Installing the Safe2go adapters to the frame (w)
- The adapter marked with 'R' is placed on the right side of the frame, the adapter e adapter marked 'L' is placed on the left side.
- Remove the bumper bar and the hood.
- There is an opening at the front of the adapter. Put the opening of the adapter around the cam (w1) on the frame from the outside.
- Turn the top of the adapter inwards (w2) until it clicks. Check that the adapter has been attached properly by trying to lift it from the frame.
Place the Safe2go car seat
- Orientate the Safe2go car seat such that it is directed rearwards on the frame. Hold the Safe2go car seat with the central hinge points of the support bar directly above the adapters.
- Lower the Safe2go car seat and press solidly into the adapters until you hear a click. Check that the Safe2go car seat has been placed horizontally and has been attached properly by trying to lift it from the frame.
Remove the Safe2go car seat
- Press the buttons on both adapters to unlock the Safe2go car seat.
- Lift the Safe2go car seat straight up from the frame.
Remove the Safe2go adapters (x)
- Press the release button (x1) on the adapter. Turn the top of the adapter outwards (x2) and take the adapter out of the cam from the top. (x3)
Maxi-Cosi car seat
- The Maxi-Cosi car seat adapters are suitable for use with the following Maxi-Cosi group 0+ car seats: Maxi-Cosi Pebble, Maxi-Cosi Pebble Plus, Maxi-Cosi Cabriofix, Maxi-Cosi Citi.
- Always observe the instructions in the manual of your Maxi-Cosi car seat before you start using the car seat.
- Make sure that the frame has fully been unfolded and the brake blocked during all actions indicated below.
The car seat can be combined with the pushchair seat.
Place the Maxi-Cosi adapters on the frame (y)
- The adapter marked with 'R' is placed on the right side of the frame, the adapter e adapter marked 'L' is placed on the left side.
- Remove the bumper bar and the hood.
- There is an opening at the front of the adapter. Put the opening of the adapter around the cam (y1) on the frame from the outside.
- Turn the top of the adapter inwards (y2) until it clicks. Check that the adapter has been attached properly by trying to lift it from the frame.
Place the Maxi-Cosi car seat on the adapters
- Orientate the Maxi-Cosi car seat such that it is directed rearwards on the frame.
- Hold the Maxi-Cosi car seat with the central hinge points of the support bar directly above the adapters.
- Lower the Maxi-Cosi car seat and press solidly into the adapters until you hear a click. Check that the Maxi-Cosi car seat has been placed horizontally and has been attached properly by trying to lift it from the frame.
Remove the Maxi-Cosi car seat from the adapters
- Operate the unlocking system of the Maxi-Cosi car seat.
- Lift the Maxi-Cosi car seat straight up from the frame.
Remove the Maxi-Cosi adapters from the frame (z)
- Press the release button (z1) on the adapter. Turn the top of the adapter

outwards (z2) and take the adapter out of the cam from the top. (z3)
Kiddy / Cybex car seats
Maxi-Cosi car seat adapters are suitable for use with the following car seats:
Kiddy: Evolution Pro, Evolution Pro 2, Evo-luna i-size
-Cybex: Aton, Aton 4, Aton Q
- Always read the instructions for use in your car seat manual carefully before you start using the car seat.
- Ensure that the frame is fully unfolded and the brake applied during all of the actions indicated below.
- For fitting and removing adapters: please refer to Maxi-Cosi adapters
- For fitting and removing car seats to or from adapters, please refer to the instructions in your car seat manual.
BeSafe car seats:
- The car seat must be combined with the pushchair seat. The Maxi-Cosi car seat adapters are suitable for use with the BeSafe: iZi Go and iZi Go Modular.
- Always observe the instructions in the manual of your car seat before you start using the car seat.
-
Make sure that the chassis has fully been unfolded and the brake blocked during all actions indicated below.
-
For placing and removing the adapters: see Maxi-Cosi adapters
-
For placing and removing the car seats on / from the adapters see the instructions in the manual of your car seat.
Inhaltsverzeichnis
Einleitung 25
Warning 25
Garantie 27
www.mutsy.com/iten/service/warranty
www.mutsy.com/gben/contact
Montar as rodas traseiras (e)
Desmontar as rodas traseiras (f)
Montar as rodas dianteiras (g)
Desmontar as rodas dienteiras (g)
www.mutsy.com/gben/service/warranty
JaToro UTo6bl yCTaHOBnTB 6amnp, BCTaBbTe Kpa8 6ampeBa Cneun
aIbHbIe BbIeMKn (o1) B Kapkace -Bbl yCnblIuNTe XapakTePbI IeNtok.
HaXMMTe C DByx CTOPOH KHOKN pa36JOKNPOBKN (o2), pacNoJoxKeHNbIe BO BHyTpeHHNe Yactn 6amnpa, YTO6bl ChrTB 6amnpc c Kapkaca.
Azmokpecno Safe2go (dЯ demeu becom He 60nee 13 Kz)
www.mutsy.com/gben/service/warranty
Elulso' keret (c, d)
Avtosedz Safe2go 139
Avtosedez Maxi-Cosi 140
Avtosedeza Kiddy/Cybex 140
Avtosedzi BeSafe 141
Uvod
www.mutsy.com/gben/service/warranty