Evo2 - Stroller Mutsy - Free user manual and instructions
Find the device manual for free Evo2 Mutsy in PDF.

| Product Type | Modular stroller |
| Brand | Mutsy |
| Model | Evo2 |
| Use | From birth to 15 kg (carrycot up to 9 kg, seat from 6 months) |
| Safety standard | EN 1888:2012 |
| Maximum child weight (seat) | 15 kg |
| Maximum child weight (carrycot) | 9 kg |
| Maximum basket weight | 5 kg |
| Maximum carrycot cover weight | 1 kg |
| Brake | Brake pedal on rear axle |
| Harness | Adjustable 5-point harness |
| Front wheels | Swivelling with lock |
| Rear wheels | Fixed (air tyre option) |
| Handlebar adjustment | 4 height positions |
| Backrest adjustment | 4 positions |
| Leg rest adjustment | Yes |
| Canopy | Extendable with zipper and flap |
| Fabric washing | 30°C, gentle, no bleach, no tumble drying |
| Car seat adapters | Maxi-Cosi, Kiddy, Cybex, Safe2Go Mutsy |
| Warranty | 2 years |
Frequently Asked Questions - Evo2 Mutsy
User questions about Evo2 Mutsy
0 question about this device. Answer the ones you know or ask your own.
Ask a new question about this device
Download the instructions for your Stroller in PDF format for free! Find your manual Evo2 - Mutsy and take your electronic device back in hand. On this page are published all the documents necessary for the use of your device. Evo2 by Mutsy.
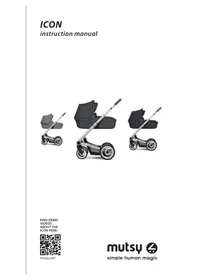
USER MANUAL Evo2 Mutsy
Introduction 15
Warnings. 15
Warranty 17
Maintenance and points for attention. 18
Content of the boxes 19
Enumeration pertaining to the drawing. 19
Assembly 19
Orientation 19
The frame 20
The wheels 20
Steering 20
The brake 21
The push bar 21
The carry cot 21
The seat. 22
The Safe2go car seat 24
The Maxi-Cosi car seat. 25
Kiddy/Cybex car seats 26
Introduction
- In order to make optimal use of this product we recommend you use it properly and maintain it well. Read these instructions for use carefully before you start using the seat and keep the instructions for future reference.
- Should you have any questions, comments or complaints then contact your retailer.
- If you want to know what accessories are available for this product or if you want to stay informed of new Mutsy products then go to www.mutsy.com.
WARNING
- IMPORTANT: Keep these instructions for future reference.
- WARNING: Failure to observe the instructions for use may put your child's safety at serious risk.
WARNING: You are responsible for your own child's safety.
WARNING: The seat unit is not suitable for children under 6 months. - WARNING: The seat is suitable for children from 6 months and up to 15kg
- WARNING: The carry cot is not suitable for children who can sit or turn independently or who can raise themselves on their hands and knees. The maximum weight of the child is 9kg .
WARNING: The pushchair is suitable for children up to 15kg
EN
- WARNING: The maximum permissible weight as indicated on the relevant product applies when using a car seat.
- WARNING: For car seats used in conjunction with the chassis, this vehicle does not replace a cot or a bed. Should your child need to sleep, then it should be placed in a suitable carry cot, cot or bed.
- WARNING: A shopping basket is located between the wheels underneath the chassis. The maximum permissible weight for this basket is 5kg .
- WARNING: The carry cot has a number of bags. The maximum permissible weight in each bag is 1kg .
WARNING: Overloading can result in a dangerous, instable situation.
- WARNING: Bags, accessories or both, other than recommended by the manufacturer, can, when placed on the product, result in an unstable pram. Exclusively use original Mutsy accessories.
-
WARNING: Shopping bags or other heavy objects must not be hung on the push bar due to the risk of toppling.
-
WARNING: Do not let your child play with this product.
WARNING: Never leave your child unattended, this can be dangerous. -
WARNING: To avoid pinching of fingers, keep children away from the chassis when folding and unfolding the product.
- WARNING: Ensure that the chassis and handlebar are completely unfolded and that all locking devices are engaged before use.
- WARNING: Check that the carry cot or seat unit or car seat attachment devices are correctly engaged before use.
- WARNING: Before use, check that the attachment points of the carry cot, the pushchair or the adapters have been secured correctly.
- WARNING: Always check that the accessories have been secured properly before you start using the pram.
- WARNING: Do not use the carry cot with a mattress thicker than 25mm / 0,984 inch. Do not add an additional mattress.
- WARNING: Always ensure that the carry straps have been removed if a child is placed in the carry cot.
WARNING: Only use the pram for one child at a time.
- WARNING: Make sure that the brakes are applied when placing or removing your child.
WARNING: Always use the restraint system.
- WARNING: Always secure your child with the 5-point safety harness combined with the strap running between the legs.
- WARNING: You must take your child from the pram before lifting the pram or using stairs, escalators or lifts.
- WARNING: You need to tilt the pram on its rear wheels if you want to get on or get off the kerb.
WARNING: Always apply the brakes when parking the pram. -
WARNING: This product is not suitable for running or skating.
-
WARNING: Use only replacement parts supplied or recommended by Mutsy.
- The Mutsy EVO has been approved according to EN 1888 norm of 2012.
Warranty
There's a warranty term of 2 years for all Mutsy products, starting the day of purchase. When a production error is found, Mutsy will provide a solution in cooperation with the retailer. Reparation of such faults are covered by the warranty. The warranty is not valid on exchanging or returning of Mutsy products.
EN
The warranty is only given if you provide the retailer you purchased the product from, with the following:
- a filled in warranty card
- a copy of your proof of purchase
- a clear description of the defect
- the product itself
The warranty card can be found at:
www.mutsy.com/gben/service/warranty
Please complete this card in full and correctly and return by e-mail. You are also asked to enter the serial number on the card. You will find this number on a white sticker on the product, usually underneath.
The warranty does not cover:
- fading or changing of colors
water damage to the lining
defects as a result of using Mutsy counterfeited products - a claim without the proof of purchase
- unjust or improper use
- wear from normal daily use of the product
damage from bad maintenance, neglect or an accident
damage after alteration by the customer, unauthorized by Mutsy
damage reported after more than 2 months after occurrence
The guarantee provided by Mutsy does not cover any shrinkage or defects of the fabric parts that may develop as a result of cleaning the fabric parts. Safety is extremely important to Mutsy. That is why we also meet the very highest safety standards:
- Europe: EN 1888
UK: BS EN 1888
Canada:SOR/85-379
US: ASTM F833
Should you have any questions or comments, please contact us at:
www.mutsy.com/gben/contact
Maintenance and points for attention
The frame
- Regularly check the locking mechanism of the frame. After cleaning, you can spray some Teflon spray on it and rub it with a soft cloth. This also applies to other moving parts.
The wheels
- To let the wheels run more smoothly the wheel axles must regularly be cleaned and lubricated with acid-free vaseline. The wheels can never be lubricated with oil.
Pumping up the air tyres (EVO accessory: rear wheels air tyre set)
- The air pressure in the air tyres may decrease after a while. Check the pressure regularly and is necessary pump up the tyres.
- Press the pump firmly onto the valve. Pump up the tyres until the required air pressure has been reached. The air pressure in the tyres may never exceed 16 PSI / 1.1 bars.
Air tyres may leave traces on some surfaces.
The fabrics
- Removable fabric parts (only consisting of fabric) can be washed in the washing machine on a wool cycle at 30^ . Wash without bleaching agent and do not put in the tumble dryer. Do not iron or dry clean. Before washing fasten all zips, velcro and poppers. This includes: Travel cot lining, seat covers, mattress cover, the fabric parts of the 5-point belt, foot muff, safe2go seat cover.
- You can treat stains on the outer fabric or lining of non-removable parts (or fabric parts that are combined with other materials) using a liquid, bleach-free soap. Always treat the whole area. This includes: the seat cover, the canopy, the travel cot cover itself, the storage compartment, the cover and the safe2go inlay, the pram boot cover, nursery bag and parasol.
- The mattress can be carefully hand washed with lukewarm water. Do not use soap. Do not machine wash, do not tumble dry, do not iron and do not dry clean.
- To find out how to take the seat covers on and off the pushchair, please go the FAQs in the 'Service' section of our website.
- All Mutsy fabrics have been tested for water resistance but if the pram gets really wet, water can penetrate the inner and outer fabrics and
leave marks. To prevent this we recommend that you always use the rain covers in case of wet weather.
Always let a wet pram dry with the hood fully unfolded.
- Even though Mutsy fabrics are selected with the utmost care and tested for colour fastness, fabrics can discolour. Mutsy cannot be held liable for any discolouration.
Content of the boxes
1 frame with basket
2 front wheels
2 rear wheels
- 1 seat (optional)
- 1 carry cot (optional)
Overview: Enumeration pertaining to the drawing
- push bar
- unlock buttons
- push bar adjustment
- frame attachment point
- brake pedal
- rear wheel
- front wheel
- swivel-lock
- foot rest
- back support
- leg support
- leg support adjustment
- seat unlocking
- bumper bar
- 5-point safety harness
- hood
- unfold lock
Assembly
Assembly sequence
- Unlock and unfold the frame
- Assemble the rear wheels
- Assemble the front wheels
- Place the carry cot or seat
Orientation
- References in the text to the front, rear, left or right side of the stroller
are described from the perspective of a user walking behind the stroller.
The frame
Unfold the frame (a,b)
- Press the folding safeguard inwards (a1) and tilt the upper chassis until the lower support clicks into place (a2) and move the pushbar backwards until you hear a second click (b).
- Before use always check that the pram has been unfolded and secured correctly.
Fold the frame (c,d)
- Stand behind the frame and put the brakes on. Press the height adjustment buttons (c) on the push-bar and set it to the lowest setting.
- Pull the folding buttons (d1) towards you, on both sides, and turn the push bar downwards until it has reached the lowest position (d2).
- The folding safeguard locks automatically when the product is folded up.
The wheels
Assemble the rear wheels (e)
- Push the button and slide the axle of the rear wheel in the rear wheel housing until you hear a click. Pull the wheel to check that it has been attached firmly.
Disassemble the rear wheels (f)
- Press the button at the back of the rear wheel casing and remove the wheel from the frame.
Assemble the front wheels (g)
- Slide the axle of the front wheel upwards in the front wheel housing until you hear a click. Pull the wheel to check that it has been attached firmly.
Disassemble the front wheels (g)
- Push the button on the front side of the front wheel and pull the wheel from the front wheel casing.
Steering
The swivelling wheels (h)
- Turn the ring above the front wheel on both sides inwards to lock the swivelling wheels. The swivelling wheels will automatically be locked
when the wheels are placed in the driving direction.
- Turn the ring above the front wheel on both sides outwards to unlock the swivelling wheels.
The brake (i)
- A brake pedal is available in the centre of the rear axle. Push the pedal downwards with your foot to block the brake. Push the pedal upwards with your foot to unblock the brake.
The push bar (c)
- The push-bar is fitted with four height positions. Push the push-bar adjustment buttons in and move the push-bar upwards or downwards while keeping the button depressed.
- Let go of the buttons once you have adjusted the push-bar to the appropriate setting.
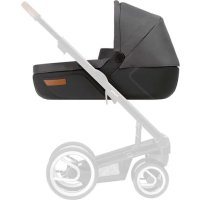
The carry cot (up to 9kg )
- The carry cot is suitable for transporting children from birth up to 9kg in a lying position. The carry cot is not suitable for children who can sit or roll independently or who can raise themselves on their hands and knees.
- You can also use the carry cot separately from the frame.
- Regularly check the bottom, the edges and the carry straps on the carry cot for signs of wear and tear.
- Make sure that the frame has fully been unfolded and the brake blocked during all actions indicated below.
Place the carry cot adapters (j)
- There are two foldable attachment points on both sides of the frame. Make sure that the attachment points are in a vertical position.
- The adapter marked with 'R' is placed on the right side of the frame, the adapter marked 'L' is placed on the left side.
- Slide the adapters in the attachment parts and press solidly until you hear a click.
Place the carry cot (k)
- Orientate the carry cot such that it is directed rearwards on the frame.
- Hold the carry cot by the handles on both sides of the cot and placed directly above the adapters.
- Slide the carry cot over the adapters and press solidly until you hear a click on both sides.
- Check that the carry cot has been placed horizontally and has been attached properly by trying to lift it from the frame.
Remove the carry cot (I)
- Hold the carry cot by the handles on both sides of the cot. Press and hold the unlock buttons.
- Lift the carry cot in vertical direction of the adapters.
Remove the carry cot adapters (m)
- Pull the unlock buttons on the inside of the adapters upwards and vertically remove the adapters from the attachment points.
The hood (n)
The hood can be unfolded by moving it upwards.
- Push and hold the buttons on both sides of the hood. The hood can now be folded downwards.
The carry straps
- The carry straps must be clicked into the plastic components in order to carry the carry cot.
- Always ensure that the carry straps have been removed if a child is placed in the carry cot.
Assemble the rain cover on the carry cot (o)
- Make sure that the hood of the carry cot has been unfolded.
- Place the rain cover from top to bottom over the carry cot and make sure that the rain cover attaches well all around the bottom of the carry cot.
The seat (6 months - 15 kg)
- The seat is suitable for children from 6 months up to 15kg who can sit independently.
- The seat can be folded and unfolded with the frame and does therefore not need to be removed from the frame.
- The back support and leg support are adjustable.
- Make sure that the frame has fully been unfolded and the brake blocked during all actions indicated below.
Place the seat (p,q)
- The seat can be placed on the frame in both directions.
-
There are two foldable attachment points on both sides of the frame. Make sure that the attachment points are in a vertical position.
-
Stand at the front side of the frame.
-
Hold the seat on both sides at the unlock buttons above the attachment points and push the seat downwards until you hear a click.
-
Check that the seat has been attached solidly by trying to lift it from the frame.
Remove the seat (r)
- Stand at the front side of the frame. Hold the seat on both sides at the unlock buttons and pull the buttons upwards with your fingers. The seat can vertically be removed from the attachment points.
Fold the frame with the seat directed forwards
- Stand behind the frame and make sure that the back of the seat is in the upright position.
- Place the push bar in the lowest position (c).
- Pull the folding buttons (d1) towards you on both sides and push the push bar downwards until the push bar is placed on the frame (d2).
- Pull the button at the back of the seat upwards, keep it pulled upwards and turn the back of the seat backwards until it is entirely flat.
- The unfolding security locks automatically when folding.
Adjust the back support (s)
- Pull the button at the back of the seat upwards and hold it upwards.
- The back support has 4 positions. Place the back support in the desired position and release the button to lock the position.
Adjust the leg support (t)
- Lift the leg support to place it upwards.
- Push the buttons on both sides of the leg support and push the leg support downwards to lower it.
Attach and remove bumper bar (t)
- Push the ends of the bumper bar in the thereto designated notches in the seat until you hear a click.
- Press the unlock buttons on both sides of the bumper bar and remove the bumper bar from the seat.
The integrated foot step ()
- There is a zipper around the leg support of the seat. If so desired you can open this zipper to thus create a higher foot rest for your child. The child can then place the feet on the aluminium bar of the leg support. When your child gets bigger you can again close the zipper and your child can place the feet on the plastic foot rest of the frame.
The hood (u1, u2)
- Hold the front hood bar in the centre and move it forwards or rearwards to adjust the hood. (u1)
- Open the zipper in the centre to further enlarge the hood. Close the zipper to again reduce the hood. (u2)
- Pull the flap on the front side of the hood outwards to additionally enlarge the hood. Push the flap inwards to again reduce the hood.
Assemble the rain cover on the seat (w)
- Make sure that the hood of the seat is in the upright position.
- Possibly open the zipper in the rain cover to adapt it to the enlarged hood of the seat.
- Place the rain cover from top to bottom over the seat and make sure that the rain cover is attached well behind the back support and over the leg support.
The 5-point safety harness (x,y)
- Place your child in the seat and make sure that the legs of your child are placed on each side of the leg piece.
- Make sure that the hip and shoulder belt is positioned correctly over your child and place both plastic clamps in the central part of the harness attached to the leg piece.
- To adjust the length of the shoulder straps, loosen the shoulder protectors from the belt by undoing the snap buttons. This will reveal the belt buckles. Adjust the length by sliding the buckles along both shoulder straps until your child is comfortably secure. After adjusting, press down both snap buttons to relock the shoulder protectors in place.
- The back support contains three positions for the shoulder belts. To adjust the position you remove both shoulder belts by moving the attachment rings through the openings in the back of the seat. Move the attachment rings through the desired openings so that the shoulder belts are positioned properly.
- Regularly check the length and position of the belts and adjust, where necessary.
- If the waist or crotch strap needs to be reassembled move the attachment ring through the corresponding opening.
Safe2go car seat (up to 13kg )
- Make sure that the frame has fully been unfolded and the brake blocked during all actions indicated below.
Place the Safe2go adapters on the frame
- There are two foldable attachment points on both sides of the frame. Make sure that the attachment points are in a vertical position.
- The adapter marked with 'R' is placed on the right side of the frame, the adapter marked 'L' is placed on the left side.
- Slide the adapters in the attachment parts and press solidly until you hear a click.
Place the Safe2go car seat
- Orientate the Safe2go car seat such that it is directed rearwards on the frame.
- Hold the Safe2go car seat with the central hinge points of the support bar directly above the adapters.
- Lower the Safe2go car seat and press solidly into the adapters until you hear a click.
- Check that the Safe2go car seat has been placed horizontally and has been attached properly by trying to lift it from the frame.
Remove the Safe2go car seat
- Press the buttons on both adapters to unlock the Safe2go car seat.
- Lift the Safe2go car seat straight up from the frame.
Remove the Safe2go adapters (z1)
- Pull the unlock buttons on the inside of the adapters upwards and vertically remove the adapters from the attachment points.
Maxi-Cosi car seat
- The Maxi-Cosi car seat adapters are suitable for use with the following Maxi-Cosi group 0+ car seats: Maxi-Cosi Pebbles, Maxi-Cosi Cabriofix, Maxi-Cosi Citi.
- Always observe the instructions in the manual of your Maxi-Cosi car seat before you start using the car seat.
- Make sure that the frame has fully been unfolded and the brake blocked during all actions indicated below.
Place the Maxi-Cosi adapters on the frame
- There are two foldable attachment points on both sides of the frame. Make sure that the attachment points are in a vertical position.
- The adapter marked with 'R' is placed on the right side of the frame, the adapter marked 'L' is placed on the left side.
- Slide the adapters in the attachment parts and press solidly until you hear a click.
Place the Maxi-Cosi car seat on the adapters
- Orientate the Maxi-Cosi car seat such that it is directed rearwards on the frame.
- Hold the Maxi-Cosi car seat with the central hinge points of the support bar directly above the adapters.
- Lower the Maxi-Cosi car seat and press solidly into the adapters until you hear a click.
- Check that the Maxi-Cosi car seat has been placed horizontally and has been attached properly by trying to lift it from the frame.
Remove the Maxi-Cosi car seat from the adapters
- Operate the unlocking system of the Maxi-Cosi car seat.
- Lift the Maxi-Cosi car seat straight up from the frame.
- Remove the Maxi-Cosi adapters from the frame (z2)
- Pull the unlock buttons on the inside of the adapters upwards and vertically remove the adapters from the attachment points.
Kiddy / Cybex car seats
- Maxi-Cosi car seat adapters are suitable for use with the following car seats:
Kiddy: Evolution Pro, Evolution Pro 2, Evo-luna i-size
Cybex: Aton, Aton 4, Aton Q
- Always read the instructions for use in your car seat manual carefully before you start using the car seat.
- Ensure that the frame is fully unfolded and the brake applied during all of the actions indicated below.
- For fitting and removing adapters: please refer to Maxi-Cosi adapters
- For fitting and removing car seats to / from adapters, please refer to the instructions in your car seat manual.
Inhaltsverzeichnis
Einleitung 27
Warnungen 27
Garantie 29
www.mutsy.com/iten/contact
Dobrar o chassis (c, d)
Montar as rodas traseiras (e)
Desmontar as rodas traseiras (f)
Montar as rodas dienteiras (g)
Desmontar as rodas dianteiras (g)
Colocar a alcofa (k)
www.mutsy.com/service/warranty
Be3onacnoctb ouehb BaXHa dIa Mutsy. CoOTBETCTByeT Heo6xOIMbIM CTaHdapTaM:
Europe: EN 1888
UK: BS EN 1888
Canada:SOR/85-379
US: ASTM F833
ПО BCEM BONpocam Bbl moKeTe CB8aTbCЯ C npOu3BODHTeJIem: www.mutsy.com/ruen/contact
Mepbl npedocmopoxhocmu:
Pama
- Perylarpno npOBepa pepaOtococ6Hocb cctaBOB cLOxehn paMbI. Nocne nporykn n uNCTKN KOJACKCycTABbl cLOxehn
pekomeHdyetc o6pa6oTaTb TefoHOBBIM cnpem. TaKa O6pa6oTKa TaKke peKomeHdyetc InI dpyrNx CyCTaBOB INIOdBHXHbIX aCtei paMbl.
Koneca
KoIeCa Heo6xOJMo peryIaRHO uNCTnTb N OCN Cma3bIbTaB 6eCKNCOTHbIM Ba3eJIINHom.
- Hɪkɔrɪda He cMa3bɪBaɪTe Kɒleca Maʊnəm.
Hakayueahuu uuh
(Evo Akceccyap uunbI ycmahOBnHeB3aHue Koneca)
- Haxmnte Haococom TBepdo Ha Knaapani 3aKpePiTe 3TO c NOMOu bIO 3a-
JIMa Ha Hacoce. HakaunBaIte uINbI c NOMOu bIO pyHoro Hacoca Ioka HyKHOe daBleHne 6yJeT IOCTnHyTo. DaBLeHne BO3dUxa B KaMepe He doJxHo npBeBbIaTb 16 PSI / 1.1 Bar.
Tkaheba o6uubka
- CHINMAEMBIE TKAHeBbIe qACTn (cdeHaHbIe TOlbKO n3 TeKCTNbHbIX MaTePnaIOB) MoJHO CTnpaTb B CTnpaIbHOm MaUInHe, NcNoJIb3yrapeXIMCTnPKI dIgepTn npi TemnepaType 30^ . He nCnoJIb3ObaTb OTBeJIIBaTeJIb I He cyuHTb B 6apabAHHOu cyuInke. He rJaINTb I He noDBepratb XIMnuecko uNCTKe. Ipeed CTnpKoJ 3acteHyTB BCE 3acteKNI-MOJIHN, IInpUckn IN KHOJKN. 3TO OTHOCITcR K CJeDyIOUIm qACTAM: YexOJ DOpOxHOb KPOBaTKn, YexIbIKpeCeI, YexOJ MaTpaca, TeKCTNbHbIe qACTn peMHei, HOxHNaMyΦTa, YexOJ cUdEnbya safe2go.
- Пята на На Наружны IX NOBEPXHOCTЯ X O6NBKe Ha HeCbeMHbIX TeKCTNJIbHbIX YACTAX (ЛИбОЧТЯ, ИЗТOTOBLEHbIX ИЗ TEKCTNДВ COUeTAHIN CДPyгIMMaTePnIaIaMn) ydaIaTb C NOMOUIJxIDKOROMbIa, He coIePkaIero OT6eJIbBaTeIb. 6Obpa6aTbIbA Tb BeCb yuaCTOK. 3To OTHocNTcK CNeDyUoiM YAcTAM:ЧexoI CnIeHbI, TeHT, NOKpbIbAlO DopoXHOJ KPoBaTn, OTCEK ДЯХЕнЯ, NOKpbIbAlO I npocTUNKa safe2go, noKpbIbAlO IIOLbK, DeTcKaY CymKa I CONHcE3aUnTHbI KO3blpeK.
MaTpac octopoxho CTnpaTB BpyHyIO B TeIIOB OJe. He nCnoJb3oBaTbMbIIO.He CTnpaTB B CTnpaJIbHO MaIINHe,He cyuHTb B 6apabAHHOc yuINKe,He rnaNTb,He noDBepratb XIMnueckO uNCTke. - INHΦopMaζIIO O TOM, KaK HaIeTb Μ CHaTb 06WuBky CnIeHbY KOJIaCKN, MOxH0 HaIITN Ha HaIeM caITe B py6pIke «UacTo 3aJaBaembIe BOpOcbl» POnD 3aRoiOBKOM «UcIyTu|.
Bce TkaHn Mutsy npoxoJrT uaTeIbHbI KOHTpOJIb, HO ecNI O6uINbKa KOLRcN CInbHO HAMOKHeT, Bnara MOKeT DOJRO HaxoINtbcra BHyTPN 06uINbKn. PeKOMeHdyem IcNoJIb3OBaTb DoXDeBVK.
Bcerda npocuunBaute KOncKy nonHocTbO c pa3BepHyTbIM KaIO- IOHOOM. - HecmOTpHaTo, YTO BcTeTkAHu Mutsy OTo6paHbI C OcO6oTtuaTeJIbHOCTbIO, BO3MOxKHO eCTeCTBeHHOE BblCBeTaHne TkaHeN IOD BO3DeICTBnEM CONHeuHbIX Lyue. Ha BblCBeTaHne TkaHeN He paCnpocTpahrJOTCraPaHTnHbIe 06a3aTeJIbCTBa.
CodepKumoe Kopo6ku:
- 1 pama c xO3ЯntBeHHoN ceTKoN
2 nepedHne koneca
23aHneKoJeca - 1 cndeHne (DOnOpHnHTeJbHaHa onZn)
- 1 cπaŋbHaŋ JIoMbKa (dɒnɒHnteJIbHaŋ Oπζη)
Kpamkuu o63op (co2nacHo pucyHky)
- Pучka Коляcke
02.ФИКcaTopbI cNoXeHnKOLaCKn - CytabblnyperynpoBKn pykn
- Kpenenien nporylouhoro cnndhen
- Педалов Тормоза
06.3aJHeeKoJIecO - Perednee koneco
08.ФИКСТОРБI KONECA
09.ПонхьдяНог - CnHka
- Perynnpyemna noHoxka nHa Hor
- CytabblnyperynipOBKn noHOxKn
13.ФИКСТОПБInpORYLOHOROcIDENH - Bamnep
- Pemn 6e30nacHOCTN
- KanioohOH
17.ФИКСАТОРКOLЯСКВСLOЖЕНHOMBIDe
6opka
IocneobamelbHocmbcbopkuKoJcKu:
Pa3nojTe paMy, yCTaHOBITE 3aHne KOJeca, yCTaHOBITE nepeHnE KOJeca u yCTaHOBITE cPaNbHyIOJIbky IINI npOryNoUHoe CInDeHne.
BhumaHue!
B TeKCTe BCE onncaHnI npaBO/JeBO noDpa3yMeBaIoT, UTo Bbl DePKeTe KOnrcky neped co6oB 3a pyuKy IIO xOdy DnUkeHnI.
Pama
PacknaadbibaHue pambi (a,b)
www.mutsy.com/gben/service/warranty
www.mutsy.com/gben/service/warranty