Spider - Stroller Mutsy - Free user manual and instructions
Find the device manual for free Spider Mutsy in PDF.
| Product Type | Stroller |
| Brand | Mutsy |
| Model | Spider |
| Recommended Age | From 3 months to 4 years |
| Maximum Child Weight | 55 lb (approx. 25 kg) |
| Maximum Child Height | 42.7 inches (approx. 108 cm) |
| Stroller Weight | Approx. 10 kg (estimate) |
| Maximum Basket Weight | 7 lb (approx. 3.2 kg) |
| Safety Harness | 5-point with crotch strap |
| Backrest Adjustment | Multiple positions (side buttons) |
| Adjustable Footrest | Yes, by pull tabs under the footrest |
| Adjustable Bumper Bar | Yes, by clips at the rear |
| Brake | Pedal on rear frame (lock/unlock) |
| Swivel Steering | Swivel front wheels with lock |
| Canopy | With sun visor, snap-on attachment |
| Recline | Restaurant position (bumper bar in low position) |
| Car Seat Adapter | Compatible with Graco Snugride (with frame adapter) |
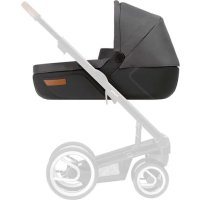
| Included Accessories | Canopy, footmuff, basket |
| Optional Accessories | Travel bag, rain cover |
| Care | Clean with soapy water, do not machine wash |
| Materials | Lacquered steel, removable fabrics |
| Safety Standards | ASTM F833-11, SOR/85-379:2012 |
| Use | Walking only (not for jogging or skateboarding) |
Frequently Asked Questions - Spider Mutsy
User questions about Spider Mutsy
0 question about this device. Answer the ones you know or ask your own.
Ask a new question about this device
Download the instructions for your Stroller in PDF format for free! Find your manual Spider - Mutsy and take your electronic device back in hand. On this page are published all the documents necessary for the use of your device. Spider by Mutsy.
USER MANUAL Spider Mutsy
natural_image
Diagram of a mechanical device with a rotating wheel and blade, showing motion direction (no text or symbols)i
natural_image
Mechanical assembly diagram showing a lever mechanism with a green bracket and orange arrow indicating motion (no text or symbols)j
text_image
I1 I2
text_image
Diagram of a stroller with labeled parts and directional arrows indicating motion or assembly stepsNL I G eb ru ik sa an wi jz in g Mu ts y Sp id er
D I Ge br au ch sa nw ei su ng M ut sy S pi de r
US I In str u ct io n ma nu al M ut sy S pi de r
F I Mo de d `e mp lo i Mu ts y Sp id er
ES I Manu al de in st ru cc io ne s Mu ts y Sp id er
folding out the Spider frame p 15
the wheels p 15
the sun canopy p 16
securing your child p 16
adjusting the back support p 16
adjusting the foot rest p 16
adjusting the push bar p 16
folding the frame p 16
the steering system p 16
the brake p 17
transporting and storing p 17
restaurant setting p 17
the foot muff p 17
the Graco car seat p 17
F
avertissements p 18
position restaurant p 21
la chancelière p 21
- WARNING: Read these instructions carefully and save them as a reference work. Failing to follow these instructions may be extremely detrimental to the safety of your child.
- WARNING: You are responsible for the safety of your child.
- WARNING: The Spider stroller is suitable for children between 3 months and four years of age (maximum 55 lbs. and up to 42.7 in. in height.).
- WARNING: A shopping basket is located at the bottom of the frame, between the wheels. The maximum weight permitted in this basket is 7 lbs.
- WARNING: Exceeding the maximum load will cause a hazardous unstable condition to exist.
- WARNING: Do not hang any heavy objects on the push bar as this may cause the stroller to fall over.
- WARNING: Parcel bags or other accessory items or both, other than recommended or provided by the manufacturer, placed on the product may cause the product to become unstable.
- WARNING: Keep the child out of reach of moving parts when the Spider stroller is being folded in, out or being adjusted.
- WARNING: Never leave your child in or near to the stroller unaccompanied.
- WARNING: Never lift the Spider stroller, use stairs or escalators when a child is in it.
- WARNING: Always check that the accessories are correctly secured before using the Spider.
- WARNING: The Spider stroller is unsuitable for children younger than 3 months old. Only use the Spider stroller when your child can sit up unassisted.
- WARNING: Avoid serious injury from falling or sliding out. Always secure your child with the 5-point safety belt in combination with the leg separator, also when you use the Spider foot muff.
- WARNING: Only use the Spider stroller for one child at a time.
- WARNING: Before using the pushchair, check whether all fastening clips are well secured.
- WARNING: Check that all parts are-
firmly secured before use. Also, always check that the adapters and car seat are correctly secured.
- WARNING: Ensure that the Spider stroller has been folded out completely and locked before placing your child in the stroller.
- WARNING: Always ensure that the brake is applied when you place you child in the stroller.
- WARNING: Care must be taken when folding and unfolding the product to prevent finger entrapment.
- WARNING: This product is not suitable for running or skating.
- WARNING: Keep plastic packaging materials away from you child in order to prevent the risk of suffocation.
- The Mutsy Spider is approved in accordance with the ASTM F833-11 and SOR/85-379:2012 standard.
Tips for use
- Only use original Mutsy accessories.
- Do not modify the product. If you have any complaints or problems, contact your dealer or importer.
- All references to the left/right in the text are written from the perspective of a person standing behind the Spider stroller.
- Always apply the brakes when parking the Spider stroller.
Maintenance
Fabrics
- All Mutsy fabrics are tested, but there is a chance, if the Spider stroller becomes extremely wet, that the moisture may penetrate into the lining through the lower edges and the stitched seams and leave stains on the inner lining. We recommend that your use the rain cover in order to prevent this.
- Clean the Spider stroller regularly. Never use aggressive cleaning agents or lubricants.
! Do not wash in a washing machine or tumble dry. - Treat stains on the interior or exterior lining with diluted liquid soap without bleach. Always treat the entire panel. Always put the Spider stroller away with a stretched cover.
- Although Mutsy fabrics are selected
with the greatest possible care and are tested for colour-fastness, the fabric may fade. Mutsy does not accept any liability for fading.
Stroller
- The coating is maintenance free but is also-easier to damage with bumps and scratches than chrome. Take this into account when - transporting the stroller in cars.
! Tip: We recommend using a transport bag in order to prevent scratches to the coating.
- The wheels may never be lubricated with oil. Cleaning the axels regularly and lubricating them with acid-free vaseline will ensure the smooth operation of the wheels.
- The other moving parts can be sprayed with Teflon spray (dry lubricant) and then rubbed with a soft cloth.
- Ensure that the locking mechanism is sprayed regularly with Teflon spray.
- The tyres may leave black marks on some surfaces (especially smooth floors such as parquet, plastic laminate, linoleum, etc.).
Overview
Summary of the parts in picture a
- Push bar (1)
- headrest (2)
- back rest (3)
- seat (4)
- safety belt (5)
- shoulder protectors (6)
- unlocking clamps (7)
- fastening point on upper frame (for sun canopy) (8)
- upper frame (9)
- central plastic block (10)
- front lower frame (11)
- rear lower frame (12)
- footrest (13)
- front wheel block (14)
- swivel lock (15)
- rear wheel (16)
- brake pedal (c2: 17)
- handle (18)
- handle with unlocking function (b2: 19)
- transport bag
- rain cover
- sun canopy (20)
- canopy fastening device (21)
- canopy stretcher (22)
- frame adaptor (m: 23)
- foot muff
Assembly
Contents of the box
1 Spider frame with seat and basket
1 canopy
1 front wheel block
2 rear wheels
Assembly sequence
- folding out the Spider frame (1)
- fitting the rear wheels (2)
- fitting the front wheel block (3)
- fitting the canopy (4)
Folding out the Spider frame (b)
- Release the frame lock that is attached to the basket.
- Pull the handle of the Spider up and then move the push bar up until you hear a clear click. Check that the plastic handle is in the notch.
- Push the seat down until you hear a click.
- You can adjust the push bar to any desired height by moving the metal clamps on the back of the push bar backwards. Do not forget to close the clamps again in order to lock the push bar.
- Folding the foot rest down.
! Always check that the buggy is correctly folded out and locked before use.
The wheels
Fitting the wheels
- Two rear wheels and 1 frontwheel block must be fitted to the frame. The rear wheels are fitted with brake rings.
Fitting the rear wheels (c1)
- To fit the rear wheels, slide the plastic wheel axle into the plastic tube. The plastic lip at the end of the wheel axle ensures that the rear wheel locks when the wheel axle is completely in the plastic notch.
Fitting the front wheel block (d1)
- To fit the front wheel block, slide the opening of the front wheel block over the vertical end of the tube on the front of the Spider frame in such a way
English
swivel blocking of the front wheel block is facing up. The front wheel block will only click closed automatically when the front wheel block is completely covering the end of the tube.
Removing the rear wheels (c2)
- You can remove the rear wheels by pressing the plastic lip at the end of the wheel axle and then pulling the wheel axle out of the plastic notch.
Removing the front wheel block (d2)
- The front wheel block can be removed by clicking the plastic lip on the underside of the front wheel block out. This then unlocks the front wheel block, allowing it to be removed from the vertical axle.
The sun canopy (e)
- Use the click system to fasten the sun canopy to the Spider frame. Push the 2 plastic components (L+R) on the cap in the appropriate notches (canopy fastening points) until you hear a click.
- Remember to stretch the sun canopy with the aid of the plastic stretchers on both sides of the canopy.
- To remove the canopy, press (L+R) the appropriate pawl and then pull the canopy out of the notches.
Securing your child
! Always use the safety belt when your child can sit independently.
- Place your child in the stroller seat, ensuring that one of your child's legs in on either side of the leg separator
- Ensure that both the seat and foot rest are adjusted correctly for the size of your child.
- The Spider stroller is fitted with a 5-point safety belt. Operate the safety belt by clicking the plastic components of the safety belt together.
- The belt can be adjusted by sliding the adjustment mechanism over the belts to the desired position.
Adjusting the back support (f)
- If you want to move the back rest back wards, press both sides of the adjustment button at the rear of the stroller
seat and simultaneously move the adjustment button backwards until the desired position has been reached.
- If you wish to move the back rest for wards, press both sides of the adjustment button at the rear of the stroller seat and simultaneously move the adjustment button forward until you have reached the desired position.
Adjusting the foot rest (g)
- To adjust the foot rest, move both plastic handles (L+R) under the foot rest towards you while simultaneously moving the foot rest into the desired position.
Adjusting the height of the push bar (h)
- The push bar can be adjusted to any height. Find out what height is comfortable for you.
- Adjust the push bar with the clamps at the rear, as described above in "folding out the Spider frame".
Folding the frame (k)
- Apply the brakes.
- Start by folding the push bar. First, release the clamps at the back of the push bar. You can now push the push bar down until it can move no further. Remember to lock the push bar clamps.
- There is a handle located underneath the seat, on the left. Pull this out when you wish to fold the seat up. A handle with which you can unlock the Spider is located under the seat in the central fastening section. First pull this away from you – this unlocks the upper frame. Now push the handle up, which then folds up the lower frame.
! You do not have to remove the sun canopy, but the product can be folded more compactly if you first remove the sun canopy.
- You can reattach the frame lock to the basket if you wish.
The steering system (Spider)
The swivel setting (i)
- Push the swivel blocking on the front wheel block up. The front wheel block can now swivel.
- Blocking the swivel setting: push the swivel blocking down. The swivel setting locks automatically when the front wheels are moved into their original, straight position.
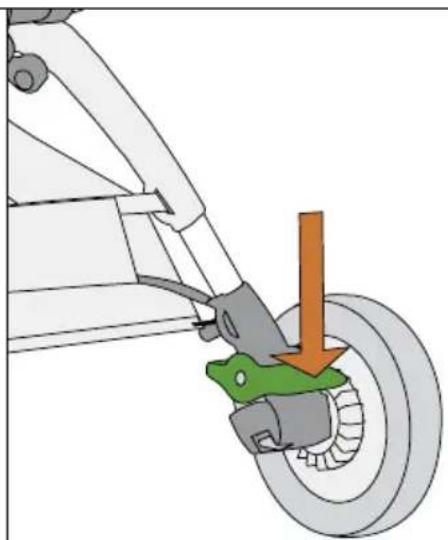
The brake (j)
- Press one of the brake pedals on the rear of the frame gently with your foot until the brake is blocked.
- Push one of the brake pedals gently upwards with your foot to unblock the brake.
Transporting and storing the Spider frame
- It is easy to carry the folded Spider frame with the handle located on the central fastening component. A handy transport bag is also available that can be used to store and transport Spider.
- The top of the transport bag has a slot for the handle. The Spider and transport bag can be carried with the (Spider) handle or with the aid of a woven shoulder strap that is attached to the transport bag.
The restaurant setting
- This is the lowest position in which the pushchair can be set. For example, this setting can be used to promote compactness when the Spider stroller is taken into restaurants.
The Spider foot muff
- To attach the foot muff, first release the safety belt and pull the straps through the gaps in the foot muff.
- You only have to release one zip fastener to remove the top of the foot muff and only use the bottom.
- You can turn the top part of the foomuff over to give your child more comfort.
Graco Snugride (5-22 lbs and < 29 in) Graco Safeseat (5-30 lbs and < 32 in) Fitting the frame adaptor onto the frame (1)
- Fold the sides of the seat backwards (11).
- Set the back in the horizontal position.
- Open the adaptors by means of the appropriate catch and move the adaptors (L+R) around the upper frame in the position and direction indicated (12).
! Place the adaptor marked R on the right-hand side, and place the adaptor marked L on the left-hand side.
Fitting the Graco adaptor onto the frame (m)
- Push the Graco adaptor into the universal connection points of the frame adaptor (m1).
- Place the Graco car seat on the Graco adaptors facing backwards, until you hear a click (m2).
- Make sure that the Graco car seat is secured by testing whether you can lift it off the frame.
- Secure the sides underneath the seat by means of the Velcro straps.
Taking the Graco off the Spider buggy
- Press the lock at the back of the Graco and lift the car seat off the adaptor.
- Push the locks of the universal connection points backwards until the Graco adaptor is released from its lock. You can now remove the Graco adaptor from the frame adaptor.
- Now remove the frame adaptor.
⚠ AVERTISSEMENTS
Graco Safeseat (5 - 30 lbs. et < 32 in.)
Graco Safeseat (5 - 30 lbs. y < 32 in.)