Nio - Stroller Mutsy - Free user manual and instructions
Find the device manual for free Nio Mutsy in PDF.
| Product type | Stroller |
| Brand | Mutsy |
| Model | Nio |
| Category | Stroller |
| Maximum child weight (carrycot) | 9 kg |
| Maximum child weight (seat) | 15 kg (from 6 months) |
| Maximum shopping basket weight | 5 kg |
| Maximum weight per carrycot pocket | 1 kg |
| Safety standard | EN 1888:2012 |
| Warranty | 2 years |
| Chassis material | Metal (not specified) |
| Covering | Waterproof fabric |
| Cleaning of removable fabric parts | Machine wash at 30°C, delicate detergent, do not bleach or tumble dry |
| Stain cleaning on non-removable fabric | Soapy water without bleach, treat entire surface |
| Chassis maintenance | Clean locking mechanism with Teflon spray and soft cloth |
| Wheel maintenance | Clean axles and grease with non-acidic petroleum jelly |
| Brake | Brake pedal |
| Safety harness | 5-point height-adjustable harness |
| Handlebar positions | 4 height positions |
| Chassis folding | Possible with seat facing forward, not backward |
| Car seat adapters | Safe2go, Maxi-Cosi, BeSafe, Kiddy, Cybex |
| Cart function | Folded chassis can be towed like a cart |
| Available accessories | Waterproof cover, hood, basket, etc. |
Frequently Asked Questions - Nio Mutsy
User questions about Nio Mutsy
0 question about this device. Answer the ones you know or ask your own.
Ask a new question about this device
Download the instructions for your Stroller in PDF format for free! Find your manual Nio - Mutsy and take your electronic device back in hand. On this page are published all the documents necessary for the use of your device. Nio by Mutsy.
USER MANUAL Nio Mutsy
www.mutsy.com/nlnl/service/garantee
-IMPORTANT: Keep these instructions for future reference.
Content
Introduction 14
Warnings. 14
Guarantee 16
Maintenance and points for attention 17
Content of the box. 18
Summery of parts: corresponding to the summery diagram 18
Orientation 18
The chassis 18
The wheels. 19
The brake 19
The push bar 20
The carry cot 20
The seat 21
The Safe2go car seat 24
The Maxi-Cosi car seat 24
BeSafe / Kiddy / Cybex car seats 25
Introduction
- In order to make optimal use of this product we recommend you use it properly and maintain it well. Read these instructions for use carefully before you start using the pushchair and keep the instructions for future reference.
-Should you have any questions, comments or complaints please contact your retailer. - If you want to know what accessories are available for this product or if you want to stay informed of new Mutsy products then go to www.mutsy.com.
WARNING
- WARNING: Failure to observe the instructions for use may put your child's safety at serious risk.
-WARNING: You are responsible for your own child's safety. - WARNING: This seat unit is not suitable for children under 6 months.
- WARNING: The seat is suitable for children from 6 months and up to 15kg .
- WARNING: The carry cot is not suitable for children who can sit or turn independently or who can raise themselves on their hands and knees. The maximum weight of the child is 9kg .
-WARNING: The pushchair is suitable for children up to 15kg - WARNING: The maximum permissible weight as indicated on the relevant product
applies when using a car seat.
- WARNING: For car seats used in conjunction with the chassis, this vehicle does not replace a cot or a bed. Should your child need to sleep, then it should be placed in a suitable carry cot, cot or bed.
- WARNING: A shopping basket is located between the wheels underneath the chassis. The maximum permissible weight for this basket is 5kg .
- WARNING: The carry cot has a number of bags. The maximum permissible weight in each bag is 1kg .
- WARNING: Overloading can result in a dangerous, unstable situation.
- WARNING: Do not place bags, accessories or both, other than recommended by the manufacturer on the product. This can result in an unstable pram. Exclusively use original Mutsy accessories.
- WARNING: Shopping bags or other heavy objects must not be hung on the push bar due to the risk of toppling.
-WARNING: Do not let your child play with this product.
- WARNING: Never leave your child unattended, this can be dangerous.
- WARNING: To avoid injury ensure that your child is kept away when unfolding and folding this product.
- WARNING: Ensure that all the locking devices are engaged before use.
- WARNING: Check that the carry cot or seat unit or car seat attachment devices are correctly engaged before use.
- WARNING: Before use, check that the attachment points of the carry cot, the pushchair or the adapters have been secured correctly.
- WARNING: Always check that the accessories have been secured properly before you start using the pram.
- WARNING: Do not use the carry cot with a mattress thicker than 25mm / 0,984 inch. Do not add an additional mattress.
-WARNING: Only use the pram for one child at a time.
- WARNING: Make sure that the brakes are applied when placing or removing your child.
-WARNING: Always use the restraint system. - WARNING: Always secure your child with the 5-point safety harness combined with the strap running between the legs.
- WARNING: You must take your child from the pram before lifting the pram or using stairs, escalators or lifts.
-
WARNING: You need to tilt the pram on its rear wheels if you want to get on or get off the kerb.
-
WARNING: Always apply the brakes when parking the pram.
-WARNING: This product is not suitable for running or skating. - WARNING: Use only replacement parts supplied or recommended by Mutsy.
The Mutsy Nio has been approved according to EN 1888 norm of 2012. - The Nio carry cot is only suitable for the Nio frame.
The Nio seat is only suitable for the Nio frame.
Guarantee
All Mutsy products come with a guarantee period of two years, starting on the day of purchase. If you encounter a production defect, Mutsy will work with the retailers to provide a solution. Production defects will be repaired under guarantee.
The guarantee does not apply to exchanging or returning Mutsy products. The guarantee will only be honoured if you can provide the following at the store at which the product was purchased:
-a completed guarantee card
-a copy of the purchase receipt
a clear description of the defect
- your product
The guarantee card can be found on:
www.mutsy.com/gben/service/warranty. This card must be completed correctly and submitted digitally. You will also need to enter the serial number. This number can be found on a white sticker on the product; it is usually located on the underside.
The guarantee does not apply:
- if the problem concerns fabric discolouration
-
if the fabric has been damaged by water
-
in relation to damage caused by the use of non-original Mutsy accessories.
- if you cannot provide the purchase receipt
- if you have used the product incorrectly or unreasonably
in relation to regular wear and tear that occurs as a result of day-to-day use - in the event of damage caused by bad maintenance, neglect or an accident
-
if damage has been caused as a result of modifications to the product that have been carried out by the consumer, without permission from the manufacturer
-
if the damage is not reported promptly (within 2 months)
Mutsy provides no guarantee in relation to shrinkage or defects concerning the fabric elements that have been caused as a result of cleaning.
Safety is a priority for Mutsy. We therefore fulfil the highest safety standards:
- Europe: EN 1888
-UK: BS EN 1888
Canada:SOR/85-379
-US: ASTM F833
For questions or comments, please contact us via: https://mutsy.com/gben/contact
Maintenance and points for attention
The chassis
- Regularly check the locking mechanism of the chassis. After cleaning you can spray some Teflon spray on it and rub it with a soft cloth. This also applies to other moving parts.
The wheels
- To let the wheels run more smoothly the wheel axles must regularly be cleaned and lubricated with acid-free vaseline. The wheels can never be lubricated with oil.
The fabrics
- Removable fabric parts (only consisting of fabric) can be washed in the washing machine on a wool cycle at 30^ . Wash without bleaching agent and do not put in the tumble dryer. Do not iron or dry clean. Before washing fasten all zips, velcro and poppers. This includes: Travel cot lining, seat covers, mattress cover, the fabric parts of the 5-point belt, foot muff, safe2go seat cover.
- You can treat stains on the outer fabric or lining of non-removable parts (or fabric parts that are combined with other materials) using a liquid, bleach-free soap. Always treat the whole area. This includes: the seat cover, the canopy, the travel cot cover itself, the storage compartment, the cover and the safe2go inlay, the pram booth cover, nursery bag and parasol.
- The mattress can be carefully hand washed with lukewarm water. Do not use soap. Do not machine wash, do not tumble dry, do not iron and do not dry clean.
- To find out how to take the seat covers on and off the pushchair, please go the FAQs in the 'Service' section of our website.
-
All Mutsy fabrics have been tested for water resistance but if the pram gets really wet, water can penetrate the inner and outer fabrics and leave marks. To prevent this we recommend that you always use the rain covers in case of wet weather.
-
Always let a wet pram dry with the hood fully unfolded.
-
Even though Mutsy fabrics are selected with the utmost care and tested for colour fastness, fabrics can discolour. Mutsy cannot be held liable for any discolouration.
Content of the box
-1 chassis with basket
-2 front wheels
-2 rear wheels
Summary of parts: corresponding to the summary diagram
- push bar
- push bar adjustment
- built-in safeguard
- chassis unlocking buttons
- attachment point
- unlocking button for seat, carry cot and adapters
- folding safeguard
- brake pedal
- rear wheel
- front wheel
- swivelling wheel locking
- wheel unlocking button
- foot rest
- leg support
- leg support adjustment
- bumperbar
- bumper bar unlocking button
- 5-point safety harness
- hood
Orientation
- References in the text to the front, rear, left or right side of the pram are described from the perspective of a user walking behind the pram.
The chassis
Unfold the chassis (a,b)
- Press the folding safeguard inwards (a1) and tilt the upper chassis until the lower support clicks into place (a2) and move the pushbar backwards until you hear a second click (b).
- Before use always check that the pram has been unfolded and secured correctly.
Fold the chassis (c,d)
-
Stand behind the frame and put the brakes on. Press the height adjustment buttons (c1) on the push-bar and set it to the lowest setting.
-
Pull the folding buttons (c2) towards you, on both sides, and turn the push-bar forwards until it is located on the chassis (c3).
- Pinch the chassis unlocking buttons and fold the chassis (d).
- The folding safeguard locks automatically when the product is folded up.
The wheels
Assemble the rear wheels (e)
- Slide the axle of the rear wheel in the rear wheel casing until you hear a click. Pull the wheel to check that it has been attached firmly.
Disassemble the rear wheels (f)
- Press the button at the back of the rear wheel casing and remove the wheel from the frame.
Assemble the front wheels (g)
- Press the button on the back of the front wheel and pull the wheel out of the front wheel casing.
Disassemble the front wheels (g)
- Push the button on the front side of the front wheel and pull the wheel from the front wheel casing.
The swivelling wheels (h1)
- Turn the ring above the front wheel inwards on both sides in order to block the swivel setting. The swivelling wheels will automatically be locked when the wheels are placed in the rear direction.
- Turn the ring above the front wheel on both sides outwards to unlock the swivelling wheels.
Pumping up the air tyres (Nio accessory: rear wheels air tyre set)
- The air pressure in the air tyres may decrease after a while. Check the pressure regularly and is necessary pump up the tyres.
- Press the pump firmly onto the valve. Pump up the tyres until the required air pressure has been reached. The air pressure in the tyres may never exceed 16 PSI / 1.1 bars.
Air tyres may leave traces on some surfaces.
The brake (i)
- Push the pedal downwards with your foot to block the brake.
- Push the pedal upwards with your foot to unblock the brake.
The push bar (j)
- The push-bar is fitted with four height positions. Push the push-bar adjustment buttons in and move the push-bar upwards or downwards while keeping the button depressed.
- Let go of the buttons once you have adjusted the push-bar to the appropriate setting.
Using the frame's trolley function
- When folded up, the frame can easily be pulled along behind you without the frame having to be folded out.
-Leave the frame folded up and use the push-bar adjustment buttons.
Pull the pusher out. - You can now use the pram / pushchair as a trolley.
- Tip: if you put the pram /pushchair's brakes on, you can leave it leaning vertically against a wall.
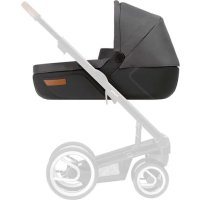
The carry cot (up to 9kg )
- The carry cot is suitable for transporting children from birth up to 9kg / 20 lbs in a lying position.
-
The carry cot is suitable for a child who cannot sit up by itself, roll over and cannot push itself up on its hands and knees.
-
You can also use the carry cot separately from the chassis.
-
Check the base, the edges and the carry belts on the carry cot regularly for any wear and tear.
- Make sure that the chassis has been fully unfolded and the brake is blocked during all actions indicated below.
Place the carry cot (k)
- Place the attachable elements on the carry cot into the attachment points on the chassis and press the carry cot downwards until you hear a click on both sides.
- Check to ensure that the red sections on the chassis attachment points are no longer visible. Check that the carry cot has been installed securely by trying to lift it from the chassis.
Remove the carry cot (I)
- Slide the unlocking buttons backwards until you hear a click on both sides. Be careful! The carry cot is now unlocked; the red sections on the chassis attachment points are now visible. Take the carry cot firmly by the handle on the hood and remove it from the chassis in a vertical movement.
The hood (m)
The hood can be unfolded by moving it upwards.
- Push and hold the buttons on the sides of the hood. The hood can now be folded downwards.
Assemble the rain cover on the carry cot (n)
- Make sure that the hood of the carry cot has been unfolded.
- Place the rain cover from top to bottom over the carry cot and make sure that the rain cover attaches well all around the bottom of the carry cot.
EN
Folding the carrycot
In order to make the carrycot more compact, it can be folded up.
- Remove the mattress and the interior upholstery from the carrycot
- Unlock the 3 metal brackets by pulling on the loops.
The carrycot can now be folded up.
Unfolding the carrycot (m)
- Put the carrycot canopy up and pull it upwards.
- Push the metal brackets into place. The upholstery is now firm.
- Reposition the interior upholstery using the Velcro
- Reposition the mattress.
The seat (6 months - 15 kg / 33 lbs)
- The seat is suitable for children from 6 months up to 15kg / 33lbs who can sit independently.
- When in the drive position, the seat can be folded and unfolded with the chassis and does not therefore need to be removed from the chassis.
The back support and leg support are adjustable.
- Make sure that the chassis has been fully unfolded and the brake is blocked during all actions indicated below.
Moving the seat unit to face forwards (o)
- Place the attachable elements on the seat into the attachment points on the chassis and press the seat downwards until you hear a click on both sides. NB! Place both ridges on the attachment elements into the chassis attachment points at the same time.
- Check that the chair has been attached solidly by trying to lift it from the chassis.
Moving the seat unit to face backwards (p)
- Position the seat facing backwards and then insert the attachment clips on the seat in the attachment points on the frame and push the seat
downwards until you hear a click on both sides.
- Check that the chair has been attached properly by trying to lift it from the chassis. NB! The chassis cannot be folded with the seat facing backwards!
Remove the seat (q)
- Slide the unlocking buttons backwards until you hear a click on both sides. Be careful! The seat is now unlocked; the red section on the chassis attachment points are now visible. The seat can vertically be removed from the attachment points.
Adjust the back support (r)
-
Pull the button at the back of the seat upwards and hold it upwards.
-
The back support has 4 positions. Place the back support in the desired position and release the button to lock the position.
Folding the chassis with the seat facing forwards (s)
- Stand behind the chassis and put the chassis on the brake. Fold the hood back if it is folded out. Fold the seat unit in two by tilting the back support forwards (s1).
-
Push the height adjustment buttons (s2) of the pushbar in and move this to the lowest setting. Pull the folding safeguard (s3) towards you on both sides and turn the pushbar forwards until the pushbar lies on the frame (s4).
-
Pinch the chassis unlocking buttons and fold the chassis (s5).
-
The folding safeguard locks automatically when the product is folded up.
- NB! The chassis cannot be folded with the seat facing backwards!
Unfolding the chassis with the seat
- Press the folding safeguard inwards (a1) and tilt the upper chassis until the lower support clicks into place (a2) and move the pushbar backwards until you hear a second click (b).
- After unfolding the seat, always push the bumper bar to its upright position before placing a child in the seat. Make sure that no child is near the bumper bar when moving it.
- Before use always check that the pram has been unfolded and secured correctly.
Adjust the leg support (t2)
- Lift the leg support to place it upwards.
- Push the buttons on both sides of the leg support and push the leg support downwards to lower it.
Attach and remove bumper bar (t1)
- To secure the front bumper, press the ends of the bumper into the recesses intended for this purpose on the seat until you hear a click.
- Press the unlock buttons on both sides of the front of the bumper bar to remove the bumper bar from the chair.
The hood (u1, u2)
- Hold the front hood bar in the centre and move it forwards or rearwards to adjust the hood (u1)
- Open the zipper at the back of the opened hood in order to enlarge it. Close the zipper to again reduce the hood (u2)
- Pull the flap on the front side of the hood outwards to additionally enlarge the hood. Push the flap inwards to again reduce the hood.
Assemble the rain cover on the pushchair (v)
-
Make sure that the hood of the seat is in the upright position.
-
Open the zipper in the rain cover in order to attach it to the enlarged hood of the seat.
- Place the rain cover from top to bottom over the pushchair and make sure that the rain cover is attached well behind the back support and over the leg support.
The 5-point safety harness (w1, w2)
- Place your child in the pushchair and make sure that the legs of your child are placed on each side of the leg piece.
- Make sure that the hip and shoulder belt is positioned correctly over your child and place both plastic clamps in the central part of the harness attached to the leg piece (w1).
- To adjust the length of the shoulder straps, loosen the shoulder protectors from the belt by undoing the velcro. This will reveal the belt buckles. Adjust the length by sliding the buckles along both shoulder straps until your child is comfortably secure. After adjusting, press down the velcro on both sides to relock the shoulder protectors in place.
- The backrest contains three positions for the shoulder belts. To modify the position, open the zip behind the backrest (w2). Loosen the shoulder belts by moving the attachment rings through the openings. Move the attachment rings through the desired openings so that the shoulder belts are positioned properly.
- Regularly check the length and position of the belts and adjust, where necessary.
Safe2go car seat (up to 13kg / 29 lbs)
- Make sure that the chassis has fully been unfolded and the brake blocked during all actions indicated below.
Installing the Safe2go adapters to the frame (x1)
- The adapter marked with 'R' is placed on the right side of the chassis, the adapter marked 'L' is placed on the left side.
- Slide the adapters in the attachment parts and press solidly until you hear a click. Check the adapters by trying to remove them from the chassis.
Place the Safe2go car seat
- Orientate the Safe2go car seat such that it is directed rearwards on the chassis. Hold the Safe2go car seat with the central hinge points of the support bar directly above the adapters. Lower the Safe2go car seat and press solidly into the adapters until you hear a click. Check that the Safe2go car seat has been placed horizontally and has been attached properly by trying to lift it from the chassis.
Remove the Safe2go car seat
- Press the buttons on both adapters to unlock the Safe2go car seat.
-Lift the Safe2go car seat straight up from the chassis.
Remove the Safe2go adapters
- Slide the unlocking button on the chassis attachment points upwards until you hear a click. The adapter can now be taken off the chassis.
Maxi-Cosi car seat
- The Maxi-Cosi car seat adapters are suitable for use with the following Maxi-Cosi group 0+ car seats: Maxi-Cosi Pebbles, Maxi-Cosi Cabriofix, Maxi-Cosi Citi.
- Always observe the instructions in the manual of your Maxi-Cosi car seat before you start using the car seat.
- Make sure that the chassis has fully been unfolded and the brake blocked during all actions indicated below.
Place the Maxi-Cosi adapters on the chassis (x3)
- The adapter marked with 'R' is placed on the right side of the chassis, the adapter marked 'L' is placed on the left side.
- Slide the adapters in the attachment parts and press solidly until you hear a click.
Place the Maxi-Cosi car seat on the adapters
- Orientate the Maxi-Cosi car seat such that it is directed rearwards on the chassis.
- Hold the Maxi-Cosi car seat with the central hinge points of the support bar directly above the adapters.
- Lower the Maxi-Cosi car seat and press solidly into the adapters until you hear a click.
- Check that the Maxi-Cosi car seat has been placed horizontally and has been attached properly by trying to lift it from the chassis.
Remove the Maxi-Cosi car seat from the adapters
- Operate the unlocking system of the Maxi-Cosi car seat. Lift the Maxi-Cosi car seat straight up from the chassis.
Remove the Maxi-Cosi adapters from the frame
- Slide the unlocking button on the frame attachment points upwards until you hear a click. The adapter can now be taken off the frame.
BeSafe / Kiddy / Cybex car seats
- Maxi-Cosi car seat adapters are suitable for use with the following car seats:
-BeSafe: iZi Go, iZi Go Modular
Kiddy: Evolution Pro, Evolution Pro 2, Evo-luna i-size
-Cybex: Aton, Aton 4, Aton Q
- Always read the instructions for use in your car seat manual carefully before you start using the car seat.
- Ensure that the frame is fully unfolded and the brake applied during all of the actions indicated below.
- For fitting and removing adapters: please refer to Maxi-Cosi adapters
-
For fitting and removing car seats to / from adapters, please refer to the instructions in your car seat manual.
-
WICHTIG: Lesen Sieitte diese Gebrauchsanleitung sorgfaltig durch und bewahren Sie sie zum späteren Nachlesen auf.
Inhaltsverzeichnis
CadeirinhasBeSafe/Kiddy/Cybex 88
Introdução
Dobrar o chassis (c, d)
Montar as rodas traseiras (e)
Desmontar as rodas traseiras (f)
Montar as rodas dianteiras (g)
Desmontar as rodas dienteiras (g)
www.mutsy.com/gren/service/warranty
Auto to tio npenei va ouunlnpw0ei oomega kaivu noBn0ei nKtpoviká. Ppenei enionc va eiayete tov oepiako apiou. Autoc o apiOmuoc avaypapetai o eva leuko autokolnto to onioo uvn0wC pioke-tai otnv katw nEupa tou npoiovtoc.
H eyyunon 8ev iOxuei:
- HaKaTb Ha KHONKy C 3aJHei CTOpOHy I KpeJIeHnI 3aJHeRo KOleCa I CHaTb KOLeCO C WAccn.
MOnmax nepeDHux konec (g)
- UCTAHOBITE NEPEDHHee KOJECO Ha Ocb Ha pame, yCbIHTe ueenqK. Y6eDNTecb, YTO KOJECO 3aΦnKcnpoBaHo.
Демонмж nepeDHux konec (g)
- HaxaTb Ha KhoNky c 3aJHei CTOpOhbl nepeHrO KOleCa n BbyHyTb KOleCo n3 KpePHeHnI nepeHrO KOleCa.
Iobopomhbi Mexahu3m nepeDHux konec (h1)
- YTO6bI 3aΦHKCuPoBaTb nepeHnE KOleCa, Heo6xOJMo ΦNKcaToPbI B VnDE KOJIbUa, KOToPbIe paCNoJIoKeHbI Ha BUNKax nepeHNIX KOJec NOBepHyTb C O6eHX CTOpOH BO BHyTpB.
- Переднице konecа abTomatnueckn 3aФИКсИpyOTcK KaTToIbKO 6yDyTВ
- положени по xOdy ДИЖeHЯ, KaK nOKa3aHo Ha pIscyHKe h.
-4To6bI paocnncpoBaTnepeHHe KOleca, Heo6xoJIMO oKCaTopbIB
BUNe KOJbua, KOTOpbl paCNOIOXKeHbHa BUNKAX
- nepeDHnx KOJec, NOBepHyb c 6eHX CTOpOH KOB HWeHc CTOpOHe.
TopM03 (i)
- Чтобл заблорова Тормо3, Heo6xOДМО НадаВиТь на петалы Тормо3a на занен OсN.
-4To6bI pa36noknpoBaTb TopMO3, Heo6xOIMo NOHrTb neJaB BBepx.
Pyka (j)
BbICOTy TOIkaTeJI MOKHO perynipOBaTb, yCTaHOVB erO B OndHO n3 YeTbIpeX IonoJKeHn. HaxaTb Ha KOnKn peYnpOBKn IonoJKeHn ToIKATeJI N IOHrTb IIN ONyCTNTb TOIkaTeJI, pNIDepKJBaR KONKy.
-OTnyctntb KONKn, KOrda ToIkaTeNb npHraJI xeJaemoe NOIOXeHne.
Ucnolb308aHue waccu b Kauecmbe menexku
B CLOXeHHOM BnDE uaccn MoXHo npocTo TAnHyTb 3a co6oH, He packla- DbIBa.
HepacklaIbIaIaCCn,piN NOMOuN KHOJOK OTpeyIIpOBaTb NonoJxHne TOnKaTeJIa.
BbItTMybpykyynpaBHeHn.
Tenepb Kojracy / nporylouHyIO KOJIACKy MoXHO NcNoIb3OBaTb B KaueCTBe TeJexKNI.
Cobet: ecn noctabntb kony / nporylohyo kony Ha TOpMo3, eemoxho npncnohtb B BeptkaibHom noloxhen K cTeHe.
CnabHaJIOJIbKa (do 9K2)
Cnabha nolbka npedHa3NayeHa dna deTe c poXdeHn y do 9Kr, T06bl TpaHcnpOtpoBaT pe6eHkBA JexaueM noLoKeHH.
CnabhaJIbka He noxodnt dJeTei, KOtOpbie yke camoctoTebHO MOryT cnTeB nI nepeBopaHbTaBC.
CnabHyIO IIObky MoKHO TaKKe NcNoIb3OBAb OTdEJIbHO OT paMbI dI nepeHockn pe6eHka.
- Perylaryno npOBepaTe cnaIbHyIO IIOIbKy, OCHOBaHne cnaIbHOIIOIbKN, peMHn cnaIbHOIIOIbKN i DpyrHe qactn Ha npEmdet n3-HOca.
-y6eHNTecb, yTO pama NOLHOCTbIO IN DOJXHBIM o6pa3OM pa3IOKeHa.
- Перед установский садын Люльkin на рamy, Нeoбхомо зашикungовать Тормо3.
YcmaHO8Ka cnaBHOJIOJIbKu (k)
Cnabha IIObka DoJxHa 6bIb paonoloxeHa TaKIM o6pa3OM, KaK noka3aHO Ha pucyHke (npotNB DnIXKeHna)
-Пи установке спально Люльkin Heo6xodmo DepekaTb loNbky 3a pyuky Ha kaIIOsoHe.
- YCTaHOBnTe cnaIbHyIO IIOJbKy Ha MeCTa KpeJIeHnHa pame. YcbluNTe ⅢeYOK. Y6eINTEcB, yTO cnaIbHnA IIOJbKa 3aΦNKcnpObaHa. KpacHbIe MeTKn Ha MeCTax KpeJIeHnA DOJXHbI 6bITb NOJHOCTbIO 3aKpbITbl, INx He DOnJXHO 6bITb BnIDHO.
- Y6eIntecb,чTO cnaIbHЯ JIOIbKa yCTaHOBJIeHa B rOpN3OHTaJIbHOM NOJIOXKeHn HAnIeKAsm O6pa3OM.
4mo6bl cHmblnOJbkycpambl (I)
-Heo6xOIMO nepeBnHyTb BBepx KHOKn C 06eNx CTOpOH Ha paMe. ByIbTe BnMaTeJbHbI TeNepb cnaJIbHa JIOJIbKa pacfNKcnpOBaHa (KpaChbIe MeTKn B MeCTax KpeIIeHn CTaII BNHbI).
Jaee Heo6xOIMO npocTo NODHbTy 3a pyKHa KaIOWOHe BBepx OT paMbI B BePTnKaJIbHOM HAppaBHeHIn.
Kanowon (m)
-TO6bI ONyCTNTb KaIIOHOH cnaIbHOJ IIOJIbKN HeO6XoIMO HaxaTb Ha KHONIK B OCHOBaHN KAIIOHOHa C 06eNX CTOPOH.
JoxdeuK (n)
PacknaadbibaHue IIOJIbku (m)
-ПОДHArTeH TIOJIbKIN I NOTAHyTb BepxHee OKOuKO BBepX.
- yCTaHOBt b MeTaIIuueckne cKO6bl. Tepeb 0NBka HaTaNHyTa.
-Прикpenntb BHyTpeneHHIO 6OBky,ИСплььуллучКи
-ПОJOXnTbMaTpac.
IpozynoHoe cudeHue (6 Mecaueb-15 K2)
BHHMaHHe!KoJrKa He MoKeT 6bITb CNoXeHa C cnJeHnEm, KOTOpoe yCTaHOBNeHO npOTnB DmXeHnI.
Ymo6bI cHambcudeHuecpambl(q)
CdbnHyb KhoNkpa36nokupOBKn Ha3a, noka He 6ydt cblweH uen- yOK c o6eux ctopoH.
-БудьTe BнIMaTeIbHbI TeNepb npOryIoUHoe CnIeHne paCΦnKcnpoBaHo (KpaChbIe MeTKI B MeCTax KpeJIeHnA CTaII N BuHbI).
Jaee Heo6xOIMo npocTo noHnTb nporyNoHoe cndeHne BBepx OT paMbI B BepTKaJIbHOM HaNPaBHeHn.
Pezylupobahue haknoha cnuHKU (r).
-NotAHnTeΦnKcaTOp Ha cnnHKe BBepx.
Jaee yctahOBITE cHHky B Heo6xOJUMoe noloxeHne n OTnyCTHTe fNKcaTop.
CnHka mMeet 4 noJxehn.
CknadbibaHue kOJcKU cCuDeHuem HanpaBneHHbIM bnepeD (no xody dbuxkeHua) (s)
-3a6JoknpyuTe cTOrHOUHbI TOPM03
-CbepHnTe KaHooH Ha nporylouHOM CnDeHn.
-Onyctnte cnnHky cnJeHn Bnepe (s 1).
HaKaTb Ha KhoNk nperynnpOBKn BbcOTbl (s2) Ha ToIkaTeNe u yCTaHOBnTB nX Bcamoe Hn3Koe noLoxKeHne. IotraHnTe BBePx npedoxpaHnte nn (s 3) c o6eHX CTOpOH n nepemecnTe pyuKy BpePd Ha noDnopkn (s 3).
- Haxmte Ha KhoKn dJa cNoXeHn paMbI C 06eHX CTOpOH n cNoXtKe KOJrCKy (s 5).
-ФИКcaTOp KOLЯСКиВ CLOXKeHHom BnDe Cpa6OtaeT aBtOMaTnueckn, ecN KOLЯСKa CLOXeHa npaBnIbHO.
-BHIMAHHe! KOnrcka He MoKeT 6bITb CNoXeHa C cnDeHnEm, KOtOpoe yCTaHOBJIeHO IpOTnB DnIXeHnI.
PacnaobibaHue konrcku cudeHuem
- Chmnte φнкcatop (a 1) и Notяnte Bberpx do ynpa 3a 6okobbie частп рамы (a 2), усblшnte щеник.
-ПоднMuTe pyUk KoJЯСКи BBepx b, yCblIuTte BToPoN цeLqK.
-y6eHntecb,yTO pama IONHOCTbIO IN DOJXHBIM 6pa3OM pa3JIOKeHa.
-Tepeb moKHO nOmeCTnTb pe6eHkA B KOJIaCKy.
IodHoxka (t2)
-уctahOBHTb Heo6xOIMoe noloxeHne nOHOKKn, Heo6xOIMo HaxaTb Ha KhoKn C 06eHX CTOpOH.
Bamnep npo2ynoohzo cuodeHua (t1)
-
UctaHOBnte 6amnp B MeCTa KpeJIeHnHa CnDeHn. YcblIHTe 9en-OK. Y6eINTecb, yTO 6amnp 3aΦNKcnpOBaH.
-
HaKMITE Na KhoNk B OCHOBaHn 6ampepa c oBeux cToPOH t1 /1 n CHMITE 6amnp C cnJeHna.
Kanpooh npo2ynouHoo cudeHu (u1, u2)
-KanIOOH MOxHO cBepHyTb IIN pa3BepHyTb (u1)
- KanIOshOH mMeET 3acteKy-MoJIHnIO, KOtOpA perynpyeT dInHy KaIOHOHa (u2)
- IotraHnTe Hapxky 3acNoHKy nepedHei qactn KaIIOoHa yTO6bl DOJNOJIHTeBHO erO yBeINuHTb.
- HaxmTe 3acJIOHky BOHyTpblTO6bI CHOBA yMeHbIHTb KaIIoUOH.
JoxdeBuk dna npoynoqHO2O cuDeHua (V)
- Праздучим HaTebdoXdeBnK Ha nporynoHoe cndeHne, Heo6xOIMo pa3BepHyTb KaIIOUOH.
IoxdeBnK DOnKeH NOKpbBaTb nporyNoHoe cndHe n cennkOM n XO
poo npnneraTb K Hemy.
AzmolnykBeSafe/Kiddy/Cybex
AanTepbI ABToJIbKn Maxi-Cosi noXoJr nna cJeNyIOxN x ABToJIoeK:
-BeSafe: iZi Go, iZi Go Modular
Kiddy: Evolution Pro, Evolution Pro 2, Evo-luna i-size
-Cybex: Aton, Aton 4, Aton Q
www.mutsy.com/gben/service/warranty
www.mutsy.com/gben/service/warranty