
CE4493 - Coffee machine SOLAC - Free user manual and instructions
Find the device manual for free CE4493 SOLAC in PDF.
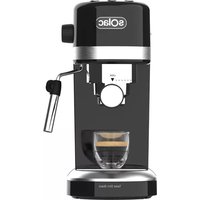
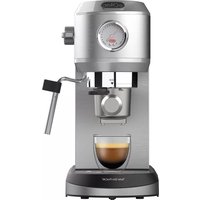
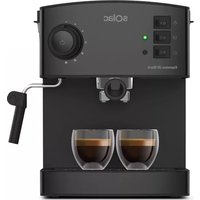
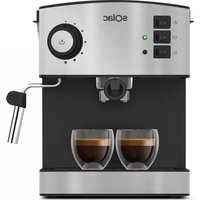
| Product type | Espresso coffee machine |
| Brand | Solac |
| Model | CE4493 |
| Pump pressure | 19 bars |
| Water tank capacity | Approximately 1.2 L (estimate) |
| Power supply | 220-240 V ~ 50/60 Hz |
| Rated power | Approximately 1100 W (estimate) |
| Main functions | Espresso coffee preparation, steam production for heating and frothing milk |
| Usable coffee types | Ground coffee and pods (single-dose) |
| Included filters | Single-dose filter and two-cup filter |
| Steam nozzle | With protector, adjustable |
| Water tank | Removable, with lid |
| Body material | Plastic and metal (estimate) |
| Maintenance and cleaning | Regular cleaning of tank and filter holder; annual descaling recommended |
| Safety | Automatic shutdown not specified; grounded outlet required; do not immerse |
| Weight | Approximately 3.5 kg (estimate) |
| Dimensions (W x D x H) | Approximately 30 x 25 x 32 cm (estimate) |
| Included accessories | Measuring spoon with tamper, filter holder, filters, steam nozzle |
| Warranty | Manufacturer’s warranty (refer to provided document) |
Frequently Asked Questions - CE4493 SOLAC
User questions about CE4493 SOLAC
0 question about this device. Answer the ones you know or ask your own.
Ask a new question about this device
Download the instructions for your Coffee machine in PDF format for free! Find your manual CE4493 - SOLAC and take your electronic device back in hand. On this page are published all the documents necessary for the use of your device. CE4493 by SOLAC.
USER MANUAL CE4493 SOLAC
MACCHINA PER CAFFÉ ESPRESSO
ISTRUZIONI PER L'USO
ESPRESSOMACHINE
GEBRUKSAANWIJZING
ESPRESSOKAVOVAR
NAVOD KPOZITI
EKSPRES DO KAWY
INSTRUKCJA OBSLUGI
ESPRESSOKAVOVAR
NAVOD NAPOUZITIE
ESZPRESSZÖ KAVÉFOZO
HASZNALATI UTASITÁS
KAΦEMAUNHA 3A ECNPECO
INHCTPYKUN3A YNOTPEBA
ESPRESSOMASINADECAFEA
INSTRUCTION DE UTILIZARE
Solac is a registered Trade Mark


ESPANOL ES
Read these instructions carefully before using the appliance. This manual is an integral part of the product. Keep it in a safe place for future reference.
WARNING
This appliance is intended to be used in household applications such as: staff kitchen areas in shops; offices other working environments; farm houses; by clients in hotels, motels and other residential type environments; bed and breakfast type environments. Using it for any purpose other than the one indicated could be dangerous.
This appliance can be used by children aged from 8 years and above and persons with reduced physical, sensory or mental capabilities or lack of experience and knowledge if they have been given supervision or instruction concerning use of the appliance in a safe way and understand the hazards involved. Children shall not play with the appliance.
- Cleaning and user maintenance shall not be made by children unless they are older than 8 and supervised. Keep the appliance and its cord out of reach of children aged less
than 8 years.
If the power cord is damaged, it should be replaced by the manufacturer or by your after sales service shop or similar qualified personnel to prevent possible hazards.
andeverimmersethemabin bodyinwaterorany other li quid,orput it in the dishwasher.The appliance should not come into contact with water during cleaning.
- Clean the tank, steam nozzle and filter holder regularly. To keep your coffee machine in a perfect condition, we recommend the use of a special descaler product for coffee machines to descale the appliance approximately once every 12 months (depending on the hardness of the water and the frequency with which the appliance is used).
- Do not modify or repair the appliance. In the event of any anomaly in the appliance, do not use it and take it to an authorised assistance service.
- Do not use any parts or accessories not supplied or recommended by SOLAC.
- Before plugging the appliance into the mains, check that the indicated voltage is the same as in your home.
Always unplug the appliance after use and before assembling or removing parts, and performing any maintenance or cleaning operations. Also unplug it in the case of a power cut. The appliance must be switched off before plugging or unplugging it into the mains - Never pull the cord or use it to hang up the appliance. Always unplug the appliance by pulling the connection pin, and not the cord.
Make sure the cord does not come into contact with sharp edges or hot surfaces. Do not leave the cord hanging over the edge of a table or worktop, to prevent children from pulling it and causing the appliance to fall. - Remove all elements from the inside or outside
ENGLISH EN
de of the appliance used for protection during transport or for sales promotions, such as paper or plastic bags, plastic sheets, cardboard and stickers.
Make sure that there is water in the tank, before connecting the coffee maker.
- Do not touch the appliance with wet hands when in operation.
- Do not use the appliance on wet surfaces or outdoors.
- The appliance must be connected to a power socket with a suitable ground connection.
- Do not release the filter holder while coffee is coming out.
- Steam and water may sometimes emerge from the coffee outlet. This is not a sign of a fault or malfunction.
- This espresso coffee maker is a high pressure model (up to 19 bar) and has a built-in electric pump to draw out the maximum flavour and aroma from the coffee. It is therefore normal for the electric pump to make a little noise and vibrate when it comes into operation.
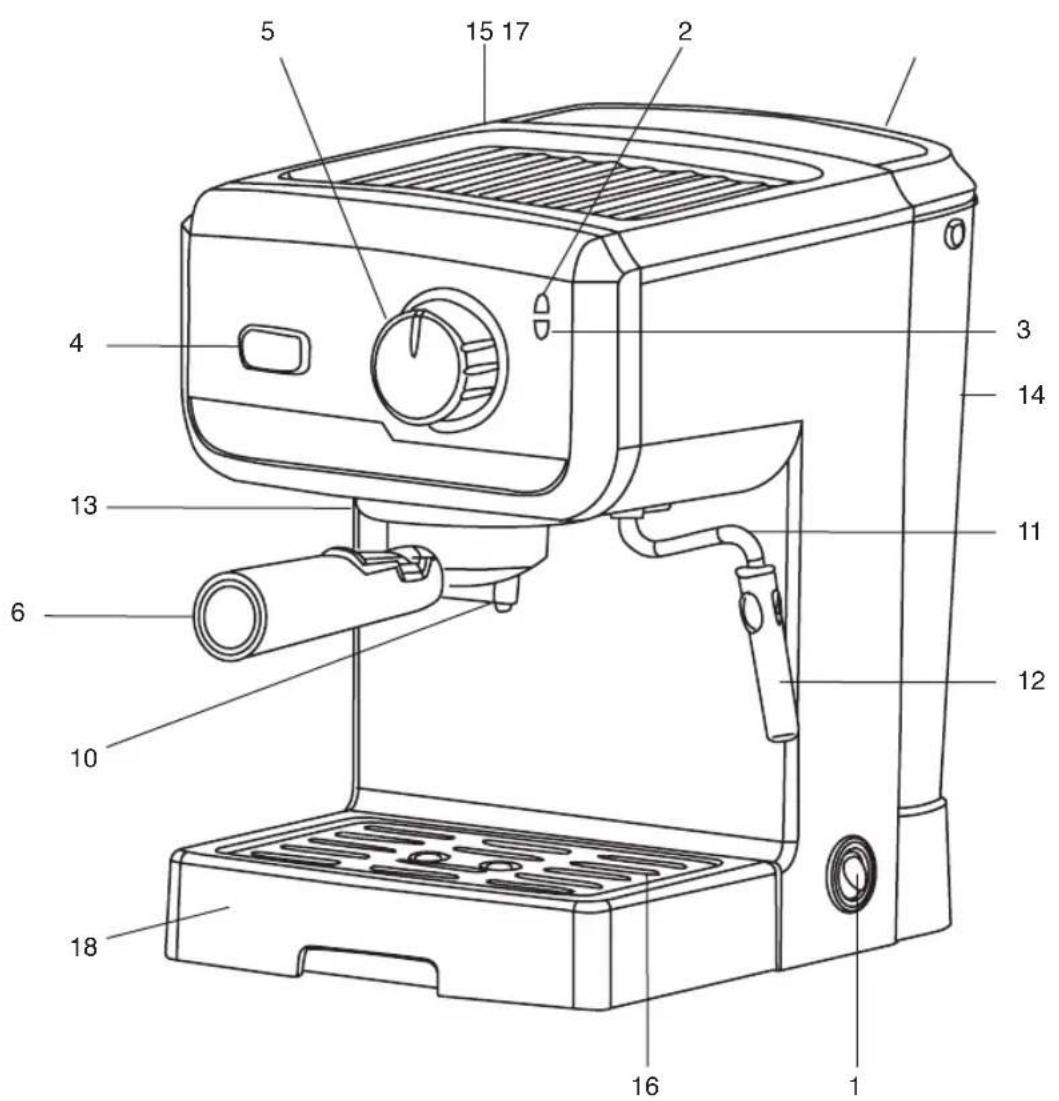
MAIN COMPONENTS
1 on/ff switch
2 Network indicator lamp
3 Temperature indicator lamp
4 Temperature selector (coffee/steam)
5 Coffee/steam brewing
6 Filter holder
7 Capsule filter
8 Two cup filter
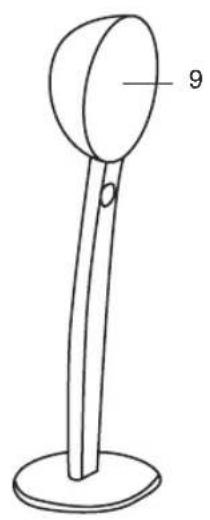
9 Measuring scoop with compactor
10 Coffee outlet holes
11 Steam nozzle
12 Steam nozzle protector
13 Filter holder guide
14 Water tank
15 Cup holder tray
16 Tray grille
17 Container lid
18 Drip tray
TIPS
Before using the coffee machine for the first time, we recommend allowing the equivalent of 8-10 cups of water to run through the filter holder (with no coffee in the filter). This completely cleans the entire system.
- Getting the right espresso for every user's taste is a result of the type of coffee, the dose
and the pressing:
We recommend you choose your preferred coffee blend, one with a fine grind especially for espresso.
The result will vary considerably according to the quantity of coffee used. If you want a strong coffee, you can exceed the dispenser spoon amount and fill the filter holder to the top.
- Finally, we recommend that you press the coffee to extract all the coffee essences and improve the cream.
- Coffee should always come out of holder in a regular stream, without dripping. If not, both the quantity of coffee and the pressing should be reduced or the coffee grind adjusted.
We recommend that you make the coffee as soon as the indicator light turns blue to ensure a higher temperature.
SERVICE:
Any misuse or failure to follow the instructions for use renders the guarantee and the manufacturer's liability null and void.
USE
COFFEE
Initial use
The boiler may come empty from the factory. Fill the boiler for initial use of the coffee maker. With the coffee maker cold, perform a system refill cycle. To do this:
1 Fill the tank with cold water. The tank (14) can be removed via the back of the coffee maker or open the lid (17) and pour the water in directly.
2 Plug the appliance into the mains and switch it on using the on/off switch (1) The indicator lamp (2) will light up red.
3 Make sure the temperature selector (coffee/ steam) (4) is in "coffee position. Turn the brewing selector (5), to "coffee" position. The pump will start operating. In a few seconds, water will start to come out from coffee outlet. That means the machine is ready to start.
Start
1 Fill the tank with cold water. The tank (14) can be removed via the back of the coffee maker or open the lid (17) and pour the water in directly.
2 Plug the appliance into the mains. The indica
EN
tor lamp (2) will light up red.
Brewing the coffe
1 Press the selector (4) to the "coffee" position.
The temperature indicator lamp (3) will light up blue when it is ready to brew the coffee.
2 Place the filter that you wish to use, 2 cups (8) into the filter holder (6).
3 Use the scoop (9) to measure in the coffee. Press the coffee down as per taste.
One scoop represents the recommended amount for one cup.
4 If you wish to use coffee capsules A: Open the unit measure bag. Place the capsule filter (7) into the filter holder (6). Place the capsule into the filter holder.
5 Put the filter holder (6) into the coffee maker.
1 Make sure that the filter holder is closed, pushing the handle from left to right, otherwise it may drip.
6 Place one or two cups below the coffee outlet holes (10).
Coffee extraction (brew)
If you want your first coffee to be hotter, fit the filter holder without coffee and allow one or two cups of hot water to come out, this will heat up the coffee maker.
1 Press the selector (4) to the "coffee" position.
2 When the temperature indicator (3) turns blue, set the selector (5) to the "Coffee brewing" position. The coffee will begin to come out.
3 Set the selector (4) to the "OFF" position to stop the coffee brewing
1 Check the water level in the tank and make sure it does not drop below the minimum mark. If during the brew no coffee comes out and the pump makes a strange noise, unplug the machine, check the water level and refill the tank (14) if necessary. In such a situation it may be necessary refill the boiler, see "Initial Use" in the "Operation" section.
Cleaning
- If you have used ground coffee, clean out the grounds by placing the filter holder running tap.
If you have used a capsule, remove it and put it in the rubbish.
B. STEAM
To heat any type of liquid using the steam nozzle (11).
To avoid possible burns always handle the steam nozzle (11) by the protector (12).
1 Plug the appliance into the mains. The indicator lamp (2) will light up red.
2 Set the selector (4) to the "Steam" position.
1 The temperature indicator lamp (3) will light up orange when it is ready to produce steam.
3 Insert the steam nozzle (11) into the liquid to heat and gradually open the steam nozzle extraction (5).
At the beginning a little water will come out.
4 When you have finished clean away any waste matter that may have got inside it. To do this:
5 Place an empty container below the steam nozzle and open the steam nozzle extraction (5) to allow steam to exit.
6 When you have finished, turn the steam se-degreen(5) to off position and set the coffee tem-perature (4).
If you plan on using the steam nozzle (11) continuously to heat a lot of liquid (more than 100ml ) proceed as follows:
Once the steam loses pressure (no force), the boiler must be filled again
Set the temperature selector (4) in coffee position and the brewing selector (5) in coffee brewing position until little water comes out through the coffee outlet. Repeat Steam brewing steps as many times as necessary.
If after using the steam you wish to make coffee, allow two cupfuls of water to come out through the filter holder (with no coffee in the filter) to ensure that the coffee comes out at the right temperature.
The maximum time for steam production is 2 minutes.
CLEANING AND MAINTENANCE
Unplug the coffee maker from the mains.
Clean the tank and filter holder regularly
1 Do not use alcohol, solvents or abrasive products to clean the coffee maker or tray, just a soft damp cloth.
- If you use the steam nozzle to heat milk, clean it immediately as soon as possible for easy cleaning. Wait for the steam nozzle to cool down and wipe it with a damp cloth.
- Every now and again, for more thorough cleaning of the steamer, proceed as follows: wait until the steamer cools down and remove the steam protector pulling it down. Wipe the steamer spindle with a damp cloth and soap the cylindrical part. Make sure that the small
EN
hole at the top of the steamer is clean before refitting the part.
- Fit the steamer on its spindle again
It is advisable to remove the water from the cup-holder tray regularly.
LIMESCALE REMOVAL
We recommend de-scaling the appliance once a year using a special product for coffee machines so as to maintain the coffee maker in perfect condition. We recommend the Solac de-scaling agent.
1 Follow the instructions that come with the de-scaling product.
2 To flush out the circuits, fill the tank again with water only, switch on the coffee maker, fit the filter holder without coffee, and carry out all the steps described in the 'Operation' section twice. During this process, turn the steam control (13) and release the steam for 1 minute.
ANOMALIES AND REPAIR
Take the appliance to an authorised technical support service if problems arise. Do not try to dismantle or repair without assistance, as this may be dangerous.
For EU product versions and/or in the case that it is requested in your country:
ECOLOGY AND RECYCLABILITY OF THE PRODUCT
The materials of which the packaging of this appliance consists are included in a collection, classification and recycling system.
Should you wish to dispose of them, use the appropriate public containers for each type of material.
The product does not contain concentrations of substances that could be considered harmful to the environment

This symbol means that in case you wish to use of the product once its working life has ended, take it to an authorised waste agent for selective collection of waste electrical and tronic equipment (WEEE)
This appliance complies with Directive 2014/35/EU on Low Voltage, Directive 2014/30/EU on Electromagnetic Compatibility, Directive 2011/65/EU on the restrictions of the certain hazardous substances in electrical and electronic equipment and Directive 2009/125/EC on the ecodesign requirements for energy-related products.
use of

FRANÇAIS FR
Extraction de café (percolation)
HEN3PABHOCTN I PEMOHT
B CnyaHa Heu3npaBHOCT, 3aHeceTe ypeDa B OToPn3npaH cepBn3 3a TexHuecko o6cnykBaHe. He ce ONITbaiTe da pa3rI06nte nn pemOHtnpaTe, TbN K TOBa MoKe Da ce OKaKe OnaCHO.
3a npodyktn OT EbponeeCKn CbIO3 n/nn B cIyau, Ye taKa ro N3NCKBa HOpMaTHNBata BB BaWata cTpHa:
ОПАЗBAHE HA OKОЛHATA CРEDA N Bb3MOЖHOCT 3A PELИКЛИРАЕ HA YPEDA
MaTePnAnIte,OT KOnTO ce CbCTOn ONaKOBKaTa Ha To3N eNeKTpoypeD, BKnHoueHN B CnCTema 3a TxAHOTo Cb6npaHe, KLnacnФuCnPaHe n peuNKnpaHe. AKeJaeTe Da CEOCBO6OJnte OT THX,MOKeTe
Ia I3IOJI3BaTe OObIeCTBeHInTe KOHTeHepn,
PpeHa3HaueHn 3a pa3eJHo Cb6upaHe Ha OTnAdbuNTe.
B npOyKta Hama KOHcHTpaunn Ha BeueCTBa, KOnTO MORaT da Ce CMrTaT BpeHN 3a OKoHaTa CpeJa. Ha

To3n CmB0n 03NaUaBa, Ye aKO JeKnaTe, Ce ocBO6oJTe OT ypeDa, cNeD KaTO, NIOaTauNOHHrT My XNBOT e N3TEKbI, oBa Da rO npdeAeTe NO IOxODaH NaUn H pInpMa 3a npepa6oTKa Ha OTpaDbL OIN3npaHa 3a pa3dEnHO Cb6npaHe IOCHO OTpaDbu OT eJeKtpueecko IN KTPoHNo 6OpuyDbHe (OEEO).
HacToaIypeN3nJIHraBa DnpeKtNa2
2014/35/EU 3a HnCKn HnpeXeHn, DnpeKtNa2
2014/30/EU 3a eNeKtpomarHeTnHo
cboTBeCTBnE n C DnpeKtNbBa 2011/65/EU 3a orpaHnueHnTa npn ynoTppe6b Ha HnKoN onpeJeIeHn OAnCHn BeIeCTBa B eIeKTpueckn n EJIeKTpOHHn anapatn N DnpeKtNbBa 2009/125/ EC 3a cb3daBaHe Ha pamka 3a onpeJeIeHne Ha n3nCKBaHnTa 3a ekOДn3aHn KbM npOdyKTn, CBbp3aHn c eHeprONotpe6JIeHnTo.

ROMÁNA RO
gai jia jin jia xia jia jia jia jia jia jia jia jia jia jia jia jia jia jia jia jia jia jia jia jia jia jia jia jia jia jia jia jia jia jia jia jia jia jia jia jia jia jia jia jia jia jia jia jia jia jia jia jia jia jia
- ESPANOL ES
- WARNING
- ENGLISH EN
- MAIN COMPONENTS
- TIPS
- SERVICE:
- USE
- COFFEE
- Initial use
- Start
- EN
- Brewing the coffe
- Coffee extraction (brew)
- Cleaning
- STEAM
- CLEANING AND MAINTENANCE
- LIMESCALE REMOVAL
- ANOMALIES AND REPAIR
- ECOLOGY AND RECYCLABILITY OF THE PRODUCT
- FRANÇAIS FR
- Extraction de café (percolation)
- HEN3PABHOCTN I PEMOHT
- ОПАЗBAHE HA OKОЛHATA CРEDA N Bb3MOЖHOCT 3A PELИКЛИРАЕ HA YPEDA
- ROMÁNA RO
Brand : SOLAC
Model : CE4493
Category : Coffee machine