BLSB 3030 - Blower Grizzly - Free user manual and instructions
Find the device manual for free BLSB 3030 Grizzly in PDF.
| Product type | Gas leaf blower (blowing, vacuum, shredding) |
| Brand | Grizzly |
| Model | BLSB 3030 |
| Engine displacement | 30 cc |
| Engine power | 1 kW (1.36 hp) |
| Maximum engine speed | 9,000 rpm |
| Fuel tank capacity | 500 ml |
| Fuel mixture | Unleaded gasoline + 2-stroke oil (40:1) |
| Blowing air speed | 300 km/h max. |
| Vacuum flow rate | 10.5 m³/min max. |
| Collection bag capacity | 40 liters |
| Weight (with accessories) | 6.5 kg |
| Sound pressure level (LpA) | 91 dB(A) (K=3 dB(A)) |
| Guaranteed sound power level | 108 dB(A) |
| Handle vibrations | 20.6 m/s² (K=8.2 m/s²) |
| Spark plug | Torch L8RTC or Champion RCJ6Y |
| Included accessories | Engine housing, 2-part vacuum tubes, blower tube, 2 blower accessories, strap, collection bag, mixing bottle, hardware, maintenance wrench, manual |
| Air filter maintenance interval | Check before each use; clean after 10 h (or 4 h in dusty conditions) |
| Spark plug maintenance interval | Check after 10 h, clean after 25 h, replace if necessary |
| Warranty | 24 months (excluding wear parts and damage due to improper use) |
Frequently Asked Questions - BLSB 3030 Grizzly
User questions about BLSB 3030 Grizzly
0 question about this device. Answer the ones you know or ask your own.
Ask a new question about this device
Download the instructions for your Blower in PDF format for free! Find your manual BLSB 3030 - Grizzly and take your electronic device back in hand. On this page are published all the documents necessary for the use of your device. BLSB 3030 by Grizzly.
USER MANUAL BLSB 3030 Grizzly
natural_image
Two red and black industrial hair blower tools against a white background (no text or symbols visible)BLSB 3030

Translation of the original instructions for use
GB Translation of the original instructions for use 90
Before initial start-up, please read through these operating instructions carefully prior to using the machine. Keep the instructions safe and pass them on to any subsequent user so that the information is always available.
Symbol am Chokehebel:

Hebel in Kaltstartposition (START)
Hebel in Warmstartposition (RUN)
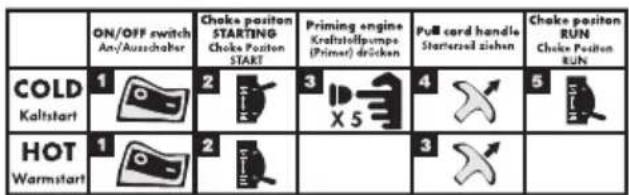
Motor starten:

text_image
ON/OFF switch An/Ausschalter Choke position STARTING Choke Position START Priming engine Kraftstoffpumppe (Primer) drücken Pull card handle Startered ziehen Choke position RUN Choke Position Bule COLD Kaltstart 1 2 3 4 5 HOT Warmstart 1 2 3Grizzly Service-Center ....195
Symbols used in the instructions ..... 90
Symbols on the device....90
General notes on safety 91
Intended purpose 94
General description 94
Scope of delivery - Parts list ..... 94
Function description....94
Overview 94
Safety features 95
Initial start-up 95
Installing/removing blower pipe and blower attachment....95
Installing/removing two-piece suction pipe 96
Installing/removing the collection bag...96
Attaching the neck strap 96
Fill with Fuel 96
Operating the leaf blower 97
Start the motor 97
Stopping the engine 98
Working with the leaf blower 98
Cleaning and maintenance 99
General cleaning....100
Removing obstructions and blockages....100
Clean the Air Filter 100
Spark plug maintenance 101
Replacing the collection bag ..... 101
Safekeeping 101
General storage instructions ..... 101
Storage when not in operation ..... 101
Disposal/environmental protection ..102
Technical Data 102
Spare parts 103
Guarantee 103
Service intervals 104
Trouble shooting 105
Translation of the original EC declaration of conformity .... 190
Exploded Drawing 194
Grizzly Service-Center 195
Intended use
A leaf blower is not intended for wet conditions! Avoid wet materials such as leaves and dirt, twigs, branches, pine needles, grass, earth, sand, mulch, cuttings, etc. Do not use on wet lawns, grass areas or fields. Misuse may lead to congestion in the shredding unit and lead to reduced functionality. The machine may need to be completely dismantled and cleaned. This work should be carried out by a qualified service technician and is not covered by guarantee.
Notes on safety

Caution! Follow all safety instructions when using the machine.
Symbols used in the instructions

Hazard symbol (explanation of hazard partly instead of exclamation mark) with information on prevention of personal injury and property damage.

Precaution symbol (explanation of precaution partly instead of exclamation mark) with information on prevention of harm / damage.

Notice symbol with information on how to handle the device properly.
Symbols on the device

Caution, danger! through the operating manual carefully before using the device.
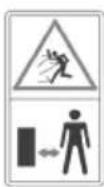
Danger due to materials blown out of machine! Remove persons in the vicinity from the danger area.

Caution.
Rotating impeller wheel.
Keep hands away.

Wear personal protective equipment. Basically, wear protective goggles or, even better, face

protection, ear protection, safety helmet, cut-protection working clothes, cut-protection gloves, and

cut-protection safety boots with anti-slip soles.

Caution! Hot surface. of burns.

Add petrol mix before attempting to start the engine.

Guaranteed sound power level
Symbol on the choke lever
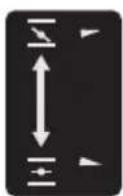
Lever in cold start position (START)
Lever in warm start position (RUN)
Start the engine:
text_image
ON/OFF switch An/Ausschahrer Choke positon STARTING Choke Position START Priming engine Kraftstoffpumps (Primer) drücken Pul card handle Startered zishen Choke positon RUN Choke Position RUNs COLD Kaltstart 1 2 3 4 5 HOT Warmstart 1 2 3General notes on safety
- This device can be used by individuals with reduced physical, sensory or mental capabilities or a lack of experience or knowledge if they are supervised or have been instructed in how to use the device safely and understand the associated dangers. Children must not play with the device.
- Do not stretch the body too far and ensure that balance is maintained.
- The device must not be operated by children. Laws and local regulations can determine a minimum age for use. Likewise, working with the device should never be allowed for persons who are not completely familiar with the operating instructions.
- The user is responsible for accidents and risks to other people and their property.
Working with the device:

Familiarise yourself with all the unit's parts and correct operation of the unit before you start working with it. Make sure that you can immediately switch off the unit in an emergency. Improper use of the unit may lead to serious injury.

CAUTION: How to avoid accidents and injuries:
The personal protective equipment protects your own health and the health of others and ensures trouble-free operation of the device.
- Wear suitable working clothes such as robust footwear with anti-slip soles, rugged, long trousers, gloves, protective goggles and hearing protection.
GB
Do not use the device if you are barefoot or are wearing open sandals. Wear respiratory protection if you are working in a dusty environment. Wear a dust mask.
- In very dry conditions, dampen the surface slightly in order to reduce the strain from dust.
- Change position regularly while operating the device. Prolonged use of the device can lead to blood circulation disorders in the hands caused by vibration. You can however extend your machine use time by wearing appropriate gloves or by taking regular breaks. Please note that a personal disposition to poor blood circulation, low outside temperatures, or strong grip forces while working may reduce your work capabilities.
- Refrain from wearing loose clothing or jewellery that could be drawn into the air intake nozzle. If you have long hair, use protective head covering.
- Check the operational serviceability and integrity of the device regularly in order to avoid danger to the operator.
- Keep the device away from persons, particularly children and domestic animals.
- Pay attention to open windows, children, pets, etc. Stop working if children and pets are nearby. The blown material may fly in their direction. Maintain a safety distance around you of 5 m.
- Do not turn on the device if it is upside down or is not in working position.
- Do not point the device when it is working at persons, in particular, do not point the airstream at eyes and ears.
- Make yourself familiar with your surroundings and pay attention to possible dangers which, under certain circumstances, can be missed while working.
- While working, make sure that you are standing in a firm position – especially when you are on a slope. Always hold the device with both hands and work only with correctly adjusted shoulder carrying strap.
- Caution! Hot surface. Risk of burns:
- The exhaust pipe can become hot.
- Hold the equipment only on your right hand side.
- Do not touch the exhaust pipe – even with your clothing.
- Carefully inspect the surface to be cleaned and remove all wires, stones, cans and other foreign bodies.
- Keep fingers and feet away from the suction tube opening and impeller wheel. There is a danger of injury.
- Do not work with the device if you are tired or lack concentration or after the consumption of alcohol or tablets. Always take time out for a break. Work at a reasonable pace. Move slowly; do not run.
- Do not use the device in the rain, in bad weather or in a moist environment. Work in daylight or under good artificial lighting.
- Do not work with a device which is damaged, incomplete or altered without the approval of the manufacturer. Check the safety status of the device before use
- Employ the device in a completely assembled condition only.
- Employ the device suction operating mode only when the collection bag is attached.
- Do not intake any burning, smouldering or smoking materials (e.g. cigarettes, embers etc.), fumes or easily inflammable, poisonous or explosive materials.
- Do not intake any moist or wet material or any liquids.
- Only use the replacement parts that are supplied and recommended by our Service Centre.
- Do not use the device in closed or badly ventilated rooms. Do not use the device near inflammable liquids or gases. In case of non-observance of these directions, danger of fire or explosion exists.
- Keep the device in a dry location and out of reach of children.
- Keep all cooling air inlets clear of dirt.
- Never let the internal combustion engine run in a confined space, as dangerous carbon monoxide can accumulate.
- Warning: Petrol is highly flammable. Fire or explosions can lead to severe burns.
- store petrol only in the specially provided containers;
- refuel only in open areas and never smoke during the refuelling operation;
- petrol has to be added before starting the engine. The fuel tank cap may not be opened and petrol may not be added while the engine is running or the device is still hot.
- if there was an accidental petrol spill, do not attempt to start the engine. Instead, remove the device from the petrol contaminated surface. You must not try to ignite the engine until all petrol vapours have evaporated.
- if the fuel tank cap is damaged, replace it for safety reasons.
- Shut off the engine, disconnect the spark plug connector and make sure that all movable parts have stopped moving:
- before removing obstructions, or loosening blockages from the ejection opening;
- before checking the device, cleaning it or performing maintenance work on it;
- when a foreign object has been hit. Check for damages to the device and perform any required repairs before starting and working with the machine
again.
- if the device starts to vibrate abnormally strong, an immediate inspection is required;
- when leaving the device;
- before refuelling.

CAUTION! The following states how damage to the trimmer and possible injury to people can be avoided:
- Make sure that all nuts, bolts and screws are properly tightened, and that the device is in safe working order. Many accidents are the result of poorly maintained machinery.
- Never store the device with fuel in its tank inside a building, where fuel vapours may be coming in contact with fire or sparks.
- Give the engine time to cool off before you store the device in an enclosed space. Possible fire hazard.
- To avoid risk of fire, keep engine, exhaust and the area around the fuel tank free of grass, leaves, or leaking grease (oil).
- Check the collection bag regularly for wear or damages.
- Replace worn or damaged parts for safety reasons. Replace defective mufflers.
- If you need to drain the fuel tank, you must do so outside.
- Treat your device with care. Keep the tools sharpened and clean, in order to be able to work better and safer. Follow the maintenance instructions.
- Do not try to repair the device yourself, unless you have professional training. All work, not mentioned in these instructions, may only be performed by authorized service representatives commissioned by us.
GB
- Store the device in a dry place and out of reach of children. Machines can be dangerous, if operated by inexperienced persons.
Intended purpose
The device is designed only for the blowing and suction and of dry leaves in private households and as a hobby device in the garden. Every other utilization, which is not explicitly approved in these directions, can lead to damage to the device and represents a serious danger to the user.
The device must not be employed in areas where there is health endangering dusts or as a wet suction device.
The device is designed for use by adults. Young people over 16 years may use the device under supervision only. The use of the device in the rain or in a humid environment is forbidden.
The operator or user is responsible for accidents or damage to other persons or their property. The manufacturer is not liable for damage which is caused through inappropriate use or incorrect operation.
General description
Scope of delivery - Parts list
Unpack the device and check for completeness.
Dispose of the packaging material properly.
- engine housing
- two-piece suction pipe
- blower pipe
- 2 blower attachments
- neck strap
- collection bag with feeder pipe
- fuel mixing canister
- mounting hardware
- service key
- instructions for use
Function description
The garden vacuum has a blowing/vacuuming unit for the blowing and suction functions. In blowing mode, you can quickly blow together fallen leaves or blown them out of places that are difficult to reach. In suction mode, the leaves are shredded to save space, and blown out of the ejector outlet into the collection bag.
The collection bag is fitted with one-sided inner lining to prevent fine dust and wetness from penetrating the bag to the outside. This lining is located on the left-hand side of the bag to protect your working clothes from soiling.
You can vacuum up dry leaves and leaf parts on the flat with the flat suction nozzle. The guide rollers at the lower end of the tube make it easier to guide the tube along the ground. For the protection of the user, the equipment is to be operated only with the two-part blow/suction pipe fully fitted.
Refer to the following descriptions for instructions on how the operating controls work.
Overview
1a+b fixing lugs for neck strap
2 On/off switch
3 throttle
4 handle
5 engine housing
6 fixing bolt for intake cover
7 intake cover
8 intake opening (not visible)
9 impeller and chopper knives (not visible)
10 discharge area / discharge chute
11 spark plug connector
12 bolt for fixing blower pipe/feeder pipe to collection bag
13 mounting collar
14 exhaust guard
15 suction pipe handle
16 fuel tank
17 tank cover
18 fuel pump (primer)
19 choke
20 air filter cover
21 starter handle with starter cable
22 plastic hook
23a upper suction pipe
23b lower suction pipe 24 wheels
25 blower pipe
26 standard blower attachment
27 flat blower attachment
28 neck strap
29 intake pipe for collection bag
30 zippered collection bag
31 fuel mixing canister
32 service key

33 bolt and nut for suction pipe attachment
34 spring hinge
35 2 fixing screws

36 locking devices at the air filter cover
37 air filter

38 spark plug
Safety features

2 On/off switch
The engine is shut off with the on/off switch. It will have to be on setting „I“ to restart the engine.
7 Intake cover
protects the operator from unintentional contact with the cutting tools and from injury by ejected foreign objects..
14 Exhaust guard
prevents hands or flammable
materials from coming into contact with the hot exhaust.
Initial start-up
Before operating the equipment, you must
- install the blower or suction pipes,
- install the collection bag for suctioning leaves,
- install the neck strap,
- fill with the fuel mixture

Caution, Risk of Injury! During the assembly or disassembly of the blower pipe, suction pipe or collection bag, the engine must be turned off, the on/off switch set on „0“, and all moving parts must have come to a standstill.
Installing/removing blower pipe and blower attachment

-
Screw on the desired blower attachment (26/27) clockwise onto the blower pipe (25), until the two parts snap firmly into place.
-
Loosen the fixing bolt (12) at the mounting collar (13) of the engine housing (5).
- Slide the blower pipe (25) into the discharge chute (10). The lug on the blower pipe fits into the recess on the engine housing (position).
- Turn the blower pipe (25) clockwise until the two marks show in a stacked (position).
- Retighten the fixing bolt (12).
- Remove the blower pipe and blower attachment in reverse order.
Installing/removing two-piece suction pipe

-
Fit the two suction pipes (23a+b) together.
-
Attach the two pipe pieces with the supplied bolt and nut (33).

For security reason the two pipe pieces cannot be taken apart later.
-
Loosen the fixing bolt (6) of the intake cover (7) and open the intake cover.
-
To install the upper suction pipe (23a) in the engine housing (5), position the plastic hook (22) at the spring hinge (34) of the intake cover (7).
-
Slide the two-piece suction pipe (23) into the intake opening (8) and screw fasten it with the enclosed fixing screws (35).

As a safety precaution you can only turn on the device if both pipe parts have been correctly mounted on the engine housing.
- Remove the suction pipe (23) in reverse order.
Installing/removing the collection bag

In suction mode the device can only be operated with the collection bag installed.

-
Attach the collection bag (30) to the intake pipe (29) using the Velcro strip.
-
If necessary, remove the blower pipe (25) (see „Installing/removing blower pipe and blower at-
tachment").
- Mount the intake pipe (29) of the collection bag (30) at the discharge chute (10) on the engine housing (5) as described under „Installing/removing blower pipe and blower attachment“.
Attaching the neck strap

Always wear a neck strap when operating the device. Always turn off the device, before removing the neck strap. Accident hazard.

Attach the snap hook of the neck strap (28) to the fixing lugs (1a+b) on the engine housing (5).
Fill with Fuel

Always ensure good ventilation when handling fuel.
Do not smoke when refuelling and keep away from any heat sources. Never refuel with the motor running or hot.
Open the filler cap carefully, so any excess pressure that is present can escape slowly.
Do not start the equipment near the filling location.
Use suitable and authorised containers for storing the fuel.
There is a risk of fire or explosion in case of non-observance.

Only use the fuel mix recommended in the instructions. This must not be older than 3 months. In case of non-observance, the motor may be damaged and the guarantee will be invalidated.

Avoid direct skin contact with petrol and inhalation of petrol fumes. They are hazardous to health!

The equipment is run with a mix of unleaded petrol and two-stroke engine oil (quality API TC) in the ratio 40:1.

Never use undiluted fuel. Use only two-stroke engine oil (no four-stroke engine oil or oil for water cooled motors). In case of non-observance, the motor may be damaged and the guarantee will be invalidated.
-
Mix petrol and motor oil in the fuel mixing canister included with the supply (31):
-
fill petrol (Gas) up to the "585.37" mark.
- fill two stroke cycle engine oil (Oil) up to the "600" mark.
-
close the container and carefully shake it.
-
Unscrew the filler cap and pour the fuel mix into the petrol tank. Wipe off petrol residues around the filler cap and close the filler cap.
Operating the leaf blower

Danger of injury.
Wear suitable clothing and work gloves when working with the device. Make sure that the device is functioning properly before every use. Make sure that the collection bag and the tube are assembled correctly and the carrying strap is adjusted correctly for work.

Note noise protection laws and local regulations.

After switching off the device, the impeller wheel continues to rotate for some time. Danger of injury due to rotating tool.
Start the motor

Start the engine at least three meters from where you refuelled.

Before switching on device, make sure it is not in contact with any objects. Ensure stable positioning.

The device can only be switched on if the entire blower / suction tube is correctly mounted.
| ON/OFF switchAn-/Ausschalter | Choke positon STARTINGChoke Positon START | Priming engineKraftstoffpumps(Primer) drücken | Pull cord handleStartersel ziehen | Choke positon RUNChoke Positen RUN | |
| COLDKaltstart | 1 | 2 | 3 | 4 | 5 |
| HOTWarmstart | 1 | 2 | 3 |

-
Place the device on a stable, level surface.
-
Switch the on/off switch (2) to „I“.
- For a cold start set the choke lever (19) to the „START“ position and press 5 x on the fuel pump (18), until you see fuel flowing.
For a warm start leave the choke lever (19) in the „RUN“ position.
- Firmly hold the device with one hand at the handle (4). With the other hand pull the starter cable at the starter handle (21) quickly several times in succession until the engine starts. Caution! Do not pull the stater cable out too far- DANGER OF BREAKAGE!
GB
-
Let the engine warm up for about 10 seconds.
-
Slide the choke lever (19) to the „RUN“ position.

If the engine has not started after two attempts, try a warm start without the choke in the „RUN“ position. If this is not successful, follow the instructions in the „Troubleshooting“ section.
Stopping the engine
- Release the fuel lever (3).
- Set the on/off switch (2) to „0“ to stop the engine.
Working with the leaf blower

The leaf blower may only be used for the following purposes:
- As a blower to pile up dry leaf material or to blow material out of places that are hard to access (e.g. under cars)
- As a suction device to suck up dry leaf material. The device also functions as a shredder in the suction function. The dry leaves are shredded and their volume is reduced, preparing the material for later composting if desired.
The shredding intensity depends on the size of the leaf material and its residual moisture.
Uses other than those described here may damage the machine and put the operator at risk.

During work, ensure that the device is not struck against hard objects, which can cause damage. Do not suck up any solid bodies such as stones, branches or pieces of
branch, fir cones or similar, since these can damage the device, in particular the shredding mechanism. Repairs of this type are not covered by the guarantee.

You should always work with the lowest possible engine rpms, since with reduced engine power the noise level and fuel consumption will be reduced as well.
Blowing operating mode:

For safety reasons, make sure the intake cover is properly closed.

- Put on the neck strap (28) and adjust the strap in such a way that the blower pipe is at a distance of 5 - 10 cm from the ground.
- Hold the device on your right hand side and do not touch the exhaust. Risk of burn injury.
- The standard blower attachment (26) allows for greater accuracy in blowing;
The flat blower attachment (27) facilitates blowing a broad stream of air.
- Begin work with the highest blowing power, in order to rapidly pile up the leaves lying around. Select a lower blowing power to compact the previously piled up leaves.
- Before blowing, loosen leaves adhering to the ground with a broom or rake.
- The guide rollers at the end of the tube make it easier to work on flat surfaces.
Suction operating mode:

In suction mode the device must only be operated with the collection bag mounted.

- Put on the neck strap (28) and adjust it to the optimal length.
• Always hold the device with both hands during operation: with your left hand at the handle (4), with the right hand at the suction pipe handle (15).
- Make sure the volumes of leaf material sucked in at one time are not too large. This will avoid clogging of the blower / suction tube and blockage of the impeller wheel.
- For ground suction of leaves or leaf residues, place the enclosed flat nozzle onto the end of the tube.

The ejection nozzle ensures ideal transport of leaves into the leaf bag. Additionally, it serves your safety by preventing contact with the fan during operation.

To reduce wear on the collection bag, do not drag it along the ground while working.

If the device stops suddenly during operation and does not produce any suction, then it is to be switched off immediately. Make sure that no material is wedged in between the shredder impeller and the casing. Carry out the work as described in the chapter “Cleaning and Maintenance”. If the appliance will not start, consult our Service Centre.
Emptying the collection bag:
With full collection bag, the suction pumping capacity decreases considerably and the collection bag must be emptied when the bag is full or interferes with the suction capacity of the device.

Disconnect the spark plug terminal before carrying out any work on the equipment.
- Turn off the device and wait until the impeller has stopped.
- Release the Velcro latch and remove the collection bag (30) from the intake pipe (29).
- The carrying handle on the collection bag makes it easier to transport the bag.
- Open the zip-fastener on the collection bag and empty it completely.
- Mount the emptied collection bag again.

Composting material does not be-long with domestic waste!
Cleaning and maintenance

Disconnect the spark plug terminal before carrying out any work on the equipment.

Leave all work not described in this manual to our Service Centre. Only use original parts.
Before every use, check the leaf blower for obvious deficiencies, such as loose, worn or damaged parts and for correct seating of the parts. Replace damaged parts. Check the bag regularly for wear and tear. Carry out the following maintenance and cleaning work regularly. By this means, a long and reliable life is guaranteed.
General cleaning

Clean the device in each case immediately after working, since otherwise mud with leaf residues hardens and sets and can possibly no longer be removed without dismantling the motor casing. Such cleaning work is not covered by the guarantee.

Do not employ any cleaning agents or solvents. They can irreparably damage the device. Chemical substances can attack the plastic parts of the device.
- Clean the device casing, the tube and the ventilation slots regularly with a soft brush or a cloth. Never clean the device under running water.
• Take off the collection bag after finishing work, turn it inside out and brush it thoroughly. In this way, you avoid the generation of mold and unpleasant odours. - Free the outlet area from possible shredded residues.
Removing obstructions and blockages
Leaves and fresh plant cuttings may obstruct the device

Cleaning the impeller:
-
Loosen the fixing bolt (6) of the intake cover (7) and open the intake cover.
-
Carefully remove debris or obstructions from the impeller (9).
- Check that the impeller rotates easily and is in perfect condition. Replace a defective impel-
ler at our service centre.
- Refasten the intake cover.
Cleaning the discharge chute:
- Remove the collection bag (30) or the blower pipe (25).
- Clean the outer area of the device discharge chute (10).
- Remove dirt remnants on the inside of the discharge chute with a brush (e.g. bottle brush). Remove bulky items with a blunt and dull tool.
Cleaning the suction pipe
- Loosen the fixing screws (33) and remove the suction pipe (23).
- Tap the suction pipe and clean out the inside if necessary.
Clean the Air Filter

Never operate the equipment without an air filter, otherwise dust and dirt will get into the motor and result in damage to the machine. Keep the air filter clean.

-
Switch off the equipment.
-
Press the locking devices (36) at the air filter cover (20) and remove the air filter cover.
-
Remove the air filter (37) from the air filter cover (20).
- Clean the air filter (13) with soap and water.
Never use petrol!
- Allow the filter to dry in the air.
- Reinsert the filter in reverse order.

Clean the air filter regularly (see "Service intervals"). Replace the air filter if it is worn, damaged or dirty. Replace the air filter if it is worn, damaged or heavily soiled.
Spark plug maintenance

Worn spark plugs or a spark gap that is too large will result in a reduction of motor power.
-
Turn off the device.
-
Pull the spark plug connectors (11) from the spark plugs (38).
- Unscrew the spark plug (38) counter clockwise with a spark plug wrench (Service key 32).
- Check the spark plug gap with the help of a feeler gauge (available from specialised dealers). The electrode air gap must be 0.6-0.7 mm.
- Reset the gap if necessary, by carefully bending the ground/ side electrode of the spark plug.
- Clean the spark plug with a wire brush.
- Reinsert the cleaned and reset spark plug or replace any damaged spark plugs with a new one (e.g. "Torch L8RTC or Champion RCJ6Y" spark plug).
- Replace the spark plug connector (11).
Replacing the collection bag
Replace a defective collection bag. Employ only original collection bags (see chapters "Spare Parts"), otherwise the guarantee claim is invalid.
Safekeeping
- Keep the leaf blower in a dry, frost-free location, which is inaccessible to children.
-
Do not store the device in direct sunlight; store it in dark or in reduced light conditions.
-
Do not cover the device with nylon bags, since moisture can form.
- Clean the device thoroughly at the season end and for storage during wintering. Clean the collection bag by removing it, emptying it and washing with warm water and neutral soap. Re-attach the dried bag again.
- Ensure that all nuts, bolts and screws are tightened so the equipment is in safe, functional condition.
General storage instructions
Be environmentally friendly. Return the tool, accessories and packaging to a recycling centre when you have finished with them.
Hand over the device at an utilization location. The plastic and metal parts employed can be separated out into pure materials and recycling can be implemented. Ask your Service Center about this.
Defective units returned to us will be disposed of for free.
Storage when not in operation

Failure to follow the storage instructions may leave fuel remnants in the carburettor, which in turn can cause start-up problems or permanent damage.
- Drain the fuel tank in a well-ventilated place.
- Start the engine, allowing it to idle until the engine stops and the carburettor is free of fuel.
- Let the engine cool off (about 5 minutes).
For operational breaks of more than three months:
- Loosen the spark plug with a spark
GB
plug wrench (see „Spark plug maintenance“).
- Fill a teaspoon with pure 2-cycle motor oil into the combustion chamber and pull the starter cable several times slowly to distribute the oil in the engine interior.
- Put the spark plug back in.
Disposal/environmental protection
Do not dispose of waste oil and fuel remnants in the sewer or your drain system. Dispose of waste oil and petrol remnants in an environmentally friendly way - take them to your local recycling centre. The device, accessories and packaging should be properly recycled.
Drain the fuel tank carefully and drop the device off at a recycling centre. The plastic and metal parts used on your device can be properly sorted according to materials and grades and efficiently recycled.
Technical Data
Leaf blower ....BLSB 3030
Engine size....30 cm ^4
Engine power....1 KW (1,36 PS)
Engine speed....9000 min ^-1
Fuel mixture....40:1
Tank volume, max. 500 ml
Spark plug .... Torch L8RTC
Suction power/throughput max. 10,5 m ^3 /min
Air speed ....max. 300 km/h
Content of the collection bag....40 l
Weight (incl. accessories kit)......6,5 kg
Sound pressure level
(L_pA) .....91 dB(A); K_pA = 3 dB(A)
Sound power level
Measured (L_WA) ..105 dB(A); K_WA = 3 dB(A)
Guaranteed 108,0 dB(A)
Vibration at the handle ( a_n )
Noise and vibration values were determined according to the standards and stipulations designated in the Declaration of Conformity.
Technical and optical changes can be carried out in the course of the further development without announcement. All measures, references and information contained in this operating manual are therefore without guarantee. Legal claims, which are made on the basis of the operating manual, cannot be considered.
Spare parts
The following spares are available from Grizzly Service-Center. Please indicate the machine type and the number of the spare part with your order.
If further spare parts should be necessary, please find the part number on the exploded drawing.
Spare parts and accessories can be obtained at
www.grizzly-service.eu
Guarantee
This appliance has a 24-month guarantee; In particular, this includes impeller, collection bag, air filter and spark plug.
Engine damage is also excluded from the guarantee, if it was caused by an incorrect fuel mixture or incorrect fuel mixture ratio.
Furthermore, the prerequisite for guarantee services is that the references indicated in the operating instructions regarding cleaning and maintenance have been adhered to.
Damage, which has been caused from material or manufacturing faults, will be made good free of charge, by replacement delivery or repair.
Repairs, which are not covered by the guarantee, can be carried out for charge by our service center. Our service center will be glad to provide you with a cost estimate.
We can only process devices which have been packaged sufficiently and which have been dispatched with correct stamping.
Note: In case of complaint or service,
please deliver your device cleaned, and with an indication of the defect, to our service address.
Caution: Never ship a defective device with fuel in the fuel tank. It is essential that you empty the fuel tank. Any property damage (oil/petrol might leak, if device is placed on the side or upside down!) or fire damage during transport shall be borne by the consignor.
Please insure before the dispatch, that the device is not classified as “bulk freight”. That could be the case if the packaging is not sufficient or if the device is sent wrapped only with wrapping paper. Defective units returned to us will be disposed of for free.
Devices sent in freight collect - by bulk freight, express or with other special freight - are not accepted.
If you have a justified guarantee claim, please contact our service centre by telephone, which will then advise you on how the claim will be processed.
Service intervals
Carefully perform the maintenance tasks listed in the following table on a regular basis. Regular servicing of your unit will extend the life of your equipment. Additionally, you will achieve optimum cutting performance and prevent accidents.
| Machine part | Action Before every use | After 10 hours of operation | After 25 hours of operation |
| Spark plug Check | √ | ||
| Spark plug Clean | √ | ||
| Spark plug Replace if required | |||
| Airfilter Check | √ | ||
| Airfilter Clean * | √ | ||
| Airfilter Replace if required | |||
* in a high dust environment, clean the air filter after every 4 operating hours
Trouble shooting
| Problem Possible | Cause Error correction | |
| Device doesn't start | On/off switch (2) may be defective | Repair by Customer Care |
| Suction pipe (23) is not properly installed | Install two-piece suction pipe correctly, as directed | |
| Old or incorrect fuel mixture | Empty fuel tank and refuel according to directions | |
| Fuel tank (16) empty Refuel | ||
| Incorrect starting sequence | Follow directions on how to start the engine as described in these instructions | |
| Engine is flooded | Let off throttle, start engine several times, remove, clean and dry the spark plug if necessary | |
| Sooty spark plug (38), incorrect spark plug gap | Clean spark plug, reset or replace it | |
| Spark plug connection, wires faulty | Replace | |
| Carburettor, carburettor jets dirty, incorrect carburettor mix setting | Have the carburettor cleaned and reset by a specialist workshop | |
| Clogged fuel filter Clean or replace the fuel filter | ||
| Engine will not run at expected maximum power | Sooty spark plug (38), incorrect spark plug gap | Clean spark plug, reset or replace it |
| Dirty air filter (37) Clean or replace air filter | ||
| Carburettor, carburettor jets dirty, incorrect carburettor mix setting | Have the carburettor cleaned and reset by a specialist workshop | |
| Old or incorrect fuel mixture | Empty fuel tank and refuel according to directions | |
| Excessive formation of exhaust fumes/smoke | Incorrectly set carburettor-mix | Have a specialist workshop reset the carburettor |
| Incorrect fuel mixture Refuel according to directions | ||
| Weak or no suction power/throughput | Collection bag (30) is full Empty collection bag | |
| Collection bag is dirty Clean collection bag | ||
| Impeller (9) or suction pipe (23) is clogged or blocked | Remove obstructions or blockages | |
Obsah
Grizzly Service-Center ....195
acústica (LpA).....91 dB (A); KpA=3,0 dB(A
medido .....105,0 dB (A); K_WA=3,0 dB(A
Grizzly Service-Center ....195
......91 dB (A); K_pA = 3,0 dB (A)
mért.....105,0 dB (A); K_wA = 3,0 dB (A)
Grizzly Service-Center

Unit 3, Beldray Park
Beldray Road, Mount Pleasant
Bilston, West Midlands WV14 7NH
Tel.: 0845 683 2672
e-mail: care@novoserv.co.uk

LTU
UAB Garden Baltic