
Rotak 430 LI - Lawn mower BOSCH - Free user manual and instructions
Find the device manual for free Rotak 430 LI BOSCH in PDF.

User questions about Rotak 430 LI BOSCH
0 question about this device. Answer the ones you know or ask your own.
Ask a new question about this device
Download the instructions for your Lawn mower in PDF format for free! Find your manual Rotak 430 LI - BOSCH and take your electronic device back in hand. On this page are published all the documents necessary for the use of your device. Rotak 430 LI by BOSCH.
USER MANUAL Rotak 430 LI BOSCH
OBJ DOKU-42626-012.fm Page 1 Thursday, September 8, 2016 8:50 AM
natural_image
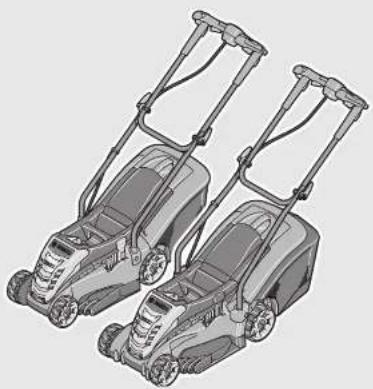
Illustration of two lawn mower machines with adjustable arms (no text or symbols)Robert Bosch Power Tools GmbH
70538 Stuttgart
GERMANY
www.bosch-garden.com
F016 L81 430 (2016.09) O/320

3'165140"814300'
Rotak
370 LI | 430 LI

BOSCH
Warning! Read these instructions carefully, be familiar with the controls and the proper use of the machine. Please keep the instructions safe for later use!
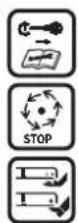
Explanation of symbols on the machine

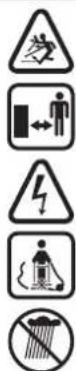
General hazard safety alert.

Read instruction manual.

Pay attention that bystanders are not injured through foreign objects thrown from the machine.

Warning: Keep a safe distance from the machine when operating.

Caution: Do not touch rotating blades. Sharp blade(s). Beware of severing toes or fingers.

Switch off and remove isolator key before adjusting, cleaning and before leaving the product unattended for any period.

Not applicable.

Wait until all machine components have completely stopped before touching them. The
blades continue to rotate after the machine is switched off, a rotating blade can cause injury.

Do not use the machine in the rain or leave it outdoors when it is raining.

Beware electric shock hazard.

Not applicable.

Only use the battery charger in-doors.

Battery charger contains a safety transformer.
Operation
▶ Never allow children or people unfamiliar with these instructions to use the machine. Local regulations may
14 | English
restrict the age of the operator. When not in use store the machine out of reach of children.
This machine is not intended for use by persons (including children) with reduced physical, sensory or mental capabilities, or lack of experience and knowledge, unless they have been given supervision or instruction concerning use of the machine by a person responsible for their safety. Children should be supervised to ensure that they do not play with the machine.
▶ Never mow while people, especially children, or pets are nearby.
▶The operator or user is responsible for accidents or hazards occurring to other people or their property.
▶ Do not operate the machine when barefoot or wearing open sandals, always wear substantial footwear and long trousers.
▶ Thoroughly inspect the area where the machine is to be used and remove all stones, sticks, wires, bones and other foreign objects.
▶ Before using, always visually inspect to see that the blades, blade bolts and cutter assembly are not worn or damaged. Replace worn or damaged blades and bolts in sets to preserve balance.
▶ Mow only in daylight or in good artificial light.
▶ Avoid mowing in bad weather conditions especially when there is a risk of lightning.
- Avoid operating the machine in wet grass, where feasible.
▶Walk, never run.
▶ Never operate the appliance with defective guards or shields, or without safety devices, for example deflectors and/or grass catchers in place.
▶ Always wear ear protection.
▶ Working on banks can be dangerous.
- Do not mow on excessively steep slopes.
- Always be sure of your footing on slopes or wet grass.
- Mow across the face of slopes - never up and down.
- Exercise extreme caution when changing direction on slopes.
▶ Use extreme caution when stepping back or pulling the machine towards you.
▶ Never mow by pulling the mower towards you.
▶ Wait until the blades stop if the machine has to be tilted for transportation when crossing surfaces other than grass and when transporting the machine to and from the area to be mowed.
▶ Do not tilt the machine when starting or switching on the motor, except if the machine has to be tilted for starting in long grass. In this case, do not tilt it more than absolutely necessary and tilt only the part which is away from the operator. Always ensure that both hands are in the operating position before returning the machine to the ground.
▶ Switch on the motor according to the instructions with feet well away from rotating parts.
▶ Do not put hands or feet near or under rotating parts.
▶ Always stand clear of the discharge zone when operating the machine.
▶ Never pick up or carry the machine while the motor is running.
▶ Do not modify this product. Unauthorized modifications may impair the safety of your product and may result in increased noise and vibration.
▶ Regularly inspect the supply cable and any extension cables. Do not connect damaged cables to the supply or touch a damaged cable before it is disconnected from the supply. A damaged cable can lead to contact with live parts. Beware electric shock hazard.
Leaf Collect
The leaf collect blade has been designed to allow you to pick up autumn leaves from your lawn. In order for this functionality to work within optimal parameters, please note the following:
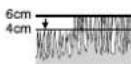
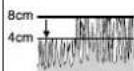
- only collect leaves with the machine set at 70 mm cutting hight
- collect leaves from your lawn only
– before collecting leaves inspect the area where the machine is to be used and keep people, pets, glass structures and cars away from use
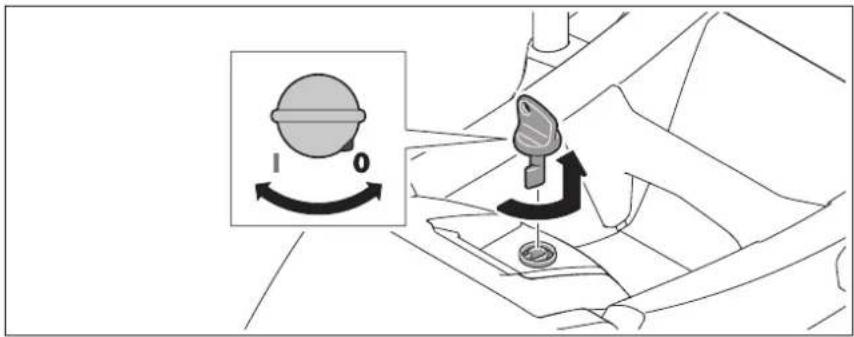
Remove the isolator key:
- Whenever you leave the machine.
- before clearing a blockage,
– before checking, cleaning or working on the machine,
– after striking a foreign object. Inspect the machine for damage and make repairs as necessary, - if the machine starts to vibrate abnormally (check immediately).
Maintenance
▶ Always wear gardening gloves when handling or working near the sharp blades.
- Keep all nuts, bolts and screws tight to be sure that the machine is in safe working condition.
▶ Check the grass catcher frequently for wear or deterioration.
▶ Examine the machine and replace worn or damaged parts for safety.
▶ Ensure replacement cutting means of the right type are used.
▶ Ensure replacement parts fitted are Bosch approved.
▶ Before storage ensure machine is clean and free from debries, if necessary clean with a soft, dry brush.
Recommendations for Optimal Handling of the Battery
▶ Ensure the switch is in the off position before inserting battery pack. Inserting the battery pack into machines that have the switch on can cause accidents.
16 | English
▶ Use only Bosch battery packs intended specifically for the machine. Use of any other battery packs may create a risk of injury and fire.
▶ Do not open the battery. Danger of short-circuiting.
Protect the battery against heat, e. g., against continuous intense sunlight, fire, water, and moisture. Danger of explosion.
- When battery pack is not in use, keep it away from other metal objects like paper clips, coins, keys, nails, screws, or other small metal objects that can make a connection from one terminal to another.
Shorting the battery terminals together may cause burns or a fire.
▶ In case of damage and improper use of the battery, vapours may be emitted. Ventilate the area and seek medical help in case of complaints. The vapours can irritate the respiratory system.
▶ Use the battery only in conjunction with your Bosch product. This measure alone protects the battery against dangerous overload.
The battery can be damaged by pointed objects such as nails or screwdrivers or by force applied externally. An internal short circuit can occur and the battery can burn, smoke, explode or overheat.
▶ Do not short-circuit the battery. There is danger of explosion.
▶ Protect the battery against moisture and water.
▶ Store the battery only within a temperature range between -20^ and 50^ . As an example, do not leave the battery in the car in summer.
▶ Occasionally clean the venting slots of the battery using a soft, clean and dry brush.
Symbols
The following symbols are important for reading and understanding the operating instructions. Please take note of the symbols and their meaning. The correct interpretation of the symbols will help you to use the garden product in a better and safer manner.
Symbol Meaning

Movement direction

Reaction direction

Wear protective gloves

Weight

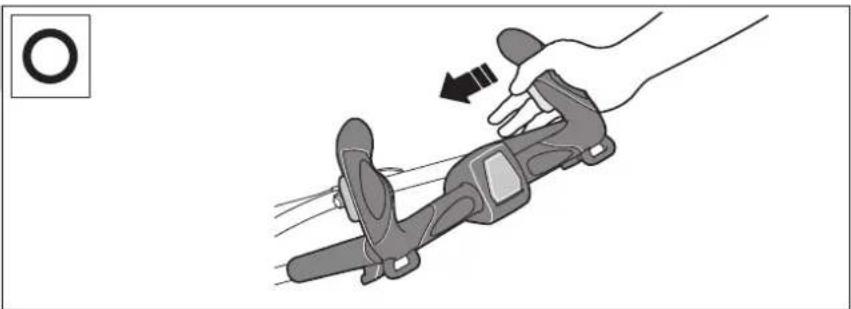
Switching On

Switching Off

Permitted action

Prohibited action

Accessories/Spare Parts
Intended Use
The garden product is intended for domestic lawnmowing.
English | 17
Technical Data
| Cordless Lawnmower Rotak 370 LI Rotak 430 LI | |||
| Article number | 3 600 HA4 4.. 3 600 HA4 5.. | ||
| Blade width | cm 37 43 | ||
| Height of cut | mm 20 - 70 20 - 70 | ||
| Grassbox, capacity | l | 4 | 0 |
| Weight according to EPTA-Procedure 01:2014 | kg 13.2 13.8 | ||
| Serial number | see type plate on the garden product | ||
| Battery | Li-Ion Li-Ion | ||
| Article number | |||
| - 1 . 3 Ah | 2 607 336 001 | 2 607 336 001 | |
| - 2 . 0 Ah | 1 607 A35 02V | 1 607 A35 02V | |
| Rated voltage | V= 36 36 | ||
| Capacity | |||
| - 2 607 336 001 | Ah | 1.3 | 1.3 |
| - 1 607 A35 02V | Ah | 2.0 | 2.0 |
| Number of battery cells 10 10 | |||
| Battery | Li-Ion Li-Ion | ||
| Article number | 2 607 336 633 2 607 336 633 | ||
| Rated voltage | V= 36 36 | ||
| Capacity | Ah | 2.6 | 2.6 |
| Number of battery cells | 20 20 | ||
| Battery | Li-Ion Li-Ion | ||
| Article number | 2 607 337 047 2 607 337 047 | ||
| Rated voltage | V= 36 36 | ||
| Capacity | Ah | 4.0 | 4.0 |
| Number of battery cells | 20 20 | ||
| Battery Charger | AL 3620 CVProfessional | AL 3620 CVProfessional | |
| Article number | EU | 2 607 225 657 | 2 607 225 657 |
| UK | 2 607 225 659 | 2 607 225 659 | |
| Charging current | A | 2.0 | 2.0 |
| Allowable charging temperature range | °C | 0 - 45 | 0 - 45 |
| Charging period (battery discharged) | |||
| - 1.3 | min | 55 | 55 |
| - 2.0 | min | 70 | 70 |
| - 2.6 | min | 95 | 95 |
| - 4.0 | min | 140 | 140 |
| Weight according to EPTA-Procedure 01:2014 | kg | 0.6 | 0.6 |
| Protection class | ☐/II | ☐/II | |
| *with AL 3640 CV Professional charger | |||
18 | English
| Cordless Lawnmower Rotak 370 LI Rotak 430 LI | |||
| Battery Charger | AL 3640 CVProfessional | AL 3640 CVProfessional | |
| Article number EU | 2 607 225 099 | 2 607 225 099 | |
| UK | 2 607 225 101 | 2 607 225 101 | |
| Charging current | A | 4 | . |
| Allowable charging temperature range | °C 0 - 45 0 - 45 | ||
| Charging period (battery discharged) | |||
| - 1.3 | min | 45 | 45 |
| - 2.0 | min | 45 | 45 |
| - 2.6 | min | 65 | 65 |
| - 4.0 | min | 80 | 80 |
| Weight according to EPTA-Procedure 01:2014 | kg 1.0 1.0 | ||
| Protection class | ☐/II /II | ☐ | |
| *with AL 3640 CV Professional charger | |||
Noise/Vibration Information
| Sound emission values determined according to EN 60335-2-77. | 3 600 ... | HA4 4.. | HA4 5.. |
| Typically the A-weighted noise levels of the product are: | |||
| Sound pressure level | dB(A) | 75 | 76 |
| Sound power level | dB(A) | 89 | 90 |
| Uncertainty K | dB | =1.0 | =1.0 |
| Wear hearing protection! | |||
| Vibration total values an(triax vector sum) and uncertainty K determined according to EN 60335-2-77: | |||
| Vibration emission value an | m/s2 | <2.5 | <2.5 |
| Uncertainty K | m/s2 | =1.5 | =1.5 |
Mounting and Operation Starting
| Action | Figure | Page |
| Delivery Scope | 1 | 305 |
| Handle Assembly | 2 | 306 |
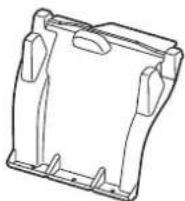
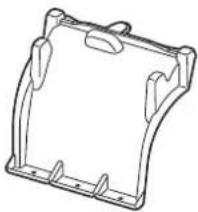
| Snap together the Grassbox Grassbox fitting/removing | 3 | 306-307 |
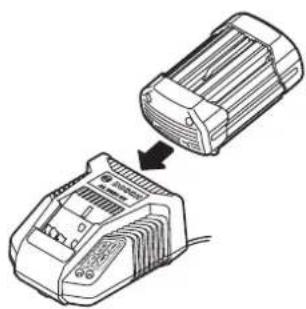
| Battery Charging | 4 | 307 |
| Inserting the Battery | 5 | 307 |
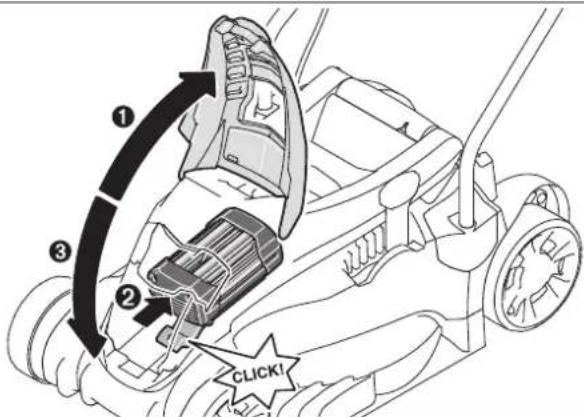
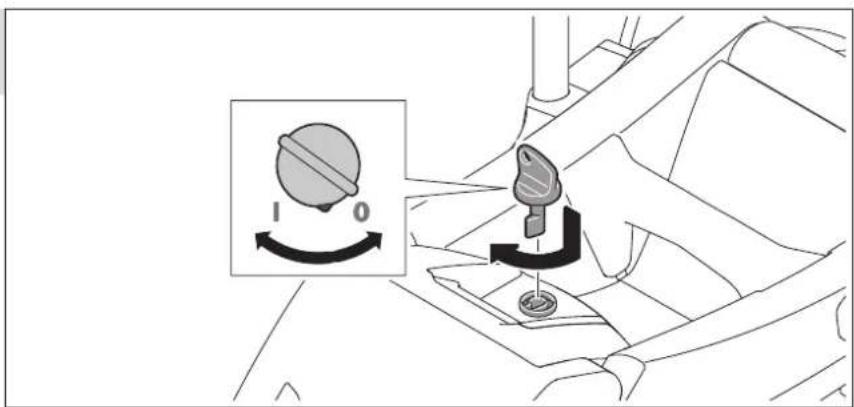
| Insert Isolator Key and fit in the Storage Position | 6 | 308 |
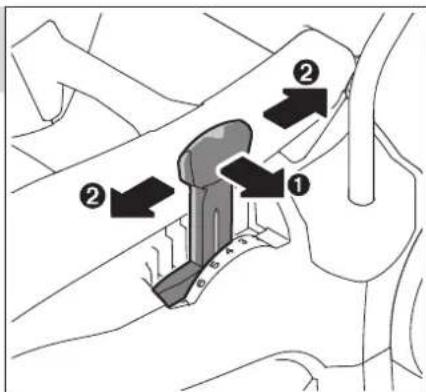
| Adjusting the Cutting Height | 7 | 308 |
| Starting | 8 | 308-309 |
| Working Advice | 9 | 309 |
| Stopping, Remove the isolator key | 10 | 309-310 |
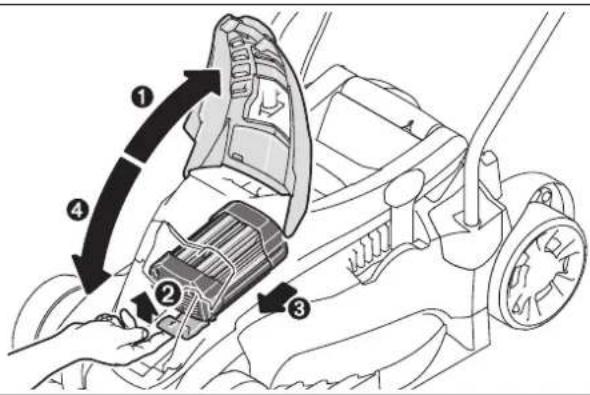
| Removing the Battery | 11 | 310 |
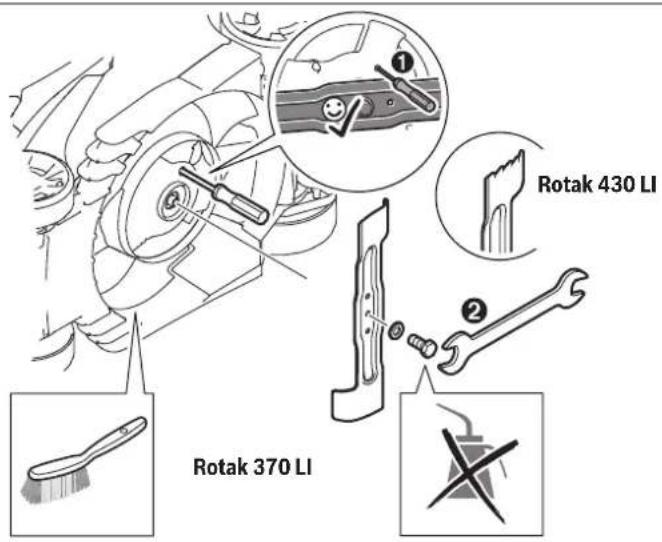
| Blade Maintenance | 12 | 310 |
| Selecting Accessories | 13 | 311 |
For Your Safety
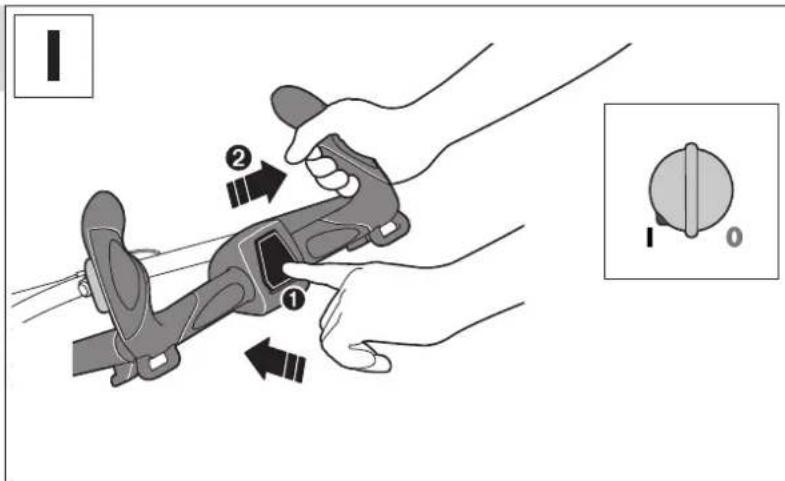
▶ Warning! Switch off, remove the isolator key and the battery before adjusting, cleaning or if cable is cut, damaged or entangled.
The blades continue to rotate for a few seconds after the machine is switched off.
▶ Caution – do not touch the rotating blade.
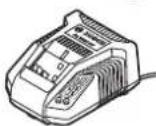
Battery Charging
▶ Do not use other battery chargers. The supplied battery charger is designed for the Lithium-Ion battery in your garden product.
▶ Observe the mains voltage! The voltage of the power supply must correspond with the data given on the name-plate of the battery charger. Battery chargers marked with 230 V can also be operated with 220 V.
The battery is equipped with temperature monitoring that allows charging only in the temperature range between 0 °C and 45 °C. In this manner, a high battery service life is achieved.
Note: The battery supplied is partially charged. To ensure full capacity of the battery, completely charge the battery in the battery charger before using your power tool for the first time.
English | 19
The lithium-ion battery can be charged at any time without reducing its service life. Interrupting the charging procedure does not damage the battery.
The "Electronic Cell Protection (ECP)" protects the lithium-ion battery against deep discharging. When the battery is run down or discharged, the garden product is shut off by means of a protective circuit: The blade no longer moves.

IMPORTANT
Do not continue to press the On/Off switch after the garden product has
been automatically switched off. The battery can be damaged.
Charging Procedure
The charging procedure starts as soon as the mains plug of the battery charger is plugged into the socket outlet and the battery is inserted into the charging compartment.
Due to the intelligent charging method, the charging condition of the battery is automatically detected and the battery is charged with the optimum charging current, depending on battery temperature and voltage.
This gives longer life to the battery and always leaves it fully charged when kept in the charger for storage.
Rapid-charging Procedure
AL 3640 CV
Professional
AL 3620 CV
Professional
The rapid-charging procedure is indicated by flashing of the green charge control LED.
Indication element of the battery: During the charging procedure, the three green LEDs light up one after the other and briefly go out. The battery is fully charged when the three green LEDs light up continuously. The three LEDs go out again approx. 5 minutes after the battery has been fully charged.
Note: The rapid-charging procedure is only possible when the battery temperature is within the allowable charging temperature range, see section "Technical Data".
Battery Charged
AL 3640 CV
Professional
AL 3620 CV
Professional
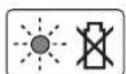
Continuous lighting of the green charge control LED signals that the battery is fully charged.
Additionally, a signal tone sounds for approx. 2 seconds, which acoustically indicates that the battery is fully charged. Afterwards, the battery can be removed for immediate use. With no battery inserted, continuous lighting of the green charge control LED indicates that the mains plug is plugged into the socket and that the battery charger is ready for operation.
Battery Temperature below 0 °C or above 45 °C
AL 3640 CV
Professional

AL 3620 CV
Professional
Continuous lighting of the red LED indicates that the battery temperature is not within the rapid-charging temperature range of 0 °C–45 °C. As soon as the allowable temperature range is reached, the battery charger automatically switches to rapid charging.
When the battery is not within the allowable temperature range, the red battery LED lights up when inserting the battery into the battery charger.
No charging procedure possible

AL 3640 CV
Professional
AL 3620 CV
Professional
If a different malfunction of the charging procedure is present, this will be indicated through flashing of the red charge control LED.
The charging procedure cannot be started and the battery cannot be charged (see section "Troubleshooting").
Charging Advice
With continuous or several repetitive charging cycles without interruption, the charger can warm up. This is not meaningful and does not indicate a technical defect of the battery charger.
A significantly reduced working period after charging indicates that the battery is used and must be replaced.
Observe the notes for disposal.
Battery Cooling (Active Air Cooling)
The fan control integrated in the battery charger controls the temperature of the inserted battery. When the battery temperature is above 30 °C, a fan cools down the battery to the optimal charging temperature. The switched-on fan produces a fan noise.
20 | English
The battery temperature is within the optimal charging temperature range when the fan is not running. Another reason for a non working fan might be that it is defective. In this case, the charging time of the battery might be extended.
Working Advice
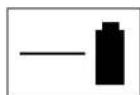
Battery Charge-control Indication
The battery is equipped with a charge-control indicator which indicates its charge condition. The charge-control indicator consists of 3 green LEDs.
Press the button to actuate the charge-control indicator. After approx. 5 seconds, the charge-control indicator goes out automatically.
The charge condition can also be checked when the battery is removed.
LED Indicators Battery Capacity
Continuous lighting of 3 green LEDs ≥ 2/3
Continuous lighting of 2 green LEDs ≥ 1/3
Continuous lighting of 1 green LED ≤ 1/3
Flashing of 1 green LED Reserve
When no LED lights up after actuating the button, the battery is defective and must be replaced.
For safety reasons, the charge condition of the battery can only be checked when the garden product is at a standstill.
During the charging procedure, the three green LEDs light up one after the other and briefly go out. The battery is fully charged when the three green LEDs light up continuously. The three LEDs go out again approx. 5 minutes after the battery has been fully charged.
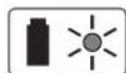
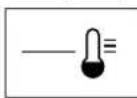
Temperature Control Indicator
The red LED signals that the battery or the electronics of the garden product (with battery inserted) are not within the optimum temperature range. When this occurs the garden product will not operate or not at full capacity.
Temperature Control of the Battery
The red LED flashes when you press the button or the On/Off switch (with battery inserted): The battery is outside of the permitted operating temperature range.
The battery switches off at a temperature above 70^ C until the optimum temperature range is reached again.
Temperature Control of the Garden Product Electronics
The red LED lights up continuously when pressing the On/Off switch: The temperature of the garden product electronics is below 5 °C or above 75 °C.
At a temperature above 90 °C, the electronics of the garden product switch off until the temperature is within the allowable temperature range again.
Area of Cut (Battery Duration)
The area of cut (battery duration) depends on lawn conditions, grass density, moisture content, grass length and height of cut.
Switching the machine on and off frequently during cutting will also reduce the area of cut (battery duration).
To improve the area of cut (battery duration) it is recommended to cut more frequently, raise the cutting height and walk at a normal pace.
The example below shows impact of conditions against run time, when using the machine with two batteries.
Cutting Conditions
Very light, dry grass Light, dry grass
Area of cut
up to 450 m²
up to 225 m²
To increase the run time an additional battery or higher capacity battery (Ah) can be purchased from an authorised customer service agent for Bosch garden products.
Troubleshooting
Problem Possible Cause Corrective Action
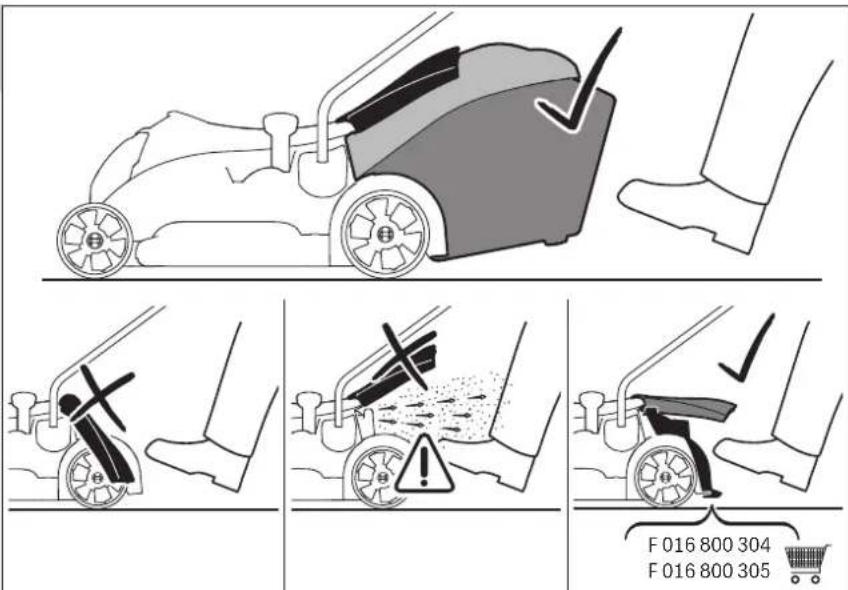
| Machine fails to operate | Possible clogging Remove the isolator key: | Check underneath the garden product and clear out as necessary (always wear protective gloves) |
| Battery not fully charged Battery Charging | ||
| Battery not inserted (properly) Inserting the battery | ||
| Grass too long Increase height of cut and tilt garden product to reduce starting load | ||
| Motor protector has activated Allow motor to cool and increase height of cut | ||
| Battery too hot/cold Allow to cool/warm | ||
| Isolator key not inserted correctly/fully Fit correctly | ||
| There is a short delay in the motor starting after Engaging the On/Off switch | Hold On/Off switch for 1 - 3 s to start motor | |
| Motor starts and stops immediately | Battery not fully charged Battery Charging | |
| Isolator key not inserted correctly/fully Fit correctly | ||
| Battery not inserted (properly) Inserting the battery | ||
| Battery too hot/cold Allow to cool/warm | Increase height of cut | |
| Machine functions intermittently | Internal wiring of machine damaged Contact Service Agent | |
| Motor protector has activated Allow motor to cool and increase height of cut | ||
| Machine leaves ragged finish and/or Motor labours | Height of cut too low Increase height of cut | |
| Cutting blade blunt Replace the blade | ||
| Possible clogging Check underneath the garden product and clear out as necessary (always wear protective gloves) | ||
| Blade fitted upside down | Refit blade correctly | |
| Area of cut (battery duration) not large enough | Height of cut too low Increase height of cut and walk slower | |
| Grass too high Increase height of cut and walk slower | ||
| Grass wet or damp | Wait until grass is dry and walk slower | |
| Grass is dense | Increase height of cut, walk slower and cut more frequently | |
| An additional battery can be purchased from an authorised customer service agent for Bosch garden products | Contact Service Agent | |
| Cutting blade not rotating while garden product switched on | Cutting blade obstructed | Switch off garden productClear obstruction (always wear protective gloves) |
| Blade nut/bolt loose Tighten blade nut/bolt (17 Nm) | ||
| Excessive vibrations/ noise | Blade nut/bolt loose Tighten blade nut/bolt (17 Nm) | |
| Cutting blade damaged | Replace the blade | |
| No charging procedure possible | Battery contacts contaminated | Clean the battery contacts (e.g. by inserting and removing the battery several times) or replace the battery |
| The battery is defective, due to a disconnection in the battery (individual cells) | Replace the battery | |
22 | English
Problem Possible Cause Corrective Action
| The charge control LEDs and respectively, do not light up after inserting the mains plug into the socket | Mains plug of battery charger not plugged in (properly) | Insert mains plug (fully) into the socket outlet |
| Socket outlet, mains cable or battery charger defective | Check the mains voltage and if necessary, have the battery charger checked by an authorized customer service station for Bosch power tools |
Maintenance and Service

Battery Maintenance
▶ Warning! Switch off, remove the isolator key, battery and grassbox before adjusting or cleaning.
▶ Always wear gardening gloves when handling or working near the sharp blades.
Use the following procedures to enable optimum usage of the battery:
- Protect the battery against moisture and water.
- Store the battery only within a temperature range between -20^ and 50^ . As an example, do not leave the battery in the car in summer.
- Do not leave the battery in the product in direct sunlight.
- The ideal storage condition for the battery is 5^ .
- Occasionally clean the venting slots of the battery using a soft, clean and dry brush.
A significantly reduced working period after charging indicates that the battery is used and must be replaced.
After-sales Service and Application Service
www.bosch-garden.com
In all correspondence and spare parts orders, please always include the 10-digit article number given on the type plate of the garden product.
Great Britain
Robert Bosch Ltd. (B.S.C.)
P.O. Box 98
Broadwater Park
North Orbital Road
Denham
Uxbridge
UB 9 5HJ
At www.bosch-pt.co.uk you can order spare parts or arrange the collection of a product in need of servicing or repair.
Tel. Service: (0344) 7360109
E-Mail: boschservicecentre@bosch.com
Ireland
Origo Ltd.
Unit 23 Magna Drive
Magna Business Park
City West
Dublin 24
Tel. Service: (01) 4666700
Fax: (01) 4666888
Australia, New Zealand and Pacific Islands
Robert Bosch Australia Pty. Ltd.
Power Tools
Locked Bag 66
Clayton South VIC 3169
Customer Contact Center
Inside Australia:
Phone: (01300) 307044
Fax: (01300) 307045
Inside New Zealand:
Phone: (0800) 543353
Fax: (0800) 428570
Outside AU and NZ:
Phone: +61 3 95415555
www.bosch.com.au
Republic of South Africa
Customer service
Hotline: (011) 6519600
Gauteng - BSC Service Centre
35 Roper Street, New Centre
Johannesburg
Tel.: (011) 4939375
Fax: (011) 4930126
E-Mail: bsctools@icon.co.za
KZN - BSC Service Centre
Unit E, Almar Centre
143 Crompton Street
Pinetown
Tel.: (031) 7012120
Fax: (031) 7012446
E-Mail: bsc.dur@za.bosch.com
Western Cape - BSC Service Centre
Democracy Way, Prosperity Park
Milnerton
Tel.: (021) 5512577
Fax: (021) 5513223
E-Mail: bsc@zsd.co.za
Français | 23
Bosch Headquarters
Midrand, Gauteng
Tel.: (011) 6519600
Fax: (011) 6519880
E-Mail: rbsa-hq.pts@za.bosch.com
Transport
The contained lithium-ion batteries are subject to the Dangerous Goods Legislation requirements. The user can transport the batteries by road without further requirements.
When being transported by third parties (e.g.: air transport or forwarding agency), special requirements on packaging and labelling must be observed. For preparation of the item being shipped, consulting an expert for hazardous material is required.
Dispatch batteries only when the housing is undamaged. Tape or mask off open contacts and pack up the battery in such a manner that it cannot move around in the packaging. Please also observe possibly more detailed national regulations.
Disposal
Do not dispose of garden products, battery chargers and batteries/rechargeable batteries into household waste!
Only for EC countries:
According to the European law 2012/19/EU, electrical and electronic equipments that are no longer usable, and according to the European law 2006/66/EC, defective or used battery packs/batteries, must be collected separately and disposed of in an environmentally correct manner.
Batteries no longer suitable for use can be directly returned at:
Great Britain
Robert Bosch Ltd. (B.S.C.)
P.O. Box 98
Broadwater Park
North Orbital Road
Denham
Uxbridge
UB 9 5HJ
At www.bosch-pt.co.uk you can order spare parts or arrange the collection of a product in need of servicing or repair.
Tel. Service: (0344) 7360109
E-Mail: boschservicecentre@bosch.com
Battery packs/batteries:
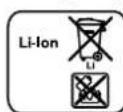
Li-Ion:
Please observe the instructions in section "Transport".
Subject to change without notice.
Français
www.bosch-garden.com
Accukoeling (Active Air Cooling)
www.bosch-garden.com
www.bosch-garden.com
Bosch Service Center
Telegrafvej 3
2750 Ballerup
På www.bosch-pt.dk kan der online bestilles reservedele eller oprettes en reparations ordre.
Tlf. Service Center: 44898855
Fax: 44898755
E-Mail: vaerktoej@dk.bosch.com
Transport
www.bosch-garden.com
Bosch Service Center
Telegrafvej 3
2750 Ballerup
Danmark
Tel.: (08) 7501820 (inom Sverige)
Fax: (011) 187691
Transport
www.bosch-garden.com
www.bosch-garden.com
Robert Bosch Sp. z o.o.
www.bosch-garden.com
Bosch Service Center PT
K Vápence 1621/16
692 01 Mikulov
www.bosch-garden.com
www.bosch-garden.com
www.bosch-garden.com
www.bosch-garden.com
Tel. service scule electrice: (021) 4057540
Fax: (021) 4057566
E-Mail: infoBSC@ro.bosch.com
www.bosch-garden.com
www.bosch-garden.com
www.bosch-garden.com
Kod svih upita i naručivanja rezervnih dijelova molimo neizostavno navedite 10-znamenkasti kataloški broj sa tipske pločice vrtnog uredaja.
Hrvatski
Robert Bosch d.o.o
Kneza Branimira 22
10040 Zagreb
Tel.: (01) 2958051
Fax: (01) 2958050
Transport
Akumulatora dzesëšana (Active Air Cooling)
www.bosch-garden.com
www.bosch-garden.com
text_image
Diagram showing a hand operating a cart with labeled parts, including numbered arrows and a small gear mechanism.4
natural_image
Diagram showing two connected electrical enclosures, one with a button and arrow indicating assembly (no text or symbols present)5

text_image
Diagram of a lawn mower with labeled parts and directional arrows indicating motion or movementBosch Power Tools F 016 L81 430 | (8.9.16)
308
6
text_image
1 07
text_image
Diagram showing mechanical assembly with numbered components and directional arrows indicating motion or force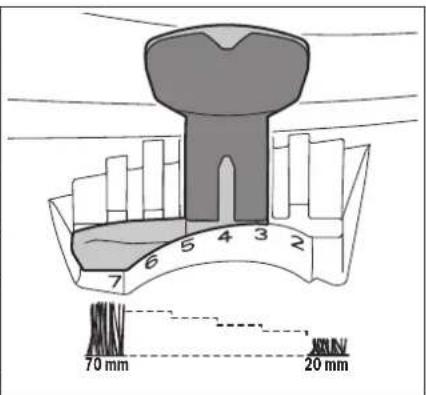
text_image
70 mm 20 mm8
text_image
Diagram illustrating the step-by-step instructions for adjusting a mechanical component, with labeled parts and an inset showing a rotary dial.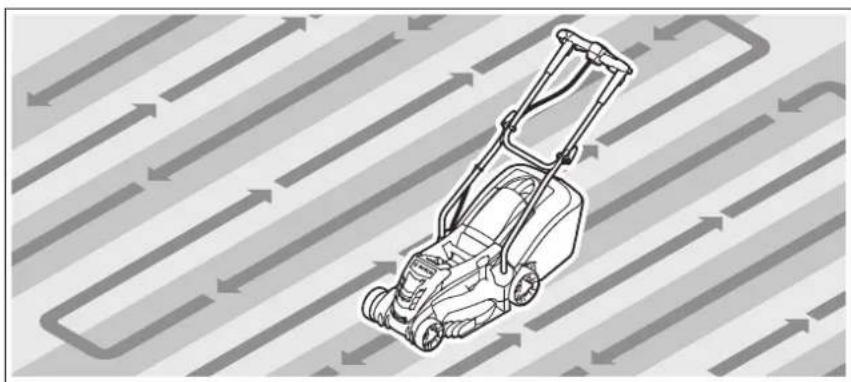
natural_image
Line drawing of a lawn mower with directional arrows indicating flow or movement (no text or symbols)9

text_image
F 016 800 304 F 016 800 30510
natural_image
Illustration of a hand using a cable buckle to lift a car seatbelt, showing motion direction (no text or symbols)310
text_image
Diagram illustrating a mechanical shift operation with labeled components and directional arrows indicating rotation or movement.11

text_image
Diagram of a lawn mower showing labeled parts including seatbelt, blade, and wheel handle12


text_image
Rotak 430 LI Rotak 370 LI13
natural_image
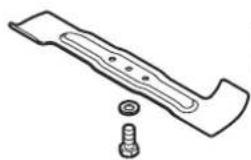
Technical line drawing of a mechanical component with a bolt and nut (no text or symbols)Rotak 370 LI
F016800277
natural_image
Technical line drawing of a mechanical component with a bolt and nut (no text or symbols)Rotak 430 LI
F016800369
Rotak 370 LI
F016800304
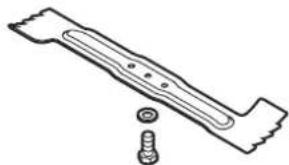
natural_image
Technical line drawing of a mechanical component with mounting holes and a curved base (no text or symbols)Rotak 430 LI
F016800305

(4 Ah) F 016 800 346
2 607 225 657 (EU)
2 607 225 659 (UK)
2 607 225 099 (EU)
2 607 225 101 (UK)
| I | CE | ||
| de | EU-KonformitätserklärungAkku-Rasenmäher Sachnummer | Wir erklären in alleiniger Verantwortung, dass die genannten Produkte allen einschlägigen Bestimmungen der nachfolgend aufgeführten Richtlinien und Verordnungen entsprechen und mit folgenden Normen übereinstimmen. | |
| en | EU Declaration of ConformityCordless Lawnmower Article number | We declare under our sole responsibility that the stated products comply with all applicable provisions of the directives and regulations listed below and are in conformity with the following standards. | |
| fr | Déclaration de conformité UETondeuse sans fil N° d'article | Nous déclarons sous notre propre responsabilité que les produits décrits sont en conformité avec les directives, règlements normatifs et normes énumérés ci-dessous. | |
| es | Declaración de conformidad UECortacésped accionado N° de articulo por acumulador | Declaramos bajo nuestra exclusiva responsabilidad, que los productos nombrados cumplen con todas las disposiciones correspondientes de las Directivas y los Reglamentos mencionados a continuación y están en conformidad con las siguientes normas. | |
| pt | Declaração de Conformidade UECorta-relvas sem fio N.° do produto | Declaramos sob nossa exclusiva responsabilidade que os produtos mencionados cumprem todas as disposições e os regulamentos indicados e estão em conformidade com as seguintes normas. | |
| it | Dichiarazione di conformità UETosaerba a batteria Codice prodotto | Dichiariamo sotto la nostra piena responsabilità che i prodotti indicati sono conformi a tutte le disposizioni pertinenti delle Direttive e dei Regolamenti elencati di seguito, nonché alle seguenti Normative. | |
| nl | EU-conformiteitsverklaringAccu-grasmaaier Productnummer | Wij verklaren op eigen verantwoordelijkheid dat de genoemde producten voldoen aan alle desbetreffende bepalingen van de hierna genoemde richtlijnen en verordeningen en overeenstemmen met de volgende normen. | |
| da | EU-overensstemmelseserklæringAkku-plæneklipper Typenummer | Vi erklærer som eneansvarlige, at det beskrevne produkt er i overensstemmelse med alle gældende bestemmelser i fuølgende direktiver og forordninger og opfylder følgende standarder. | |
| sv | EU-konformitetsförklaringSladdlös gräsklippare Produktnummer | Vi förklarar under eget ansvar att de nämnda produkterna uppfyller kraven i alla gällande bestämmelser i de nedan angivna direktiven och förordningar nas och att de stämmer överens med följande normer. | |
| no | EU-samsvarserklæringBatteridrevet Produktnummergressklipper | Vi erklærer under eneansvar at de nevnte produktene er i overensstemmelse med alle relevante bestemmelser i direktivene og forordningene nedenfor og med følgende standarder. | |
| fi | EU-vaatimustenmukaisuusvakuutusAkkuruohonleikkuri Tuotenumero | Vakuutamme täten, että mainitut tuotteet vastaavat kaikkia seuraavien direktiivien ja asetusten asiaankuuluvia vaatimuksia ja ovat seuraavien standardien vaatimusten mukaisia. | |
| el | Δήλωση πιστότητας EEΧλοοκοπτικό μπαταρίας Αριθμόςευρετηρίου | Δηλώνουμε με αποκλειστική μας ευθύνη, ότι τα αναφερόμενα προϊόντα αντιστοιχούν σε όλες τις σχετικές διατάξεις των πιο κάτω αναφερόμενων οδηγιών και κανονισμών και ταυτίζονται με τα ακόλουθα πρότυπα. | |
| tr | AB Uygunluk beyaniAkülü çim biçmemakinesi | Ürün kodu | Tek sorumlu olarak, tanımlanan ürünün aşağıdaki yönetmelik ve direktiflerin geçerli bütün hükümlerine ve aşağıdaki standartlara uygun olduğunu beyan ederiz. |
| pl | Deklaracja zgodności UEKosiarka akumulatorowa Numer katalogowy | Oświadczamy z pełną odpowiedzialnością, że niniejsze produkty odpowiadają wszystkim wymaganiom poniżej wyszczególnionych dyrektyw i rozporządzeń, oraz że są zgodne z następującymi normami. | |
| cs | EU prohlásení o shoděAkumulátorová travní sekačka Objednací číslo | Prohlašujeme na výhradní zodpovědnost, že uvedený výrobek splňuje všechna příslušná ustanovení niže uvedených smérnic a nařizení a je v souladu s následujícími normami: | |
| sk | EÚ vyhlásenie o zhodeAkumulátorová kosačka na trávu Vecné číslo | Vyhlasujeme na výhradnú zodpovednosť, že uvedený výrobok splňa všetky príslušné ustanovenia nižšie uvedených smerníc a nariadení a je v súlade s nasledujúcími normami: | |
| hu | EU konformitási nyilatkozatAkkumulátoros Cikkszám fűnyírógép | Egyedüli felelőséggel kijelentjük, hogy a megnevezett termékek megfelelnek az alábbiakban felsorolásra kerülő irányelvek és rendeletek valamennyi ide-vágó előírásainak és megfelelnek a következő szabványoknak. | |
CE
||
| ru | Заявление о соответствии ЕСАккумуляторная газонокосилка | Товарный No | Мы заявляем под нашу единоличную ответственность, что названныепродукты соответствуют всем действующим предписаниямнижеуказанных директив и распоряжений, а также нижеуказанныхнорм. |
| uk | Заява про відповідність ЄСАккумуляторна газонокосарка | Товарний номер | Мизаявляемо під нашу одноособову відповідальність, що названі виробивідповідають усім чинним положенням нищеозначених директив ірозпоряджень, а також нижчеозначеним нормам. |
| kk | ЕО сәйкестік маглумдамасыАккумулятормен жұмыс істейтін көгалшапқыш | Өнім немірі | Өз жауапкершілікпен біз аталған өнімдер теменде жзылғандиректикалар мен жарлықтардың тиісті қағидаларына сәйкестігін жәнетемендегі нормаларға сай екенін білдіреміз. |
| ro | Declarație de conformitate UEMaşină ce tuns iarba cu acumulator | Număr de identificare | Declarăm pe proprie răspundere că produsele mentionate corespund tutuordispozițiilor relevante ale directivelor și reglementărilor enumerate în cele ceurmează și sunt în conformitate cu următoarele standarde. |
| bg | ЕС декларация за съответствиеАкумулаторна тревокосачка | Каталожен номер | С пълна отговорност ние декларираме, че посочените продуктиотговарят на всички валидни изисквания на директивите и разпоредбитепо-долу и съответства на следните стандарти. |
| mk | EU-Изјава за сообразностБежична косачка Број надел/артикл | Со целосна одговорност изјавуваме, дека опишаните производи се восогласност со сите релевантни одредби на следните регулативи ипрописи и се во согласност со следните норми. | |
| sr | EU-izjava o usaglašenostiAkumulator-kosačicaza travu | Broj predmeta | Na sopstvenu odgovornost izjavljujemo, da navedeni proizvodi odgovarajusvim dotičnim odredbama naknadno navedenih smernica u uredaba i da su uskladu sa sledećim standardima. |
| sl | Izjava o skladnosti EUAkumulatorska kosilni-са | Številka artikla | Izjavljamo pod izključno odgovornostjo, da je omenjen izdelek v skladu z vse-mi relevantnimi določili direktiv in uredb ter ustreza naslednjim standardom. |
| hr | EU izjava o sukladnostiAkumulatorska kosilica za travu | Kataloški br. | Pod punom odgovornošću izjavljujemo da navedeni proizvodi odgovarajusvim relevantnim odredbama direktiva i propisima navedenima u nastavku ida su sukladni sa sljedećim normama. |
| et | EL-vastavusdeklaratsioonAkumuruniiduk | Tootenumber | Kinnitame ainuvastutajatena, et nimetatud tooted vastavad järgnevalt loetletud direktiivide ja määruste kõikidele asjaomastele nõuetele ja on kooskõlasjärgmiste normidega. |
| lv | Deklarăcija par atbilstību ESstandartiemAkumulatora zăliena plăvėjs | Izstrădăjumamumurs | Mės ar pilnu atbildību paziņojam, ka šeit aplūkotie izstrădājumi atbilst visiemtălăk minētajās direktivās un rīkojumos ietvertajām saistošajām nostădnēm,kā arī sekojošiem standartiem. |
| lt | ES atitikties deklaracijaAkumuliatorinė žoliapjovė | Gaminio numeris | Atsakingai pareiškiame, kad išvardyti gaminiai atitinka visus privalomusžemiau nurodytų direktyvų ir reglamentų reikalavimus ir šiuos standartus. |
| Rotak 370 LI | 3 600 HA4 4.. | 2006/42/EC | |
| Rotak 430 LI | 3 600 HA4 5.. | 2000/14/EC2014/30/EU2011/65/EUEN 60335-1:2012+A11:2014EN 60335-2-77:2010EN 55014-1:2006+A2:2011EN 55014-2:1997+A2:2008EN 50581:2012 | |
III
CE
de Rotak 370 LI
2000/14/EC: Measured sound power level 89 dB(A), uncertainty K = 1 dB, guaranteed sound power level 89 dB(A); Conformity assessment procedure in accordance with annex VI. Product category: 32 Notified body: SRL, Sudbury, England, Nr. 1088
Rotak 430 LI
2000/14/EC: Measured sound power level 90 dB(A), uncertainty K = 1 dB, guaranteed sound power level 90 dB(A); Conformity assessment procedure in accordance with annex VI. Product category: 32 Notified body: SRL, Sudbury, England, Nr. 1088 Technical file at: *
fr Rotak 370 LI
* Bosch Lawn and Garden Ltd., PT-HG/ENS-PA2, Stowmarket, Suffolk IP14 1EY, England
Henk Becker
Executive Vice President
Engineering and Manufacturing
Helmut Heinzelmann
Head of Product Certification

i.v. h=w
Robert Bosch Power Tools GmbH, 70538 Stuttgart, GERMANY Stuttgart, 01.01.2017