
Unix MX - Exercise bike KETTLER - Free user manual and instructions
Find the device manual for free Unix MX KETTLER in PDF.
| Brand | Kettler |
| Model | Unix MX |
| Product Type | Exercise Bike |
| Display | Electronic screen with various functions (time, distance, speed, energy, heart rate, cadence, brake level) |
| User Memories | 2 memories for personal data (Person 1 and 2) |
| Training Types | Without presets, with presets (time, distance, energy), heart rate monitoring |
| Heart Rate Measurement | Ear clip (infrared), chest strap (POLAR accessory n°67002000), handlebar sensors |
| Brake Levels | 1 to 10 |
| Power Supply | 2 batteries (type LR6/AA estimated) |
| Recovery Function | Recovery heart rate measurement with fitness rating calculation (F) |
| Time Setting | 12h/24h mode |
| Units | Metric (km/h, kJ, km) or imperial (mi/h, kcal, mi) |
| Safety | Instructions: consult a doctor before training, check fastenings, use original KETTLER parts |
| Maintenance | Check connections before first use and every 6 days of operation; replace defective parts immediately |
| Spare Parts | Use exclusively original KETTLER spare parts |
| General Information | User manual and instructions available free of charge as PDF on notice-facile.com |
Frequently Asked Questions - Unix MX KETTLER
User questions about Unix MX KETTLER
0 question about this device. Answer the ones you know or ask your own.
Ask a new question about this device
Download the instructions for your Exercise bike in PDF format for free! Find your manual Unix MX - KETTLER and take your electronic device back in hand. On this page are published all the documents necessary for the use of your device. Unix MX by KETTLER.
USER MANUAL Unix MX KETTLER
Training and Operating Instructions
.Wert: 0 - 9999
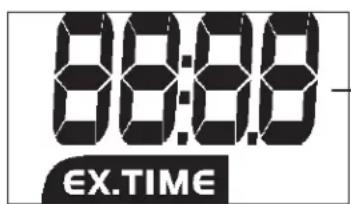
Zeit (EX.TIME)

Wert: 0:00 – 99:59
Bremsstufe (BRAKE)
Training and Operating Instructions

Table of contents 12
Safety instructions 12
Service 12
Your safety 12
Description 13-15
• Function range / Buttons 13
• Indicating range / Display 14-15
Settings 16
• Time
• Metric / Imperial 16
- Memory P1/P2 16
Training 17
without presetting/pulse monitoring 17
with presetting 17
• Time
• Distance
• Energy (KJoule/kcal) 17
• Age (10-99) 17
- Set warning signal (yes/no) 17
• Selection of target pulse (FA 65%/FI 75%) 17
• Entry of target pulse (40-199) 17
• Interruption/end of training 18
• Resumption of training 18
• Recovery (recovery pulse measurement) 16 19
• Display of previous training 19
• System signals 20
• Recovery
• Calculation of average value 20
• Notes on pulse measurement 17 20
With ear clip 17 20
General instructions 20
With chest belt 20
With hand pulse 20
- Changing the batteries 20
- Brake level display 20
Training instructions 20
• Stamina training 20
• Strain intensity 20
• Duration of strain 21
Glossary 21

This sign in the instructions refers to the glossary, where the respective term will be explained.1320
Safety instructions
Please observe the following instructions for your own safety:
- The training device must be set up on an appropriate and firm surface.
- Inspect the connections for firm fitting before initial operation and additionally after approximately six operation days.
- In order to prevent injuries caused by wrong stress or overstress, the training device may only be used in accordance with the instructions.
- It is not recommended to permanently set up the device in humid rooms due to the resulting corrosion development.
• Assure yourself regularly that the training device functions properly and that it is in duly condition. - The operator is responsible for the safety controls, which have to be carried out on a regular and proper basis.
- Defective or damaged parts must be exchanged immediately. Only use original KETTLER spare parts.
- The device may not be used until after repairs are completed.
- The safety level of the device can only be maintained provided that it is regularly inspected for damage and wear and tear.
For your safety:
- Please clarify with your general practitioner before you start with the training, whether or not your health condition allows you to train with this device. The diagnostic findings should be the basis for the determination of your training programme. Wrong or excessive training can cause damage to your health.
Description
The electronics assembly has the following functions:
• 2 personal memories for:
Training kilometres and time
Training presettings
Display of last training with average and maximum values
• KJoule/km/h or kcal/m/h settings
• Calculation of energy consumption depending on speed and braking level
Function range
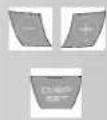
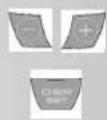
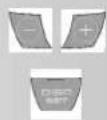
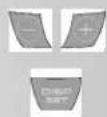
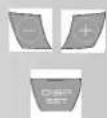
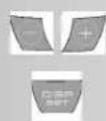
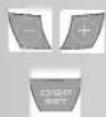
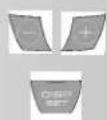
The five buttons will be described in short below.
DISP-SET (press shortly)
- Switches from time display to ready for training.
- Switches to next input or display. Settings or values will be accepted.
Settings or values will be accepted.
DISP-SET (press longer) RESET
- Deletes display for a reset. Only possible in standstill.
Minus - / Plus +
With these function buttons, you can change the values in the different input data before the start of the training
- Press longer > fast run through the values
- Press "Plus" and "Minus" together: input data will be reset)
Minus - (press shortly when time is displayed)
• Display of last training data (MEM) and total kilometres (ODO)
Minus - (press longer when time is displayed)
- Set time (TIME)
- Switch from ME to IM (SETTINGS) ME = [24h], [KJoule], [kilometres] -display IM = [12h], [Kcal], [miles] -display
- Activate Save training presettings.
REC (recovery pulse with fitness mark)
By pressing this function button, the recovery pulse function is started and a fitness grade is calculated.
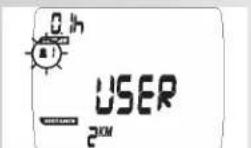
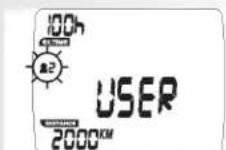
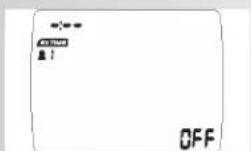
Persons
- Display of training kilometres and time of person 1 or person 2.
• Display of previous training data.
Measuring the pulse
The measurement of the pulse can be carried out by means of 3 sources:
- Ear clip - The plug is put into the socket.
- Chest strap without plug-in. In this electronic unit, the receiver is built in behind the display. A plugged-in ear clip must be removed. The Polar chest strap is available as an accessory (item no. 67002000).
- Hand pulse - The connection is situated at the back of the display;
FB601/610
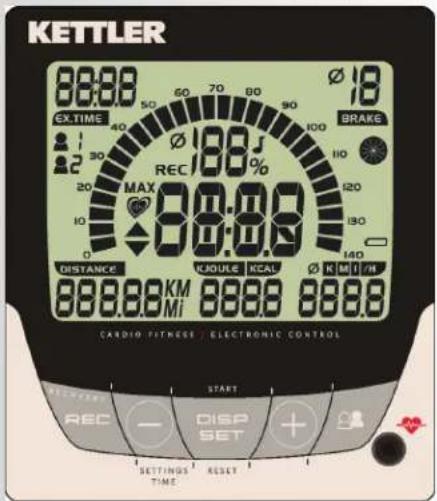


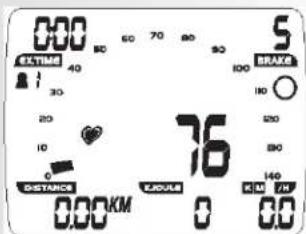
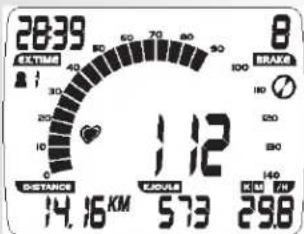
Training and Operating Instructions Indicating range / Display
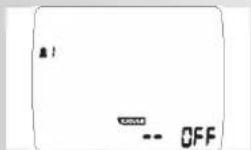
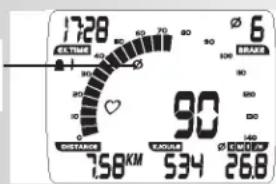
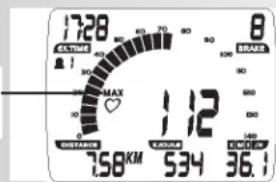
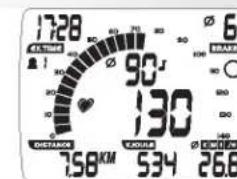
The display provides information on different functions.
Pedalling frequency (RPM)
![10 - 140 [1/min] 1 Segment = 5 [1/min]](/content/2026/02/396168/images/0a734ca05e2810fb39c0307584c380114bfc7cdc1332982d4caa9b96a1dc73ce.jpg)
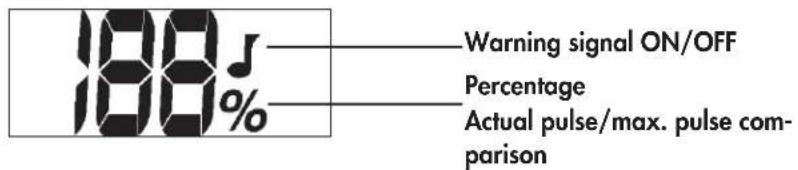
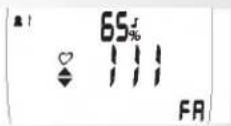
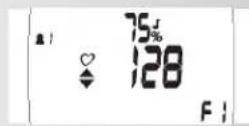
PULSE

![Display of average value RECOVERY function RECOVERY Maximum Pulse Warning (flashes) max. pulse +1 Heart symbol (flashes) Target pulse limit fallen below -11 Increase pulse beat Target pulse limit exceeded +11 Reduce pulse beat Ø 188 J REC 100 % MAX 38:89 Warning signal ON/OFF Percentage Actual pulse/max. pulse comparison Display of pulse value 40 – 220 [1/min]](/content/2026/02/396168/images/f9004d27522bb512b16ddaaf9e0702caa46ca3ee93fd3aade76ffaae1b84380f.jpg)
Percentage pulse
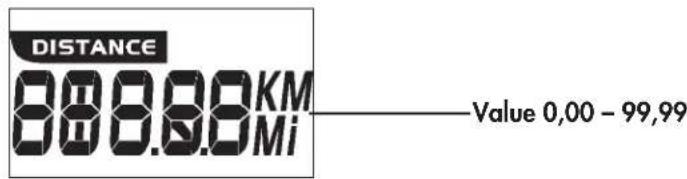
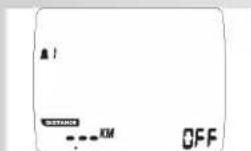
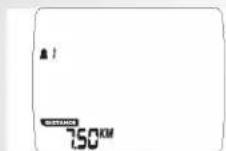
DISTANCE
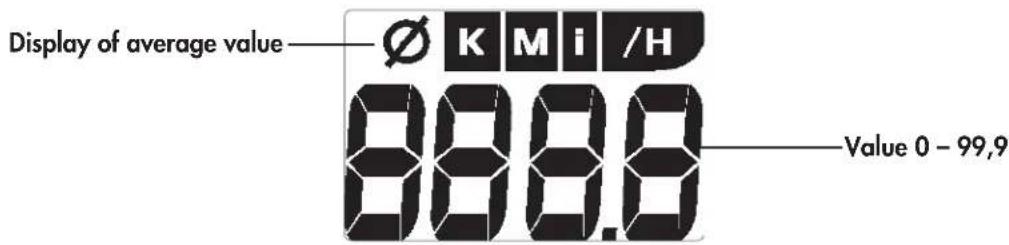
SPEED
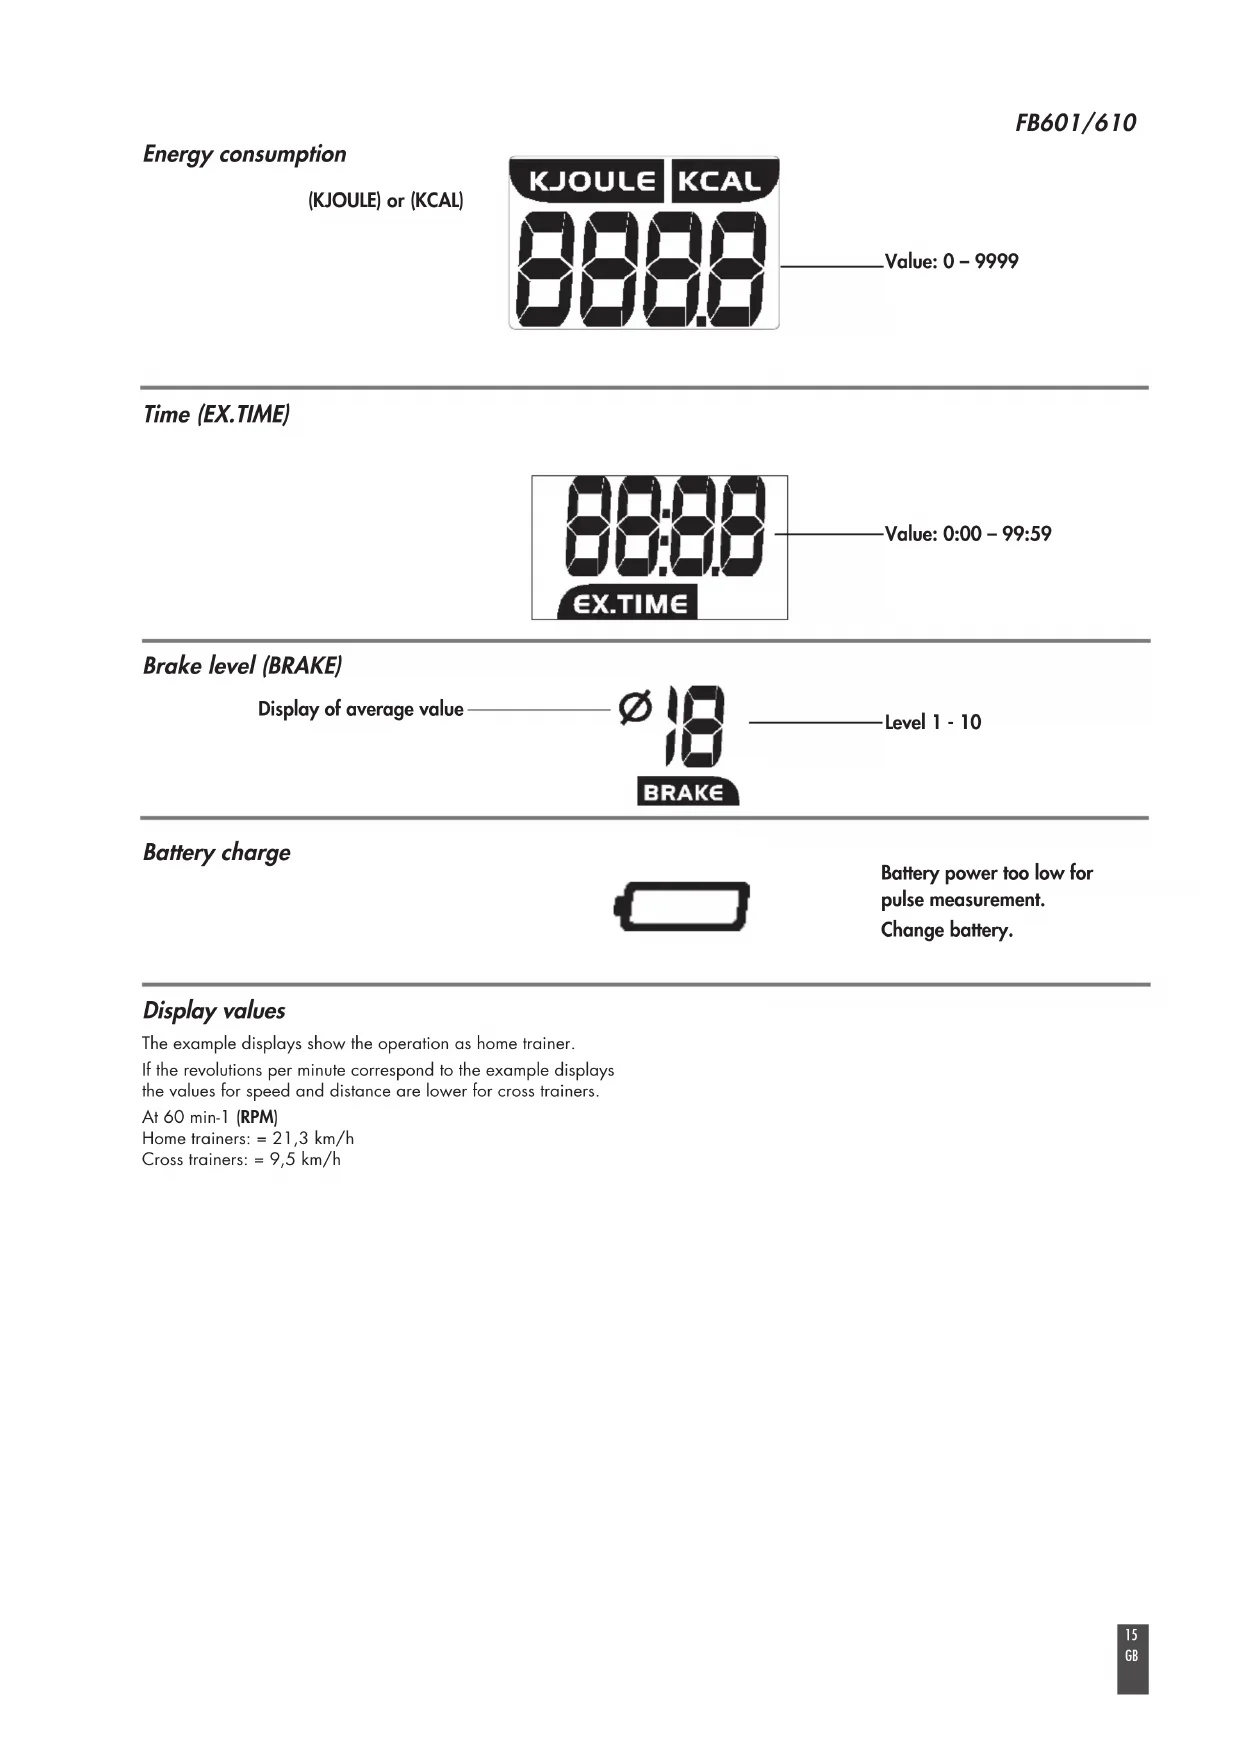
Energy consumption
(KJOULE) or (KCAL)
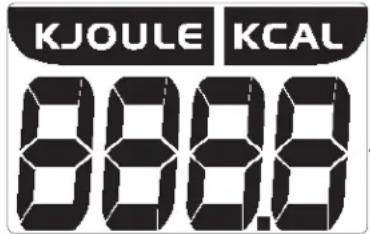
.Value: 0 - 9999
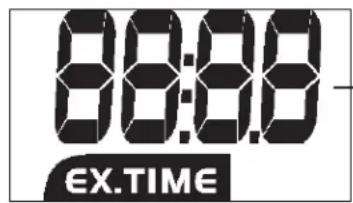
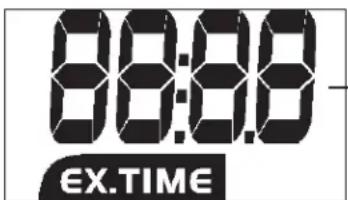
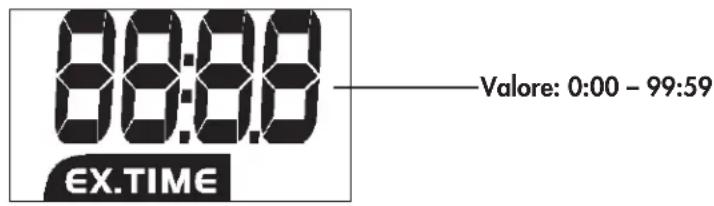
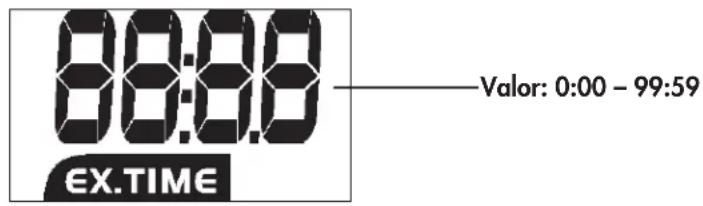
Time (EX.TIME)

Value: 0:00 - 99:59
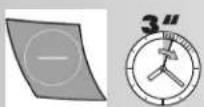
Brake level (BRAKE)
Display of average value


BRAKE
Level 1 - 10
Battery charge

Battery power too low for pulse measurement.
Change battery.
Display values
The example displays show the operation as home trainer.
If the revolutions per minute correspond to the example displays
the values for speed and distance are lower for cross trainers.
At 60 min-1 (RPM)
Home trainers: = 21,3 km/h
Cross trainers: = 9,5 km/h
Training and Operating Instructions


Settings
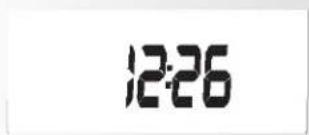
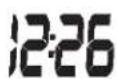
Time
- Minus – (press longer when time is displayed) Hours flash
- Press Minus - / Plus + Set hour
- Press DISP SET Minutes flash
- Press Minus - / Plus + Set minutes
- DISP SET
- Press Minus - / Plus + Set to IM or ME ME = [24h], [KJoule], [kilometres] -display or IM = [12h], [Kcal], [miles] -display
- Press DISP SET Activate presetting memory for person 1
- Press Minus - / Plus + Activate memory for person 1. [STORE] As soon as STORE is activated, the training presettings time, distance, energy and pulse monitoring are stored and displayed for each new training.
- Press DISP-SET Activate presetting memory for person 2
- Press Minus - / Plus + Activate memory for person 2. [STORE] As soon as STORE is activated, the training presettings time, distance, energy and pulse monitoring are stored and displayed for each new training.
- Press DISP-SET Time is displayed
Training
1. Training without presetting / Pulse measurement / Readiness for training
- Press DISP button
Person 1 is displayed.
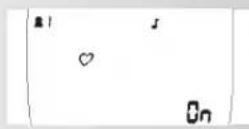
The readiness for training is displayed with 0 values.
A pulse value is displayed as soon as a pulse signal is identified on the ear clip, hand pulse or plug recipient. A braking level is indicated.
and / or
- Pedalling
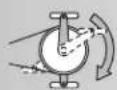
„EX.TIME“ Exercise time, “DISTANCE”, energy consumption and speed are displayed in increasing order. Pedal revolutions are displayed.
Animation wheel is active.
2. Training with presettings/pulse monitoring
It is possible to enter time, distance and energy presettings. When the training is started, these values count down in reverse. If zero is reached, the display flashes and a signal is emitted. Then the presetting value counts up.
When the pulse function is activated, pulse can be monitored displaying a pulse range with deviations of +/- 10 beats as well as a maximum pulse deviation which is signalled by a warning signal.
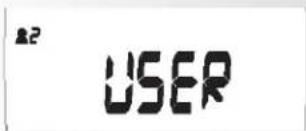
Selection of persons
The electronic system has 2 personal memories which allow for 2 exercising persons to enter different training presettings. This makes sense if the training shall always be carried out using the same presettings. Thus it is not necessary any more to enter the presettings before starting the training.
The total training time and kilometres are also stored under person 1 and 2.
For activation you must press Activate [STORE] preset- tings/memory for person
- Press "persons": selection of persons
Display: "Person 1 flashes, total training time and kilometres"
- Switch person pressing "Plus" or "Minus"
- Confirm person with "DISP/SET"
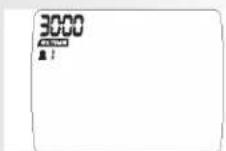
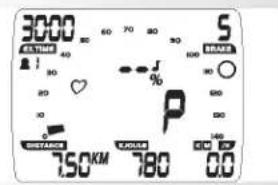
Time presettings (EX.TIME)
- Enter values using "Plus" or "Minus" (e.g. 30:00) Confirm with "DISP/SET".
Display: next menu "DISTANCE"
Distance presettings (DISTANCE)
- Enter values using "Plus" or "Minus" (e.g. 7.50) Confirm with "DISP/SET"
Display: next menu "Age"
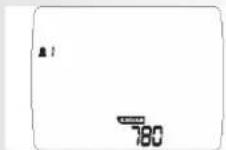
Energy presettings (KJOULE/KCAL)
- Enter values using "Plus" or "Minus" (e.g. 780) Confirm with "DISP/SET".
- Select kJoule or kcal unit using "Plus" or "Minus". Confirm "DISP/SET".
Display: next menu "Age"
FB601/610


Training and Operating Instructions


Age entry (AGE)
Entering the age allows for the determination and monitoring of the maximum pulse (MAX symbol, warning signal, if activated).
- Enter values using "Plus" or "Minus" (e.g. 50). This will result in a maximum pulse of 170 when entering the relation (220 - age). Confirm with "DISP/SET".
Display: next menu "Warning signal"
Warning signal when maximum pulse is exceeded.
- Select function with symbol using "Plus" or "Minus" Confirm with "DISP/SET".
Display: next menu target pulse selection "FA 65%"
Target pulse monitoring FA 65% / FI 75%
- Select using "Plus" or "Minus" - Fat burning 65%, fitness 75% of maximum pulse Confirm with "DISP/SET" (presetting mode completed)
Display: Readiness for exercise using the presettings
or
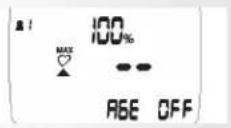
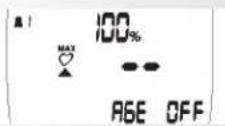
Target pulse entry
Entering the values 40 - 199 allows for the determination and monitoring of the training pulse irrespective of age (HI symbol, warning signal if activated, no maximum pulse monitoring).
For this purpose, age entry must be switched to "OFF".
- Deselect maximum pulse monitoring using "Plus" and "Minus". Display: "AGE OFF" Confirm with "DISP/SET".
Display: next presetting "Target pulse"
- Enter value using "Plus" or "Minus" (e.g. 130) Confirm with "DISP/SET" (presetting mode completed)
Display: Readiness for training using presettings
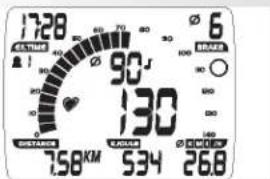
- Pedalling The presettings are counted in decreasing order.
Training interruption/end of training
With less than 10 pedal rotations per minute, the electronics assembly of the training device identifies a training interruption. The animation wheel is displayed empty. The achieved training data are displayed.
Rotations, pulse, speed and brake level are displayed as average value using the ∅ symbol.
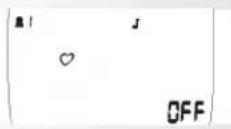
The training data are displayed for 4 minutes. If you do not press any button nor train during this period of time, time electronics assembly of the training device switches to stand-by mode and displays the time.
Resumption of training
If you resume training within 4 minutes, the last values continue to be counted up or down.
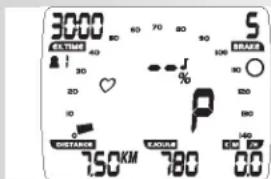
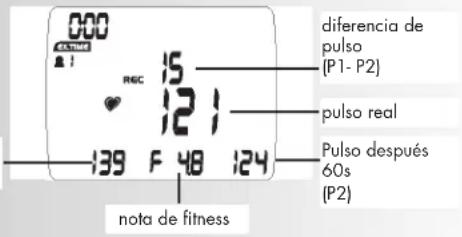
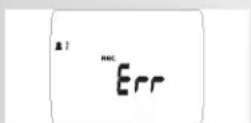
RECOVERY function
Recovery pulse measurement
Press "RECOVERY" at the end of training.
Display: REC
The pulse value is stored (P1).
The current pulse is still displayed.
The electronics assembly of the training device measures your pulse 60 seconds in reverse.
The pulse value after 60 seconds (P2) is stored.
The pulse difference (P1-P2) is displayed
From this value, a fitness mark (F 4.8 for this example) is determined.
The display is completed after 20 second.
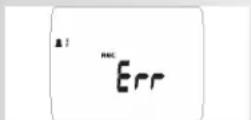
"RECOVERY" interrupts the recovery pulse function or the fitness mark display.
If no pulse is measured in the beginning or at the end of the reverse counting, the error message "Err" is displayed.
Display of previous training with average and maximum values
- Press "Persons": selection of persons
Display: "Person 1 flashes, total training time and kilometres" - Switch persons using "Plus" or "Minus"
- Press "Persons" once more:
Display: Average values of pulse, % pulse, RPM, km/h and brake level of the previous training are displayed with the [] symbol.
- Press "DISP/SET"
Display: Average values of pulse, % pulse, RPM, km/h and brake level of the previous training are displayed with the [MAX] symbol. - Press "DISP/SET"
Display: Readiness for training with or without presettings.
Comment:
The last training values only refer to the previous training unit. The values are stored by "RESET" or by the activation of the stand-by mode with time display deleting previous values.
FB601/610


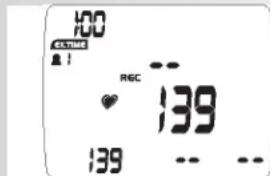
Pulse REC Start (P1)

Display of average values [∅]
Display of max. values [MAX]
Training and Operating Instructions
General instructions
System signals
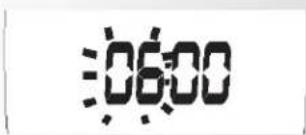
Activation of the device
If you activate the device, a signal is emitted during the segment test.
Presetting
A short signal is emitted, if you reach a presetting such as time, distance and KJoule/ kcal.
Maximum pulse exceeding
If the preset maximum pulse is exceeded by one pulse beat, 2 short signals are emitted for the time.
Recovery
Calculation of the fitness mark (F):
$$ \operatorname{mark} (F) = 6. 0 - \left(\frac {1 0 \times (P 1 - P 2)}{P 1}\right) ^ {2} $$
P1 stress pulse P2 = recovery pulse
Grade 1 = very good Grade 6 = insufficient
Calculation of average value
The calculations of the average values refer to training units in the past until a reset or the stand-by mode.
Instructions for pulse measurement
The pulse measurement starts as soon as the heart in the display blinks in time with your pulse beat.
With ear clip
The pulse sensor works with infrared light and measures the variations in translucence in your skin, which are produced by your pulse beat. Rub your ear ten times strongly to activate the blood circulation before attaching the pulse sensor to your earlobe.
Avoid disturbing pulses.
- Attach the ear clip properly to your earlobe and look for the best point for the measurement (heart symbol blinks without interruption).
- Do not train directly under strong incidence of light, e.g. neon light, halogen light, spotlights, sun light.
- Completely eliminate any shocks or bounces of the ear sensor and the cable. Always attach the cable with a clip at your clothing or, even better, at your headband.
With breast clip
Please observe the corresponding instructions.
With hand pulse
An extra-low voltage caused by the contractions of your heart is registered by the hand sensors and evaluated by the electronics assembly of the device
• Always grab the contact faces with both hands
- Avoid jerky grasping
- Hold your hands calmly and avoid contractions and rubbing on the contact faces.
Comment:
Only one way of pulse measurement is possible: either with ear clip or with hand pulse or with breast belt. If no ear clip or plug recipient is located in the pulse plug, hand pulse measurement is activated. If you insert an ear clip or a plug recipient in the pulse plug, hand pulse measurement is automatically deactivated. It is not necessary to disconnect the plug of the hand pulse measurement.
Battery change
If the battery symbol occurs in the display, battery power is too low for pulse measurement. Training kilometres and time as well as all presettings will get lost. Time must be reset.
Brake level display
Brake setting is classified in level 1-10. If this classification is disturbed or lost, you must restore it as follows:
- Check whether the 3-pole connecting cable is plugged in at the back of the display.
- Insert batteries and press the "DISP/SET" button until the segment test is completed.
- Turn back hand lever to minimum setting and press the "DISP/SET" button when 0%, BRAKE 0 is displayed.
- Pre-turn hand lever to maximum setting and press the "DISP/SET" button when 100%, BRAKE 10 is displayed.
The process is completed.
Training instructions
Sports medicine and training science use cycle ergometry, among other things, for the examination of the functional capability of heart, circulation and respiratory system.
You can find out whether or not you have achieved the desired effect from your training after several weeks using the following method:
- You manage a particular endurance performance with less heart / circulation performance than previously
- You sustain a particular endurance performance with the same heart / circulation performance over a longer period.
- You recover more quickly than previously after a particular heart / circulation performance.
Guide values for the endurance training
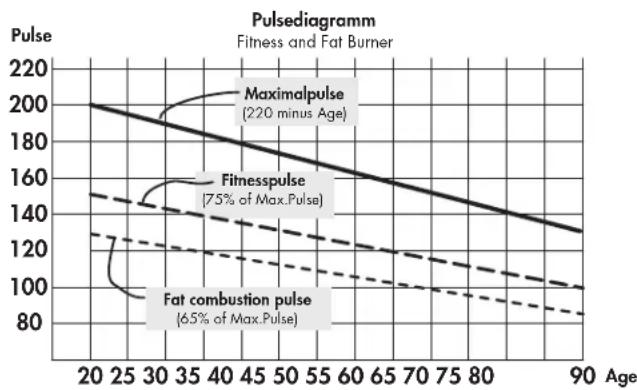
Maximalpulse: maximum strain means the reaching of the individual maximum pulse. The maximum achievable heart rate is dependant on age.
Here the following empirical formula applies: the maximum heart rate per minute corresponds to 220 heart beats minus age in years.
Example: age 50 years -> 220 - 50 = 170 pulse/min.
Load intensity
Load pulse: the optimum intensity of load is reached at 65–75 % (see also diagram) of the maximum pulse. This value changes depending on age.
line
| Age | Maximalpulse | Fitnesspulse | Fat combustion pulse | | --- | ------------ | ------------ | ------------------- | | 20 | 200 | 140 | 130 | | 30 | 180 | 130 | 120 | | 40 | 160 | 120 | 110 | | 50 | 140 | 110 | 100 | | 60 | 120 | 100 | 90 | | 70 | 100 | 90 | 85 | | 80 | 80 | 85 | 80 | | 90 | 60 | 80 | 75 |Extent of load
Duration of a training unit and its frequency per week:
The optimum extent of load is attained, if 65–75 % of the individual heart / circulation performance is achieved over a longer period.
Training frequency Duration of training
daily 10 minutes
2–3 times a week 20–30 minutes
1–2 times a week 30–60 minutes
Beginners should not begin with training units of 30-60 minutes. The beginner's training can be planned as follows in the first 4 weeks:
Training frequency Extent of training session
1st week
3 times a week 2 minutes of training
Break of 1 minute for physical exercises
2 minutes of training
Break of 1 minute for physical exercises
2 minutes of training
2nd week
3 times a week 3 minutes of training
Break of 1 minute for physical exercises
3 minutes of training
Break of 1 minute for physical exercises
2 minutes of training
3rd week
3 times a week 4 minutes of training
Break of 1 minute for physical exercises
4 minutes of training
Break of 1 minute for physical exercises
3 minutes of training
4th week
3 times a week 5 minutes of training
Break of 1 minute for physical exercises
4 minutes of training
Break of 1 minute for physical exercises
4 minutes of training
It is recommended that you perform approx. 5 minutes of exercises before and after every training unit, in order to warm up and cool down. There should be a training-free day between each two consecutive training units, if you prefer training sessions of 20-30 minutes 3 times a week later on in your training. Otherwise, there is no reason why you should not train daily.
Glossary
Age
Entry for the calculation of the maximum pulse.
Dimension
Units for the display of km/h or mi/h, kJoule or kcal.
Fat burning pulse
Calculated value of 65% max. pulse
Fitness pulse
Calculated value of 75% max. pulse
Glossary
A collection of attempted explanations.
HI symbol
If "HI" is displayed, the target pulse is exceeded by 11 beats.
If "HI" flashes, the maximum pulse is exceeded. "HI" monitoring is always activated.
LO symbol
If "LO" is displayed, the target pulse is fallen below by 11 beats "LO" monitoring is activated if the target pulse has been achieved in training.
MaxPulse(s)
Value calculated from 220 minus age
Menu
Display where values must be entered or selected.
Pulse
Registration of heart beats per minute

DISP SET (appuyer un court instant)
.Valeur : 0 - 9999
Temps (EX.TIME)


Réglages
Heure
.Waarde: 0 - 9999
Tijd (EX.TIME)
- Met "plus" of "minus" keuze maken
Pulso REC Start (P1)
.Valore: 0 - 9999
Tempo (EX.TIME)
Livello di frenatura (BRAKE)
.Wartość : 0 - 9999
Czas (EX.TIME)

Tętno REC Start (P1)
![000 C:\WINDOWS\ REC 15 121 139 F 48 124 [ P1- P2 ] Tętno rzeczyw. Tętno do 60s (P2) Ocena](/content/2026/02/396168/images/fb4b1c478d3afb348c2b0d4ac56fbd7217795891baf6669486ea5a51949bb71c.jpg)
natural_image
Two gray rectangular panels with circular and plus symbols, one labeled 'G' (no text or numbers on panels)


Valor: 0 - 9999
Tempo (EX.TIME)
.Værdi: 0 - 9999
Tid (EX.TIME)

Værdi: 0:00 – 99:59
Modstand (BRASKE)
Indstilling of distance (Distance)
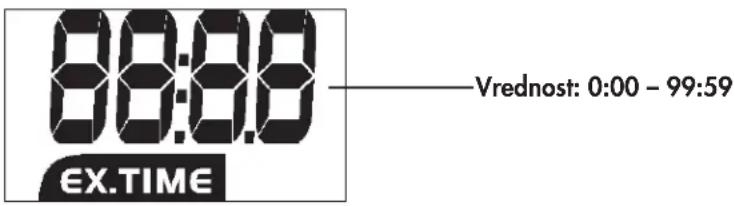
.Vrednost: 0 – 9999
Čas (EX.TIME)
Stopnja zaviranja (BRAKE)
.Érték: 0 – 9999
Idő (EX.TIME)
Érték: 0:00 – 99:59
Fékerő (BRAKE)
natural_image
Blank white image with no visible content or text

natural_image
Blank white image with no visible content or text
A "DISP/SET" fogadhatja el.
A "DISP/SET" fogadhatja el.
natural_image
Man in athletic gear using a stationary retable machine on a tiled floor (no visible text or symbols)
natural_image
Person in green and black racing suit riding a red and orange electric vehicle on a snowy slope under clear blue sky (no text or symbols visible)
natural_image
Woman riding bicycles on a city street with mountainous background, no visible text or symbols
natural_image
Outdoor patio scene with wooden table and white chairs, no visible text or symbols
- Training and Operating Instructions
- Table of contents 12
- Safety instructions 12
- Description 13-15
- Settings 16
- Training 17
- General instructions 20
- Training instructions 20
- Glossary 21
- Safety instructions
- Please observe the following instructions for your own safety:
- For your safety:
- Description
- Function range
- DISP-SET (press shortly)
- DISP-SET (press longer) RESET
- Minus - / Plus +
- Minus - (press shortly when time is displayed)
- Minus - (press longer when time is displayed)
- REC (recovery pulse with fitness mark)
- Persons
- Measuring the pulse
- Training and Operating Instructions Indicating range / Display
- Display values
- Settings
- Time
- Training
- Training without presetting / Pulse measurement / Readiness for training
- Training with presettings/pulse monitoring
- Selection of persons
- Time presettings (EX.TIME)
- Distance presettings (DISTANCE)
- Energy presettings (KJOULE/KCAL)
- Age entry (AGE)
- Warning signal when maximum pulse is exceeded.
- Target pulse monitoring FA 65% / FI 75%
- or
- Target pulse entry
- Training interruption/end of training
- Resumption of training
- RECOVERY function
- Recovery pulse measurement
- Display of previous training with average and maximum values
- Comment:
- General instructions
- System signals
- Activation of the device
- Presetting
- Maximum pulse exceeding
- Recovery
- Calculation of average value
- Instructions for pulse measurement
- With ear clip
- With breast clip
- With hand pulse
- Battery change
- Brake level display
- Training instructions
- Guide values for the endurance training
- Load intensity
- Training frequency Duration of training
- Training frequency Extent of training session
- 1st week
- 2nd week
- 3rd week
- 4th week
- Glossary
- Age
- Dimension
- Fat burning pulse
- Fitness pulse
- HI symbol
- LO symbol
- MaxPulse(s)
- Menu
- Pulse
- DISP SET (appuyer un court instant)
- Réglages
- Heure
- Tid (EX.TIME)
- Modstand (BRASKE)
- Indstilling of distance (Distance)
- Čas (EX.TIME)
- Stopnja zaviranja (BRAKE)
- Idő (EX.TIME)
- Fékerő (BRAKE)
Brand : KETTLER
Model : Unix MX
Category : Exercise bike