
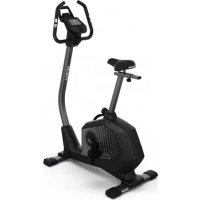
Polo M - Exercise bike KETTLER - Free user manual and instructions
Find the device manual for free Polo M KETTLER in PDF.
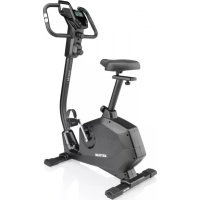
| Product type | Exercise bike (home trainer) |
| Brand | Kettler |
| Model | Polo M |
| Use | Cardiovascular training at home |
| Dimensions (L × W × H) | 100 × 50 × 130 cm (approx.) |
| Weight | 30 kg (approx.) |
| Max. user weight | 120 kg |
| Power supply | 2 AA batteries (1.5 V) |
| Display | LCD screen with segments: time, distance, speed, energy, heart rate, pedal cadence |
| Resistance | Magnetic brake adjustable from 1 to 10 |
| Heart rate measurement | Handlebar sensors, ear clip, chest strap (optional) |
| Training programs | Free or with presets (time, distance, energy, age, target heart rate) |
| Recovery function | Recovery heart rate measurement and fitness score calculation |
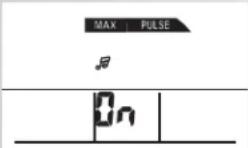
| Audible signals | When starting, when targets are reached or if maximum heart rate is exceeded |
| Maintenance | Clean with a damp cloth; check connections every 6 days of use |
| Safety | Consult a doctor before use; do not use in humid environment; replace defective parts with original Kettler parts |
| Spare parts | Original Kettler replacement parts |
| Repairability | Replacement of batteries, heart rate sensors, etc. |
Frequently Asked Questions - Polo M KETTLER
User questions about Polo M KETTLER
0 question about this device. Answer the ones you know or ask your own.
Ask a new question about this device
Download the instructions for your Exercise bike in PDF format for free! Find your manual Polo M - KETTLER and take your electronic device back in hand. On this page are published all the documents necessary for the use of your device. Polo M by KETTLER.
USER MANUAL Polo M KETTLER
Training and Operating Instructions
PekomeHdaunno npOBeHnIO TpeHnpOBOK n pyKOBOCTBO no 3KcnpyaTaun
deutsch
english
franchise
nederlands
español
italiano
polski
cestina
portugues
dansk
hrvatski
româna
Pycckn
POLO M
VITO M

Inhaltsverzeichnis
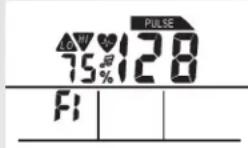
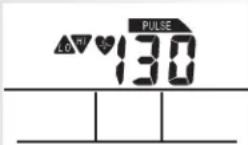
Tritffrequency (RPM)
Puls (PULSE)

Prozentpuls

Training and Operating Instructions

Table of contents 12
Safety instructions 12
Service 12
- Your safety 12
Short description 13-15
- Functions and keys 13
- Display range and display 14-15
Quick start (for introduction) 16
Ready for training 16
- Start of training 16
End of training 16
- Sleep mode 16
Training 17-18
- without presetting 17
with presetting 17
General instructions 19
Time 17
Distance 17
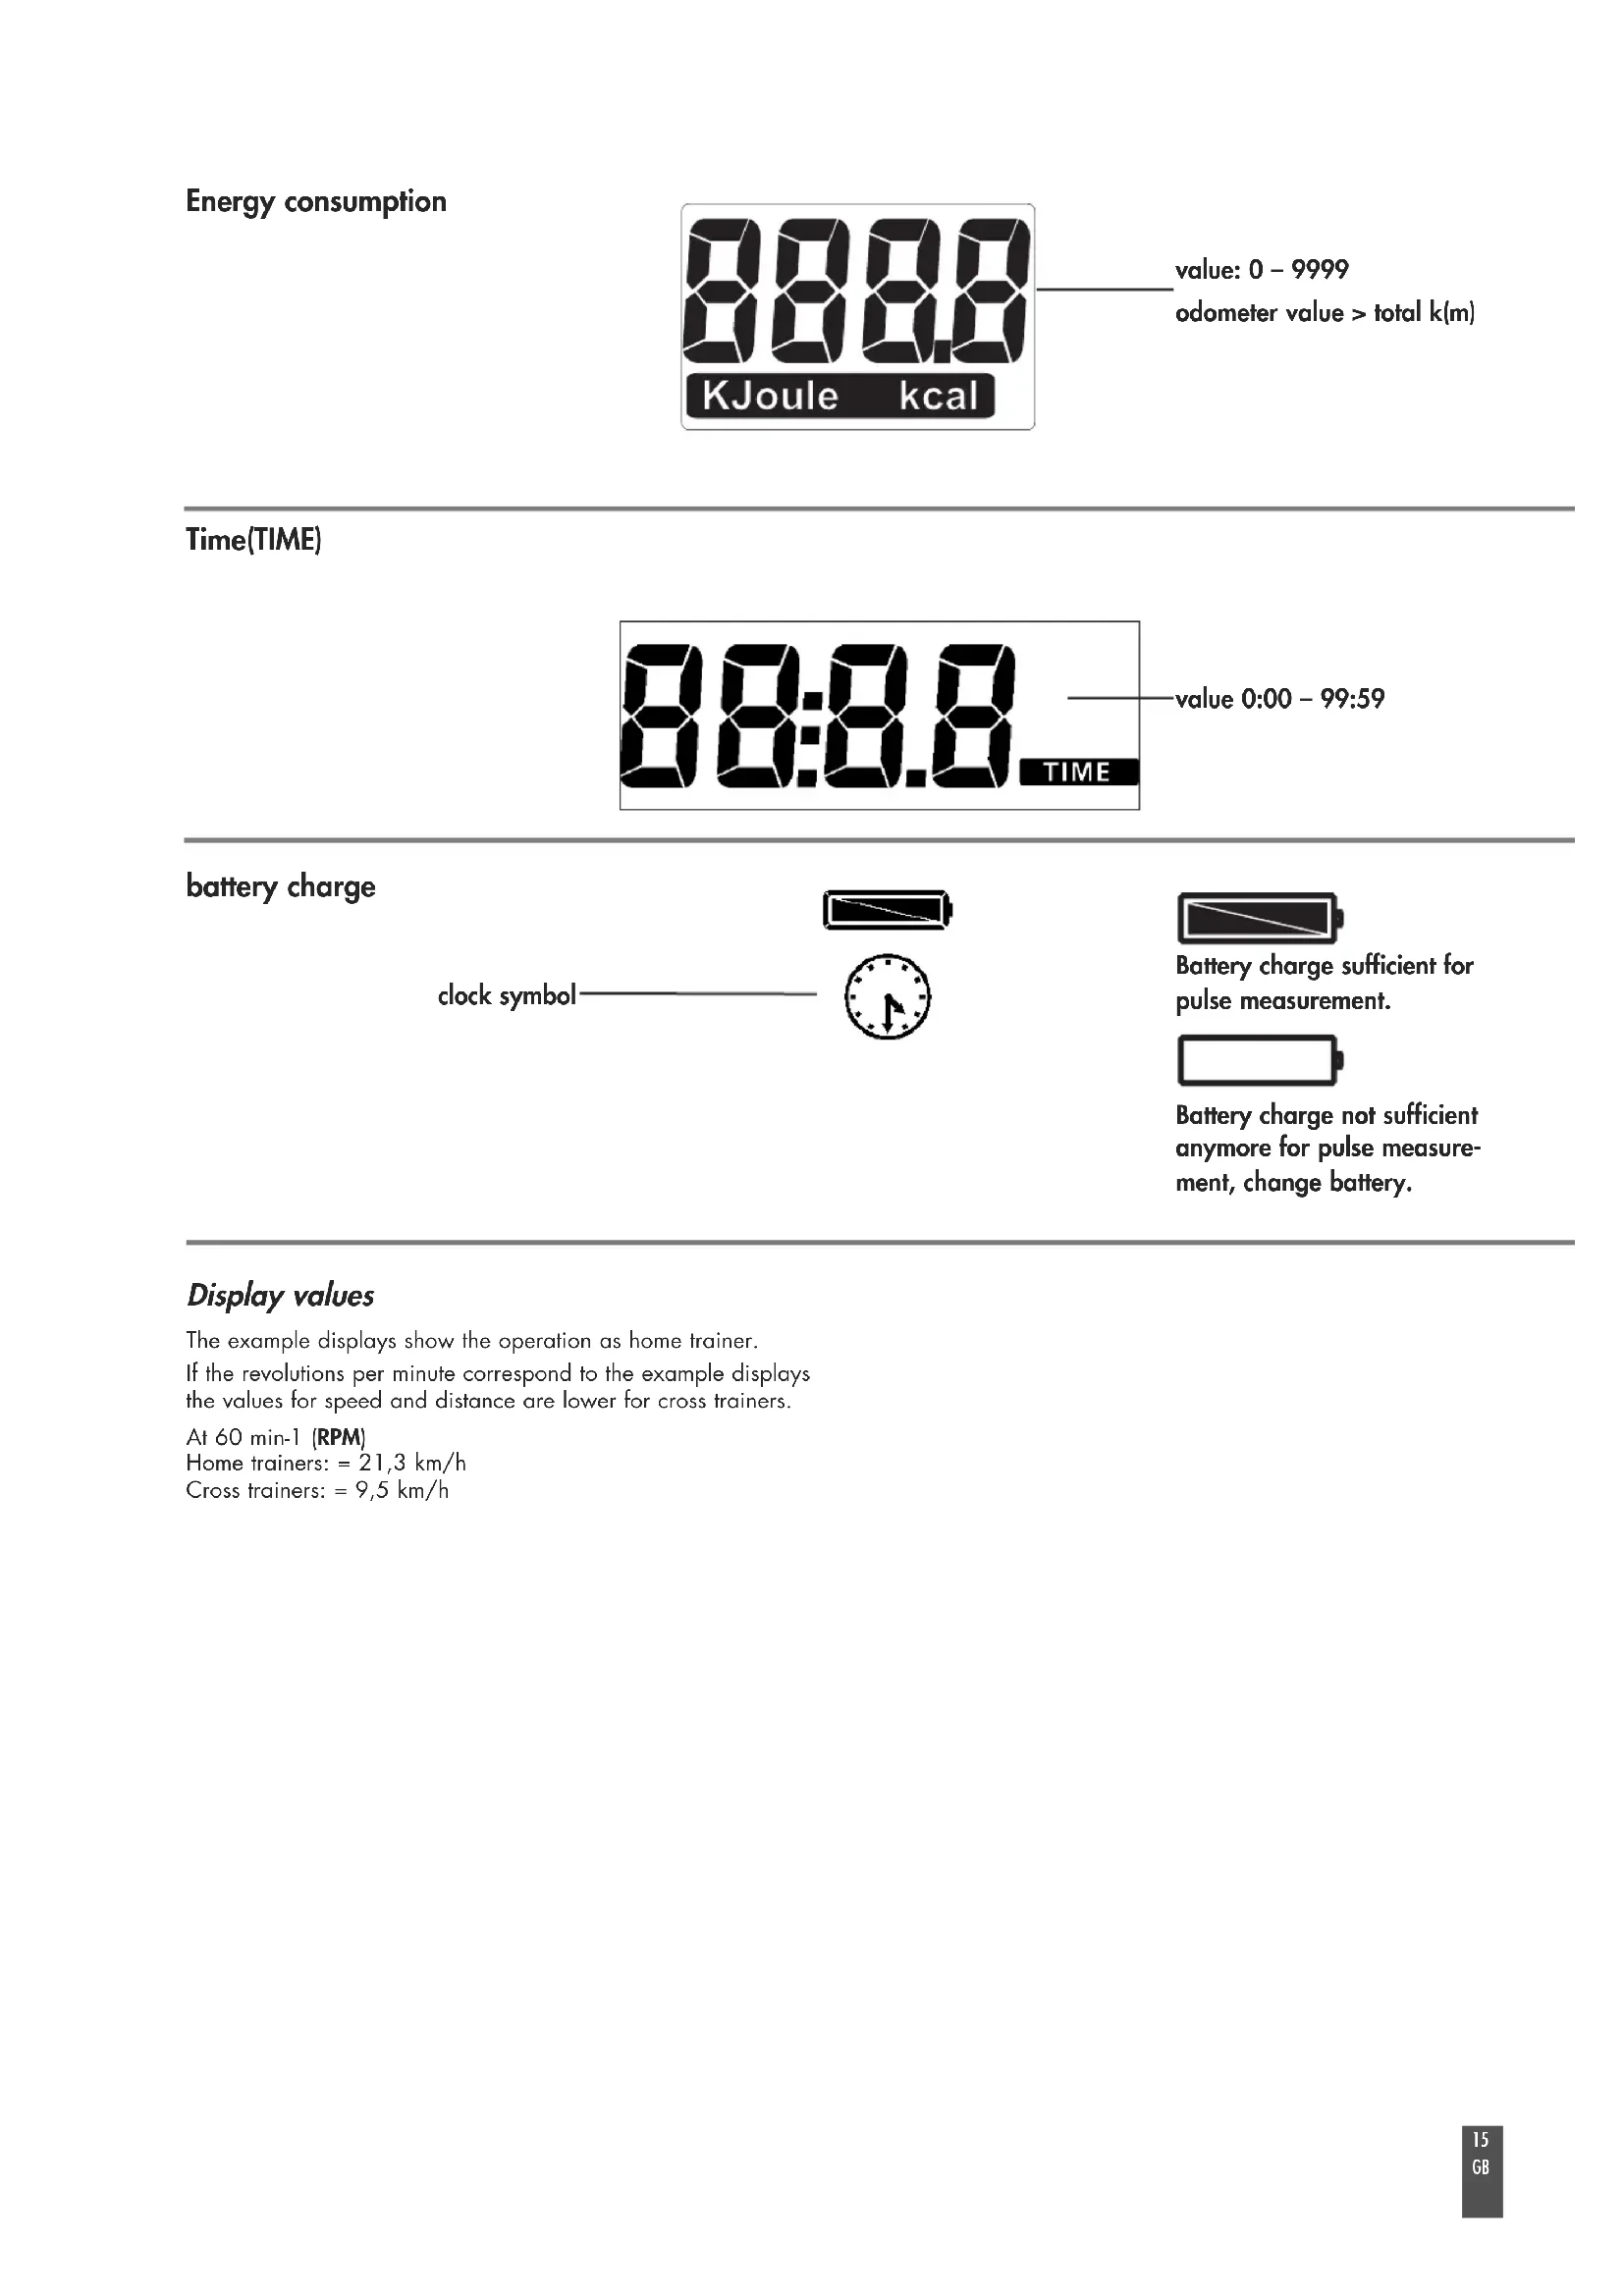
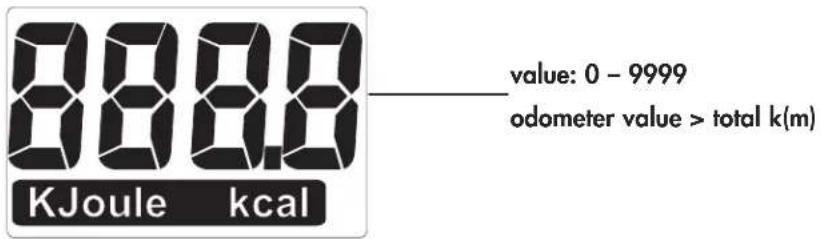
Energy (KJoule/kcal) 17
Age input (10-99) 17
- Set alarm signal (yes/no) 17
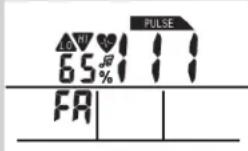
Target pulse selection (FA 65%,/FI 75%) 17
Target pulse input (40-199) 17
Ready for training 17
- Training interruption/end of training 18
- Resumption of training 18
- Recovery measurement 18
System signals 19
Recovery 19
Calculation of average value 19
- Instructions for pulse measurement 19
with ear clip 19
with breast belt 19
with hand pulse 19
Computer errors 19
Training instructions 19
Stamina training 19
- Load intensity 20
- Extent of load 20
Glossary 20

This sign in the instructions refers to the glossary, where the respective term will be explained.
Safety instructions
Please observe the following instructions for your own safety:
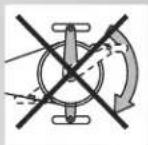
- The training device must be set up on an appropriate and firm surface.
- Inspect the connections for firm fitting before initial operation and additionally after approximately six operation days.
- In order to prevent injuries caused by wrong stress or over-stress, the training device may only be used in accordance with the instructions.
- It is not recommended to permanently set up the device in humid rooms due to the resulting corrosion development.
Assure yourself regularly that the training device functions properly and that it is in duly condition.
The operator is responsible for the safety controls, which have to be carried out on a regular and proper basis.
Defective or damaged parts must be exchanged immediately. Only use original KETTLER spare parts.
The device may not be used until after repairs are completed. - The safety level of the device can only be maintained provided that it is regularly inspected for damage and wear and tear.
For your safety:
- Please clarify with your general practitioner before you start with the training, whether or not your health condition allows you to train with this device. The diagnostic findings should be the basis for the determination of your training programme. Wrong or excessive training can cause damage to your health.
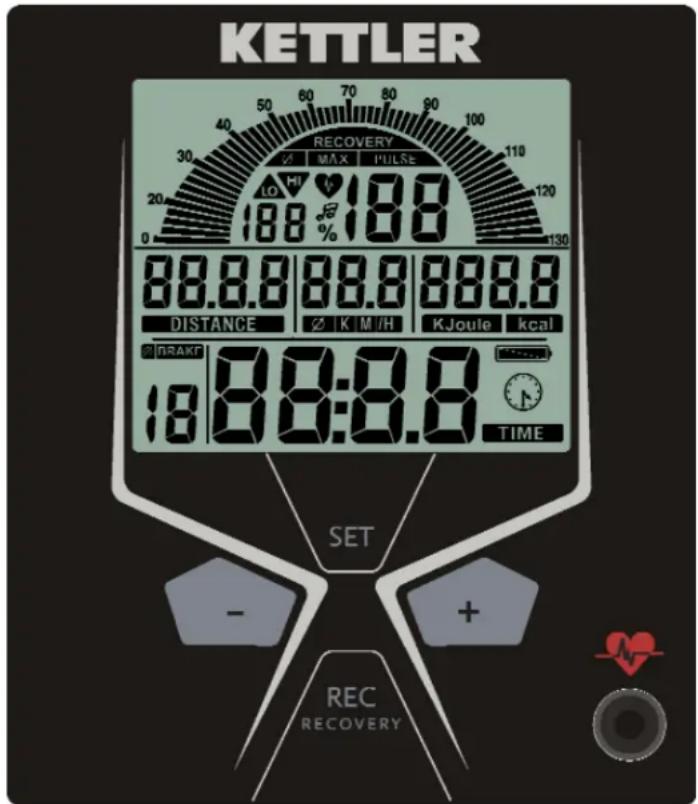
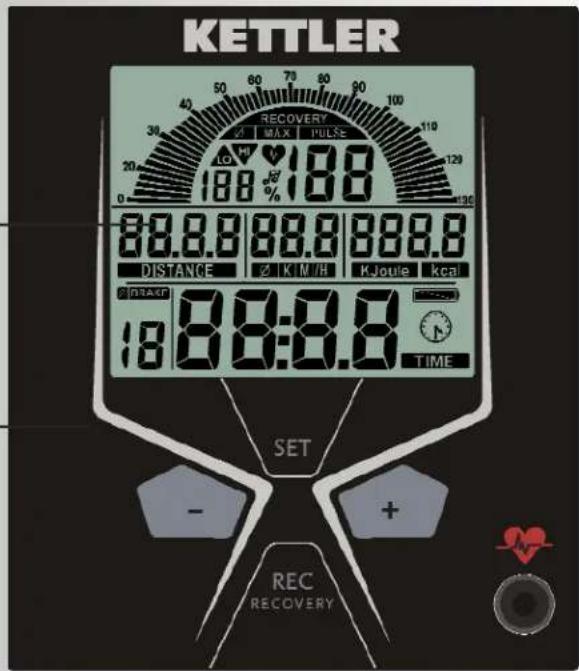
Short description
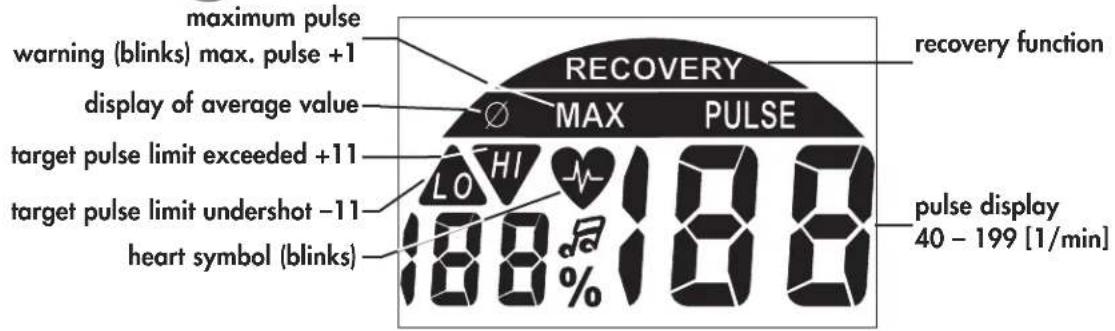
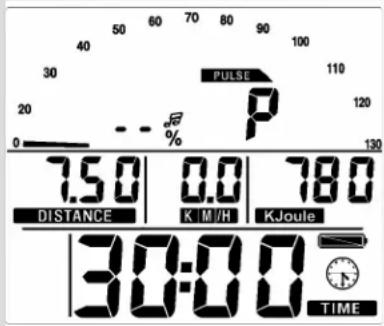
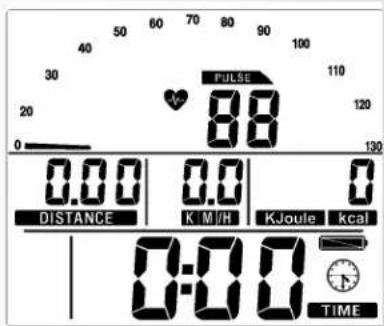
The electronics assembly is equipped with functions with keys and a display range (display) with variable symbols and graphics.
display range
display
functions
keys
Quick reference guide
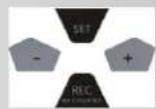
Functions
The four keys will be described in short below.
A detailed application description can be found in the respective chapters. The names of the function keys in the chapters correspond to the names used in this quick reference guide.
SET (press shortly)
Input data are accessed with this function key.
The set data are accepted.
Reset (press SET longer)
The current display is deleted for a reset.
Minus-/Plus+
With these function keys, you can change the values in the different input data before the start of the training.
-
press longer > fast run through the values
-
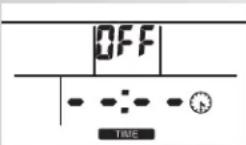
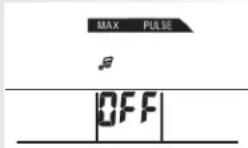
press "Plus" and "Minus" together: value input skips to OFF
RECOVERY
You can start the recovery pulse function with this function key.
Pulse measurement
Pulse measurement can be achieved via three sources:
- ear clip - connect the plug with the plug socket
- hand pulse - the connection is situated at the back of the display
- breast belt (accessories) - please observe the corresponding instructions


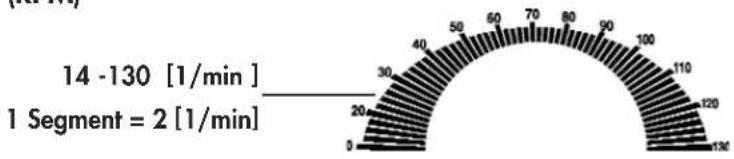
Pedal frequency (RPM)
14-130 [1/min]
1 segment = 2 [1/min]
Pulse (PULSE)

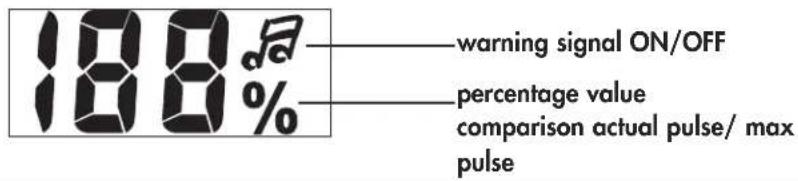
Percentage pulse
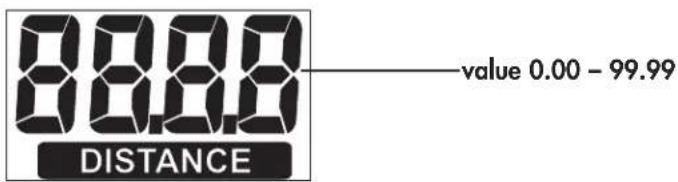
Distance (DISTANCE)
Speed

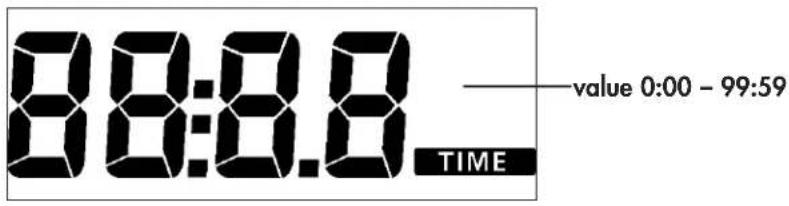
Time(TIME)
battery charge

clock symbol


Battery charge sufficient for pulse measurement.

Battery charge not sufficient anymore for pulse measurement, change battery.
Display values
The example displays show the operation as home trainer.
If the revolutions per minute correspond to the example displays the values for speed and distance are lower for cross trainers.
At 60 min-1 (RPM)
Home trainers: = 21,3km / h
Cross trainers: = 9,5km / h
Training and Operating Instructions


Quick start (for introduction)
Without special settings
- press a key
Display
- All segments are shortly displayed (segment test).
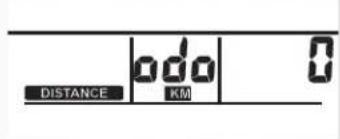
- The total kilometres are shortly displayed.
Subsequently change to the display "Reading for training".
Ready for training
Display
All segments display "Zero", except for pulse (if activated)
Start training by pedalling.
Start of training
Display
- Pedal rotation segments, distance, speed, energy and time increase.
- Pulse (if activated).
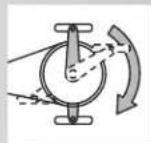
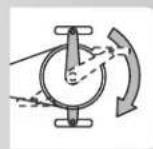
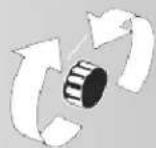
Brake setting levels 1-10
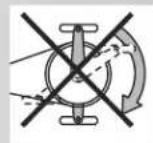
- Turn hand wheel to the right to increase the brake level; turn hand wheel to the left to decrease the brake level.
Training interruption/end of training
If you interrupt or complete your training, average values of the last training unit are displayed with the symbol.
Display
Average values: pedal rotation segments, speed and pulse (if activated).
Total values: distance, energy and time.
Sleep mode
Four minutes after the end of training, the device switches into the sleep mode. If you press a key, the display starts again with the segment test, odometer and ready for training.
Training
1. Training without presetting
- Press a key.
and/or
- Start pedalling (as in "Quick start").
2. Training with presetting
Display: "Ready for training".
- Press "SET": presetting segment
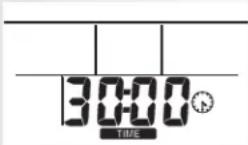
Time setting (TIME)
- Enter values using "Plus" or "Minus" (e.g. 30:00), confirm with "SET".
Display: next menu "DISTANCE".
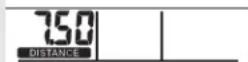
Distance setting (DISTANCE)
- Enter values using "Plus" or "Minus" (e.g. 7.50), confirm with "SET".
Display: next menu "ENERGY".
Energy setting (KJoule/kcal)
- Enter values using "Plus" or "Minus" (e.g. 780), confirm with "SET".
- Select unit KJoule or kcal using "Plus" or "Minus", confirm with "SET".
Display: next menu "Age input".
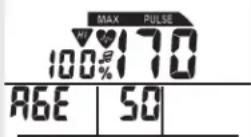
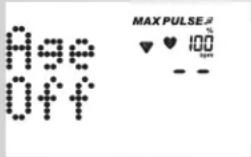
Age input (AGE)
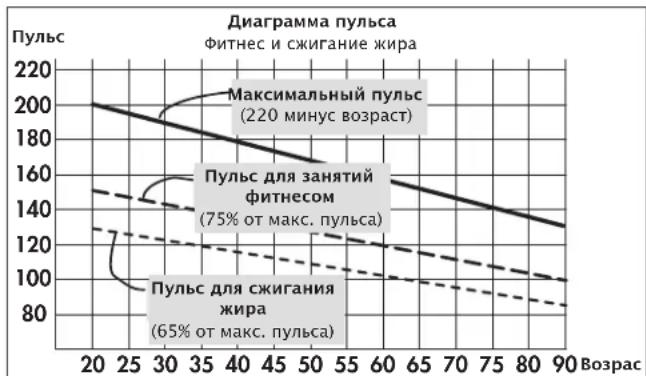
The input of the age serves for the calculation and the monitoring of the maximum pulse (symbol HI; warning signal, if activated).
- Enter values using "Plus" or "Minus" (e.g. 50). Upon input, the maximum pulse is calculated with the formula (220 - age), here: maximum pulse of 170. Confirm with "SET".
Display: next menu "Alarm signal".
Alarm signal, if maximum pulse is exceeded
- Select function using "Plus" or Minus", confirm with "SET".
Display: next menu target pulse selection "FA 65%".
Target pulse monitoring FA 65% /FI 75%
- Make your choice using "Plus" or "Minus".
- Fat burning 65% , fitness 75% of maximum pulse, confirm with "SET" (presetting mode completed).
Display: ready for training with the presetting.
Or
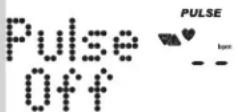
Target pulse input
The input 40 - 199 serves for the determination and monitoring of a training pulse independent of the age (symbol HI; warning signal, if activated; no maximum pulse monitoring). Note that the age input has to be set to "OFF".
- Switch off maximum pulse monitoring using "Plus" and "Minus". Display: "AGE OFF", confirm with "SET".
Display: next presetting "Target pulse" (pulse). - Enter values using "Plus" or "Minus" (e.g. 130), confirm with "SET" (presetting mode completed).
Display: ready for training with the presetting.


Training and Operating Instructions


Pedalling
Decreases with presetting.
Comment:
The presetting entries are lost with a "Reset".
Training interruption/end of training
With less than 14 pedal rotations per minute, the electronics assembly of the device identifies a training interruption. The achieved training data are displayed. Rotations, pulse and speed are displayed as average values with the symbol .
You can switch to the current display using "Plus" or "Minus".
The training data are displayed for four minutes. If you do not press any key nor train during this period of time, the electronics assembly of the device switches to sleep mode.
Resumption of training
If you resume training within four minutes, the last values continue to be increased or decreased.
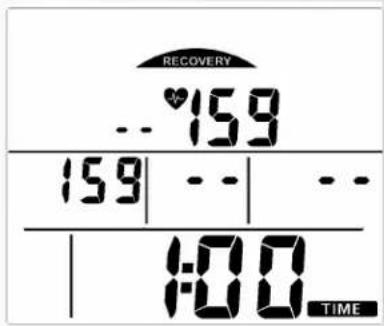
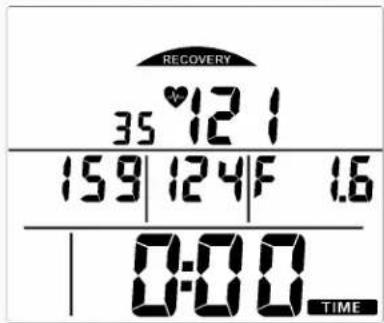
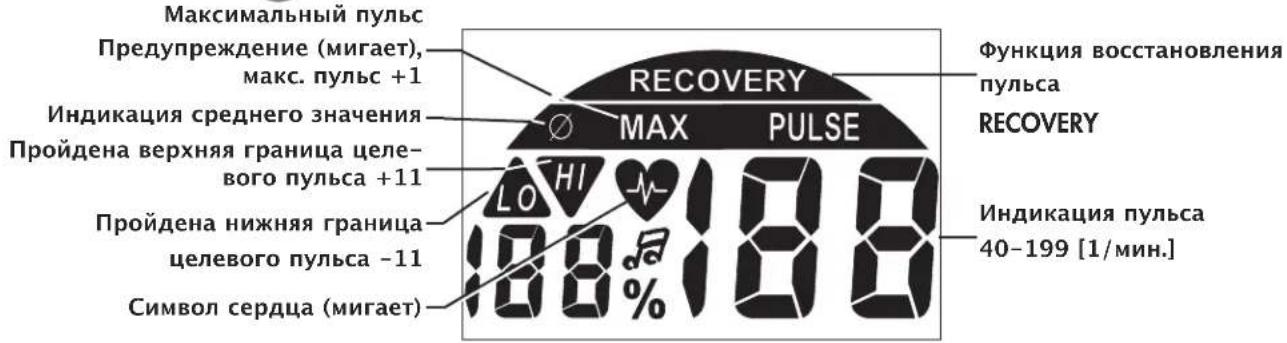
RECOVERY function
Recovery pulse measurement
Press "RECOVERY" at the end of training. Display
RECOVERY
The electronics assembly of the device measures your pulse 60 seconds in reverse.
The current pulse value is saved under "DISTANCE"; the pulse value after 60 seconds is saved under "KM/H". Next to % Puls, the difference between the two values is displayed. From this difference, a fitness mark (in this example F 1.6) is calculated. The display switches off after 20 seconds.
"RECOVERY" interrupts the recovery pulse function or the fitness mark display.
If no pulse is measured in the beginning or at the end of the reverse counting, the error message "E" is displayed
General instructions
System signals
Activation of the device
If you activate the device, a signal is emitted during the segment test.
Presetting
A short signal is emitted, if you reach a presetting like time, distance and KJoule/kcal.
Exceeding of maximum pulse
If the set maximum pulse is exceeded by one pulse beat, two short signals are emitted for the time of exceedance.
Recovery
Calculation of the fitness mark (F):
$$ \operatorname {m a r k} (\mathbf {F}) = 6. 0 - \left(\frac {1 0 \times (\mathrm {P} 1 - \mathrm {P} 2)}{\mathrm {P} 1}\right) ^ {2} $$
P1 stress pulse P2 = recovery pulse
F1.0 = very good F6.0 = insufficient
Calculation of average value
The calculations of the average values refer to training units in the past until a reset or the sleep mode.
Instructions for pulse measurement
The pulse measurement starts as soon as the heart in the display blinks in time with your pulse beat.
With ear clip
The pulse sensor works with infrared light and measures the variations in translucence in your skin, which are produced by your pulse beat. Rub your ear ten times strongly to activate the blood circulation before attaching the pulse sensor to your earlobe.
Avoid disturbing pulses.
- Attach the ear clip properly to your earlobe and look for the best point for the measurement (heart symbol blinks without interruption).
- Do not train directly under strong incidence of light, e.g. neon light, halogen light, spotlight, sun light.
- Completely eliminate any shocks or bounces of the ear sensor and the cable. Always attach the cable with a clip at your clothing or, even better, at your headband.
With breast clip
Please observe the corresponding instructions.
With hand pulse
An extra-low voltage caused by the contractions of your heart is registered by the hand sensors and evaluated by the electronics assembly of the device.
Always grab the contact faces with both hands.
- Avoid jerky grasping.
- Hold your hands calmly and avoid contractions and rubbing on the contact faces.
Comment:
Only one way of pulse measurement is possible: either with ear clip or with hand pulse or with breast belt. If no ear clip or plug recipient is located in the pulse plug, hand pulse measurement is activated. If you insert an ear clip or a plug recipient in the pulse plug, hand pulse measurement is automatically deactivat
ed. It is not necessary to disconnect the plug of the hand pulse measurement.
Failures with the training computer
Press the "SET" key for a longer period of time (reset).
Training Instructions
Sports medicine and training science use cycle ergometry, among other things, for the examination of the functional capability of heart, circulation and respiratory system.
You can find out whether or not you have achieved the desired effect from your training after several weeks using the following method:
- You manage a particular endurance performance with less heart / circulation performance than previously
- You sustain a particular endurance performance with the same heart / circulation performance over a longer period.
- You recover more quickly than previously after a particular heart / circulation performance.
Guide values for the endurance training
Maximum pulse: maximum strain means the reaching of the individual maximum pulse. The maximum achievable heart rate is dependant on age.
Here, the following empirical formula applies: the maximum heart rate per minute corresponds to 220 heart beats minus age in years.
Example: age 50 years 220 - 50 = 170 pulse / min.
Load Intensity
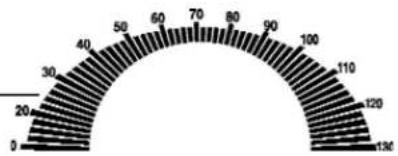
Load pulse: the optimum intensity of load is reached at 65 - 75% (see also diagram) of the maximum pulse. This value changes depending on age.
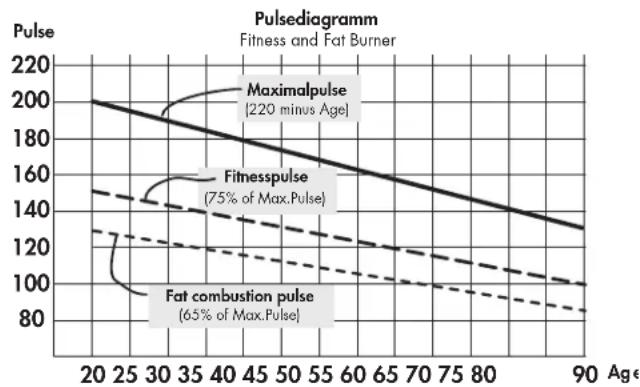
Extent Of Load
Duration of a training unit and its frequency per week:
The optimum extent of load is attained, if 65 - 75% of the individual heart / circulation performance is achieved over a longer period.
Empirical Formula:
Training frequency Duration of training
daily 10 minutes
2-3 times a week 20-30 minutes
1-2 times a week 30-60 minutes
Beginners should not begin with training units of 30-60 minutes.
Training and Operating Instructions
The beginner's training can be planned as follows in the first 4 weeks:
Training frequency Extent of training session
1st week
3 times a week 2 minutes of training
Break of 1 minute for physical exercises
2 minutes of training
Break of 1 minute for physical exercises
2 minutes of training
2nd week
3 times a week 3 minutes of training
Break of 1 minute for physical exercises
3 minutes of training
Break of 1 minute for physical exercises
2 minutes of training
3rd week
3 times a week 4 minutes of training
Break of 1 minute for physical exercises
4 minutes of training
Break of 1 minute for physical exercises
3 minutes of training
4th week
3 times a week 5 minutes of training
Break of 1 minute for physical exercises
4 minutes of training
Break of 1 minute for physical exercises
4 minutes of training
It is recommended that you perform approx. 5 minutes of exercises before and after every training unit, in order to warm up and cool down. There should be a training-free day between each two consecutive training units, if you prefer training sessions of 20-30 minutes 3 times a week later on in your training. Otherwise, there is no reason why you should not train daily.
Glossary
Age
Input for the calculation of the maximum pulse.
Dimension
Units for the display of km/h or mph, KJoule or kcal.
Fat burning pulse
Calculated value of: 65% maximum pulse.
Fitness pulse
Calculated value of: 75% maximum pulse.
Glossary
An accumulation of attempts at explanation.
HI symbol
If "HI" is displayed, the target pulse is too high by 11 beats. If "HI" blinks, the maximum pulse is exceeded. "HI" monitoring is always activated.
LO symbol
If "LO" is displayed, the target pulse is too low by 11 beats. "LO" monitoring is activated, if the target pulse is reached during training.
Maximum pulse(s)
Value calculated from 220 minus age.
Menu
Display, in which values can be entered or selected.
Pulse
Registration of the heart beat per minute.
Recovery
Recovery pulse measurement at the end of training. The difference between start pulse and end pulse of a minute is calculated. With the help of this difference, a fitness mark is determined. If you train regularly, the improvement of this mark is an indication for your fitness progression.
Reset
Deletes the display contents and resets the display.
Target pulse
Input of a particular pulse value, which is be monitored.
Performance table
| Date | Restpulse | Stress pulse | Recovery pulse | Slope | Time(min) (km) | Distance(Kcal) | Energy consumption | Fitness | Mark |

Itable des matieres 22
SET (pression brève)
3 x per week 2 minutes trainen
3 x per week 4 minutes trainen
Data Puls. repusso P 1 P 2 Nivel de Tempo DistCncia Consumo Class. Fitness Puls. Esforco Puls. recup. esforco (min.) (km) de e
Indstilling of distance (DISTANCE)
Genoptagelse of training
Fortsaettes traingen i Iobet af 4 minutter, taelles de sidste vaerdier videre aller nedad.
RECOVERY - Funktion
Måling af hvilepuls
Tryk på "RECOVERY" after endt traening afsluttet.
Visning
RECOVERY
Elektronikken mäl er din puls nedadgaende i 60 sekunder.
Beregning of fitnesskarakter (F):
$$ \operatorname {K a r a k t e r} (\mathbf {F}) = 6. 0 - \left(\frac {1 0 \times (\mathrm {P} 1 - \mathrm {P} 2)}{\mathrm {P} 1}\right) ^ {2} $$
SET (apāsare scurṭa)
Cu aceastata tastafunctionalaa sunt apelate intrarile. Datele setate sunt preluate.
Calcularea notei fitness (F):
$$ \text {N o t e} (\mathbf {F}) = 6. 0 - \left(\frac {1 0 \times (\mathrm {P} 1 - \mathrm {P} 2)}{\mathrm {P} 1}\right) ^ {2} $$
P1 puls de soliciterare P2 Puls de recuperare
F1.0 = foarte bine F6.0 = insufficient
Calcularea valorilor medii
PeKoMeHdaaunn no npOBeJeHHIO TpeHnpOBok 129
TpeHnpOBKa BbHOCINBOcTn 129
- IMHTeHCNBHOCTb HaRpy3Ku 129
-Obem Harpy3K 130
Tloocapn 130

3TOT 3HaB pyKOBOCTBe O3Ha- aet CcbIky Ha rIoCCapn. B HEM 6bIacHReTc COOTBeTCTByIO- ue noHrTne.
Yka3aHnno TcXnKe 6e3- onaChOCTn
Длг obecneueHn CBoe co6cTBeHHo8 6e3onac-HocTn co6IIOaIte cIeDyUOuNe yka3AHn:
Tpehaepe cneyetyctahOBHTbHaNOxOJMeM dnyctaHOBN, npOHOM OCHOBHN.
- Ipeep nepBbIM BBODOM B3KcNpyaTuHIO npOBepbTe npOuHocTb coeDnHeHn. IpOBepky CneJyET NOBtOpNTb npImepHoYeep3 6 DHeN 3KcNpyaTuHn.
-Bo n36exkHne TpaBm BCnECDTBne HnnpaBnIbHOHaRpy3Kn nn nepeperpy3Kn nCnoJb3yNe Te TpeHaJepNCKIIQUHTeJIbHO B COOTBETCTBnC pyKOBODTBM.
- yCTaHOBka yCTpOINCTBa BO BnAChbIX NOMEeHnX HaДЛNTeIbHoe BpeM He peKOMeHdyETcR N3-3a ONaCHOCTU O6pa3OBAHn pKaBvHnbl.
- PeryIaRHO npOBepaIte nCnpaBHOCTb TpeHaepea I erO HauJexkauee COCToHne.
-Пользоватьобязан пювдntь пюверкп NOТexн-ke 6e3oNAcHOCHT.N.Takne пюверкп сеДуET пювдntbperуларноHaJNeKaUIMO6pa3OM.
3aMeHy HeNCpPaBbix INI NOBpeKJeHHbIX KOMNoHeHTOB BbIOJHnTe HEmeDJIeHNO. IcNoJIb3yIte ToIbKO opuRHaJIbHbIe 3aIyactN KETTLER.
-До npBvEeHnBИ nCnpaBHOe coCTOAHHe yCTPOIcTBOM
noIb3OBaTbc3aPpeuaETc.
- CoxpaHnTb yCTpoIcTB O NocToaHHo 6e3OnaCHocTm MoXHO ToIbKO nyTeM peryIaPHoro npObeHeHn npOBe-pOK Ha HauNue NoBpeKdEHN n I3HoCa.
ДlaBaWei co6CTBENHO 6eONaCHOCTN:
- Ipeqn Hauanom TpeHnpOBK npOKOHcyIbTyntyTeCy y Bpaay, N03BOJareT nn Bawe 3dOpOBbe nCNOB30BaTb DaHHoe yCTpOcTBo DnA TpeHnpOBok. PeWeHne Bpaay DoJXHO 6bITb OCHOBaHmE DnA CoCTaBHeHn Bawen nporpaMMbl TpeHnpOBok. HenpaBnIbHa TpeHnpOBKa nn Ype3MePHa Harpy3Ka MOryt HaheCTN BpeD Bawemy 3dOpOBbo.
Kpatkoe onncahne
Y3NEKTPoHHORO MOyIaEcTb 06JaCTb yHKcIu C KHOIIKAMn u 06NaCTb HNIMKaUu (DNCJIe) C N3MeHRAIOUMC3HaKaMn n rpaΦNKoI.
O6laactb nHdkauu nn
O6naCTbФyHKcN KhoIKN
KpaTKoe pyKOBOdCTBO
06naCTb yHKcui
Y3NEKTPoHHORO MoyIaEcTb 06laactb yHKcun C KHOIIKAMn N O6laCTb HNdkaun (DNCnne) C n3MeHRAIOUMC3HaKaMn INrpaΦNKoN.
SET (kpaTkoe HaxaTne)
3a yHKUHOHaBHa KHONKa NcNoB3yeTc dAknBaun BBOda. PnmuHryOTc BBeDeHHbIe daHHbIe.
C6poc (dnttehoe haxaTne SET)
Tekyuune noka3aTeu ydaIaHTcra nnoBTOPO 3anycka.
MnHyc-/nnIOc+
3TuФyHKUHOHaJIbHbIe KHOJKN N03BOJrOT N3MeHrTb 3HaueHn pa3NHybIX npaMeTpOB Nepe TpeHnpOB-Ko:
-ДЛNTeJIbHoe HaxaTne >6bICTpoe N3MeHeHne 3HaueHn;
- «Плон» и «Мину» HaxaТы BmecTe: yctaHaBnBaetc3HaueHne BbIK. (OFF)
RECOVERY
IyI3MepeHnIyIbCaMOxHO IcNoJb3ObaTb 3 ICTOuHnka:
- Ushna Klnncs -
Utekep BctabnreTcB pa3bem; - Puyho Nylbcometp Pa3bem HaxoNTcC o6paTHO CTOpHO b dncnne;
3.HarpyHbI pemeHb (npnHaJnxKHOCTb)
Co6IIOdaIe pykoBOdCTBO no 3KcNpyaTuIN peMn


PekomeHdaaNo npOBeHnIO TpeHnpOBOK n pyKOBoCTBO n 3KcNlyaTaun
KpaTkoe pyKOBOdCTBO
06naTb Hndkaun/duCnnei
06nactb HnHnKaun (Dncnne) nHΦOpMnpye TnoB3ObaTeTRe O BblONHeHH pa3NnHbIX ΦyHKn.
Yactota warob (RPM)
14-130 [1/MNH.] 1 cerMeHT = 2 [1/MNH.]

PnIbC (PULSE)

IpoeHTHOe 3haueHne nylbca
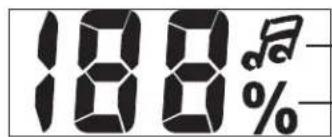
3BykoBoi CunHan BKJ./BblKJI.
IpoeHTHoe 3haueHne CpaBHeHne aKT. nybc/MaKc. nybc
PacctoHne (DISTANCE)
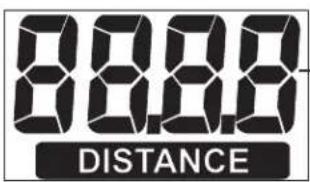
3NaueHne 0,00-99,99
CkopoocTb
BpeM (TIME)
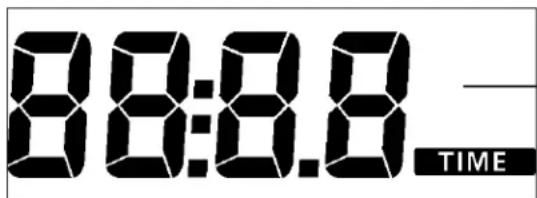
3HaueHHe:0:00-99:59
3apnakkymyIaTopa
3HaK yacOB


HanpexHe aKKymyIaTopa doTaTOHoe IJIa N3MepeHn nyIbCa.

Hanpexe Hne akkymnyTopa HeocTaTOUHOe Iy N3MepeHHyIbca.
3aMeHnTe aKKymyIaTOp.
Poka3aTeJn
Pnmupehble nokaataeJe dmOHcTppyoT nokaataeJe npu TpeHnpOBKe Ha Domaunem TpeHaKepe.
Pn TAKOM Ke uncie o6opotOB, KaH Ha pucyHKax, NOKa3aTeN CKOpOCTu PaCCToHnHa npofoecCuHOHaBbIX TpeHaxepax Hxke.
Pp60 MmH-1 (o6./MnH)
Домашни Тренир: = 21,3 KM/ч
IpofoecnoHaBbHn TpeHaKepe: = 9,5KM /U
PekomeHdaunno npOBeHnIO TpeHnpOBOK n pyKOBoDCTBO n 3KcnIyataun
БыICTpbI CTapT (ДЯ OЗнakOMNeHnA)
6e3 0c06bix HAcTpoek


HaxkMnteIIO6yIO KHOIpKy
Hnkaun
Bce cerMeHTb OTo6pa3rTaHa KOpOTKoe Bpem. (npOBepKa cerMeHToB) KOpOTKoe Bpem 6ydet OTo- 6paKaTbC O6uN KnIOMetpaX.
Iocne 3TOrO npOnCxOAnT nepExoB B peKIM «TOOBHOCTb K TpeHnpOBKe>.
TOTOBHOCTb K TpeHnpOBke
Hndnkaun
Bce INHnKAtOpbI NOKa3bIbAIOT «HONb」.NCKIOUeHne — nybc(ecnn nDeT n3MepeHne nybcA).TpeHnpOBKa HaunHaETc npn HaxaTn NeDann
Hauaio TpeHnpOBKn
NHUNKauN
Pactyt noka3aTeH uactotbI BpaueHn neJaIe, paCCToHn, CKOpOCTn, pacXoDa 3Heprn N BpeMeHn.
- OTo6paKaaeTc npIbc (ecn nnTe n3MepeHne).
Perynnpovka Topmo3a ctyneH 1-10
- Pn BpaueHn BnpaBO TOpMO3Ha CtyneHb NOBbluAeTc, npn BpaueHn BNEBO - CHNkaETc.
Ipepbibahne nn 3abepweHne TpeHnpOBKn
Pn npepbBaHnn nnn 3aBepseHnn TpeHnpOBKn CpeHnne 3HaueHnna NocJeHero 3Tana TpeHnpOBKn OTo6paKaIoTc co 3HaqKOM
Hndkaua
CpeHnne 3NaueHnna (0):
ceTMeHTb YaCTObI BpaueHn neaJeN,CKOpocTb, CTypeHb TOPMo3a N PyIbC (ecnn n3Mepehne aKTNB-HO)
- 06uue3haeHHa
PacctoHne,3heprnBbpe
Cnau npexm
Yepe3 4 MInHytbl nocIe 3aBepWeHn TpeHnpOBKn yCtpoNCTBO nepexOanT B CnAun peKm. HaxaTne IIO60 KHOJKN PnIBoNDT K TOMy, YTO HauHnaETc npOBepKa cerMeHTOB, OTO6paKaetc NOKa3aTeNb ODometpa INpONCXoNDT nepexoB B COCTOHNr rOTOBHOCTN K TpeHnpOBKe.
TpeHnpobka
1. TpeHnpBka 6e3 HacTpoek
HaxmnteIHO6yIO KHOIIKy
n/nn
Haxmnte neaIb (corlaacno pa3dny «BictpbI CTapT»)
2. TpeHnpOBKa c HacTpOyKaMn
VHdNka:K TpeHnpBKe
- Haxmte «SET»: Pekn hactpoiKn
Hactpoika BpeMeHN (TIME)
BBeIe 3HaueHnC NOMOuBIO KHOKN «NIOC
3NeKToHnKa 6yTeT n3MePraTb Baw Nynbc TteHne 60cekyHd.
Ha MeCTe nOKa3aTeJIa DISTANCE 3aINcMbBaETcReKyuuee 3haueHne, a Ha MeCTe nOKa3aTeJIa KM/H 3haueHne nyIbca no nCTeHn60 cekyHd.
TAm, rIe DoJXHa 6bItb HaDnncb (% Puls), oTo6paKaetcpa3Hnua MExdy 3HaueHnma. Ha OCHOBE 3TORO 3HaueHn onpeJeIeTcra OueHka COCToHnna (Ha npImpe F 1.6).
No nCTeueHn 20 cekyHn HndnKaun 3aBepwnTcra.
Ipn Haukatau KhoKn «RECOVERY» npepbBaetcny3mepeHne NybcA B CnOKoHOM COCTOHN NIOTO6paKeHne OueHKn COCTOHN.
EcnB Hauane NnB KOHcpe BpemHeHO npomExyT Ka He ydaetc n3MePntb nybc, NOBnTeCra coo6eHne 06 Own6Ke: 3HaK «E».
06uye yka3aHn
CnCTeMHbIe 3ByKu
BkIoueHne
PnBkIIOueHnn,BO Bpem npOBepKn CeMeHTOB BOC- npON3BOOHTC3ByKOoB CNHaJ.
HactpomKu
Pn DoctnkeHn HOpMaTINBOB BpeMeHN, paCCTOaHnI npacxoJa 3Heprn BOCpOn3BODNTcK OPOTKN 3ByKOBoi CnHaJ.
PpeBbIeHHe MaKcMaJIbHOrO nyIbCa
Ecn yctaHOBHeHHb MaKcMaJIbHbI Nybc npeBbIaTcHa OINuap, BocpOun3BOUITc2 KOpOTKx 3Byka.
BocctaHOBJeHne
PykoBoCTBO no npOBeHnIO TpeHnpOBok
3prometprnncnoj3yeTcB cnpTUBHO MeuHne n aTneuecko nOtroBKe IJnPOBepKn COCTOHN cepua, KPOBeHOCHO u bIXaTeJIbHOI CNTeMb.IbIOCTURHeTe Jeenaembx pe3yIbTaTOB uepe3 HeckoBko HeJeB,ecn:
- BbIOCTnIraTe ONpeIeIeHHbIX pe3yIbTaTOB C MeHb-We Harpy3KoHa cepDue, Yem paHbwe;
- BbI BbIePknBaTe OnpdeJeHHyO Harpy3ky B TeueHne IINTEJbHO BpemHn, npn 3TOM Harpy3ka Ha cepDuce He N3MeHReTcra.
- Bb6IcTpeepnIXOAnTeB HopMy nocne onpeJeHHO HArpy3Kn Ha cepDue, yem paHbwe.
OpneHTnpOBouHbIe noka3aTeJIIN dJIr TpeHnPOBKn Ha BblHOCLNBOCTb
MaKcMaJIbHbI nylbc: IOD MaKcMaJIbHO HArpy3KOI NOpa3yMeBaETCa IOCTnHexHe INHdNbUdyaJIbHO MaKcMaJIbHO nylba. MaKcMaJIbHO BO3MOxHaJ YaCTota cepJeHHbIX COKpaueHm 3aBNCIT OT BO3pacta.3Decb DeIcTByET 3Mnpupecka fOpMya: MaKcMaJIbHaJaCaTota cepJeHHbIX COKpaueHm B MmHyTy COOTBeTCTByET 220 yIapam MNHyc Bo3pact.
$$ \text {I p i m e p : B o 3 p a c t} 5 0 \text {i n t} - > 2 2 0 - 5 0 = 1 7 0 $$
$$ \text {y d a p o B M M H y T y} $$
HHTeHCNBHOCTb Haarpy3KN
Nylbc Harpy3Kn: ONTnMaJIbHnIHTEHCNBHOCTb HArpy3Kn DOCTnIaEeTCB Dnana3OHe 65-75 % OT MaKcIMaJIbHOrO NyIbCa (CM. dNaIrpamMy). B 3aBNCIMoCTn OT BO3pacta 3TO 3HaueHne n3MeHReTc.
06bem Harpy3Kn
ДлnteьнocтбТрснровки KОЛчecво TрснровokВ HeDJIOnOHTmAbHbIy OБьEM Harpy3Kn DoCTnraeTcK, KOrda B TeueHne ДлnteьнHorO nepnoDA BpeMeHn pyNbC NOdepxNBAeTcHa ypoBHe 65-75%OT MaKcMyma.
YacToTa 3aHrTm O6bem TpeHnPoBKn
1-HeDn
3pa3aBHeJeITo TpeHnPoBka 2 MmHyTbI
Ipepeb1 MmhyTa dIra rHMaCTnK
TpeHnpOBka 2 MmHytbl
Ipepeb1 MmhyTa dIra rHMaCTnK
TpeHnpOBKa 2 MmHyTbI
2-ηneJen
3pa3aBHeJeIOpTpeHnpOBKa3MHyTbI
IpepepbIB 1 MHyTa IJI RAHMaCTnKN
TpeHnpOBKa 3 MmHyTbI
Ipepepb1 MmhyTa Ira rHMaCTnK
TpeHnpOBka 2 MmHyTbI
3- nHeJen
3 pa3a B HeJeIIO TpeHInpOBKa 4 MmHyTbI
Ipepeb1 MmhyTa dIra rHMaCTnK
TpeHnpOBKa 3 MmHyTbI
Ipepepb1 MmhyTa Ira rHMaCTnK
TpeHnpoBka 3 MmHyTbi
4-н endern
3 pa3a B HeJeIIO TpeHInpOBKa 5 MmHyTbI
Nepepb1B 1 MmhyTa dIra rMHaCTnK
TpeHnpOBKa 4 MNHyTbI
Ipepepb1 MmHyTa Iy rMHaCTNK
TpeHnpOBka 4 MmHyTbI
Ipeed KaJdo TpeHnpOBKo n NOcIe TpeHnpOBKn Heo6xoJIMO BbIeJIaTb No 5 MnHT Ha 3aHaTn RaMHaCTNKo dna pa3OrpeBa n OxJaXdEHHa. MeKdy DByMa TpeHnpOBkAm DoJKeH 6bITb OOnn DeHb 6e3 TpeHnpOBKn, ecn B daJIbHeiWe m Bbl NpAHHpyTe npOBoDnTb TpeHnpOBKn 3 pa3a B HeJeIIO no 20-30 MnHT. Dpyrnx npOTBONOKaAHn dla ExeJeHNBeHbIX TpeHnpOBOK Het..
Tloccapn
B03pact
Iapametp Ira pacueta MaKcMaJIbHorO nyIbca.
N3mepene
EduHnucbI n3MepeHHa DnBbIODa Ha 3KpaH: KINOMeTpbl NmMNn B ac, KNOOKOyNn Nn KINOkAnOpN.
Nylbc dna cKnraHn Xnpa
PaccuTaHHoe 3NaueHHe: 65% MaKc. nYbc
PnIbC nIra noIepKaHna Hn3NueckoH opMbI
PaccuTahHoe 3HaueHHe: 75% MaKc. nYbc
Tloccapn
Pa3dien, B KOTOPOM co6paHbI o6bceHnnoHrTn.
3NaOH HI
IorBHeHne 3HaKa 已 O3HaayeT, YTO TeKyunn Nylbc Ha 11 yIapOB BbIwe uebeBOr. Ecn 3Haoyok HMI mraet, To npBeBIsWeh MaKcImaJIbHbN nyIbC. KOHTPOJb npBeBIsWeHn nyIbCa aKTNBEH BCERda.
3Haok LO
PonBHeHne 3NaKa 已 O3NaHaeT, yTo TeKyuun nybc Ha 11 yIapOB HnKe uebeBOr. FyHKUa KOnTpOra C BbIBoDom 3NaKa LO aKTHBHa IINb B TOM Cnyae, eCIn dJr TpeHnpOBKn 3aDaH UeBeBOI nplbc.
MaKcImaJIbHbI nYJbc
3NaueHHe, noIyueHHoe B pe3yIbTaTe MaTeMaTnuecko onepaun «220 - Bo3paCT>.
MeHIO
06naCTb BBOda nn Bb6opa 3HaueHn.
NyIbC

- Inhaltsverzeichnis
- Tritffrequency (RPM)
- Puls (PULSE)
- Prozentpuls
- Training and Operating Instructions
- Table of contents 12
- Safety instructions 12
- Short description 13-15
- Quick start (for introduction) 16
- Training 17-18
- General instructions 19
- Training instructions 19
- Glossary 20
- Safety instructions
- Please observe the following instructions for your own safety:
- Short description
- Quick reference guide
- Functions
- SET (press shortly)
- Reset (press SET longer)
- Minus-/Plus+
- RECOVERY
- Pulse measurement
- Pedal frequency (RPM)
- Pulse (PULSE)
- Percentage pulse
- Distance (DISTANCE)
- Speed
- Time(TIME)
- battery charge
- Display values
- Quick start (for introduction)
- Display
- Ready for training
- Start of training
- Training interruption/end of training
- Sleep mode
- Training
- Training without presetting
- and/or
- Training with presetting
- Time setting (TIME)
- Distance setting (DISTANCE)
- Energy setting (KJoule/kcal)
- Age input (AGE)
- Alarm signal, if maximum pulse is exceeded
- Target pulse monitoring FA 65\% /FI 75\%
- Or
- Target pulse input
- Comment:
- Resumption of training
- RECOVERY function
- Recovery pulse measurement
- General instructions
- System signals
- Activation of the device
- Presetting
- Calculation of average value
- Instructions for pulse measurement
- With ear clip
- With breast clip
- With hand pulse
- Failures with the training computer
- Training Instructions
- Guide values for the endurance training
- Load Intensity
- Extent Of Load
- 1st week
- 2nd week
- 3rd week
- 4th week
- Glossary
- Age
- Dimension
- Fat burning pulse
- Fitness pulse
- HI symbol
- LO symbol
- Maximum pulse(s)
- Menu
- Pulse
- Reset
- Target pulse
- Itable des matieres 22
- SET (pression brève)
- Genoptagelse of training
- RECOVERY - Funktion
- Måling af hvilepuls
- SET (apāsare scurṭa)
- Calcularea valorilor medii
- PeKoMeHdaaunn no npOBeJeHHIO TpeHnpOBok 129
- Tloocapn 130
- Yka3aHnno TcXnKe 6e3- onaChOCTn
- Длг obecneueHn CBoe co6cTBeHHo8 6e3onac-HocTn co6IIOaIte cIeDyUOuNe yka3AHn:
- ДlaBaWei co6CTBENHO 6eONaCHOCTN:
- Kpatkoe onncahne
- O6laactb nHdkauu nn
- O6naCTbФyHKcN KhoIKN
- KpaTKoe pyKOBOdCTBO
- 06naCTb yHKcui
- SET (kpaTkoe HaxaTne)
- C6poc (dnttehoe haxaTne SET)
- MnHyc-/nnIOc+
- PekomeHdaaNo npOBeHnIO TpeHnpOBOK n pyKOBoCTBO n 3KcNlyaTaun
- Yactota warob (RPM)
- PnIbC (PULSE)
- IpoeHTHOe 3haueHne nylbca
- PacctoHne (DISTANCE)
- CkopoocTb
- BpeM (TIME)
- 3apnakkymyIaTopa
- Poka3aTeJn
- PekomeHdaunno npOBeHnIO TpeHnpOBOK n pyKOBoDCTBO n 3KcnIyataun
- БыICTpbI CTapT (ДЯ OЗнakOMNeHnA)
- TOTOBHOCTb K TpeHnpOBke
- Hauaio TpeHnpOBKn
- Perynnpovka Topmo3a ctyneH 1-10
- Ipepbibahne nn 3abepweHne TpeHnpOBKn
- Cnau npexm
- TpeHnpobka
- TpeHnpBka 6e3 HacTpoek
- TpeHnpOBKa c HacTpOyKaMn
- Hactpoika BpeMeHN (TIME)
- 06uye yka3aHn
- CnCTeMHbIe 3ByKu
- BkIoueHne
- HactpomKu
- PpeBbIeHHe MaKcMaJIbHOrO nyIbCa
- BocctaHOBJeHne
- PykoBoCTBO no npOBeHnIO TpeHnpOBok
- OpneHTnpOBouHbIe noka3aTeJIIN dJIr TpeHnPOBKn Ha BblHOCLNBOCTb
- HHTeHCNBHOCTb Haarpy3KN
- 06bem Harpy3Kn
- 1-HeDn
- 2-ηneJen
- 3- nHeJen
- 4-н endern
- Tloccapn
Brand : KETTLER
Model : Polo M
Category : Exercise bike