
KM 2894 - Food Processor CLATRONIC - Free user manual and instructions
Find the device manual for free KM 2894 CLATRONIC in PDF.
| Product type | Food processor |
| Brand | Clatronic |
| Model | KM 2894 |
| Power supply | 230 V, 50 Hz |
| Nominal power | Not specified (estimated: approximately 800-1000 W) |
| Blender jar capacity | 1.25 L |
| Working bowl capacity | Up to 1 kg thick dough, 1 L crepe batter |
| Speeds | 6 speeds + pulse function (P) |
| Included accessories | Blender jar, working bowl, lids, mixing whisk, dough hooks, chopper, fine and coarse graters, scraper, french fry cutter, adjustable slicing disc, pusher, measuring cup, storage box, spatula |
| Main functions | Blending, kneading, mixing, chopping, grating, cutting (slicing, french fry cutting) |
| Materials | Plastic, stainless steel (blades) |
| Maintenance and cleaning | Clean removable parts with soapy water; wipe the base with a damp cloth; do not use abrasive products |
| Safety | Double safety system: working bowl and lid must be properly locked; safety cover on the drive shaft; automatic stop at position 0; never put hands in the bowl while operating |
| Spare parts and repairability | Original accessories only; do not repair yourself; contact customer service or a qualified technician; 24-month warranty |
| Warranty | 24 months from purchase date |
| General information | Instructions available in multiple languages; private use only; do not use outdoors |
Frequently Asked Questions - KM 2894 CLATRONIC
User questions about KM 2894 CLATRONIC
0 question about this device. Answer the ones you know or ask your own.
Ask a new question about this device
Download the instructions for your Food Processor in PDF format for free! Find your manual KM 2894 - CLATRONIC and take your electronic device back in hand. On this page are published all the documents necessary for the use of your device. KM 2894 by CLATRONIC.
USER MANUAL KM 2894 CLATRONIC
D-47906 Kempen/Germany
General Safety Instructions
- Read the operating instructions carefully before putting the appliance into operation and keep the instructions including the warranty, the receipt and, if possible, the box with the internal packing.
- The appliance is designed exclusively for private use and for the envisaged purpose. This appliance is not fit for commercial use. Do not use it outdoors (except if it is designed to be used outdoors). Keep it away from sources of heat, direct sunlight, humidity (never dip it into any liquid) and sharp edges. Do not use the appliance with wet hands. If the appliance is humid or wet, unplug it immediately. Do not put it in water.
- When cleaning or putting it away, switch off the appliance and always pull out the plug from the socket (pull on the plug, not the cable) if the appliance is not being used and remove the attached accessories.
- Do not operate the machine without supervision. If you should leave the workplace, always switch the machine off or remove the plug from the socket (pull the plug itself, not the lead).
- To protect children from the dangers posed by electrical appliances, make sure that the cable is hanging low and that children do not have access to the appliance.
- Check the appliance and the cable for damage on a regular basis. Do not use the appliance if it is damaged.
- Do not try to repair the appliance on your own. Always contact an authorized technician. To avoid the exposure to danger, always have a faulty cable be replaced only by the manufacturer, by our customer service or by a qualified person and with a cable of the same type.
- Use only original spare parts.
- Pay careful attention to the following "Special Safety Instructions".
Special safety instructions
- WARNING: The cutter and grater attachments, the chopper and the French fry slicer have extremely sharp cutting and grating surfaces and edges! When removing the attachments from the bowl and container you will come into contact with this accessory.
- Handle this accessory with care to avoid injuries.
- Before changing the attachments, the appliance must be disconnected from the mains!
- Do not reach into the mixer vessel as the underlying blade may cause injuries under certain circumstances!
- Do not put hard foods such as ice cubes, nutmeg or large pieces of chocolate into the container! The blade can be damaged!
- The appliance is equipped with a safety switch. Do not use the appliance in case of malfunctions or if the safety switch has been tampered with!
-
Do not remove the lid during use.
-
The device must only be switched on after you have inserted the seal/stopper in the hole in the lid.
- In order to prevent injury or other dangers you must only use the appropriate stopper for pressing the food and not your fingers, a fork or other objects.
- Do not use the appliance when empty.
- Do not carry or lift the appliance during use. Always switch it off first and pull out the plug. Carry the appliance always with both hands!
- Clean the appliance only as described in „Cleaning".
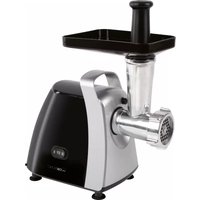
Overview of the Components
1 Kitchen machine, basis appliance
2 Utensil switch
3 Drive shaft for mixing bowl
4 Mixer vessel
5 Safety cover for mixer drive/ processor bowl drive
6 Mixer vessel lid with fi lling slot
7 Filling slot seal
8 Mixing bowl driveshaft
9 Mixing bowl
10 Mixing bowl lid
11 Filler tube
12 Stopper / Flow Limiter
13 Measuring beaker
14 Adapter for the whisk
15 Whisk
16 Kneading hook
17 Chopper
18 Chopper sheath
19 Storage box
20 Lid of the storage box
21 Locating pin
22 Utensil holder
23 Grater (GRATER)
24 Grater attachment, fine (SHREDDER THN)
25 Grater attachment, coarse (SHREDDER)
26 Disk for chips
27 Adjustable cutting disc
28 Cutting height adjustment (cutting disc)
29 Spatula
Unpacking the appliance
- Remove the appliance from the box and all the enclosed accessories.
- Do not through the packaging away, but keep it together with the inner packing and the warranty documents for the whole life of the warranty.
- Place the appliance on smooth, level and stable work surface.
- Do not insert the appliance plug without installing the necessary attachments.
- Before the device is used for the first time the mixing bowl, processor bowl, various lids and other accessories should be washed in soapy water to remove any contamination from their production.
- ATTENTION: Some parts are extremely sharp! There is the risk of being injured under certain circumstances! Clean each single part one after the other and with great caution!
- Dry well all the parts after washing.
GB
Installation and use
- Make sure that the switch (2) is positioned on 0" and that the appliance plug is not inserted when changing the attachments.
- Only now can the attachments be mounted and used.
- While food is being mixed the safety cover (5) must be in position on the drive shaft of the processor bowl in order to avoid injuries and vice versa.
- The appliance cannot be used without the safety lid!
Operation
Positioning the Mixing Bowl
- Please all parts before using for the first time (see „Cleaning").
- Place the mixing bowl (4) on the base in such a way that the circular mark is pointing to the arrow on the base. Turn the mixer (4) clockwise until the mark is pointing to the arrow on the base. The safety cover (5) must be mounted on the drive shaft of the processor bowl (8).
Positioning the Processor Bowl
- Place the processor bowl (9) on the drive shaft (8) in such a way that the left mark of the bowl is pointing to the lower mark on the base.
- Then turn the bowl clockwise until you hear it lock into place. The right mark of the bowl is now pointing to the mark on the base. Turn the bowl until it locks into place and can no longer be twisted.
- The safety cover (5) must be mounted on the drive shaft of the mixing bowl (3).
- The accessories (14, 16, 17, 27) can be attached directly to the drive shaft (8).
- Attach the accessory you wish to use (grater or rasp) to the attachment holder (22). The accessories are to be found in the storage box (19).
- Attach the locating pin (21) to the selected tool (only for accessories 22 and 26). The metal tip points upwards.
- Place the lid on the processor bowl (10) such that the OPEN mark is positioned above the recess of the base. The metal tip of the locating pin (21) has to engage into its bearing in the lid. Then turn the lid in a clockwise direction until the protruding section of the lid is heard to lock in the safety device on the base of the mixer.
- To remove the lid, turn it in an anticlockwise direction.
Double Safety System: The motor can only be switched on if the processor bowl with lid locks into place correctly and the safety cover of the mixing drive is in place (5) and vice versa. Only remove the lid of the bowl and the mixing vessel when the machine is switched off.
Initial Operation
GB
Mixer function:
- The safety cover must be mounted on the drive shaft of the processor bowl (8).
- Chop the food to be mixed into small pieces. Now place the ingredients that are to be mixed into the mixing bowl ((4) max. 1.25 l) and place the lid (6) on top. Do not overfi ll! Do not exceed the maximum quantity stated on the mixing bowl! Now tighten the lid. The safety tongue on the rear on the external edge of the cover must grip into the device above the handle.
Warning! Safety switch! The mixer only works when the mixing bowl and the large lid of the mixing bowl are in place.
Lock the lid in place with the lock (7).
- Never fill with hot food or hard ingredients such as potatoes, ice, coffee beans, nuts, and so on.
- If you wish to fill in more food to be mixed you can remove the lid and cover. Switch the device off beforehand. Remove the lid (6) of the mixer vessel (4) and fill with the desired ingredients. ATTENTION: Do not reach into the mixer vessel, as the underlying blade may cause injuries.
- Place the lid on the mixer vessel again. If you are mixing cold food, insert the lock (7) into the centre of the lid. When mixing warm foods take off the clasp. Do not use the mixer when empty or without the lid.
- Ensure that the function switch is in the "0" position.
- Insert the plug in a duly installed 230V / 50Hz socket.
- Switch the device on (Level 1 or 2 etc.) or use pulse operation (P).
- The mixing bowl must be held firmly in place during mixing.
- For constant mixing (continuous mode): When the device is operated on levels 1 to 6 the switch locks into place in the respective position.
$$ \text {L e v e l} 1 = \text {l o w r p m} $$
$$ \text {L e v e l} 6 = \text {h i g h r p m} $$
To switch the device off, turn the switch back to the "0" position.
- For pulse mode (mixing at brief intervals) shift the switch to 0^ position. The appliance is off now. Please turn the switch to P^ . Hold the switch in this position according to the desired interval length. When the switch is released it returns automatically to the off position.
- In order to remove the mixer jug turn it counterclockwise.
- Clean the used parts as described in „Cleaning“.
Mixing bowl:
- The safety cover (5) must be mounted on the drive shaft for the mixing drive (3).
- The processor bowl must be mounted as described under „Positioning the Processor Bowl" above.
GB
- Press the whisk (14), dough hook (16), chopping knife (17) or cutting disc (27) down as far as possible.
- Never use more than one utensil at a time.
- Place the lid (10) in position, as described under „Positioning the Processor Bowl" above.
- Use the stopper (12) to press the food into the fi lling slot (11). Exert a sufficient degree of pressure on the stopper. The appliance must be switched on only with the stopper (12) mounted into place.
Use of the Stopper:
The stopper (12) fulfi is several functions:
- With the measuring beaker (13) it is possible to measure out small quantities of fluids, e.g. oil, water etc. (max. 50ml ) and add them directly to the food through the flow limiter (12).
- If you wish to add items such as carrots or leek stalks etc. please use the small opening of the stopper in order to prevent the items being cut from jamming.
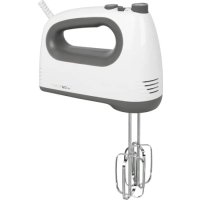
Dough kneading and beating
- The whisk (15) with adapter (14) is to be found in the storage box (19).
Each time you have finished using these items they should be returned to the box in order to avoid damage to the adapter. - The safety cover (5) must be mounted on the drive shaft for the mixing drive (3).
When using the whisk proceed as follows:
- Remove the whisk (15) and the adapter (14) from the box (19).
- Mount the processor bowl as described.
- Insert the whisk into the relevant slot of the adapter. Place the adapter on the drive shaft (8).
When using the dough kneader proceed as follows:
- Attach the dough hook (16) directly over the drive shaft (8).
- Now fi ll in your ingredients. Please note the markings on the processor bowl and do not fi ll it above them.
- Place the lid in position on the processor bowl. Turn it to the right until it is heard to lock in place.
- Close the opening in the lid with the stopper (12).
- Insert the plug into a 230V / 50Hz socket installed according to existing regulations and with earthing protection. Switch on the appliance and set a speed between 1 and 3 (for kneading) with switch (2).
With this device, in just 20 seconds, you can:
- up to 1kg of heavy dough (bread or pastry);
- beat up to 1 l of crepe or waffle batter;
- beat up to 1 kg of light dough (e.g. for cookies).
CAUTION: Do not operate the device for more than 50 seconds at maximum level when working heavy dough!
- After kneading/stirring turn the switch (2) back to position "0" as soon as a small amount or ball of dough has formed. Then remove the mains plug.
- Turn the lid to the left and remove it from the processor bowl.
- The processor bowl can now be removed. The fi nished dough can be released from the sides and with a spatula (29) and taken out of the bowl.
- Clean the used parts as described in „Cleaning".
Chopping with the chopper
WARNING: The chopper is very sharp! Danger of injury!
Take the chopping knife (17) and remove it carefully from the protective cover (18).
- The safety cover (5) must be mounted on the drive shaft for the mixing drive (3).
- Mount the processor bowl as described.
- Attach the chopping knife directly over the drive shaft (8).
- Now fi II in your ingredients. Please note the markings on the processor bowl and do not fi II it above them.
- Place the lid in position on the processor bowl. Turn it to the right until it is heard to lock in place.
- Close the fi Iller shaft (11) with the stopper (12).
- Switch on the appliance and set a speed between 1 and 6 with switch (2). You will achieve better results if you use the pulse mode (see the section „Mixing Operation").
- After chopping, turn the switch (2) back to 0 and pull out the plug.
- Turn the lid to the left and remove it from the processor bowl.
- The processor bowl can now be removed. The contents can now be taken out of the bowl.
- Clean the used parts as described in „Cleaning“.
Cutting and grating
- The safety cover (5) must be mounted on the drive shaft for the mixing drive (3).
- Mount the processor bowl as described.
- Push the locating pin (21) over the drive shaft (8).
- Insert the grater (23) or a rasp (24, 25) into the recess of the attachment holder (22). Press the grater or rasp firmly until it is heard to lock into place.
GB
CAUTION: The grater and rasp surfaces as well as the edges of the inserts are very sharp! Danger of injury! Handle these attachments with caution!
- Attach the holder (22) to the locating pin (21).
- Place the lid in position on the processor bowl. Turn it to the right until it is heard to lock in place.
- Insert the plug into a 230V / 50Hz socket installed according to existing regulations and with earthing protection.
- Switch on the appliance and set a speed between 1 and 3 with switch (2).
- Now fill the filler shaft (11) with your ingredients. Please note the maximum fi lling level on the processor bowl.
- After cutting/grating, turn the switch (2) back to ,0^ and pull out the plug.
- Turn the lid to the left and remove it from the processor bowl.
- Please remove the holder from the locating pin.
- Remove the locating pin from the drive shaft.
- The processor bowl can now be removed. The contents can now be taken out of the bowl.
- Clean the used parts as described in „Cleaning".
| Product | Attachment | Speed |
| Parmesan etc. Grater (23) 1 | ||
| Carrots, radish, cucumber, onions etc. | Grater attachment, fi ne (24) 1-2 | |
| Apples, potatoes, cabbage, hard cheese (e.g. Gouda) etc. | Grater attachment, coarse (25) | 1-4 |
| Potatoes French fry slicer (26) 1 | ||
| Cucumber, carrots etc. Cutting disc (27) 1-2 |
French fries
Potatoes can be easily and quickly cut into French fries with the French fry slicer (26).
- First follow the instructions contained under 1 to 3 under „Cutting and Rasping“, and then:
- Attach the French fries disc to the locating pin.
WARNING: The cutting surfaces and edges of the slicer are extremely sharp! Danger of injury! Handle these attachments with caution!
Now fill the fi Iller shaft (11) with your ingredients.
Adjustable Cutting Disc
With the cutting disc (27) you can easily and quickly cut slices of various thicknesses up to a maximum of 1 cm.
-
WARNING: The cutting surfaces and edges of the slicer are extremely sharp! Danger of injury! Handle these attachments with caution!
-
Set the cutting thickness by turning the cutting height adjuster (28) on the bottom of the cutting disc in a clockwise or anticlockwise direction.
Always choose a utensil and a speed according to the following table:
GB
| Product/Type of Preparation Max. | Quantity Utensil | Level | Max. Oper- ting Time | |
| Heavy dough (e.g. yeast dough) 1 kg | Kneading hook I | 50 sec. | ||
| Cake mixture 750 g Kneading hook II to III 5 min | ||||
| Sponge mixture or wafer mixture 750 g Whisk II to III 5 min | ||||
| Cutting into small pieces, e.g. fruit, vegetables, herbs | 500 g Chopper II to III 5 min | |||
| Cutting into small pieces, e.g. nuts, almonds | 500 g Chopper I to IV or P 5 min | |||
| Cutting cucumbers, carrots | 500 g | Cutting disc II to III 5 min | ||
| Grating carrots, radish, cheese 500 g | fine grater | II to III 5 min | ||
| Grating apples and carrots | 500 g | coarse grater II to III 5 min | ||
| Grating parmesan | 500 g | grating attachment | I | 3 min |
| Grating potatoes, hard cheese | 500 g | coarse grater II to III 5 min | ||
| Potatoes | 500 g | chip disk I to I | 3 min | |
| Cream | min 250 ml | Whisk | II to VI 5 min | |
| Whipped egg whites | 4-6 egg whites | Whisk | IV to VI | |
| Mayonnaise | min. 500 ml | Whisk | I | |
| Liquids, shakes | up to 1,25 l | Mixer vessel | I to VI or P | 3 min |
Note: The cutting and grating attachments should be stored in the storage box (19).
Replace the items in the storage box in the same order as shown on the floor of the box. Close the box with the lid (20), with the arrows positioned opposite one another. The arrow on the lid is in line with the arrow on the box.
Cleaning
- Remove the plug from the socket before cleaning!
- Clean the bowl and the mixing vessel carefully immediately after each procedure. To do so, remove the bowl in order to be able to clean off any residues on the drive shaft.
- Never use sharp objects for cleaning!
- Never use abrasive detergents!
- Use a moist towel to clean the outside of the basis appliance.
- In the case of intensely colored foodstuffs (e.g. carrots), the plastic parts can be stained: clean them with oil.
- Any removable parts which have come into contact with food (utensil and bowls) can be cleaned in soapy water.
GB
This device has been tested according to all relevant current CE guidelines, such as electromagnetic compatibility and low voltage directives, and has been constructed in accordance with the latest safety regulations.
Subject to technical changes without prior notice!
Guarantee
The device supplied by our Company is covered by a 24 month guarantee starting on the date of purchase (receipt).
During the life of the guarantee any fault of the device or its accessories *) ascribable to material or manufacturing defects will be eliminated free of charge by repairing or, at our discretion, by replacing it. The guarantee services do not entail an extension of the life of the guarantee nor do they give rise to any right to a new guarantee!
Proof of the guarantee is provided by the proof of purchase. Without proof of purchase no free replacement or repair will be carried out.
If you wish to make a claim under the guarantee please return the entire machine in the original packaging to your dealer together with the receipt.
*) Damage to accessories does not mean automatic free replacement of the whole machine. In such cases please contact our hotline. Broken glass or breakage of plastic parts are always subject to a charge.
Defects to consumables or parts subject to wearing (e.g. motor pistons, kneading blades, drive shafts, spare remote control, spare toothbrushes, saw blades, etc.) as well as cleaning, maintenance or the replacement of said parts are not covered by the guarantee and hence are to be paid!
The guarantee lapses in case of unauthorized tampering.
After the expiry of the guarantee
After the expiry of the guarantee repairs can be carried by the competent dealer or repair service against the payment of the ensuing costs.
0630p coCTaBbIX yacteI
1 Ba3OBaЯ NOIDCTaBka KxOHHOro KOM6aHa
2 BkJIIOuTaTeIb
3 PnBODHa Ocb MUKcepHOrO 6okana
4 MmKcepHbI 6okai
5 IpeoXpaHnteIbHaKpbIuKa npBODa Mkcepa / npBODa pa6oey awn
6 Kpbiuka MmKcepHoro 6okana C OTBepCTnEM dJa HANOJIHeHnA
7 3aŋlyka OTBepCTnЯ ДЯ HANOJIHeHЯ
8 PpivbOndnoB aal pa6oey uaun
9 Pa6o7a 7a7a
10 Kpbioka pa6oeyuans
11 HanoHHTeIbHoe OTBepCTne
12 ToIkaTeIb / OrpaHnUHTeJIb nOTOKa
13 Mepka
14 NepexoHnK JIa BEHnuKa
15 BeHcNk
16 KpIok-MeuaJaKa
17 Ceka
18 3aunTHbIKoKxUdJIceKaHa
19 Raun Dja XpaHeHn
20 KpbIka IuKa
21 HanpaBnaIounn IuTbIpb
22 3aximДЯнHaCaIOK
23 Ha6op Tepok (GRATER)
24 Shnkyuza hacaKa, MeIka (SHREDDER THN)
25 ShnKyoouaHaHacaKa, rpy6a (SHREDDER)
26Диckдя KapToфьHoi COIOMKn
27 PeryIpyeMbI uHKBaBbI INCK
28 PerynnpOBKa ToIuHbI cpe3a (HHKOBAJbHbI DNCK)
29 UnataJIb
RUS
PacnaKobka np6opa
- Bынб TeиЗ KapToHHоК Kopo6к ПибОп ИхODЯшпесь В Hei npHaIeJxHOCHTN.
- YnakoBky He BbIKnDbIbAaTe, a XpaHnte ee BMeCTe C BKlaIbIaMn I rapaHTnHbIMN DOKyMeHTaMn Do KOHca rapaHTnHOrO Cpoka.
- YctaHOBnTe npi6Op Ha rJaKyIO, poBHyIO, HaNExKHyIO pa6OuyIO NOBepXHOCTb.
- He Bключаite npиборВ сétьДО ПОЛHOrO MOHTaJa BCex npinHaДнeжHocTei.
- UdaJIb Bo3MOXHbIe 3arpa3HeHna 3JeKTpOpnp6opa, nonaBwne B Hero B npouceCe n3rTOBJIeHn Ha 3aBoDe, npOMoTe nepei nepBbIM BKIOueHnEM MKNCEpHbI bokal, pa6oyu OaWy, KpbIkwN npOChne npHaJdEJxHOCTn B npocTOM MOUcem pactBOpe.
BHIMAHNE:OTdJIbHbIe DeTaII npi6opa OueHb OcTpb! Pnp ONpeJeJIeHHbIX 06CToTeJIbCTBax MOxET BO3HNKHyTb ONaCHOCTb NOPaHTbcr! YnCTnte DeTaII NO OTdJIbHOCTn I ONDy 3a DpyroC OOCOoi OCTOPOXHOCTbIO! - После моикп тшаельно ротрпг Сс Деталн Н acyxo.
MONTAX pni6opa n nopraok pa60tbI
- Pered CmeHoi HacaOk 6a3aTeIbHO y6eIITecB TOM, YTO nepeKIOUaTeIb (2) HaxoIITcB NIOJoxEHN "0" I cTeBa BnIka BbiHyTa n3 p03ETKn.
ToIbko nocJe 3TOrO dOnyckaetc MoHTaK DeTaJIe npu6Opa u nx 3KcIIyatau, KaK 3TO ONnCaHO HIXe. - YTO6bI npeoTbpaNTb HeCuaCTHbI CnyaI, Heo6xOIMo B pexime MUKCEp HAneBaTb npeoXpaHntbHyIO KpbIuKy (5) Ha npINBOdHyIO ocB pa6ooye YaSiN I HaO6OpOT.
Pa6oTa 6e3 3ToI npedoxpaHntelbHO KnB03MOxHa!
Popraok pa60tbI
MONTAK MKNCEPHORO 6OKaja
- Перацпервим Вклоченем помои Te BCE DeТаи пибopa (смOTргалу "Чиска").
- YctaHOBHTe MmKcepHbI 6okal (4) Ha 6a3OByIO NOCTaBky TaK, YTO6bl KpyroBaMeTka 6okala yka3bIBaHa HcTepeNkY ▲ 6a3OBn NOCTaBKn. 3aTeM NOBepHtE MmKcep (4) N O YacobOn CTpeJIke TaK, YTO6bl MetKa yka3bIBaHa cTpeNkY ▲ 6a3OBOn NOCTaBKn. IpeDOxpaHITeMbHyIO KpbIshKy (5) Heo6xoDIMO HaJeTb Ha npINBOdHyO ocB pa6Ouey aAun (8).
MONTaK pa6oeyuans
- YctahOBHTe pa6OHyIO yAShy (9) Ha npINBOHHyIO Ocb (8) TaK, YTO6blJeBaMETka 7HaUN YKa3bIBaIHa HHXHIO METky ▲6a3OBOI NOCTaBKn.
- После зтого крутугую чашу по часов стpeлke до Тх по, пokaona Слblшимо He 3aФИКсчуETСЯ.Прабая Метка -разочьй чаши телердолжна COВпадаТь C MeTKОД NOДТАВК.ПрOKрутугую чашу до Тх по, пokaona He 3aФИКсчуETСЯ и He 6удET БOLьш КрутуTBСя.
- Празхапеловукpbiшky (5) HeobxOIMo HaJeTb Ha npBODHyO Ocb Mnkcepa (3).
- Hacaikn (14, 16, 17, 27) HacaXbIOTc Hapmyo Ha npBODHyO ocB (8).
- BbI6epnTe OndHy n3 HacaIOK (WunHKOBky IIn TepKy), KOToPbIE HaxOJaTcBЯuKe (19) n 3aKpEnITe ee Ha epXaTeJe (22).
- BcTaBbTe HnpaBraIoum IStbIpb (21) B Bbl6paHHyIO HacaIky (TOnbKO dIy HacaIok 22, 26).MetaJInueCKoe OcTpne DOJXHO CMOTpeTB BBepx.
- 3akpoite pa6oyu yauy (10) kpbilkoTak, YTo6bMeTKa OPEN lexana na Hnd Hacekyo Ha 6a3OBOI NOCTabKe. MeTaJInueCKoe OCTpne HnpaBIAIOUeO WtbpA (21) DoJXHO BXODITB B rHe3do Ha KpbIiKe. NOBepHInTe KpbIiKy no YacOBoI CTpeJIke TaK, YTO6bl"HOCNK" KpbIiKu C IeJIYKOM BOSeI B npeDOxpaHITeJIbHbIM BbIKJIIOUaTeJIb, KOTOpbI HAXODITcHa 6a3OBOI NOCTabKE MNUcepa.
8.ДЯСНТЯКрБИKKN KpyTNe ee npOTNB YacOBОCTpeJIKN.
Двовая систema 6e30anachoctи: ΘлжтомOTOP BKЛIOчaETTOьКВТOM cIуаe, ecn pa6oay yawa C крblшко npabINьн 3aФИКсИрОваHa И HaTeTa npedoxpaHntelbHЯ Крblшka npINbOda MmKcepa (5).Снмай Te крblshky cЧаши NII MmKCEpHbI 6OKaI C NOdCTaBKN TOьКО npN BbIKLOUeHHOM npIN6ope.
Pnodrotobka K pa6ote
Iopraokpa6oTbIC MmKcepom
- PpeOxpaHnteIbHyIO KpbIuKy Heo6xoIIMo HaJeTb Ha IprNBOIDHyIOOCb pa6oey uawn (8).
- Перд работои пожбтей ИнгpeДиЕТы Ha MaJIeHbKne KycOчК.персыпьтев мксерньй 6okal ((4) makc. 1,25Л) BCE KMПОЕТыИЗakpoITE erg кршков (6). He nepenonЯн! He nepectуаiteMaKImaJIbHO dOnyCTmUyOBMeCTmOcTb! Kpenko 3akpyTITe KpbIshky,прdoханTeJBhBn Bblctyn Ha 3aJHeN CTOpOHe BHeIHero Oobda KpbIshKnДOLJKeH BOITN B npICNoCObIeHne NaD pyKoM Mnkcepa.
BHHMaHHe npeOxpaHtJIbHbI BbIKIOuATeJb! Mnkcep
fYHKUHOHpyET TOLbKO B TOM Cnyae, ecn MnkcepHbI 6OKaJ yCTaHOBJeH
Ha Kopnyc MOTopa I NaKpbIT 6OJIbIoN KpbIko.
3aKpoIte KpbIshky npn NOMoUz 3aMka (7).
RUS
- HnB Koem cnyae He hanoJIHry Te MUKcepHbI 6okaj ropyHMn INrpeJeHTaMn nII TaKIMn DoabkamN, KaK KapToΦeJb, JeI, 6o6bl KoΦe opexn I T.Д.
- 4TO6bI Do6aBnTb KOMNoHEnTb CHIMNTE 3aMOK n KpbIuKy. IpeEiTUM o6raTeJIbHO BbIKIOUHTe MUKCEp. CHIMNTE KpbIuKy (6) C MUKCEpHoro 6okaja (4) u HanoJIHnTe erO Heo6xOINMbIMKOMNoHENTAMN.
BHUMAHNE: He cyuTe pyKn B CMEcnteJbHbI 6oKaI, TAK KaK npn OnpedeJIeHHbIX o6CTOaTeNbCTbax MOKeTe NopAHITbcrO6 HOx!
- Hakoite mKcehbl 6okal KpbIko. EcIn CMeuBaOTcXoIOHbIe npOdykTbI, BCTaBte 3amok (7) B cepeDInHy KpbIkw. C rOpaymKOMnoHeHTaMn 3aIyUka He npImeHaTe. HkoRa He BKIoUaTe np6Op BXOLOCTyIO nII 6e3 KpbIkw.
- Y6eIITecb, yTO nepeKJIIOUaTeJIb peKIMOB pa6Otbl CTOUT B NOLOXKeHH "0".
- BcTaBbTe BnKy B po3eTk y c HanpJxHHeM cTeN 230 B, 50 rU, yCTaHOBJIeHHyIO B COOTBeTCTBnC npeDnIcAHnA Mn.
- BkIIOUHTe MUKCEP (PxIM 1 nII 2 nT.I.) nII IN BOCNOJb3yIITecb IMNpyJIbCHbIM peKIMOM (P).
- MinkcepbHb 6okal Heo6xOIMO noDpeKuBaTb BO BpeMpa60tbl.
10.ДЯ paBHomepHOrO CMeUHaHn(B HeNpepbIBHom pexIme): Bo Bpm pa6oTbI B pxImax 1-6 npKIOuHaTlb ΦIKCnpyTCra B Bbl6paHHoI NO3nU.
peKm1=HN3Kne o6oPoTbI
peKIM6=BBICOKneO6oPoTbI
Дя BыклioчнЯ MИKcpa npДВиНьтnpКЛIOчТь B NOLOXHn"0".
11.ДЯ pa60tBI B mIyJIbCHOM pexHMe (CMEUINBaHne C KOPOTKIMN INTEpBaJAMn) yCTaHOBITE nepeKJIIOuAteIb B NOLOXeHne "O".Teepb np6Op BbIKJIOUeH. NOBepHITe nepeKJIIOuAteIb B NOLOXeHne "P".ДepxHTe ERO B 3TOM NOLOXeHmN B COOTBETCTBnC HEOxOdMbIM INTEpBaJOM BpeMeHn. B CBO6oJHom COCTOJHmN pepeKJIIOuAteIb aBTOMaTNUeCKN BO3BpaJauetcB NOLOXeHne BbIKJ.
12.Дя сягия микерно 6okajna npobepnte ero npotub yacobov CTpekn.
13. PpOMoIe IcNoJIb3OBAHhbIe DeTaII KAK 3TO OINcaHO B rIaBe "UncTka".
Poprajok pa60tbc yawe
- PpeOxpaHntbHa KpbIka (5)doJxHa 6bITb HaJeTa Ha npINBOOnHyIO Ocb MUKcepa (3).
Pa6o7a Ya7a D0JXHa 6bITb yCTaHOBHeHa, KaK 3TO OINcAHO B rIabe "Montax pa6o7e Ya7n".
B36nBaJka (14), CmecnteJbHbI KpIOK (16), cekay (17) nIN uHHKOBAJBHbI INCK (27) NOJIHOCTbIO BdaBNTb BHN3. - HnKoIgHa He nCNoJIb3yIte HeCKOJIbKO HaCaIOK OJHOBpeMeHHO.
- HakoTe Yauy KpbIkoN (10), KaK 3TO OINcAHO B rJIabe "MoHTax pa6OeY uAnu".
-Дяпадчи роруктов в наюншьhoe OTberpctne (11) noJB3yntecb TOLkaTeJem (12).ДаВITE Ha TOLkaTeJb CO cpeHne CnIoN.Прбop pa3peWsaETcB KJIIOHTb TOLbKO CO BCTaBJIeHHbIM TOLkaTeJem (12).
Ha3haeHne ToIkaTeJIa:
ToIkaTeIb (12) nMeet pa3JIuHbIe fYHKUIN:
- Пи помоши Мерк (13) Имeelся BO3MOxHOCt b OTMepntb Heo6xOДmOe KOJIINueCTBO XnIkoCTn, K npIMepy Macla, BODbl T.I. (MaKc. 50 Ml) n Добавпь ee HanpЯMyIO uepe3 orpaHnUHTelb NOTOKa (12) K CMeuNbaemblnpOdyKTam.
ДяdoabeneB Cmecb MopKOBn, Nyka-noper nT.D. noIb3yItecb MaJIeHbKIM OTBepCTnEM 3aIlyuSKn, YTO6bl N36exaTb nx nepekoca.
3aMeUbHne Tecta
B36nBaJIka (15)c nepexoDnKOM (14) haoDntcBraIKe IJxpaHeHn (19).
- После польбизань Нeoбхдиму уложпь BCE насади образно Вяшик Ддя Ханеня,Чтоби n3бжать NOВржденипорexODнka.
- PpeOxpaHntbHa KpbIka (5)doJXHa 6bITb HaJeTa Ha npNBOHyIO OcB Mnkcepa (3).
DЯ pa6oTbIC BEHcNKOM NOCTyNaTe CJeDyIOUIM O6pa3OM:
- BbHbTe n3Яиka (19) B36nBaIky (15) c nepexoHnikom (14).
- YctaHOBInTe pa6Ouyu YaUy, KaK 3To 6bIIO ONiCaHO BIIe.
- BCTaBbTe BeHcN K IpeXoDnK, B IpeDyCMOTpeHHoe IJIra Hero OTBepCTne. HaJeHbTe IepExoDnK Ha npuBOdHOB BaI (8).
Ipa6oTbI CO CMEcHTeJIbHbIM KpIOKOM NOCTyNaTe CneDyUOuM 6pa30M:
- BCTaBbTe CmecnteJbHbI KpIOK (16) HAnpMyIO B npNBOHyIO OcB (8).
- IpecebInbTe npOdykTbI B yaSuY. CJeDInTe 3a MeTkamn Ha pa6oey YaWe n He nepenOnHryte ee.
- HakoTe pa6oyu yawy KpbIkoN. NobepHnte ee BnpaBO,do YeTHO cnblHMoN oKcaunn.
- 3akpoIte OTBepCTne KpbIuKn 3aIyUkoN (12).
- BCTaBbTe ceTeByIO BnIKy B po3eTKy C hAnpJxHHeM CeTn 230 B, 50 Tc, yCTaHOBJIeHHyIO B COOTBeTCTBnC npeDnIcaHnAMyN. PnI NOMOuI nepeKIIouaTeIa (2) BKIOUHTe npIbOp I yCTaHOBITe CKOpocTb B DnIaNa3OHe 1-3 (B 3aBNCIMoCTn OT BnDa TeCTa).
RUS
C nOMOUIIO 3TOrO npu60pa MoXHO B TeueHn 20 cekyHd:
- 3aMeCnTb Do 1 Kr rCyToTe TcTa (XJIe6HOro nIIN cNo6HOro neCoUHoro)
pa3Bectn1IHTpTeCTaIyBaΦeJbIINrpeIOB
pa3BecTn 1 Kr JxNdkoro Tecta (K npimepy: 6nCKBNTHO)
BHUMAHNE: npn 3aMeuBaHn rYcTOro TeCTa He BKJIouHaIe npi6Op Ha MaKcImaJIbHyIO MOUHocTb 6OJIee 50 cekyHd!
- KaK ToIbKO B IpoUeCCSE 3aMeuBaHnA/CMeuBaHnA TeCTo npHraNo fOpMy Uapa nepeKJIIOUHTecb (2) B noLOXeHne "0". BbIHbTe BnIKy n3 pO3eTKn.
- NObepHnTe KpbIuKy BJIeBO u CHIMnTe ee c pa6oey qaun.
- Chmnte pa6oyu yawy. Otckpebte roTOBOe TcTo OT aun npn nOmoun 1nataTe (29) n BbHbTe ero n3 yaun.
- Помог Te Испьзованные DeТал КAK ЭTO ONИСАН В Глав "ЧИСТК".
Pa6ota c cekaayem
BHIMAHHE: Kpomkn ceka a ouehb octpbI. Onachoctb nope3aTbcra!
Bo3bMnte ceka(17)BpyknIOCTOpOxHO ydaJIInTe C HrO 3aunTHyIO OboJIOUky (18).
- Ппениханделя Крышka (5) Должна битва Надета на пиюню ось мikkера (3).
- YctaHOBInTe pa6OuIyAùy, KaK 3To 6bIIO ONUcaHO BbIe.
- HacaIte cKaHnPryMHyHa npBOnHyOcb (8).
- NpecsbInbTe npOdykTbI B yaSy. CJeIeTe 3a MeTKamn Ha pa6oey u aWe n He nepenolHnre ee.
- HakoTe pa6oyu yaw Ky KpbIkoN. NobepHrTe ee BnpaBO, Do YeTHO cnblIMoN oKcaun.
- 3aKpoIe HanoJIHHTeJIbHbI naTppy6ok (11) 3aInyuKoI (12).
- YctaHOBInTe nepeKJIIOUaTeIb (2)В NOJIOXeHne 1 nII 6.HaJIyUshn pe3yIbTat DOCTuRAeTCr ECJI npIMHeTb NMpyJIbChbI peKIm (cM. rIay "Pa6Ota c MmKcepOM".
- No OKOHuaHn pa6Otby yCTaHOBnte nepeKJIIOuataTeIb (2) o6paTHOB IIOJoxHe "0" n BbIHbTe BNJKy n3 PO3eTKN.
- NOBepHnTe KpbIuKy BJIeBO n CHIMnTe ee c pa6oey qaun.
- Chmnte paobuyu yauy. FOTOBoe coepxmuoe moxho nepeJIOXITb B NOxOJaIyIO Nocdy.
- Помог Te И спльзовные заим кak STО ONИСАНВ Глав "ЧИСТКA".
Pe3aHne n UHHKObaHne
- Ппебхантульна Крьшka (5) Должна 6ыт ha Надета Ha npибдую ocb MИКерpa (3).
- YctaHOBInTe pa6ouyIO yauy, KaK 3TO 6bIIO ONuCAHO Bbiue.
-
HacaIte HappaBlyuO u (21) Ha npBOnHy ocb (8).
-
Hacadte Ha depxaTeIb (22) OndHy n3 HacaIOK: TepKy (23) IINuHKOky (24, 25). KpeNKo BdaBte TepKy IINu SHNHOKBy, Do YeTKO CJIbIshMOJ fHKcaun.
BHUMAHNE: pa6oue NOBepxHocTn TepKn N uHHKOBKn, a TaKxe KpOMKn BCEx HacaIok OyeHb OcTpb! OnaChOCTb nopAHntbc! ObpaauTeCb c 3TIMN HacaIkaMn DoCTaTOUHO OCTOPOXHO!
- HaneBte depkaTeIb (22) Ha HanpaBJIouuI uIN (21).
- HakoTe pa6oyu yawy KpbIkoN. NobepHnte ee BnpaBO,do YeTHO cnblHMoF uKcaunn.
- BCTaBbTe CeTeByIO BnIky Bpo3eTKy C HanpJxKeHneM cTeN 230 B, 50 rU, YCTaHOBJIeHHVIO B COOTBETCTBUN C IpeDncaHnA M.
- YctaHOBInTe nepeKlnOuChaTeIb (2) B noJIOKeHne 1 nn 3.
- 3aONHnTe HAnOHNHeBHyI NaTpy6OK (11) KOMNoHEHTAMN. IoxaIyIcTa CNeIeIte 3a MaKcImMaJIbHO BMECTMOCtBIO pa6Oey YaShn.
- ПО okOHuaHn npOcecca pe3aHn/шнKOBaHn yCTaHOBnte nepeKnIOyateIb (2)образноВ поJOXeHne "O"и BbIbTe BnIKy n3 pO3eTKn.
11.ПовернITE Кршky Влево И симпес ec paбочи. - Chmnte depkaTeJb c HappaBJIooIero Iina.
- CTaHnTe HaIpaBIAUoUsI uIN C npNBOJHOOcN.
- Chmnte pa6oyu yauy. FroTOBoe coepxMoe moXHO nepeIOXHTb B IOxOJaUyIO NOcyIy.
- ПомоTe ИСпОЛьЗВаHHье ДЕТАЛК ЭTO ONИСАН В ГЛаве "ЧИСТКA".


- General Safety Instructions
- Special safety instructions
- Overview of the Components
- Unpacking the appliance
- GB
- Installation and use
- Operation
- Positioning the Mixing Bowl
- Positioning the Processor Bowl
- Initial Operation
- Mixer function:
- Mixing bowl:
- Use of the Stopper:
- Dough kneading and beating
- When using the whisk proceed as follows:
- When using the dough kneader proceed as follows:
- With this device, in just 20 seconds, you can:
- Chopping with the chopper
- WARNING: The chopper is very sharp! Danger of injury!
- Cutting and grating
- French fries
- Adjustable Cutting Disc
- Cleaning
- Guarantee
- After the expiry of the guarantee
- 0630p coCTaBbIX yacteI
- RUS
- PacnaKobka np6opa
- MONTAX pni6opa n nopraok pa60tbI
- Popraok pa60tbI
- MONTAK MKNCEPHORO 6OKaja
- MONTaK pa6oeyuans
- Pnodrotobka K pa6ote
- Iopraokpa6oTbIC MmKcepom
- Poprajok pa60tbc yawe
- Ha3haeHne ToIkaTeJIa:
- 3aMeUbHne Tecta
- DЯ pa6oTbIC BEHcNKOM NOCTyNaTe CJeDyIOUIM O6pa3OM:
- Ipa6oTbI CO CMEcHTeJIbHbIM KpIOKOM NOCTyNaTe CneDyUOuM 6pa30M:
- C nOMOUIIO 3TOrO npu60pa MoXHO B TeueHn 20 cekyHd:
- Pa6ota c cekaayem
- Pe3aHne n UHHKObaHne
Brand : CLATRONIC
Model : KM 2894
Category : Food Processor