FW 3803 - Food Processor CLATRONIC - Free user manual and instructions
Find the device manual for free FW 3803 CLATRONIC in PDF.
| Product type | Food processor (meat grinder with accessories) |
| Brand | Clatronic |
| Model | FW 3803 |
| Power supply | 220-240 V~, 50/60 Hz |
| Rated power | 250 W |
| Maximum power with motor locked | Approx. 1000 W |
| Protection class | II |
| Net weight | Approx. 1.97 kg |
| Main functions | Meat grinding, sausage making, kebbe preparation, cookie shaping |
| Included accessories | Pusher, filling tray, screw, knife, 3 perforated discs (fine, medium, coarse), cap, sausage accessory, kebbe accessory (2 parts), cookie accessory (2 parts) |
| Number of perforated discs | 3 (fine, medium, coarse) |
| Maximum continuous use time | 10 minutes, then 10 minutes cooling |
| Safety | On/off/reverse function (unblocking), housing unlocking button, sharp blades (caution) |
| Maintenance and cleaning | Clean accessories with hot water and dish soap; do not put in dishwasher; do not immerse motor block; wipe with a damp cloth |
| Storage | Store in a dry, well-ventilated place out of reach of children; regularly oil the discs with vegetable oil |
| Warranty | See included warranty certificate |
| Spare parts and repairability | Contact customer service or a specialist in case of defect; repair or donation preferred |
| General information | Household use only; do not grind bones or shells; cut meat into 2.5 cm pieces |
Frequently Asked Questions - FW 3803 CLATRONIC
User questions about FW 3803 CLATRONIC
0 question about this device. Answer the ones you know or ask your own.
Ask a new question about this device
Download the instructions for your Food Processor in PDF format for free! Find your manual FW 3803 - CLATRONIC and take your electronic device back in hand. On this page are published all the documents necessary for the use of your device. FW 3803 by CLATRONIC.
USER MANUAL FW 3803 CLATRONIC
Be sure to read the separately enclosed safety instructions first.
ENGLISH
Instruction Manual
Thank you for choosing our product. We hope you will enjoy using the appliance.
Read the instruction manual and the separately enclosed safety instructions very carefully before using this appliance. Keep these documents, including the warranty certificate, receipt and, if possible, the box with the inner packaging in a safe place. If you pass the appliance on to a third party, always include all the relevant documents.
Symbols in this Instruction Manual
Important information for your safety is specially marked. It is essential to comply with these instructions in order to avoid accidents and prevent damage to the appliance:

WARNING:
This warns you of dangers to your health and indicates possible injury risks.

CAUTION:
This refers to possible hazards to the appliance or other objects.
Content
Overview of the Components 3
Illustrations A-D 4
Unpacking the Appliance 10
Overview of the Components / Scope of Delivery 10
Intended Use. 10
Warnings for the Use of the Appliance 11
Notes for Use 11
Preparation. 11
Electrical Connection 12
Switch Functions 12
Operation 12
Cleaning 12
Storage. 13
Troubleshooting 13
Technical Data. 13
Disposal. 13
Unpacking the Appliance
- Remove the appliance from its packaging.
- Remove all packaging material, such as foils, filling material, cable ties and cardboard packaging.
- Check the scope of delivery for completeness.
- If the contents of the packaging are incomplete or if damage can be detected, do not operate the appliance. Return it to the dealer immediately.
- There may still be dust or production residues on the appliance. We recommend that you clean the appliance as described under "Cleaning".
Overview of the Components / Scope of Delivery
1 Tamper
2 Filling tray
3 Switch ON/OFF/R (forward / off / reverse)
4 Function switch ON/R (on / reverse)
5 Unlocking button for the spiral housing
6 Motor
7 Spiral housing
IllustrationsA-D
8 Spiral
9 Knife
0 Perforated discs (fine, medium, coarse)
1 Closure
12 Sausage attachment
13 2-part "Kebbe" attachment
14 2-part cookie attachment
Intended Use
This appliance is used for:
- Grinding (mincing) food.
- Shaping paste or dough with different attachments.
It is intended for the use in private households and similar applications.
It may only be used in the manner described in these operating instructions.
Use for any other purpose is considered improper and not for the intended purpose and can result in damage to property and personal injury.
The manufacturer shall not be liable for damages caused by not intended use.
Warnings for the Use of the Appliance
- The blades of the knife are sharp! There is a risk of injury! Be careful when assembling, disassembling and cleaning the individual parts.
- Do not touch any moving parts.
- Before changing accessories, wait until the knife stops.
- Before switching on, make sure that the accessory attachment is correctly fitted and firmly attached.
Always use the supplied tamper. Never insert your fingers or tools into the filling neck!
Notes for Use

CAUTION:
Do not mince any hard objects, such as bones or shells.
- Cut the meat into 2.5cm pieces. Ensure that there are no bones or tendons in the meat.
- To shred the meat coarsely, use the disc with the largest holes.
- In a second step, select the disc with the finer or centre holes. Depending on how finely you want to shred the meat.
- Before you start, lightly coat the sieves with vegetable fat.
- If you mince meat, place a container under the outlet.
- With the help of the "Kebbe" attachment (13) tubes of meat or dough can be formed.
Making Sausage
You can use both natural and synthetic casings.
- If you have opted for a natural casing, soak this casing some time in water before using it.
- Tie a knot at one end of the casing.
-
Slide the casing over the sausage attachment. Feed the sausage meat through the sausage attachment and fill the sausage casing.
-
Make sure that the sausage meat is "loosely" stuffed into the casing as the sausage expands in volume during cooking or frying and may cause the casing to burst open.
-
When the first sausage reaches the desired length, squeeze the sausage at the end of the sausage attachment together with your fingers.
- Turn the sausage once or twice around its own axis.
- Until you have established some exercise routine, you can turn off the appliance after each sausage length.
Shaping Biscuits
- Screw the cookie attachment on and adjust the required cookie shape.
- Put the dough on the filling tray and filler.
- Hold the dough strands at the outlet with your hand and cut off the required length.
Preparation
Please see the overviews on pages 3 and 4.
- Insert the spiral housing into the spiral drive in the 2 o'clock position. The arrow on the spiral housing points to the symbol G .
- Turn the spiral housing counterclockwise as far as it will go. The spiral housing audibly engages. The arrow on the spiral housing points to the symbol
- Place the filling tray on to the filler neck in such a way that the fixture for the tray is above the motor block.
- Push the spiral (8) into the horizontal section of the spiral housing.
Assembly of the accessories is described by the following sections. Prepare the meat grinder according to your requirements.
Assembly of the Meat Grinder
- Please also refer to the illustrations under "A" (page 4).
- Please follow points 1 to 4 as described under "Preparation".
- Insert the knife with the sharpened edge outwards onto the shaft of the scroll.
- Select a perforated disc (10). Pay attention to the recesses.
- Rotate the closure clockwise.
Continue reading under "Electrical connection" & "Operation".
Assembly of the Sausage Attachment
- Please also refer to the illustrations under "B" (page 4).
- Please follow points 1 to 4 as described under "Preparation".
- Insert the knife with the sharpened edge outwards onto the shaft of the scroll.
- Select a perforated disc (10). Pay attention to the recesses.
- Position the sausage attachment on the spiral housing.
- Rotate the closure clockwise.
Continue reading under "Electrical connection" & "Operation".
Mounting of the "Kebbe" Attachment
- Please also refer to the illustrations under "C" (page 4).
- Please follow points 1 to 4 as described under "Preparation".
- Position the 2-piece Kebbe attachment on the shaft of the spiral. Pay attention to the recesses.
- Rotate the closure clockwise.
Continue reading under "Electrical connection" & "Operation".
Assembly of the Cookie Attachment
You can shape different forms with this attachment after preparing a cookie dough. This is especially suitable for spritz biscuits.
- Please also refer to the illustrations under "D" (page 4).
-
Please follow points 1 to 4 as described under "Preparation".
-
First, insert the disco onto the extension of the scroll shaft.
- Then mount the shaping disc.
- Rotate the closure clockwise.
Continue reading under "Electrical connection" & "Operation".
Electrical Connection
- Check whether the mains voltage that you want to use, corresponds with that of the appliance. You will find the information about it on the rating plate.
- Ensure that the switch (3) is set to "OFF". The function selector switch (4) must be disengaged.
- Only connect the appliance to a properly installed safety socket.
Switch Functions
Function Switch ON/R(On/Reverse)
Use the function switch (4) to select the desired operating mode for the switch (3).
Switch ON/OFF/R (Forward/OFF/Reverse)
The appliance is equipped with a forward and reverse function. Should the spiral ever become blocked, the reverse function can be used to release the blockage.
-Forward
The function selector switch (4) must be disengaged.
- Turn the switch (3) to "ON". The appliance is in the "forward" mode.
- Reverse
- Turn the switch (3) to "OFF" and wait until the motor stops.
- Press the function selector switch (4) so that it is engaged.
- Press "R" on the switch (3). The appliance will be in the "reverse" mode as long as you keep the switch pressed down.
- Switching Off
- Set the switch (3) to "OFF" and pull the mains plug out of the socket.
Operation
WARNING: Risk of Injury!
Always use the supplied tamper. Never insert your fingers or tools into the filling neck!
CAUTION:
Do not use the appliance for longer than 10 continuous minutes. Let it cool for 10 minutes before using it again.
- Put the pieces of meat (meat paste / sausage mass or dough) on the filling tray and into the filler neck.
- Stuff, if necessary, the meat respectively the dough with the tamper.
Ending Operation
- Pull the mains plug out of the socket.
- Disassemble all parts of the meat grinder.
- Clean the parts used as described under "Cleaning".
Disassembly
- Remove the filling tray.
- Unscrew the closure in an anticlockwise direction.
- Remove the accessories from the spiral housing. If necessary, use a screwdriver to help.
- Release the spiral housing by pressing the release button and simultaneously turning the spiral housing clockwise.
Cleaning

WARNING:
- Always unplug the mains plug from the socket before cleaning. Wait until the appliance has cooled down.
- Never immerse the motor assembly in water for cleaning. It could result in an electric shock or fire.

CAUTION:
- Do not use any wire brush or other abrasive objects.
- Do not use any acidic or abrasive detergents.
Motor Unit
Only wipe the motor unit with a damp cloth and dry with a dry cloth after.
Filling Tray, Spiral, Spiral Housing and all Accessories

CAUTION:
Do not clean these parts in the dishwasher. The surfaces could become lacklustre.
- Use a little dishwashing liquid and clean these components in warm rinsing water.
-
Rinse with clear water and dry the parts.
-
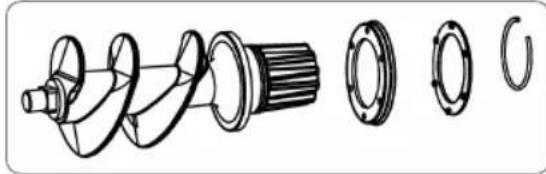
If you have removed the sealing rings and the snap ring from the spiral, mount the parts as illustrated.
Storage
- Clean the appliance as described. Let the accessories dry completely.
We recommend that you store the appliance in its original packaging when it is not to be used for a longer period.
Always store the appliance at a well ventilated and dry place outside the reach of children. - Regularly coat the steel discs with vegetable oil.
Troubleshooting
| Problem Possible Cause | Remedy | |
| The appliance has no function. | The appliance has no power supply. | Check the power socket with another appliance. |
| Insert the mains plug correctly. | ||
| Check the house fuse. | ||
| The appliance is defective. | Contact our service or a specialist. | |
| The function selector switch (4) is not in the required position. | Check the switch position. See chapter "Switch Functions". | |
| The appliance is blocked. | Food residues have stuck to the filament. | 1. Set the switch (3) to “OFF” and wait until the motor has stopped. 2. Engage the function selector switch (4). 3. Press “R” on the switch (3) to loosen the blocking food residues. 4. Switch the appliance off and pull the power plug. 5. Now remove any sticking residue. |
Technical Data
Model: FW 3803
Power supply: 220 - 240 V~, 50 / 60 Hz
Rated power: 250 W
Maximum power of the blocked motor: ...approx. 1000 W
Protection class: II
Net weight: approx. 1.97 kg
The right to make technical and design modifications in the course of continuous product development remains reserved.
This appliance has been tested according to all applicable, current CE directives and built according to the latest safety regulations.
Disposal
Meaning of the "Dustbin" Symbol
Protect our environment: do not dispose of electrical equipment in the domestic waste.
Please return any electrical equipment that you will no longer use to the collection points provided for their disposal.
This helps avoid the potential effects of incorrect disposal on the environment and human health.
This will contribute to the recycling and other forms of re-utilisation of electrical and electronic equipment.
Information concerning where the equipment can be disposed of can be obtained from your local authority. Your dealer and contractual partner is also obliged to take back the old appliance free of charge.
BELANGRIJK:
Yka3bIbaeT Ha BO3MOxHyO ONaCHOCTb In3dEInna INpynx OKpyKaHOuX INpeDMetOB.
CoedepekaHne
Ob3op detanei np6opa 3
PucyHn A-D. 4
PacnaKOBka yctpoiCtBa 44
O63op detaneepnnpopa/KomnneKt noctabkn 44
Ha3nayeHne 44
IpeDynpexJeHnnoNcNoIb3OBAHnU yctpoiCTBa.....45
PpIMeuaHnI NO IcNoJIb3OBAHnI 45
Iodrotobka 45
3JnKtpuueckoe noKnIoueHne 46
Ipeeknouateleb cyHKm. 46
3Kcnpnyatauia 46
Ynctka 47
Xpahene. 47
UcTpaHHe HeNoJaOk 47
TexHHueckme daHHbIe 48
YTNIN3aIy 48
PacnaKOBka yctpoiCTBa
1.ИЗнКУТСТВОИЗУАКOBК.
2. YdaJInte BCE ynaKOBOHyIbe MaTePnAJIbI, TAKHe KaK foJIbra, HanoNHTeJIb, Ka6eJIbHbIe CTaXKn I KapToHHaY naKOBka.
3.Поберп Te KOMЛJEKT NOCTaBKN Ha KOMJIeKTHOCTb.
4. EcIN coDEpKIMMOe ynaKOBKn HEnoJIHOe INN ecN moXHo 6bHApYkNTb NOBpeKdEHHa, He 3KcIIpyaTpyuTe ycTpOCTBO. HEmeIeHHo BepHnTe erO dInepy.
5. Ha yctpoiCTBe MoKTe OCTaBaTbCn PbIb HIn OCTaTKn Ipn3BOIDCTBa.MbI peKOMeHdyem OUYuTaB yctpoiCTBO, KaK OINcAHO B pa3dene «UInCTka»
O63op Detanei npnbopa / KomnJIeKT nocTaBKn
1 ToIkaTeIb
2 3anpaBOHbI JIoTOK
3ПepeкюателбON/OFF/R(BnepeД/BbIKI./BO3BpaT)
4IpeeknioateTb cyHKmN ON/R (BKn / Bo3BpaT)
5 KhoNka pa36nokipOBK cnnpaIbHoro Kopnyca
6ДИВIATeJIb
7 Kopnyc uheka
PncyknA-D
8 HeK
9 Hox
10 PepopopopobaHbIe Nsckn (MeKKa, cpeHna, rpybaa)
11 Ctonop
12 Hacaika dnilcocicok
13 Hacadka dIg Ke66e n3 2 qacte
14 Pa3bemHaa HacaKa DnIeueHb
Ha3haeHne
DannbI npn6op nCnoNb3yeTc dA:
-Измельецни (фарwa) npodуктов.
ΦopMnpoBaHnnaTbI INI TcTa C NOMOu bIO pa3INHbIX HacAoK.
Pp60 npEHa3NaueH dIy IcNoIb3OBaHnB 6bTy n aHAnOuHybIX npIMeHeHn.
YCTPOINCTBO MOKETNCHNOJIb3OBaTbC4TOJIbKO B COOTBETCTBNNB PnIBeDEHHbIMN 3DeCb INHCTpyKUJRMN.
Icnonb30BaHne B dpynIX cenJx H He B COOTBETCTBUN C INCTpyKcYMaM CHTaETC HEnpabNbHbIM M MoKET PnVBecTN K nopue IMyUeCTBa N NHHoTpaBME.
IV3ROTOBNTeIb He Hecet OTBeTCTBEHHOCHTa yUep6,CBA-3aHHbI C HENpABUNbHbIM INCIOJIb3OBAHNEM.
IpeynpexdHn no nCNoB3OBAHnU yCTpoiCTBa
- Ie3BnH OHXa OueHb OCTpIe! CyuectByet OnaCHOCTb nOlyueHn TpaBMbl! ByIbTe ocToPOxHb npn c6OpKe, pa36opKe nUcTke OTdIbHBix DeTanei.
- He npikacaiTecb K DvBxuyiMcyaCTaM.
-Передзамени рпнадлжно TeДохдTeсь octa-HOBKNIJIe3BnI.
-Перд BKЛЮЧЕнEM yБeДИТЕС,чTO насадka паВильно yCTaHOBJIЯHA инаджно зakpenileHa.
Bcerda noIb3yI TeCb npIanaembI ToJIkATEJIb. HnKOrDa He BCTaBnIe NaIbCuI INN KxOHHbIe npEdMeTbIB NoaIOUyIO rOpNoBHy!
PpimcuaHnno nCNoB3OBaHn

BHIMAHNE:
Hikorda He nponyckaite yepe3 macy6ky TBepdble npedMeTb, TaKne KaK KOCTn nnckopny.
HapeKbTe Mco Ky6nKaMn npImepHo no 2,5 cm. Y6eIINTECb, TTO B MRC EOTCYTCTBYOT KOCTN CUXOXINIA.
-Дягбоиpy6knMcaNcNoIb3yIteDnCKCamaBIMN 60JIbShIMNOTBepCTHAMN.
Ha BTOPOM 3Tane BbIbepnTe DnCK C MeHbUIMM OTBepCTNAM NIN C OTBepCTNAM B CEHTpe. B 3aBNCIMOCTNOT TORO, KAK MEJIKO Bbl XOTNTe HApy6ntb MRCO.
-Перед Началов Слегкамaxьт ecTuTbe HacaknIOДСОЛЧЕнblIM MaclOM.
- Пи порусяким мра сецз мсCopy6ky, посты Кakkyю-JINIO EMKOCtB NOД BBIXODHbIM pactpy6om МсCopy6kn.
C NOMObHacdKn DnKe66e (13) MoKHO fOpMoBaTb Tpy60Kn n3 Mca nN TecTa.
N3ROTOBJIeHne KOJI6aCOK
BbMOKTe INCnONb3OBaTb HATypaIbHyIO INN NCKyCCTBeHNHyO6oJouKy.
- PnI nCIOJIb3OBAHnHaTpyaJIbHOJOBIoQH, 3AMoUHTe ee B BOJe NpeJd HauJOM pa60Tbl.
- 3aBxNte y3eJ Na KOHc e o6oJouKm.
-
HaneBte oboOnky Ha hacaKy dny KOn6acok. 3anonHnte oboOnky fapwem Ype3 cooTBeTcByuO uHacaKy.
-
Y6eHITcB,уTo foapu 3aONHReT obOnOky He NIOtHO, nOckOJIbKy npn npriroTOBJIeHN KONbAcOK OH yBeINHITcB O6bEme m MoKet pa3OpBaTb obOnOky.
-
Ecni nepBra KOnBaCKa DoCTnRt NaTe6yEmoN DInHbI, CoXMMTE ee NaJIbCaMn Ha KOHc HacAdKn.
-
3akpyTne kon6acky BOKpyr CBOeN OCN OIN INIIN Dba pa3a.
-
Ioka Bbl He noIyHnO nppeJeHHbI HaBbIK npiroTOBHeHn, Bbl MoXeTe BbIKNoaTb yCTpOnCTBO nocKe KaKdOro HanoHHeHn KOJIbAcOK TpeSyEmoJ dNHBI.
ΦopMOBka neueHb
- UctaHOBtE HacaIky dIy neeHbI n 3aaiTe Tpe6yeMyIO cOpM y Ira neeHbI.
2.ПолжITE TECTO Ha 3anpaBOUHbI JIoTOK N HAnONHITeJIb.
3.Подеркваite 3aTOrOBky n3 TecTa Ha BbIXOe pyKoI n Hape3aIte neueHbe HyKHOJ dINHbl.
IoproTOBka
IcnoIbayuTe nllnctpaun Ha ctp. 3 n 4.
- Bctabte Kopnyc cnnpaBn B cnnpaIbHbI npBOD B noIOxKeHne «2 yaca.CtpeKHa Kopnyce cnnpaNyka3bIBaET Ha CNMBON
2.Повернite корпсспарлnpOTив acobои CTpeknIdoуnapa.PnITOMpa3daetc3bYK3aueJIeHnKOPnycaспарл.CтpeкаHaKOPnyceспарлуka3bIbaETHaCIMBOI - YctaHOBITE 3anpaBOHyI NOtOK Ha 3aINBHyIO rOpJIOBNHY TaKIM O6pa3OM, YTO6bl KpeJIeHne I7I JOTKa HaxOINOCb HAD 6nOKOM DBIrataTeIa.
- BcTaBbTe UHeK (8) B rOpn3oHTaIbHyIO qAcTb KOpnyCa UHeKa.
C6bopa kaceccayapOB onncana B nocneDyUOxN cekunx.
IoiroToBbTe Mrcopy6ky B COOTBeTCTBnC CBOIMN Hxkdamn.
C6opka mncopy6kn
CM.TaKKe HINIOCTpaUNBpa3JeNEA(A)(cTp.4).
BbInonHnTe nyHKtbl 1-4Ba3dJeIe «IpoiroTOBAKa
- YctaHOBNTe HOX Ha BaJI UHeKa OCTpbIM KpOMKaMn HApyKy.
- BbIepeHte npOpopOBaHHbI dNcK (10). O6paTHe BHMaHHe Ha yIy5JeHnR.
- Nobeprnite ctonop no yacoboy ctpelke.
UcTaHOBka HacaKn IJIa COcHcOK
Cm.TaKKe HIIIOCTpaUNBpa3JeNE《B》(cTp.4).
BbInonHnTe nyHKtbl 1-4Ba3dJeIe «IpoDrToBka».
- YctaHOBInTe HOK Ha BaJI UHeKa OCTpbIMN KpOMKaMn HApJyK.
- BbIbePeTe nepcOpnpoBaHHbI dNcK (10). O6paTnte BHIMaHHe Ha yIy6JeHnY.
- YcTaHOBInTe HacAnky IJnCocNcK Ha Kopnyc WHeKa.
- NobeprHnTe CTOnOp No YacBOB CTpeJIke.
IpoDIOJIKeHHe UHTaTBe B pa3dEnax 《3NeKtpnueckoe IopKnIOHeHHe》N《3KcIIyatauIy
YcTaHOBKa HacaKn IJIa Ke66e
Cm. TaKe He HJIIOCTpaUNB pa3JeNE «C» (cTp.4).
BbInonHnTe nyKtbi 1-4 B paadJe «IpoIroTOBaKa
5.YctaHOBtHe HacaKy dIg Ke66e n3 2 aactei Ha BaI uHEka.ObpaTte BHMaHne Ha yrJy6JeHn.
6. Повернite стоп по уасов стpenke.
I P E D U N P E X K D E H N E:
- Перацтков BCeГа BынмайTe ceTeByH BИКу ИЗ рОзЕТКИ. ПдождITE, пoka ппбор OCTыНET.
- HNKOrda He norgykaTe 6Iok DvRaTeJI B BODy IJa YnCTK. 3TO MoXeT npVBecTI K nopaxeHIO 3JIeKTPnuYeCKIM TOKOM IJI NBOcPJIaMeHEnIO.
BHIMAHNE:
He nCnoJb3yIte npoBOJOnHyU 8eTky nn KaKne-Jn60 npyrtnaBnBhIe INHCTpyMeHTbl.
He nCnoJIb3yIte KaKne-Ni6o KncJIoTbI NIn a6pa3nB-HbIe BeIecCTBa.
Блokдвигател.
BLOK DVBATeTNe YNCTNTe TOnbKO npOTnPKo BJaXHOI TKAHbIO N3aTEM CyXOY KAHbIO.
3anpaBOUHbI NOtOK, UHEK, KOpNyc UHeKa N BCE HacaKn
BHIMAHNE:
He MoTe 3n DeTaN B NocyDOMOeHoi MaunHe. NoBepxHOCTN MOrY TNOTyCKHETb.
OuHauTe 3Tn DeTann B TeTIOI npTOUHOB OBe C NcNoJIb3OBaHNEM He6oJIbWOrO KOINueCTBa XNdkOCTN DnA MbITbY NOCyDbl.
- OnoNoCHnTe YnCTOn BDoN n BbCyuInTe.
- EcIN Bbl CHRIN yNIOIOTHnTE hBHe I KOJIbca n CTOnOpHoe KOJIbco CnnpaII, YCTaHOBInTe DeTAln, KAK NOKa3aHo Ha pncyHke.

XpaHeHne
-Почистуе устюкв, кak onicaHo. Погнocью
посуштеша надки.
- Ecni yctpoictBO He 6ydt NcnoIb3oBaTbcra dInTeJIbHOe Bpemr,TO peKOMeHdyETcXpaHNTb erO B opnHaJIbHOJ yNaKOBKe.
Bcerda xpaHnte yctpoNCTBO B xopoIo npoBeTpnaeMOM N cyXOM MecTe, He DOCTyINOM DeTREM.
- PerynlaHPO cMa3bIbAaTe HacaIkn He6oJIbIIM KOnIueCTBOM pACTNTeJIbHO rO MaCna.
YcTpaHHeH HeNoJaOK
256 = 250 × 250
gglglgall 8(8)glglglgall
a
40000000000000000000000000000
S 匀
oogie 1
1
a 100
paUaJaoL5j
.4 (2015)lll) (A) ppooll jao 83 g961 g961 aldo xlo
.
aill 1gSic gglgol ggsd ggsd gds dssll 5
C. · = ·
.1uUullulgusw.(10)glablao!jol .6
JUSSU 10000000000000000000000000000000000000000
《文》9
gilaJaaaab1balsy
(4 aol) (B) 10000000000000000000000000000000
.
aill 1g5 gag yglg0gagall gagg agg aasll
C. 与 共线
.1u pi all lalg gaiw (10) [tai] j 6
Jgall gaoall Caa 3 gilaal Jaa aai bai j
JU 100gul) a 10000000000000000000000000000
.
<2S1> Jooa aabolb1 0oJy
.4aall)Cpaal 1gallabdo
.
gssy gssy aSsU Jaaalb1 0a Su aaiu all a
uuiy plaiu caiagzul paowu. ygU
.5
6. aLw yJz oJy JyJy
.
30gll jaiy 111 gaiy
AolUcwoI Uo 0b1
gall gail aaiy yaiy 2
gblbgl jglblg jgsghg jzjgdluee
#
4g3iiaaiall 1
2aLg 1
6j0j1 jgj000 0g000 0g000
. 2
j5o 3a1110g20 gaaal jao11g paoi Jao1g jaoai
gauu uauu uul 1e lal yol aul uul jyall uauu Cdu 13.
.
pLsWyI UlaJgO
dLwJdblauuolauo aolgl oLgaleo
glgogolgoeggclalldlljlllgy
:jgljy
:

joloo 1
aIooJooee Iao
:

clg jgljgljxjiaolaojbojg jjojll
Sy^2
Ugabbl
- _____C. Li:Stoléževáčová
- D A all
- 52
52 - 51
50
50
50
50
49 - 49
- jieziluo
GARANTIEKARTE
warranty card · garantiekaart · carte de garantie · scheda di garanzia · tarjeta de garantia · cartao de garantia · garantikort · karta gwarancyjna · zaru.cnli list · kartica jamstva · carte de garantie · rapaunonHa Kapta · zaru.cnly list · garancijski list · garanciajegy · rapaHTiHmHnOpMynp · RapaHTmHbTanoH
FW 3803
24 Monate Garantie gemäß Garantiererklarung - 24 months warranty according to warranty declaration - 24 maanden garantie volgens garantieverklaring - 24 mois de garantie selon la déclaration de garantie - 24 mesi di garanzia secondo la dichiarazione di garanzia - 24 meses de garantia de acuero con la déclaracion de garantia - 24 menedes garanti i henhold til garantibetingelsene - 24 misiace gwarancj na podstawie oswiadczenia gwarancjneo - zarauka 24 meci podle prohlasei o zaruce - 24 mesecn no jamstvo u skladu s jamsvenem declaracionj - 24 luni garantie conform déclaratiej de garantie - 24 mecaa rapaHnA a cbTBeCTBne c rapaHnOHHa deekapaua - 24 meacna zarauka podla vyhlasenio o zaruke - 24-mesecn gnacija, skladno z garancjsko Izavo - 24 honap garancia a garanciafeftetelekben leirtak szerint - rapaHTHa 24 MCHI BIDNOIDHO ZARNI npo rapaHTHO - rapaHTN A 24 MeCAa cornaco zarrneHHbM rapaHTHM npaBnAM - 24 Jd
Kaufdatum, Handlsterpmel, Unterschiedt - date of purchase, dealer stamp, signature - zankoopdatum, dealsterpmel, handlsteckeng - date d'achat, tempor du concorsionnaire, signature - data de acquisto, timbre del riveridatore,irma - fecha de compra, sella del distribuiador,irma - data de compra, carimbo do distribuidor, assinatura - kipsodata, forchandaler, signatemur - data zakupu, piecje sorzadevay, podpis - datum zakoupeni, raziko prodeje, podpis - datum kupovine, big trogova, potos - data de achilite, stamplia furnizierulai, seminita - Data na noxinykara, Neviat na Tpnojana, Tnpnuc - datum nikupu, pecliatka obchodrindja/predajcu, podpis - datum nikupu, big trogova, podiscs - vlasda datma, kereskedo belyegejra, alakiris - data npnojbaen, ne-ana npnojpaopri, npnnc - dat npnopejtenov, Udran npojana, Pnmeck.

CHATRONIC
INTERNATIONAL GMBH
www.clatronic-germany.de