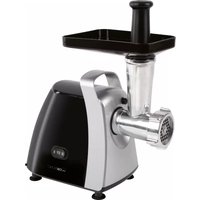
KM 3709 - Food Processor CLATRONIC - Free user manual and instructions
Find the device manual for free KM 3709 CLATRONIC in PDF.
| Product type | Food processor |
| Brand | Clatronic |
| Model | KM 3709 |
| Power supply | 220-240 V~, 50 Hz |
| Rated power | 1000 W |
| Net weight | Approx. 3.50 kg |
| Protection class | II |
| Bowl capacity | Up to 3.5 litres for light doughs |
| Number of speeds | 4 positions (MIN, 1, 2, 3, 4) + pulse function |
| Included accessories | Mixing bowl, whisk, dough hook, mixing hook, splash guard, protective disc |
| Main functions | Kneading, mixing, whisking |
| Bowl material | Stainless steel or plastic (not specified, estimate) |
| Care and cleaning | Bowl, accessories and splash guard should be hand washed (not dishwasher); motor housing wiped with a damp cloth |
| Safety | Automatic shut-off if swing arm is raised; safety switch; unplug before cleaning or changing accessories |
| Power cord length | Approx. 1 m (estimate) |
| Warranty period | 2 years (according to legislation, not specified) |
| Country of manufacture | China (common estimate) |
Frequently Asked Questions - KM 3709 CLATRONIC
User questions about KM 3709 CLATRONIC
0 question about this device. Answer the ones you know or ask your own.
Ask a new question about this device
Download the instructions for your Food Processor in PDF format for free! Find your manual KM 3709 - CLATRONIC and take your electronic device back in hand. On this page are published all the documents necessary for the use of your device. KM 3709 by CLATRONIC.
USER MANUAL KM 3709 CLATRONIC
Thank you for choosing our product. We hope that you enjoy using the appliance.
Symbols in this Instruction Manual
Important information for your safety is specially marked. It is essential to comply with these instructions in order to avoid accidents and prevent damage to the appliance:

WARNING:
This warns you of dangers to your health and indicates possible injury risks.

CAUTION:
This refers to possible hazards to the appliance or other objects.

NOTE: This highlights tips and information.
Contents
Overview of the Components 3
General Notes 35
Special Safety Instructions for this Appliance. 35
Unpacking the Appliance 36
Overview of the Components / Scope of Delivery 36
Electric Connection 36
Installation and Operation of the Kneading Machine 36
Recipes 38
Cleaning 38
Storage. 39
Troubleshooting 39
Technical Data. 39
Disposal. 39
General Notes
Before using this appliance, carefully read this instruction manual and keep it together with the warranty certificate, cashier receipt and, if possible, the original packaging including the interior packing. If you give this appliance to other people, please also pass on the instruction manual.
- The appliance is designed exclusively for private use and for the envisaged purpose. This appliance is not fit for commercial use.
- Do not use it outdoors. Keep it away from sources of heat, direct sunlight, humidity (never dip it into any liquid) and sharp edges. Do not use the appliance with wet hands. If the appliance is humid or wet, unplug it immediately.
- The appliance and the mains lead have to be checked regularly for signs of damage. If damage is found the appliance must not be used.
- Use only original spare parts.
- In order to ensure your children's safety, please keep all packaging (plastic bags, boxes, polystyrene etc.) out of their reach.

WARNING:
Do not allow small children to play with the foil. There is a danger of suffocation!
Special Safety Instructions for this Appliance

WARNING: Risk of injury!
- Before replacement of accessories or additional parts that move during operation, the appliance must be switched off and cut off from the mains!
- Do not touch moving parts.
- Before switching on, make sure that the accessories attachment has been installed correctly and is seated securely.
- Always disconnect the appliance from the supply if it is left unattended and before assembling, disassembling or cleaning.
- This appliance shall not be used by children.
- Keep the appliance and its cord out of the reach of children.

WARNING: Risk of injury!
Children may not play with the appliance.
- Appliances can be used by persons with reduced physical, sensory, or mental capabilities or lack of experience and / or knowledge, if they are supervised or have been instructed concerning safe use of the appliance and understand the hazards involved.
- Do not repair the appliance by yourself. Always contact an authorized technician. If the supply cord is damaged, it must be replaced by the manufacturer, its service agent or similarly qualified persons in order to avoid a hazard.

CAUTION:
Do not immerse the appliance into water for cleaning. Follow the instructions that we provide in the chapter "Cleaning".
- Do not manipulate any of the safety switches.
- Only process foodstuffs with this appliance. Misuse of the appliance for other purposes may cause injury.
Unpacking the Appliance
- Remove the packaging of the appliance.
- Remove all packaging material such as plastic film, filler material, cable ties and box packaging.
- Check that all parts are in the box.
- If the packaging content should be incomplete or if damages should be noticeable, do not operate the appliance. Return it to the distributor immediately.

TE:
Dust or production residues may still be found on the appliance. We recommend that you clean the appliance as described under "Cleaning".
Overview of the Components / Scope of Delivery
1 Swivel arm
2 Motor housing
3 Lever for lowering / raising the arm
4 Push button (Pulse operation)
5 Control knob
6 Operation indicator lamp
7 Mixing bowl
8 Splash guard
9 Whisk
10 Kneading hook
11 Mixing hook
12 Protective disk
Electric Connection
Check that the mains voltage to be used matches the voltage of the appliance. Refer to the rating label for detailed specifications.
Installation and Operation of the Kneading Machine

TE:
Turn on the appliance with the mixing bowl in place only!
- Opening the swivel arm: Swivel the lever in direction and hold it in that position. Move the swivel arm by hand to the top position and release the lever.
- If you need the splash guard, attach it now to the swivel arm from below. Hold the splash guard (8) in such a way
that the fill opening is positioned in front of you. On the bottom of the swivel arm, there are two recesses on the front and back. Insert the splash guard with its guide lugs into these recesses. Turn the splash guard towards LOCK to lock it.
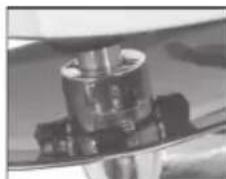
- For use of the kneading hook (10) or the mixing hook (11), first attach the protective disk. It prevents contact of dough with the drive shaft. Hold the disk like a bowl. Insert the kneading hook (10) or the mixing hook (11) from below through the recess in the disk opening and tighten it by a quarter turn to the left.
4. Use of an attachment:
On the top of the attachment, you can see a recess for the drive shaft and a recess for the splint. Push the attachment onto the drive shaft. Push down and at the same time turn the acces
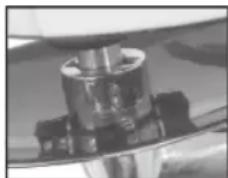
sory anticlockwise in order for the splint of the drive shaft to lock into the accessory.
- Mixing bowl: Set the mixing bowl to its holder. Turn the mixing bowl all the way in the direction LOCK shown on the housing.
- Fill your ingredients into the mixing bowl.
NOTE:
If you knead heavy doughs, do not put all the ingredients at once into the mixing bowl. Start the kneading with flour, sugar and eggs. Add fluids slowly during the kneading.
- Check that the control knob is set to MIN.
- Hold the swivel arm securely. Swivel the lever in direction and hold it in that position. At the same time, lower the arm slowly by hand. Release the lever.
- Insert the power plug into a suitable socket.
- Select a speed using the table below.
Table Dough Types and Tools
| Dough Type Attachment | Position at the Control Knob | Quantity | Max. Operating Time | |
| Heavy dough (e. g. bread or short pastry) Kneading hook | m | max. 1.5 kg 3 | 5 minutes | |
| Medium dough (e. g. batter) Mixing hook | m | min. 0.5 kg max. 3.5 kg | 2 - 4 minutes | |
| Light dough (e. g. waffle or crêpes dough, pudding) | Whisk | m | min. 500 ml max. 3.5 litre | 2 - 4 minutes |
| Cream Whisk | m | min. 200 ml max. 1 litre | 3 - 5 minutes | |
| Egg whites Whisk | m | 4 - 10 egg whites 3 | - 5 minutes |
NOTE:
- Once the appliance is turned on, the operation indicator lamp lights up.
- Short time operation: With heavy dough, do not operate the appliance longer than 5 minutes and then let it cool down for 10 minutes.
- Push button (pulse operation): Briefly switch the motor to the highest speed setting by holding down the push button (4).
Pause Operation
WARNING: Danger of injury!
- Always set the control knob to MIN if you want to interrupt the operation.
- Pull the power plug to change attachments.
- Wait for the attachment to come to a complete stop!
- If you activate the lever during operation to raise the arm, a safety switch deactivates the motor.
- The motor switches on again as soon as you lower the swivel arm again!
End Operation and Remove the Bowl
- At the end of work, set the control knob to MIN. Pull the power plug.
- Swivel the lever in direction and hold it in that position. Move the swivel arm by hand to the top position and release the lever.
- Remove the attachment.
- If you have used the splash guard, twist it counterclockwise to remove it.
- Turn the mixing bowl briefly anticlockwise to remove it.
- You can loosen the finished dough with a scraper and remove it from the mixing bowl.
- Clean all used components as described in the chapter "Cleaning".
Recipes
Sponge Mixture (Basic Recipe) Position 2 - 3
Preparation:
250 g soft butter or margarine, 250 g sugar, 1 package of vanilla sugar or 1 package Citro-Back, 1 pinch of salt, 4 eggs, 500 g wheat flour, 1 package of baking powder, approx. 1% litre milk.
Preparation:
Place wheat flour with the other ingredients in the mixing bowl, use the mixing hook to mix for 30 seconds at position 2, then approx. 3 minutes at position 3. Grease the form or line it with baking paper, fill in the dough, and bake. Before the cake is removed from the oven, test to see if it is done: With a sharp wooden stick, pierce the centre of the cake. If no dough sticks to it, it's done. Place the cake on a baking grid to let it cool.
Conventional Oven:
Tray slot: 2
Heating: Electric oven upper and lower heat 175 - 200 °C, gas oven: Speed 2 - 3
Baking time: 50 - 60 minutes
You can modify this recipe according to your taste, e. g. with 100 g raisins or 100 g nuts or 100 g grated chocolate. Let your imagination run wild.
Linseed Rolls Position 1-2
Ingredients:
500 - 550 g wheat flour, 50 g linseed, 38 litre water, 1 cube yeast (40 g), 100 g low-fat curd (well drained), 1 teaspoon salt. For brushing: 2 tablespoons water.
Preparation:
Soak linseed in 1% litre of lukewarm water. Place the remaining lukewarm water (1/4 litre) in the mixing bowl, crumble the yeast into it, add curd and mix well with the kneading hook on position 1. The yeast must be completely dissolved. Add the flour with the soaked linseeds and salt into the mixing bowl. Knead on position 1, then switch to position 2 and knead another 3 to 5 minutes. Cover the dough and let it rise in a warm place for 45 - 60 minutes. Knead again, take it out of mixing bowl, and form 16 rolls from it. Cover a baking tray with wet baking paper. Place the rolls on it, let them rise for 15 minutes, brush with lukewarm water, and bake.
Conventional Oven:
Tray slot: 2
Heating: Electric oven: Upper and lower heat
200 - 220 °C (preheat for 5 minutes),
gas oven: Speed 2 - 3
Baking time: 30 - 40 minutes
Chocolate Cream Position 4
Ingredients:
200 ml sweet cream, 150 g dark chocolate, 3 eggs, 50 - 60 g sugar, 1 pinch of salt, 1 package of vanilla sugar, 1 tablespoon cognac or rum, leaf chocolate.
Preparation:
Whip the cream stiff in the mixing bowl with the whisk, remove it from the mixing bowl, and keep it cool. Melt the chocolate according to the instructions on the package or heat it for 3 minutes in the microwave at 600W . In the meantime, beat eggs, sugar, vanilla sugar, brandy or rum and salt with the whisk in the mixing bowl on position 4 until foamy. Add and evenly stir in the molten chocolate coating on position 4. Keep some of the whipped cream for garnishing. Add the remaining cream to the creamy matter and fold in for a short time with the pulse function. Garnish the chocolate cream and serve it well cooled.
Cleaning

WARNING:
- Always pull the power plug before cleaning.
- Never immerse the appliance in water for cleaning. This might result in an electric shock or fire.

CAUTION:
- Do not use a wire brush or abrasives for cleaning.
- Do not use acid or abrasive cleaning agents.
Motor Housing
Clean the housing only with a damp cloth and a squirt of detergent.
Mixing Bowl, Splash Guard, Protective Disk, Kneading and Mixing Attachments

CAUTION:
The attachments are not suitable for cleaning in a dishwasher. Heat and aggressive cleaning agents may warp or discolour the attachments.
- Parts that have come into contact with food can be rinsed with water.
- Dry all components well before re-attaching them to the appliance.
Storage
- Clean the appliance as described. Let the accessories dry completely.
- We recommend that you keep the appliance in the original packaging, if you do not want to use it for a longer period.
Always store the appliance out of reach of children in a well ventilated, dry place.
Troubleshooting
| Problem Possible Cause Remedy | ||
| The appliance cannot be switched on or stops operation. | Appliance without power supply. | Check the socket with another appliance. |
| Connect the power plug properly. | ||
| Check the fuse. | ||
| The appliance cannot be switched on or stops operation. | The swivel arm is not locked in the lowest position. A safety switch prevents operation. | Push the lever and the swivel arm at the same time until the arm locks. |
| The appliance is defective. | Contact our service centre or a specialist. | |
Technical Data
Model: KM 3709
Power supply: 220 - 240 V~, 50 Hz
Power consumption: 1000 W
Protection class: II
Net weight: approx. 3.50kg
The right to make technical and design modifications in the course of continuous product development remains reserved.
This appliance has been tested according to all relevant current CE guidelines, such as electromagnetic compatibility and low voltage directives, and has been constructed in accordance with the latest safety regulations.
Disposal
Meaning of the "Dustbin" Symbol
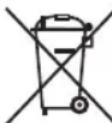
Protect our environment: do not dispose of electrical equipment in the domestic waste.
Please return any electrical equipment that you will no longer use to the collection points provided for their disposal.
This helps avoid the potential effects of incorrect disposal on the environment and human health.
This will contribute to the recycling and other forms of re-utilisation of electrical and electronic equipment.
Information concerning where the equipment can be disposed of can be obtained from your local authority.
Instrukcja obslugi
Yka3bIbaeHa BO3MOxHyO ONaCHOCTb IIN3JeINN INpynx OKpyKaIOxN INpeDMETOB.

I P E D U N P E X D E H N E:
- Pered ounstkoBcerga n3Bnekaite BnIky nITaHna.
He norpykaite yctpoiCTBO B BODy dIa OUHCTKN. 3To moKet npNBecTN K nopaxeHHIO 3JIeKTpueeCKIM TOKOM nIN noXapy.
BHIMAHNE:
He nCnoB3yIe MeTaNJIuYeCKyU 0eTky Nn INHbIe abpa3NHBIe YnCTaIe CpeCDtBA IJN OChTKn.
He nCnoB3yIe arpeccnBhble nn a6pa3nBhble. qHCTRnne cpeDCTBa.
Koxy MoTopa
KoKyx CneIyET NCTNTb TOJbKO C NOMOJIbBO BnaXHOI TKAHN, DObaBnB HEMHORO KINDKOCTN DnA MbITbIOCcybl.
KyBWH DnI CMeWNBaHnI, 3aunTHaN KpbIuKa O T pa36pb13rNBaHnI, 3aunTHbI NcK, HacAnI DnI B36uBAHnI CMeWNBaHnI
BHIMAHNE:
HacaKn HEnb3a MbItb NocydomoeyHo MaunHe. HarpeB n arpeccNBhIe YNCTAUNe CpeCDTBA MoryT deOpmpoBaT hIN ObecuBETNb HacaKn.
-ДеталуycтpoIcTBA,COnpNKacabUHneC CПИЕБВIMnpOdyKTAMN,MOKHO npONONOCKaTb BOIo.
XopoIo npocuIHTe BCE KOMnOHeHTbI nepeI NOBTOpHbIM NODKJIIOUeHHeM K pni6Opy.
XpaHenne
OuHCTnTe yctpoIcTB BO COOTBeTCTBm C INHCTpyKJrMaM.
JaTe npHaJIeXHOCTaM POJIHOCTbIO BbICOXHyTb.
- EcIN Bbl XOTNTe pOoIINb cPOK CnyK6bI yCTpoNCTBa, peKOMEHnyETcXpaHnTb erO B opuHaJIbHOy naKOBKe.
Bcerda xpaHnTe yctpoNCTBO B HeIOCTynHom IINI DeTeN, XopoIo npOBetpNBaEMOM IN CYXOM MecTe.
YcTpaHHe HEnCnpaBHOtei
a aaa a a a a a a a a a a a a a a a a a
joo 1
Jzulwfoa 0s
jgljll jiey
10 a 2a 5j 5
文:()
aL aL aL aL aL aL aL aL aL aL aL aL aL aL aL aL aL aL aL aL aL aL aL aL aL aL aL aL aL aL aL aL aL aL aL aL aL aL a L a L a L a L a L a L a L a L a L a L a L a L a L a L a L a L a L a L a L a L a L a L a L a L a L a L a L a L a L a L a L a L a L a L a L a L a L a L a L a L a L a L a L a L a L a L a L a L a L a L
aJyJy aLJU yaeol 05s 05y
Joo 10000000000000000000000000000000000000000000
.
!yloylj:j
:
1
"abil" Jaa 30aJgll Ilaeill gai. aai 161 jagai y:
.
.
.
jai slo jiz
4b - y_0 = 0

- = ( x1,y1) , = ( x2,y2)
j. aaggl dla de galey jai yj:lggl jj1
aJgJgJgJgJgJgJgJgJg
aIoo 1000
gagga.01gll 1111 Jauu. uuiia (8)
LOCK oJy j.
yjg(11)j(10)
gagaaagaaagaaagaaagaaagaaagaaagaaagaaagaaagaaagaaagaaagaaagaaagaaagaaagaaagaaagaaagaaagaaagaaagaaagaaagaaagaaagaaagaaagaaagaaagaaagaaagaaagaaagaaagaaagaaagaaagaaagaaagaaagaaagaaagaaagaaagaaagaaagaaagaaagaaa
J.
:clalbplusai.
Ggaaa1d10la 1
aaii laiyig yiyilgol gaoi la
2945 J315 aedol61 oJg 10
3gj 3gjwJl Jb0.
yjLae oiei jse jgssy jol a
1gauuSyui
0gll 4.4 jololl Jololl gbloll oeg blaal 5
Lg (JALI) LOCKolqj dajll
-
-
-
-
-
-
-
-
-
-
-
-
-
-
-
-
-
- 1.
-
-
-
-
-
-
-
-
-
-
-
-
-
-
-
-
ab = 20
Cg 15
Sall aal alol ooll aol lalol alcg 10
jssll jbj jslgwl 1
MIN gobgd de bgaosaoaol jj jo joi 7
a 1000000000000000000000000000000000000000000
aBjJy. JbJg jbjj jdi aaii g
Juaa 3 Juaa Jia
JgUgUdUgUdUgUdUgUdUgUdUgUdUgUdUgUdUgUdUgUdUgUdUgUdUgUdUgUdUgUdUgUdUgUdUgUdUgUdUgUdUgUdUgUdUgUdUgUdUgUdUgU
gjulgoo包
1..jgljdljj
2. 21 ÷ 29 ÷ 20 ÷ 100
.
- gaxially oj
-
g jj
-
g E,g g,h,l .
= x + y
jglalai jai jglaljclalalao gajslay jslalj
"..i. i. j. g. i. c. o. i. o. o. o. o. o.
aaii gbi/ ciigb1 1e aole ojbi
10 13
y061 C 2
3
()
Soll 5
J 6
ab 全 a1b0 = 7
8
aabcb19
j00 10
11
12
JUSSJ UOG
JU 100000000000000000000000000000000000000000000000000000000000
3
59
59
59
58
58
110 110
ole Udo
(
:yda !
Ugizb1
3
62
62
61
(61
- 60
jlll llool ool
3
62
GARANTIEKARTE
warranty card · garantiekaart · carte de garantie · schedadi garanzia · tarjeta de garantia · cartao de garantia · garantikort · karta gwarancyjna · zaru.cnli list · karta jamstva · carte de garantie · fapanuonHa Kapta · zaru.cnly list · garancijski list · garanciajegy · rapahtiHmOpmynap · fapaHTiHbI TaHO
jia 281
KM 3709
24 Monate Garantie gemäß Garantieerklung 24 months warranty according to warranty declaration 24 maanden garantie volgens garantieverklung 24 mois de garantie selon la déclaration de garantie 24 messi di garanzia seconde la dichiarazione di garanzia 24 meses de garantia de acuardo con la déclaración de garantia 24 menedes garantiat hemehold til garantibetingensene 24 misesc gwarancjna podastowie odwiadczenia gwarancjnego - zaruka 24 meseicpu podle prohlase n o zarue 24 mesece no jamstvo u skladu s jarnstvenom deklaraciujm 24 luni garantie conform déclaratie de garanjie 24 mecaa rapanu a cbotertcne c rapanuohnata dekpanaun 24 meacna zaruka podfa vyhlasenia o zaruke 24-mesecnagarcija, skladno z garancjsko ijavo 24 honap garancia a garanciafeletetekebken leirtak szerint rapanrHa 24 micui bIDNOIBHO BAI npo rapaHTIO - rapaHTN 24 mecaa cornaco 3aBBNEHBM rapanthnIMnpaBnAM
Kaufdatum, Handelstermtpelt. Unterschied - date of purchase, dealer stamp, signature - aankoepdatum, dealstermtpelt, handfeckenung - date d'chat, tampon du concessionaire, signature - da acquisto, timbo del riveridatore, fema - fecha de compra, sello del distribuidor, firma - data de compria, carimbo do distribuidor, assinatuna - kjusdata, forhandstermtpelt, signatur - data zakupu, piezec (spradewacy, podispis datum zakoupeli, nadiko prodejece, podispis - datum kupovine, Big trovica, potosis - data de achilie, stampila furnizoruliu, semnatura - Data na nikkayika, Tneiai na Ptopanaya, Tpoknc - datum nukupu, pecliatka obchodnica/ predajcu, podispis - datum nukupu, Big trovoca, podispis - visalas datuma, kereskedo bheyegokejai alaraks - data npnabekhen, nevata npnabekau, niknc - Data npnabepeten, Ilamran npnabka, Npncnc

CHATRONIC INTERNATIONAL GMBH
www.clatronic-germany.de