EY0L81 - Battery charger PANASONIC - Free user manual and instructions
Find the device manual for free EY0L81 PANASONIC in PDF.
| Product type | Battery charger |
| Brand | Panasonic |
| Model | EY0L81 |
| Input voltage | 100-240 V AC, 50/60 Hz |
| Compatible battery types | Panasonic Li-ion batteries (10.8 V, 14.4 V, 21.6 V, 28.8 V) |
| Weight | 0.93 kg |
| Dimensions (L x W x H) | 200 x 100 x 80 mm |
| Charge indicator | Green light (charging, full charge, charge at 80%) |
| Standby indicator | Orange light (hot/cold battery) |
| Overheat protection | Yes, automatic shutdown if battery too hot |
| Cold protection | Yes, charging suspended if battery < -10 °C |
| Charging temperature | 0 °C to 40 °C |
| Storage temperature | Max. 50 °C |
| Intended use | Indoor only |
| Safety | Do not expose to rain, do not use extension cord, do not disassemble |
| Maintenance | Unplug before cleaning, do not obstruct ventilation slots |
| Replacement parts | Specific Panasonic batteries (EY9L42, etc.) |
| Repairability | Have repaired by an authorized specialist |
| Included accessories | Power cord |
| Number of ports | 1 |
Frequently Asked Questions - EY0L81 PANASONIC
User questions about EY0L81 PANASONIC
0 question about this device. Answer the ones you know or ask your own.
Ask a new question about this device
Download the instructions for your Battery charger in PDF format for free! Find your manual EY0L81 - PANASONIC and take your electronic device back in hand. On this page are published all the documents necessary for the use of your device. EY0L81 by PANASONIC.
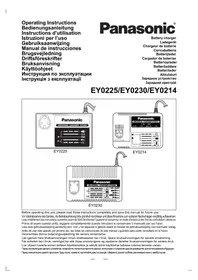
USER MANUAL EY0L81 PANASONIC
Before operating this unit, please read these instructions completely and save this manual for future use.
Original instructions: English Translation of the original instructions: Other languages
I. IMPORTANT SAFETY INSTRUCTIONS Read All Instructions
1) SAVE THESE INSTRUCTIONS -This manual contains important safety and operating instructions for battery charger.
2) Before using battery charger, read all instructions and cautionary markings on (1) battery charger, (2) battery pack.
3) CAUTION -To reduce the risk of injury, charge only applicable battery pack as shown in the last page. Other types of batteries may burst causing personal injury and damage.
4) Do not expose charger and battery pack to rain or snow or use in damp location.
5) Use of an attachment not recommended may result in a risk of fire, electric shock, or injury to persons.
6) To reduce risk of damaging the electric plug and cord, pull by plug rather than cord when disconnecting charger.
7) An extension cord should not be used.
8) Do not operate charger with damaged cord or plug - replace them immediately.
9) Do not operate charger if it has received a sharp blow, been dropped, or otherwise damaged in any way; take it to a qualified service agent.
10) Do not disassemble charger; take it to a qualified service agent when service or repair is required. Incorrect reassembly may result in a risk of electric shock or fire.
11) To reduce risk of electric shock, unplug charger from outlet before attempting any maintenance or cleaning.
12) Make sure cord is located so that it will not be stepped on, tripped over, or otherwise subjected to damage or stress.
13) The charger and battery pack are specifically designed to work together. Do not attempt to charge any other cordless tool or battery pack with this charger. Do not attempt to charge the battery pack with any other charger.
14) Do not attempt to disassemble the battery charger and the battery pack housing.
15) Do not store the tool and battery pack in locations where the temperature may reach or exceed 50^ (122°F) (such as a metal tool shed, or a car in the summer), which can lead to deterioration of the storage battery.
16) Do not charge battery pack when the temperature is BELOW 0^ (32^) or ABOVE 40^ (104^) .
17) Do not incinerate the battery pack. It can be explode in a fire.
18) The charger is designed to operate on standard household electrical power only. Charge only on the voltage indicated on the nameplate. Do not attempt to use it on any other voltage!
19) Do not abuse cord. Never carry charger by cord or yank it to disconnect from outlet. Keep cord away from heat, oil and sharp edges.
20) Charge the battery pack in a well ventilated place, do not cover the charger and battery pack with a cloth, etc., while charging.
21) Do not short the battery pack. A battery short can cause a large current flow, over heating and burns.
22) NOTE: If the supply cord of this appliance is damaged, it must only be replaced by a repair shop appointed by the manufacturer, because special purpose tools are required.
23) The appliance is not intended for use by young children or infirm persons without supervision.
24) Young children should be supervised to ensure that they do not play with the appliance.
| Symbol Meaning |
| To reduce the risk of injury, user must read and understand instruction manual. |
| For indoor use only. |
WARNING:
- Do not use other than the Panasonic battery packs that are designed for use with this rechargeable tool.
- Panasonic is not responsible for any damage or accident caused by the use of the recycled battery pack and the counterfeit battery pack.
- Do not dispose of the battery pack in a fire, or expose it to excessive heat.
- Do not drive the likes of nails into the battery pack, subject it to shocks, dismantle it, or attempt to modify it.
- Do not allow metal objects to touch the battery pack terminals.
- Do not carry or store the battery pack in the same container as nails or similar metal objects.
- Do not charge the battery pack in a high-temperature location, such as next to a fire or in direct sunlight. Otherwise, the battery may overheat, catch fire, or explode.
- Never use other than the dedicated charger to charge the battery pack. Otherwise, the battery may leak, overheat, or explode.
After removing the battery pack from the tool or the charger, always reattach the pack cover. Otherwise, the battery contacts could be shorted, leading to a risk of fire. - When the Battery Pack Has Deteriorated, Replace It with a New One.
- Continued use of a damaged battery pack may result in heat generation, ignition or battery rupture.
II. CHARGING THE BATTERY
Common Cautions for the Li-ion/Ni-MH/Ni-Cd Battery Pack
NOTE:
- If the temperature of the battery pack falls approximately below -10^ (14^) , charging will automatically stop to prevent degradation of the battery.
- Do not charge the battery pack whose temperature is below 0^ (32^) .
- When charging a cool battery pack (below 0^ (32^) ) in a warm place, leave the battery pack at the place and wait for more than one hour to warm up the battery to the level of the ambient temperature.
Cool down the charger when charging more than two battery packs consecutively. - Do not insert your fingers into contact hole, when holding charger or any other occasions.
CAUTION:
To prevent the risk of fire or damage to the battery charger.
- Do not use power source from an engine generator.
- Do not cover vent holes on the charger and the battery pack.
- Unplug the charger when not in use.
Li-ion Battery Pack
NOTE:
Your battery pack is not fully charged at the time of purchase. Be sure to charge the battery before use.
Battery charger (EY0L80/EY0L81)
EY9L42 battery pack can only be charged with the EY0L81 battery charger.
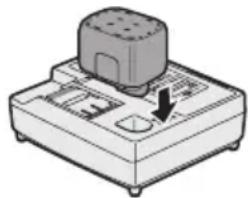
- Plug the charger into the AC outlet.
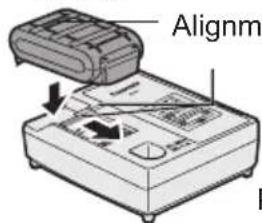
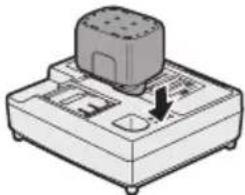
- Insert the battery pack firmly into the charger.
-
Line up the alignment marks and place the battery onto the dock on the charger.
-
Slide forward in the direction of the arrow.
Pictured: EY0L80
- During charging, the charging lamp will be lit.
When charging is completed, an internal electronic switch will automatically be triggered to prevent overcharging.
- Charging will not start if the battery pack is warm (for example, immediately after heavy-duty operation).
The orange standby lamp will be flashing until the battery cools down. Charging will then begin automatically.
- The charge lamp (green) will flash slowly once the battery is approximately 80% charged.
- Charge complete status
EY0L80: The charging lamp (green) will start flashing quickly.
EY0L81: The charging lamp (green) will turn off.
- If the power lamp does not light immediately after the charger is plugged in, or if after the standard charging time the charging lamp does not flash quickly in green, consult an authorized dealer.
- Consult an authorized dealer if the following occurs once the standard charging time has elapsed;
EY0L80: If the power lamp does not light up immediately when the charger is plugged in, or if the charging lamp (green) does not flash quickly.
EY0L81: If the charging lamp (green) does not turn off.
Ni-MH/Ni-Cd Battery Pack
NOTE:
When you charge the battery pack for the first time, or after prolonged storage, charge it for about 24 hours to bring the battery up to full capacity.
Battery charger (EY0L80)
- Plug the charger into the AC outlet.
NOTE:
Sparks may be produced when the plug is inserted into the AC power supply, but this is not a problem in terms of safety.
- Insert the battery pack firmly into the charger.
- During charging, the charging lamp will be lit.
When charging is completed, an internal electronic switch will automatically be triggered to prevent overcharging.
- Charging will not start if the battery pack is warm (for example, immediately after heavy-duty operation).
The orange standby lamp will be flashing until the battery cools down. Charging will then begin automatically.
- When charging is completed, the charging lamp will start flashing quickly in green color.
- If the charging lamp does not light immediately after the charger is plugged in, or if after the standard charging time the charging lamp does not flash quickly in green, consult an authorized dealer.
- If a fully charged battery pack is inserted into the charger again, the charging lamp lights up. After several minutes, the charging lamp may flash quickly to indicate the charging is completed.
LAMP INDICATIONS
| Charging Lamp | |||
| Green (Left) | Orange (Right) | ||
| (EY0L80 only) | Charger is plugged into the AC outlet. Ready to charge. | ||
| (EY0L80) (EY0L81) | (EY0L80) (EY0L81) | Charging is completed. (Full charge.) | |
| Battery is approximately 80% charged. (Usable charge. Li-ion only.) | |||
| Now charging. | |||
| Battery pack is cool. The battery pack is being charged slowly to reduce the load on the battery. (Li-ion only.) | |||
| Battery pack is warm. Charging will begin when temperature of battery pack drops. If the temperature of the battery pack is -10°C or less, the charging status lamp (orange) will also start flashing. Charging will begin when the temperature of the battery pack goes up (Li-ion only). | |||
| (EY0L80) (EY0L81) | (EY0L80) (EY0L81) | Charging is not possible. Clogged with dust or malfunction of the battery pack. | |
Information for Users on Collection and Disposal of Old Equipment and used Batteries
These symbols on the products, packaging, and/or accompanying documents mean that used electrical and electronic products and batteries should not be mixed with general household waste.
For proper treatment, recovery and recycling of old products and used batteries, please take them to applicable collection points, in accordance with your national legislation and the Directives 2002/96/EC and 2006/66/EC.
By disposing of these products and batteries correctly, you will help to save valuable resources and prevent any potential negative effects on human health and the environment which could otherwise arise from inappropriate waste handling.
For more information about collection and recycling of old products and batteries, please contact your local municipality, your waste disposal service or the point of sale where you purchased the items.
Penalties may be applicable for incorrect disposal of this waste, in accordance with national legislation.
For business users in the European Union
If you wish to discard electrical and electronic equipment, please contact your dealer or supplier for further information.
[Information on Disposal in other Countries outside the European Union]
These symbols are only valid in the European Union. If you wish to discard these items, please contact your local authorities or dealer and ask for the correct method of disposal.
Note for the battery symbol (bottom two symbol examples):
This symbol might be used in combination with a chemical symbol. In this case it complies with the requirement set by the Directive for the chemical involved.
III. SPECIFICATIONS
| Model EY0L80 EY0L81 | ||
| Electrical rating See the rating plate on the bottom of the charger. | ||
| Weight 0.95 k | g (2.1 lbs.) 0.93 k | g (2 lbs.) |
[Li-ion battery pack]
| 10.8 V 14.4 V | ||||
| EYFB30 EY9L41 | EY9L42 | |||
| Charging time | Usable: 40 min. | Usable: 45 min. | Usable: 30 min. | |
| Full: 65 min. | Full: 60 min. | Full: 35 min. | ||
| Charger | EY0L80 | ○ | ○ | - |
| EY0L81 | ○ ○ ○ | |||
| 21.6 V 28.8 V | ||||
| EY9L61 EY9L81 | ||||
| Charging time | Usable: 55 min. | Usable: 65 min. | ||
| Full: 70 min. | Full: 80 min. | |||
| Charger | EY0L80 | ○ | ○ | |
| EY0L81 | ○ | ○ | ||
[Ni-Cd/Ni-MH battery pack]
| Charging time | 7.2 V | 9.6 V 12 | V 15.6 V 18 | V 24 V | ||
| EY9065 | EY9080 | EY9001 | ||||
| EY9066 | EY9086 | |||||
| 20 min. | ||||||
| EY9180 | EY9101 | |||||
| EY9182 | EY9103 | |||||
| 25 min. | ||||||
| EY9166 | EY9188 | EY9106 | EY9136 | EY9116 | ||
| EY9168 | EY9107 | EY9117 | ||||
| EY9108 | 60 min. | |||||
| 30 min. | ||||||
| EY9268 E | Y9200 | EY9230 | EY9210 | 90 min. | ||
| 45 min. | ||||||
| EY9201 | EY9231 | EY9251 | ||||
| 55 min. | 65 min. | |||||
NOTE: This chart may include models that are not available in your area. Please refer to the latest general catalogue.
ONLY FOR U. K.
IV. ELECTRICAL PLUG INFORMATION
FOR YOUR SAFETY PLEASE READ THE FOLLOWING TEXT CAREFULLY
This appliance is supplied with a moulded three pin mains plug for your safety and convenience.
A 5 amp fuse is fitted in this plug.
Should the fuse need to be replaced please ensure that the replacement fuse has a rating of 5 amp and that it is approved by ASTA or BSI to BS1362.
Check for the ASTA mark or the BSI mark on the body of the fuse.
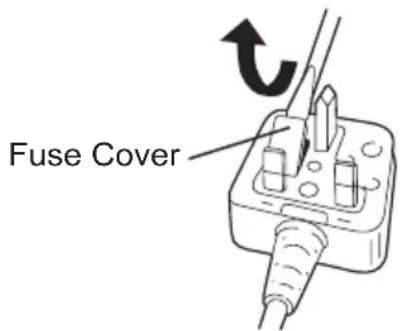
If the plug contains a removable fuse cover you must ensure that it is refitted when the fuse is replaced.
If you lose the fuse cover the plug must not be used until a replacement cover is obtained.
A replacement fuse cover can be purchased from your local Panasonic Dealer.
IF THE FITTED MOULDED PLUG IS UNSUITABLE FOR THE SOCKET OUTLET IN YOUR HOME THEN THE FUSE SHOULD BE REMOVED AND THE PLUG CUT OFF AND DISPOSED OF SAFELY.
THERE IS A DANGER OF SEVERE ELECTRICAL SHOCK IF THE CUT OFF PLUG IS INSERTED INTO ANY 13 AMP SOCKET.
If a new plug is to be fitted please observe the wiring code as shown below.
If in any doubt please consult a qualified electrician.
IMPORTANT:
The wires in this mains lead are coloured in accordance with the following code:
Blue: Neutral
Brown:Live
As the colours of the wire in the mains lead of this appliance may not correspond with the coloured markings identifying the terminals in your plug, proceed as follows.
The wire which is coloured BLUE must be connected to the terminal in the plug which is marked with the letter N or coloured BLACK.
The wire which is coloured BROWN must be connected to the terminal in the plug which is marked with the letter L or coloured RED.
Under no circumstances should either of these wires be connected to the earth terminal of the three pin plug, marked with the letter E or the Earth Symbol 1一
How to replace the fuse: Open the fuse compartment with a screwdriver and replace the fuse and fuse cover if it is removable.
This apparatus was produced to BS800.
Pacco battery Li-ion
NOTA:
[Pacco battery Li-ion]
| 10,8 V 14,4 V | ||||
| EYFB30 EY9L41 | EY9L42 | |||
| Tempo di caricamento | Utilizzabile: 40 min. | Utilizzabile: 45 min. | Utilizzabile: 30 min. | |
| Completa: 65 min. | Completa: 60 min. | Completa: 35 min. | ||
| Caricabatteria | EY0L80 | ○ | ○ | - |
| EY0L81 | ○ ○ ○ | |||
| 21,6 V 28,8 V | ||||
| EY9L61 EY9L81 | ||||
| Tempo di caricamento | Utilizzabile: 55 min. | Utilizzabile: 65 min. | ||
| Completa: 70 min. | Completa: 80 min. | |||
| Caricabatteria | EY0L80 | ○ | ○ | |
| EY0L81 | ○ | ○ | ||
III. TEKNISET TIEDOT
pOM INI IITeINCeIbHOB BUNKOH -HEMeDInEHHO 3aMeHHTe INX.
9) He ekcnnyatnpyute 3apraHoe yctpoiCTBO, eCNI OHO 6bIIO NOBBepeKHeO pe3KOMy ydApY NJI NKe 6bIIO ypoHeHO, IIN6 6blIO NOBpeXdeHo KaKIM-JIN6O dpyrIM cnoCoBOM; o6paTntEc b K KBaIIuΦnUpOBaHHOMy 06cnyJBaIOUeMy areHTy.
10) He pa3bnpaIte 3apJdHoe yCTpoiCTBO; o6paTntecb K KBaJIncnIpOBAHHOMy o6cnyKuBaIOUeMy aReHTy, ecNI Tpe6yeTc8o6cnyKuBaHne IIN peMOnT. HenpaBnIbHa8 NOBTOpHa8 c6OpKa MoKeT npVBecTu K nopaxKeHHIO 3JIeKTPnueCKm TOKOM IIN BO3rOpaHHIO.
11)ДяуMeHbSeHnpa npaJxHnna 3JIeKTpUneCKnM TOKOM,OTcoEduHnTe 3aprIHOe yCTpoNCTBO OT cTeBOI pO3eTKn,IpeXdJe Yem BblIOJHrTb eRO 06cnyKuBaHnE nII OChCTKy.
12) y6eIntecb B TOM, yTO uHyp pacnoIOxKeH TaKIM o6pa3OM, yTO Ha HERO HIKTO He HAcTyNIT N O6 HERO HIKTO He CNOTKHETcR, INaYe OH MOXeT 6bItb NOBpeJdeH nII nepeXaT.
13) 3apädHoe yctpoCTBO n 6aTapeHbI 6JOK npedHa3HaueHbI dIra COBMeCTHO pa60tbl. He nbItaTecb 3apxKaTb KaKo-III6O dpYro 6ecnpoBOHbI INHCTpyMeHT IIN 6aTapeHbI 6Jok C NOMOuTo DaHHoro 3aprHoro yCTPOCTBa. He nbItaTecb 3apxKaTb 6aTapeHbI 6Jok c NOMOuTo dpyrO 3aprHoro yCTPOCTBa.
14) He nbitaTecb pa36npaTb 3apdHoe yCTPOB-CTBO aKKyMylrTopHO bTaapeu IN KOpNyc 6aTapeeHoro 6Noka.
15) He xpaHnTe HnCTpyMeHT n 6atapeHbI 6JOK B MeCTax, rDe TEMNepaTypa MoXeT DOCTuH b IIN npEByICntb 50^ (122^) (TaKnx KaK capaI INN aBTOMO6nJIb JeTOM), YTO MoXeT pInBeCTn K NOBpeJxdeHIO xpAHmOi 6atapei.
16) He 3apjkaTe 6aTapeHbI 6nok TaM, rJe Tempepatya HIXE 0^ (32^) nBbIe 40^ (104^) .
17) He noJxirate 6aTapeHbI 6nok. OH MoKet B3OpBaTbcraB OrHe.
18) 3apdHoe yctpoCTBO npedHa3- HaueHO pabotb TOIbKO OT cTahdApTHo 6bITOBOy AEKTPocETn. BbIOJHnTe 3apdky ToIbKO OT HanpJxHeN, yka3aHHoro Ha Ta6NIuKe. He nbTaIteCb nCNoIb3OBaTb erO OT KaKOrO-Ni6o dpyrOro HAnpJxHeNia!
19) O6paaTeCb NaIeJaMm 6pa3o m co shypom. HkoIa He nepeHocnte 3apdHoe ycTpoiCTBO 3a shyp n He depraTe erO dIra OTcoeINHeHn rOT ceTeBOn po3eTKn. XpaHnTe shyp I0daJIbWe OT OTONITbHBIX CNTEm, Macna INN OCTpbIX KpOMOK.
20) 3apjaKeTe 6aTapeHbI 6nok B XopoIIO npOBeTpBaemOM MeCTe, He HAppbBaHTe 3apJdHoe yCTpoNCTBO n 6aTapeHbI 6nOK cKaTeptbIO N.T.I. BO BpeM 3apJdKN.
21) He donyckaTe KopoTkoTo 3aMbikaHnA 6bataeHoro 6Ioka. Kopotkoe 3aMbkaHne 6bataeHoro 6Ioka MoXeT npNBecTu K 6OJIbUOMy 3JIeKTPnuYeCKOMy TOKy, NpeErpeBy n OxKOram.
22) PIMMEUHNE: Ecnn cTeBOu Hyp daHHoro yCTPOUICTBa NOBpeKDeH, erO CNeDuyeT 3aMeHHTb B peMOHTHO mactepcko, yNOJHOMOueHHo npednpnraTneM-N3rTOBNTeIeM, NockoJIbky dJa 3tOro Tpe6yOTc r CneuaJIbHbIe INHCTpyMeHTbl.
23) UcTpoIcTBo He npeHa3HaueHo InI INCIOJIb3OBAHn MaIeHbKIMn DeTbMn INI Cna6bIMN JIOdBmN 6e3 npncMOtpa.
24) MaJIeHbKne DeTn DoJXHbI HaxoINTbcr NOd PnncMOTpOM, YTO6bl rapaHTnpOBaTB, YTO OHN He 6yDyT INrpaTB C yCTPOINCTBOM. B COOTBeTCTBnC ΦeDEpaJIbHbIM 3aKoHOM PoCCn "O 3aUNTe npab Notpe6nteNe", cPOK cnjK6bl dJa DaHHoro n3DeJIpy paBEN 7 roDAM C DaTbI IPOUN3BOIDCTBa npu ycIOBn, YTO n3DeJIne NcNoNb3yETcR B CTPOROM COOTBeTCTBnC HAcTOrIeN HcHTpyKcIeN pO 3KcNpyatauN IN PrIMeHmblIM TEXHnueCKIMN CTaHdApTaMn.
25) B COOTBETCTBUN C ΦeepaIbHbIM 3aKoHOM Pocnn "O 3aUnte npab nOtpe6nteJe", cPOK cnJxkbI dIa
daHHoro n3delenpaBEN 7 roDAM,1200
3apAdkam (TOJbKO dJa 6aTapeHoro
6Ioka) C DaTbI npOn3BOcCTBa npN
ycNoBN, YTO N3deJIne IcNoJb3YeTcR
B CTporOM COOTBeTCTBnC HAcTOraSei
HNCTpyKUeN NO 3KcPnyatauIN
IN PrIMeHmMbIM TEXHueCKMn
CTaHdApTaMn.
NaHacOHK 3JIeKtpNK BOpKc Ko.,IITd.
| СИМBOЛ | Знayене |
| Д�� сижени риска почени Травм, обязателно почтente и усвoitete руковозбо NO Кскпунатуни. | |
| Толбко Д�� Исторьогань В hyт pine Moneшени. |
OCTOPOXHO
He nCnoJb3yIte dpyrne 6aTapeHbIe 6IOKn, KpOme 6IokOB Panasonic, IpeHa3NaueHHbIX DJIa NCNoJIb3OBaHnA C 3TNM aKKymJYTopHbIM HHTpyMeHToM.
KoMaHnra Panasonic He Hecet OTBETCTBeHHOCTn 3a KaKne-JIb60 NOBpeJKeHnra IJIH HeCuaTHe CJIyUaN, BO3HnKUHe B pe3YbTaTe NcNoJIb3OBaHnna Nepepa6OtaHHoro IJI NODeJIbHOro 6aTaapeHoro 6loka.
He nomeuaTe 6aTapeHbI 6nOK B OROHb H He NODBepraTe erO BO3DeHCTBnIO BbICOKoTEmNepaTypbl.
He BCTaBnIe B 6aTapeHbI 6JOK TaKne IpeDMeTbI, KaK TBO3dN, He NOdBepraIte erO yIapam, He pa3bnpaTe erO n He nbITaIteCB BNDON3MeHNTb.
He donyck aIte npNKOCHOBENMaTaJIInueCKNX ppeMToB K KJIeMMa6BaTapeHoro 6noka.
He nepenocute n He xpaHnte 6atapeHbI 6nOK B OndHom Raunke C rBO3dMn IIN aHaJIOrHybIMn MetaJIInueckmN PpeDMetamN.
He 3apjaTe 6atapeHbI 6nok B MeCTe C BBICOKO Tempeatypo, HApPIMep, PdOM C ORhem NnN NOI npAmbiN LyamN cOnHa. B npOTNBHom cnyae 6atape MoKet nepeptbcra, 3aOpeTbcra NN B3OPBaTbcra.
Hn B Koem cnyae He nCnoB3ynte 3apAdkn 6atapeHoro 6Ioka dpyroe 3apAidHOe yCTPOINCTBO, Kpome CneuaNbHO npEdHa3NaueHHoro dIa 3TOO yCTPOINCTBa. B npOTNBOM cnyae 6atape MoKet Naatb npoteKaTb, NeperpTeBCr nn B3OpBaTbcra.
-Послс сягия 6атapestенoro 6лoka
С ИНСТРУМЕNTа Или 3ардного
YСТРОИСТВа, BCERДа yСТанавиBa�е
Ha MeCTо крblшку 6лoka. B П ropTNBHom
Слуахе Контakты 6aTapesten MOryT 6bITb
ЗамКHyТы, YTO MOЖET ПпВecТи K
ПОжар.
-Послс сягия 6атapestенoro 6лoka
CИНСТРУМЕNTа Или 3apЯного
YСТРОИСТВа, BCERДа yСТанавиBa�е
Ha MeCTо крblшку 6лoka. B П ropTNBHom
Слуахе Контakты 6aTapesten MOryT 6bITb
ЗамКHyТы, YTO MOЖET ПпВecТи K
ПOnжар.
B cn yu ae yx yd we n npa6 otbl 6batapeHoro 6Ioka, 3aMeHnte ero HObbIM 6IOKOM. IpoDolXnTeJbHoe NcNoJIb3ObaHne NOBpeKdEHHoro 6batapeHoro 6Ioka MOKeT npNBecTI K BbIJeJIeHNIO TeIIa, BO3rOpAHIO IIIN pa3pyWeHNIO 6batapeN.
II. 3APRAKAKATAPEN ObuNe MepbI ppeOcTOPOXHocTn dJIa JNTN-NOHOro/HNKeJIb- MeTaJIIOrNpNDHorO/HNKeJIb- KaAMneBoro 6aTapeHoro 6Joka IPIMEYAHNE:
- Ecnn TemnepaTypa 6batapeHoro 6Ioka onyCTntcHnKe npN6n3nTeJbHo -10^ (14°F), 3apraKa aBtOMaTnueckn npeKpaTntcI dIЯ npeDToBpaUeHn yxudhenx hapaKTePncTik 6batapei.
He 3apjkaTe 6atapeHbI 6IOK, Tempepatpa KOTOPORO HnKe 0^
-ПиЗЗрдкхОLOнHOrOБaTapeHnOro 6IOKa(cTeMnepaTypoHnKHe 0^ (32^) BTeNlOM MeCTe,OCaBbTe 6aTapeHbIb 6IOKB3TOMMeCTe INNoOxKnTe 6OJee ODHoro Yaca, Noka 6aTapeHarpeetcdo yPOBnA TeMnepaTypbI OkpyKaHOuSei CpeDbI. - Oxlaante 3apraHoe yctpoNCTBO npi nocJeIOBaTeIbHOJ 3apAKe 6Oonee Yem DByx 6aTapeINhIX 6nOKOB.
He BCTaBJIne BaUN naIbUbI B KOHTaKTHbIe OTBepCTn, KOrDa Bbl DePKeTe 3apAIDHOe ycTpoNcTBO, a TaKKe B Dpynx CnyaJx.
BHIMAHNE
Дпя пededOTbpaueHЯ рнсka пожарилп NOВpeKdEHN3apdHOrO ycTpoICTBa.
He nCnoJb3yIte B kaueCTBe nCTOuHnKa nITaHn rHePapToP DBrTaTeJI.
He 6Iokpyte BHTnJraCIOHbIE OTBepCTNa Ha 3apAaHOM yCTpoiCTBe n 6aTapeiHOM 6Ioke.
BbIKIIOHTe 3apAHOe yCTPOIcTBO n3 wTeNCEJIbHO pO3ETKn, eCNI OHO He NCNOJb3yETc.
OpaHkeBaJ lamnoUka peXmAm OxnDaHn6 Byet Mrrb, Noka 6atapea He OCTbIHET.
3aTeM 3apJaKa HauHeTcA aBTOMaTn-ueCKn.
4.лamnoчkaЗapяdkn(3eJIeHa)6ydetMeДЛeHNO MngaTb,KaKToIbKO6aTape86yDet3apJKeHa npIMepHo Ha 80%
5. CoctoHne 3aBepseHHo3 apaIkn
EY0L80: JAmnoUka 3apAdkn (3eJeHaj) NaHcHET 6bIcTpo MmraTb.
EY0L81:ламнока зардк (зеленя) BBIKIIOUHTc.
- Ecnn JAMNOUka NHTAHnHe 3aROpNTcHemeJEnHO Nocne BKNIOueHn3apJHoro yCTPOINCTBa, INN ecnn NO nCTeYehn CTaHApTHORO BpeMeHN JAMNOUka He NaHET 6bICTPO MURATb 3eJIeHBIM CBETOM, O6paTInTEcb ByyNOJHMOueHHBICPBNCbHIn CEHTP.
- 6bpaTntecb B yNoJHMOueHHbI cepBnCHbI ueHTp, ecn IIO nCTeueHN CTaHdapTHOrO BpeMeHN 3apAKn npOn3oJdT cNeDyUoUee;
EY0L80: Ecnn lamnocha nHTaHnHe 3aROpNTc HEmeJneHNOncIe BkJIoucheHn 3aprAnHOyCTpoiCT Ba, IIN ecnn lamnoka 3aprKn (3eJeHa) He NaHET 6bICTpO MURatb.
EY0L81: Ecnn lamnocka 3aprKn (3eJeHa) He BbIKJIOHTc.
HnkeIb-MeTaJIIOrIaPnIhBIn/ HnKeIb-KaDMnEByIb 6aTapeHbIb 6Jok
ПРИМЕЧАНЕ:
Pn npB0B 3apAKe 6aTapeHoro 6noKa, nnn noCne dInTeJbHO xpaHeHna, 3apXaIte ero B TeueHne OKoNo 24 YacOB, yTO6bl DOBeCTn 6aTapeO Do NOnHO 3apAHDH eMKoCTn.
3apndoe yctpoicTBO (EY0L80)
- BкнючITE 3apяДhoe ycTpOиCTBOВ StTeNceIbHyIO po3eTKy nepemeHHoro Toka.
ПРИМЕЧАНЕ:
Pn NOkHoueHn WTeNcEhHOB BUNK K NCTOuHky NITaHnpeMeHHoro TOKa MOryT NOBHTbCn NCKpbl, HO 3TO He npedctabJrE Tpo6Jemy C ToKn 3peHn6Be3oNaCHOCTn.
2.ПлOTнOBCTaBbTe 6aTapeHbI 6JOKВ 3apAINDHO yCTpoiCTBO.
3.BoBpeMa 3apAdkn6ydtropeTb lamNoUka 3apAdkn.
Iocne 3aBepWeHn 3apAdkn aBTOMaTHueckn cpa6oTaET BHyTpeHHN 3JIeKtpOHbI nepeKlOuAtel, npedOTbpaUaaype3MepHyIO 3apAky.
3apraKa He hauHetcA, ecn 6aTapeHbI 6JOK cN NsK O M rO pR yHn (HaPpIMep, HENOCpeDCTBeHNO nocJe cyHKUHOHPOBaHn npi 6oJIbWoHn Harpy3Ke).
OpaHkeBaJ lamnoUka peKIma OxuDaanHb Byet Mrratb, Noka baTapey He OCTbIHET.
- Поссе 3авершени зардклamnotka 3apdннаннетбICTpo MntaTb 3eJIeHbIM CBETOM.
- Ecnn JAmnoUka 3apRKn He 3arOpntc HEnocpeDCTBHeHNO Pocne BkIIOueHnna 3aprHoro yCTPOJCTBa, INn ecnn JAmNoUka He NorachET NO NCTeueHN CTaHdApTHoro BpeMeHn 3apRkn, O6paTnteCb B yNOnHOMOeHHbI CepBnCHbI ueHTp.
- Ecnn noHocTbO 3apJxKeHHbI 6aTapeHbI 6JOK CHOBA BCTaBNTb B 3apJdHOe yCTPOINCTBO, 3aROpNTc JAMNoUka 3apJdkn. Ypeez HeCKoJIbKO MmHyT JAmNoUka 3apJdkn MoKeT HaayT 6bICTpo MInrA Tb, NOKa3bIBa, YTO 3apJdka 3aBepseHa.
CBETOBbIE INHdNKATOPbl
Poxayncta, obpaTntecb K camomy nocneHemy oBcHemy kaTaNory.
OpriHaIbHa iHcTpkykciA: AnrniIcbka IpeKnaD opriHaIbHOi iHcTpkykii: Inwi MOBn
I. BAXJIINBI INPABUNA TEXHIKN BE3NEKN IpouNTaIte BCIO iHCTpyKciO
1) 36EPEKITb DAHY IHCTPYKUIO - B DaHOMy Noci6NkU MicTЯTbcra BaXJIuBi npaBnla TexhIKu 6e3neKn Ta iHCTpyKci3 ekCnIyataui 3apArdHoro npicTroIo DnAkyMylTopHOi 6aTaapei.
2)пераьнористаням зардноуnpсгю akулг�рноiбатаepi npочтайтевсio inhctpykuio i nonepeжувальни маркувальни habини (1)зардому псгю akулг�рноiбатаеi, (2)батаернomy 6лоцi.
3) YBAGA -Для 3нжehн ри3nky OTPIMaHHЯ TpaBMN 3apJxKaIte NIIWE npndaTHN 6atapeHnN 6lOK, RA NOKa3aHO Ha octaHHI CTOpIHcI. IHwi TnN 6atapeM MoKytb Bn6yXHyTu, IIO npu3BeDe Do TpaBMN IIOdINH i NOwKOJxehHЯ npIcTpoI.
4) He npinyckaite notpanJHnna 3apdHoro npictpoio i akymyIaTOpHoro 6noky niD doou cn CHir i He KOpncTyItecra Hm y BOIOrOmy Micci.
5) BnK opnc TaHHn npncTpoH, He pekomeHdoBaHOro NiInpnEMCTBOMBnPo6HnKOM, MoKe npu3BeCTn Do nOxkei, ypaXeHH eJeKTpUHm CTpyMOM a60 Do TpaBMn IIOdeJ.
6) Дя 3менин ринку поковеденништencьhoi Bnkn a6o shhupa,приВд' endybanhi 3apdHoro npictpoB ViMepexeBoi po3etkn notpi6Ho TaryHTN 3a wTekep, a He 3a shhyp.
7) He moxHa BnKOpNCToBvBaTn shHypnoOBxvBa.
8) He ekcnlyaTyuTe 3apArdn npncTpii 3 noxkoJKeHm shypom a6o wTeNCeJIbHOU BNJKOIO - HeaHOb 3amHITb iX.
9) He ekcnnyaTyte 3apdHn npncTpi, kso BIn 3a3HaB CnIbHorO ydApy, BnaB nn NOsKOJKeHn 6yDb-AKM
iHWM CnOCOBOM; 3BepHiTbcra Do KBaJIiΦIKOBaHOro O6cIyRObyOuro areHTa.
10) He po36paaiTe 3apdHn npucTpi; 3BepHitbcra do KBaIioKOBaHOro 06cnyROByOuOraeHTa, kUo notpi6He 06cnyROByBaHHa 6o peMOHT. HenpabInbHe NOBTOPHe 36npAHn MoKe npN3BeCTn Do ypaKeHHa eJeKTpuHm cTpyMOM a6o noXeKi.
11)ДЯЗMeHWeHЯ ри3nky ypaXeHHa eNeKtpuHm CTpyMOM, BiD'EdHaNTe 3apAHN pIncTpiBid MepeXeBOi po3eTKI, nepH HIX BnKOHyBaTN Ioro 06cnyroByBaHHa a6o OunchKy.
12)ПepekoHaITeCЯВ TOMy,иошурpo3TaWOBaHn TaKIM YINHom,HA HbOrO HIXTo He HaCTyNITb i O6HbOrO HIXTO He CNIJKHeTbcra,iHaKWeBIn MoKe 6yTu NOnKoJxHn a6o nepetncHEn.
13) 3apdHn npucpti i 6bataepHn 6Iok npn3naeHi dIa cnilbHOi pO6OTn. He HAMaraTeC8 3apJxKATN JIK-NHe6yDb IHsN 6e3npoBIDHn IHCTpymENT a60 6bataepHn 6Iok 3a DonomoroIO daHoro 3apJHoro npucpto. He HAMaraTeC8 3apJxKATN 6bataepHn 6Iok 3a DonomoroIO IHoTO 3apJHoro npucpto.
14) He hamaraTecepaTn 3apAHH npictpiakymyIaTOPHOI 6atapei i Kopnyc 6atapeHoro 6nOky.
15) He 36epiraTe iH cTpyment i 6bataeHHN 6IOK B Micx, De TemnepaTpya MoKe DOcRHyTu a6o nepeBnUHTu 50^ (122^) (TaKnx JaK capaA abO aBTOMoBInb BnITky), 0o MoKe npn3BeCTu Do nOwKOJxehnHa 6bataeI, 0o 36epiraetbcra.
16) He 3apjaKeTe 6aTapeHnN 6JOK TaM, De Tempepatya HIXKYE 0^ (32^) a6o BNUE 40^ (104^) .
17) He πίπαπιοῦ Te 6aṭapeην ἡποκ. BiH Mòxe BnóbyxHyTu y BɔrHi.
18) 3apndn npncptpi npna3hauehni Dnpa o60tn nIwe BiD cTaHdapTHoio no6ytoBoi eNeKtpomepexi. BkoHynte 3apdky Inwe BiD Hanpyr, 10BkazHa Ha Tabnuci. He HamaTae TecBnKOpNCTOByBaTn Ioro BiD AKOi-He6yd b IHooi Hanpyr!
19)Повьтеся наlexнUM YHOM 3i shypom. Hikonn He nepehocte 3apdHn npictpi 3a shyp i He cMkaIte Ioro dJa BID'EDHaHHaBid MepexeBOI po3etKn. 36epiraTe shyp noDani BiD onaHOBaJIbHNx CnCTem, macna a6o roctpnx KpOMok.
20) 3apJkaTe 6atapeHn6loK B Micci, zo do6pe npoBtPioE7bcra, He NaKpNBaTe 3apAHN npncTpi i 6atapeHn 6Iok cKaTeptnHOIO I T.I. nIac 3apAkn.
21) He donyckaite kopotkoro 3amnkaHHaTaapeHoro 6IOKy. Kopotke 3amnkaHHaTaapeHoro 6IOKy MoKe npu3BecTN do BeJIHKOrO eJNeKtpuHoro cTpyM, neperpiBy ta onikiv.
22) PIMITKA:ЯкwoМержевишуданoropnCTpoI NOWKoJxHni,NoTpi6HO 3amHHTN BpeMOHTiM MaC-TePHi,ynOBHOaXeHIn NiDpNcEMCTBOMBnPo6HnKOM,OckIbKnДЯ Zboro NOTpi6Hi cneuaJIbHI IHCTpy-MENTn.
23)Ппст piн He npn3naeHn Дя BnKOpncTaHHa MaJIeHbKIMn DiTbMn a6o Cna6mN IIOdbMn 6e3 HaIpy.
24) Manenbki dItn nobHHi 3haxoHITncra nI HarJydom, uO6 rapaHTyBaTu, uO BOHN He 6ydytb rpatu 3 npunctpoem. 3rIO 3 3aKOHOM YkpaIHN "PpO 3aXnCT npab CNOxNBaiv", TepMn CnyK-6n dJaHO BnPO6y pIBHn 7 pOKam 3 DaTN BnPO6HnTBA npu yMOBI, uO BnpiB NKOPNCOTBycTBcR BiNDOBIDHO cyBOPomy Do cnpabXhBoi IHCTpyKciI NO ekCnPyataci i 3actocOBHX TexHiYHX CTaHdaptib.
25) InΦopmaizioToTepminy cnyx6n (npndaTHoCTi)
BCTaHOBJIeHn BIno6HnKOM TepMIn Cnyk6n (npndaTHocTi)Cboro BIno6y DOpIBHc7 pOKam 3 DaTn BInrOToBJIeHHa 3a yMOBn, 10 BoPi6 BnKOpNCTOBycTBcay CyBopi BiNObiHocTi Do DiINCHOI IHCTpyKci 3 ekCnPyatauTa TaTexHiHnx CTaHdApTb, 10 3aCTOCOBHTbcra Do Cboro BIno6y.
Tepmin cnyk6n 6batapeHHx 6lOKiB dopIBHoe:5003apdKaM (tIbKn dJa HikeJb-KaDMeBOrO 6batapeHoro 6lOky),1200 3apdKam (tIbKn dJa HikeJIb-MetanoripnDHoro 6batapeHoro
6noky) 3 daTn Bnpo6HnTBA 3a Tnx camnx yMOB.
Panaconik EneKtpnk BopKc Ko., Td. OcaKa, YnoHia.
| Симboл 3н | Чения |
| Для 3мений ризник Отуmaнни Травли, Корисува повинен озданомитсь Та Зрочимп посibск корисува ч Для викорисанни лише В级以上 посibск. Примдану监ь. |
OSEPEXHO:
-
He BnKOpNCTOByTe iHwi 6aTapeHi 6IOKn, KpIM 6IokiB Panasonic, npu3HaueHnx IJRA BnKOpNCTaHHra 3 cIm aKymyJIrTOPHM iHcTpymeHTOM.
Kompania Panasonic He Hece BiDIOBIAIbHocTi 3a6yDb-riKOJKeHHa 60 HeuacHI BnAaIK, 1O TpaINICBA peyIbTaTI BnKOpNCtAHNHepepeo6NeHoro a60PiDPo6NeHoro 6batapeHoro 6NoKy.
He KnaiItb 6aTapeHn6NOK y BORoHb i He NiDaBaTe NOrO BnInBy BnCOKoi Tempeatypu.
He BCTaBnIe B 6aTapeHnN 6NoK Taki npedmetn, k TBi3dkn, He niDaBaTe noro ydapam, He po3bupaTe noro i He HamaraTeCB BINO3MiHNTn.
He donyckaTe TopkaHHaMeTJIuHnx npedmetiBdoKlemBaTapeHoro 6noka
He nepenocitb i He 36epiraute 6atapeHnB ODHOMy RUnky 3 rBi3dkamn a6o anaIoriyHMn MetaJIiHMM npedMetamn.
He 3apraJkaIte 6batapeHn 6IOK y Micu 3 BncoKOIO TEMpepaTPOHO, HApnKnaI, nopAa 3 BOrHem a6o nID npraMMn COHauHMMn Ipomehm. IHaKwe 6batape MoKe neperpITncs, 3aHrtncs abo Bn6buxHyTN.
Hi B yKOMy BnnaKy He BnKOpncToBynte DnA 3apAnk 6batapeHoro 6Ioka iHnN 3apAnn npncTpi, Kpim CneuaJIbHO npn3HaueHoro dIra cboRo npncTpoIO. Ihakwe 6batape MoKe nOaTu npotikatN, neperpITnca abo BVbuxHyTu. -
Picna 3HnTTa bataeHoro 6NOKy 3 IHCTpyMeHTy a60 3apraHoro npncTpoHO, 3aBXn BCTaHOBJIOnTe Ha Micue KpnUkY 6NOKy. IHaKwe MoKe TpanNTucr KOpOTke 3AMnKaHHa KOHTaKTtB bataeii, 1O MoKe npn3BecTI Do nOxEki.
- Ppn noripseHhi pobotn 6aTapei 3amHtB ix Ha HOBI. BnkopncTaanHn nozkOJKeHnx 6aTapei MOKe npN3BeCTn Do yTBOpEHn TENla, 3anaIOBaHHa a6o po3pNBy 6aTapei.
II. 3APЯДKA BATAPEI
3araIbHI 3aCTepexHHi 3axOdn IooI NiTiH-IOHHoro/HikeNb MeTaNOriDpNdHoro/HikeNb KaAdMiEBOr6aTapeHoro 6JOky
ПРИМITKA:
-Якшо temnéратура 6atapeинoro 6лokу ваде Нжчe пиблзно -10°C (14°F), зардку 6уde abTomatунно первано, соб заюгп по ripшеню xapakтepиctик 6atapei.
He 3apJxauTe 6aTapeHnN 6IOK, TemepaTypa JKOHO HXKYe 0^
- Prn 3apaDi xoNoHoro 6batapeHoro 6Ioky (3 Temnepatypo HxKue 0^ (32^) B TeNlomy Micui, 3aNiUte 6batapeHnB 6Iok B UcbOmy Micui Ta NoeKaIte NOHaD ONDHy rOOnHy, DOKn 6batape Harpietbcra Do pIBHr Temn epat ypu Ha BKONn OhB ORO cepeDoBnua.
- Oxonoditb 3apdHn npncpti npn nocniobHn 3apdci 6ilbHix DBOX 6atapeHnx 6lokiB.
- He BCTabJnTe BaWi nablci B KOHTaKTHi OTBOpN, KOn BN TpImaTe 3apAHN npicTpIn, a TAKOX B iHux BUnaKaX.
YBAGA:
Для ункHeHHЯ риЗИКу пож经i abo пошКоДЖeHHЯ 3apДНOrO npICТpoI.
He BnKOpncToBnyTe B JKOcTi DKepeNa XnBJIeHHra ReHepaTOP DnBryHa.
- He 6lOKyIe BeHTnJIaIciHi OTBOpN Ha 3apAnHOMy npncTpoi Ta 6aTapeHOMy 6loci.
Bumkhitb 3apaHn npucptpi 3 WTeNCeJIbHOI PO3eTK, RaKIO BIn He BHKOpNCTOByETbcra.
JIitii-ioHHn 6aTaapeHn 6Jok
PNUMTKA:
Baw 6atapeHn 6Iok He e nobHicTIO 3apJxKeHmPiJ qac npnd6aHHa. He 3abYbTe 3apJntu Ioro nepeD BVKOPNCtAHNM.