
EY0225 - Battery charger PANASONIC - Free user manual and instructions
Find the device manual for free EY0225 PANASONIC in PDF.
| Product type | Battery charger |
| Brand | Panasonic |
| Model | EY0225 |
| Weight | 0.6 kg |
| Supply voltage | 230 V ~ 50 Hz (according to rating plate) |
| Standard charging time | Approximately 15 minutes for batteries EY9025/EY9021 |
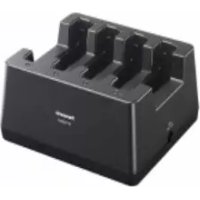
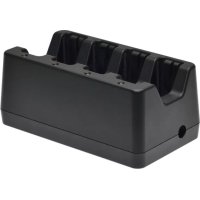
| Compatible battery types | Panasonic batteries (models EY9025, EY9021, etc.) |
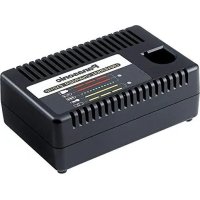
| LED indicators | Charging indicator (green), standby indicator (orange) |
| Protections | Overcharge protection, automatic shut-off at end of charge, thermal protection |
| Cooling | Built-in fan for certain models (EY0230/EY0214) |
| Charging temperature | 0 °C to 40 °C |
| Storage temperature | Below 50 °C |
| Humidity precautions | Do not expose to rain or snow, do not use in damp environments |
| Cleaning and maintenance | Disconnect before cleaning, wipe with a dry cloth |
| Repairability | Repair by an authorized specialist; do not disassemble yourself |
| Spare parts | Power cord replaceable by an authorized workshop |
Frequently Asked Questions - EY0225 PANASONIC
User questions about EY0225 PANASONIC
0 question about this device. Answer the ones you know or ask your own.
Ask a new question about this device
Download the instructions for your Battery charger in PDF format for free! Find your manual EY0225 - PANASONIC and take your electronic device back in hand. On this page are published all the documents necessary for the use of your device. EY0225 by PANASONIC.
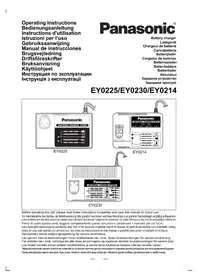
USER MANUAL EY0225 PANASONIC
YkpaHcbKa: CtopiHa 48
GB
SAFETY INSTRUCTIONS
Read All Instruction
1) SAVE THESE INSTRUCTIONS
This manual contains important safety instructions for battery charger.
2) Before using battery charger, read all instructions and cautionary markings on (1) battery charger, (2) battery pack.
3) CAUTION - To reduce the risk of injury, charge only applicable battery pack. Other types of batteries may burst causing personal injury and damage.
4) Do not expose charger and battery pack to rain or snow or use in damp location.
5) Use of an attachment not recommended may result in a risk of fire, electric shock, or injury to persons.
6) To reduce risk of damaging the electric plug and cord, pull by plug rather than cord when disconnecting charger.
7) An extension cord should not be used.
8) Do not operate charger with damaged cord or plug - replace them immediately.
9) Do not operate charger if it has received a sharp blow, been dropped, or otherwise damaged in any way; take it to a qualified service agent.
10) Do not disassemble charger; take it to a qualified service agent when service or repair is required. Incorrect reassembly may result in a risk of electric shock or fire.
11) To reduce risk of electric shock, unplug charger from outlet before attempting any maintenance or cleaning.
12) Make sure cord is located so that it will not be stepped on, tripped over, or otherwise subjected to damage or stress.
13) The charger and battery pack are specifically designed to work together. Do not attempt to charge any other cordless tool or battery pack with this charger. Do not attempt to charge the battery pack with any other charger.
14) Do not attempt to disassemble the battery charger and the battery pack housing.
15) Do not store the tool and battery pack in locations where the temperature may reach or exceed 50^ (122°F) (such as metal tool shed, or a car in the summer), which can lead to deterioration of the storage battery.
16) Do not charge battery pack when the temperature is BELOW 0^ (32^) or ABOVE 40^ (104^) .
17) Do not incinerate the battery pack. It can explode in a fire.
18) The charger is designed to operate on standard household electrical power only. Charge only on the voltage indicated on the nameplate. Do not attempt to use it on any other voltage!
19) Do not abuse cord. Never carry charger by cord or yank it to disconnect from outlet. Keep cord away from heat, oil and sharp edges.
20) Charge the battery pack in a well ventilated place. Do not cover the charger and battery pack with a cloth, etc., while charging.
21) Do not short the battery pack. A battery short can cause a large current flow, over heating and burns.
22) NOTE: If the supply cord of this appliance is damaged, it must only be replaced by a repair shop appointed by the manufacturer, because special purpose tools are required.
23) The appliance is not intended for use by young children or infirm persons without supervision.
24) Young children should be supervised to ensure that they do not play with the appliance.
CHARGING THE BATTERY
Note: When you charge the battery pack for the first-time, or after prolonged storage, charge it for about 24 hours to bring the batteries up to full capacity.
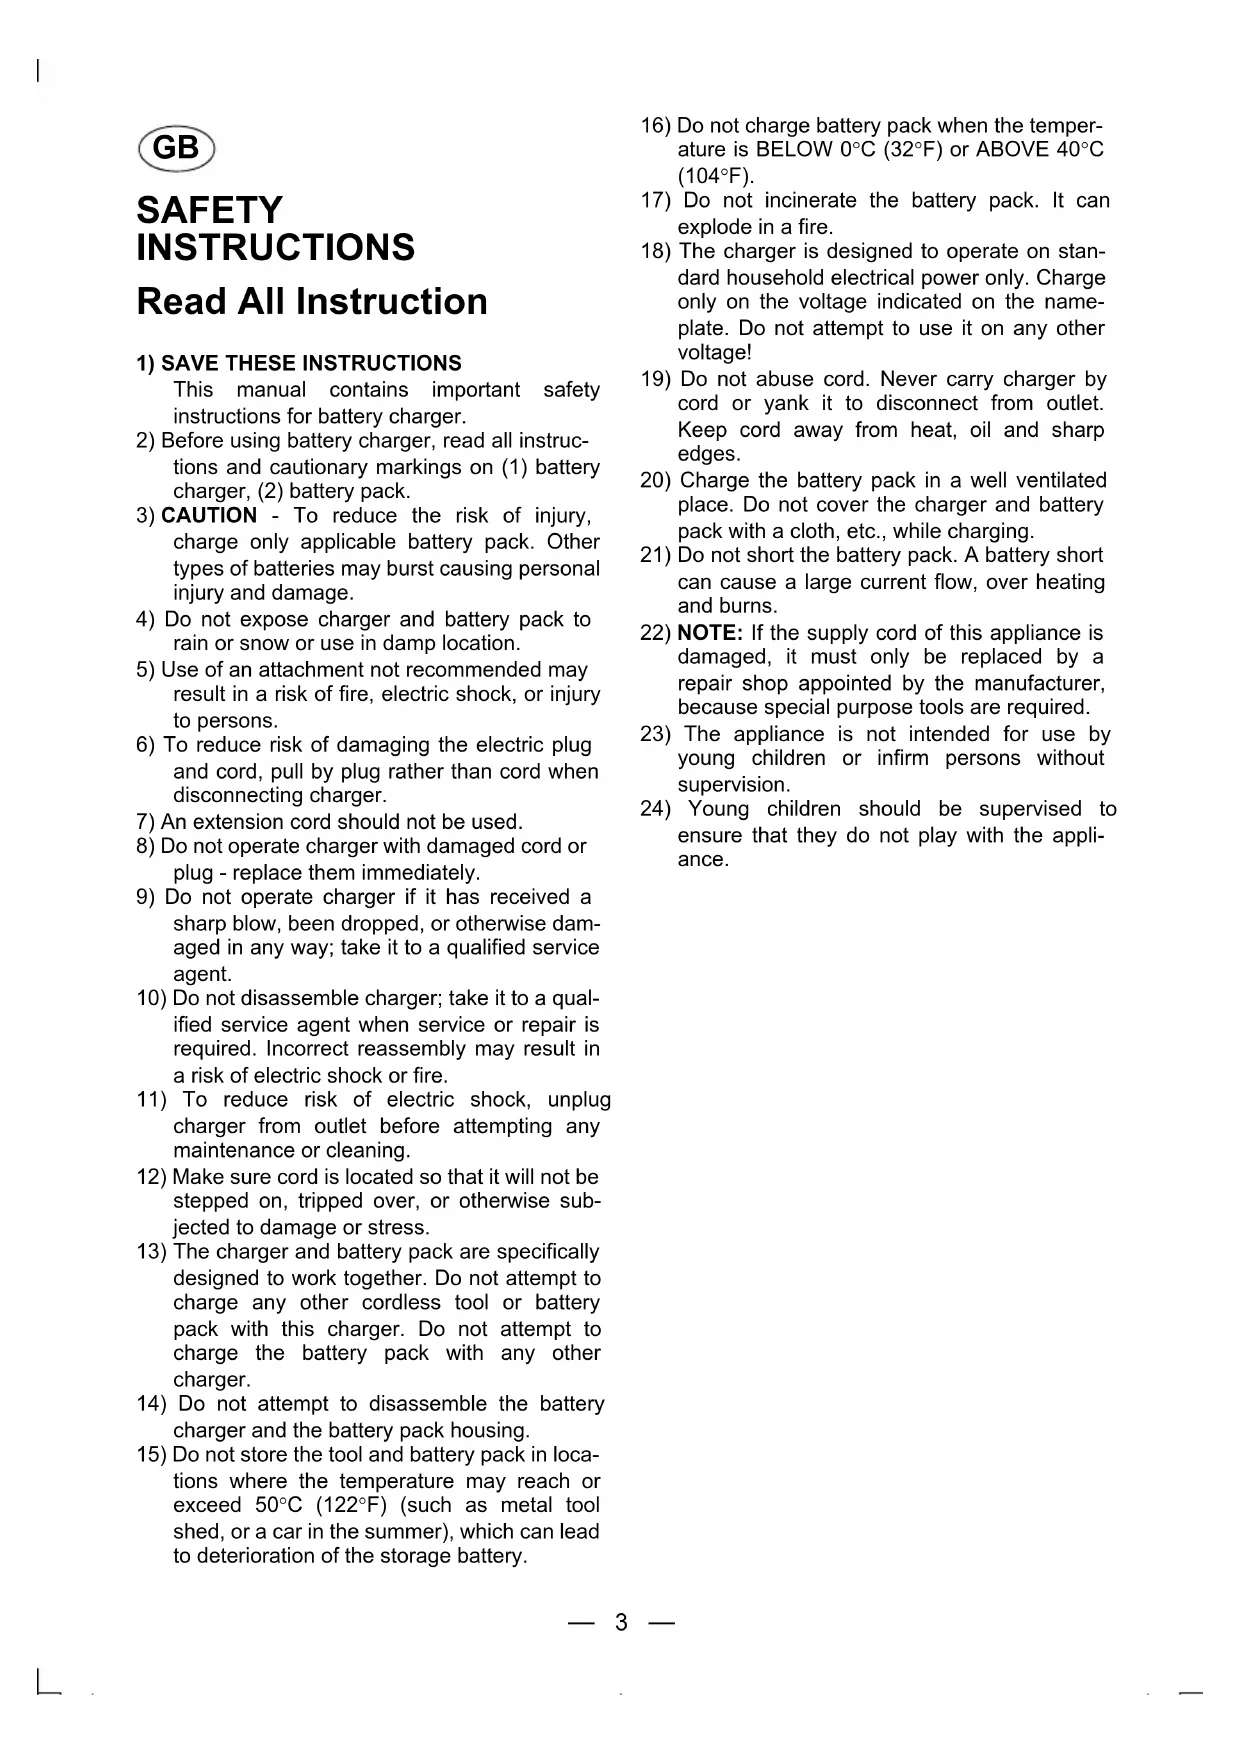
- Plug the charger into an AC outlet.
EY0225:
-
Sparks may be produced when the plug is inserted into the AC power supply, but this is not a problem in terms of safety.
-
Insert the battery pack firmly into the charger.
(^* EY0230 is referred for illustration.)
EY0214:
-
When charging, cooling fan in the charger functions to cool down the battery pack, and the sound of fan can be heard. This is normal. If this sound cannot be heard, it is a malfunction. Stop charging immediately and consult an authorized dealer.
-
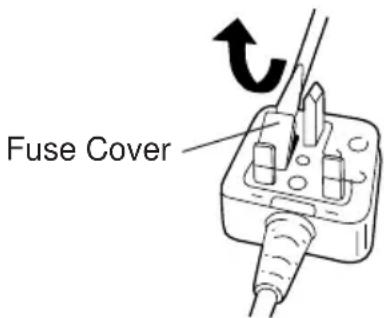
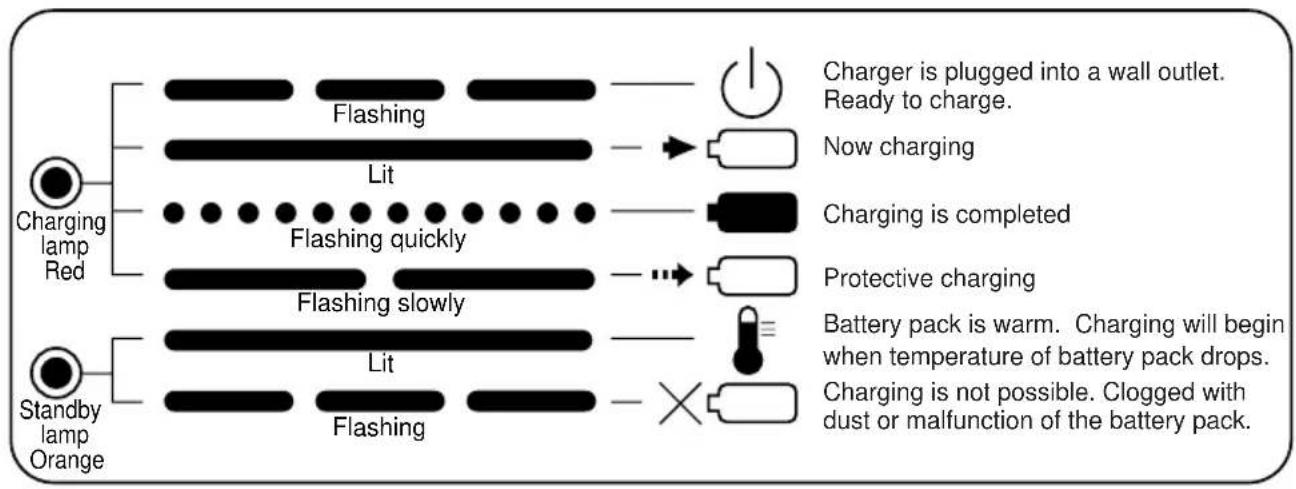
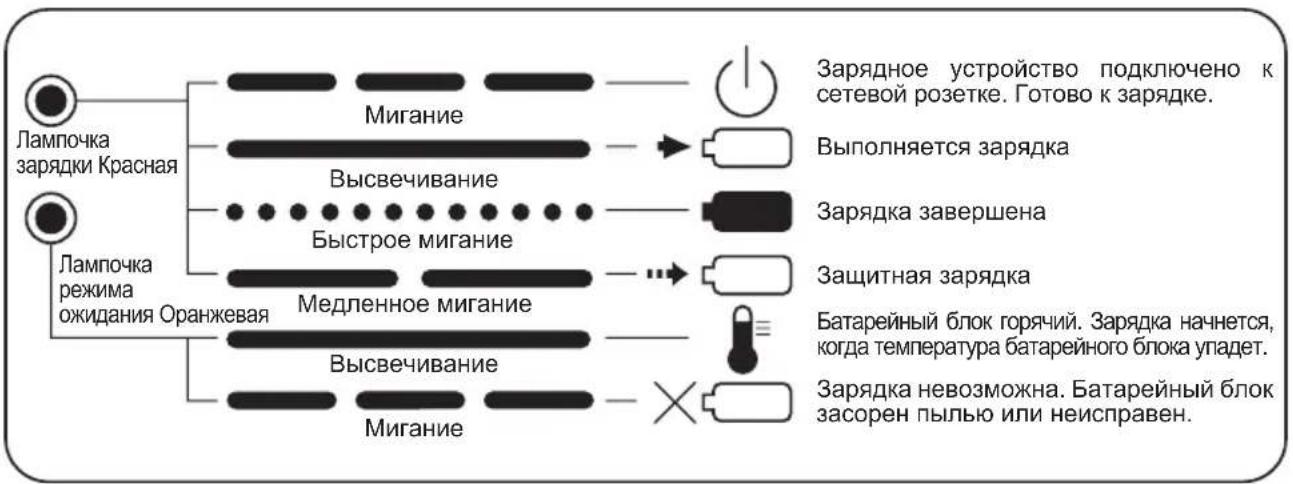
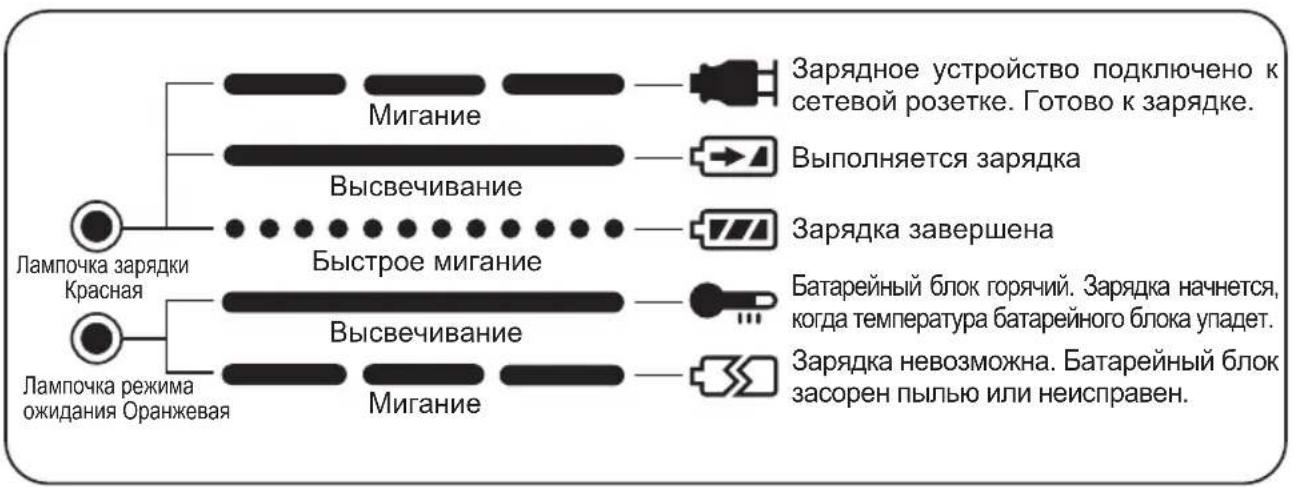
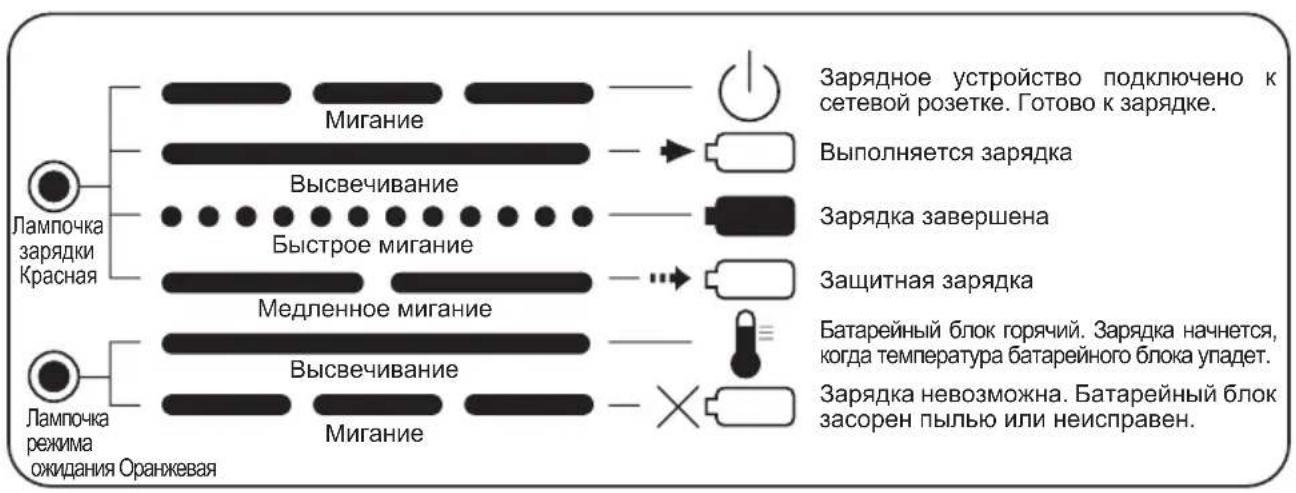
During charging, the charging lamp will light up. When the charge is completed, an internal electronic switch will automatically be triggered to prevent overcharging.
-
Charging will not occur if the battery pack is warm (for example, immediately after heavy-duty operation). The orange standby lamp will light up until the battery becomes cool. Charging will then begin automatically.
-
When charging is completed, the charging lamp will start flashing quickly.
EY0230/EY0214:
-
When the battery pack has not been used for a long time, the charging lamp starts flashing slowly to indicate protective charging. Protective charging takes longer to fully charge the battery pack, then the standard charging time. (Max. charging time is approx. 90 minutes.)
-
If a fully charged battery pack is inserted into the charger again, the charging lamp may light up. After several minutes, the charging lamp may flash quickly to indicate the charging is completed.
-
If the charging lamp does not light immediately after the charger is plugged in, or if after the standard charging time the lamp does not go off, consult an authorized dealer.
Note: When a cold battery (of about 5^ or less) is to be charged in a warm room, leave the battery in the room for at least one hour. Charge the battery when the battery temperature has leveled with room temperature. (Failing to do so may result in less than a full charge.)
Cool down the charger when charging more than two battery packs consecutively.
- Do not insert your fingers into contact hole, when holding charger or any other occasions.
CAUTION: Do not use power source from an engine generator.
- Do not cover vent holes on the charger and the battery pack.
- Unplug the charger when not in use.
ONLY FOR U.K.
ELECTRICAL PLUG INFORMATION
FOR YOUR SAFETY PLEASE READ
THE FOLLOWING TEXT CAREFULLY
This appliance is supplied with a moulded three pin mains plug for your safety and convenience.
A 3 amp fuse is fitted in this plug.
Should the fuse need to be replaced please ensure that the replacement fuse has a rating of 3 amp and that it is approved by ASTA or BSI to BS1362.
Check for the ASTA mark or the BSI mark on the body of the fuse.
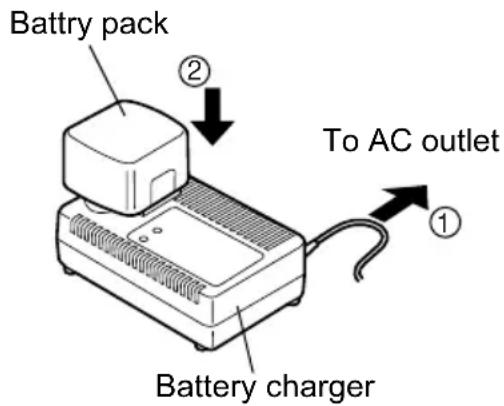
If the plug contains a removable fuse cover you must ensure that it is refitted when the fuse is replaced.
If you lose the fuse cover the plug must not be used until a replacement cover is obtained.
A replacement fuse cover can be purchased from your local Panasonic Dealer.
IF THE FITTED MOULDED PLUG IS UNSUITABLE FOR THE SOCKET OUTLET IN YOUR HOME THEN THE FUSE SHOULD BE REMOVED AND THE PLUG CUT OFF AND DISPOSED OF SAFELY.
THERE IS A DANGER OF SEVERE ELECTRICAL SHOCK IF THE CUT OFF PLUG IS INSERTED INTO ANY 13 AMP SOCKET.
If a new plug is to be fitted please observe the wiring code as shown below.
If in any doubt please consult a qualified electrician.
IMPORTANT: The wires in this mains lead are coloured in accordance with the following code:
Blue: Neutral
Brown: Live
As the colours of the wire in the mains lead of this appliance may not correspond with the coloured markings identifying the terminals in your plug, proceed as follows.
The wire which is coloured BLUE must be connected to the terminal in the plug which is marked with the letter N or coloured BLACK.
The wire which is coloured BROWN must be connected to the terminal in the plug which is marked with the letter L or coloured RED.
Under no circumstances should either of these wires be connected to the earth terminal of the three pin plug, marked with the letter E or the Earth Symbol 1一
How to replace the fuse: Open the fuse compartment with a screwdriver and replace the fuse and fuse cover if it is removable.
This apparatus was produced to BS800.
LAMP INDICATIONS
EY0225
EY0230
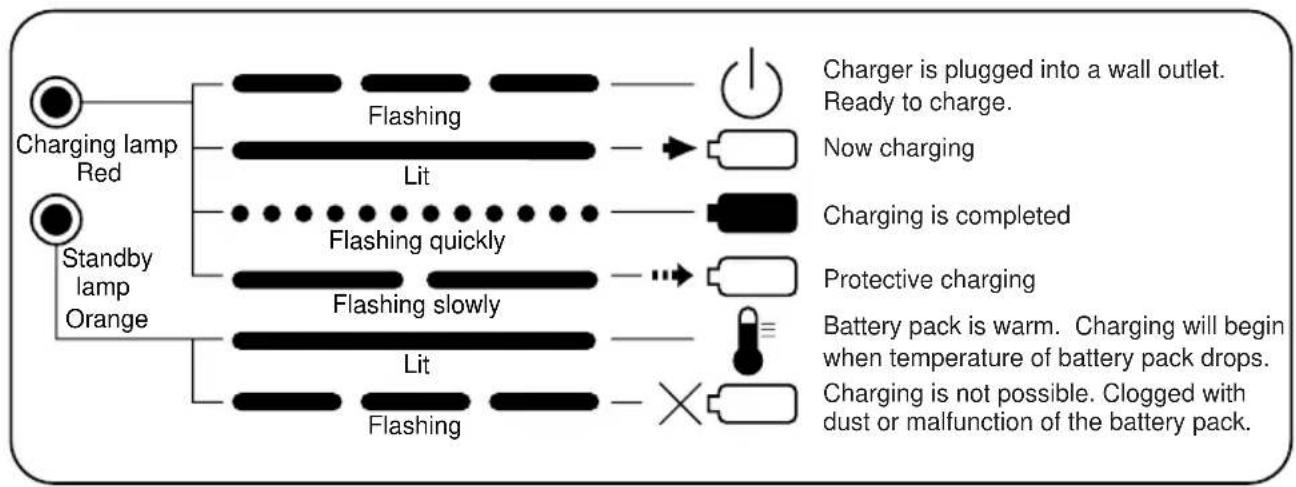
EY0214
SPECIFICATIONS
| Model EY0225 EY0230 EY0214 | ||||
| Weight 0.6 kg (1.3 lbs) 0.83 kg (1.83 lbs) 1.12 kg (2.47 lbs) | ||||
| Electrical Rating See the name plate on the bottom of the charger. | ||||
| Charging time | 3.6 V 2.4 V Standard charging time | |||
| EY9025 EY9021 Approx : 15 min | ||||
| EY0230: | ||||
| 15.6 V 1.2 V 9.6 V 7.2 V Standard charging time | ||||
| - | EY9001 | EY9080 | EY9065 | |
| EY9006 | EY9068 | EY9066 | ||
| - EY9 | 101 | EY9180 | - | |
| EY9182 | ||||
| EY9136 | EY9106 | - EY9 | 168 Approx. 30 min. | |
| EY9107 | ||||
| EY9108 | ||||
| EY9230 | EY9200 - | - | Approx. 45 min. | |
| EY0214: | ||||
| 24 V 15.6 V 12 V 9.6 V 7.2 V Standard charging time | ||||
| - | - | EY9001 | EY9080 | |
| EY9006 | EY9086 | |||
| - | - EY9 | 101 | EY9180 | |
| EY9182 | ||||
| EY9117 | EY9136 | EY9106 | - EY9 | |
| EY9107 | 168 Approx. 30 min. | |||
| EY9108 | ||||
| EY9210 | EY9230 EY9200 - | - | Approx. 45 min. | |
Note: This chart may include models that are not available in your area. Please refer to the catalogue.
D
SICHERHEITSHINWEISE
MaCyuNtTa 3NeKtpnBOpKc, TTrd.
BAXHbIE INPABNIA TEXHnKn B3OpACHOCTN
Ipepepa6otka 6aTapei
BHIMAHNE: ДяЗштбОкржагошсpeдь npepeap60kn materpaioB o6ecnebTe yTININ3aunH6atapen B cIeuaJIbHO OTBeDEHHOM IJRA 3TOrO MeCTe,ecnT TaKoe IMeETcR B BaWei cTpaHe.
OTKINHOHTe 3apJHoe yCTpOCTBO OT CETN,ecn OHO He NcNOb3yETCA.
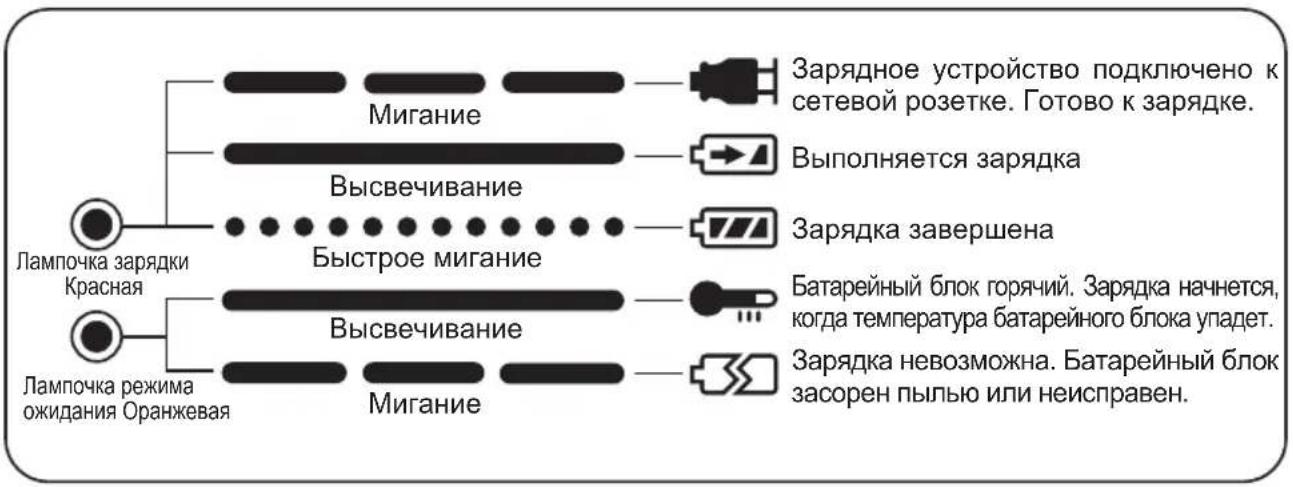
CBETOBbIE INHdNKATOPbI EY0225
EY0230
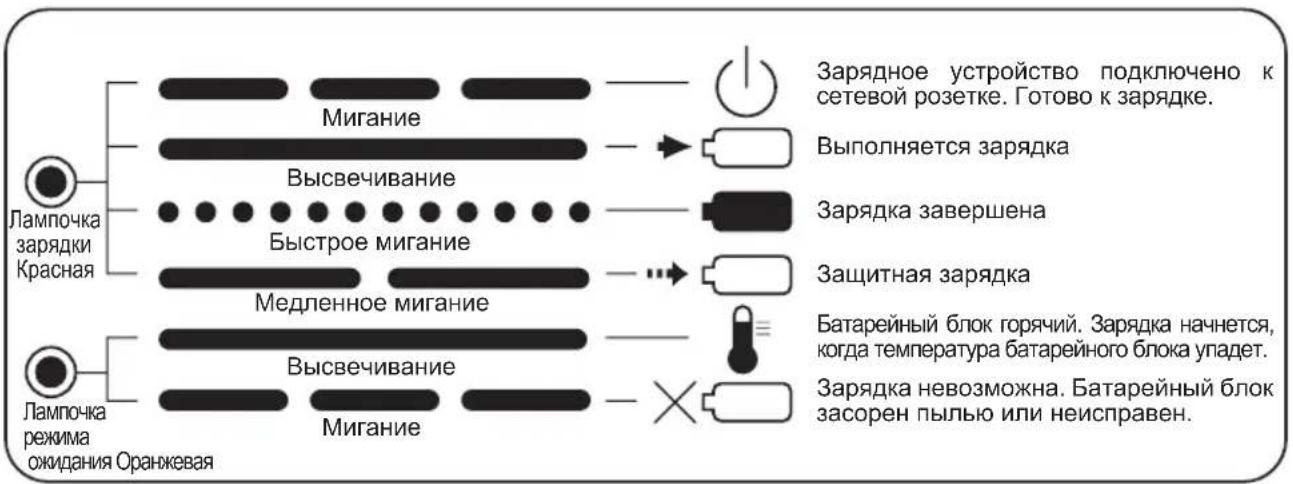
EY0214
TEXHnueCKNE XAPAKTEPNUCTUNK
| Мо德尔 EY0225 EY0230 | EY0214 | ||||
| Вес | 0,6 кг (1,3 Фунта) | 0,83 кг (1,83 Фунта) | |||
| Зелектуеске пaramетры | См. tabличу с пaramетразни на постор的基础上 заю устю CTBA. | ||||
| Верma заряdkи | EY0225: | ||||
| 3,6 V | 2,4 V | Стондэрное врема заряdkи | |||
| EY9025 EY9021 Пр. 6лл. : 15 мIN | |||||
| EY0230: | |||||
| 15,6 V | 12 V | 9,6 V | 7,2 V | Стондэрное врема заряdkи | |
| - | EY9001 EY9006 | EY9080 EY9068 | EY9065 EY9066 | Проблиз.: 20 мIN | |
| - | EY9101 | EY9180 EY9182 | - | Проблиз.: 25 мIN | |
| EY9136 | EY9106 EY9107 EY9108 | - | EY9168 | Проблиз.: 30 мIN | |
| EY9230 | EY9200 | - | - | Проблиз.: 45 мIN | |
| EY0214: | |||||
| 24 V 15 | 6 V 12 V 9,6 V 7,2 V | Стондэрное врема заряdkи | |||
| - | - | EY9001 EY9006 | EY9080 EY9086 | EY9065 EY9066 | |
| - | - | EY9101 | EY9180 EY9182 | - | |
| EY9117 | EY9136 | EY9106 EY9107 EY9108 | - | EY9168 | |
| EY9210 | EY9230 | EY9200 | - | - | |
He 6IokyTe BeHTnIaIHi OTbOpH a3apAnHomy npncTpoI Ta 6aTapeHOMy 6noi.
Biknouitb 3apdHni npncpti BId Mepeki, kUO BiH He BIKOPNCTOBYeTBCr.
CBITJIOBI INDINKATOPN
EY0225
EY0230
EY0214

TEXHIYHI XAPAKTEPNUCTUKN
| Мо德尔 EY0225 EY0230 | EY0214 | |||||
| Bara | 0,6 кг (1,3 Фунтп) | 0,83 кг (1,83 Фунтп) | 1,12 кг (2,47 Фунтп) | |||
| Ельстрини пaramетри | Диь. Табличу 3 пaramетramи на посхил зарядно ристою. | |||||
| Час зарады | EY0225: | |||||
| 3,6 V | 2,4 V | Станданайчac зарады | ||||
| EY9025 | EY9021 Пр. | Блес. : 15 мIN | ||||
| EY0230: | ||||||
| 15,6 V | 12 V | 9,6 V | 7,2 V | Станданайчac зарады | ||
| - | EY9001 EY9006 | EY9080 EY9068 | EY9065 EY9066 | Проблиз.:20 мIN | ||
| - | EY9101 | EY9180 EY9182 | - | Проблиз.:25 мIN | ||
| EY9136 | EY9106 EY9107 EY9108 | - | EY9168 | Проблиз.:30 мIN | ||
| EY9230 | EY9200 | - | - | Проблиз.:45 мIN | ||
| EY0214: | ||||||
| 24 V | 15,6 V | 12 V | 9,6 V | 7,2 V | Станданайчac зарады | |
| - | - | EY9001 EY9006 | EY9080 EY9086 | EY9065 EY9066 | Проблиз.:20 мIN | |
| - | - | EY9101 | EY9180 EY9182 | - | Проблиз.:25 мIN | |
| EY9117 | EY9136 | EY9106 EY9107 EY9108 | - | EY9168 | Проблиз.:30 мIN | |
| EY9210 | EY9230 | EY9200 | - | - | Проблиз.:45 мIN | |
Matushita Electric Works, Ltd.
Osaka, Japan
No.1 EN. GN. FR. IT. ND. ES. DN. SW. NR. FN. RUS. Uk
EY971002304 H1706 Printed in Japan
- GB
- SAFETY INSTRUCTIONS
- Read All Instruction
- 1) SAVE THESE INSTRUCTIONS
- CHARGING THE BATTERY
- EY0230/EY0214:
- ONLY FOR U.K.
- ELECTRICAL PLUG INFORMATION
- FOR YOUR SAFETY PLEASE READ
- THE FOLLOWING TEXT CAREFULLY
- LAMP INDICATIONS
- D
- SICHERHEITSHINWEISE
- BAXHbIE INPABNIA TEXHnKn B3OpACHOCTN
- Ipepepa6otka 6aTapei
- CBETOBbIE INHdNKATOPbI EY0225
- EY0230
- EY0214
- TEXHnueCKNE XAPAKTEPNUCTUNK
- CBITJIOBI INDINKATOPN
- TEXHIYHI XAPAKTEPNUCTUKN
Brand : PANASONIC
Model : EY0225
Category : Battery charger