Diablo 152 - Phone TOPCOM - Free user manual and instructions
Find the device manual for free Diablo 152 TOPCOM in PDF.
User questions about Diablo 152 TOPCOM
0 question about this device. Answer the ones you know or ask your own.
Ask a new question about this device
Download the instructions for your Phone in PDF format for free! Find your manual Diablo 152 - TOPCOM and take your electronic device back in hand. On this page are published all the documents necessary for the use of your device. Diablo 152 by TOPCOM.
USER MANUAL Diablo 152 TOPCOM
This product is in compliance with the essential requirements and other relevant provisions of the R&TTE directive 1999/5/EC.
The Declaration of conformity can be found on :
http://www.topcom.net/support/cedeclarations.php

To use 'Caller ID' (display caller), this service has to be activated on your phone line. If you don't have the Caller ID function on your phone line, the incoming telephone numbers will NOT be shown on the display of your telephone.
Om de 'Nummerweergave' te kunnen gebruiken, moet deze dienst geactiveerd zijn op uw telefoonlijn. Indien U geen nummerweergavefunctie hebt op uw telefoonlijn, zullen de inkomende telefoonnummers NIET op de display van uw toestel verschijnen.
Pour utiliser la fonction 'Caller ID/Clip' (affichage de l'appelant), ce service doit être activé sur votre ligne téléphonique. Si vous n'avez pas la fonction 'Caller ID - Affichage Appellant' sur votre ligne téléphonique, les numéros de téléphone entrants n'apparaîtront PAS sur l'écran
Zur Verwendung der 'Rufnummernanzeige' muss dieser Dienst erst für Ihre Telefonleitung freigegeben werden. Wenn Sie für Ihre Telefonleitung keine Rufnummernanzeigefunktion haben, erscheinen die eingehenden Telefonnummern NICHT im Display Ihres Gerätes.
Para poder usar la función *Identificación de llamadas, este servicio tiene que estar dado de alta en su línea telefónica. Si sullínea telefónica no dispone de la función identificación de llamadas, la pantalla del aparato no mostrará los números de teléfono de las llamadas entrantes.
en "nummervisning" måste tjänsten vara aktiverad för din telefonlinje. Om nummervisningsfunktionen inte finns för din telefonlinje kommer inkommande telefonnummer INTE visas på din telefons display.
For at kunne anvende "Caller ID" (gengivelse af opkalderens nummer) skal denne tjeneste først aktiveres på Deres telefonlinie. Hvis De ikke råder over en Caller ID-anordning på Deres telefonlinie, vises opkalderens telefonnummer IKKE på displayet på Deres apparat.
Før du kan bruke funksjonen "Hvem ringer" må denne service aktiveres på din telefonlinje. Dersom du ikke har funksjonen "Hvem ringer" på di n telefonlinje, vil IKKE telefonnummeret til anropet som kommer inn vises på skiermen.
Voidaksesi käyttää soittajan numeron näyttötoimintoa (Caller ID), tämä palvelu on aktivoltava puhelinlinjaasi. Ellel sinulla ole soittajan numeron näyttötoimintoa puhelinlinjassasi, soittajan numero el näy puhelimen näytössä.
sul display del proprio telefono. In caso di chiamata entrante, suona soltanto il ricevitore e non la base.
Para utilizar a função "ID Chamador" (visualizar Chamador), este serviço terá de ser activado na sua linha telefónica. Se não tiver contratado este serviço a função ID do Chamador não estará disponível e por isso os números de telefone das chamadas entrantes não
Για να χρησιμοποιήσετε την υπηρεσία αναγνώρισης κλήσεων, πρέττει η υπηρεσία αυτή να έχει ενεργοποιθεί στην τηλεφωνική γραμμή σας. Εάν δεν Έχετε ενεργοποιήσει στη γραμμή σας την υπηρεσία αναγνώρισης κλήσεων, ΛΕ θα εμφανζονται οι αριθμοί των εισερχόμενων
да се изписват на дисплея на Вашия телефон.
Dúležité upozornění
Akvsta mohlinovákuť svýby „identifikace volsířídhoř /složané (volsířídho) – musítá svíjna svut telefremi lízne aktivovat. Pálvud na svut
Abyste mori podzivat službu identifikace volajícího (zobrazeni volajícího), fi telefonpi lince funkci identifikace volajícího pemáte. NEBUDOU se telefon
Ahhoz hogy használhassa a hívóazonosítót, előbb aktiválni kell ezt a szolgáltatást az Ön telefonvonalán. Ha az Ön telefonvonalán nem él a hívóazonosító funkció, a beérkező hívásokhoz tartozó telefonszámok NEM Jelennek meg az Ön készülékének kijelzőjén.
aby urządzenie prezentowało numer przychodzący, niezbędna jest ustuga prezentacji numeru. Jeżeli ustuga prezentacji numeru nie jest
Pentru a putea utiliza serviciul de identificare a apelantului (afișarea apelantului), acesta trebuie activat pe linia dvs. telefonica. Dacă
a dvs. de telefon, numâr
Для использования режима "Определитель номера" (показывает номер звоящего), данная услуга должна быть активирована на Вашей телефонной линии. Если данный вид услуги не активирован на линии, то номера входящих звонков НЕ будут отображаться
на Вашем аппарате.
Dôležité
Pre použivanie 'Caller ID' (zobrazenie čisla volajúceho), musite túto službu aktiv
linke funkciu Caller ID nemáte, prichádzajúce telefónne čísla sa vám na displeji telefónu NEZOBRAZIA.
'Caller ID' (aravani gösterme) bizmetinden vararlanabilmek için telefon hattında bu servisin etkinlesterilmis olması gere
hattinizda Caller ID fonksiyonu yoksa, gelen telefon numaralari telefonunuzun ekranında GÖSTERILMEZ.
Important
To use 'Caller ID' (display caller), this service has to be activated on your phone line. If you don't have the Caller ID function on your phone line, the incoming telephone numbers will NOT be shown on the display of your telephone.
Om de 'Nummerweergave' te kunnen gebruiken, moet deze dienst geactiveerd zijn op uw telefoonlijn. Indien U geen nummerweergavefunctie hebt op uw telefoonlijn, zullen de inkomende telefoonnummers NIET op de display van uw toestel verschijnen.
Pour utiliser la fonction 'Caller ID/Clip' (affichage de l'appelant), ce service doit être activé sur votre ligne téléphonique. Si vous n'avez pas la fonction 'Caller ID - Affichage Appellant' sur votre ligne téléphonique, les numéros de téléphone entrants n'apparaîtront PAS sur l'écran
Zur Verwendung der 'Rufnummernanzeige' muss dieser Dienst erst für Ihre Telefonleitung freigegeben werden. Wenn Sie für Ihre Telefonleitung keine Rufnummernanzeigefunktion haben, erscheinen die eingehenden Telefonnummern NICHT im Display Ihres Gerätes.
Para poder usar la función *Identificación de llamadas, este servicio tiene que estar dado de alta en su línea telefónica. Si sullínea telefónica no dispone de la función identificación de llamadas, la pantalla del aparato no mostrará los números de teléfono de las llamadas entrantes.
en "nummervisning" måste tjänsten vara aktiverad för din telefonlinje. Om nummervisningsfunktionen inte finns för din telefonlinje kommer inkommande telefonnummer INTE visas på din telefons display.
For at kunne anvende "Caller ID" (gengivelse af opkalderens nummer) s
Viktig
Før du kan bruke funksjonen "Hvem ringer" må denne service aktiveres på din telefonlinje. Dersom du ikke har funksjonen "Hvem ringer"
pa di m telechinenje, VI IRKE telefonnumineret til anfropet som kümmler inn vises på skjernien.
Türkegä
Voidaksesi käyttää soittajan numeron näyttötoimintoa (Caller ID), tämä palvelu on aktivoltava puhelinlinjaasi. Ellei sinulla ole soittajan numeron näyttötoimintoa puhelinlinjassasi, soittajan numero el näy puhelimen näytössä.
er utilizzare la funzione „Caller ID" (visualizzazione chiamante), è necessario che questo servizio sia attivato sulla propria linea telefonica.
sul display del proprio telefono. In caso di chiamata entrante, suona soltanto il ricevitore e non la base.
Para utilizar a função "ID Chamador" (visualizar Chamador), este serviço terá de ser activado na sua linha telefónica. Se não tiver contratado este serviço a função ID do Chamador não estará disponível e por isso os números de telefone das chamadas entrantes não
Για να χρησιμοποιήσετε την υπηρεσία αναγνώρισης κλήσεων, πρέτει η υπηρεσία αυτή να έχει ενεργοποιηθεί στην τηλεφωνική γραμμή σας. Εάν δεν Έχετε ενεργοποιήσει στη γραμμή σας την υπηρεσία αναγνώρισης κλήσεων, ΛΕ θα εμφανίζονται οι αριθμοί των εισερχόμενων
За да можете да изполавате функцията "Caller ID" (идентификация на повикването), тази услуга трябва да е активирана за Вашата
да се изписват на дисплея на Вашия телефон.
Dúležité upozornění
Akvsta mohlinovákuť svýby „identifikace volsířídhoř /složané (volsířídho) – musíte si jinnu svut telefremi lízne aktivovat. Pálvud os vyt
Abyste mioni podzivat službu identifikace volajícího (zobrazení volajícího), musite si ji na sve telefonii finice aktivovat. Pokdu na sve telefonji lince funkci identifikace volajícího pemáte. NEBUDOU se telefonní čísla příchozích, hovorů na displeji vašeho telefonu
Ahhoz hogy használhassa a hívóazonosítót, előbb aktiválni kell ezt a szolgáltatást az Ön telefonvonalán. Ha az Ön telefonvonalán nem él a hívóazonosító funkció, a beérkező hívásokhoz tartozó telefonszámok NEM Jelennek meg az Ön készülékének kijelzőjén.
Uwaga
Aby uznadzania przestawala numerarzuchadzany, niezhodna jest uluga przestacji numeru, leżeli uluga przestacji numeru nie jest
ner przychodzący, niezbećna jest usługa prezentacji numiera: senza usługa prezentacji numiera nie jest włączona, numery przychodzących połączeń nie beda prezentowane.
Important
Pentru a putea utiliza serviciul de identificare a apelantului (afișarea apelantului), acesta trebuie activat pe linia dvs. telefonica. Dacă
funția de identificare a apelantului nu exista pe linia ovs. de telefon, numarul de la care primiți apelor NO va fi indicat pe ecranul telefonului.
показывает номер звон
активирован на линии
на Вашом аппарато
Dôležité
Pre použivanie 'Caller ID' (zobrazenie čisla volajúceho), musite túto službu aktivovat' na svojej telefonnej linke. Pokial' na svojej telefonnej
Inike linkoid caller ID hemate, prichadzajuce telefonine cisią sa varii na dispieji telefonu NEZOBRAZIA.
Önomli
arayani gösterme) hizmetinden yararlanabilmek için, telefon hattında bu servisin etkinlestirilmis olması gerekir. Telefon hattinizda Caller ID fonksiyonu yoksa, gelen telefon numaralari telefonunuzun ekranında GÖSTERILMEZ.
Important
To use 'Caller ID' (display caller), this service has to be activated on your phone line. If you don't have the Caller ID function on your phone line, the incoming telephone numbers will NOT be shown on the display of your telephone.
Om de 'Nummerweergave' te kunnen gebruiken, moet deze dienst geactiveerd zijn op uw telefoonlijn. Indien U geen nummerweergavefunctie hebt op uw telefoonlijn, zullen de inkomende telefoonnummers NIET op de display van uw toestel verschijnen.
Pour utiliser la fonction 'Caller ID/Clip' (affichage de l'appelant), ce service doit être activé sur votre ligne téléphonique. Si vous n'avez pas la fonction 'Caller ID - Affichage Appellant' sur votre ligne téléphonique, les numéros de téléphone entrants n'apparaîtront PAS sur l'écran
Wichtig
Zur Verwendung der 'Rufnummernanzeige' muss dieser Dienst erst für Ihre Telefonleitung freigegeben werden. Wenn Sie für Ihre Telefonleitung keine Rufnummernanzeigefunktion haben, erscheinen die eingehenden Telefonnummern NICHT im Display Ihres Gerätes.
Para poder usar la función *Identificación de llamadas, este servicio tiene que estar dado de alta en su línea telefónica. Si sullínea telefónica no dispone de la función identificación de llamadas, la pantalla del aparato no mostrará los números de teléfono de las llamadas entrantes.
Viktigt
För att använda funktionen "nummervisning" måste tjänsten vara aktiverad för din telefonlinje. Om nummervisningsfunktionen inte finns för din telefonlinje kommer inkommande telefonnummer INTE visas på din telefons display.
For at kunne anvende "Caller ID" (gengivelse af opkalderens nummer) skal denne tjeneste først aktiveres på Deres telefonlinie. Hvis De ikke råder over en Caller ID-anordning på Deres telefonlinie, vises opkalderens telefonnummer IKKE på displayet på Deres apparat.
Før du kan bruke funksjonen "Hvem ringer" må denne service aktiveres på din telefonlinje. Dersom du ikke har funksjonen "Hvem ringer"
pa ürl telechimje, VII IRKE telechnummieret ürl anriopet som kümmer im Vises pa skjernih. Tärkeää
Voidaksesi käyttää soittajan numeron näyttötoimintoa (Caller ID), tämä palvelu on aktivoltava puhelinlinjaasi. Ellei sinulla ole soittajan numeron näyttötoimintoa puhelinlinjassasi, soittajan numero el näy puhelimen näytössä.
er utilizzare la funzione „Caller ID" (visualizzazione chiamante), è necessario che questo servizio sia attivato sulla propria linea telefonica.
sul display del proprio telefono. In caso di chiamata entrante, suona soltanto il ricevitore e non la base.
função "ID Chamador" (visualizar Chamador), este serviço terá de ser activado na sua linha telefónica. Se não liver
aparecerão no seu telefone.
Σημαντικό
πιν να χρηστοποίσε την υπηρεσία αναγνώρισης κλήσεων, πρείτετη οπηρεσία συή να εχει ενεργοποίσει συήν ιμεφωνική γραμμή σας. Εάν δεν έχετε ενεργοποίσει στη γραμμή σας την υπηρεσία αναγνώρισης κλήσεων, ΛΕ θα εμφανίζονται οι αριθμοί των εισερχόμενων
κλήσεων στην οθόνη του τηλεφώνου σας.
Важно
За да можете до исполните функцията "Caller ID" (идентификация на деликраноте), таси услуго тябъва да о актирирена за Решета
телефонна линия. В случай, че Вашата телефонна линия не поддържа функцията "Caller ID", входящите телефонни номера НЯМА
да се изписват на дисплея на Вашия телефон.
Důležité upozornění
Akvsta mohlinovákuť svýby „identifikace volsířídhoř /složané (volsířídho) – musítá svíjna svú telafropiční klas aktívovat. Děkud na svú
Abyste mioni podzivat službu identifikace volajícího (zobrazení volajícího), musite si ji na sve telefonii finice aktivovat. Pokdu na sve telefonji lince funkci identifikace volajícího pemáte. NEBUDOU se telefonní čísla příchozích, hovorů na displeji vašeho telefonu
zobrazovat.
Fontos
Anhoz hogy hasznalnassa a hivozonosító, elobb aktivalni kell ezt a szolgáltatast az On telefonvohalan. Ha az On telefonvohalan hem el a hivozonosító funkció, a beérkező hivásokhoz tartozó telefonszámok NEM lelennek meg az Ön készülékének kijelzőlén
Uwaga
Aby urządzenie prezentowało numer przychodzący, niezbędna jest ustuga prezentacji numeru. Jeżeli ustuga prezentacji numeru nie jest
wiączona, numery przychodzących połączeń nie będą prezentowane.
Important
de identificare a apolantului (afiezas apolantului), ascerta trebuie activat na linin dva, telefania. Das
Fentru a patea utiliză servicii de identificare a apelantului (anşarea apelantului), acesta trebuie activat pe limia dvs. telefonica. Daca
functia de identificare a apelantului nu există, pe linja dvs. de telefon, pumărul de la care primiti apelul NU va fi indicat pe ecranul
telefonului.
Важная информация
Для использования режима "Определитель номера" (показывает номер звонящего), данная услуга должна быть активирована на Вашей телефонной пинии. Боди данный вид услуги на активированы на пинии, то номера вределяющих запасов НБ будут отображаться
Вашей телефонной линии. Если данный вид услуги не активирован на линии, 10 номера входящих звонков НЕ будут отображаться на Вашем аппарате.
Dôležité
Pre použivanie 'Caller ID' (zobrazenie čisla volajúceho), musite túto službu aktivovat' na svojej telefonnej linke. Pokial' na svojej telefonnej
Inke funkciu Caller ID hemate, prichadzajuce telefonine cista sa vani na displeji telefonu NEZOBRAZIA. Önemli
'Caller ID' (arayani gösterme) hizmetinden vararlanabilmek için, telefon hattında bu servisin etkinlesterilmis olması gerekir. Telefon
text_image
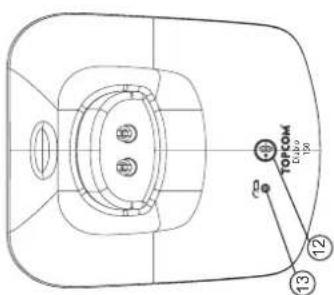
TOPCOM Dubo 190
text_image
TOPCOM ① ② ③ ④ ⑤ ⑥ ⑦ ⑧ ⑨ ⑩ ⑪ ⑫ ⑬ ⑭ ⑮ ⑯ ⑰ ⑱ ⑲ ⑳ ㉑ ㉒ ㉓ ㉔ ㉕ ㉖ ㉗ ㉘ ㉙ ㉚ ㉛ ㉜ ㉝ ㉞ ㉟ ㉳ ㉟ ㉟a ㉟b ㉟c ㉟d ㉟e ㉟f ㉟g ㉟h ㉟i ㉟j ㉟k ㉟l ㉟m ㉟n ㉟o ㉟p ㉟q ㉟r ㉟s ㉟t ㉟u ㉟v ㉟w ㉟x ㉟y ㉟z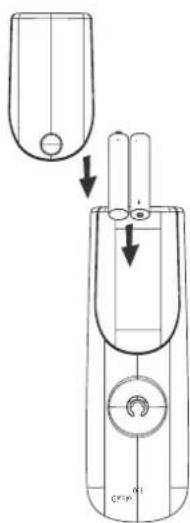
natural_image
Technical line drawing of a mechanical component with internal components and directional arrows (no text or symbols)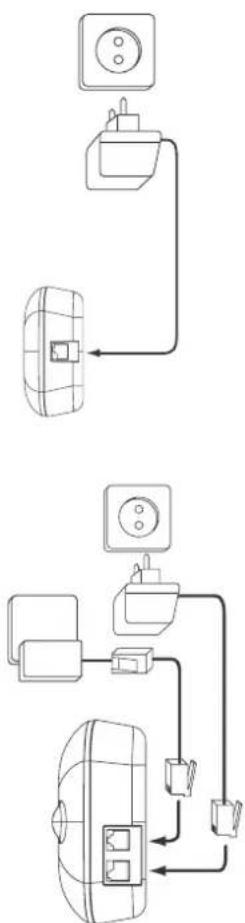
text_image
Diagram showing two electrical connections: one with a dome-shaped device and connected to a power outlet, and another with a grid-patterned appliance connected to an electrical outlet.Technical Data
Wichtig
Viktigt
importante
Σημαντικό
Range: up to 300 m in open space
up to 50 m in buildings
Dialling options: DTMF (tone) and Pulse
Batteries: 2 x 1.2V, 550 mAh AAA Type NiMH rechargeable
Max. standby time: approx. 100 hours
Max. talk time: 10 hours
Ambient temperature: +5 °C to +45 °C
Permitted relative air humidity: 25 to 85 %
Power supply base adapter: 220/230V, 50 Hz
Memories 10 indirect with max. 25 digits
text_image
TOPCOM
text_image
Technical diagram of a handheld device with labeled parts and directional arrows indicating process flow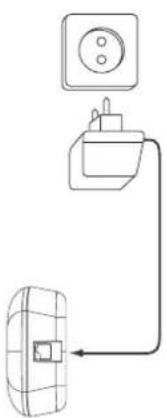
natural_image
Simple line drawing of a wall-mounted electrical outlet connected to a grid-patterned device (no text or symbols)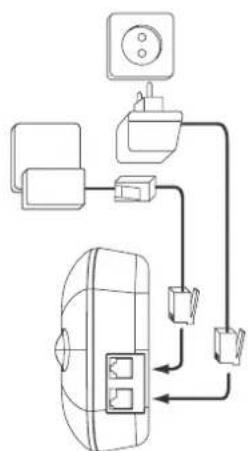
flowchart
graph TD
    A["Air Conditioner"] --> B["Control Panel"]
    B --> C["Wall-mounted Unit"]
    C --> D["Control Panel"]
    D --> E["Return Line"]
    style A fill:#f9f,stroke:#333
    style B fill:#ccf,stroke:#333
    style C fill:#cfc,stroke:#333
    style D fill:#fcc,stroke:#333
    style E fill:#ffc,stroke:#333
NEDERLANDS
5.1.2 Call setup with dial preparation
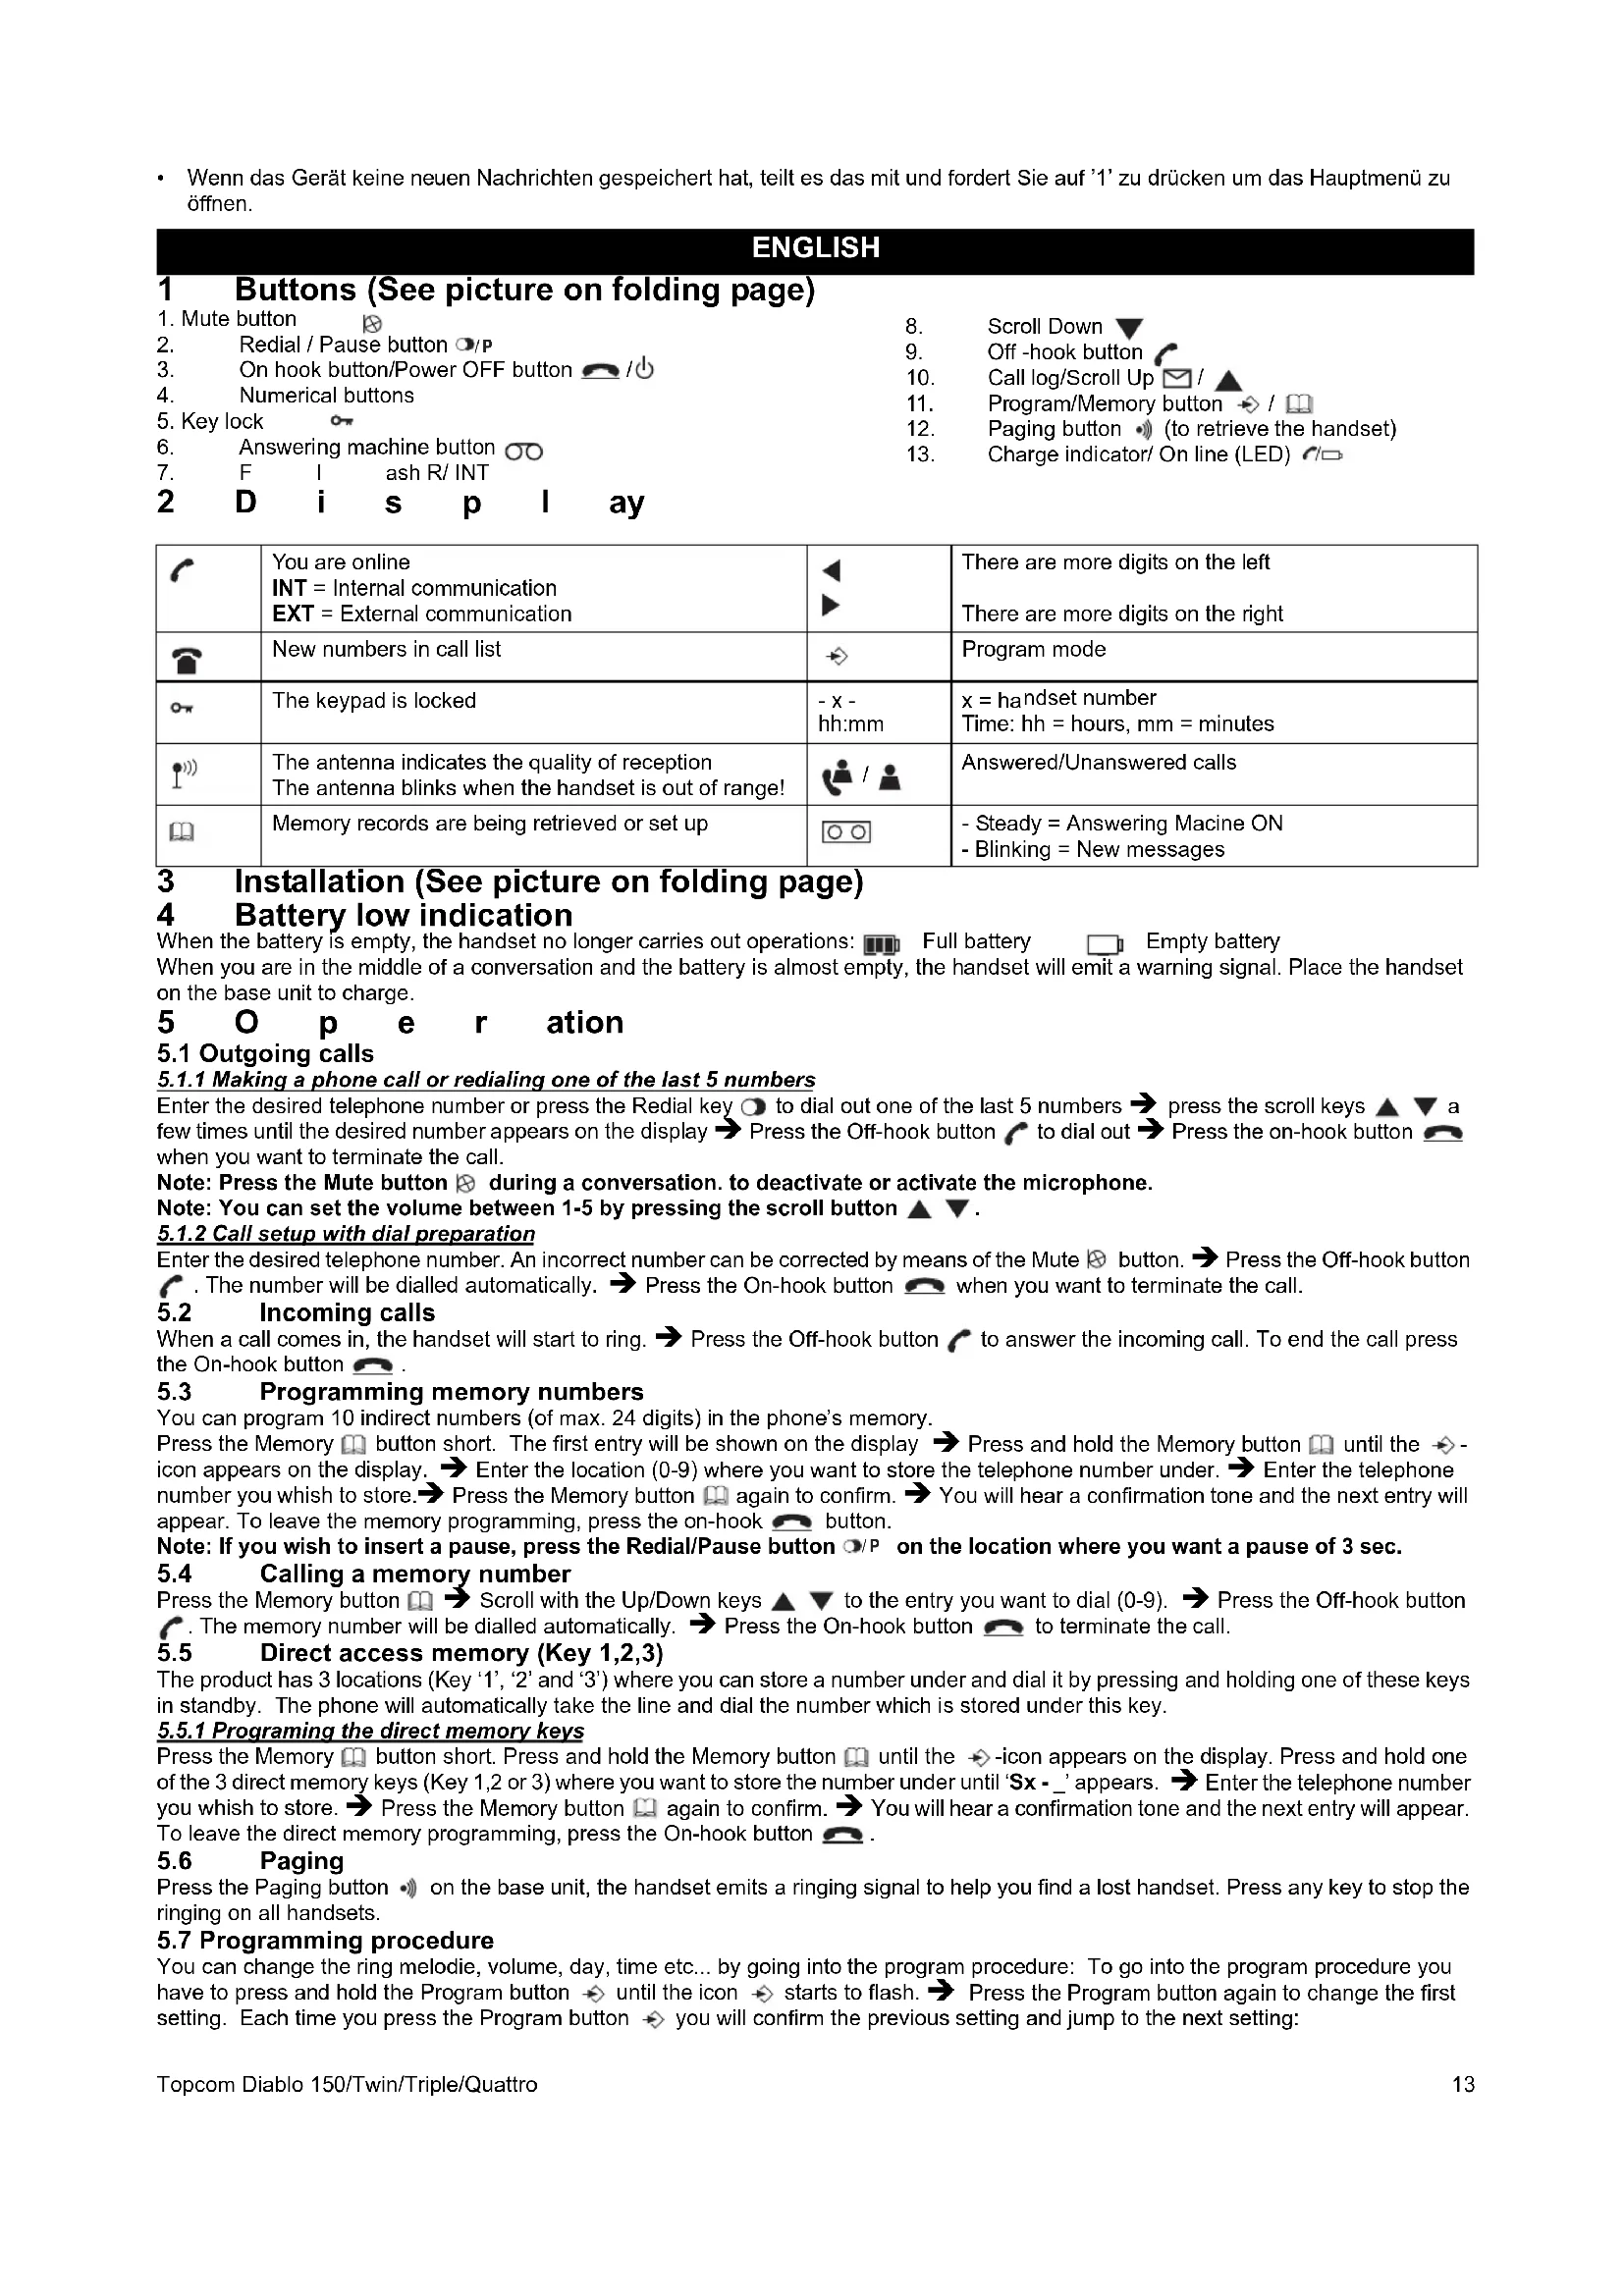
1 Buttons (See picture on folding page)
| 1. Mute button | ⊗ | 8. | Scroll Down ▼ | |
| 2. Redial / Pause button ○/P | 9. | Off -hook button | ||
| 3. On hook button/Power OFF button 📄/⏻ | 10. | Call log/Scroll Up ☑/ ▲ | ||
| 4. Numerical buttons | 11. | Program/Memory button ➕/ 📋 | ||
| 5. Key lock | ○ | 12. | Paging button ➕ (to retrieve the handset) | |
| 6. Answering machine button ○○ | 13. | Charge indicator/ On line (LED) ↗/□ | ||
| 7. F I ash R/ INT | ||||
| 2 D i s p l ay |
| You are onlineINT = Internal communicationEXT = External communication | There are more digits on the leftThere are more digits on the right | ||
| New numbers in call list | Program mode | ||
| The keypad is locked | - x -hh:mm | x = handset numberTime: hh = hours, mm = minutes | |
| The antenna indicates the quality of receptionThe antenna blinks when the handset is out of range! | Answered/Unanswered calls | ||
| Memory records are being retrieved or set up | - Steady = Answering Macine ON- Blinking = New messages |
3 Installation (See picture on folding page)
4 Battery low indication
When the battery is empty, the handset no longer carries out operations: Full battery Empty battery When you are in the middle of a conversation and the battery is almost empty, the handset will emit a warning signal. Place the handset on the base unit to charge.
5 O p e r ation
5.1 Outgoing calls
5.1.1 Making a phone call or redialing one of the last 5 numbers
Enter the desired telephone number or press the Redial key ⚙ to dial out one of the last 5 numbers → press the scroll keys ▲ ▼ a few times until the desired number appears on the display → Press the Off-hook button ↗ to dial out → Press the on-hook button 📞 when you want to terminate the call.
Note: Press the Mute button ✉ during a conversation. to deactivate or activate the microphone.
Note: You can set the volume between 1-5 by pressing the scroll button ▲ ▼.
5.1.2 Call setup with dial preparation
Enter the desired telephone number. An incorrect number can be corrected by means of the Mute ☒ button. → Press the Off-hook button ↗ . The number will be dialled automatically. → Press the On-hook button 📞 when you want to terminate the call.
5.2 Incoming calls
When a call comes in, the handset will start to ring. → Press the Off-hook button ↗ to answer the incoming call. To end the call press the On-hook button 🔔.
5.3 Programming memory numbers
You can program 10 indirect numbers (of max. 24 digits) in the phone's memory.
Press the Memory 📊 button short. The first entry will be shown on the display → Press and hold the Memory button 📊 until the → -icon appears on the display. → Enter the location (0-9) where you want to store the telephone number under. → Enter the telephone number you whish to store. → Press the Memory button 📊 again to confirm. → You will hear a confirmation tone and the next entry will appear. To leave the memory programming, press the on-hook 📊 button.
Note: If you wish to insert a pause, press the Redial/Pause button ☐/P on the location where you want a pause of 3 sec.
5.4 Calling a memory number
Press the Memory button 📄 → Scroll with the Up/Down keys ▲ ▼ to the entry you want to dial (0-9). → Press the Off-hook button ⬇. The memory number will be dialled automatically. → Press the On-hook button 🔔 to terminate the call.
5.5 Direct access memory (Key 1,2,3)
The product has 3 locations (Key '1', '2' and '3') where you can store a number under and dial it by pressing and holding one of these keys in standby. The phone will automatically take the line and dial the number which is stored under this key.
5.5.1 Programming the direct memory keys
Press the Memory 📁 button short. Press and hold the Memory button 📁 until the ➔ -icon appears on the display. Press and hold one of the 3 direct memory keys (Key 1,2 or 3) where you want to store the number under until 'Sx - _' appears. ➔ Enter the telephone number you whish to store. ➔ Press the Memory button 📁 again to confirm. ➔ You will hear a confirmation tone and the next entry will appear. To leave the direct memory programming, press the On-hook button 📁.
5.6 Paging
Press the Paging button • on the base unit, the handset emits a ringing signal to help you find a lost handset. Press any key to stop the ringing on all handsets.
5.7 Programming procedure
You can change the ring melodie, volume, day, time etc... by going into the program procedure: To go into the program procedure you have to press and hold the Program button until the icon starts to flash. Press the Program button again to change the first setting. Each time you press the Program button you will confirm the previous setting and jump to the next setting:
External ring volume/melody → Internal ring volume/melody → Date/time setting → Dial mode setting → Flash time setting → Base ring volume/melody
5.7.1 Handset External/Internal melody and volume
Press and hold the Program button until the icon starts to flash. Press the Program button again, the external melody is heard and the EXT-icon is flashing. Select the desired melody (1-5) by entering a number (1 - 5). Use the scroll keys ▲▼ to select the desired volume (Off or 1-5) Press again to confirm the setting and to go to internal melody and volume (same as above).
5.7.2 Date time setting
DD-MM HH:MM (DD= day, MM=month, HH=houre and MM=minutes)
Enter the date and time using the number key. The flashing cursor can be moved by the scroll keys ▲ ▼ . ➞ Press ➞ again to confirm the setting and to go to the next setting below.
5.7.3 Setting the Dial mode
There are two types of dialling mode: -1 - DTMF/Tone dialling (the most common) (default) OR -2 - Pulse dialling (for older installations). Press '1' or '2' and press again to confirm the setting and to go to the next setting below.
5.7.4 Setting the Flash time
There are two flash times: -1 - 100ms OR -2 - 250 ms
Press '1' or '2' and press again to confirm the setting and to go to the next setting below.
5.7.5 Base melody and volume
The base ringer is heard. Select the desired melody (1-5) by entering a number (1 - 5). Use the scroll keys ▲ ▼ to select the desired volume (Off or 1-5) Press again to confirm the setting and to go back to standby.
5.8 Keypad lock
When the keypad is locked, pressing any key will have no effect during standby (except holding the o* key). Press and hold the o* key. → o* appears on the display and the keypad is locked. → Press twice the o* key again to un-lock the keypad.
5.9 Turning handset ON/OFF
Press ⏻ and hold to turn off. Press ⏻ for 2 seconds to turn back ON.
6 Caller-ID function (Display the telephone number of incoming calls)
This function is only possible if you are subscribed to a telephone operator that provides this service. When you receive a call, the numbers are saved in a Call list. This list can hold 10 telephone numbers (each of max. 20 digits). When you've received a new unanswered call, the CLIP symbol will blink on the display.
6.1 Consulting the Call list
Press the Call Log button ☑. The last received call is shown on the display. If the list is empty, '----' is shown on the display. For answered calls the -icon appears and unanswered calls the -icon appears → Press the program → key to show the other digits (if longer then 12) or to show the date and time. → Use the scroll keys ▲▼ to scroll to the previous call. When you reach the top or bottom of the list an error tone will be sounded → You can leave the Call list by pressing the on-hook button. You can dial out the number by pressing the Off-hook button ↗.
7 Answering machine
The Diablo has a built-in digital answering machine with a recording capacity of 11 min. The answering machine can be operated from the handset and remotely. It features the possibility of recording two outgoing messages (OGM 1 and OGM 2) (maximum of 3 min).
There are 2 possibilities:
- With OGM 1, the caller has the possibility to leave a message
• With OGM 2, only the outgoing message is given without the caller having the opportunity to leave a message
An internal voice will state various information, such as day and time of the call, as well as settings such as Security code, ringer tones,... The language of the internal voice is depending from the country sold (English or German).
The max. recording time for each incoming message = 2 min.
7.1 Display
The TAM icon 📄 will appear when the answering machine is turned ON. It's starts flashing if new messages have been received (regardless of the answering ON/OFF mode). If the answering machine is switched Off, the 📄 icon will not appear.
The icon will flash fast if the internal memory is full and no new messages can be recorded.
When entering the answering machine mode (see below) the display will show the following if:
- If no new messages are received: '----' and a flashing ○○ -icon.
- If new messages are received the unit will start playing the messages and show '-NN- -MM-'. NN = total of messages and MM= number is message currently played.
7.2 Entering the Answering controle mode
To start operating the answering machine you have to press the answering machine key ☐. If you have new messages the messages will be played to the handset. If all new messages are played the new messages can be deleted if ☐ is pressed within 8 seconds of the end of the last message.
To leave the answering controle mode, press the ⬤-key again. In no instruction is received for 8 seconds, the unit shall return to idle. Following functions are available under each numerical key:
| ‘1’ | To hear main menu |
| ‘2’ | Play all messages ▶ |
| ‘3’ | Play new messages ▷ |
| ‘4’ | Skip back during message playback ◀◀ |
| ‘5’ | Deleting messages ∅ |
| ‘6’ | Skip forward during message playback ▶▶ |
| ‘7’ | Set answer On or Off |
| ‘8’ | Hear the outgoing message menu 📊 |
| ‘9’ | To set the security code |
| ‘0’ | To set the day |
| ‘*’ | Set the answering delay |
| ‘#’ | To record a memo ▼ |
7.2.1 Turning Answering Machine On/Off
If the answering machine is On, the -Icon appear on the display in standby (or blink when there are new messages) and the machine will automatically pick up the line after a number of rings (§ 7.2.2). To turn it On or Off, press '7'.
Even if the answering machine is Off, it will automatically pick up after 10 rings to enable remote activation (§ 7.4)
7.2.2 Setting Number of Rings
The number of rings after which the answering machine will answer calls can be set from
2 – 9 and TS (Toll saver). The standard setting is 6 rings. In Toll saver mode, the machine will answer after 6 rings if there are no new messages, and after 2 rings if there are new messages. If there are no new messages and you call your machine to check your messages remotely ( § 7.4 ), you can hang up after the 2nd ring. You do not need to pay connection fees and you know that you do not have any new messages.
To check the actual number of rings, press the “*-key twice. A voice will playback the current number of rings.
Press the '*' key followed by the '#-key to set the number of ringing tones. Enter the number of ring you want (2-9) or press '1' for Toll saver.
7.2.3 Day setting
Press '0' followed by '*' to hear the actual day.
Press '0' followed by '#' to set the day. Enter the day '1= Sunday, 2= Monday...7= Saturday'
If the day is correctly entered, the unit will announce the new setting.
7.2.4 Memory Full
If the memory is full, the answering ON/OFF icon will flash on the display rapidly (0.5 sec.
ON/OFF). If the answering machine is turned On and a call comes in, the machine will automatically play OGM 2 (answering machine function without recorded caller message).
When listening to the messages, the internal voice will announce that the memory is full and then play back the messages.
Erase some or all the messages after listening to them. The memory is free again.
7.2.5 Programming the security Code
The security code is a 3-digit code used to operate the machine remotely ( § 7.4 ). The security code is set to '123' by default. You can hear the current security code by entering '9' followed by the '#'-key.
To set a new security code press '9' + '*'. Enter the new code (3 digits) after the tone and confirm with the '#'-key.
7.2.6 Recording and selecting a Outgoing message
Press '8' to enter the outgoing message menu. The following options are available:
'1' To hear main menu
'2' To play current set OGM
'3' To record OGM 1
'4' To record OGM 2
'5' To select OGM 1
'6' To select OGM2
'8' To hear OGM menu again
7.3Operation
If a call is received and the answering machine is turned ON, the answering machine will automatically answer the call after the set number of rings. If outgoing message 1 has been selected, the message will be played, a beep will be heard and the caller can leave a message (max. 3 minutes). If outgoing message 2 has been selected, after the beep, the line will automatically be disconnected. The caller doesn't have the possibility to leave a message.
Note: If, during pick-up, nothing is said for 8 seconds, the line will be automatically disconnected.
7.3.1 Call screening
This function is convenient if you only want to answer certain calls. During incoming call it is possible to screen the call and hear who is calling. You can hear the outgoing message and the caller who is leaving a message by pressing the Answering machine key....
7.3.2 Recording a Memo
A memo is considered as an incoming message that can be picked up later by the user. The max. recording time for a memo is 3 minutes. Press the Answering machine key 📄 and 📋. Start speaking after the tone and press “#” to stop the recording.
7.3.3 Playback of Incoming Messages and Memos
Press the Answering machine key to enter the Answering mode.
Press ▶ to play all the messages and memos.
Press ▷ to play only the new messages and memos.
For each message, the internal voice announce the day and time when the message was recorded.
During playback, you can:
Go to the beginning of the current message by pressing ◀ once.
Go to the previous message by pressing ◀ twice.
Interrupt playback by pressing ▶. Press ▶ again to restart playback.
Go to the next message by pressing ▶.
7.3.4 Deleting Messages
a. Deleting one by one during playback
Start message playback as explained above.
During playback of the message to be erased starts, press ∅.
The machine will start playing the next message.
b. Deleting all messages
After you have listened to all messages, the internal voice will ask you to delete all the messages.
Press ∅ to confirm. After pressing delete, the internal voice confirms that all the messages have been deleted.
7.4 Remote operation
The answering machine can be operated remotely using a touch-tone phone (DTMF tone selection system).
The remote control is menu operated.
7.4.1 To enter the remote operation
- Call your machine.
• The answering machine picks up the line, you hear the outgoing message and a beep.
• After the beep, press “*” long. The unit will ask to enter the VIP code.
• Slowly dial the Security code (default 123).
- If the Security code is incorrect, the unit will confirm and ask you to re-enter. If the Security code is correct and the unit has new messages, it will start to pronounce the amount of new messages an also play them. When all messages are played, the unit will ask you to press '5' to delete current played messages, or '1' to hear main menu.
- If the unit doesn't have any new messages, it will say so and ask you to press '1' for main menu.