
Coach Entertainment TV Tuner 04 - TV Tuner BLAUPUNKT - Free user manual and instructions
Find the device manual for free Coach Entertainment TV Tuner 04 BLAUPUNKT in PDF.
| Product type | TV tuner for leisure vehicle (caravan, motorhome) |
| Brand | Blaupunkt |
| Model | Coach Entertainment TV Tuner 04 |
| Dimensions (W×D×H) | 207 × 132 × 30 mm |
| Weight | 650 g |
| Operating voltage | 12 V / 24 V DC |
| Current consumption | 0.6 A |
| Operating temperature | -20 °C to +70 °C |
| Storage temperature | -40 °C to +85 °C |
| Supported TV standards | PAL, SECAM, B/G, L/L', I, D/K, cable |
| Number of storable stations (terrestrial) | 70 |
| Number of storable stations (cable) | 56 |
| Video output level | 1 Vss / 75 ohms (Cinch) |
| Audio output level (adjustable) | 1.3 V typ. (FM 1 kHz, 30 kHz) |
| Video input level | 1 Vss / 75 ohms (Cinch) |
| Audio input level | 3 V max (Rin > 10 kohms) |
| Connections | A/V outputs (audio L/R, video), A/V input, TV antenna, Molex 3/4/6 pin, 2.5 mm IR jack, separate IR receiver |
| Main functions | Auto search, Travelstore, manual memorization, fine tuning, IR remote control, OSD menu, TV/video switching, mute, output level adjustment |
| Care and cleaning | Clean with a soft dry cloth. Avoid moisture and abrasive products. |
| Safety | Do not use while driving if distraction is dangerous. Adjust volume to stay alert to emergency signals. |
| Spare parts and repairability | Contact the Blaupunkt dealer or after-sales service for parts and repairs. |
| Warranty | Manufacturer warranty for products sold in the EU. Details at www.blaupunkt.de |
Frequently Asked Questions - Coach Entertainment TV Tuner 04 BLAUPUNKT
User questions about Coach Entertainment TV Tuner 04 BLAUPUNKT
0 question about this device. Answer the ones you know or ask your own.
Ask a new question about this device
Download the instructions for your TV Tuner in PDF format for free! Find your manual Coach Entertainment TV Tuner 04 - BLAUPUNKT and take your electronic device back in hand. On this page are published all the documents necessary for the use of your device. Coach Entertainment TV Tuner 04 by BLAUPUNKT.
USER MANUAL Coach Entertainment TV Tuner 04 BLAUPUNKT
TV Tuner 04 7607276015
Bedienungs- und Einbauanleitung
Operating and installation instructions
Notice d'emploi et de montage
Instrucciones de manejo e instalacion
Instruções de service e de montagem
Istruzioni d'uso e di installmente
Kullanma ve montaj kilavuzu
Gebruiksaanwijzing en inbouwhandleiding
Betjenings- og monteringsvejledning
Bruks- och monteringsanvisning
Käytö- ja asennusohje
Instrukcja obstugi i montazu

www.blaupunkt-professional-systems.com

Tonfrequenz: 6,0 MHz,
Norm L/L'
(Cinch, Ri = 75Ohm
Audio-Ausgangspegel
(einstellbar): TV
TV
(FM 1kHz, 30 kHz),
typ. 1,3 V
Video - abhan-
gig vom Audio
Eingangspegel
(Ri < 300Ohm)
Stereo
(Cinch, Ri = 75Ohm
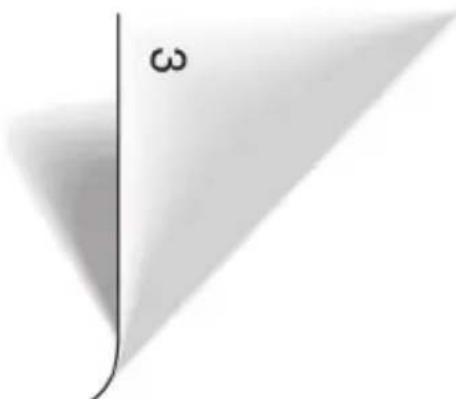
① POWER button to switch the device on/off.
PROGCH Buttons to call up stored stations from the memory locations.
3 SEARCH CH buttons to start station seek tuning up/down. To adjust set values: +, -.
④ Recall button to call up the station saved last with MEM.
5 AUDIO button to set the audio level for the TV tuner and a video source connected to the tuner.
6 TRAVEL STORE button for automatically seek tuning and storing receivable stations.
SOURCE SELVIDEO button for video source selection. If a video source is connected, it is played back.
8 SOURCE SEL TV button for the TV tuner source selection.
BAND button for mode switching between terrestrial reception and cable network.
10 FINETUNE button for manual finetuning of stations.
11 MEM button for storing a station at a memory location 0 - 9. 70 stations can be stored for terrestrial reception and 56 for the cable network.
12 Numeric buttons 0-9 for the direct selection of stations.
DISP button shows, for example, the current settings on the monitor or special settings if operated in the Coach system.
14 MUTE button to mute the car sound system.
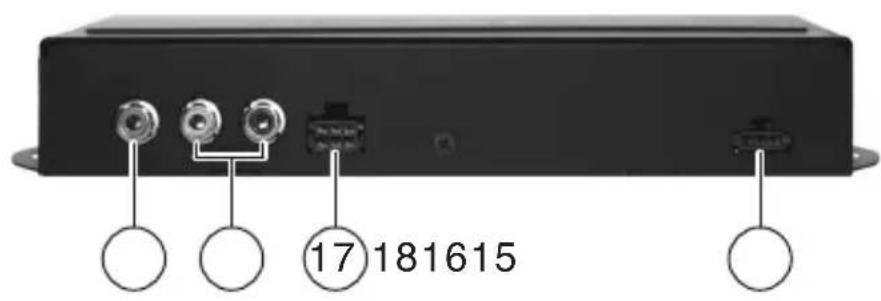
15 A/V Output - Video socket to connect a monitor or for integration in an existing Coach system.
16 A/V Output - Audio socket to connect an amplifier or for integration in an existing Coach system.
17 6-pole Molex socket to connect the TV tuner to a CCA or CPA amplifier.
3-pole Molex socket 12/24 VDC for the voltage supply.
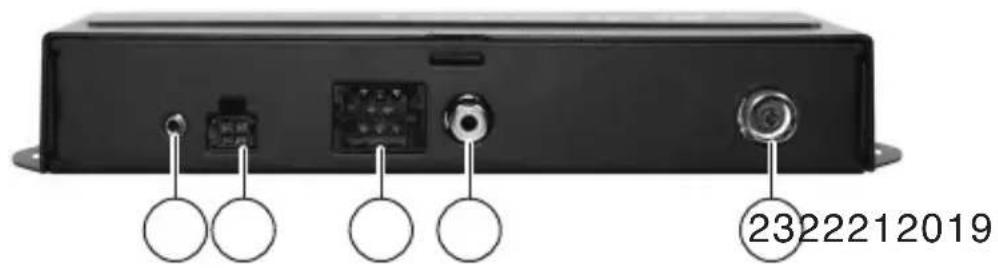
19 2.5-mm IR Remote jack socket to connect a cable remote control.
20 4-pole Molex IR Remote socket to connect the IR receiver for the remote control.
21 A/V Input - Audio/Remote socket to connect an external video source, e.g. DVP. This socket is used to conduct the audio signals from the video source to the TV tuner and the signals of the remote control to the video source.
22 A/V Input - Video socket to connect a video source to the TV tuner.
23 TV IN socket to connect an antenna to the TV tuner.
6-pole Molex plug to connect to the Classic Line system (source selection/ cable remote control)
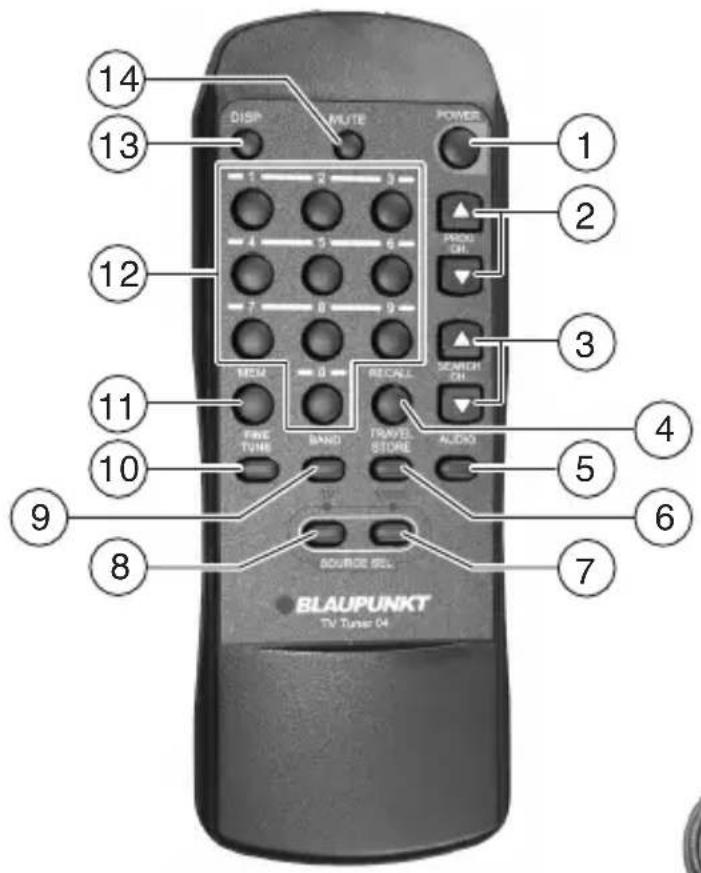
(25) 3-pole Molex plug to establish a power supply.
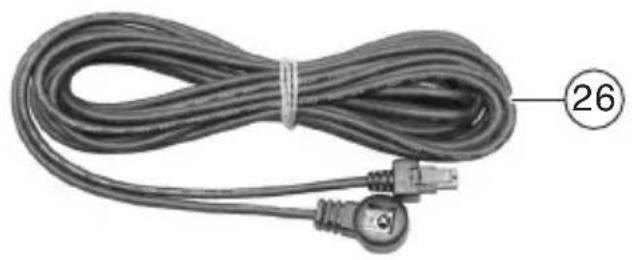
26 Infrared receiver for the remote control with 4-pole Molex plug.
Notes and accessories. 15
Installation and connection 16
Scope of delivery 16
Notes about the installation 16
General connections 16
Connection to a Classic Line
Coach system 17
Connection to a Professional
Line Coach system 17
Connection of an external
video source 18
Initial Startup 18
Activating the remote control 18
Operating the TV tuner with
the IR remote control 19
Switching on/off 19
OSD menu 19
Antenna/cable network setting 19
Tuning into a station 19
Storing stations manually 20
Listening to stored stations 20
Fine tuning (only for terrestrial reception) 20
TV/video device source selection ....20
Operating the basic functions
with the CCA/CCU 21
Setting/adjusting the output level ....21
Mute 21
Frequency table 22
Standards B/G. 22
Standards D/K 22
Standard I 22
Standards L/L 22
Cable 22
Disposal of old unit
(EU countries only) 22
Technical data 23
Notes and accessories
Thank you for choosing a Blaupunkt product. We hope you enjoy using this new piece of equipment.
Please read these operating instructions before using the equipment for the first time.
The Blaupunkt editors are constantly working on making the operating instructions clearer and easier to understand. However, if you still have any questions on how to operate the device, please contact your dealer or the telephone hotline for your country. You will find the telephone number printed at the back of these operating instructions.
We provide a manufacturer's warranty for our products purchased within the European Union. The warranty terms can be called up under www.blaupunkt.de or requested directly from:
Roadsafety has absolute priority.
Only operate this device if the road and traffic conditions allow you to do so.
Familiarise yourself with the device before setting off on your journey.
You should always be able to hear police, fire and ambulance sirens in good time from inside your vehicle.
For this reason, listen to your car sound system at a suitable volume level during your journey.
Installation and connection
Scope of delivery
The scope of delivery contains a 3-pole and 6-pole Molex plug with connector pins, an IR receiver with 4-pole Molex plug, an IR remote control and two 1.5-V batteries for the remote control.
Notes about the installation
Note the following when selecting a place for installation:
Under the surface on which the device is to be installed, there may not be any wires or tubing.
Do not install the device in a place,
where it is subject to direct sunlight,
- near hot air outlets (heating, etc.),
where it is subject to rain or moisture,
where it is subject to dust or dirt,
where it is subject to strong vibrations.
General connections
Power supply
Create a cable for the power supply of the TV tuner.
Feed a cable from Pin3 (ON) to theVIDEO RELAY socket at your CCA or CPA (switched power supply of the video monitors).
Connect Pin2 with an earth wire and Pin1 with a +12-V or +24-V line.
| 3 | 2 | 1 |
Pin1: Continuous positive 12 V/ 24 V, Pin2: Earth
Pin3: ON/OFF (+12V / + 24V = ON, 0V = 0F
Connect the connector plug into the 3-pole 12 / 24VDC socket 18 at the side of the tuner.
Note:
If the tuner is operated as stand-alone, Pin3 may not be connected (open = ON).
IR remote control
The infrared receiver of the remote control can be connected to the 4-pole IR-REMOTE socket ② and installed anywhere in the vehicle.
Antenna connection
Connect the cable of your TV antenna to the antenna socket (23) at the TV tuner.
Connection to a Classic Line Coach system
Audio/video
To integrate the TV tuner into your existing Classic Line system, you need 2 audio cables (7607402000) and 2 video cables (7607263001).
Connect the audio cable with the A/V Output-Audio L/R outputs 16 of the TV tuner and the corresponding inputs of the CCA (plug D, Pin8-10).
Connect the video cable with the A/V Output-Video output (15) of the TV tuner and with the first monitor in your Classic Line system.
Cable remote control and source selection
To be able to operate the TV tuner with the CCA, you must install the following cables: Cable set (7 607 006 418 / 419)
to the 2.5-mm IR Remote jack socket 19
Connect Pin1 of chamber A of your CCA with the video remote connection of the jack socket.
Connect Pin2 of chamber A of your CCA with the earth connection of the jack socket.
Insert the 2.5-mm jack socket into the IR Remote socket ① at the TV tuner.
For the source selection, connect Pin4 of the 6-pole REMOTE Molex socket (17) at the TV tuner with the CAM-Out output at the CCA (C2, Pin10).
| 6 | 5 | 4 |
| 3 | 2 | 1 |
Pin4: Source selection
Pin5: Earth
Pin6: Cable remote
Connection to a Professional Line Coach system
Audio/cable remote control
To integrate the TV tuner into your existing Professional Line system, you need the video remote cable (7 607 006 437).
Connect the video remote cable with the A/V Output-Audio L/R outputs 16 and the 6-pole Remote Molex socket 17 at the TV tuner and connect it to the X1500 CPA socket of your Professional system.
Video
The video connection of the TV tuner requires the video cable (7 607 263 001). Connect the video cable with the A/V Output-Video output (15) of the TV tuner and with the first monitor in your Professional system.
Connection of an external video source
You can also connect an external audio/video source (e.g. DVP/MVP) to the TV tuner. To be able to remotely control the video source as usual with the CCA or CCU, you must use the video remote cable (7 607 006 437) for the connection.
Connect the video remote cable with the Audio L/R outputs and the 6-pole Molex socket at the video device and connect it to the A/V Input - Audio/Remote socket (21) of the TV tuner.
The video connection to the TV tuner requires the video cable (7 607 263 001).
Connect the video cable with the video output of the playback device and with the A/V Input - Video input (22) of the TV tuner.
Initial Startup
When you operate the TV tuner for the first time, you must insert the batteries in the remotecontrol.
Activating the remote control
Inserting the batteries
The IR remote control requires two 1.5-V AAA batteries for operation which are part of the scope of delivery.
- Open the battery compartment at the back of the remote control.
Insert the batteries (as depicted in the battery compartment). - Close the battery compartment.
Using the remote control
Point the remote control at the separate infraredreceiver26.
Operating angle: Approximately 30^ in each direction from the front of the remote control.
Operating the TV tuner with the IR remote control
Switching on/off
The TV tuner is switched on and off with the Coach system by default.
If you operate the TV tuner without the Coach system (Stand-alone),
you switch it on and off with the POWER button 1 of the remote control.
OSD menu
The TV tuner is equipped with an OSD menu (On-Screen Display) which displays different setting functions on the monitor.
Antenna/cable network setting
You can adjust whether the TV tuner should receive a terrestrial program via antenna or whether it is connected to a TV cable network.
To select the band,
press the BAND button 9.
The monitor displays the setting 1. TV or 2. CABLE. The flashing function is active.
To switch between the functions,
press the corresponding number button 1 or 2 (12) on the remote control.
Wait approx. 10 seconds until the setting is stored.
Tuning into a station
There are different ways of tuning into a station.
Using the station seek tuning or
using the Travelstore seek tuning.
Station seek tuning
For a channel seek tuning to the next receivable station up or down in the band,
press the SEARCH CH or button 3.
The seek tuning starts and stops at the next receivable station.
Travelstore seek tuning
With terrestrial reception, you can store up to 70 stations and with cable reception up to 56 stations.
To start a Travelstore seek tuning,
press the TRAVEL STORE button 6.
The monitor displays:
- AUTO DETECT SYSTEM
- L SYSTEM: FRANCE
The AUTO DETECT SYSTEM is activated as factory default. The number 1. flashes.
After approx. 10 seconds, the seek tuning starts.
After the entire band has been scanned, the Travelstore seek tuning stops at the first stored station.
If you want to perform a Travelstore seek tuning in the SECAM band,
press button 2 ⑫ on the remote control.
The L SYSTEM: FRANCE is switched to active.
Storing stations manually
In addition to the Travelstore seek tuning, you can also store stations manually.
Use the BAND button 9 to select the TV or CABLE option.
Find the desired station (channel).
For this purpose, press one of the SEARCH CH , Buttons ③.
To store the station,
press the MEM button 11.
To call up the station saved last with MEM,
press the RECALL button 4.
You can assign a desired program location to the set station.
For this purpose, press the corresponding number button 12.
The monitor displays the "PROG" program location and the "CH" channel.
Listening to stored stations
To listen to stations (channels) stored with Travelstore or manually,
press the PROG CH button 2 or the number buttons 12 corresponding to the program location.
The monitor displays the "PROG" program and the "CH" program location.
Fine tuning (only for terrestrial reception)
To finetune a station,
press the FINE TUNE button (10).
The monitor displays "FINE TUNE SETTING".
If necessary, adjust the image for perfect image quality using the SEARCH CH , Buttons ③.
TV/video device source selection
If you connected a video device to the TV tuner using the appropriate cables, you can operate its basic functions as usual with the CCA or CCU.
For this purpose, you must set the TV tuner to the video device.
Press the Video button 7 to view the image of a connected video device.
or
Press the TV button 8 to view the image of the TV tuner.
Source switching with the CCA
If the TV tuner is installed in a Classic Line system,
press theVIDEO button on the CCA to view the TV/video image on the monitors.
To switch the sources with the CCA,
press the CAM button on the CCA repeatedly until either the TV image or the image of the video device is displayed.
Source switching with the CCU
If the TV tuner is installed in a Professional Line system,
press one of the VIDEO buttons on the CCU repeatedly until the TV or the video image is displayed on the monitors.
Operating the basic functions with the CCA/CCU
You can operate the following basic functions of the TV tuner with the CCA or CCU.
Function CCA
Next memory location
Previous memory location
Seek tuning forwards
Seek tuning down
Function CCU
Next memory location
Previous memory location
Seek tuning forwards >>
Seek tuning back <<
Setting/adjusting the output level
To avoid voltage peaks while changing the source, you can adjust the volume differences between the TV tuner and the video playback device.
Press the AUDIO button 5.
The "OUTPUT LEVEL SETTING" menu for setting the TV or AV level is displayed. The active setting fl ashes.
To switch between TV and AV,
press the corresponding number button 1 or 2 (12).
The desired volume
is set using the SEARCH CH , buttons 3.
Mute
To mute the audio playback of the TV tuner,
press the MUTE 14 button.
To cancel muting,
press the MUTE 14 button again.
Frequency table
Standards B/G
Frequency range VHF/UHF:
47.00 MHz - 862.00 MHz
Image carrier frequency:
38.90
Sound carrier frequency 1:
33.40
Sound carrier frequency 2:
33.16
Sound frequency: 5.5 MHz,
FM sound
Standards D/K
Frequency range VHF/UHF:
48.50 MHz - 861.75 MHz
Image carrier frequency:
38.90
Sound carrier frequency:
32.40
Sound frequency: 6.5 MHz,
FM sound
Standard I
Frequency range VHF/UHF:
44.50 MHz - 861.25 MHz
Image carrier frequency:
38.90
Sound carrier frequency:
32.90
Sound frequency: 6.0 MHz,
FM sound
Standards L/L'
Frequency range VHF:
41.00 MHz - 222.75 MHz
Frequency range UHF:
470.00 MHz - 861.75 MHz
Image carrier frequency L:
MHz 38.90
Image carrier frequency L':
MHz 33.95
Sound carrier frequency L:
MHz 32.40
Sound carrier frequency L':
40.40
Sound frequency: 6.5 MHz,
AM sound
Cable
Frequency range:
MHz00 MHz - 470.00 MHz
Image carrier frequency:
MHz 38.90
Sound carrier frequency:
33.40
Sound frequency: 5.5 MHz,
FM sound
MHz
Disposal of old unit
(EU countries only)
Do not dispose of your old device in the household trash!
Please use the return and collection systems available to dispose of the old unit.
Technical data
Operating voltage: 12V / 24V
Current consumption:
Operation: 0.6 A
Operating temperature:
-20°C to +70°C
Storage temperature:
-40°C to +85°C
Standards: PAL, SECAM.
B/G,L/L',I,D/K,
Cable
Video output level: 1 Vss at 75 ohm
(cinch, Ri = 75ohm )
Audio output level
(adjustable): TV
TV
(FM 1 kHz, 30 kHz),
typ. 1.3 V
Video - dependent
upon audio input
level (Ri < 300 ohm),
stereo
Video input level: 1 Vss
(Cinch, Ri = 75ohm
Audio input level: max. 3 V
Broche 3: MARCHE/ARRET
$$ \begin{array}{l} (+ 1 2 \mathrm {V} / + 2 4 \mathrm {V} = \text {M A R C H E}, \ 0 \mathrm {V} = \text {A R R E T}) \end{array} $$
Broche 6:cable Remote
Ligação a umsystema Coach Professional Line
(Cinch, Ri = 75Ohm
Nível de saía audio
(ajustavel): TV
TV
(FM 1kHz, 30 kHz),
tip. 1,3 V
Vdeo - em funcao
do nível de entrada
MHz audio (Ri < 300 Ohm),
estereo
Njel de entrada video:
MHZ 1 Vss
(Cinch, Ri = 75 Ohm)
32,90 Frequenza audio: 6,0 MHz,
FM audio
Classic Line Coach
sistemine baglanti 67
Professional Line Coach
sistemine baglanti 67
Classic Line Coach sistemine böglanti
Audio/Video
Mevcut olan Classic-Line sisteminize TV alicisinin baglanmasi icin 2 defa audio kablosu (7 607 402 000) ve video kablosu (7 607 263 001) gereklidir.
Professional Line Coach系統ine baglanti
Normlar: e13, FCC, WEEE, ROHS
MHz (Cinch, Ri = 75Ohm
Audio-uitgangsiveau
(Whstelbaar): TV
(FM 1kHz, 30 kHz),
typ. 1,3 V
Video - afhankelijk
van audio-ingangs
niveau
(Ri < 300Ohm)
stereo
Video-ingangsniveau:
1 Vss
MHz
(Cinch, Ri = 75Ohm
Audio-ingangsniveau:
Max. 3 V
(Ri > 10 kOhm)
stereo
Gewicht:
650
g
Afmeting: 207 × 132 × 30 ~mm
(BxHxD)
(Cinch, Ri = 75Ohm
Audio-udgangsniveau
(kan indstilles): tv
(FM 1 kHz, 30 kHz),
type 1,3 V
(Cinch, Ri = 75Ohm
Audio-indgangsiveau:
Maks. 3 V
(Ri > 10kOhm)
stereo
Vaelg: 650 g
Dimensioner: 207 × 132 × 30 ~mm
(BxDxH)
Normer: PAL, SECAM. B/G,L/L',I,D/K, Kabel
Ut-nivá video: 1 Vss vid 75 Ohm (Cinch, Ri= 75 Ohm)
Ut-nivá audio
installbar):
TV
(FM 1 kHz, 30 kHz),
typ. 1,3 V
Video - beroende av
in-nivå För audio
(Ri < 300Ohm)
stereo
Normit: e13, FCC, CE, WEEE, ROHS
(Cinch, Ri = 75Ohm
(Cinch, Ri = 75Ohm
Germany (D) 0180-5255666
| Austria | (A) | +43-1-61 | 03 |
| Belgium (B) +32-5 25 54 47 | |||
| Czech Republic (CZ) +36-76-88 97 02 | |||
| Denmark (DK) +45-44 89 83 76 | |||
| Finland (FIN) +358-9-56 05 04 | |||
| France (F) | +33-1 40 10 70 07 | ||
| Great Britain | (GB) | +44-1274-68 89 90 | |
| Greece | (GR) | +30-21 09 42 73 37 | |
| Hungary | (HU) | +36-76-88 97 02 | |
| Ireland | (IRL) | +353-18-72 66 44 | |
| Italy | (I) | +39-23-92 54 99 | |
| Luxembourg | (L) | +352-40-40 78 | |
| Netherland | (NL) +31-80 04 00 10 10 | ||
| Norway | (N) | +45-44-89 83 76 | |
| Poland | (PL) | +48-22-8 77 12 60 | |
| Portugal | (P) | +351-18-51 86 75-66 | |
| Russia | (RUS) | +7-095-2 87 10 36 | |
| Spain | (E) | +34-972-86 05 76 | |
| Sweden | (S) | +45-44-89 83 76 | |
| Switzerland | (CH) | +41-43-45 54 40 | |
| Turkey | (TR) | +90-212-6 58 23 30 | |
| USA | (USA) | +1-800-5 62 59 78 | |
