
Arrifana 07 - Air Conditioning BLAUPUNKT - Free user manual and instructions
Find the device manual for free Arrifana 07 BLAUPUNKT in PDF.


| Brand | Blaupunkt |
| Model | Arrifana 07 |
| Type of Product | Portable Air Conditioner |
| Cooling Capacity | 7000 BTU/h (approx. 2.05 kW) |
| Energy Efficiency Rating | A+ |
| Power Supply | 220-240 V ~ 50 Hz |
| Power Consumption (Cooling) | 700 W |
| Air Flow Rate | 300 m³/h |
| Dehumidification Capacity | 1.0 L/h |
| Refrigerant Type | R290 |
| Noise Level (Low/High) | 52 / 62 dB(A) |
| Dimensions (W x D x H) | 350 x 330 x 700 mm |
| Net Weight | 22 kg |
| Exhaust Hose Length | 1.5 m |
| Remote Control Included | Yes |
| Timer Function | Yes (24-hour) |
| Sleep Mode | Yes |
| Self-Evaporative System | Yes (no bucket required) |
| Castor Wheels | Yes (4 swivel castors) |
| Filter Type | Washable anti-dust filter |
| Maintenance & Cleaning | Clean filter every 2 weeks; wipe exterior with damp cloth |
| Safety Features | Overheat protection, auto-restart after power failure |
| Spare Parts Availability | Contact Blaupunkt service center for remote, filter, hose |
Frequently Asked Questions - Arrifana 07 BLAUPUNKT
User questions about Arrifana 07 BLAUPUNKT
0 question about this device. Answer the ones you know or ask your own.
Ask a new question about this device
Download the instructions for your Air Conditioning in PDF format for free! Find your manual Arrifana 07 - BLAUPUNKT and take your electronic device back in hand. On this page are published all the documents necessary for the use of your device. Arrifana 07 by BLAUPUNKT.
USER MANUAL Arrifana 07 BLAUPUNKT
natural_image
White industrial air conditioner unit with heat exchanger and ventilation slots (no visible text or symbols)Competence Center Aircons
MATEKO Sp. z o. o.
ul. Przyleśna 15
Michałów - Grabina
05-126 Nieporęt
e-mail: service@mateko.pl
www.blaupunkt.com
UNPACKING INSTRUCTIONS ....42
CONTENTS....42
NAME OF THE PARTS 43
CONTROL PANEL & DESCRIPTION OF FUNCTION 44
REMOTE CONTROL FUNCTION ....46
NOTICE......47
MAINTENANCE 48
AIR FILTER 48
CONDENSER/EVAPORATOR....48
Casing....48
POWER SUPPLY 48
PLACE FOR USE 49
HELPFUL HINTS....49
EXHAUST HOSE INSTALLATION....49
HOW TO ENJOY THE HEATING FUNCTION? 50
Technical Specification....51
WEE SIGN....53
NOMENCLATURE 60
KUNDENHOTLINE 60

BLAUPUNKT
WICHTIGE INFORMATION BITTE SORGFÄLTIG AUFBEWAHREN.

Kundenhotline
AT: Tel. +43-1-9717059 E-Mail: office@esc-service.at
DE: Tel. 00 800 888 00 444 E-Mail: blaupunkt-service-de@teknihall.com
natural_image
Symbol of a trash bin crossed with a diagonal line, representing waste or disposal (no text or numbers present)natural_image
Symbol of a trash bin with crossed lines indicating no waste or restriction (no text or labels)Produktmerkmale
natural_image
Line drawing of a portable air conditioner unit with ventilation grille and control panel (no text or symbols)flowchart
graph LR
    A["① Fan"] --> B["② Air Conditioner"]
    B --> C["③ Receiver"]
flowchart
graph LR
    A["① Fan"] --> B["② Bag"]
    B --> C["③ Doorbell"]
natural_image
Diagram of a device with a grid pattern and an arrow pointing to a circular component (no text or symbols)Abb. 1

natural_image
Technical line drawing of a mechanical component with internal mesh structure (no text or symbols)Abb. 2
Reinigung
natural_image
Line drawing of a portable air conditioner unit with ventilation grilles and heat exchangers (no text or symbols)Fehlerbehebung
Competence Center Aircons
MATEKO Sp. z o. o.
ul. Przyleśna 15
Michałów - Grabina
05-126 Nieporęt
e-mail: service@mateko.pl
www.blaupunkt.com
natural_image
Symbol of a trash bin crossed with a diagonal line, representing waste sorting or disposal (no text present)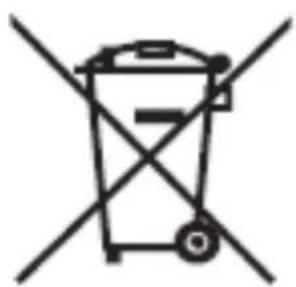
natural_image
Symbol of a trash bin with crossed lines indicating no waste or discharge (no text or labels)natural_image
Line drawing of a portable air heater with ventilation grille and cooling unit (no text or symbols)natural_image
Close-up of a modern remote control with buttons and a blue power button (no readable text or symbols)Zdalne sterowanie
natural_image
Technical line drawing of a device interior with a mesh chamber and labeled component (no text or symbols)Competence Center Aircons
MATEKO Sp. z o. o.
ul. Przyleśna 15
Michałów - Grabina
05-126 Nieporęt
e-mail: service@mateko.pl
www.blaupunkt.com

natural_image
Line drawing of a portable air conditioner unit with ventilation grilles and cooling fins (no text or symbols)VERY IMPORTANT
Do not install and use your portable air conditioner unit before carefully reading this instruction guide.
Please retain this manual brochure for product warranty and future reference
CAUTION
-
"PLEASE MAKE SURE THE PRODUCT VENTILATES ALL THE TIME!" Please make sure the inlet and outlet ventilation is not blocked at all times.
-
Operate this unit on a horizontal surface to avoid water leakage.
-
Do not operate this unit in an explosive or corrosive atmosphere.
-
Operate this unit in an ambient of 32irc C or less.
-
The heating function of the unit should be operated in an indoor ambient temperature between 7irc C and 23irc C
-
Clean air filter periodically to enjoy the most efficient cooling.
-
When the unit is shut off, please wait at least 3.5 minutes before restarting this is to prevent the compressor from being damaged.
-
This unit needs at least 7 Amps of electricity to have its compressor operational. To avoid the household electricity block out, please do not use any extension cord for this unit.
-
This unit is for indoor cooling, heating and dehumidifying.
-
When turning on the unit, the fan will operate but the compressor will start up after the cooling alarm flashes for three minutes
- In heating function, the heating alarm will flash for 3.5 minutes before the compressor and fan start up.
- When the supply cord is damaged, it must be replaced by the manufacturer, its service agent or similarly qualified persons in order to avoid hazard.
- In order to dispose the appliance safely, please remove the batteries from the unit before scrapping it.
- This appliance is not intended for use by persons (including children) with reduced physical, sensory or mental capabilities, or lack of experience and knowledge, unless they have been given supervision or instruction concerning use of the appliance by a person responsible for their safety. Children should be supervised to ensure that they do not play with the appliance.
- The air-conditioner can be connected only to a supply with system impedance no more than 0.219Ω. In case necessary, please consult your supply authority for system impedance information.
- Drain out the water before moving the unit.
ATTENTION
For effective heating and cooling functions, please ensure that the following steps are undertaken:
1) Extend the exhaust hose to a length of not more than 400mm. The exhaust hose must be kept parallel and must not be bent up or down.
2) A distance of 500mm minimum must

be kept between the filter side of the unit and wall or any other obstacles".
3) When this appliance starts to defrost, the word "DF" will be displayed on the LED.
PORTABLE AIR CONDITIONER
This Air Conditioner has been designed and manufactured to the highest standards of modern engineering.
Our product not only provides you a remote control to help user operate all the functions easily and conveniently but also has below benefits:
- Moves easily from room to room on easy glide castors
• No installation required-just plug into any household power outlet
• Powerful refrigerated air system cools down the ambience instantly whenever you want.
• Dehumidified and filtered air cycle improve breathing environments effectively. - Besides the remote control, your one touch electronic pad also provides easy-identifying manual operation.
- 24 hour programmable timer that can be used with either the air conditioning or dehumidification setting
- Unique sleep control function
• 220-240 Volt 50Hz operation
• 1.8 meter cord with plug
UNPACKING INSTRUCTIONS
- Place the unit in the correct upright position before unpacking.
- Cut the two packing straps.
- Slide the carton in an upwards motion and it will release from the base.
- Grip the carry handles located on either sides of the unit and carefully lift until it slides out of the foam base.
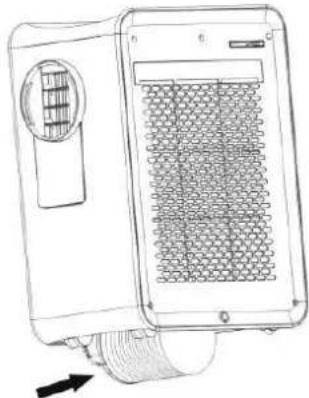
- Lift and lean the unit slightly to take out exhaust hose from unit's bottom as picture.
- Install the exhaust hose on the unit before operating the unit.
natural_image
Line drawing of a portable electric heater with cooling fan and heat sink (no text or symbols)CONTENTS
• Air conditioner unit
- Remote control
- Batteries
NAME OF THE PARTS
- Control panel
- Remote control receiver
- Cool air-outlet
- Cool air-outlet's joint part
- Exhaust hose's connector
- Exhaust hose
- Hot air-inlet
- Downside drain hole
- Remote control's location

- Hot air-outlet's joint part
- Hot air-outlet
- Evaporator's filter
- Cool air-inlet
- Upside drain hole

CONTROL PANEL & DESCRIPTION OF FUNCTION
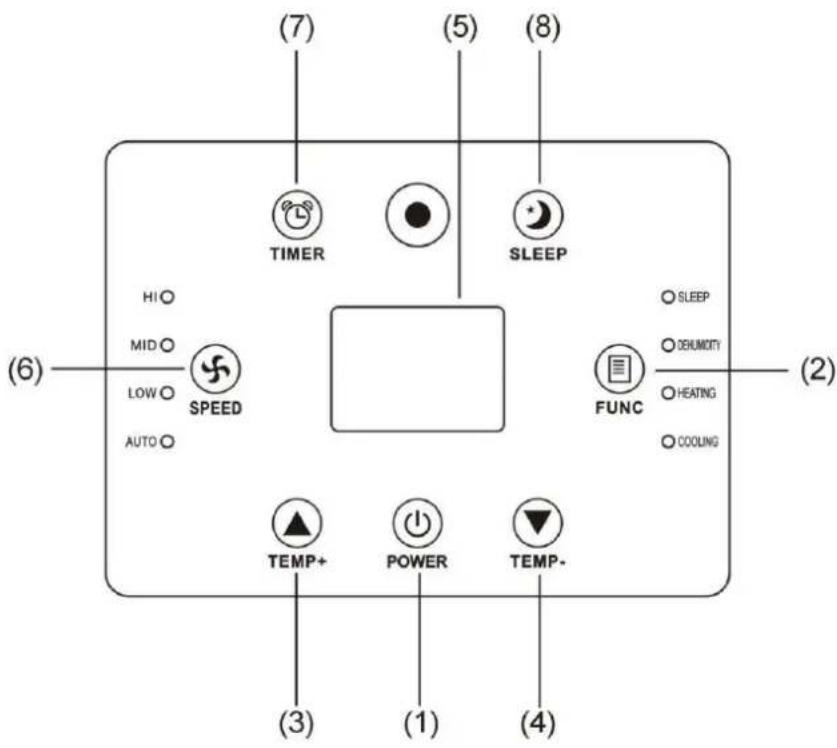
- POWER KEY
Press to turn unit "ON" or "OFF".
- FUNCTION
Press this key to select cooling, heating, or dehumidifying.
-
TEMPERATURE REGULATION KEY (UP)
-
TEMPERATURE REGULATION KEY (DOWN)
-
L.E.D. DISPLAY
The display indicates the current setting temperature or the timer setting. When the set temperature or the timer is adjusted, the new setting is shown then the display returns the current set temperature.
※The display is also used to show error codes should a fault occur, see ERROR CODES.
6. SPEED
Press to select either LOW, MEDIUM, HIGH or AUTO fan speed.
If "AUTO" is selected (During cooling function),"HIGH" or "MEDIUM" or "LOW" will be selected automatically according to the difference between setting temperature and ambient temperature.
Note: In heating function and dehumidifying function, this key is invalid because the unit is defined to be high speed in heating mode and low speed in dehumidifying mode.
7. PROGRAMMABLE TIMER
Programmable timer ON/OFF key.
TIMER-ON: The timer-on is used to turn on the unit automatically after the set time is over.
- Press the "TIMER" key at stand-by status to set the time you desired.
- Once the set hour has come to an end, the unit will turn on automatically.
- Press the "POWER" key before time out, the setting time will be canceled and the unit will turn on.
- You can set the function and fan speed while setting the timer.
TIMER-OFF: The timer-off is used to turn off the unit automatically after the setting time is over.
- Press the "TIMER" key at operating status to set the time you desired.
- Once the set hour has come to an end, the unit will turn off automatically.
- Press the "POWER" key before the time out, the setting time will be canceled and the unit will turn off.
8. SLEEP CONTROL FUNCTION
- While in cooling mode, press the SLEEP key to set the temperature. It increases 1\ °C after an hour and at most increases 2\ °C after 2 hours.
- While in heating mode, press the SLEEP key to set the temperature. It decreases 1 °C after an hour and at most decreases 2 °C after 2 hours.
- Press the SLEEP key again can cancel the setting.
9. ALARM
When the water tank is full, "E4" will be displayed on the display panel. To resume operation, please remove the rubber cap of the drain hose to drain out the water firstly. The E4 warning will disappear after draining, and then you can restart the unit by pressing the POWER key.
REMOTE CONTROL FUNCTION
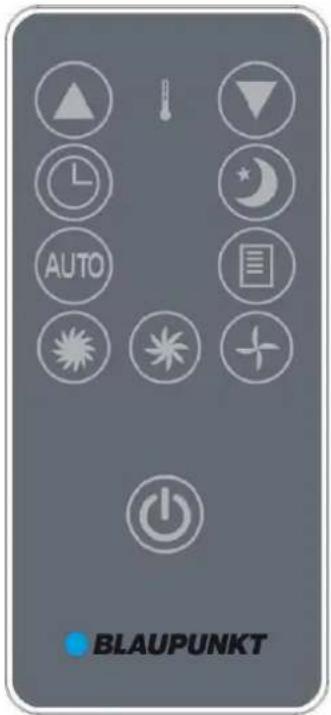
- POWER ⏻
- FUNC
- TIMER Ⓤ
- AUTO
- HI
- MID
- LOW
- SLEEP
-
TEMP. ▲ ↓ ▼
-
On/Off switch
- Function "MODE" selector
- Hourly programming
- Automatic fan speed
- High fan speed
- Medium fan speed
- Low fan speed
- Night operation selector
- Temperature selector
NOTICE
This unit can evaporate the condensation and distribute through the exhaust hose automatically.
-
When the unit is in the cooling function, it does not need the drain pipe installed. Please make sure that the rubber cap is locked on drain hole, when the unit is running.
-
When operating the heating function, the “①” rubber cap on drain hole should be pulled out and install a proper drain pipe in order to improve the heating effect
-
When operating the dehumidifying function the “①” rubber cap on drain hose should be pulled out and install a proper drain hose.
- Please remove the air exhaust hose, connect a drain hose to the drain hole and lead the water to the outside in order to intensify dehumidifying capacity.
※ When the water tank is full, "E4" will be displayed on the display panel. Please remove the rubber cap“②” of the drain hole to drain out the water first. After the drainage is completed, please restart the unit and then the unit can operate normally.

natural_image
Technical line drawing of a device panel with labeled components (no text or symbols present)MAINTENANCE
PLEASE DISCONNECT THE POWER CORD BEFORE CLEANING.
AIR FILTER
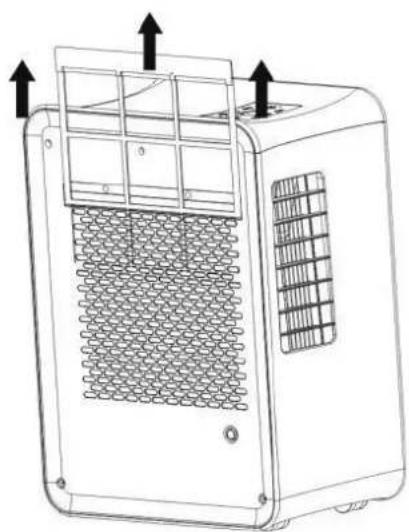
The air filter located on the left hand side of theunit can be removed simply by pulling the frame up.
Clean the air filter with a vacuum cleaner ensuring all dust is removed.
CONDENSER/EVAPORATOR
Use a brush attachment with a vacuum cleaner.
Casing
natural_image
Line drawing of a portable air conditioner unit with ventilation grilles and top panel (no text or symbols)Wipe with a damp cloth and polish with a soft cloth.
To remove the air filter, please follows the arrow direction and pull the filter lightly, and then take out the filter for cleaning.
POWER SUPPLY
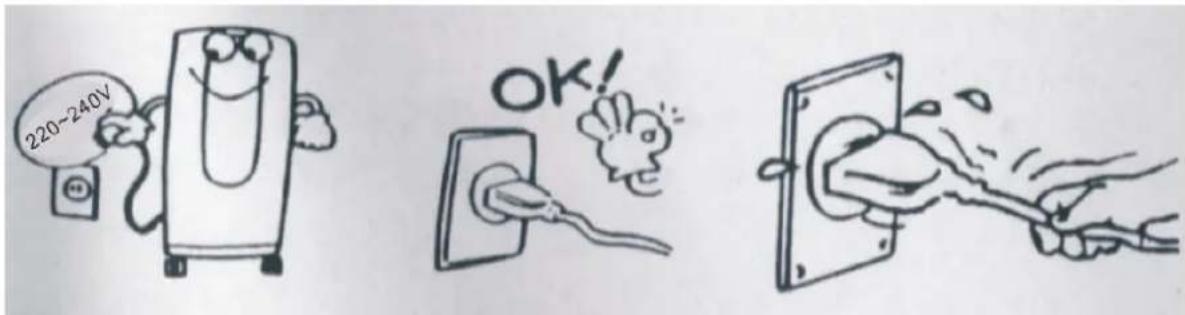
- Confirm the correct power.
- Insert the plug into the outlet firmly In order to prevent any dangerous leakage.
- Don't pull power wire by force because it will cause damage to power wire.
PLACE FOR USE
- Because the machine distributes hot air, please don't place or operate in a narrow place.
- In case of dangerous leak, don't work the machine in a humid place.
- Do not place the machine in a sunlit corner otherwise the unit might shut down due to the overheat and the colour of the machine may soon fade out.
HELPFUL HINTS
The unit is fitted with a special thermal cut off device. Please ensure the unit is not placed against objects which will obstruct air intake e.g. furniture or curtains as this will affect it's performance dramatically.
EXHAUST HOSE INSTALLATION
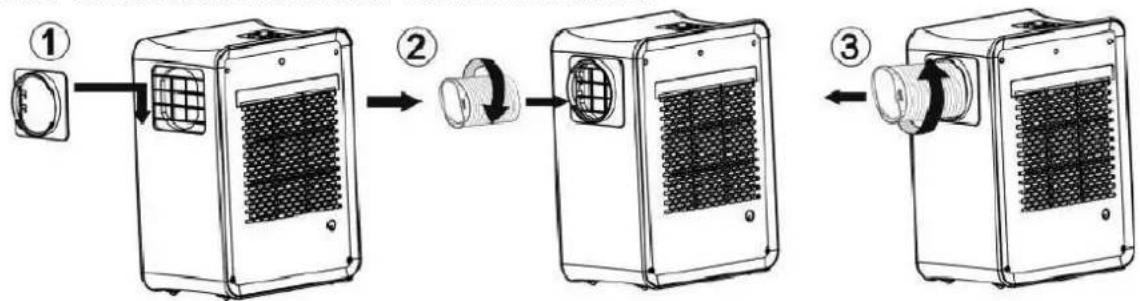
- Follow the instruction of arrow head ① to Install the air-outlet's joint part
- Follow the arrow head ② to circumrotate the exhaust hose, and then the exhaust hose can be installed firmly on the unit.
- Follow the arrow head o, 3 to circumrotate the exhaust hose, then the exhaust hose can be loosen and take out from the unit.
A:
flowchart
graph LR
    A["①"] --> B["②"]
    B --> C["③"]
    style A fill:#f9f,stroke:#333
    style B fill:#ccf,stroke:#333
    style C fill:#cfc,stroke:#333
B:

flowchart
graph LR
    A["① Fan"] --> B["② Mirror"]
    B --> C["③ Receiver"]
HOW TO ENJOY THE HEATING FUNCTION?

Fig.01 Fig.02 Fig.03
If you want to use heating function, please disassemble the cool and hot air outlet connectors in an upward direction as “Fig.01”, and interchange two connectors as “Fig.02” to re-install again. After installation, the unit should be like “Fig.03”.
TROUBLE SHOOTING
| Problem | Cause | Trouble shooting |
| E1 | Electrical short on both temperature sensor and PCB | Contact an electrician for repair |
| E2 | Electrical short of temperature sensor copper tube and PCB wiring | Contact an electrician for repair |
| E4 | Indicates water tank full or poor contact of signal plug. | User needs to pull out the rubber stopper which is located at the bottom of the unit, to drain the water away. Check that the plug has been wired correctly. |
Technical Specification
| Model No. | BAC-PO-0707-C11D |
| Power Source | 220-240V~50Hz |
| Rated Power(EN60335) | 900W(COOLING) |
| 700W(HEATING) | |
| Capacity | 2000W(COOLING) |
| 2000W(HEATING) | |
| Moisture Removal | 30Litres/day |
| Noise Level | Max 65dB |
| Refrigerant | R410a |
| Unit Dimensions(WxDxH) | 300x455x630mm |
| Unit Weight | 22kg |
Important information for correct disposal of the product in accordance with EC Directive 2002/96/EC.

natural_image
Symbol of a trash bin crossed with a diagonal line, no text or labels presentAt the end of working life, the product must not be disposed of as Urban Waste. It must be taken to a special local authority differentiated waste collection centre or to a dealer providing this service.
Disposing of a household appliance separately avoids possible negative consequences for the environment and health deriving from inappropriate disposal and enables the constituent materials to be recovered to obtain significant savings in energy and resources. As a reminderof the need to dispose of household appliances separately, the product is marked with a crossed-out wheeled dustbin.
This product contains fluorinated greenhouse gases covered by Kyoto Protocol. Do not vent gases into the atmosphere. Refrigerant type: R410A. GWP (Global Warming Potential) with value: 1975.
WEE SIGN
English (GB) : Disposal of Waste Equipment by Users in Private Households in European Union. This symbol on the product or on its packaging indicates that this product must not be disposed of with your other household waste. Instead, it is your responsibility to dispose of your waste equipment by handing it over to a designated collection point for the recycling of waste electrical and electronic equipment. The separate collection and recycling of your waste equipment at the time of disposal will help to conserve natural resources and ensure that is recycled in a manner that protects human health and the environment. For more information about where can you drop off your waste equipment for recycling, please contact your local city office, your household waste disposal service or the shop where you purchased the product. Where batteries or accumulators are collected together with waste electrical and electronic equipment on the basis of Directive 2002/96/EC, batteries or accumulators shall be removed from the collected waste electrical and electronic equipment.
Tel. 00 800 888 00 444
E-Mail:
blaupunkt-service-de@teknihall.com


- BLAUPUNKT
- Kundenhotline
- Produktmerkmale
- Reinigung
- Fehlerbehebung
- VERY IMPORTANT
- CAUTION
- ATTENTION
- PORTABLE AIR CONDITIONER
- UNPACKING INSTRUCTIONS
- CONTENTS
- NAME OF THE PARTS
- CONTROL PANEL & DESCRIPTION OF FUNCTION
- SPEED
- PROGRAMMABLE TIMER
- SLEEP CONTROL FUNCTION
- ALARM
- REMOTE CONTROL FUNCTION
- NOTICE
- MAINTENANCE
- AIR FILTER
- CONDENSER/EVAPORATOR
- Casing
- POWER SUPPLY
- PLACE FOR USE
- HELPFUL HINTS
- EXHAUST HOSE INSTALLATION
- HOW TO ENJOY THE HEATING FUNCTION?
- TROUBLE SHOOTING
- Technical Specification
- WEE SIGN
Brand : BLAUPUNKT
Model : Arrifana 07
Category : Air Conditioning