
VL 5525 M - Fan AEG - Free user manual and instructions
Find the device manual for free VL 5525 M AEG in PDF.
| Brand | AEG |
| Model | VL 5525 M |
| Product type | Pedestal fan |
| Power supply | 220-240 V, 50 Hz |
| Power consumption | 30 W |
| Protection class | I |
| Net weight | 2.90 kg |
| Number of speeds | 3 (low, medium, high) |
| Oscillation function | Yes, angle of about 60° |
| Adjustable tilt | Yes, angle of about 15° |
| Protective grille | Front and rear, with fixing hooks |
| Control type | Rotary knob (0-3) and oscillation button |
| Material | Plastic and metal |
| Height | Approx. 120 cm (with base and tube) |
| Blade diameter | Approx. 40 cm |
| Cleaning | Dry or slightly damp cloth, without abrasive detergent |
| Safety instructions | Do not insert objects into the grille, do not use near water |
| Warranty | Standard AEG (see conditions) |
| Included accessories | Support base, tube, grilles, blade, screws, nuts |
Frequently Asked Questions - VL 5525 M AEG
User questions about VL 5525 M AEG
0 question about this device. Answer the ones you know or ask your own.
Ask a new question about this device
Download the instructions for your Fan in PDF format for free! Find your manual VL 5525 M - AEG and take your electronic device back in hand. On this page are published all the documents necessary for the use of your device. VL 5525 M by AEG.
USER MANUAL VL 5525 M AEG
Overview of the components.. Page 3
Instruction Manual. Page 23
Technical Data . Page 25
Język polski
Spis tres'ci
D-47906 Kempen/Germany
General Safety Instructions
Read the operating instructions carefully before putting the appliance into operation and keep the instructions including the warranty, the receipt and, if possible, the box with the internal packing. If you give this device to other people, please also pass on the operating instructions.
- The appliance is designed exclusively for private use and for the envisaged purpose. This appliance is not fit for commercial use. Do not use it outdoors. Keep it away from sources of heat, direct sunlight, humidity (never dip it into any liquid) and sharp edges. Do not use the appliance with wet hands. If the appliance is humid or wet, unplug it immediately.
- When cleaning or putting it away, switch off the appliance and always pull out the plug from the socket (pull the plug itself, not the lead) if the appliance is not being used and remove the attached accessories.
- Do not operate the machine without supervision. If you leave the room you should always turn the device off. Remove the plug from the socket.
- The device and the mains lead have to be checked regularly for signs of damage. If damage is found the device must not be used.
- Do not try to repair the appliance on your own. Always contact an authorized technician. To avoid the exposure to danger, always have a faulty cable be replaced only by the manufacturer, by our customer service or by a qualified person and with a cable of the same type.
- Use only original spare parts.
- Pay careful attention to the following "Special Safety Instructions".
Children and Frail Individuals
- In order to ensure your children's safety, please keep all packaging (plastic bags, boxes, polystyrene etc.) out of their reach.
WARNING!
Caution! Do not allow small children to play with the foil as there is a danger of suffocation!
- This device is not intended to be used by individuals (including children) who have restricted physical, sensory or mental abilities and/or insufficient knowledge and/or experience, unless they are supervised by an individual who is responsible for their safety or have received instructions on how to use the device.
Children should be supervised at all times in order to ensure that they do not play with the device.
Symbols in these Instructions for Use
Important information for your safety is specially marked. It is essential to comply with these instructions in order to avoid accidents and prevent damage to the machine:
WARNING:
This warns you of dangers to your health and indicates possible injury risks.
CAUTION:
This refers to possible hazards to the machine or other objects.
NOTE: This highlights tips and information.
Special safety instructions
- Never stick fingers or other objects through the protection grid!
- Watch out for long hair! It can be caught in the fan owing to the air turbulence!
- Use the appliance only with the protection grids on!
The appliance must be assembled completely before use! - Select a stable base to avoid the tipping of the fan during use!
- Do not place the device immediately next to stoves or other sources of heat.
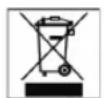
Overview of the components
1 Hook
2 Retaining screw for propeller
3 Flattened section on the motor shaft
4 Motor
5 Adjustment knob for oscillation
6 Rotary switch for the speed
7 Stand tube
8 Base
9 Washer
0 Fastening screw
1 Fastening nut
2 Rear protection grid
3 Attachment ring for rear protection grid
4 Propeller
5 Front protection grid
6 Fastening screw
Unpacking the Device
- Remove the device from its packaging.
- Remove all of the packaging material such as foils, fi lling material, cable holders and cardboard packaging.
- Check the scope of delivery.
24 English
NOTE:
There may still be dust or production residues on the surface of the device. We recommend that you quickly wipe off the housing with a damp cloth.
Assembly instructions
The device must be completely assembled before use! While reading the text it is advisable to refer to the "Overview of the Components".
- Place the stand tube (7) in the base (8).
- Insert the washer (9) on the underside of the base.
- Tighten the fastening screw (10) in a clockwise direction.
- Position the rear protection grid (12) in place in accordance with the recesses.
NOTE:
Please ensure that the carrying handle is facing upwards.
- Turn the attachment ring (13) for the rear protection grid (12) slightly in a clockwise direction.
- Place the propeller in position and tighten it with the retaining screw (2).
CAUTION:
The screw (2) has to be positioned on the fl attented section!
- Attach the front protection grid (15) by inserting the hook (1) with the groove into the rear protection grid.
NOTE:
Ensure that the holes for the attachment screw in the front and rear protective grille are aligned one above the other.
- Close the attachment hooks.
- Secure the protection grid with the fastening screw (16) and the nut (11).
Position
The ideal position is a non-slip, fl at surface.
Putting into Service
Electrical Connection
- Before inserting the plug into the socket. Make sure that the mains voltage to be used matches that of the device. You can find this information on the nameplate.
- Connect the device to a duly installed 230V / 50Hz protective contact socket.
Use
Basic Settings
Set the blower inclination angle before starting the device. You can adjust the inclination angle by tipping the blower casing with both hands.
CAUTION:
The inclination angle amounts to approx. 15^
Rotary Switch
On the rotary switch you can select the following settings:
| o | 1 | slow |
| o | 2 | medium |
| o | 3 | fast |
| o | 0 | off |
Shift to "0" to switch off the device.
Fan Setting
For this you have two possibilities:
Fixed
- Turn the device off.
- Pull out the adjustment knob.
- Hold the fan by the protective cage and turn it in the desired direction.
Oscillating
- Press in the adjustment knob.
The device swivels automatically within a range of approximately 60^
Pull the adjustment knob in order to switch the function off.
Cleaning
WARNING:
Always remove the mains plug before cleaning the device.
- If you need to remove the safety guard: Always switch the device off and remove the mains plug.
- Under no circumstances should you immerse the device in water for cleaning purposes. Otherwise this might result in an electric shock or fire.
CAUTION:
- Do not use a wire brush or any abrasive items.
-
Do not use any acidic or abrasive detergents.
-
Clean the outside of the device with a dry cloth without any additives.
- If the device is very dirty wet a cloth with water and then wipe the device dry once you have finished.
Noise development
The workplace-related emission value is less than 70 dB(A).
Technical Data
Model: VL 5525 M
Power supply: 220-240 V, 50 Hz
Power consumption: 30 W
Protection class: I
Net weight: 2,90 kg
This device has been tested according to all relevant current CE guidelines, such as electromagnetic compatibility and low voltage directives, and has been constructed in accordance with the latest safety regulations.
Subject to technical changes without prior notice!

Meaning of the "Dustbin" Symbol
Protect our environment: do not dispose of electrical equipment in the domestic waste.
Please return any electrical equipment that you will no longer use to the collection points provided for their disposal.
This helps avoid the potential effect of incorrect disposal on the environment and human health.
This will contribute to the recycling and other forms of reutilisation of electrical and electronic equipment.
Information concerning where the equipment can be disposed of can be obtained from your local authority.
26 Jezyk polski
Дябзнсвсгдг He 3aHuaTe DoCTyHMn naKyBaJIbHI MaTePiaIIN (NAACTNKOBi NaKeTn, KapTOHHI Kopo6Kn, NeHONnact TToO).
3ACTEPEXEHHA!
He do3B0JIrTe MaIIM dITRM rpaTncb i3 nIIIBKOIO. IcHyc 3aRpo3a3aIyX!
Le npnla He npnauehen nBnKOpCTaHnIIObMn (BKNHOaOHN dTei) 3 O6MeKeHHMn F3NCHHM, YyTcBMMn a0o pO3ymOBmN 3dIOHOCTHMn, HEDOCTaTHIM DOCBiDOM Ta/ a0o 3HaHHMa - Kpim BnAaKIB, KOJI 3a HMMn DOrJrae BiNDoBaJIbHa 3a iX 6e3neky OCOba a0o BOHn OTPMaJIb BkAzIBKn UdoO BNKOpCTaHHn PnpnaNy.
IITHM He Do3BOJHeO rpaTncb 3 cM npiJaOM. NpTi6eH DOrJIa3a HMM.
CHMBONBuiinctpykui3eknnyatau
Baxnbi BkazibKn IBaWooi 6e3neKn cneuiabHo BiMiuHc.
Ira 3anobirahnHa HeuacnHex BNanikB Ta noKoJKeHb npnaNy
OoB'3KOBO PnTpMMyTeCb Bkazibok.
3ACTEPEKEHHR!
PonepeJxye npo 3arpo3nДЯ BaIoro 3dopoB'a Ta Bka3yE Ha MoJIINBI pI3IKN TpaBM.
yBARA:
Bka3ye Ha moKJIbI 3aRpo3n IIN npInaMy a6o iHux npEmTIB.
BKA3IBKA:
Budinie niiKa3n ta iHOpMauiDnBac.
CneuiJIbHI Bka3iBKN 0oO 6e3neKn IJRA CboRo npHaNy
He ycoByTe naIbci a6o kicb npedmetn cepes 3anobixHy peuitky.
- 06epexHNO 3 DOBnM BOIOccAM: POBITpRnN IOTIK MOKe Ix BCMOKTyBaTH!
- EKcnpnyatyte npnlaTinbKn 3akpnto0 3anobixhopeuitkoHO!
- Péné ékcnnyatauii npinaad Heo6xHNO nobHicTHO 3i6paTNI
Bn6epitb nixoanu ny ndabky taK, uo6 npuaq niu ceknnyaataui He mir nepeknadncb!
He cTabe npnla6n3bko do neuea afo iHux dkepe Tennla.
Детали пиладу
1
2 PerynobalbHn rBnHT dnn nponeepa
3ПлоскemeцеHaBaIyMOtOpY
4 1BvryH
5 PeryIIOBaIbHa KHOIIKa ΦyHKuII KOJIINBaHHB EHTNIJATOpY
6 Nobopotnny peryntop wBnkocti
7 CtpnHexHb
8 CToRk
9 PdkaHa 7aH6a
0 KpiinbHH TBNH
1 KpinnbHa raika
12 3aHn3anobikha pewiitka
13 Kpinnnhe kInbuee 1n 3aHboi 3anobixho peuitkn
14 Ipneneep
15 PepedHra 3anobikha pewiitka
16 Kpiinilbni
TBNHT
Po3naKyBaHH npuJaNy
-ДoctaHbTe npiJa3 3yNAKOBKn.
YcyhBe BcniakyBaIbHi MaTepiAnIK NIIIBKN, MaTepiAn3aNoBHOBAci, Ka6eBiHcKObTa KApToHHy YnaKOBky.
- PpeBipTe KOMJIeKTHiCtB.
BKA3IBKA:
Ha npnaMy MoKytb 6ytn a0b Bnpo6Hni3aJnilKn. PekomeHaiaqBnInpatN Kopnyc 3BOnOKeHo raHupkoIO.
IHCtpyKci3 MOHTaKy
Pepedeknnyatauieho npnaad Heo6xioHO NOBHCIO 36npaTH! PekomHeauiy uHTaTN TeKCT i O3HaMyMTncb i3 nepenikOM detaney npnaady.
- BCTABTE Tpy6y cTOnKy (7) B niDcTaBky (8).
2.ПokладиьпінклдHyшay(9)HaHMHIOCTOPOHy CTOKy. - 3akpyitb kpiinl bHH rBnHT (10) no xOdy roINHHKOBoi cTpiIKN.
- BCTABTe 3aAnHIO 3aNo6iKHy peWitKy (12) 3riDHO na3Am.
BKA3IBKA:
3BepHbIyBaIyHaTe,io6pyuKa 6yIa Bropi.
- PnKpyTb KpInMbHe KInBcE (13) dIaHbOIT 3anobiKHO peuitkn (12) 3a roHNHHKOBOO cTpinko.
- HacyhTe nponeep Ha ctpnKehb i 3akpinitb noro perynIOBAJBHM TBHHTOM (2).
yBArA:
TbHT (2) Maé 3haxOHTHC Ha IIOCKOMY MiCi!
- 3aKpiTb 3anobixHy peWitKy (15), BCTabnHourak (1) npopip30M B 3aDHO 3anobixHy peWitKy.
BKA3IBKA:
3BepHb yBaIy Ha Te, 0o6 OTBOp nI KpINnblnHex TBNITIpePdHBoi I 3aDhBoI 3anO6jHXx peuitOK 3HAOXINNC OIN HAD ppyHM.
- 3akpnbaiTe KpiinblnraK.
- 3aKpinItb 3anobixHy peWitky 3a donomoro KpinnIbHoro rBnHTy (16) i raiKn (11).
Micue nla po3aaybaHH
PpuaTHM Micem Ipa po3aWbAHn e noIora HeKOB3ka nOBepxH.
BVeHHeBeknnyaTaciIO
EneKtpnue nIiklnoehna
- IpeTe Tm, 10o nocTaNTH Bnky Do po3eTK, nepeBiprIte BiIOBViDHCtB HanpyrH MepeXi HanpyrN npuJaY. DaHI Bn 3haJDeTe Ha 3aBOcBkI Ta6nui.
2.Плкшчыпрладdopo3eTKN3aXHCHM KOHTaKTOMHa 230B,50Tq,цHOHeKHO BCTaHOBneHa.
BnKOpncTaHH
Ba30bi HAcTpoIOBaHHH
Ipeen nyckom B eKcnnyatauio BCTaHOBITb Kyt Haxnly BeHTNlA TOpTy. Bn MoKeTe BCTaHOBIIoBaTH Kyt Haxnly B 6aKaHIN NO3nTtMM, IIO nepeKnadaTe Kopnyc BeHTNlAToPyBOMa pykAmN.

YBAGA: Kyt haxinycklaaepnpi6n3Ho 15 rpaucib.
Perynatop wBnKocti
PeryIaTOpOM WbNdkOcTi Bn MoKeTe o6paTH NaCTynH MoKInBocTi:
o 1 noBInbHo
o 2 cepenHbO
0 3 WBNIKO
0 0 BHMKHHYTO
BnMnKaHnBn6epItb no3nji0“
PeryHOBAHBEHTNIAITopHoro arperaTy
BmaeTe DbIMoKJINBOCTI:
HenopyushnCtAN
BmKnHb npua.
BHTKONkyIpeyIOBaHHA.
BizbmitbBeHTnITop 3a 3anO6jHky peuItky i nobepHitb Ioro B TOMy HappMky, 0o Bam notpi6hni.
KOLINBAHNA BeHTNATOPY
- HataChiB KhoNky DnIpeRyIIOBaHnR.
- PpnaIa camocTIIHO 6yIe KOINBaTnC B dian3oHi np6n3-HO 60 rpaDyciB.
ДЯ npINHHeHФHKUKOJI KOLIMBaHHBNTIgHTbpeYJIOBAIbHy KHONKy.
OuHueHH

3ACTEPEXEHHA:
-Пелед очишийнгIM i TextичIHm O6cIyroBaHnM 3aBxIN BITRITb BNkY 3 pO3ETK.
Koln Bucybae 3anobixny peiwitky:3aBxDN BmHKaTe npnaD i BHTHITb BNky 3 po3ETKn.
B JIOHOMy pa3i He onyckaTe npnaI dIry OunueHH B BOy. Ie MoJe npBe3n Do ydApy Ctpymom a6o do nOXXekn.

YBATA:
He BHKOPNCTOByTe IpoTHOI UJTKn a6o IHnx abpa3HBHX npedmetiB.
He BnKOpNCTOByIe roctpnx a6o a6pa3HBHx 3ac06iB DnA OuNueHH.
BHTnpaTne npnna330BHI cyxHO raHupkoIO,6e3doataKOBHX 3ac06IB.
- PnCnblbHlOMy 3acMIeHHI MOXHa 3NerKa 3B0LOXHTn raHcipKy.
Texhihnapametpn
Moelb: VL 5525 M
IopdaHHJKNBJIeHHN: 220-240B,50T
CnoxmbaHn noTyXhOcTi: 30
Irpyna eelenkpo6e3neuHocti: I
Bara HETTO: 2,90 Kr
Ley npnaad 6yno nepebipeho 3riHNO Bcix BiNObiHNx, AKtyaIbHnX DnpeKTHB CE, HAnpknad 1oOe ENEKTpOMarHITHO CymichocTi Ta Hn3bKOBoTBHO DnpeKTHBN, Ta 36ydoBaHO 3 a HOBITHM NIOJOKeHHMm TexHk 6e3neKn.
3aIIuMaEO 3a cO6oI npaBO HaTexHiHi 3MiHn!
38 Pycckn


- Język polski
- General Safety Instructions
- Children and Frail Individuals
- WARNING!
- WARNING:
- CAUTION:
- Special safety instructions
- Overview of the components
- Unpacking the Device
- English
- NOTE:
- Assembly instructions
- Position
- Putting into Service
- Electrical Connection
- Use
- Basic Settings
- Rotary Switch
- Fan Setting
- Fixed
- Oscillating
- Cleaning
- Noise development
- Technical Data
- Meaning of the "Dustbin" Symbol
- Jezyk polski
- 3ACTEPEXEHHA!
- CHMBONBuiinctpykui3eknnyatau
- 3ACTEPEKEHHR!
- yBARA:
- BKA3IBKA:
- CneuiJIbHI Bka3iBKN 0oO 6e3neKn IJRA CboRo npHaNy
- Детали пиладу
- Po3naKyBaHH npuJaNy
- IHCtpyKci3 MOHTaKy
- Micue nla po3aaybaHH
- BVeHHeBeknnyaTaciIO
- EneKtpnue nIiklnoehna
- BnKOpncTaHH
- Ba30bi HAcTpoIOBaHHH
- Perynatop wBnKocti
- PeryHOBAHBEHTNIAITopHoro arperaTy
- HenopyushnCtAN
- KOLINBAHNA BeHTNATOPY
- OuHueHH
- 3ACTEPEXEHHA:
- YBATA:
- Texhihnapametpn
- Pycckn
Brand : AEG
Model : VL 5525 M
Category : Fan