
9 CFM 90 N - Range hood FAGOR - Free user manual and instructions
Find the device manual for free 9 CFM 90 N FAGOR in PDF.
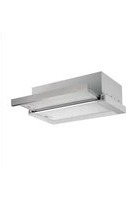
| Product type | Decorative hood |
| Brand | Fagor |
| Model | 9 CFM 90 N |
| Width (cm) | 90 |
| Minimum height (cm) | 65-75 (recommended distance between cooktop and hood) |
| Duct dimensions (mm) | 6 |
| Approximate weight (kg) | 15-20 |
| Power supply | 220-240 V ~ 50 Hz |
| Number of speeds | 3 (Low, Medium, High) |
| 24-hour function | Yes (standby with clock display) |
| Lighting | Yes (standard bulb, replaceable) |
| Filter type | Washable metal grease filters + activated carbon filter (optional) |
| Cleaning grease filters | Dishwasher wash at 60°C or by hand with mild detergent |
| Carbon filter replacement | Every 3 to 6 months depending on use |
| Safety instructions | Unplug before maintenance; do not flambé under the hood; ventilate the room when using combustion appliances simultaneously |
| Installation | By a certified electrician; minimum clearance of 65-75 cm between cooktop and hood |
| Spare parts | Filters, bulb: available from dealer |
| After-sales service | Fagor Consumer Service: 0892 02 88 07 |
| Warranty | Standard (according to dealer terms) |
Frequently Asked Questions - 9 CFM 90 N FAGOR
User questions about 9 CFM 90 N FAGOR
0 question about this device. Answer the ones you know or ask your own.
Ask a new question about this device
Download the instructions for your Range hood in PDF format for free! Find your manual 9 CFM 90 N - FAGOR and take your electronic device back in hand. On this page are published all the documents necessary for the use of your device. 9 CFM 90 N by FAGOR.
USER MANUAL 9 CFM 90 N FAGOR

m = 311
- Safety recommendations 14
- Environmental protection 15
Description of your appliance 16
2 / INSTALLING YOUR APPLIANCE
- Environmental protection 17
3 / USING YOUR APPLIANCE
To use your cooker hood 18
4 / CARING FOR AND CLEANING YOUR APPLIANCE
- Changing and cleaning the anti-grease fi Iters 20
- Installing the carbon fiIter 20
- Changing the light bulb 20
- Maintaining your appliance 21
5/TROUBLESHOOTING 22
6/ AFTER-SALES SERVICE 22
1 /NOTICES TO THE USEREN

Attention
Keep this user guide with your appliance. If the appliance is ever sold or transferred to another person, ensure that the new owner receives the user guide. Please become familiar with these recommendations before installing and using your oven. They were written for your safety and the safety of others.
SAFETY RECOMMENDATIONS
-
This oven was designed for use by private persons in their homes.
-
This appliance is to be used by adults. Make sure that children do not touch and that they do not treat it as a toy. Make sure that they do not touch the appliance's control panel.
-
When you receive the appliance, unpack or have it unpacked immediately. Give it an overall general inspection. Make note of any concerns or reservations on the delivery slip and make sure to keep a copy of this form.
-
Your appliance is intended for standard household use. Do not use it for commercial or industrial purposes or for any other purpose than that for which it was designed.
-
Do not modify or attempt to modify any of the characteristics of this appliance. This would be dangerous to your safety.
-
Repairs must only be carried out by an approved specialist.
-
Always unplug the hood before cleaning it or performing other maintenance acts.
-
Provide adequate ventilation for the room in the case of simultaneous use of the hood and other appliances powered by an energy source other than electricity. This will prevent the hood from aspirating the combustion gases.
-
You should never "fl ambé" dishes under the hood or operate gas rings under the hood without placing cookware on them (the fl ames sucked up into the hood can damage the appliance).
-
When frying food under the appliance,
you must carefully monitor the preparation at all times.
Oils and grease brought to very high temperatures can catch fire.
- Respect the recommended frequency of cleanings and fiiter replacements. The accumulation of grease deposits may cause a fire.
The hood should never be used over a combustible fuel burning stove (wood, coal, etc.).
- Never use steam or high-pressure devices to clean your appliance (requirement imposed by electrical safety).
With a view to constantly improving our products, we reserve the right to modify their technical, functional or aesthetic characteristics, making any changes to their features considered necessary or desirable in view of technical progress.
In order to easily locate the reference information for your appliance, we recommend that you note these data on the "After-Sales Service Department and Customer Relations" page. (This page also explains to you where to find this information on your appliance.)
- This appliance is not intended to be used by persons (including children) with reduced physical, sensory or mental abilities, or persons lacking experience or awareness, unless using it with the help of a person responsible for their safety, or under supervision and with prior instruction in its use.

Warning
In the case of a kitchen heated by a device connected to a chimney (a stove, for example) the "recycling" version of the hood should be installed. Do not use the hood without metal fi Iters.
Suitable ventilation should be provided in the room when the hood is used at the same time as appliances operated by gas or another combustible fuel.
1 /NOTICES TO THE USER EN
ENVIRONMENTAL PROTECTION
- This appliance's packaging material is recyclable. Help recycle it and protect the environment by dropping it off in the municipal receptacles provided for this purpose.
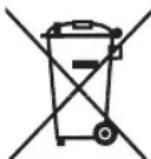
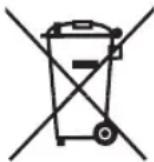
- Your appliance also contains a great amount of recyclable material. It is marked with

this label to indicate the used appliances that should not be mixed with other waste. This way, the appliance recycling organised by your manufacturer will be done under the best possible conditions, in compliance with European Directive 2002/96/EC on Waste Electrical and Electronic Equipment. Contact your town hall or your retailer for the used appliance collection points closest to your home.
- We thank you doing your part to protect the environment.

Warning
Installation should only be performed by installers and quali ed technicians.

Warning
Remove the protective fi lm from the cartridge fi Iter before use.
1 /NOTICES TO THE USEREN
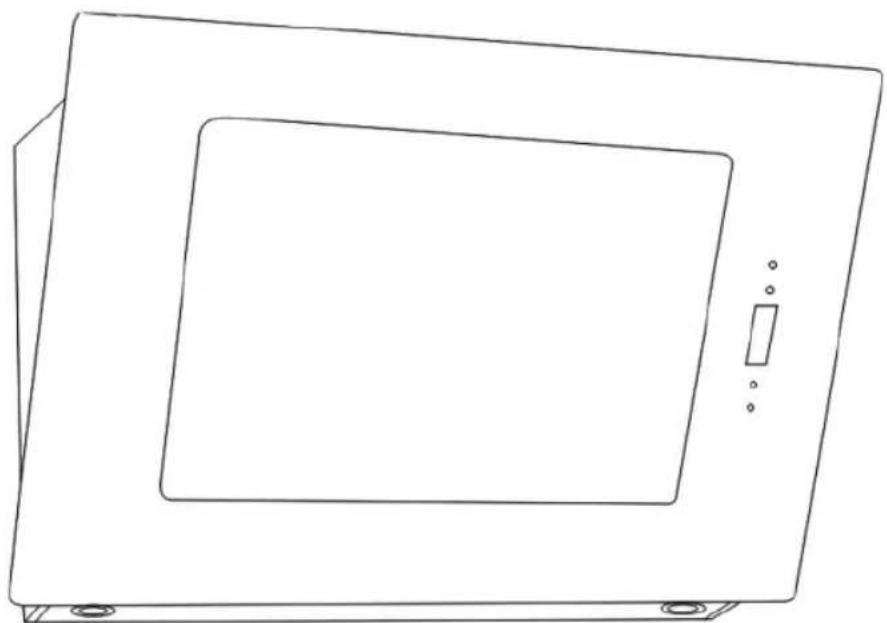
DESCRIPTION OF YOUR APPLIANCE

2 / INSTALLING YOUR APPLIANCE EN
ENVIRONMENTAL PROTECTION
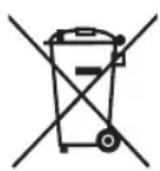
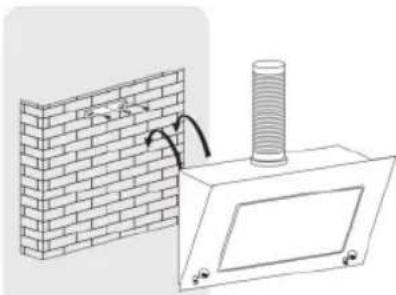
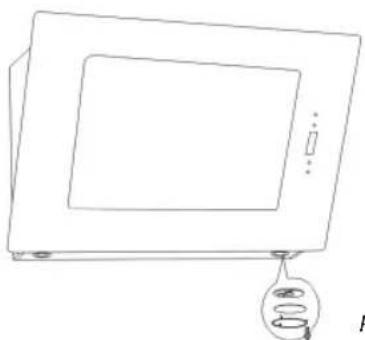
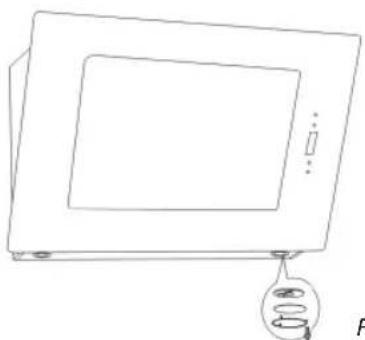
The cooker hood should be placed at a distance of 65 - 75cm (26-30inch) from the cooking surface for the best effect. See Pic 1.
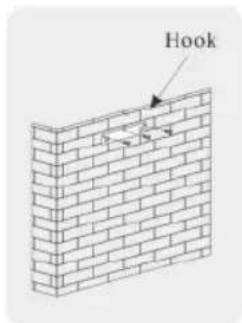
- Install the hook on a suitable place once the installation height is fixed, and keep it in line. See Pic 2.
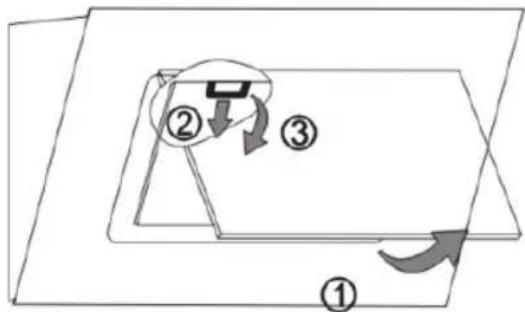
Install the extension tube and chimney on the cooker hood. See Pic 3.
Put the cooker hood on the hook. After adjusting the position, fix the body with safty screw. See Pic 4.

Note
The two safty vents are positioned on a back casing, with diameter of 6mm

Note
-
Any installation work must be carried out by a qualified electrician or competent person.
-
Do not connect the ducting system of the hood to any existing ventilation system which is being used for any other appliance, such as warmer tube, gas tube, hot wind tube.
The angle of the bend of the ventilation pipe should not be less than 120^ ; you must direct the pipe horizontally, or, alternatively, the pipe should go up from the initial point and should be led to an outer wall.
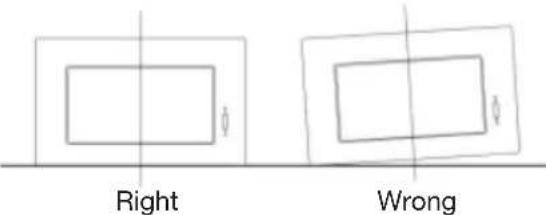
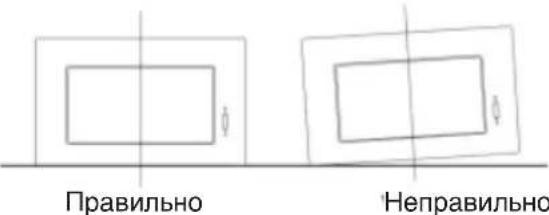
After the installation, make sure that the cooker hood is level to avoid grease collection at on end. See Pic. 5
Pic 1

Pic 2
Extension tube
Pic 3
Pic 4
Pic 5
3 / USING YOUR APPLIANCEEN
TO USE YOUR COOKER HOOD
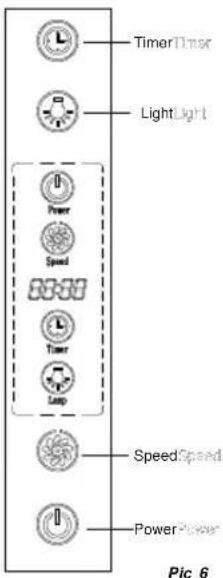
How to use the control panel, See Pic. 6:
- Plug the hood: When power-on, the backlight is lit. Then showing the "24-hour system", the output is off, and the machine standby. Without any operation, the backlight disappear automatically after 30 seconds.
- Press the " button once, the lamp and the " is lit. Press the button again, the lamp and the " is lit will be disappear.
- To use the Speed " button. The motor has three speeds: Low, Medium, High.
Press " button once, the motor starts to work at LOW speed.
Press " button again, the motor works at MEDIUM speed.
Press " button one time more, the motor works at HIGH speed.
- When working, press " button can select the speed of motor: "LOW-MEDIUM HIGH - LOW - MEDIUM... circularly
-
Press the Power " button once, the motor of hood starts to work at the speed it worked last time. Press " button again, the motor stops working.
-
To use the Timer " " button:
The standard time setting is 12:00. When the hood is cut off, the time will return to 12:00 automatically, and you have to reset the time.
- When both " button and " button don't work, "按钮 is used for time-setting.
Press "按钮 for 2 to 5 seconds, time segment "88:88", and the first two number for hour setting will flash. Press "按钮, the number increases by degrees, and press ",",the number
3 / USING YOUR APPLIANCE EN
decreases by degrees. Namely, the variability is 01 each time when it is pressed once; And the largest digit is 23, the " button can't work when exceeded. If it is equal to 00, the " button can't work.
Press the Timer "按钮 for the second time, time segment "88:88", and the last two number for minute setting will fl ash. Press "button, the number increases by degrees, and press ", the number decreases by degrees. Namely, the variability is 01 each time when it is pressed once; And the largest digit is 59, the " button can't work when exceeded. If it is equal to 00, the " button can't work.
Press the Timer " 念 button for the third time, and it means time setting exit and confirmation.
- Long press the Timer "按钮 for 2-5 seconds under mode, it is for hour setting. Press it for the second time: minute setting. Press it for the third time: time setting exit and confirmation. And it will repeat the action again and again when it is pressed.(It can't run this procedure, if the first time pressing doesn't exceed 2 seconds).
4 / CARING FOR AND CLEANING YOUR APPLIANCEEN
CHANGING AND CLEANING THE ANTI-GREASE FILTERS
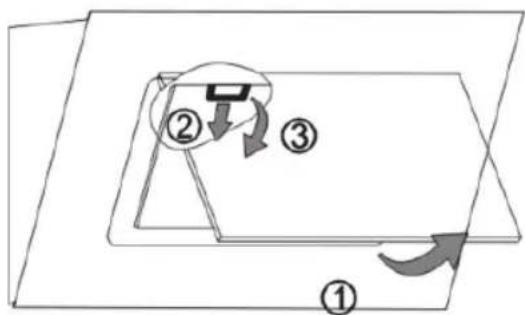
— Tear down your cooker hood as per the approach shown on Pic. 7
-
You can clean the fi Iter as below:
-
Soak them for about 3 minute in hot water (40-50 degrees) with a greaseloosening detergent then brush it gently with a soft brush. Please do not apply too much pressure, avoid to damage it.
-
It can be put into a dishwasher with detergent, set the temperature at around 60 degrees.
-
Please do not use abrasive detergent for it will damage the hood.
Pic 7

Note
Make sure that cooker hood is shut before cleaning.
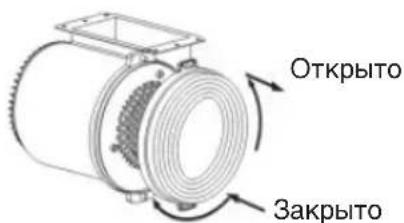
- INSTALLING THE CARBON FILTER (OPTIMAL), SEE PIC.8
- Remove the filters see Pic.7.
The charcoal filters (Pic.8) are located at either end of the motor. Turn the charcoal fi iters anti-clockwise until they are unscrewed.
- Apply reverse procedure to uninstall the charcoal filter.
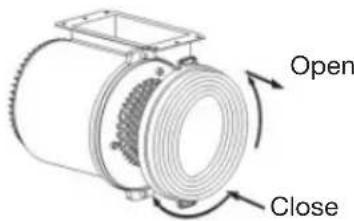
Pic 8

Warning:
the charcoal cannot be washed or red. It should be changed at at three or months according to your cooking habit
CHANGING THE LIGHT BULB
Take the bracket and glass off and then take the broken light bulb off, See Pic 9.
Fix the new light bulb, glass and bracket on. Attention: Before changing the lights, ensure that the appliance is not live.
Pic 9
4 / CARING FOR AND CLEANING YOUR APPLIANCE EN

Warning
Before carrying out any work, the power supply to the hood must be turned off, either
by unplugging it or by using the circuit breaker switch.
MAINTAINING YOUR APPLIANCE
| MAINTENANCE WHAT TO DO | PRODUCTS / ACCESSORIES TO USE | |
| Top surface and accessories | Never use metal scouring pads, abrasive products or excessively stiff brushes. | To clean the body and the lighting port, you should use only commercial household cleaning products diluted in water and then rinse using clean water, drying with a soft cloth. |
| Filter cartridge | This fi iter traps fatty vapours and dust. This component plays an important role in ensuring the effectiveness of your hood. In the event of tough stains, use a non-abrasive cream, then rinse with clean water. | Use a commercial household cleaning product then rinse abundantly and dry. These fi Iters can be cleaned in a vertical position in your dishwasher. (Do not allow them to touch dirty dishes or silverware.) |
| Activated carbon fi Itler | This fi iter traps odours and must be changed at least once a year depending on your level of use. You should order these fi Iters from your dealer (quoting the reference shown on the identifi cation plate located inside the hood) and note the date the fi Itier was changed. | |
To preserve your appliance, we recommend that you use Clearit cleaning products.

Professional expertise
serving individuals
Clearit offers you professional products and solutions designed for the daily care of your household appliances and kitchens.
They are on sale at your regular retailer, along with a complete line of accessories and consumable products.
5/TROUBLESHOOTINGEN
| SYMPTOMS | SOLUTIONS |
| The hood is not working... | Ensure that: • The power is not cut off. • A speed has been selected. |
| The hood is not operating effectively... | Ensure that: • The selected motor speed is sufficient for the quantity of smoke and vapours to be cleared. • The kitchen is suffiently ventilated to allow for fresh air intake. • The carbon fiiter is not worn (hood operating in recycling mode). |
| The hood stopped working | Ensure that: • The power is not cut off. • The single-pole cut-off device was not activated. |
6/ AFTER-SALES SERVICEEN
Any maintenance on your equipment should be undertaken by:
- either your dealer,
- or another quali ed mechanic who is an authorized agent for the brand appliances.
When making an appointment, state the full reference of your equipment (model, type and serial number). This information appears on the manufacturer's nameplate attached to your equipment.
FRS
1 / A L'ATTENTION DE L'UTILISATEUR

Extension tube
Image 3
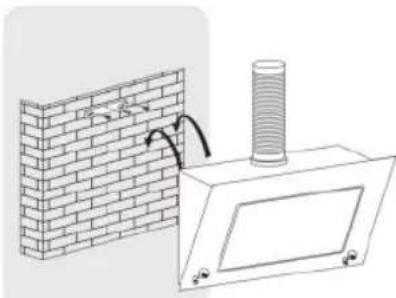
Image 4
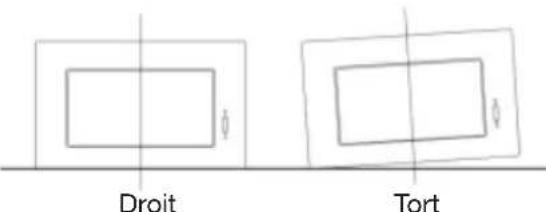
Image 5
3 / MODE D'EMPLOIFR
- UTILISATION DE LA HOTTE ASPIRANTE
- RELATIONS CONSOMMATEURS

m = 311
m = 311
m = 311
2 / INSTALACE VAŠEHO PRISTROJE
· Ochrana zivotniho prostredi 87
3 /POUZITI VASEHO PRISTROJE
2 / INSTALLATION AF APPARATET
BESCHRIJVING VAN HET APPARAAT
2 / HET INSTALLEREN VAN UW APPARAAT NL
BESCHERMING VAN HET MILIEU
2/MOHTAX KXYOHHO BbITJAKK
3AUNTA OKPYKAIOUEN CPEbl 137
3 / INTOJIb3OBAHNE KXYOHHO BbITJAKKNI
KAKIOJIb3OBATcK KyXOHHO BbITAXKOI 138
4/UXO3A BbITAKKO
3AMEHA N OUHCTKA FINbTPOB AHTN-JKIP 140
- YCTAHOBKA YGOLbHOrO ΦnIbTPA 140
3AMEHA JAMNOUKN 140
-OBCLJYKINBAHNE KYXOHHO BbITAKKN 141
5/UCTPAHEHNE HENOJAIOK 142
6/TEXHINUECKOE OBCJYKINBAHINE 142
C ueIbIO NOCTOARHHORO COBepWeHCTBOBaHnHaWeIN PPOyKuM Mbl OCTaBnAeM 3a C6oB npaBO n3MeHrTb TEXHnueckne, yHKUHOHaJIbHbIe IN BHeUHne XapakTePncTnKn B COOTBeTCTBnC HOBeiShMN DOCTNXKeHNHM TEXHnKn.

3TOBaXHO:
Npeed hauaONM nCNoIb3OBAHnny KxOHHO BbITAXKN BHMaTeNbHO npoHTnte
3TO pyKOBOcTBO no yCTaHOBKe n 3KcNpyaTuu N O3HaKOMbTeCb C npaBnAmN erO NCIOJIb3OBaHn.
1/OBSHA INHΦOPMAUNI DJI NIOJb3OBATEJIAPYC

3TOBaXHO
CoxpaHnTe 3To pyKOoDCTBO no 3KcNpyaTuHN. Ecnn BbITXHO annapat Heo6xOIMo npOdaTb Hnn nepeDaTB dpyromy nHy, y6eINTecb B Hanuynny pkoBODCTBa no erO 3KcNpyatauHN. Npeed hauanom MOHTaxa H cNOJIb3OBAHn KyXOHHO BbITAXKN O6raTeNbHO O3HaKOMbTEcB C COBETAM 3TORO pyKOoDCTBa. OHn 6bln HaNCahbl C ueIbO obecneueHn BaWe 6e3OnachocTH n 6e3OnachocTH dpyrnx IIOdei.
- TEXHNUKA BE3ONACHOCTN
- Kyxohna BbITJkKa 6bla pa3pa60TaHa IINcNoJIb3OBaHn YacTHbIMN NlUaMn B XInJIbIX domax.
KyxOHHO BITJAKKO MOrTy N0Ib3OBAbCToBko B3pocblc. CneIte 3a Tem, YTO6bl DeTn He npNKacJIncb K HeN He NCIOB3OBaIN B KaueCTBe irpyuKn. He pa3peWaaTe DeTm HaxkMaTb KHONKn naneHIn ynpabLeHn.
Cpa3y Jxocne DoCTaBKn KxyOHHO BbITAKKN pacnaknyTe ee Hnn Nopocnte Koro-Jn6o CdeNaTb 3TO. PnoBepbTe ee obuHn BnD. B cnyae KaKnxJn6o HapeKaHH CdeJaNTe 3aNcB b KBNtAHnO O doCTaBKe n COXpAHnte OINh 3K3EMnIrp.
Kyxohna BbITAXKa PpeHa3HaueHa DnOBbyHoro NcNoB3OBAHnB 6bIToBbIX YcNOBnX.He nCNoB3yIe ee B KOMMepuecknx ININpOn3BOJCTBeHHbIX CEJAX.
He n3MeHnTe H He NbItaTecb MeHrTaTexHnueckne xapaKtepncTuKn annapata. 3To MoKet 6bITb onaCHO. - PemOHThbIe pa60TbIOJXHbI pOn3BOuNTbcra TOJIbKO KBaJIncnupOBAHHbIMn CneuaJINCtAmN.
BcerdaOTKJIouaHTe BbITaJxHOn KynoI nepeOuICTKoI INN 3aMeHOf qInbTPOB.
O6raTeIbHo npoBeTpBaIte nomeeHne,ecn Hapny C BbITAXHBIM yCTPOXCTBOM pa6otaOTdpyme yCTPOXCTBA, NcTOUHNKOM NITaHNR KOTOpbIX HeRBJIaTc3NEKTPo3Hepn.3To Heo6xOIMO dIraTOrO,HTO6blBbTAKKa He BCacbIbAII ppoDyKTbI cTropAHN.
HeIb3ra roTOBnTb npOdyKtby nITaHna, Tpe6yIOUne npImeHEnHa OTKpbIToro ORHa nn OCTaBnTb NOB BbITAXKO 3aXXKeHHbIe ra3OBbIE ropENKn, He 3aKpbTBe NocDo (npn 3a6ope BO3dYxa OTKpbIToe PnAm MOXET NOBpeDnTB annapaT).
—EcnKyXOHnBaBbITJgKaIprImeHReTcBO BpEm JxapKn,Heo6xoNMO NOBblueHHoe BHMaHne.Macno IIN XnP,pa3OrpeTbe Do BbICOKO TempeTaypbl, MoryT BocnnAmEHHTcbr.
Co6IIOaIe rpaΦnK ONUCTKN 3aMeHbI ΦnIbTpOB. HAKONJIeHne OTLOKeHn Jxupa MoXeT Bbl3BaTb NoXap.
HeIb3a IcNoIb3OBA Tb BbITaK Ky HaI NeaMn, BV KOTOpbIX IcNoIb3yETcra TBepdoe TOnNIBO (6ymara, yOrnb...).
- He nCnoIb3yIte npoBbIe yCTpoiCTBa nIyCTpOiCTBa,pa6ToAIOUne IOD BbICOKm daBJIeHnEM, dIa OYNCTK BbITJXHO KynOla (3TO Tpe6OBaHne 3JIeKtpo6e30NaChOCTn).
C CEJIbIO NOCTOHHORO COBepueHCTBOBaHNHaWeI npOdyKmMbIOCTaBnEm 3a co6oI npaOBn3MeHrTbe ee TexHueCKne, yHKUHOHaNbHbIeN BHeuHne XapaKTepnCTKN B COOTBETCTBN CHOBeuIMM IOCTNXEHNMI TEXHKn.
-Дя 6bIcTepeJUero NOmCKa INHOpMaunno KxOHHO BbITXKe peKOMeHNyEtC3aNcBtB Heo6xoDMbIE CcblKn Ha cTpaHnue «TexHueckoe o6cLyKuBaHnE n pa6To c noTppe6nteJIaMn’. (Ha 3ToJ Xe cTpaHnue POKa3aHo pacNoLoXeHne COOTBeTCTByIOux O6O3HaYeHn Ha CaMOM annapate).
- He npeducmptepno nCNoB3OBaHne KxohHO BbITAXKINIaAMN(BKIOUOaAJeTei)COrpaHnueHHbIMn FIn3nHeCKMn N yMCTBeHHbIMN BO3MOXHOCTfIMN JINI IINaMn, He yMeIOUIMN EIO NpB3OBaTcR. B 3TOm CInyae NpB3OBaHne BbITAXKO B03MOXHO TOJbKO NOI pncmOTPOM OTBECTBEHHORo 3a 6e3OnaCHOCTb INu a N oCNE npedBaPteJIbHO rHCTpyKTaxKa NcNOB3OBaHIO annapata.

BHHMaHne
Ecnnnnnta noKIOueHa KdbIMoxOy (Hanpnmep,neyb), Heo6xOmo 3KcNnyatnpoBaTy yCTPOIcTBO BpeKmE BbITXKKn. He nONb3yTe BbITXkky 6e3 MOyNbHbIX fNtPOB.
B cnyuae nCnOJIb3OBaHnK KxOHHO BbITAXKNO ODHOBpeMeHHO C npyHM NcTPOCTBaMn, pa6oTAQUmHa ra3e Hn Ha Dpyrom TOnJInBe, Heo6xoIIMO npedycmOTpeTB COOTBETCTBYUOYBEHTNJAIO NOMEueHn.
1/OBZAAHΦOPMAZINIPOJIb3OBATEJRA PUC
3AUHTA OKPYXAIOUEIN CPEIbI
- MaTePnAbl, nCNoB3OBAHbIe dIy yNaKOBKn 3TOro annapaTa, MoryT nCNoB3OBAbCS nobTOpHO. Bbl6pacBaH IN B CneUaNbHO npEynCMOTpeHHbIe dIy 3TOrO MyHUnaNbHbIe KOHTeHepbl, Bbl yAcTByeTe B INx yTNIN3aUIM, CNOC6CTByr, TAKIM Oba3OM, COxpaHeHIO OKpyKaIOSei cpebl.
-
Kyxohna BbITaKKa TaKKe CoepKnt MaTePnAbl BTOpHOrO NcNoIb3OBaHnR, BvNy OHa OTMeueHO IOROTINOM, yka3bIBaIOUIM Ha To, YTO Nocne OKOHuaHnR CPOKA 3KcNpyaTauuN 3OT annapaHT HeB3y yTuJIn3NpOBAtB BmecTe C dpyrMM b6bTOBbIMN OTxOaMn. TaKIM 0bpa3OM yTuIN3aUIN aannapatoB, opraHn3OBaHHa IN pON3BOIDtelem, pONCXoNT B COOTBeTCTBnC eBpOeNcknM 3aKOHOaTeNBbIM AKTOM 2002/96/CE 06 yTuIN3aUIN 3NeKTPnuEckoN n 3NeKTPoHHoB 6bTOBOI TexHKn. DnN NOUYehn HOpMaUN O MeToHaxOxJDeHN 6bnXaIIwN X BaWemy DOmy PnyKTob C6opa BblSeJeN n3 yNOTpe6JIeHNH 6bTOBOI TexHKn CneDyET 6bPAITbCB MecThbIe OpraHb BlaCTN NnK ToproBOMy npedCTabNTeIO, y KOTOPoro 6bl npno6peTeH annapat.
-
Mbl 6naroDapmBac3aCOTpyDNHueCTBO B DeJe 3aunTbOkpyKaIOe Cpebl.

BHHMaHne
YcTaHOBka DOJXHa OcyueCTBnATbC KaBAnuHnUpoBaHHbIM NepcoHaIOM.

BhimaHne
Ipeep nepbbim nCnoB3ObaHnEM MoyIbHoro fHbTp aChmnte 3aunTHyIO nnEHy.
1/OBuaHΦOPMAUДJI NIOJB3OBATEJAPYC
ONUCAHNE KYXOHHO BBITAXKKI

2/MOHTAX KXYOHHO BbITAKKNUPC
3AUHTA OKPYXAIUCEI CPEbI
— Kynon KyxOHHO BbITJKKN DOJIKeH pacnonaraTbcn Ha pacctOHH 65-75 cm OT BapOHH NOBepXHOCTn DnA DOCTNXEHn lywero 3oPekTa. Cm. pnc. 1.
- OnpeDenIte BbICOTy, Ha KOTopoN 6yJeT yCTaHOBHeHa BbITJxKka, 3aKpeNITE KpIOK Ha COOTBeTCTByIOUeM MeCTe NOTUeHTpyNJTe erO. Cm. pnc. 2.
- YctaHOBHTe COeINHInTeIbHyIO Tpy6y I BO3dYXOBoJ Ha KynOJI KxOHHO BbITAXKn. CM.pnc.3.
- NObecbTe KynoB BbITaXKn Ha KpIOK. Pocne OKOHaTeNbHOY cTaHOBKn 3aΦnKcnpuTEkOpnyCnpeOxpaHNTbHBIM BNHTOM.CM.pnc.4.
IprnmeuHne
DbanpeoXpaHHTeNbHbIXBeHTKaHaJa DnAmETpOM 6 MM HaxoJrTcB 3aHHeuactn KapKaca.
PnmeuHne
doJXhbl npOn3BOaNTbcra CneuaHnCTOM- 3JeKtpnkom nn NcOm, HMeIoUmm pa3peWeHne Ha TaKe pa6Otbl.
—HeNcNoIb3yIeTeTOTXeBEHTnIaHNOHHbIKaHaI, KOTOpBIMcNoIb3yETCnpyrMUCYCTPOINCTBOM,CnCTeMOIOTONJIeHNIA,NTOBda ra3a nn IROPryero BO3dyxa.
-
YrOJ n3rN6a BeHTnJIauHOnHO KaHaJa DOJXeH 6bITb He MeHee 120^ .BeHTKaHaJI DOJXeH pacNoJaratbcraRopu3oHTanbHo, B npOTnBHom cIyuae erO cJeMyET npINoDnHtB HHaayabHOJ TOUKe N BbIEcTn Ha BHeuHIOCTOpOHy.
-
Nocne MoTaxa y6eHntecb, 4TO Kynon Kyxohno BbITAXKN paCnOJaRaETcA CTporo Ropn30HTaJIbHO, 4TO NO3BOJNT npedOTBpaNTb XHPOBbIe OTNOXKeHna. Cm. pnc.5.

Pnc.1
Pnc.2

Extension tube
Pnc.3

Pnc.4
Pnc.5
3 / INCIOJIb3OBAHNE KYXOHHOBbITJAKKINPYC
- Ecnn KhoNka " " n KhoNka He 3aJeInCTBOBaHbI, KhoNka INCNOJb3yETcA DnA

3 / INCIOJIb3OBAHME KYXOHHO BblTAXKN PUC
HacTpoKn BpeMeHn
- YdepxnBaTe KhoNky "HaxaTneM TeueHne 2-5cekynd,Ha cerMeHTe BpeMeHn "88:88" n TOrda 3acBETcA nepBbIe Dba Yncna HactpoKn BpeMeHn. HaxmaiTe KhoNky "DnYBEInuEHn 3NaueHn HaxmaiTe KhoNky "DnYMeHbWeHn 3NaueHn. KaXdbI pa3 npn HaxkTuN KHOKN YncNo MeHReTcH Na 01, camoe 6OJIbUoe YncNo 23. KhoNka "He cyHKUOnHpyet npn 6JIbWeM YncNe. EcIn YncNo paBHo 00, KhoNka " He cyHKUOnHpyeT.
—HakmTe KhoNky YacbI “BtopoJ pa3.
3acBETcCerMeHn“88:88”> n Dba NocJeHNX YNCSNa HAcTPOKNI MNHYT 3amraOT. Haxmaite KhoNky “ДЯ yBeIyHeHnI 3HaYeHnI Haxmaite ”DЯ yMeHbSeHnI 3HaYeHnI.
KaKdbi pa3 npn HaxkTmN KhoNk YncNo MeHReTcHa 01, camoe 6oNbSoe YncNo 59. KhoNka " He yHKUHOHPyET npn 6IbWeM 3NaueHm. Ecnn YncNo paBHO 00, KhoNka" "He yHKUHOHPyET
—Haxmte KhoNky Yacbl “TpeTn pa3IbBixOda I3 HAcTpOkiBpEmHn I NOdTBePxxDeHn BBOda.
- YdepxnBaIte HaxaTneM KhoNky " 9 Acbl B TeueHne 2-5 cekyHb B 3Tom pexnme IJn HaCTPOKu YacOB. Ppi NOBTOPHOM HaxaTNI 3ACBETATc MHyTb. Ppi TpeTbeM HaxaTNI npOn3OJET BBOD DaHHbIX N BbIXoJ. KhoNka 6byet NOBTOPbTb 3TO DeiCTBne Ppi KaXdom ee HaxaTNI (Bbl He CMOxTe BbINOHNHTb npoueDpy, ecnn B nepBbI pa3 He 6yDeTe ydepxnBaTb KhoNkY 6oee 2 cekyHd).
4/ YXOD 3A BbITAAKKOIPYUC
3AMEHA N OUHCTKA ΦNJIbTPOB AHTN-KINP
-
IOTAHHTe BHN3 KynoI BbITAXKN, KaK 3TO NOKa3aHO Ha pnc.7
-
PpomOte pJIbTp, KaK onIncaHO HnKe:
1.ПлoxкTeФиьтпрпrimeрноHa3MHHytBI B ropayuBody(40-50 rpaDycOB)cMOUIM CpeCTBOM,ydAJIHOUM XnP,3aTeM CJIerKa NOTpIte MЯrkO uTochKo.He TpIte CunbHo, YTO6bI He NOBpeNTbФиьт.
- MoXHoMbITb erO B nocydomoeyHoi MaunHe CdoabJIeHNEM MOUeero cpeCTBa.IocTaBbTe TEMnepaTpy npImepHO 60 rpaDycob.
He cneNyET nCnOJb3OBaTb cyXne YnCTAunE cpeIcTBA, KOTOpblc MOrY T NOBpeIITb NOBepxHocTb BblTAKN.

PpmeaHne
Ipepa y6opkoyn6eunrtecb,TO BbITAAKka
OTKJIOUeHa.
Pnc.7
- YCTAHOBKA YIOLbHOrO ΦNJIbTPA (HA BbIEOP), CM. PNC. 8
- IV3BnEKeNte QmJIbTpbl CM. pnc.7.
-ФильтпсдревechьIMугнEM(pnc.8)нхояТСИ NOКраимДвигаTeN.IПоверпteФильтпIpOTИЧаCOВОВСТpeЛКИ NBIKpyTITe.
-CobepuTe o6paTHbIe DeHCTBnIaNJa DEMoHTaxa yroIbHorO qnlbTpA.
Pnc.8

BHMaHne:
DpeBecbI yronb He MoETCa N NOBTOpHO
He HcNoIb3yeTc. CJeIyER 3aMeHrTb eRo KaXdble
TpH HnH Wectb MecAueB B 3aBNCMIOCTN OT
HHTEHCNBHOCTN NCOJb3OBAHNA.
3AMEHA JAMNOyKIN
CHIMITE KpeIeHne nCTeKIO, 3aTeM BblkpyTITe neperopeBswyIO naMNoCy, cm. pnc.9.
BkpyTne HObyIO JAMnOChy, yCTaHOBtE CTeKNo n KpeIJIeHne. BHMaHHe: nepe3aMeHOJ lamnochkyb6dntecb, YTO BBITaKKa OTKnIOUeHa.
Pnc.9

BHHMaHHe
Ipeed npoBeHnem KaKnx-1n60 pa60 Heo6xOJnMo OTKnIOuHTb BbITaXkY 1neKTpocETn, BbITAHyB BNkY n3 pO3ETKn nnn C NOMOsbIO py6nNbHnka.
- OBCJNYKUBAHNE KYXOHHO BbITAXKKN
| MEPOПРЯТNДЕЛСТВИ | ИСПОЛБ3YEMБIE ПОДУKTБI/CРДСТВА |
| ВHEШня NOВерхноctь и ИСПОЛБЗУЕМБIE СРЕДСТВА | Нikогда He ИспOLTьзуITEmetаллочиескne шETК,Cухе чирastsсредствAnLCLIMKOM JХECSTKNeшETKN. |
| ФИльТР (Карtripдж) | ЭТOT ФИльТР 3aDEPЖИBAeTЖИы N ПьЛь.ЭТOTKOMПОЕNT INrpaOT BaxhHyOpOBbB OБecpeHEnnФфФЕKTUBHоR pa60ТыBaшe KuxOHNo BbITJXKKN.DЯ уdALeHnA CToKnxПЯTeH PrIMeHIne MЯrkINReЛ, 3aTeM ONOLCHIneЧИСТоВODоI. |
| ФИльТРСAKTINBИРОВAHнБIM YГЛЕМ | ЭТOT ФИльТР 3aDEPЖИBAeT3aPAXN,И erO 3aMeHnyHeobxOДимо InpON3BOДNTbHe pRege Ondro Pa3a BToD B 3aBnCnMoCTN OTCTeHEN 3KcPJIyAtaUHn.CnpaSHuBAite TakiEФИльТрbl y CBOeroДиСТрбЮТopa(TexHnueckneXapakTEPnCTNKU yKa3aHbIHa BNYrHHe NOBERXHOCTNaIIapapaT)ИЗAPSCbIBaIte DaTy 3aMeHbIФИльТра. |
Для подержаня annapata B xopoшem TexHnueckOM COCTOHRN INCNoIb3yIte CpeIcTBA yxoJa Clearit.

3HaHnH NOnbIT npOpeccnHaNoB Ha cnjX6e notpe6nteJ
Clearit npednaraet MOIOUne CpeCTBa n npoceccnoHaJIbHbIe peueHna IJRA exEeNHeBHorO yXoJa 3a 6blTOBbIMn N KxOHbIMn 3NeKTpOpnp6opamn.
CnpaunBaTe Nauy npOdyKuH, a TaKxte BcIO JINHIO aKceccyapOB n pacxoDhIX MaTePnAIOB B TOPROBbIX TOUkax BaWero HaceIeHHoro NyHKta.
5/YCTPAHEHNE HENOJIADOKPYC
6/TEXHUNECKOE OBCJNYXNBAHNEPVC
PemOH KyxOHHO BbITAKKNOJIXeH BbINOHrTbCA:
TOPRObIM npeIcTaBnTeJIEM;
- INI NIO6bIM KBAInOpOBaHHbIM CNEuHaJNCTOM-IPeDCTaBtTeJEM TOPROOB MapK.
Pn Bb3OBe CneuaHCTa 63aTeBHO COo6uHr Te XeHNueckNe XapaKTepeNKn AnnapaTa (MoJeB, TnI N Homep cepn). 3Tn DaHHbIe PpeDcTaBHeHbI Ha IeHTNuKaunHOnPiactHne, paCNoJoxEHHo Ha BHyTpHen NoBepxHoctn annapata.


- / INSTALLING YOUR APPLIANCE
- / USING YOUR APPLIANCE
- / CARING FOR AND CLEANING YOUR APPLIANCE
- /NOTICES TO THE USEREN
- Attention
- SAFETY RECOMMENDATIONS
- Warning
- /NOTICES TO THE USER EN
- ENVIRONMENTAL PROTECTION
- / INSTALLING YOUR APPLIANCE EN
- Note
- / USING YOUR APPLIANCEEN
- TO USE YOUR COOKER HOOD
- / USING YOUR APPLIANCE EN
- / CARING FOR AND CLEANING YOUR APPLIANCEEN
- CHANGING AND CLEANING THE ANTI-GREASE FILTERS
- - INSTALLING THE CARBON FILTER (OPTIMAL), SEE PIC.8
- Warning:
- CHANGING THE LIGHT BULB
- / CARING FOR AND CLEANING YOUR APPLIANCE EN
- Professional expertise
- serving individuals
- 5/TROUBLESHOOTINGEN
- 6/ AFTER-SALES SERVICEEN
- FRS
- / A L'ATTENTION DE L'UTILISATEUR
- / MODE D'EMPLOIFR
- - UTILISATION DE LA HOTTE ASPIRANTE
- - RELATIONS CONSOMMATEURS
- / INSTALACE VAŠEHO PRISTROJE
- /POUZITI VASEHO PRISTROJE
- / INSTALLATION AF APPARATET
- / HET INSTALLEREN VAN UW APPARAAT NL
- BESCHERMING VAN HET MILIEU
- 2/MOHTAX KXYOHHO BbITJAKK
- / INTOJIb3OBAHNE KXYOHHO BbITJAKKNI
- 4/UXO3A BbITAKKO
- 1/OBSHA INHΦOPMAUNI DJI NIOJb3OBATEJIAPYC
- 3TOBaXHO
- - TEXHNUKA BE3ONACHOCTN
- BHHMaHne
- 1/OBZAAHΦOPMAZINIPOJIb3OBATEJRA PUC
- 3AUHTA OKPYXAIOUEIN CPEIbI
- BhimaHne
- 1/OBuaHΦOPMAUДJI NIOJB3OBATEJAPYC
- 2/MOHTAX KXYOHHO BbITAKKNUPC
- 3AUHTA OKPYXAIUCEI CPEbI
- IprnmeuHne
- PnmeuHne
- / INCIOJIb3OBAHNE KYXOHHOBbITJAKKINPYC
- / INCIOJIb3OBAHME KYXOHHO BblTAXKN PUC
- 4/ YXOD 3A BbITAAKKOIPYUC
- 3AMEHA N OUHCTKA ΦNJIbTPOB AHTN-KINP
- PpmeaHne
- - YCTAHOBKA YIOLbHOrO ΦNJIbTPA (HA BbIEOP), CM. PNC. 8
- BHMaHne:
- 3AMEHA JAMNOyKIN
- BHHMaHHe
- 5/YCTPAHEHNE HENOJIADOKPYC
- 6/TEXHUNECKOE OBCJNYXNBAHNEPVC
Brand : FAGOR
Model : 9 CFM 90 N
Category : Range hood