
9 CFD 90 X - Range hood FAGOR - Free user manual and instructions
Find the device manual for free 9 CFD 90 X FAGOR in PDF.
| Product type | Cooker hood |
| Brand | Fagor |
| Model | 9 CFD 90 X |
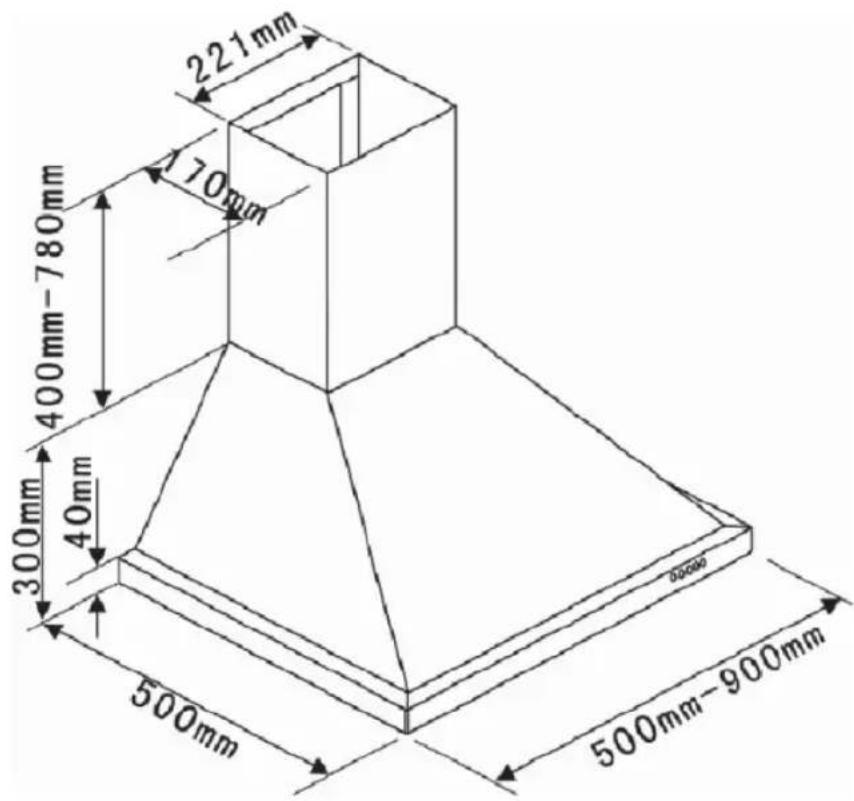
| Width | 90 cm |
| Finish | Stainless steel |
| Installation type | Wall-mounted |
| Controls | Push buttons |
| Number of speeds | 3 |
| Lighting | 2 halogen lamps |
| Operating mode | External extraction or recirculation |
| Main filtration | Washable metal filters |
| Optional filter | Active carbon filter (for recirculation) |
| Air outlet diameter | 125 mm (minimum) |
| Power supply | 220-240 V, 50 Hz, single phase |
| Recommended fuse | 10 or 16 A |
| Power cable | H05 VVF 3×0.75 mm² |
| Minimum distance to hob | ≥ 70 cm |
| Metal filter cleaning | Every 30 hours (dishwasher) |
| Charcoal filter replacement | Every 120 hours |
| Lamp replacement | Halogen lamp (accessible through the porthole) |
| Spare parts available | Charcoal filters, lamps, metal filters |
Frequently Asked Questions - 9 CFD 90 X FAGOR
User questions about 9 CFD 90 X FAGOR
0 question about this device. Answer the ones you know or ask your own.
Ask a new question about this device
Download the instructions for your Range hood in PDF format for free! Find your manual 9 CFD 90 X - FAGOR and take your electronic device back in hand. On this page are published all the documents necessary for the use of your device. 9 CFD 90 X by FAGOR.
USER MANUAL 9 CFD 90 X FAGOR
ENGUIDETO INSTALLATION
FR GUIDE D'UTILISATION
PT MANUAL DE UTILIZACHO
As part of our commitment to constantly improving our products, we reserve the right to make changes to them based on technical advances to their technical and functional features and appearance.

Warning :
Before installing and using your appliance, please carefully read this Guide to Installation and Use, which will allow you to quickly familiarise yourself with its operation.
ENT
1 /NOTICES TO THE USER
- Safety recommendations 20
- Environmental protection 21
- Description of your appliance 22
2 / INSTALLING YOUR APPLIANCE
- Using the evacuation mode 23
- Using the recycling mode
- Electrical connections 24
-Assembling the hood 25 - Assembling the ventilation shaft
^ Outdoor evacuation 26
^ Recycling 27
23
3 / USING YOUR APPLIANCE
- Description of control panel 28
4 / CARING FOR AND CLEANING YOUR APPLIANCE
- Cleaning the fi Iter cartridges 29
- Changing the carbon filter 29
- Cleaning the outer surfaces 30
- Changing the light bulb 30
- Maintaining your appliance 31
5/TROUBLESHOOTING 32
6/ AFTER-SALES SERVICE 33
1 /NOTICES TO THE USEREN

Attention
Keep this user guide with your appliance. If the appliance is ever sold or transferred to another person, ensure that the new owner receives the user guide. Please become familiar with these recommendations before installing and using your oven. They were written for your safety and the safety of others.
SAFETY RECOMMENDATIONS
-
This oven was designed for use by private persons in their homes.
-
This appliance is to be used by adults. Make sure that children do not touch and that they do not treat it as a toy. Make sure that they do not touch the appliance's control panel.
-
When you receive the appliance, unpack or have it unpacked immediately. Give it an overall general inspection. Make note of any concerns or reservations on the delivery slip and make sure to keep a copy of this form.
-
Your appliance is intended for standard household use. Do not use it for commercial or industrial purposes or for any other purpose than that for which it was designed.
-
Do not modify or attempt to modify any of the characteristics of this appliance. This would be dangerous to your safety.
-
Repairs must only be carried out by an approved specialist.
Always unplug the hood before cleaning it or performing other maintenance acts.
-
Provide adequate ventilation for the room in the case of simultaneous use of the hood and other appliances powered by an energy source other than electricity. This will prevent the hood from aspirating the combustion gases.
-
You should never "fl ambé" dishes under the hood or operate gas rings under the hood without placing cookware on them (the fl ames sucked up into the hood can damage the appliance).
-
When frying food under the appliance,
you must carefully monitor the preparation at all times.
Oils and grease brought to very high temperatures can catch fire.
- Respect the recommended frequency of cleanings and fiiter replacements. The accumulation of grease deposits may cause a fire.
The hood should never be used over a combustible fuel burning stove (wood, coal, etc.).
- Never use steam or high-pressure devices to clean your appliance (requirement imposed by electrical safety).
With a view to constantly improving our products, we reserve the right to modify their technical, functional or aesthetic characteristics, making any changes to their features considered necessary or desirable in view of technical progress.
In order to easily locate the reference information for your appliance, we recommend that you note these data on the "After-Sales Service Department and Customer Relations" page.
(This page also explains to you where to find this information on your appliance.)
- This appliance is not intended to be used by persons (including children) with reduced physical, sensory or mental abilities, or persons lacking experience or awareness, unless using it with the help of a person responsible for their safety, or under supervision and with prior instruction in its use.

Warning
In the case of a kitchen heated by a device connected to a chimney (a stove, for example) the "recycling" version of the hood should be installed. Do not use the hood without metal filters.
Suitable ventilation should be provided in the room when the hood is used at the same time as appliances operated by gas or another combustible fuel.
1 /NOTICES TO THE USER EN
ENVIRONMENTAL PROTECTION
- This appliance's packaging material is recyclable. Help recycle it and protect the environment by dropping it off in the municipal receptacles provided for this purpose.
- Your appliance also contains a great amount of recyclable material. It is marked with this label to indicate the used appliances that should not be mixed with other waste. This way,
the appliance recycling organised by your manufacturer will be done under the best possible conditions, in compliance with European Directive 2002/96/ EC on Waste Electrical and Electronic Equipment. Contact your town hall or your retailer for the used appliance collection points closest to your home.
- We thank you doing your part to protect the environment.

Warning
Installation should only be performed by installers and qualifi ed technicians.

Warning
Remove the protective fi lm from the cartridge filter before use.
1 /NOTICES TO THE USEREN
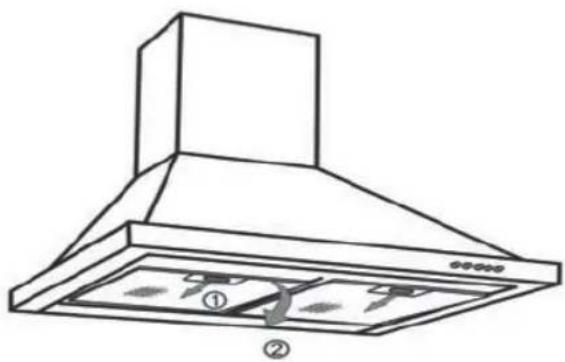
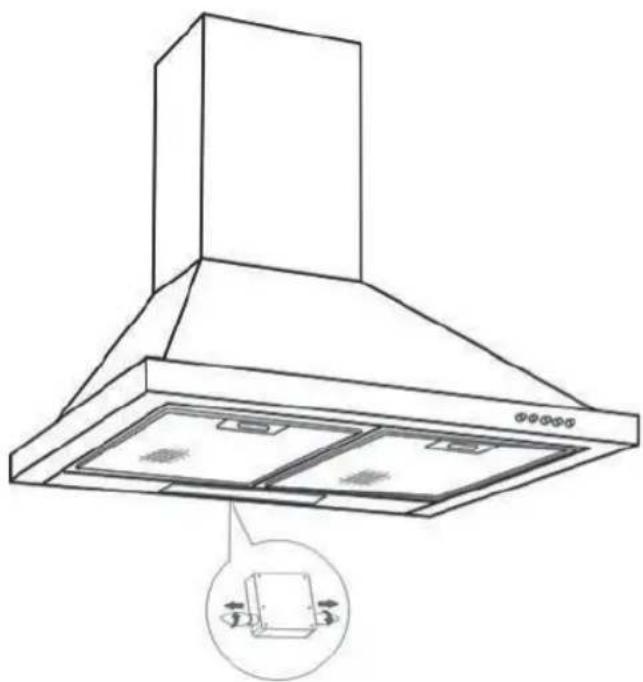
DESCRIPTION OF YOUR APPLIANCE

2 / INSTALLING YOUR APPLIANCE EN
The appliance must be unplugged during installation or when any repairs or maintenance work is being performed.
- Ensure that the network voltage corresponds to the voltage noted on the identificaiton plate located inside the hood.
If the electrical installation at your residence requires any changes in order to hook up your Appliance, call upon a professional electrician.
- If the hood is being used in evacuation mode, do not connect the appliance to a combustion gas exhaust duct (boiler, chimney, etc.) or to a CMV (controlled mechanical ventilation) system.
- Under no circumstances should the exhaust duct empty into the attic.
- Install the hood at a safe distance of at least 70~cm from an electric, gas or combined cooking hob.
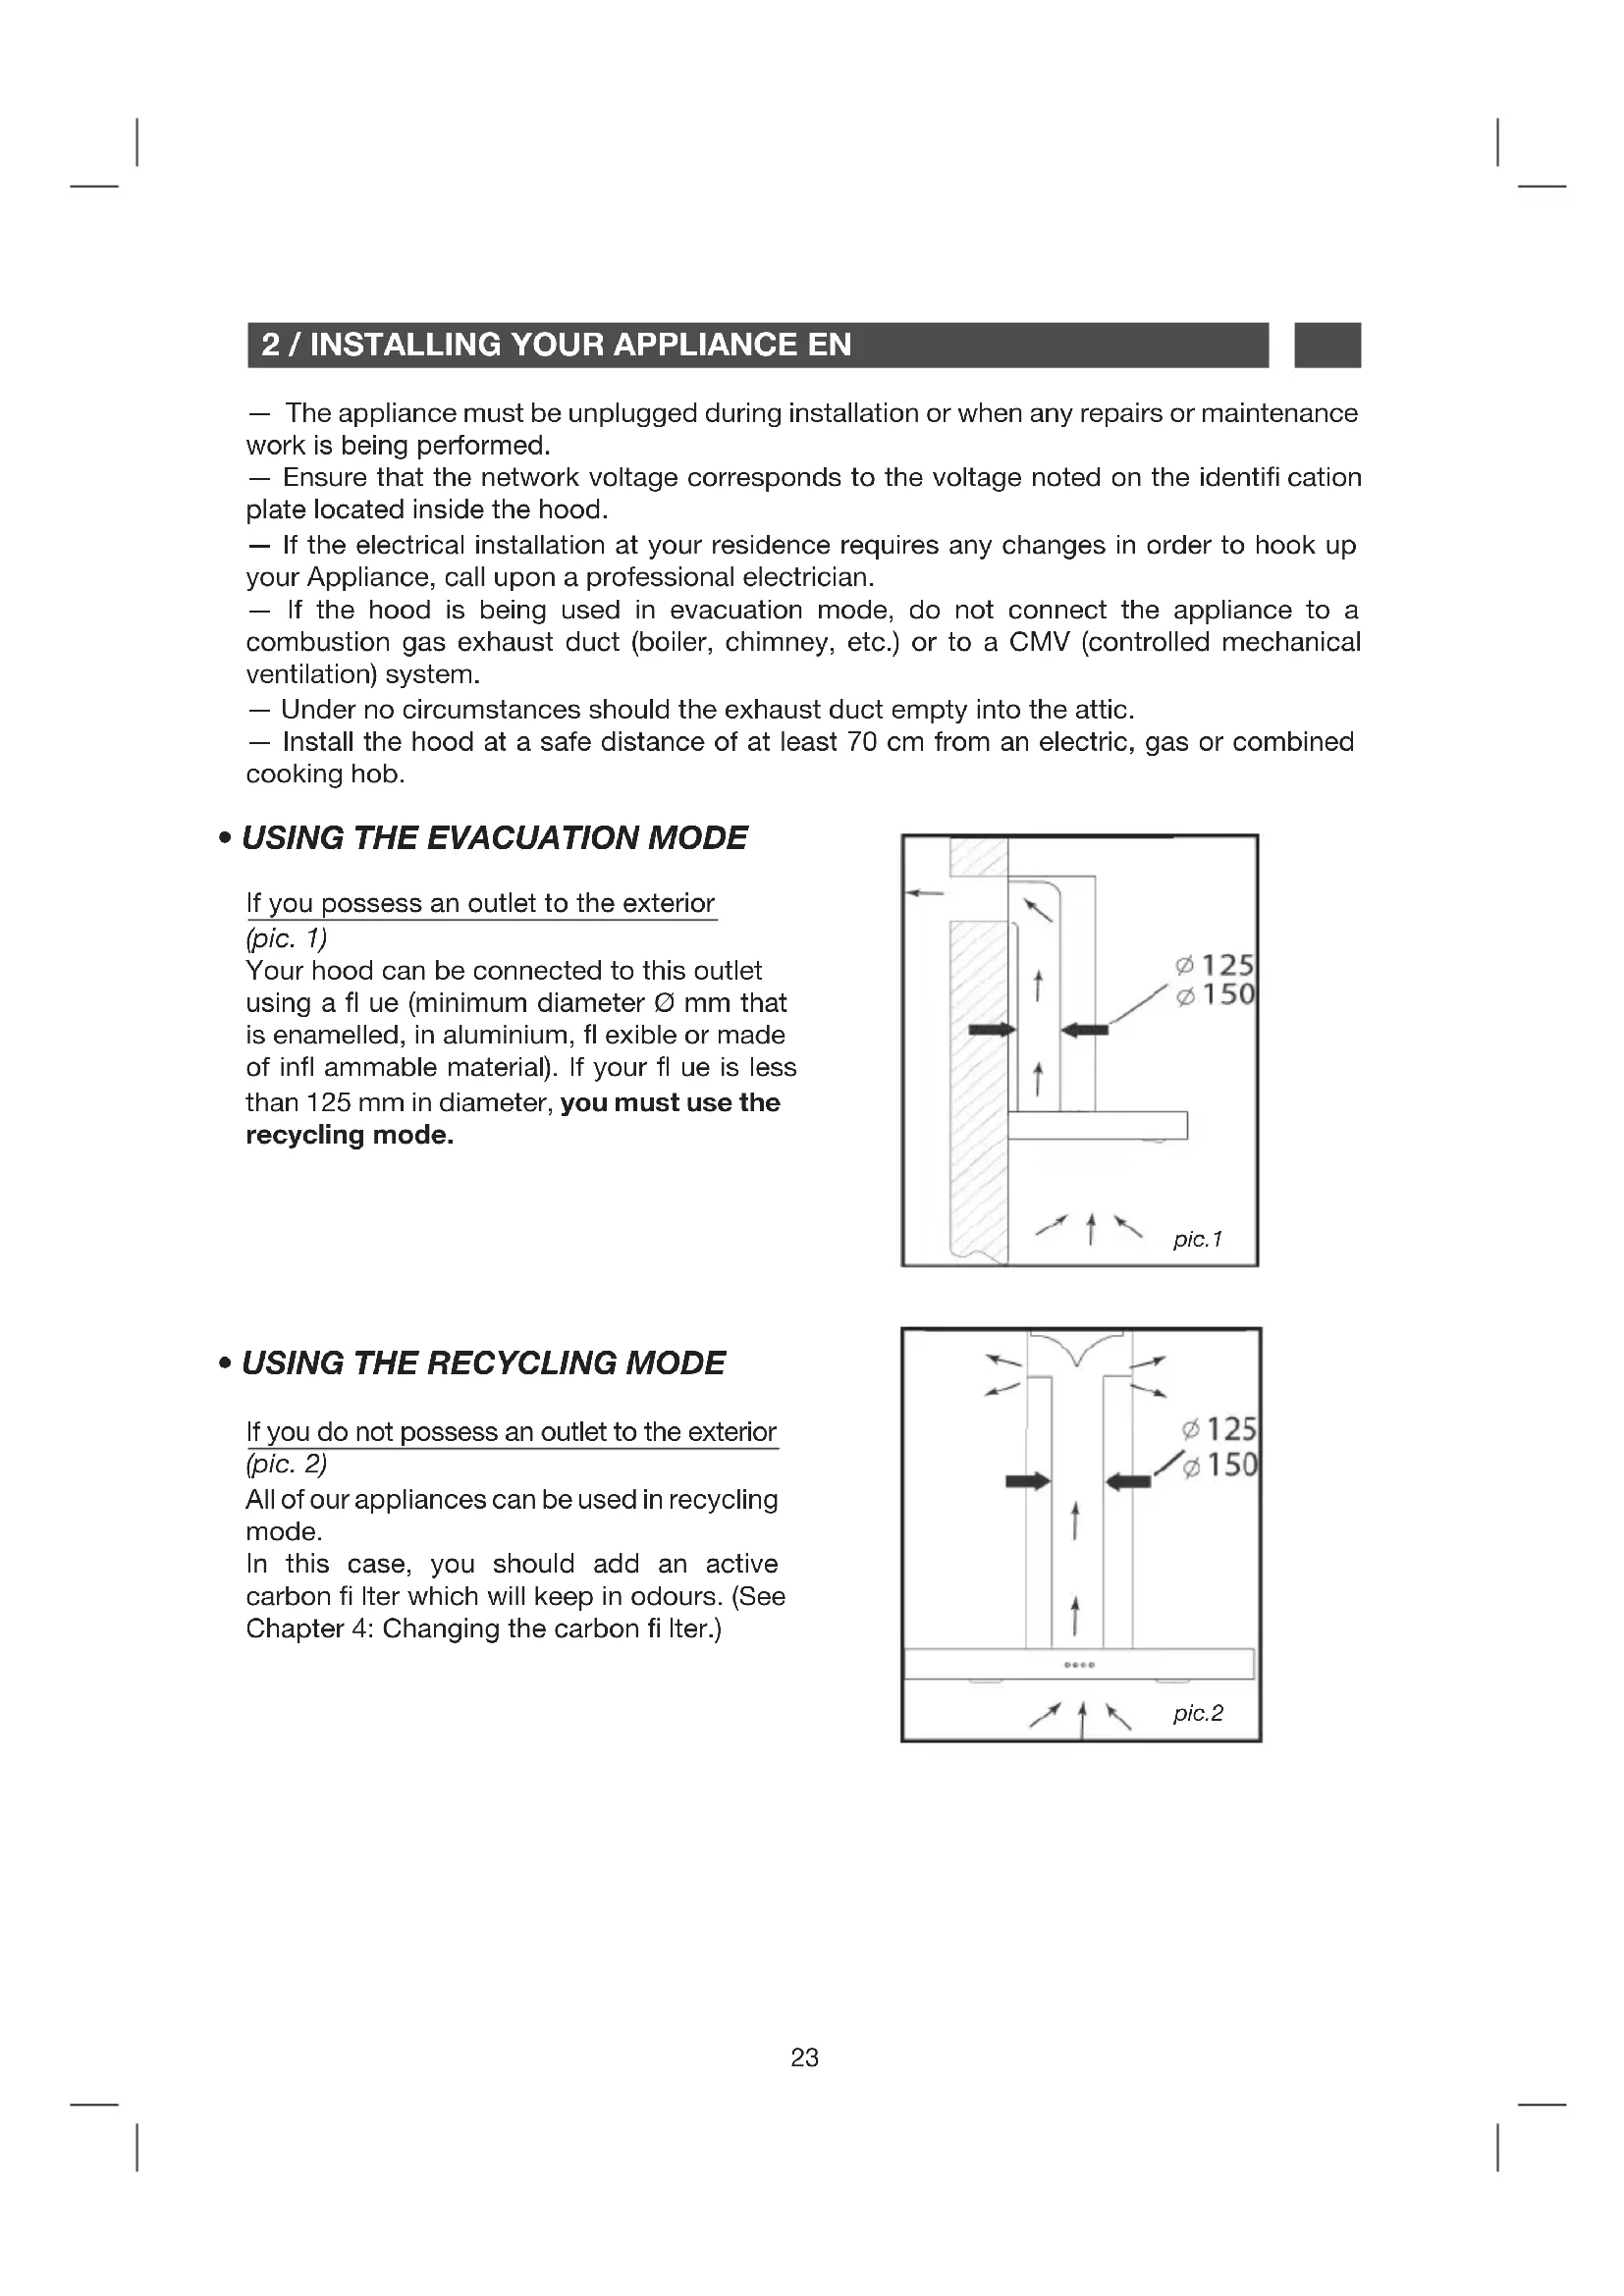
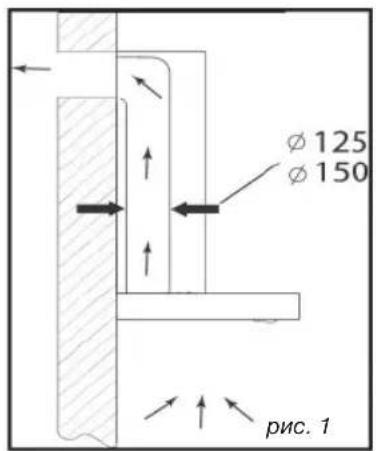
- USING THE EVACUATION MODE
If you possess an outlet to the exterior (pic. 1)
Your hood can be connected to this outlet using a fl ue (minimum diameter mm that is enamelled, in aluminium, fl exible or made of infl ammable material). If your fl ue is less than 125mm in diameter, you must use the recycling mode.

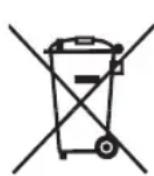
- USING THE RECYCLING MODE
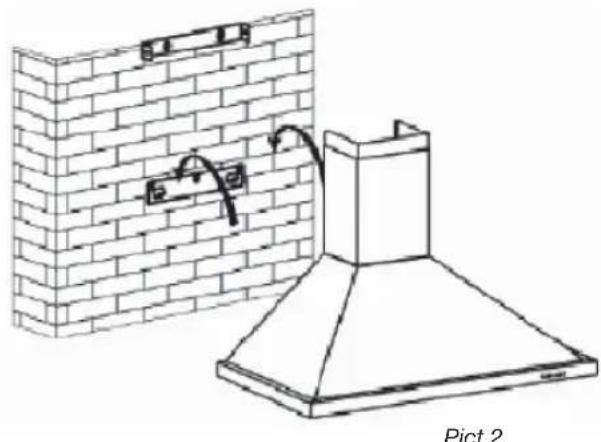
If you do not possess an outlet to the exterior (pic. 2)
All of our appliances can be used in recycling mode.
In this case, you should add an active carbon fi Iter which will keep in odours. (See Chapter 4: Changing the carbon fi Iter.)
2 / INSTALLING YOUR APPLIANCEEN
ELECTRICAL CONNECTIONS
During installation and maintenance operations, the appliance must be unplugged from the electrical grid; fuses must be cut off or removed.
The electrical connections are made before the appliance is installed in its housing.
Ensure that:
the electrical installation has sufficient voltage,
the electrical wires are in good condition,
the diameter of the wires complies with the installation requirements.

Warning
This appliance is delivered with a H 05 VVF power cord that has three- 0.75mm^2 conductors (neutral, phase and ground). It must be connected to the main power supply (which should be a 220-240 V single phase current) via a CE160083 standardised socket that should remain accessible after installation, in keeping with installation guidelines.
We cannot be held responsible for any accident resulting from an inexistent, defective or incorrect ground lead. The fuse for your installation must be 10 or 16A. If the power cable is damaged, call the aftersales service department in order to avoid danger.

Warning
If the electrical installation at your residence requires any changes in order to hook up your appliance, call upon a professional electrician.

Warning
If the hood displays any malfunctions, unplug the appliance or remove the fuse corresponding to the electrical socket where your appliance is plugged in.
2 / INSTALLING YOUR APPLIANCE EN
ASSEMBLING THE HOOD
Warning The hoo
The hood must be installed in compliance with all applicable regulations concerning the ventilation of premises. In France these regulations are described in DTU 61.1 from the CSTB. In particular, the evacuated air should never be conveyed to a duct used to evacuate smoke from appliances that use gas or other combustible fuels. Unused ducts may only be used after approval from a competent specialist.
The minimum distance between the cooking surface and the lowest part of the hood must be 70~cm at least. If the instructions for the hob installed under the hood specify a distance of more than 70~cm , this requirement must be respected.
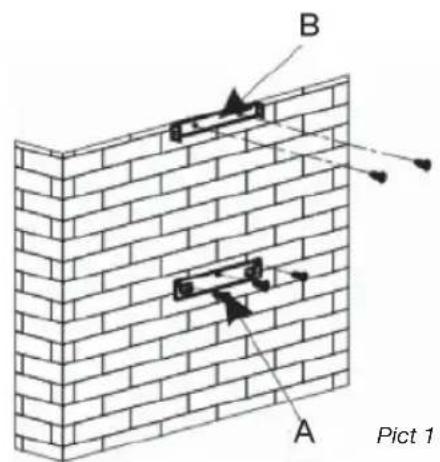
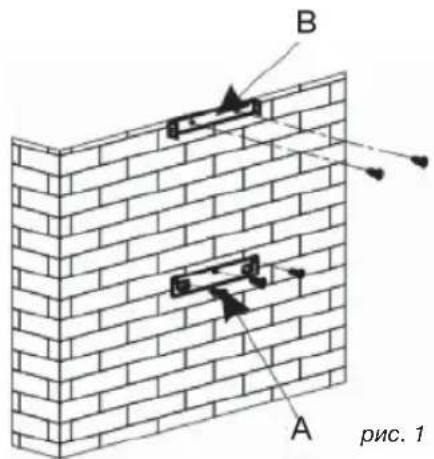
Fixing to the wall :
Mark a vertical line on the wall centred on the cooktop.
-
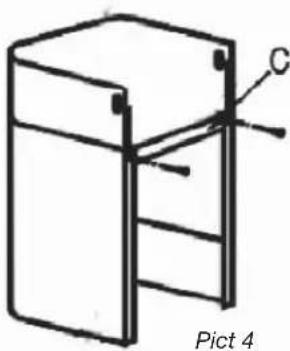
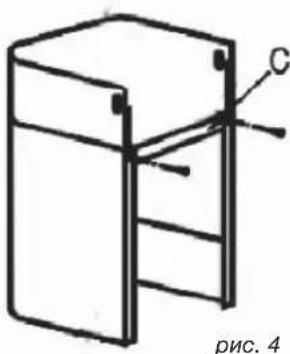
Mark on the wall the three holes that have to be drilled, using the supplied hood suspension hook and observing the recommended distance. (part A Pic. 1)
-
Drill the three 8 mm diameter holes in a suitable position and insert the plugs.
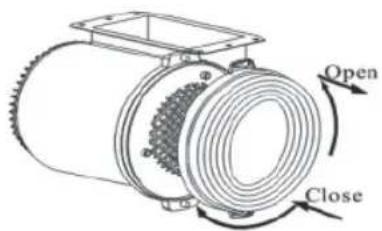
Before fi xing the hood, mount the nonreturn valve on the motor outlet -Secure the hood's fi xing support, ensuring that it is perfectly level. (part A Pic. 1)
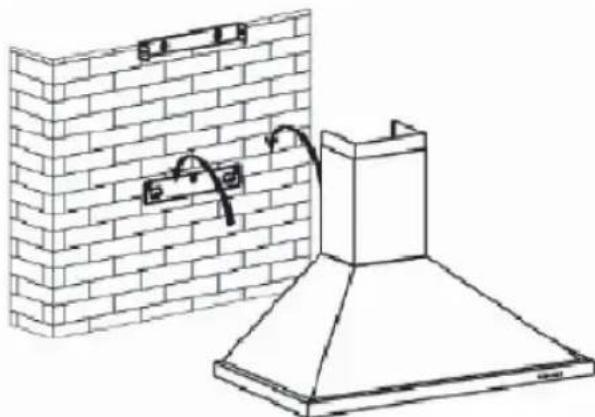
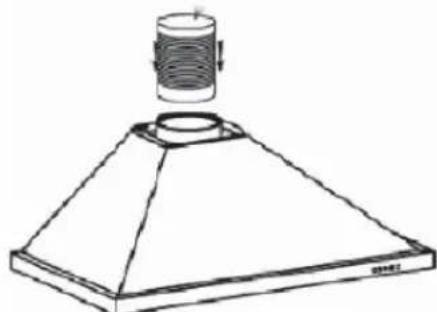
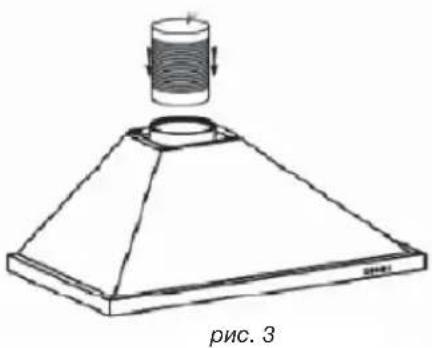
Fix the extendable evacuation sleeve (not included) to the motor outlet without impeding the movement of the non-return valve.(Pic. 3)
- Fit and secure the body of the hood on this support with the screws provided for this purpose. (Pic. 2)

2 / INSTALLING YOUR APPLIANCEEN
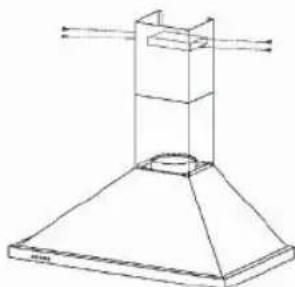
ASSEMBLING THE VENTILATION SHAFT
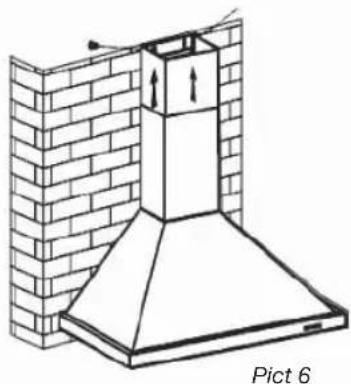
- Outdoor evacuation
Calculate the final height for fixing the duct support U-bracket (part B Pic. 1)
Mark the two holes accordingly
Drill 8 mm diameter holes and secure the duct support bracket, ensuring that it is fixed on the same axis as the hood (part B Pic.1)
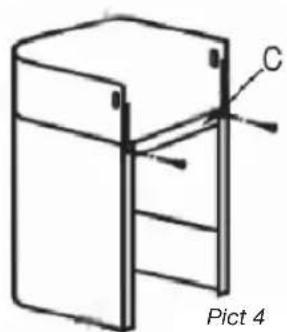
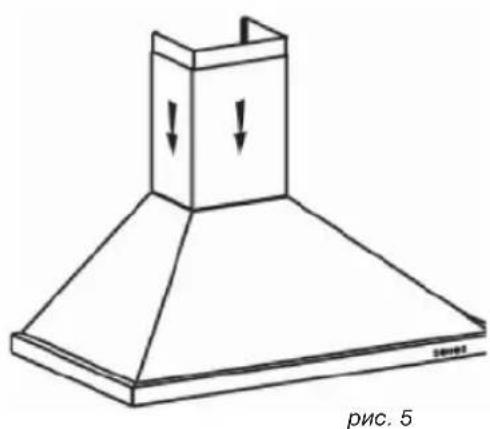
Fix the fl at bracket behind the lower duct.
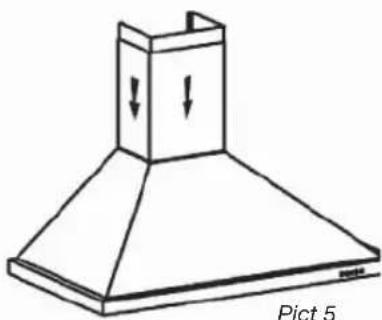
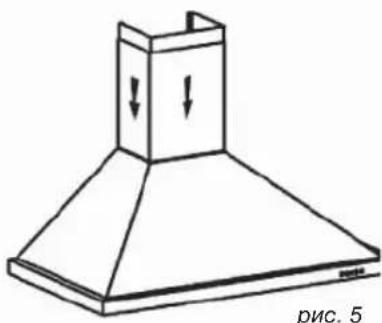
Fix the two ducts to the hood.(Pic. 5)
- Connect the sleeve to the air outlet to the outside.
- Make the electrical connection to the hood using the mains supply cable.
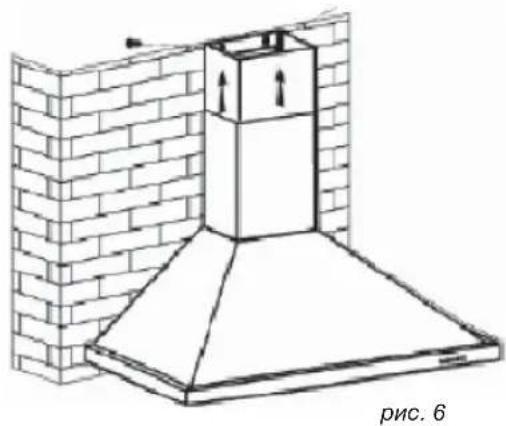
- Lift the upper duct up to the ceiling and fi x it to the bracket using the screws.

Pict 5

Pict 3
2 / INSTALLING YOUR APPLIANCE EN
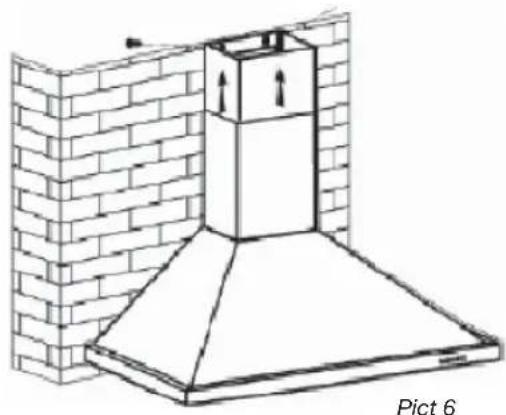
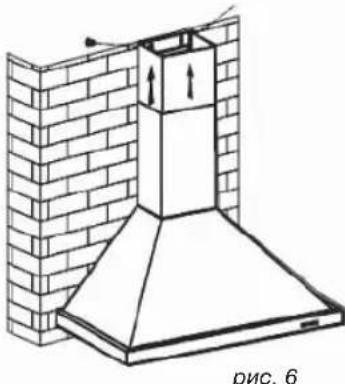
Recycling
Calculate the final height for fixing the duct support U-bracket.
Mark the two holes.
Drill 8 mm diameter holes and secure the duct support bracket, ensuring that it is fixed in the same axis as the hood.
Fix the fl at bracket behind the lower duct.
- Fit the sleeve adapter on the deflector (Pic. 8).
- Connect the extendable sleeve to the deflector.
- Fit the two parts of the duct on to the hood (Pic. 5).
- Fit the deflector (Pic. 8) into the upper duct by the ventilation inlets (Pic. 6)
- Make the electrical connection to the hood using the mains supply cable.
- Lift the upper duct up to the ceiling and fix it to the bracket using the two screws.
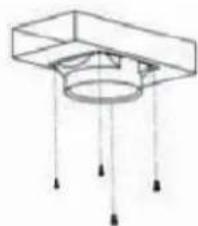
Pict 8


Tip
For optimal use of your appliance, we recommend that you connect the hood to a 150 mm-diameter fl ue (not delivered with the appliance). Minimise the number of angles and bends and the lengths of the fl ue. In the event that the hood will be operated using outdoor evacuation, you should ensure a sufficient inflow of fresh air to avoid a pressure deficiency in the room.

Warning
Do not use tools to remove the safety fi lm of hood.
3 / USING YOUR APPLIANCEEN
- DESCRIPTION OF CONTROL PANEL
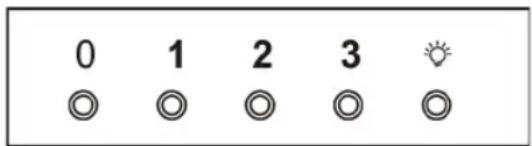
Push button
- Push stop button, and the motor will stop.
- Push the Low button, the buzzer will buzz once, and the motor runs at low speed.
- Push the Mid button, the buzzer will buzz once, and the motor runs at mid speed.
- Push the High button, the buzzer will buzz once, and the motor runs at high speed.
- Push the light button and the two lights will come on. Push it again and the light will turn off.
4 / CARING FOR AND CLEANING YOUR APPLIANCE EN

Warning
Always unplug the hood before cleaning it or performing other maintenance acts. Regular maintenance of your appliance is a guarantee of proper functioning, good performance and durability.

Warning
Failure to respect the guidelines for cleaning the appliance and fi iters may cause fi res. Please carefully adhere to the maintenance recommendations.
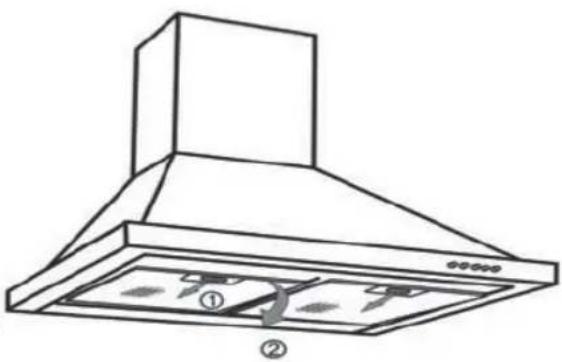
- CLEANING THE FILTER CARTRIDGES
They must be cleaned after approximately 30 hours of use or at least once a month. These fi iters can be cleaned in a vertical position in your dishwasher.
Use a brush, hot water and mild detergent. Rinse and dry them thoroughly before returning them to the hood.
- Dismantling the fi Iter cartridge
Turn the built-in fi Iter cartridge handle.
Tilt the fi lter cartridge downward.
- CHANGING THE CARBON FILTER (optional)
Replace it after approximately 120 hours of use.
- Remove the fi Iter cartridge.
Turn the carbon filter to remove it.
- Do the operation in the reverse order to put a new filter back.
Put the filter cartridges back.

4 / CARING FOR AND CLEANING YOUR APPLIANCEEN
- CLEANING THE OUTER SURFACES
To clean the outside of your hood, use soapy water, but never use abrasive creams, corrosive detergents, scrubbing sponges or brushes. Wipe down with a soft, damp cloth.
CHANGING THE LIGHT BULB

Warning
Before carrying out any work, the power supply to the hood must be turned off, either by unplugging it or by using the circuit breaker switch.
Model with halogen bulb
- Remove the lighting port
Change the halogen bulb. - Replace the bulb by repeating these steps in reverse order.

4 / CARING FOR AND CLEANING YOUR APPLIANCE EN

Warning
Before carrying out any work, the power supply to the hood must be turned off, either by unplugging it or by using the circuit breaker switch.
MAINTAINING YOUR APPLIANCE
| MAINTENANCE WHAT | TO DO | PRODUCTS/ACCESSORIES TO USE |
| Top surface and accessories | Never use metal scouring pads, abrasive products or excessively stiff brushes. | To clean the body and the lighting port, you should use only commercial household cleaning products diluted in water and then rinse using clean water, drying with a soft cloth. |
| Filter cartridge | This fi iter traps fatty vapours and dust. This component plays an important role in ensuring the effectiveness of your hood. In the event of tough stains, use a non-abrasive cream, then rinse with clean water. | Use a commercial household cleaning product then rinse abundantly and dry. These fi Iters can be cleaned in a vertical position in your dishwasher. (Do not allow them to touch dirty dishes or silverware.) |
| Activated carbon fi Iter | This fi iter traps odours and must be changed at least once a year depending on your level of use. You should order these fi Iters from your dealer (quoting the reference shown on the identifi cation plate located inside the hood) and note the date the fi Iter was changed. |
To preserve your appliance, we recommend that you use Clearit cleaning products.

Professional expertise serving individuals
Clearit offers you professional products and solutions designed for the daily care of your household appliances and kitchens.
They are on sale at your regular retailer, along with a complete line of accessories and consumable products.
5/TROUBLESHOOTINGEN
| SYMPTOMS | SOLUTIONS |
| The hood is not working... | Ensure that: · The power is not cut off. · A speed has been selected. |
| The hood is not operating effectively... | Ensure that: · The selected motor speed is sufficient for the quantity of smoke and vapours to be cleared. · The kitchen is suffiently ventilated to allow for fresh air intake. · The carbon fiiter is not worn (hood operating in recycling mode). |
| The hood stopped working. | Ensure that: · The power is not cut off. · The single-pole cut-off device was not activated. |
6 / AFTER- SALES SERVICE EN
Any maintenance on your equipment should be undertaken by :
either your dealer,
- or another qualified mechanic who is an authorized agent for the brand appliances.
When making an appointment, state the full reference of your equipment (model, type and serial number). This information appears on the manufacturer's nameplate attached to your equipment.
FR 34
Attention: Si I'installa
- RELATIONS CONSOMMATEURS
2/INSTALACE PRISTROJE
| KONSERWACJA CO ZROBIĆ? | STOSOWANE PRODUKTY IAKCESORIA | |
| Obudowa i akcesoria | Nigdy nieNSEnzwoStosowacé metalowych zmywaków,ŚrodkówSciernych ani zbyt twardych szczotek. | Do czyszczenia obudowy i oslony lampki国家重点 uzywać wyłącznie powszechnie dostepnych w handlu Środkówmy(jj-)ch Rozpuszczonych w wodzie. Nastepnie噤ci te国家重点 opłukać i osuszyc miękka sciereczka. |
| Filtr kasetowy | Filtr ten zatrzymuje opary, túszcze i kurz. jest elementem zapewniajacym wydajne dziatanie okapu. W przypadku uporcewych plam,国家重点 zastosowac delikatne mleczko my)—e i spłukać czysta woda. | Myć powszechnie dostepnymi w handlu Środkami my)—cymi, obficie splukać i osuszyc. Można myć w zmywarce, w poźycji pionowej. (Nie ustwa)—obok budrych naczyni i srebrnych sztuć)—c.) |
| Filtr z aktywowanym węglem | Filtr ten zatrzymuje zapachy i powinien być wymieniany co najmiej raz w roku, wazole)—no"—ci od cz)—stotiwo"—ci uzytkowania. Filtrny国家重点 zamaw)—u swo)—go sprzemawcy (pod)—numer indeksu wskazany na tablic)—z)—z—z—z—z—z—z—z—z—z—z—z—z—z—z—z—z—z—z—z—z—z—z—z—z—z—z—z—z—z—z—z—z—z—z—z—z—z—z—z—z—z—z—z—z—z—z—z—z—z—z—z)—z)—z—z—z—z—z—z—z—z—z—z—z—z—z—z—z—z—z—z—z—z—z—z—z—z—z—z—z—z—z—z—z—z—z—z—z—z—z—z—z—z—z—z—z—z—z—z—z—z—Z—Z—Z—Z—Z—Z—Z—Z—Z—Z—Z—Z—Z—Z—Z—Z—Z—Z—Z—Z—Z—Z—Z—Z—Z—Z—Z—Z—Z—Z—Z—Z—Z—Z—Z—Z—Z—Z—Z—Z—Z—Z—Z—Z—Z—Z—Z—Z—Z—Z—z—z—z—z—z—z—z—z—z—z—z—z—z—z—z—z—z—z—z—z—z—z—z—z—z—z—z—z—z—z—z—z—z—z—z—z—z—z—z—z—z—z—z—z—z—z—z—z—z—Z—Z—Iz)—z—Iz—Iz—Iz—Iz—Iz—Iz—Iz—Iz—Iz—Iz—Iz—Iz—Iz—Iz—Iz—Iz—Iz—Iz—Iz—Iz—Iz—Iz—Iz—Iz—Iz—Iz—Iz—Iz—Iz—Iz—Iz—Iz—Iz—Iz—Iz—Iz—Iz—Iz—Iz—Iz—Iz—Iz—Iz—Iz—Iz—Iz—Iz—Iz—Iz—Iz)—z—Iz—Iz—Iz—Iz—Iz—Iz—Iz—Iz—Iz—Iz—Iz—Iz—Iz—Iz—Iz—Iz—Iz—Iz—Iz—Iz—Iz—Iz—Iz—Iz—Iz—Iz—Iz—Iz—Iz—Iz—Iz—Iz—Iz—Iz—Iz—Iz—Iz—Iz—Iz—Iz—Iz—Iz—Iz—Iz—Iz—Iz—Iz—IZ—Iz—Iz—Iz—Iz—Iz—Iz—Iz—Iz—Iz—Iz—Iz—Iz—Iz—Iz—Iz—Iz—Iz—Iz—Iz—Iz—Iz—Iz—Iz—Iz—Iz—Iz—Iz—Iz—Iz—Iz—Iz—Iz—Iz—Iz—Iz—Iz—Iz—Iz—Iz—Iz—Iz—Iz—Iz—Iz—Iz—Iz—Iz—Iz—Iz—IZ—Iz)—z—Iz—Iz—Iz—Iz—Iz—Iz—Iz—Iz—Iz—Iz—Iz—Iz—Iz—Iz—Iz—Iz—Iz—Iz—Iz—Iz—Iz—Iz—Iz—Iz—Iz—Iz—Iz—Iz—Iz—Iz—Iz—Iz—Iz—Iz—Iz—Iz—Iz—Iz—Iz—Iz—Iz—Iz—Iz—Iz—Iz—Iz—Iz)—z—Iz)—z—Iz—Iz—Iz—Iz—Iz—Iz—Iz—Iz—Iz—Iz—Iz—Iz—Iz—Iz—Iz—Iz—Iz—Iz—Iz—Iz—Iz—Iz—Iz—Iz—Iz—Iz—Iz—Iz—Iz—Iz—Iz—Iz—Iz—Iz—Iz—Iz—Iz—Iz—Iz—Iz—Iz—Iz—Iz—Iz—Iz—Iz—Iz)—Z—Iz—Iz—Iz—Iz—Iz—Iz—Iz—Iz—Iz—Iz—Iz—Iz—Iz—Iz—Iz—Iz—Iz—Iz—Iz—Iz—Iz—Iz—Iz—Iz—Iz—Iz—Iz—Iz—Iz—Iz—Iz—Iz—Iz—Iz—Iz—Iz—Iz—Iz—Iz—Iz—Iz—Iz—Iz—Iz—Iz—Iz—Iz—Iz—Iz)—Z—Iz)—Z—Iz—Iz—Iz—Iz—Iz—Iz—Iz—Iz—Iz—Iz—Iz—Iz—Iz—Iz—Iz—Iz—Iz—Iz—Iz—Iz—Iz—Iz—Iz—Iz—Iz—Iz—Iz—Iz—Iz—Iz—Iz—Iz—Iz—Iz—Iz—Iz—Iz—Iz—Iz—Iz—Iz—Iz—Iz—Iz—Iz—Iz—Iz—IZ—Iz—IZ—Iz—Iz—Iz—Iz—Iz—Iz—Iz—Iz—Iz—Iz—Iz—Iz—Iz—Iz—Iz—Iz—Iz—Iz—Iz—Iz—Iz—Iz—Iz—Iz—Iz—Iz—Iz—Iz—Iz—Iz—Iz—Iz—Iz—Iz—Iz—Iz—Iz—Iz—Iz—Iz—Iz—Iz—Iz—Iz—Iz—Iz—Iz—IZ—Iz)—Z—Iz—Iz—Iz—Iz—Iz—Iz—Iz—Iz—Iz—Iz—Iz—Iz—Iz—Iz—Iz—Iz—Iz—Iz—Iz—Iz—Iz—Iz—Iz—Iz—Iz—Iz—Iz—Iz—Iz—Iz—Iz—Iz—Iz—Iz—Iz—Iz—Iz—Iz—Iz—Iz—Iz—Iz—Iz—Iz—Iz—Iz—Iz)—Z—Iz—IZ—Iz—Iz—Iz—Iz—Iz—Iz—Iz—Iz—Iz—Iz—Iz—Iz—Iz—Iz—Iz—Iz—Iz—Iz—Iz—Iz—Iz—Iz—Iz—Iz—Iz—Iz—Iz—Iz—Iz—Iz—Iz—Iz—Iz—Iz—Iz—Iz—Iz—Iz—Iz—Iz—Iz—Iz—Iz—Iz—Iz—Iz—Iz)—Z—Iz)—z—Iz—Iz—Iz—Iz—Iz—Iz—Iz—Iz—Iz—Iz—Iz—Iz—Iz—Iz—Iz—Iz—Iz—Iz—Iz—Iz—Iz—Iz—Iz—Iz—Iz—Iz—Iz—Iz—Iz—Iz—Iz—Iz—Iz—Iz—Iz—Iz—Iz—Iz—Iz—Iz—Iz—Iz—Iz—Iz—Iz—Iz—Iz-Iz—Iz—Iz—Iz—Iz—Iz—Iz—Iz—Iz—Iz—Iz—Iz—Iz—Iz—Iz—Iz—Iz—Iz—Iz—Iz—Iz—Iz—Iz—Iz—Iz—Iz—Iz—Iz—Iz—Iz—Iz—Iz—Iz—Iz—Iz—Iz—Iz—Iz—Iz—Iz—Iz—Iz—Iz—Iz—Iz—Iz—Iz—Iz—Iz—Iz-Iz—Iz)—Z—Iz—Iz—Iz—Iz—Iz—Iz—Iz—Iz—Iz—Iz—Iz—Iz—Iz—Iz—Iz—Iz—Iz—Iz—Iz—Iz—Iz—Iz—Iz—Iz—Iz—Iz—Iz—Iz—Iz—Iz—Iz—Iz—Iz—Iz—Iz—Iz—Iz—Iz—Iz—Iz—Iz—Iz—Iz—Iz—Iz—Iz—Iz)—Iz—Iz—Iz—Iz—Iz—Iz—Iz—Iz—Iz—Iz—Iz—Iz—Iz—Iz—Iz—Iz—Iz—Iz—Iz—Iz—Iz—Iz—Iz—Iz—Iz—Iz—Iz—Iz—Iz—Iz—Iz—Iz—Iz—Iz—Iz—Iz—Iz—Iz—Iz—Iz—Iz—Iz—Iz—Iz—Iz—Iz—Iz—Iz—Iz—Iz/Iz)—Z—Iz—Iz—Iz—Iz—Iz—Iz—Iz—Iz—Iz—Iz—Iz—Iz—Iz—Iz—Iz—Iz—Iz—Iz—Iz—Iz—Iz—Iz—Iz—Iz—Iz—Iz—Iz—Iz—Iz—Iz—Iz—Iz—Iz—Iz—Iz—Iz—Iz—Iz—Iz—Iz—Iz—Iz—Iz—Iz—Iz—Iz—Iz—Iz)—Z—IZ—IZ—IZ—IZ—IZ—IZ—IZ—IZ—IZ—IZ—IZ—IZ—IZ—IZ—IZ—IZ—IZ—IZ—IZ—IZ—IZ—IZ—IZ—IZ—IZ—IZ—IZ—IZ—IZ—IZ—IZ—IZ—IZ—IZ—IZ—IZ—IZ—IZ—IZ—IZ—IZ—IZ—IZ—IZ—IZ—IZ—IZ—IZ—IZ—IZ)—Z—IZ—IZ—IZ—IZ—IZ—IZ—IZ—IZ—IZ—IZ—IZ—IZ—IZ—IZ—IZ—IZ—IZ—IZ—IZ—IZ—IZ—IZ—IZ—IZ—IZ—IZ—IZ—IZ—IZ—IZ—IZ—IZ—IZ—IZ—IZ—IZ—IZ—IZ—IZ—IZ—IZ—IZ—IZ—IZ—IZ—IZ—IZ—IZ—Iz)—Z—IZ—IZ—IZ—IZ—IZ—IZ—IZ—IZ—IZ—IZ—IZ—IZ—IZ—IZ—IZ—IZ—IZ—IZ—IZ—IZ—IZ—IZ—IZ—IZ—IZ—IZ—IZ—IZ—IZ—IZ—IZ—IZ—IZ—IZ—IZ—IZ—IZ—IZ—IZ—IZ—IZ—IZ—IZ—IZ—IZ—IZ—IZ—Iz)—Z)—Z)—Z)—Z)—Z)—Z)—Z)—Z)—Z)—Z)—Z)—Z)—Z)—Z)—Z)—Z)—Z)—Z)—Z)—Z)—Z)—Z)—Z)—Z)—Z)—Z)—Z)—Z)—Z)—Z)—Z)—Z)—Z)—Z)—Z)—Z)—Z)—Z)—Z)—Z)—Z)—Z)—Z)—Z)—Z)—Z)—Z)—Z)—Z)—Z)—IZ)—Z)—Z)—Z)—Z)—Z)—Z)—Z)—Z)—Z)—Z)—Z)—Z)—Z)—Z)—Z)—Z)—Z)—Z)—Z)—Z)—Z)—Z)—Z)—Z)—Z)—Z)—Z)—Z)—Z)—Z)—Z)—Z)—Z)—Z)—Z)—Z)—Z)—Z)—Z)—Z)—Z)—Z)—Z)—Z)—Z)—Z)—Z)—Z)—Z”—Z)—Z)—Z)—Z)—Z)—Z)—Z)—Z)—Z)—Z)—Z)—Z)—Z)—Z)—Z)—Z)—Z)—Z)—Z)—Z)—Z)—Z)—Z)—Z)—Z)—Z)—Z)—Z)—Z)—Z)—Z)—Z)—Z)—Z)—Z)—Z)—Z)—Z)—Z)—Z)—Z)—Z)—Z)—Z)—Z)—Z)—Z)—Z)—Z)—Z) | |
2 / INSTALLATION AF APPARATET
BESCHRIJVING VAN HET APPARAAT
2 / INSTALLATIE VAN HET APPARAAT NL
2 / INSTALLATIE VAN HET APPARAATNL
2 / INSTALLATIE VAN HET APPARAATNL
- MONTAGE VAN HET AFVOERKANAAL
2/MOHTAX KXYOHHO BbITAAKKU
- INCIOJIb3OBAHNE B PEXKIME BBITAKKI BO3JYXA 215
- INCIOJIb3OBAHNE B PEXKIME OUHCTKN BO3DyX A 215
-ПОДКЛЮЕНЕКЗЛЕКТРИECHКОCTEN 216
MOHTAX BbITXHORO KYNOLA 217
MOHTAK BO3IyXOBODA 218
^ Pekim BbITaKKn BO3dyxa 218
^ Pekim Ovnctkn Bo3nyxa 219
3 / INCIOJIb3OBAHNE KXYOHHO BbITJAKKIN
-ОПИСАНЕ ЗЛЕМЕТOBУПAPВЛECHИ 220
4/ YXOD 3A KYXOHHO BbITJAKKO IN EE OBCJIYKBAHNE
OuNTKA MOyJbHbIX FNJIbTPOB 221
3AMEHA YTOJIbHOFOΦIbTPA 221
OCHCTKA BHEUHENIOBEPXHOCTN 222
3AMEHA JAMNOUKN 222
MEPOPNPNAIPOYXOy 223
5/UCTPAHEHNE HENOLAOK 224
6/TEXHINUECKOE OBCJYKINBAHNE 225
1/OBJIAR INHΦOPMAUJNДЛЯ NOJIb3OBATEJIAPYC

3TO BaxkHO
CoxpaHnIe 3TO pyKOBODCTBO NO 3KcnnyatauH. EcH N BbITXHO annapat Heo6xOIMO npOdaTb Hnn nepeDAtb dpyromy nUcy, y6eHNTECB Hannuyn pyKOBODCTBA no erO 3KcnnyatauH. Ipeed hauanom MOHTaKa H cnoB3OBAHN KxOHHO BbITXKN O63aTeNbHO O3HaKOMbTECb C COBtAMN 3TORO pyKOBODCTBa. OHn 6blnn Hanncahblc c eIbIoo oecneueHn Baew 6e3OnacHocTN 6e3OnacHocTN dpynx IIOdei.
- TEXHnKA BE30NACHOCTN
- Kyxohna BbITJkka 6bla pa3pa60THa nHNCIOJIb3OBAHNA YACTHBIMN JIuamn B XINbIX DOMax.
KyxohHb BbITXKKO MORYT NOJb3OBaTbCToNbKO B3PocIbe.CneIte 3a TEM, YTO6bl DeTI He npKacalncb K Hn Hn IcNtB3OBaIN B KaeeCTBeIrpyuKn. He pa3pewaTe DeTAM HAXMaTb KHONKn naHei ynpaBHeHa.
Cpa3y Xe nocJe DOCTaBKn KxyoHHO BbITAAKn pacnaknyTe ee nn Nopocnte Koro-Im6o CdeNaTb 3To. PpOBepbTe ee 6uMn BnD. B cnyae KaKxHn6o HapeKaHH CdenaIte 3aNcB KBNTaHnO O DCtABKe IN COXpAHnte OIN 3K3EmnIrp. - Kyxohna BbITJkKa npeHa3NaYeHa InI
06bIyHOrO NcNoJIb3OBaHnB B 6bITOBbIX ycIOBnAX.
He NCIOJIb3yIte ee B KOMMepuecknx INI
npON3BOIDCTBeHHbIX CJIeJX.
He n3MeHnTe Hn He nbTaNTecb MeHrTb TexHnueckne XapaKTepnCTnKn annapata. 3To MOKet 6bITb ONaCHO. - PemOHThbIe pa60TbI dOJIxKHbI npOn3BOJNTbcr TOJbKO KBaJIINΦUINpOBaHHbIMn CNEuNAInCTAmN.
BcerdaOTKJIOaHTe BbITaXHOy KynoI nepeO uNCTKO NIN 3aMeHO fNJIbTPOB.
O6raTeIbHo npoBeTpBaIte NOMEueHHe, ECn HapAy C BbITAKHbIM yCTPOINCTBOM pa60taOT Dpyne yCTPOINCTBa, MTOUHNKOM INTAHIN KOTOpbIX He ABJIeTc3NeKTPo3HEprN. 3TO Heo6xOIMO dIa TOrO, YTO6bl BbITAKKa HE BCacbIBaI pOnyKtBi CROPAHN.
HeIb3ra roTOBnTb npOdyKtby nITaHna, Tpe6yUoIe npImeHEnHr OTKpbITOrO rHr nnocTabnTb NOB BbITAKKO 3aXKeHHbIe ra3OBbIE ropENKn, He 3aKpbTBe NocyoN (npn 3abope BO3dYxa OTKpbIToe PnAm MOKeT NobpeDnTB annapaT).
—EcnKyXOHnBaBbITaKKKa npImeHReTcBO Bpem XapKn,Heo6xOIMNO NobIiueHHoe BVHMaHne.Macno IINJIKP,pa3OrpeTbe Do BbICOKoTEmnpaTypbl, MOrTy BocIIaMeHHTcbr.
CobnIpaTpe rpaqNK OuNCTKN 3aMeHbI
fNbTPOB.HakonJIeHne OTIOXeHNI Xnpa MoXeT
BblBaTb NOxap.
— HeIb3a IcNoIb3OBA Tb BbITJxKy HaI NeaMn, B KOTOpBx IcNoIb3yETcH TBepDoe TOnJIINBO (6ymara, yOrIb...).
He nCnoB3yIte npoBbIe yCTpoNCTBa nnnyCTPOINCTBa,paOtaIOUne NOd BbICOKm DaBNeHnEM,DAOuNCTKn BbITJxHoro KynOna (3TO Tpe6OBaHne 3JIeKTPo6e30NaCHOCTn).
C CEJIbIO NOCTOHHORO COBepueHcTBOBaHnHaWeI npOdyKmMbIOCTaBnHem 3a C6oB IpaBOu3MeHrTbe ee TexHueCKne, yHKUHOHaNbHbIe IN BHeuHne XapaKTepnCTnKn B COOTBETCTBNN C HOBeuHIMN IOCTNXeHnMn TEXHnK.
-Дя 6bIcTepeIeero noncka nHΦopMaunno KxOHHO BbITXKE peKOMeHdyeTcra 3aINCbIBaTb Heo6xoDnMbIe CcblKn Ha cTpaHnue «TexHnueckoe 06cIyKmbaHne npabOta c notpe6nTeJAMn'. (Ha 3ToJ xe cTpaHnue pOKa3aHo paCNOIOKeHne COOTBeTCTByUOux 0603HaueHn Ha caMOM annapate).
- He npeducmptepno nCNoJIb3OBaHne KxOHHO BblTAAKNIUaMM(BKNIOUaJTeE)CORpaHnueHHbIMN fN3uHECKMn UyMCTBeHHbIMN BO3MOXHOCTAMN IINIINIaMn,He yMeIOUcMM EIO NOLb3OBaTcB.C. B 3TOm CIIyae NOJIb3OBAHNE BblTAAKKO B03MOXHO TOJIbKO POInpNCMTPOM OTBeTCTBEHHORO 3a 6e3ONaCHOCTb IINCa I NocJe PpeBaPHTeBHO INHCTpyKTaxKa IO NCNOJIb3OBaHIO aannapata.

BHHMaHne
Ecnn nnta nocknoeHa KdbimoxOy (Hanpnmep, neb), Heo6xOIMO 3KcnnyaTnpobatb yctpoiCTBO B pexnme BbTTKKn. He nonb3yTe BbTTKKy 6e3 MoynbHbIX qnlbTpOB.
B clyuae nncnbo3oBaHn KxohHO BbITAAKK OJHOBpeMeHHO C dpyHM yCTpOcTBAMn, pa6oTaIOHMn Ha ra3e nnHa dpyrom TOnnBe, Heo6xoJIMo npedymOTpeTb COOTBeTCTByUOy BOHTNIAHQ NOMEeHn.
1/OBSSA INHΦOPMAUINI NOJB3OBATEJN PUC
3AUHTA OKPYXAIIOUEN CPEbl
- MaTePnAbI, nCNoB3OBAHbIe dIy yNaKOBKn 3TOro aInpaTa, MOrY T nCNoB3OBAbCBaIOBTOpHO. Bbl6paBaH IN B CneuaJIbHO npElyCMOTpeHHbIe dIy 3TOrO MyHUNIaJIbHbIE KOHTeHepBI, Bbl yAcTByeTe B IN yTINN3aUHN, cNOcO6CTBya, taKIM O6pa3OM, coXpaHeHIO OKpyKaIOSeI cpebl.
- KyxohHb BbITaKKa TaKke CoepKnt MaTePnAbl BTOpHOro IcNoIb3ObaHn, BBNuD yero OHa

OTMeueHO IOROTINOM, yKa3bIBAIOUIM Ha To, YTO NOCNE OKOHaHnC pOka 3KcNllyaTaUIM 3TOT aIInapat HeIb3y yTInIIN3npOBaTB BmecTe C dpyrIMN 6bITOBbIMN OTXoamN. TaKIM O6pa3OM yTInIIN3aUIN aIInapaTOB, oPRAHIN3OBaHHa IN XN pON3BOINTeJEM, pONCXoINB C COOTBETCTBNC C EBPOeIKCNM 3aKOHOaTeJIbHbIM AKTOM 2002/96/CE 06 yTInIIN3aUIN 3JIeKTPuYeCKO IN 3JIeKTPoHHo 6bITOBO TexHnKn. DnR NOJUeyHn INΦOpMaUIN O MecToHaxOXKeHn 6blXaMxN K BaWemy DOmy NYHKTOB c6opa BblweDuEIN 13 yNtpe6JIeHn 6bITOBO TexHnKn CJeDyET 6bpatNTCB R MeCThBi EopAHbI BNaCTn INN K TOPROBOMy PpeCTaBNTeIIO, y KOTOPOrO 6bl npiNo6peTeH anppaT.
- Mbl 6naoradapm Bac 3a cotpydHnueCTBO B deJe 3aunTb Okpykaioe cpebl.

BHHMaHne
YcTaHOBka DOJXHa OcyueCTBnATbCBAJIHnΦuNpuOBaHHbIM NepCOHaJIOM.

BHHMaHne
Ipeep nepbbim HcnoIb3ObaHnem MoynbHoro pnhtpa CHMNTe 3aunTHyIO nnEHK.
1/OBJIAR NHΦOPMAUJIДЛЯ NOJIb3OBATEJIAPYC
ONICAHNE KXYOHHO BbITRAKKN

2/MOHTAX KYXOHHO BbITAKKPNYC
- Ipepe MoHTaxKom HIn NIO6oB Dpyro Onepauee BbITXKy Heo6xOIMO OTKIIOHTb.
- Y6eIntecb, yTO HApJxHHe 3NeKTPocETn COOTBeTCTByet HApJxHHeIO, yKa3aHHOMy B TaBInue XapAKTEpNCtIK. KOTOPA HAXOHTcHa BHVTpeHHe NaHEIN BlITAKKN.
Bcnyae Heo6xoDMOCn Ipon3BecTn 3MeHnB 3JeKtpuecko Yactn BbITAXKn DnR ee NOKIOUeHn, PpIgACNTe KBaINΦuINPOBAHHORO 3JeKTPuKa.
— EcIn yCToIcTBO nCnOlb3yeTcBpeXIMe BbITaKKn BO3dyxa, He NOkNIOaIte aannapat K BbITaKHO Tpy6, IpeHa3HaueHHO IN OTOBda npOyKTOB CROPAHNA KOtna, KAMHa N T.D. INN K WaxTe 06eMEXAHUeCKoBHTINHUN.
-OTBOHNOB03dYXOBDHeNoJXeHBbIXOINbIOKPOBJIIO. - YcTaHaBnBaIe Kyonl Ha 6e3oNaChom paCToHm OT BapOuHOI NOBepXHOCTN 3NeKtpueCKoro, ra3OBOrO nnn CMeuaHHOR Tuna (He MeHee 70 cm).
- IcNoJIb3OBAHNE B PEXNME BbITJXKN BO3dYXA
Ecn eCTb KaHAn dIa OTB0da BO3dyxa I3 NOMeueHH
(pnc.1).
BbITXKApOcOeHnREtC K Hemy C NOMOsbIO BO3dYxOBOda (MHNMaJIbHbI 125 MM, n3 3MaJIa, aIOMMHNHa IIN I3 dpyrOro HeropUcero MaTePnAna). Ecn DNAmETp BO3dYxOBOda MeHee 125 MM, o6raTeNbHO hCNoJb3OBaHne peXnMa OCHCTKn.
- INCIOJIb3OBAHNE B PEXNME OYNCTKI BO3dYXA
Ecn HET KaHana DnA OTBoa BO3yxa n3 NOMeueHH
(pnc. 2).
Bce Bblnyckaemble Haewe KOMnaHne KyxOHhbie BbITAAKKN IMEOT BO3MOXHOCTb pa60TaTb BpeKIMe OCHCTKN BO3Dyxa B NOMEueHHN.
B 3TOM Cnyuae HcnoJb3yIte DOnONHITeNbHO ΦnIbTp C aKTHBnPoBaHHbIM yrIeM, yNaBnBaIOuN 3aIaxn. (cm. IaBy 4: 3aMeHa yroIbHorO fIbTpα).

2/MOHTAX KYXOHHOB BBITAKKINPYC
- NOДКЛIOUЧЕНК ЗЛЕКТРУECHKO CETN
Bo Bpem yctahOBKn annapata N BbINONHeHnpeMOHTbIX pa6OT kyxOHHa BbITXkA DOJXHa 6blTbOTKIOUeHa OT 3NeKTPOCeTn, a npEdoxpaHntenOTKIOUeHbI n3BJIeYeHbl.
IopKnIOueHnK 3JNEKtpocETn PpOu3BOUntCn DO yCTaHOBKn BbITAXKNO BCTPOeHHyIO Me6eJIb.
Y6eTeCb, YTO:
-3NEKTPOCETb IMeET IOCTaTOHYIO MOLHOCTb;
JIINHIN 3JNEKTPocETn HaxoJATcB XopoWem COCTOHHN;
- KaBEN 3JIeKTPocETN IMeIOT dIaMeTp cOrJaCHO HOpM MOHTaXa.

BHHMaHne
Kyxohn BbITAXKa NOCTABNReTcB KOMnKeTc C 3JIeKTPnueCKm TPexXnIbHbIM Ka6enm H 05 VVF (HOB, pa3a n 3a3emHeHc CceHnEM Xn0.75 MM², JnnoNDKIOUeHnB OndoHa3HyO CETb 220 - 240 B NocpeDCTBOM PO3ETKn CTAndapTa CEI 60083, KOtopa dnJXHa 6bItb HnHnBu BpEm MoHTaxa cornaCHO HOpMaM MOHTaxa.
Mbl He 6epem Ha Ce68 OTBeTCTBHeHoc7b 3a HecyactHbIe Cnyan, PpON3oWedwne H3-3a OTCYCTBnN HnnpabunbHO BbINONHeHHoro 3aEmnHen. PpeOxpanHTen 3JKeKtpocTeu DOnXeH 6bIb paccHTan Ha 10 - 16 A. B cnyae NOBpexdHn 3NeKtpueckoro Ka6eBn BO n36ExAHne ONachOCTn NOPaxhenr TOKOM BOCNoJIb3yItec yCnyramcneuaHncta.

BHHMaHne
B Cnyuae Heo6xOaHMoCTn npOn3BeCTN H3MeHeHH B 3NeKTPocET BaWei KBapTnpbl DnI NOkJIIOueHH BbITAAHORO yCTPOcTBa PnIRJaCtTe KBaINΦuNPoBaHOrO 3NeKTPnKa.

BHHMaHne
Ecn BBITAXHON KYNON NMeet KaKHe-TO NOBpeXdEHN,OTKIOUHTe annapat HnN 3BKeHTe npedoxpaHNTb B cenn NoKIOUHTe annapata.
2/MOHTAX KYXOHHO BbITAKK PUC
MOHTAX BbITXHORO KYNOJA

BHHMaHne
YctahOBka DOJXHa npON3BOOnTbcn CORnaCHO DeNCTByIOUHM HopMaB BeHTnIaHn NOMeueHn.Bo OpaHnn 3TN HOpMaTHNBbl N3IOKeHb B DTU 61.1 CSTB. B YacTHocTH, BCacbIbAembl BO3dYx He DOJIxHe OTBOOnTbcB B BEHTnIaUHOHHbe WaxTbI, PpeHa3HaueHHbE dNy YcTPOINCTB, NCNoNb3yIOUx Ra3 Nn Dpyroe TOnJIbO. Be3DeNCTByIOUne BEHTKaHaJIbI MOrTy NcNoJIb3OBaTbCn TOIbKO C pa3peWeHHa KOMnTeHTHOrO nua.
MHHMaJIbHoe pacCTOHNHe MEXy BApOuHOI NOBepxHOCTbIO N OCHOBaHnEM KynoA DoJXHO 6bITb He Mehee 70 cm. EcIn corJIaCHO INCTpyKUN nnTbI, yCTaHOBJEHNO NOD BBITAKKO, paCCTOHNe DOJXHO 6bITb BoJee 70 cm, bepetca pacCTOHNHe, yKa3aHHOE B INCTpyKUN No 3KcnJyataUINnnTbI.
KpenneHnHa cTeHy:
Hapncynte liHHIO ha CTHe,OTMeTbTe ueHTp.
C nOMOsbKpEnHnI Ia NODBeWnBaHn KynoIa OTMeTbTe Ha CteHe 3 OTBepCTn, KOtOpbIe Heo6xOIMO npocBepnITb, paCCHTab N OTMepNB COOTBETCTByOuue paCCTOHNHe (cM. A pnc.1).
- PpocBepnnte 3 OTBepCTnA DnAmetpOM 8 MM B COOTBETCTBYOUX MECTAX N BCTaBbTE Camope3bl.
-Пркртугтke Крелпене Дд ПОДBEшВань Куюla И yбeintecь,чTO OHO paCNoIOnKeHo npaBnJIbHo (CM.Apnc.1).
-
IpeaTcK, KaK IOBecNTb KynoI, yCTaHOBnte 6bpaTHbKnapanHa BbIXOdHoe OTBepCTne DnurataTe.
-
PnKpyTne CMeHHbI OTBODHOyexo (He NOCTaBnRETCB KOMNKeTc) Ha BbIXOHDoe OTBepCTNE DBNRatEn, He HApUaB DnBXeHne aHTNB03BpAthORO KlananaHa (pnc.3).
-
YcTaHOBnTe KynoHaKpEnHeHne npKpyTnte BnHTaMn, NOCTaBnEmbmB KOMnEKeTc (pnc.2).
pnc.2
pnc.3
2/MOHTAX KYXOHHOB BBITAKKINPYC
MOHTAX BO3dYXOBOda
- PexkM BbITaKKN BO3dYxa
-ПрocHTaIte KOHeuHyIO BbICOTy N yCTaHOBITeCKO6y U-06pa3Hoi ФорMbI dIЯ Крелпеня Kopo6a (cM.В риC.1).
- HametbTe 2 OTBepCTna Ha COOTBeTcTByIOUeM pacCToHH.
- PpocBepnTe 2 OTBepCTnI DnAmEtpom 8 MM N PnpcoeDnHInTe COeDnHInTeIbHbI ΦIaHeu BO3dyXoBOJa. CneDnTe, YTObI OH HaxOdnCnToUHO Ha ocN KynOna (cm.B pnc.1)
- PπpKpyTne pIoCKyO CKo6y K 3aDHe nAHeNn HxHKe Yactn BO3dYxOBOda.
- YcTaHOBnTe 06a Kopo6a Bo3dyxOBOda Ha KynoI (pnc.5).
- PnpcoeHnHte nepexoHOn ΦlaHeu K BbIXOHNOMY OTBepCTNIO BEHTINLAHOHOrO KaHaJa.
I OdknIOHTe BbITXkky K 3JIeKTPocetu C NOMOsbIO 3JIeKTPnueCKOro Ka6enr.
- POnHIMnTE BHeuHnKOPO6 BO3dyXOBoJa Do MaKcMaJIbHorO yPoBHa n pNkpeHnTe erO K Cko6e C NOMOsbIO BNHTOB.

2/MOHTAX KYXOHHO BbITAKKPNYC
- PexkM OunchKn BO3dyxa
PaccnTaIe KOHeHyO BbICOTy IINrTO, UTO6bl BCTaBnTB COeHNHTelhBi PnaHeu BO3dyxOBOda.
OTMeTbTe 2 OTBepCTnHa COOTBetCTByIOUcEM pacCToHHN.
- PocBepnTe 2 OTBepCTnAaMeTpOM 8 MM n PnPKpyTnte CoeHNHTeIbHbI ΦNaHeu BO3dyXOBoJa. CneDInTe, YTO6bl OH cUdEJI TOUHO Ha OcN KynOJa.
- PpIKpyTne pIockyIO ckOy K 3aHHe nHaHn HxHHe Nactu BO3dyXoBOda.
- YcTaHOBInTe 06a KOpO6a Bo3dYxOBoJa Ha Kypon (pnc.5).5)
- PnpcoeDnHte nepexoHoi fnaHeu K BbIXOHDomy OTBepCTIO BEHTNJRAOHHORO KaHana.
- PnoknHouTe BbITaKky K 3neKtpocetn C NOMOsbIO 3NEKTPnueCKTO Ka6eJI.
IIOHNMTBE BHeuHn Kopo6 BO3dyXoBOda MoAKCMaJIbHO rOpBHa n npKpeNTe erO K CkOBe C NOMOsbBHTOB.
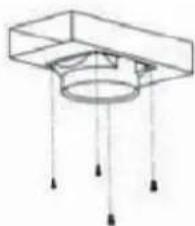
pnc.8

Cobet
ДЯ ONTUMaHbHO NcONb3ObAHn BByTAXHOro annapata COBeyEM NOKKnOyATb erO C NOMOsbIO 3JIeKTPonpoBODa dAmetpom 150 MM (He NoCTabNepTe B KOMNKeTe). MakcImaNbHO cOKpaTne KOJNUeCTBO n3r6OB u nnHy npoBDA. Ecnu BbITaxHoe yCTPOIcTB OpaOtaeTB peXnme HApYxHoro OTBODa, CNeDyET y6eHTbcR B TOM, YTO6bI B NOMEseHne NOCTyNaIIO DOCTaTOHoe KOJNUeCTBO BO3dyxA He Co3DaBaJalacb Oblaactb IONHKeHHOrO daBJeHnA.

BHHMaHne
He nCnoB3yIe HnCTpyMeHTbI JJI CHrTHa 3aunTHoH IneHK.
3 / NCIOJIb3OBAHME KVXOHHO BBITJXKN PYC
ONICAHNE 3JEMEHTOB YNPABNEHNA
KhoNk
KhONka 1. Pn HaxaTN KhoNk0 DBnraTeNb octHaBnBaetc.
KhoNka 2. Pn HaxaTm N KhoNk 1 pa3daTcraHnA, n DnBraTeJIb HaunHaet pa6OtaTb HaMaNo CKOpOCTn.
KhoNka 3. Pn HaxKaTm KHOKn 2 pa3daTcraHnA, n DnBraTeJIb HaunHaet pa6oTaTb Ha CpeDHeckOpocTN.
KhoNka 4. Pn Haxkatn KhoNk 3 pa3daetc cnHnI, n DnBraTeJIb HaunHaet pa60TaTb Ha BbICOKO CKOpocTN.
KhONka 5. Pn HaxaTmN KHONKn 3aropaiOTc
06e lamnoch. Pn NOBTOpHOM HaxaTmN
NoCDBeTKa rachet.
0

1

2

3


4/ yXoJ 3A KYxOHHO BbITAXKOI EE OBCJIyXHBAHME Pyc

BhimaHne
PepoOcHTKOn n npyRnMa pa6otAmn annapat Heo6xOIMO OTKNoaTb. PpOPhNaKTnueckne MeponpAHTN NO yXoHy N O6CnyKBAHNO rapaHTnpYOT HAdexKHyIO N DInTeNbHyIO 3KcnNyatauNIO BBICOKyIO pON3BOAnTENBHOCTb.

BHHMaHne
HecBoeBpeMeHHa OuchTka BbITXHoro yCTpoNCTBa n erO fNbTpOB MoKet npNBecTN K NOxApy. Ctporo npndeepXnBaIteCb npabNJ no yxOdy n o6cnyXnBaHIO.
OuNCTKA MOyIbHbIX ΦIbTPOB
ФильТьг HeобхОДИМ OуИцаТь KaЖдьe 30 YacOB NcПОЛБЗОВАнЯ ИИnpIMePHO OdINH pa3 B MecaK KaMnHmUМ.ФильТьg MOxHObMbITb B NOcYdOMOeHOn MaшиНeВ BePTNKaJIbHOM NpIoXeHnN.
ДЯ OYNCTKnФINbTpOB BpyHyIO NcnoJIb3yIteUeTKy,rOpAyu BOyIMMfKoe MOOuee CpeDCTBO.3aTeM OCTopoXHo npOnoONuTE n BblCyUIneФINbTpblpei INx NOBTOPHO yCTaHOBKOJ.
- CHaTne MoDyIbHOrO qNJIbTpA
- NObepHnTe pbyaXoK MoDyIbHOro cnIbTpA.
—HaKNoHnTe MoDyIbHbI ΦNJIbTp BHN3.
3AMEHA YTOJIbHOrO ΦNJIbTPA
PpOu3BODnTe 3aMeHy yrOJIbHOro qIINbTpapnp6Iu3nTeJbHo KaXDbIe 120 YacOBpa60Tbl.
—CHIMMTEMOdyIbHbIeΦnIbTpbl.
-
NObepHnTe yroIbHbI ΦnIbTp n3BnKeHTe erO.
-
YcTaHOBtHe HOBbI cHJIbTp, NOBTOpNB IpeIbIyUne DeIcTBnB O6paTHOM NOPaIke.
-
YcTaHOBnTe MoDyHbHbIe qNtTpbl.
4/ yXoI 3A KYXOHHO BbITJxKoI N EE OBCJIyXINBAHNEPUC
OuNCTKA BHEWHEN NOBEPXHOCTN
Длг OчNTКВБншн NOBepxHOCTN BbITaXHOrO KynOna NcNoIb3yIteMbIbHyIO BDOy. He NcNoJIb3yIte TELN DnA MblTb, cyXne YnCTaUne CpeIcTBA, XeCTKne MoaANKn IuETKn. IpotnpaIte KynoI BlaxHoN mMKoTpAnOyKOi.
3AMEHA JAMNOUKN

BHHMaHne
Ipeep npoBeHnem KaKnx-Jn6o pa60 Heo6xOaMo o6eToHTb BbITAAKcy, OTKnIOuHB ee ot 3JeKTpocetn.
ModenbraJIOReHHoJ lamnoHcKoI
-CHMnTe nnafoh.
-3aemeHnte ranoreHHyIaamnoHyK.
- YcTaHOBInTe nJafoH Ha npexKHe MeCTO.
4/ YXOD 3A KYXOHHO BbITAXKO I EE OBCJYXINBAHNE PUC

BHHMaHne
Ipeep npoBeHnem KaKnx-Jn6o pa60 Heo6xoJIMO oBecToHTb BbITaXKy, OTKnIOuHB ee ot 3JIeKTpocetN.
MEPOPNPURA TNO YXOy


- Warning :
- ENT
- /NOTICES TO THE USER
- / INSTALLING YOUR APPLIANCE
- 23
- / USING YOUR APPLIANCE
- / CARING FOR AND CLEANING YOUR APPLIANCE
- /NOTICES TO THE USEREN
- Attention
- SAFETY RECOMMENDATIONS
- Warning
- /NOTICES TO THE USER EN
- ENVIRONMENTAL PROTECTION
- / INSTALLING YOUR APPLIANCE EN
- - USING THE EVACUATION MODE
- - USING THE RECYCLING MODE
- / INSTALLING YOUR APPLIANCEEN
- ELECTRICAL CONNECTIONS
- Ensure that:
- ASSEMBLING THE HOOD
- Warning The hoo
- Fixing to the wall :
- ASSEMBLING THE VENTILATION SHAFT
- - Outdoor evacuation
- Recycling
- Tip
- / USING YOUR APPLIANCEEN
- - DESCRIPTION OF CONTROL PANEL
- Push button
- / CARING FOR AND CLEANING YOUR APPLIANCE EN
- - CLEANING THE FILTER CARTRIDGES
- - Dismantling the fi Iter cartridge
- - CHANGING THE CARBON FILTER (optional)
- / CARING FOR AND CLEANING YOUR APPLIANCEEN
- - CLEANING THE OUTER SURFACES
- CHANGING THE LIGHT BULB
- Model with halogen bulb
- Professional expertise serving individuals
- 5/TROUBLESHOOTINGEN
- / AFTER- SALES SERVICE EN
- FR 34
- Attention: Si I'installa
- - RELATIONS CONSOMMATEURS
- 2/INSTALACE PRISTROJE
- / INSTALLATION AF APPARATET
- / INSTALLATIE VAN HET APPARAAT NL
- / INSTALLATIE VAN HET APPARAATNL
- - MONTAGE VAN HET AFVOERKANAAL
- 2/MOHTAX KXYOHHO BbITAAKKU
- / INCIOJIb3OBAHNE KXYOHHO BbITJAKKIN
- 4/ YXOD 3A KYXOHHO BbITJAKKO IN EE OBCJIYKBAHNE
- 1/OBJIAR INHΦOPMAUJNДЛЯ NOJIb3OBATEJIAPYC
- 3TO BaxkHO
- - TEXHnKA BE30NACHOCTN
- BHHMaHne
- 1/OBSSA INHΦOPMAUINI NOJB3OBATEJN PUC
- 3AUHTA OKPYXAIIOUEN CPEbl
- 1/OBJIAR NHΦOPMAUJIДЛЯ NOJIb3OBATEJIAPYC
- 2/MOHTAX KYXOHHO BbITAKKPNYC
- - IcNoJIb3OBAHNE B PEXNME BbITJXKN BO3dYXA
- - INCIOJIb3OBAHNE B PEXNME OYNCTKI BO3dYXA
- 2/MOHTAX KYXOHHOB BBITAKKINPYC
- - NOДКЛIOUЧЕНК ЗЛЕКТРУECHKO CETN
- Y6eTeCb, YTO:
- 2/MOHTAX KYXOHHO BbITAKK PUC
- MOHTAX BbITXHORO KYNOJA
- KpenneHnHa cTeHy:
- MOHTAX BO3dYXOBOda
- - PexkM BbITaKKN BO3dYxa
- - PexkM OunchKn BO3dyxa
- Cobet
- / NCIOJIb3OBAHME KVXOHHO BBITJXKN PYC
- ONICAHNE 3JEMEHTOB YNPABNEHNA
- KhoNk
- 4/ yXoJ 3A KYxOHHO BbITAXKOI EE OBCJIyXHBAHME Pyc
- BhimaHne
- OuNCTKA MOyIbHbIX ΦIbTPOB
- - CHaTne MoDyIbHOrO qNJIbTpA
- 3AMEHA YTOJIbHOrO ΦNJIbTPA
- 4/ yXoI 3A KYXOHHO BbITJxKoI N EE OBCJIyXINBAHNEPUC
- OuNCTKA BHEWHEN NOBEPXHOCTN
- 3AMEHA JAMNOUKN
- ModenbraJIOReHHoJ lamnoHcKoI
- 4/ YXOD 3A KYXOHHO BbITAXKO I EE OBCJYXINBAHNE PUC
Brand : FAGOR
Model : 9 CFD 90 X
Category : Range hood