KAP 3015 - Coffee machine CLATRONIC - Free user manual and instructions
Find the device manual for free KAP 3015 CLATRONIC in PDF.
User questions about KAP 3015 CLATRONIC
0 question about this device. Answer the ones you know or ask your own.
Ask a new question about this device
Download the instructions for your Coffee machine in PDF format for free! Find your manual KAP 3015 - CLATRONIC and take your electronic device back in hand. On this page are published all the documents necessary for the use of your device. KAP 3015 by CLATRONIC.
USER MANUAL KAP 3015 CLATRONIC
Overview of the Components 3
Instruction Manual 67
Technical Data 74
Guarantee 74
Spis tresci
PL
Strona
D-47906 Kempen/Germany
Consommation: 1300 W
Classe de protection: I
F
General Safety Instructions
- Read the operating instructions carefully before putting the appliance into operation and keep the instructions including the warranty, the receipt and, if possible, the box with the internal packing.
- The appliance is designed exclusively for private use and for the envisaged purpose. This appliance is not fit for commercial use. Do not use it outdoors (except if it is designed to be used outdoors). Keep it away from sources of heat, direct sunlight, humidity (never dip it into any liquid) and sharp edges. Do not use the appliance with wet hands. If the appliance is humid or wet, unplug it immediately. Do not put it in water.
- When cleaning or putting it away, switch off the appliance and always pull out the plug from the socket (pull on the plug, not the cable) if the appliance is not being used and remove the attached accessories.
- Do not operate the machine without supervision. If you should leave the workplace, always switch the machine off or remove the plug from the socket (pull the plug itself, not the lead).
- To protect children from the dangers posed by electrical appliances, make sure that the cable is hanging low and that children do not have access to the appliance.
- Check the appliance and the cable for damage on a regular basis. Do not use the appliance if it is damaged.
- Do not try to repair the appliance on your own. Always contact an authorized technician. To avoid the exposure to danger, always have a faulty cable be replaced only by the manufacturer, by our customer service or by a qualified person and with a cable of the same type.
- Use only original spare parts.
- Pay careful attention to the following "Special Safety Instructions".
Special Safety Instructions for this Machine
Before using this device for the first time, please read the operating instructions carefully and retain them for any questions that you may have in future. If you give the machine to somebody else, you should also pass on the operating instructions.
- The machine may only be connected to an earthed 230 volt AC socket.
- Never leave the machine unsupervised during use. Keep children and disabled individuals away from the machine.
- Children are not aware of the dangers associated with electrical devices. You should therefore never leave children unsupervised with electrical equipment.
- The machine should always be placed on a stable level surface.
- Always ensure that the lid is tightly closed when you are using the machine. The device works at a pressure of approximately 3 bars.
-
Rinse the machine through thoroughly once before brewing coffee for the first time (see "Initial Operation"). This will fill the boiler with water, which is essential if the machine is to function properly.
-
Only fresh cold water should be filled into the water container. Do not use milk or ready-made drinks.
- Please ensure that the electric lead is not allowed to hang down!
- Always switch the machine off when you have finished using it.
-
Remove the mains plug:
-
if the machine does not work correctly
-
before cleaning and maintaining the machine
whenever you have fi nished using it -
Do not use the machine if:
the connection lead is damaged
- it has fallen on the floor and is visibly damaged or does not work correctly. In such cases the machine must be checked and repaired by a specialist () in order to avoid any hazards.
- For safety reasons do not leave any items of packaging (plastic bags, boxes, polystyrene, etc.) within the reach of children.
(*) The term specialist refers to an approved after-sales service department of the supplier or importer who is responsible for such repairs. Please contact this after-sales service for any repairs.
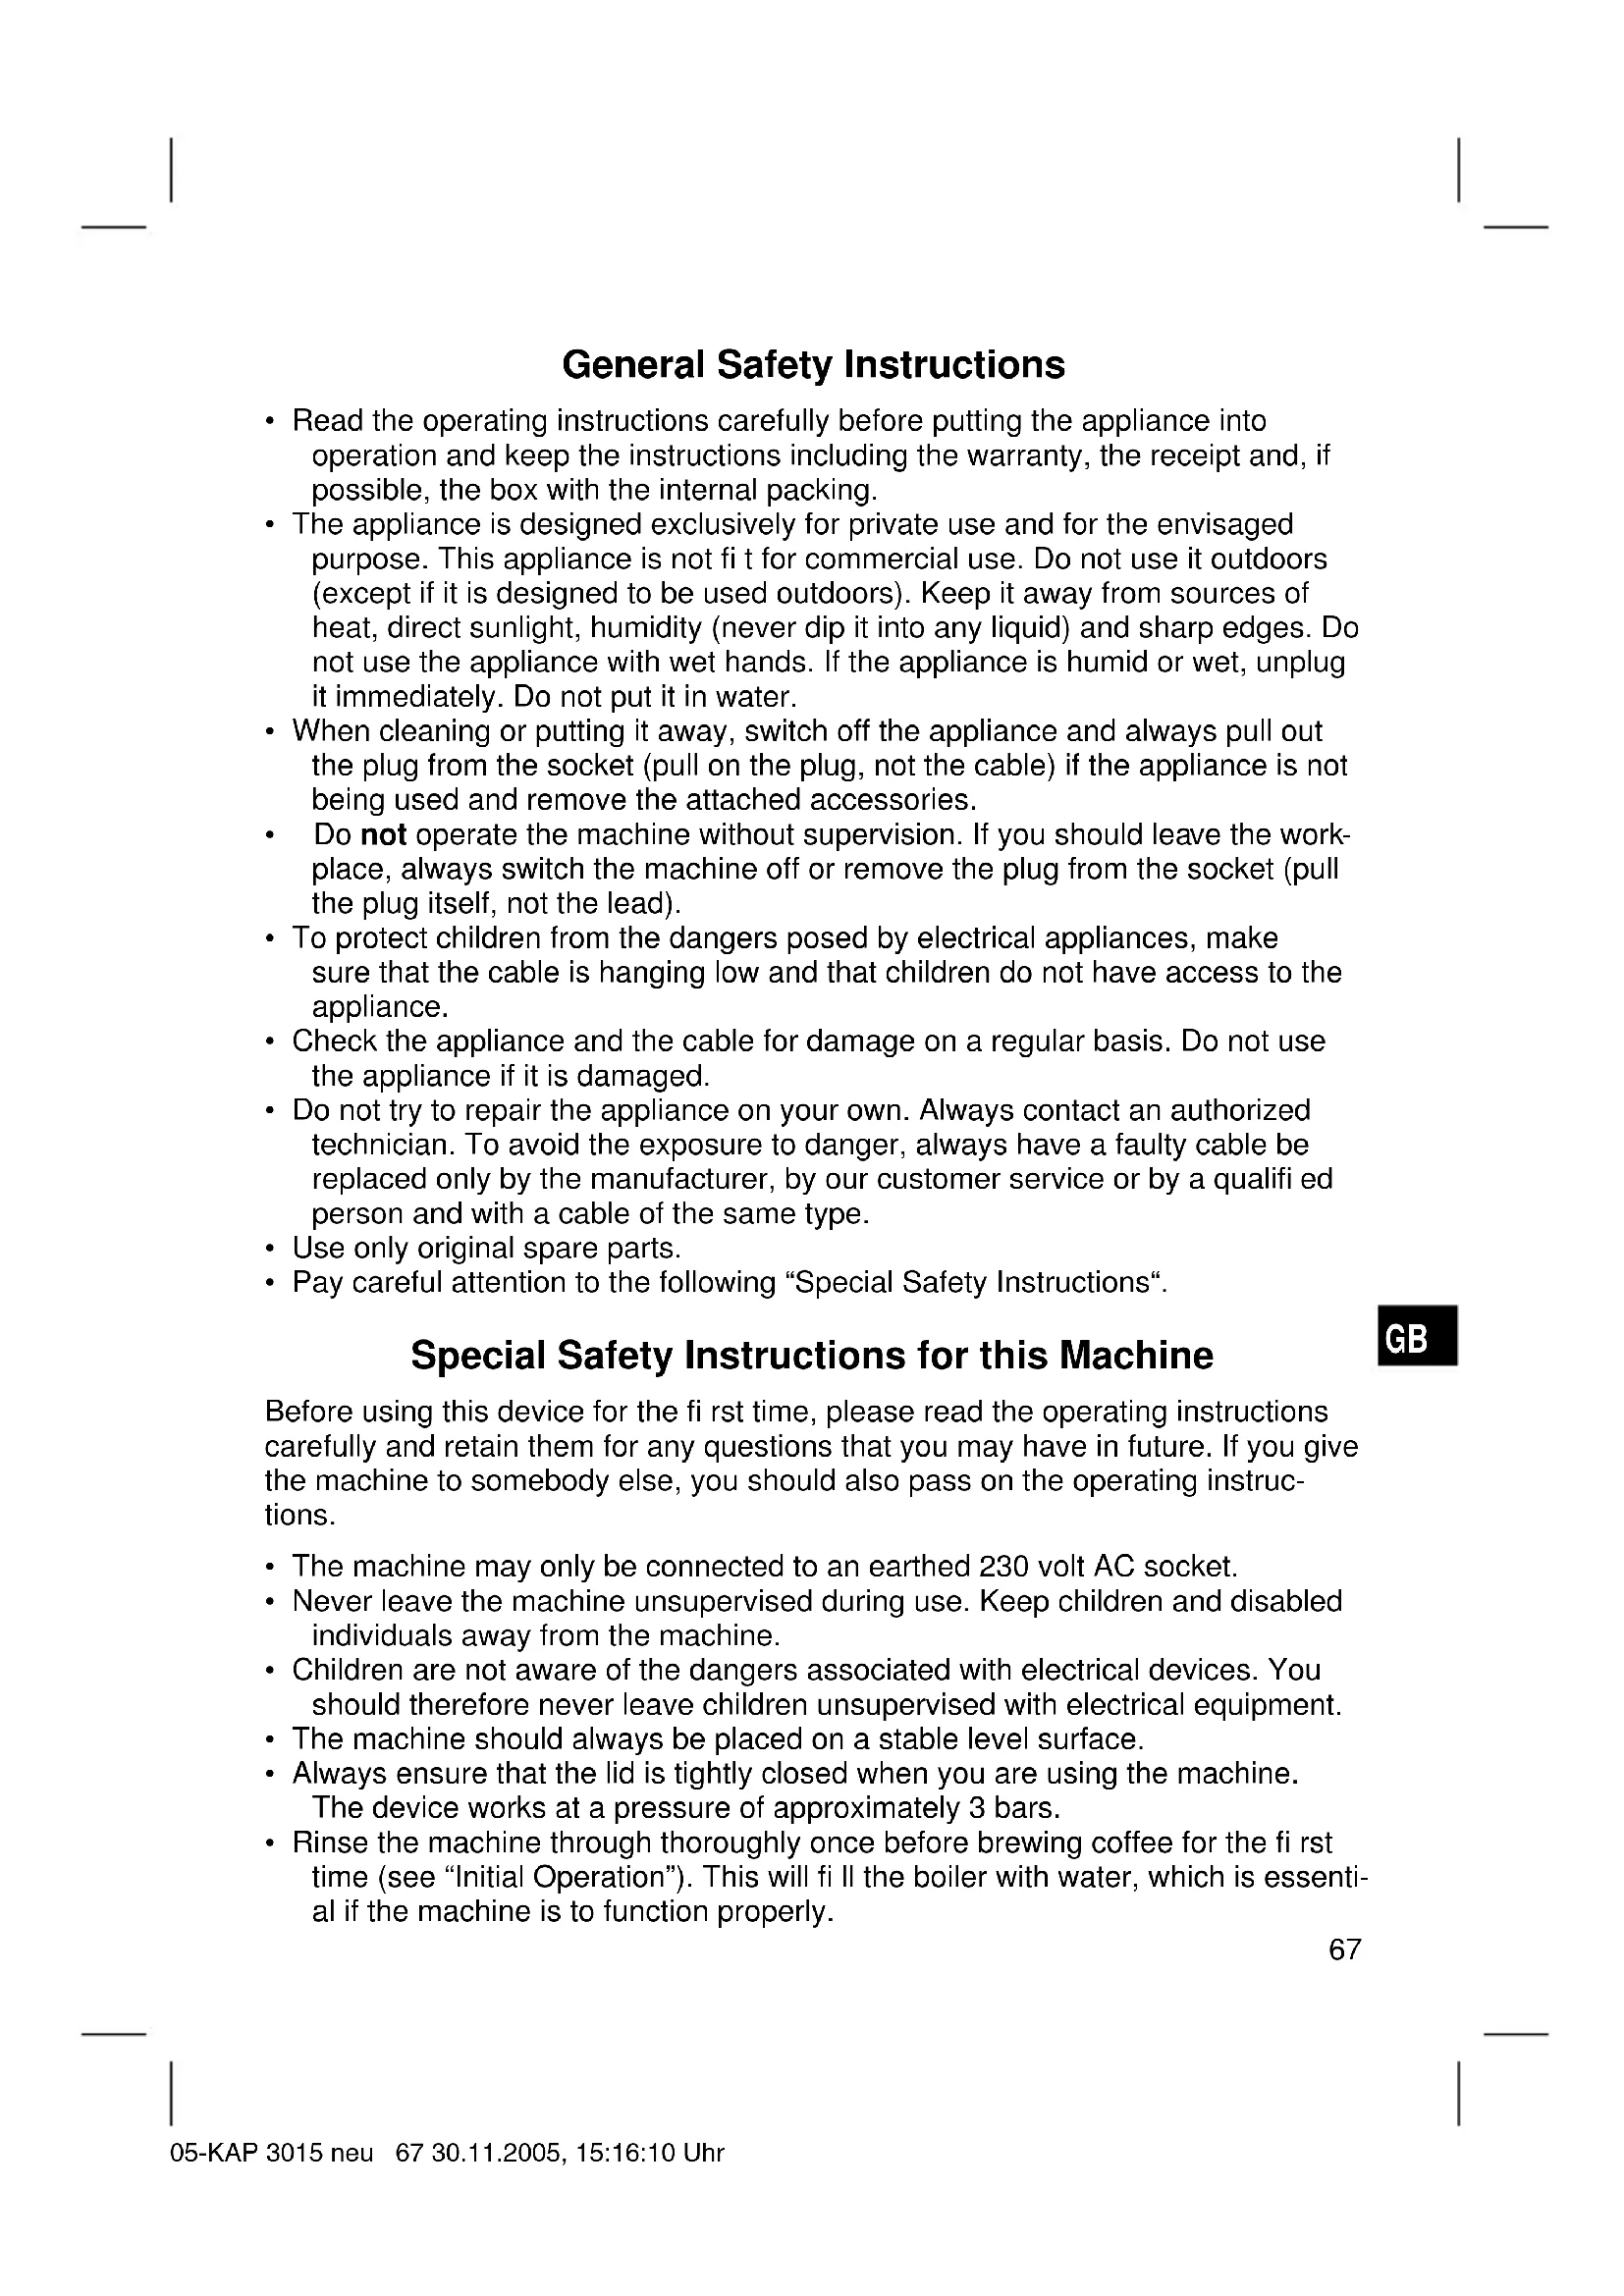
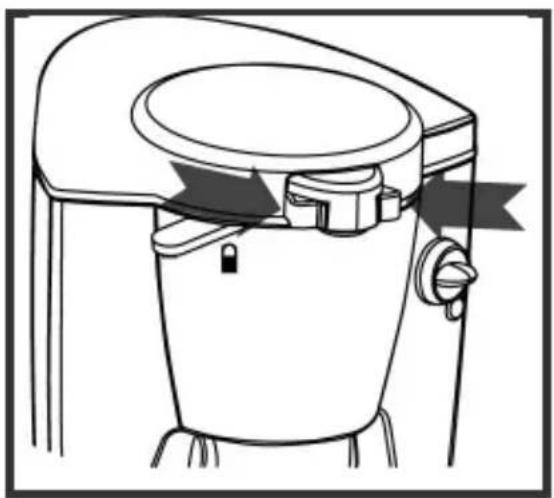
Overview of the Components
1 Lid lock 8 Drip tray
2 Filter lock
9 ON/OFF switch, illuminated
3 Brewing head 10 Toggle switch - steam production
4 Push buttons 11 Non-slip feet
height adjustment 12 Steam nozzle
5 Adjustable coffee spout 13 OK control lamp
6 Spout aperture 14 Function selector switch
7 Cup tray 15 Lid
Initial Operation
Before initial operation we recommend that you clean the water reservoir and the pad cassette (pad holder) with washing-up liquid and then rinse with clean water.
Important Note:
It is only possible to make coffee if the machine has been rinsed through with clear water beforehand. See sections 1 - 9 – without coffee pads however.
Preparing Coffee
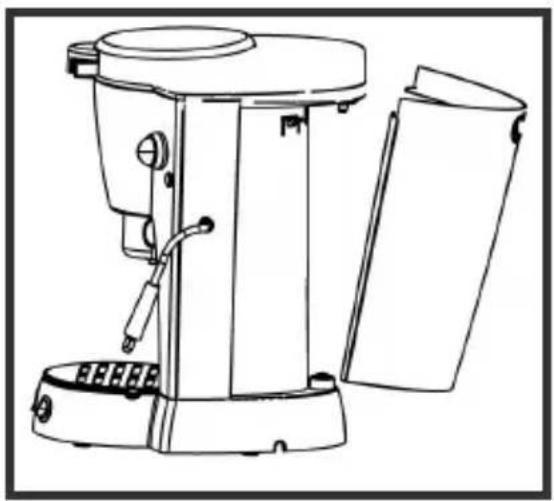
Pull downwards by the two-finger opening and pull out towards the rear at the same time. Remove the water reservoir.
With the water reservoir fi lled with fresh water, place it on the water fi Ier neck using the two-finger opening, press downwards and position in place. Please only fill the water reservoir up to the MAX mark.
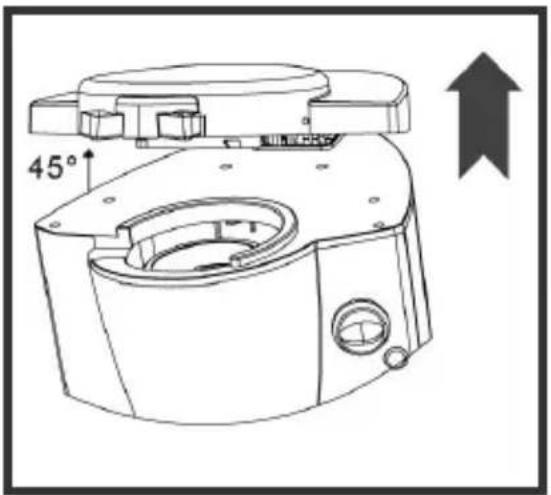
3 Please turn the pad holder as far as it will go to the left until it is located on the open cross symbol Open the lid (15) (max. 45^ angle) by pressing the lock (1) together with your thumb and index finger.
GB
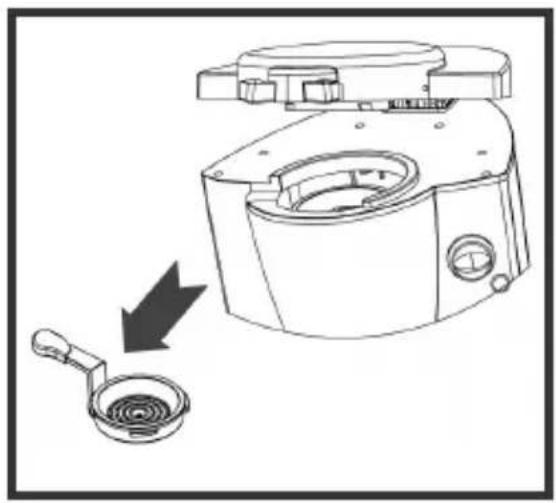
4 Remove the pad holder from the machine.
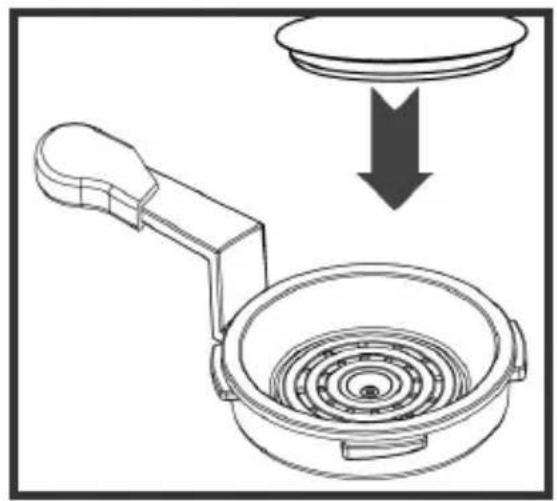
5 Insert a round coffee pad in the pad holder and place this back in the machine, ensuring that the pad is correctly positioned in the fiiter as otherwise it is not possible to completely close the lid (15). Make sure that the handle is located to the extreme left (in position 忍 Now press the lid of the machine with both hands until it is closed. Please do not use force to close the lid as it might be damaged.
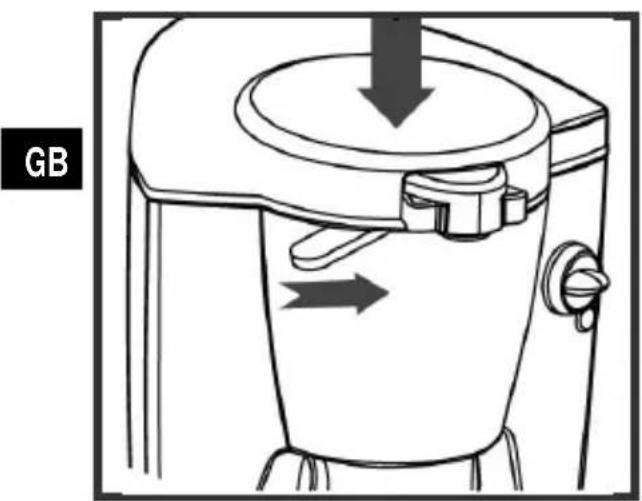
6 Then with the lid (15) closed - turn the pad handle to the right-hand position
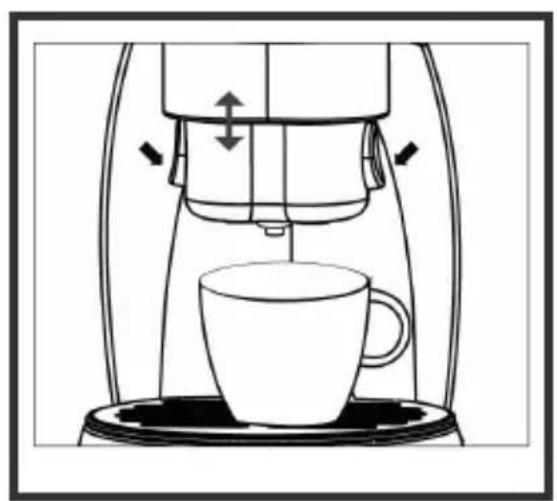
Place a cup on the cup tray (7) under the opening of the coffee spout (5), whose height can be adjusted. By simultaneously pressing with your index finger and thumb on the push buttons (4) to the left and right of the coffee spout (5) you can adjust the spout to the size of the coffee cup.

Turn on the machine to the "I" position using the ON/OFF switch (9). When the OK control lamp (13) lights up the machine is ready for operation. Turn the function selector switch (14) to the cup symbol.
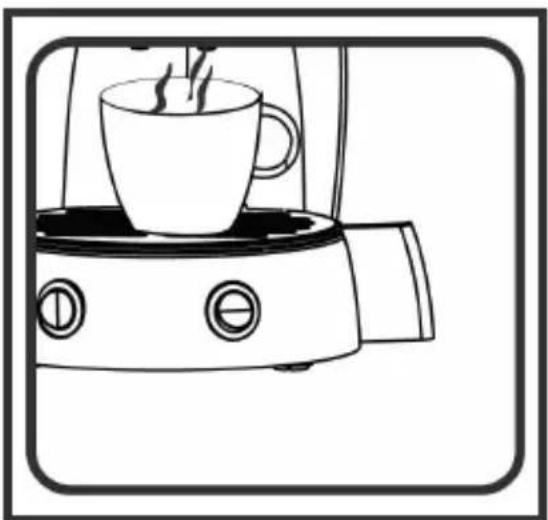
9 Coffee flows through the spout. You can adjust the strength of the coffee by means of the quantity of water used. By turning the switch (14) to 0^ in a horizontal position it is possible to stop the flow of coffee at any time.
Frothing Milk
- Frothing milk takes practice. Do not be discouraged if it is not perfect the first time. The milk should be half steamed and half frothed. Please use skimmed or low-fat milk; long-life UHT milk is particularly suitable for frothing. A rust-proof beaker or a small stainless steel jug is ideal.
- Both switches (9/10) must be turned on and there must be enough water in the water reservoir.
After approximately 20 seconds the OK control lamp (13) lights up to indicate that the machine is ready for milk frothing. - In order to froth the milk immerse the steam nozzle (12) in the milk in the vessel. Hold the vessel in such a way that the end of the steam nozzle is slightly immersed in the milk.
- Turn the function selector switch (14) to " . Caution! The emitted steam is very hot. As the milk heats up the vessel also becomes hot. Move the beaker carefully up and down. When you have finished, turn the function selector switch back to "O".
- In order to warm the milk using the steam nozzle (12), immerse the nozzle in the milk in the vessel. Hold the beaker in such a way that the nozzle is completely immersed in the milk. When you have finished, turn the function selector switch back to "O".
- Turn the machine off, remove the plug and allow the machine to cool down.
Clean the steam nozzle each time immediately after use. Half fi II a beaker with water and use the steam function once more for approximately 20 seconds. This cleans the inside of the steam nozzle. Wipe off the exterior of the steam nozzle with a damp cloth.
If the outlet of the steam nozzle is blocked by dry milk, clean the small aperture carefully with a needle.
Dscaling
Regular descending will prolong the lifetime of your coffee machine. Descale your machine regularly at least every 2 - 3 months, depending on the hardness of your water. Only commercially available liquid descending agents (based on citric acid) should be used. Follow the instructions provided by the manufacturer. The guarantee does not cover coffee machines blocked by scale!
- Fill the water reservoir with a commercially available descaling agent and water. Place the water reservoir back in the machine.
- Open the device and put a used pad in the pad holder. Close the lid carefully. (It is recommended that you use a used pad as this serves as a „fi iter“ and prevents scale residues blocking the small openings of the pad holder mesh).
- Place a large vessel under the coffee spout (5) and a second vessel under the steam nozzle.
- Switch on the machine.
- Turn the function selector switch (14) to "Brew coffee" and allow approximately 1/3 of the liquid to flow through.
- Then turn the function selector switch to steam and allow the descending liquid to flow for approximately 2 minutes through the steam nozzle.
- Allow the descending liquid to flow alternately through the brewing head and the steam nozzle.
- Remove the vessels and empty them.
- Remove the water container from the device and rinse out thoroughly using clean water.
- Then clean the machine in the same way twice with clean water, but without descending agent and without any pad.
Cleaning and Care
- Always remove the mains plug before cleaning the machine.
- Never immerse the machine in water.
- Clean the external walls of the machine only with a damp cloth.
- The cup tray (7) and drip tray (8) can be removed for cleaning. Clean with hot water and a little washing-up liquid if necessary – or in the dishwasher.
- Clean the coffee pad holder thoroughly under hot water, using a little washing-up liquid if required. Use a washing-up brush if necessary, and unblock any openings with a needle.
-
Clean the steam nozzle carefully with a damp cloth.
-
Clean the water container with warm water, using a little washing-up liquid if necessary. If you use a washing-up brush make sure you do not damage the valve on the floor of the water container.
- The lid of the machine should always be left open so that the remaining moisture can evaporate and no fungus is formed.
Disposal
Please consider the environment!
- The packaging should be disposed of according to type and in line with your local refuse regulations.
- Please return cardboard, paper and foils for appropriate recycling.
- When the device can no longer be used, please arrange for it to be disposed of in an environmentally-friendly manner (local collection point for electrical devices).
Troubleshooting
| Problem Possible Reason Suggested Solution | ||
| Coffee is not fl owing No water in the water container | Fill water into the water container | |
| Water container is not correctly inserted | Insert the water container correctly | |
| Pad holder mesh is blocked | Removed the pad holder mesh, clean and unblock with a needle if necessary | |
| Machine is blocked by scale | De-scale the machine | |
| No steam is coming out of the nozzle | Steam nozzle is blocked De-scale the machine | |
| Switch is turned to „Brew coffee“ | Turn switch to „Steam“ | |
| Pump is making a strange noise | No water in the water container | Fill the container with water |
| Water container is not correctly inserted | Insert the water container correctly | |
| Coffee machine is not working | Pad holder mesh is blocked | Remove the pad holder mesh and clean |
| Machine is blocked by scale | De-scale the machine | |
| Lid (15) does not close Pad | holder is not in the correct position | Please turn the pad holder to the left to the position |
Technical Data
Model: KAP 3015
Power supply: 230 V, 50 Hz
Power consumption: 1300 W
Protection class: I
This device has been tested according to all relevant current CE guidelines, such as electromagnetic compatibility and low voltage directives, and has been constructed in accordance with the latest safety regulations.
Subject to technical changes without prior notice!
Guarantee
The device supplied by our Company is covered by a 24 month guarantee starting on the date of purchase (receipt).
During the life of the guarantee any fault of the device or its accessories *) ascribable to material or manufacturing defects will be eliminated free of charge by repairing or, at our discretion, by replacing it. The guarantee services do not entail an extension of the life of the guarantee nor do they give rise to any right to a new guarantee!
Proof of the guarantee is provided by the proof of purchase. Without proof of purchase no free replacement or repair will be carried out.
If you wish to make a claim under the guarantee please return the entire machine in the original packaging to your dealer together with the receipt.
*) Damage to accessories does not mean automatic free replacement of the whole machine. In such cases please contact our hotline. Broken glass or breakage of plastic parts are always subject to a charge.
Defects to consumables or parts subject to wearing (e.g. motor pistons, kneading blades, drive shafts, spare remote control, spare toothbrushes, saw blades, etc.) as well as cleaning, maintenance or the replacement of said parts are not covered by the guarantee and hence are to be paid!
The guarantee lapses in case of unauthorized tampering.
After the expiry of the guarantee
After the expiry of the guarantee repairs can be carried by the competent dealer or repair service against the payment of the ensuing costs.
Meaning of the "Dustbin" Symbol
Protect our environment: do not dispose of electrical equipment in the domestic waste.
Please return any electrical equipment that you will no longer use to the collection points provided for their disposal.
This helps avoid the potential effects of incorrect disposal on the environment and human health.
This will contribute to the recycling and other forms of reutilisation of electrical and electronic equipment.
Information concerning where the equipment can be disposed of can be obtained from your local authority.
In many EU countries the disposal of electrical and electronic equipment in the domestic waste is prohibited from August 13, 2005 on. In Germany from March 23, 2006 on.
GB
3neKtpoHTaHHe: 230B,50T
Ioppe6nemar MOuHocTB: 1300 BaTT
Klacc 3auntbI:
3TO n3deneHne npoJIO BCE Heo6xOIMbIe N aKTyaJIbHbIe npOBepKn, npedncaHHbIe dIpeKTbOi CE, K npm. Ha 3JeKtpOMaRHTHyIO COBMeCTHMocTb H COOTBeTCTBHe Tpe6OBAHnM K Hn3KOBoJbTHOH TexHnke, OHO 6blNo TaKKe CkOHCTpyuPoBaHO I NOcTpOeHO C yYeToM NOcJIeDHnx Tpe6OBAHn N IO TexHnke 6e30NaChOCTn.
Mbl octabIrem 3a co6oI npabo Ha texHnueckne n3MeHeHHr!
TapaHTnHoe 6ra3aTeJIbCTBO
TapaHTnHbI cPOK Ha TeppntOpnn PocChcko Fedepaun yCTaHaBnBaETcA NOHOMOHyIMN npEcdTaBNTeJIaMn.
KaccobbIyekraBnEeTcra rapaHTnHbIM TaHOHOM. Be3 Hero HeBO3MOKeH 6ecnlaTHbI pemOHrN 3ameHa H3dennr.
B cnyuae BO3HKnHOBxHHn npnteH3n no rapaHTn, npeIbBAITE u3dJIne B NOHOBOMNKeTauHH, C opHnHaNbHO yNaKOBKO NKACCobbIM YeKOM TOPROBOI TOUKe, npOdaBwe 3TO u3dJIne.
*) DeΦeKtbl npHaJdIeXHocTe He cIyKAT npuHoiDJIa ABToMaTHueCKo3aMeHb BCero n3denn. B 3OM cIyuae no3BOHnte HAM, noXaYnCTa, noToprae nnH! Pa3bTbIe cTeKJHHbIe I NOIOMaHbIe pIaCTMaCCOBbIe DeTaNNB03MeUaOTcR TOJIbKO 3a DOnONHITeJIbHyO ONlAty!
DeΦeKtBi N3HaUHbAembIX npHaIJIeXHOCTe IIN TpyuNXcI DeTanei (HaPnMep KOHTaKTHbIe 5ETKN MOTOPOB, CMEcNTeNbHbIe KpIOKn, PnpBOdHbIe peMHN, 3aNaChbIe NylbTbI ynpabLeHnra, 3aNaChbIe 3y6HbIe 5eTKN, NIIbHbIe NOJOTHa nT.D.), a TaKke YnCTKa, Texo6CnyXbAHne IIN 3aMeHa TpyuNXcI DeTanei He nonaHaOT NOI rapaHTnO, I No3TOMy pnoBOdATc 3a OTdeJIbHyO ONnAty!
TapaHTn TepaETc np BCKpbITn N3dEINr NOCTOPOHMMN IuaMn.
После rapаенти
Iocne okOHuaHn Cpoka rapaHTn, pemOHT n3dJIH npOn3BOJNTcra 3a Onilaty, COOTBeTCTByIOUzIMMaCTepCKmHnnnyHKtAmN cepBnCHOro 06CnyKuBaHn.
RUS
110

CHATRONIC
INTERNATIONAL GMBH
D-47906 Kempen/Germany · Industriering Ost 40
Telefon 02152/2006-888
Internet: http://www.clatronic.com · email: info@clatronic.de