KA 3756 - Coffee machine CLATRONIC - Free user manual and instructions
Find the device manual for free KA 3756 CLATRONIC in PDF.

User questions about KA 3756 CLATRONIC
0 question about this device. Answer the ones you know or ask your own.
Ask a new question about this device
Download the instructions for your Coffee machine in PDF format for free! Find your manual KA 3756 - CLATRONIC and take your electronic device back in hand. On this page are published all the documents necessary for the use of your device. KA 3756 by CLATRONIC.
USER MANUAL KA 3756 CLATRONIC
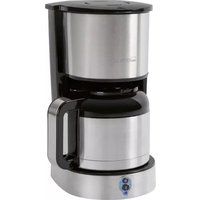
THERMO-KAFFEEAUTOMAT KA3756
Thermo koffiezetapparaat · Cafetière thermique · CafeteraTERMICA Caffettiera termica · Thermo Coffee Machine · Termiczny ekspres do kawy Hóartó automata káféfozo · Ténpobary koébapka ·
C
ATTENTION: Anti-goutte
Thank you for choosing our product. We hope you will enjoy using the appliance.
Symbols in this Instruction Manual
Important information for your safety is specially marked. It is essential to comply with these instructions in order to avoid accidents and prevent damage to the appliance:

WARNING:
This warns you of dangers to your health and indicates possible injury risks.

CAUTION:
This refers to possible hazards to the appliance or other objects.

NOTE:
This highlights tips and information.
Contents
General Notes 34
Special Safety Precautions for this Appliance 34
Designated Use 36
Unpacking the Appliance 36
Scope of Delivery 36
Notes for Use 36
Operation 37
De-scaling 37
Cleaning 38
Storage 38
Troubleshooting 38
Technical Data. 39
Disposal. 39
General Notes
Read the operating instructions carefully before putting the appliance into operation and keep the instructions including the warranty, the receipt and, if possible, the box with the internal packing. If you give this appliance to other people, please also pass on the operating instructions.
- The appliance is designed exclusively for private use and for the envisaged purpose. This appliance is not fit for commercial use.
- Do not use it outdoors. Keep it away from sources of heat, direct sunlight, humidity (never dip it into any liquid) and sharp edges. Do not use the appliance with wet hands. If the appliance is humid or wet, unplug it immediately.
- When cleaning or putting it away, switch off the appliance and always pull out the plug from the socket (pull the plug itself, not the lead) if the appliance is not being used and remove the attached accessories.
- Do not operate the appliance without supervision. If you leave the room you should always turn the appliance off. Remove the plug from the socket.
- The appliance and the mains lead have to be checked regularly for signs of damage. If damage is found the appliance must not be used.
- Use only original spare parts.
- In order to ensure your children's safety, please keep all packaging (plastic bags, boxes, polystyrene etc.) out of their reach.

WARNING:
Do not allow small children to play with the plastic foil.
There is a danger of suffocation!
Special Safety Precautions for this Appliance
You will find the following symbol with warning character on the appliance:
WARNING: Hot Surface!
Danger of Burns!
The temperature of accessible surfaces can be very hot during and after operation. The water tank lid, the storage surface for the coffee pot and the base of the pot are still hot after use.
- Touch the pot by the handle only.
WARNING: Hot Surface!
Danger of Burns!
- Never open the lid of the water reservoir during the cooking process.
CAUTION:
This appliance is not intended to be immersed in water during cleaning. Please observe the instructions that we have included in the chapter "Cleaning".
- Use the appliance only on a level work surface.
- Only use the appliance when water is filled into the water container.
- Do not move the appliance when it is in operation.
- This appliance can be used by children aged from 8 years and above if they have been given supervision or instruction concerning the safe use of the appliance understand the hazards involved.
- Cleaning and maintenance by the user shall not be made by children unless they are older 8 years and supervised.
- Keep the appliance and its cord out of reach of children less than 8 years.
Children shall not play with the appliance. - Appliances can be used by persons with reduced physical, sensory or mental capabilities or lack of experience and knowledge if they have been given supervision or instruction concerning use of the appliance in a safe way and if they understand the hazards involved.
- Do not repair the appliance by yourself. Always contact an authorized technician. If the supply cord is damaged, it must be re
placed by the manufacturer, its service agent or similarly qualified persons in order to avoid a hazard.
- Please see the following chapter "Designated Use". The abuse for any other purposes may result in injuries.
Designated Use
- This appliance serves for brewing of ground coffee.
- Only use the appliance in a dry, indoor area.
-
It is intended for domestic use and similar areas of use such as e.g.:
-
in staff kitchen areas in shops, offices and other working environments;
- by clients in hotels, motels and other residential type environments.
It is not intended for use in farm houses or in bed and breakfast type environments.
Unpacking the Appliance
- Remove the appliance from its packaging.
- Remove all packaging material such as plastic films, filler material, cable ties and cardboard packaging.
- Check the content for any missing parts.
- In the event that the packaging content should be incomplete or if damages are noticeable, do not operate the appliance. Return it to the dealer immediately.

NOTE:
There may be dust and production residue on the appliance. We recommend cleaning the appliance as described under "Cleaning".
Scope of Delivery
1 × Automatic coffee maker
1 × Filter holder
1 × Stainless steel insulated pot
1 × Coffee pot lid
Notes for Use
Placement
- Place the automatic coffee maker on a stable and level surface. Place the appliance in such way that it cannot tip over.
- Do not place the appliance in close proximity to a gas or electric stove or any other heat source.
Note About the Brewing Process
During the brewing process and depending on the degree of grinding and the used amount, the coffee powder absorbs a certain amount of water. That is why the quantity of coffee might diverge from the quantity of water in the water tank.
European Regulations on Energy Saving

NOTE:
The European Directive 2009 / 125 / EC (Ecodesign Directive) incorporates measurements for energy saving.
The following applies to coffee makers: The keep-warm period is limited to max. 5 minutes after which the appliance turns off automatically.
You benefit from better safety and lower energy consumption.
Electric Connection
- Ensure that your mains power corresponds with the specifications of the appliance. The specifications are printed on the type label.
- Connect the mains cable to a properly installed and earthed wall outlet.
Initial Operation
Before making coffee for the first time operate the appliance twice with clean water only and without paper filter. This removes dust, which may have collected during transport. Follow the instructions given under "Operation".
Turning the Appliance On/Off
- Press the " switch in order to turn on the appliance. The button must snap in. The operating control lamp lights up.
- Press the "O switch in order to turn off the appliance or to cancel the brewing process. The operating control lamp turns off.
Operation
- Open the lid of the water tank.
- Fill cold water according to the desired amount of cups of coffee into the rear water tank. You can determine the water level with the help of the scale in the water tank.

NOTE:
You can use the pot to fill the water tank. To open the lid of the pot, press the two latching lugs together simultaneously.

CAUTION:
Do not overfill the tank! Do not fill it above the MAX mark.
- Insert the filter holder. One of the two handles must be on the right hand side and the other on the left. Push the filter holder down until it snaps in.
- Turn over the lower fold of the paper filter (size 1 × 4 ) and place it in the filter funnel. Then fill it with coffee powder.

NOTE:
Do not put too much coffee powder into the filter to avoid spillage.
- Now close the lid of the water tank. It must snap into place.
-
Place the lid on the pot. The button on the lid must face the handle. Note the recesses on the opening of the pot and the latching lugs on the lid. The lid must snap in.
-
Place the pot onto the storage surface.

CAUTION: Drip stop
Your appliance comes with a drip stop. It closes when removing the coffee pot. This prevents the coffee from dripping onto the warming plate if there is still water in the filter.
- Ensure that the lid is attached to the coffee pot. It opens the drip stop.
-
If there is still water in the tank, place the pot underneath as soon as possible. Otherwise the filter might overflow.
-
Switch on the appliance. The operating control lamp lights up.

NOTE:
The appliance will switch off automatically a few seconds after the brewing process has ended. The operating control lamp turns off.
After the Brewing Process
- When no more coffee is flowing through the filter you can remove the pot.
- Press the button on the lid, if you wish to pour coffee from the pot.

NOTE:
The filter holder can be removed from the coffee machine by using its handles on the right and left side.
This makes it easier to dispose of the old coffee filter, for example.

WARNING:
If you would like to prepare another pot of coffee right away, wait about 5 minutes after the brewing process has been completed. Allow the appliance to cool down, with its water tank open, to prevent hot splashes of water when filling up the water. If the appliance is still too hot, a thermostat prevents it from being switched on again immediately.
De-scaling
De-scaling is necessary when the brewing time increases substantially.
- Use only commercially available citrus acid-based descaler.
- Follow the recommended instructions for use.

WARNING:
- Afterwards you should boil fresh water in the pot three or four times in order to rinse out residues of the de-scaling agent.
- Do not use any coffee powder!
- Do not use this water for consumption.
Cleaning

WARNING:
- Before cleaning, always remove the mains plug and wait until the appliance has cooled down.
- Do not immerse the appliance in water. Otherwise this might result in an electric shock or fire.

CAUTION:
- Do not use a wire brush or any abrasive items.
-
Do not use any acidic or abrasive detergents.
-
The exterior of the appliance should be cleaned as necessary with a slightly damp cloth - without any additives.
- Remove spilled coffee grounds with a paper towel from the inner casing. Afterwards wipe with a damp cloth.
- Clean the pot and the filter holder in warm rinse water with a bit of washing-up liquid. Use a soft brush if necessary.
Storage
- Clean the appliance as described and let it dry completely.
We recommend that you store the appliance in its original packaging when it is not to be used for a longer period.
Always store the appliance at a well ventilated and dry place outside the reach of children.
Troubleshooting
| Problem Possible cause | Solution | |
| The appliance does not work. | The appliance is not connected to mains power. | Check the wall outlet with a different appliance. |
| Insert the plug properly in the wall outlet. | ||
| Check the in-house fuse. | ||
| A thermostat prevents switching on as the appliance is still too hot after the brewing process. | Allow the appliance to cool off sufficiently. | |
| The appliance is defective. Contact our service or a repair centre. | ||
| Filter blockage: coffee grounds spill over the edge of the filter. | The drip stop is closed: The coffee pot is not on the warming plate or the lid is not on the coffee pot. | 1. Switch the appliance off. Disconnect from mains power supply.2. Put the coffee pot with lid on the warming plate so that the filter is emptied.3. Dispose of the paper filter.4. Clean the appliance as described. |
| Too much coffee powder in the filter. | ||
| Coffee grounds in the coffee. | The paper filter is too small. Use a paper filter size "1 x 4". | |
| Too much coffee powder in the filter. Use less coffee powder. | ||
| The brewing process takes too long. | Limescale deposits in the appliance. Decalcify the appliance as described. | |
| The appliance stops the brewing process although there is still water in the water tank. | ||
| The appliance turns off automatically. | This is not a malfunction of the appliance. In order to comply with the Ecodesign Directive (2009/125/EC), the appliance turns off automatically after max. 40 minutes after the brewing process has finished. | |
Technical Data
Model: KA 3756
Power supply: 220-240V\~,50-60Hz
Power consumption: 800 W
Filling quantity: approx. 1.2 litre
Protection class: I
Net weight: approx. 1.85kg
The right to make technical and design modifications in the course of continuous product development remains reserved.
This appliance has been tested according to all relevant current CE guidelines, such as electromagnetic compatibility and low voltage directives, and is manufactured according to the latest safety regulations.
Disposal
Meaning of the "Dustbin" Symbol
Protect our environment: do not dispose of electrical equipment in the domestic waste.
Please return any electrical equipment that you will no longer use to the collection points provided for their disposal.
This helps avoid the potential effects of incorrect disposal on the environment and human health.
This will contribute to the recycling and other forms of re-utilisation of electrical and electronic equipment.
Information concerning where the equipment can be disposed of can be obtained from your local authority.
Instrukcja obslugi
CTC Clatronic Sp. z 0.0
Ul. Brzeska 1
45-960 Opole
Usuwanie
Yka3bIbaeHa BO3MOxHyO ONaCHOCTb IIN3JeINN INpynx OKpyKaIOxN INpeDMETOB.

ПИМЕЧАнЯ:
JaetcoBtbnHOpMaIIO.
CoapedkaHne
OmbaHOpMa. 52
Oc06bIe yka3aHnNo TeXnIke
6e3oNaChocTn DnI DaHOrO yCTpoiCTBa 53
Ha3naueHne 54
PacnaKOBka yCTpoiCtBa. 55
KOMIIeKT noCTaBKn 55
PpmeaHnno nncnboBaHnna 55
Pa6ota 55
UdaneHne HAKINN 56
UncTka. 56
XpahHeHne 56
UcTpaHHe HeNCpPaBHOCTe. 57
TexHHueckme daHHbIe. 57
Ytunnaia 57
067aHhOpMaun
Ipeed Haayanom 3KcNpyataunn np6opba BHNMaTeIbHO npouTaNte npuIaraeMyo HNCTpykTuNO no 3KcNpyataunn COxpaHNTe ee BHaTeXHOM MeCTe, BMeCTe C rapaHTnHBIM TaIOHOM, KaccOBbIM YekOM N, NO BO3MOxHOCtN, KAPTOHHO KOp6KOc yNAKOBOUHBM MaTePnaIaON. Ecn daTe KOMyJIn6o nononb30BaTbcra np6bOpom, o83aTeNbHO daNe T B npndauy DaHHYIO INCTpykTuNO nKcNpyataunn.
-Повьтугсь пибором только чатным образим и по наз nauseю. Пибор не пedingондян дя кOMМерчесКOrO ИСПОЛБЗОВАИ.
He nIb3yIeTcB np6OpOM IOJ OTKpbITbIM He6OM. PpeDoxpaHnTe np6Op OT kApbl, pRmBIX cOnHeuHbIX LyUey, BnaXHOCTN (HN B KOem cIyae He nOprpyKaIte ero B BoY) n yapob 06 ocTpble yrIbI. He npKacaiTeC b K np6OpBy BnaXHbIMn pykam. Ecn np6Op yBaNaXHHncra nn HAOK, Tyx Ke BbIbTe BNky n3 po3eKn.
- Pocne 3KcNpyatauM, MoTAtke npHaadnEeKHOCTe, YIcTKe IINI POJOMKe pnp60pa Bcerda BbIHMaIte BUNKy n3 po3ETKn (TaNHTe 3a BNkY, a He 3a Ka6eJIb).
He octabnIte BkIOUeHHbIe 3NEKtpoPnp6Opbl 6e3 npICMOTpa.BbIXOJa n3 IOMeUeHnB BcERda BbIKIOuayTe np6Op.BbIHbTe wTekep n3 po3ETKn.
- Pn6b np KabeB cTeBO rntaHn HeoXoHmO peryIpaHo 06cneIOBaTb Ha Hauuue CNeIOB NOBpeKdeHn. Pn 6hApXeHN NOBpeXdHn NOJb3ObaTbcr np6bopom 3anpeaaetc.
Vicnoj3yuteToIbKOopnHaJIbHbe3aIaCTN.
- IV3 coo6paXeHn 6e3oNaChOCTn IJr DeTeH He ocTaBJIaIte JExKaTb ynaKOBky (PiNactNKOBbIe MeWKIn, KapTOH, neHONlact n T.D.) 6e3 npNCMOTpa.

IPEDYUNPEXDEHNE:
He no3B0JrTe DeTm nIpaTb c noIIN3TNHeHOBOI nIeHKO. OnachocTb ydyuBa!
Oco6bIe yka3aHnI NO TexHnke 6e3OpacHOCTNДЯ ДaHHoro yCTpoiCTBa
Ha n3deIin ImeOTcA cIeDyUoI npEynpeXdaIOuI CNMBOJ:

PpmeaHne K npocceCy npiroTOBHeHn
B npoucece npiroTOBJIeHn B 3aBNCIMOCtN OT CTeneHn NOMOna n Osbema MoIOTbM KOpe NOrIIOuaet HeKOTOpoe KOINueCTBO BObl. I03TOMy KOInueCTBO KOpe MOKeT He COOTBeCTCBOBaTB KOINueCTBy BObl B EMKOCTN DII R BObl.
Ebponeckne Hopmb1 3heproc6epexeHHa

ПРМЕЧАнЯ:
Ebponeicka DnpeKtNa 2009/125/EC (DnpeKtNa no 3KoDn3ayHy) BKNIOuHaET Bce6a MepbI NO 3HeprocbepeKeHIO.
Cneyuooee noJIOxKeHne npImeHReTcB OTHoWeHn KoepBaPOK: IepnoD noOpIepKAnHn KoPe B TEnlOM CoCTOHN OrpAHuHBaEtCMAKCMyM 5 MmHyTaMn, NocJe Yero np6op ABtOMaTHueCKN OTKnIOUaeTcR.
BbI n3BHepeTe noJIb3y n3 ycIIeHHo6eOaHocTn I IOHIKeHHOrO 3HeprONTope6JIeHn.
IopknHouHeHne
- Y6eIntecb, yTO napameTpbl 3NeKtpoNTaHnCooTBeCTByIOT CneUΦNkAciu NycToPiTCBa.CneUΦNkAciu HaneYaTaHa Ha 3TNKeTke.
- BctabTe Wtencelb Hypa 3JekTpOnnTaHnB INcnpaBHyu N 3a3emHenHyo po3EtKy.
BbOdBCTpO
Ipeed Tem Kac Bapntb Kofoe B nepBbI pa3, BkHouHTe KofoeBapky Dba pa3a npocTo C uHcToB BOoN H6e3 6yMaK-Horo fHbtpa. 3To ydaINT n3 ycTpoiCTBa IbIb, KOtOpaR MoNa cKOINbCBA BO Bpem TpaHcNoPTnPOBKn. CneDyIte HNCTpyKUIM B pa3dene «Pa6Ota».
BkIIOUeHne I BbIKIOUeHne np6opa
- UTo6bI BkIIOuHTb npIbOp, HaxMnte nepeKIOuAtel «I». IpeKIOUaTeIb DoJxH eJIKNHyTb. 3aropaeTcHnDnKaTOp paOtbl.
- UTO6bI BvIKIOCHITb np6op HIN OTMeHnTB npOeCC npiroTOBHeHna, haxMITE nepeKIOUaTeNB «O». Hndik Katop paobtI rachet.
Pa6ota
- OtkpoTe KpbIuKU eMKoCTn DnB BoDbI.
- HanonHInTe EMKocTb DnB OBObl, HaxOJaUyOcB 3aDHeuactn ycTpoiCTBa, XoJIoHOB BOoB B COOTBETCTBUN CKeJaEMbIM KOJIueCTbOM YaIeK KoPe. OnpeJeNtbyPOBeHb BObl MOXHO C NOMOUsbIO ShKaJIb Ha EMKocTn DnB OBObl.

ПРИМЕЧАнЯ:
ДязANOненЯ EMKOCTNДЯ BOБьВы можete BOCNIOb3OBaTbCS KOpeHnKOM.УTO6bI OTkpblb KpbIuKy YAUN,ОнHOBpeMeHNO HaxMITE DBaФИКСИpyUOxNBbICTyNA.

BHIMAHNE:
He nepenonHnIte EMKoCTb IJa BOIb! He 3aunBaIte BOy BbIe OTMeTKn MAX.
- Bctabte DepeXaTeIb fInIbTpA. OHa n3 DByx pyKoTOK doJkHa 6bIb Ha npBaOi CTOpHe, a dpyra - Ha IeBoi. HaxMITE depeXaTeIb fInIbTpA BnI3 Do fNkCaun Co ueJIyKom.
- NoOrHnTe HxKm KpaB 6yMaXHoRo QnIbTpA (pa3-Mep 1 x 4) n yIOxNte erO B qINbTpBaJIbHyIO BOPOHky. HanOIHNTE erO MoNTbIM KoPe.

ПРИМЕЧАнЯ:
UTo6bIu36eKaTaPb36pb13rmbaHnH,He NOMeuaTe B cnNtBcJINKOM MHORO MOJOTORo KoPe.
- 3aKpOte KpbIuKy EMKoCTn DnBBoNbI. KpbIuKa DoJnxHaZeJIKNHyTb.
-
YctaHOBtKe KpbIuKy Ha aauy. KhONka Ha KpbIuKe doJxHa 6bITb HnPaBHeHa B cTOpOHy pyKoRrKn. O6paTte BHIMAHne, yIpy6JIeHnHa rOpNe KOJIb DoJNkhBi COBNaadTa CΦNKCuPyUOIMM BbICTynAmn Ha KpbIuKe. KpbIuKa DoJxHa 3aΦNKCuPObaTbc SoJeIyKoM.
-
NomeCTnTe KOJIbIy Ha onOpHyIOBepxHOCTb.
BHIMAHHE:3aunTaOTnoTeKaHn
YcTpoCTBO CHa6KeHc 3aunTOIOT NOTeKaHnO. OHO 3aKpbIBaETcPn N3BneHmN KoFeHnHa. 3To npedOTbPaauet KanAHne KoFe Ha 3JeKtpoNITKy,ecnBΦnJIbTpE BCE eue eCTb BODa.
Y6eHITcB, YTO KpbIbIa IpiNcoEINHeHa K KoFeHNky. OHa oBeCneuBaET 3aunTy OTIOTeKaHn
- EcnB EMKOCTn EeE eCTb BOa,TO CBOEBPemHCHOBa NODCTaBBTe KOpeHnK. HnAye MOKeT nepeNOLHHTbcra qnIbTp.
- BkIIOUHTe npINbOp. 3aRopaETcN INDnKaTOp pa6Otbl.
I PIMMEUAHNIA:
Pp6op OTKIOHITcA BtOMaTnueckn Chepe3 HeCKoJIbKO cekyHd nocne 3abepseHn Ipoceca BapKn. HndkaTop pa60tbl rachet.
TocJe 3aBepeHn npoceCa BapKn
- Pocne Toro, kak Kofoe 6oNbIe He TeUeT Upe3 funIbTp, KofoeHnK MoXHO yBupaTb.
HaxmTe KONky Ha KpbIuKe DnHaJIbAHnKa Ope n3 KOJI6bl.
I PIMMEUAHNIA:
I P E D U N P E X D E H N E:
- Bcerda nepeq chKoB bHMaTe ceTeBOJ uTeKeP n Xdnte, Poka np6op He octbIHeT.
- He norgykaite npnbop B Body. 3To moKet 6bItb npuHoi 3JIeKtpnueckoro yda pa nn noXapa.
BHIMAHNE:
He nCnoJIb3yIte npOBIoNoHyu TeKyu nnDpynne a6pa3nBhIe INCTpyMeHTbl.
He nCnoIb3yIe KNCIOTHbIe IIN a6pa3NHBIe MoIO- Ⅲue cpeCTBa.
C hapyKHO CTOpObl, pni Heo6XODIMOCTN, npOTnpaTne np60p CJIeKa BnaXHNO TprKnO b63 DoabNeHNr MOUxNxCpeDCTB.
- YdaIte npocbIaBuniece 3epHa KoPe C BHyTprenHei CTOpOHbI KOpNcA C NOMOuBIO ByMaXHOrO NOJIoTeHua. Iocne 3TOrBO BVITPnTE NOBepxHOCTb BlaXHOB BeToUbIO.
Дя OунstкУаи ИдржateЯ Фильтра npOMоTe IxB TENIOI BODE C He6OJIbшIM KOLINueCTBOM MOUeero
KJIKKOrO CpeCTBa. Pn HEO6XoDMOCtN, BOCNoJIb3yI-TEcb MRAKO UeTkoI.
XpaHeHne
-ПОИСТНЕ yCTPОДСТВО B COOTBETCTBUN C OПИСАHЯМ, И ДAITe EMY NOJIHOCTbIO BBICOXHYtB.
- PekomeHnyetc xpaHnTb yCTpoiCTBO B erO opuHnHaB-HoynyNAKOBKe,ecnnoHO he BydET nCNoJIb3OBAtbcr DInTeJbHoE Bpem.
Bcerda xpaHnte yctpoNCTBO B cyxom, xopoO npoBeTpnaEMOM MecTe, HeIOCTynHom DnIaTei.
YcTpaHHe HEnCnpaBHOCTeI
| Проблема Возимнaya р孥 Ини Рецениe | |
| Устриства не павotasг. К устриства не поочь сюлоченье зелкову的新штва. | Проберные розettes с поочь друто的老чесы. |
| Встовные stoleсь в розettes поочь поочь. | |
| Проберные поочьпат��ы. | |
| Термостат поочьпатвахоченьи, поочь поись поочь поочьпатвах. Термостат поочьпатвах栓хоченьи. Термостат поочь栓хоч栓х. Термостат поочь栓х. Термостат поочь栓х. Термостат поочь栓х. Термостат поочь栓х. Термостат поочь栓х. Термостат поочь栓х. Термостат поочь栓х. Термостат поочь栓х. Термostах. Термостах. Термостах. Термостах. Термостах. Термостах. Термостах. Термostах. Термostах. Термostах. Термostах. Термostах. Термostах. Термostах. Термostах. Термostах. Термostах. Термostах. Термostах. Термostах. Термostах. Термostаx. Термostах. Термostах. Термostах. Термostах. Термostах. Термostах. Термostах. Термostах. Термostах. Термostах. Термostах. Термostах. Термostах. Термostах. Tу procssь. Ту procssь. Ту procssь. Ту procssь. Ту procssь. Ту procssь. Ту procssь. Ту procssь. Ту procssь. Ту procssь. Ту procssь. Ту procssь. Ту procssь. Ту procssь. Ту procssь. Ту procssь. Ту procssь. Ту procssion. Ту procssion. Ту procssion. Ту procssion. Ту procssion. Ту procssion. Ту procssion. Ту procssion. Ту procssion. Ту procssion. Ту procssion. Ту procssion. Ту procssion. Ту procssion. Ту procssion. Ту procssion. Ту procssion. Туprocssion. Туprocssion. Туprocssion. Туprocssion. Туprocssion. Туprocssion. Туprocssion. Туprocssion. Туprocssion. Туprocssion. Туprocssion. Туprocssion. Туprocssion. Туprocssion. Туprocssion. Туprocssion. Туprocssion. Tуprocssion. Туprocssion. Туprocssion. Туprocssion. Туprocssion. Туprocssion. Туprocssion. Туprocssion. Туprocssion. Туprocssion. Туprocssion. Туprocssion. Туprocssion. Туprocssion. Туprocssion. Туprocssion. Туprocssions. Туprocssion. Туprocssion. Туprocssion. Туprocssion. Туprocssion. Туprocssion. Туprocssion. Туprocssion. Туprocssion. Туprocssion. Туprocssion. Туprocssion. Туprocssion. Туprocssion. Туprocssion. Туprocssion. Ту procssion. Туprocssion. Туprocssion. Туprocssion. Туprocssion. Туprocssion. Туprocssion. Туprocssion. Туprocssion. Туprocssion. Туprocssion. Туprocssion. Туprocssion. Туprocssion. Туprocssion. Туprocssion. Tуprocssion. Tуprocssion. Tуprocssion. Tуprocssion. Tуprocssion. Tуprocssion. Tуprocssion. Tуprocssion. Tуprocssion. Tуprocssion. Tуprocssion. Tуprocssion. Tуprocssion. Tуprocssion. Tуprocssion. Tуprocssion. Tуprocssions. Tуprocssion. Tуprocssion. Tуprocssion. Tуprocssion. Tуprocssion. Tуprocssion. Tуprocssion. Tуprocssion. Tуprocssion. Tуprocssion. Tуprocssion. Tуprocssion. Tуprocssion. Tуprocssion. Tуprocssion. Tуprocssion. Tу procssion. Tуprocssion. Tуprocssion. Tуprocssion. Tуprocssion. Tуprocssion. Tуprocssion. Tуprocssion. Tуprocssion. Tуprocssion. Tуprocssion. Tуprocssion. Tуprocssion. Tуprocssion. Tуprocssion. Tуprocssion. Tуprocssion. Туprocssion. Tуprocssion. Tуprocssion. Tуprocssion. Tуprocssion. Tуprocssion. Tуprocssion. Tуprocssion. Tуprocssion. Tуprocssion. Tуprocssion. Tуprocssion. Tуprocssion. Tуprocssion. Tуprocssion. Tуprocssions. Tуprocssions. Tуprocssion. Tуprocssion. Tуprocssion. Tуprocssion. Tуprocssion. Tуprocssion. Tуprocssion. Tуprocssion. Tуprocssion. Tуprocssion. Tуprocssion. Tуprocssion. Tуprocssion. Tуprocssion. Tуprocssion. Tу procssion. Tу procssion. Tу procssion. Tу procssion. Tу procssion. Tу procssion. Tу procssion. Tу procssion. Tу procssion. Tу procssion. Tу procssion. Tу procssion. Tу procssion. Tу procssion. Tу procssion. Tу procssion. Tу procssion. Ту procssion. Tу procssion. Tу procssion. Tу procssion. Tу procssion. Tу procssion. Tу procssion. Tу procssion. Tу procssion. Tу procssion. Tу procssion. Tу procssion. Tу procssion. Tу procssion. Tу procssion. Tу procssion. Tу procssions. Tу procssion. Tу procssion. Tу procssion. Tу procssion. Tу procssion. Tу procssion. Tу procssion. Tу procssion. Tу procssion. Tу procssion. Tу procssion. Tу procssion. Tу procssion. Tу procssion. Tу procssion. Tу procssion. Tуprocssion. Tуprocssion. Tуprocssion. Tуprocssion. Tуprocssion. Tуprocssion. Tуprocssion. Tуprocssion. Tуprocssion. Tуprocssion. Tуprocssion. Tуprocssion. Tуprocssion. Tуprocssion. Tуprocssion. Туprocssion. Туprocssion. Tуprocssion. Tуprocssion. Tуprocssion. Tуprocssion. Tуprocssion. Tуprocssion. Tуprocssion. Tуprocssion. Tуprocssion. Tуprocssion. Tуprocssion. Tуprocssion. Tуprocssion. Tуprocssions. Tуprocssion. Tуprocssions. Tуprocssion. Tуprocssion. Tуprocssion. Tуprocssion. Tуprocssion. Tуprocssion. Tуprocssion. Tуprocssion. Tуprocssion. Tуprocssion. Tуprocssion. Tуprocssion. Tуprocssion. Tуprocssion. Tу procssion. Tу procssion. Tуprocssion. Tуprocssion. Tуprocssion. Tуprocssion. Tуprocssion. Tуprocssion. Tуprocssion. Tуprocssion. Tуprocssion. Tуprocssion. Tуprocssion. Tуprocssion. Tуprocssion. Tуprocssion. Туprocssion Туprocssion Туprocssion Туprocssion Туprocssion Туprocssion Туprocssion Туprocssion Туprocssion Туprocssion Туprocssion Туprocssion Туprocssion Туprocssion Туprocssion Туprocssion Туprocssion ТуproCSSN. Туprocssion Туprocssion Туprocssion Туprocssion Туprocssion Туprocssion Туprocssion Туprocssion Туprocssion Туprocssion Туprocssion Туprocssion Туprocssion Туprocssion Туprocssion Туprocssion Ту procssion Ту procssion Ту procssion Ту procssion Ту procssion Ту procssion Ту procssion Ту procssion Ту procssion Ту procssion Ту procssion Ту procssion Ту procssion Ту procssion Ту procssion Ту procssion Ту procssion Tу procssion Ту procssion Ту procssion Ту procssion Ту procssion Ту procssion Ту procssion Ту procssion Ту procssion Ту procssion Ту procssion Ту procssion Ту procssion Ту procssion Ту procssion Ту procssion Ту procssions Ту procssion Ту procssion Ту procssion Ту procssion Ту procssion Ту procssion Ту procssion Ту procssion Ту procssion Ту procssion Ту procssion Ту procssion Ту procssion Ту procssion Ту procssion Ту procssion Туprocssion Туprocssion Туprocssion Туprocssion Туprocssion Туprocssion Туprocssion Туprocssion Туprocssion Туprocssion Туprocssion Туprocssion Туprocssion Туprocssion Туprocssion Туprocssion Tуprocssion Туprocssion Туprocssion Туprocssion Туprocssion Туprocssion Туprocssion Туprocssion Туprocssion Туprocssion Туprocssion Туprocssion Туprocssion Туprocssion Туprocssion Туprocssion Туprocssions Туprocssion Туprocssion Туprocssion Туprocssion Туprocssion Туprocssion Туprocssion Туprocssion Туprocssion Туprocssion Туprocssion Туprocssion Туprocssion Туprocssion Туprocssion Туprocssion Ту prossions Ту procssion Ту procssion Ту procssion Ту procssion Ту procssion Ту procssion Ту procssion Ту procssion Ту procssion Ту procssion Ту procssion Ту procssion Ту procssion Ту procssion Ту procssion Ту procssion Тс procssion Тс procssion Тс procssion Тс procssion Тс procssion Тс procssion Тс procssion Тс procssion Тс procssion Тс procssion Тс procssion Тс procssion Тс procssion Тс procssion Тс procssion Тс procssion Тс procssion |
TexHnueckne daHHbIe
MoeJIb: KA 3756
Подач ha npяжен: 220-240 B\~,50-60 T
MoHocTb Ha BxOe: 800BT
He donyckaIte He npabnIbHO yTNIN3aUN OTXoOB. 3TO HAnocNT BpeD OKpykaIOSeI cpeE N OKa3bIbAEr HeRaTNUBHOe BO3dEICTBNE Ha 3IDOPOBBe IIOeN.
Oka3bIaBte coaeCTBne nporpamme yTuIN3aunn npyTm fopmam nepepa60TKn 3NeKtpoHHoN n3NeKtpuueckoTeXHKn.
HOpMaIIO O NyHKtax yTINN3aIIN 6bITOBOy TEXHNKMOXHO NOJTyHbTB MecTHbIX OpraHAX Bnactn.
aai
KA 3756
60-50 240-220
800 2
1,2.
I
185 1
jauuui jygbull g uus auaaag aie cuiyai yj! g auu baaai .wlaub
aall jao aalll CCEaLjg jao
y
.do. do well 25
jglsl jolal
"aaalglgioo"jor gao
3a 111111111111111111111111111
4ab = 3a
y
aJbKa jzjyj yj 101 jj6 136 5
aololololololololololololololololololololololololololololololololololololololololololololololololololololololololololololololol
0g0gbl ③xylglcgc ggydaxia,0g0gblagglal doy
bfoa
. 12jxjz j
a
gj 0gai xia liqie xiai jil 1ologao jia
p^a + 1 x^b - y^b p^a + 1 x^b - y^b
101 101 101 101 101 101 101 101 101 101
S OBC = S BOC + S_ CBA
jdu JdJydy jdy jdy 10 dJyJyJyJyJy
pJU1 J0 j51 1aab1 g
Jusill 8
ab = 10
gabisw gabil alas agil jajg g ay ly lalj gabis
S木弟形 COBD = S COD + S_ BDO
nssu aae
.
jooagall 1511
y
:ddz
j 1
y
JlJI JUe JcJaiIgagall jn Jalalj ndu
y = - ( x - 2) ^2 + 9 = - x^2 + 4x + 5
5 100000000000000000000000000000
olaljfo 100
jIbJyIeI JyIeJIbI3]1.161=Jo uie aiLW oIbI jIi g
jgl 1d aij jy jdoa jdoaie cjjwgojj
a1b j
Lusn nn 0g oolj uae aog aoe all j aao
Ludzulldg odjus aagadasstl uallj adas
LgogbI 1
yoo
m = 311
auii 1
18gagll 100000000000000000000000000000
S AOB = S COD + S BOC - S BOC
10000g
.
aalos jab abgdo
aie aodcui 10g jadll adjgl gaoi dai o
jaoa5 jolaiolol lo liog.1o jaoao afo gall
cb = 1j1j2j3 = 1cb = 1j0a_0s = 0g
aalalalalalalalalal
=
jaiy (gll aag) EC/2009/125 gjjg j
aB
J 1
Lilaljglal jabla loa 5
ailll 1alj jao jaoy Jao yao Jao aai
3.25611 4.200811
- aegbaol
.egill qala d
2 .
文
jglall aolw jie gll lalgai alal
Jglu jc Jg (la g jyjglg 3aal
yj 1 yj 2 yj 3 yj 4 yj 5 yj 6 yj 7 yj
L
jglplnlygiaz jol. liqul 1e
1uLsUyI UoUeJgO
L 1000000000000000000000000000000000000000000000000000000
:

jbo 0g jy g cdo y bdo jao jll iio