
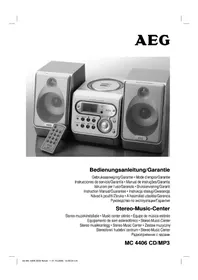
MC 4408 CDMP3 - Hi-fi system AEG - Free user manual and instructions
Find the device manual for free MC 4408 CDMP3 AEG in PDF.
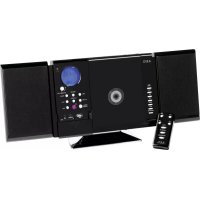
| Product type | Hi-fi system with CD/MP3 player, cassette deck and tuner |
| Brand | AEG |
| Model | MC 4408 CDMP3 |
| Power supply | 230 V, 50 Hz |
| Output power | 100 W PMPO |
| Protection class | II |
| Radio frequency ranges | FM: 87.5 - 108 MHz / AM: 535 - 1650 kHz |
| Supported audio formats | Audio CD, CD-R, CD-RW, MP3 |
| CD player type | Class 1 laser, motorized compartment |
| Cassette deck | Playback and recording (copy protection) |
| Speakers included | Yes, rear connection (Speaker R and L) |
| Remote control | Infrared, range 5 meters, batteries 2x AAA (not included) |
| Special functions | X-BASS (bass boost), repeat/random, track programming, quick search |
| Headphone jack | Yes, 3.5 mm jack, cuts speakers |
| Warranty | 24 months from date of purchase |
| Cleaning and maintenance | Wipe with a slightly damp cloth, without additives; unplug before cleaning |
| Safety | Do not expose to humidity, do not open the motor block, use only for intended purposes |
| Batteries (remote control) | 2 micro AAA 1.5 V batteries, observe polarity |
Frequently Asked Questions - MC 4408 CDMP3 AEG
User questions about MC 4408 CDMP3 AEG
0 question about this device. Answer the ones you know or ask your own.
Ask a new question about this device
Download the instructions for your Hi-fi system in PDF format for free! Find your manual MC 4408 CDMP3 - AEG and take your electronic device back in hand. On this page are published all the documents necessary for the use of your device. MC 4408 CDMP3 by AEG.
USER MANUAL MC 4408 CDMP3 AEG
Overview of the Components.. Page 3
9 Instruction Manual. Page 39
Technical Data.. 42
3 Guarantee
FRANÇAIS
JEZYK POLSKI
Sommaire
Mittelwelle = AM (Mono); UKW = FM; UKW = FM ST.
D-47906 Kempen/Germany

Middengolf = AM (Mono); UKW = FM; UKW = FM ST.
Ondes moyennes = AM (Mono); UKW = FM; UKW = FM ST.
Ondas medias = AM (mono); UKW = FM; UKW = FM ST.
$$ O N = p \dot {a}, O F F = a v. $$
Volum
Med VOLUME-knappene (7/8) kan du stille inn onsket lydstyrke.
PHONES (4)
Spille inn kassetter
- Legg inn en lydkassett med den siden du vil spille inn pa, forover (den fulle spolen til hoyre). Forsikre deg om at kassetten ikke er kopieskyttet (kopieskyttelsesf ikene pa den ovre smalsiden av kassetten, ma ikke vare brutt).
-
Velg opptakskilde med bryteren for funksjonsvalg (5). Start\ denne kilden. Du tar opp fra den lydkilden du hær. Innspil- lingsmaleren nivajusteres automatisk. Endringer i klang og volum endrer ikke på opptaket.
-
Trykk pa opptaksknappen (24), avspillingsknappen trykkes automatisk ned sammen med denen).Opptaket starter. Alle tidigere opptak slettes automatisk.
- Du kan avbryte opptaket kort med II, pauseknappen (19)
eller stanse det welt med / ▲, stopp/eject-knappen (20).
Spille av CD-er
Silk spiller du av en CD
General Safety Instructions
Read the operating instructions carefully before putting the appliance into operation and keep the instructions including the warranty, the receipt and, if possible, the box with the internal packing.
- To avoid the risk of fire or an electric shock, you should not expose the device to rain or moisture. Consequently, do not use the device in the immediate vicinity of water - for example near a bath tub, a swimming pool or in a damp cellar.
- Use the device only for the intended purpose.
- Only connect the device at a properly installed plug socket. Pay attention that the specified voltage corresponds to the voltage of the plug socket.
- When using external mains supply, pay attention to the correct polarity and voltage. Always place the batteries in the correct direction.
- Assemble the device in such a way that the available ventilation openings are not covered.
- Never open the housing of the device. Incorrect repairs can constitute a considerable risk for the user. Should the device become damaged, in particular the mains supply cable, do not operate the device any longer, but rather have it repaired by an expert. Check the mains supply cable regularly for damage.
- For safety reasons a broken or damaged mains lead may only be replaced by an equivalent lead from the manufacturer, our customer service department or a similar quali ed person.
- If the device is not used for a longer period, remove the plug connector from the plug socket or take out the batteries.
These symbols may be found on the machine and are intended to indicate the following:

The lightning symbol should advise the user of parts in the inside of the device which carry dangerously high voltage levels.

The symbol with an exclamation mark should advise the user of important operation or maintenance instructions in the accompanying documentation.

Devices bearing this symbol work with a ,class 1 laser for tracing the CD. The built-in safety switches should prevent the user being exposed to dangerous laser light, which is invisible to the human eye, when the CD compartment is opened.
Under no circumstances should these safety switches be bypassed or manipulated, as this could result in a danger of exposure to the laser light.
Children
- In order to ensure your children's safety, please keep all packaging (plastic bags, boxes, polystyrene etc.) out of their reach.
Caution! Do not allow small children to play with the foil as there is a danger of suffocation!
- To protect children from the dangers posed by electrical appliances, make sure that the cable is hanging low and that children do not have access to the appliance.
Special safety information
This device works with a class 1 laser.
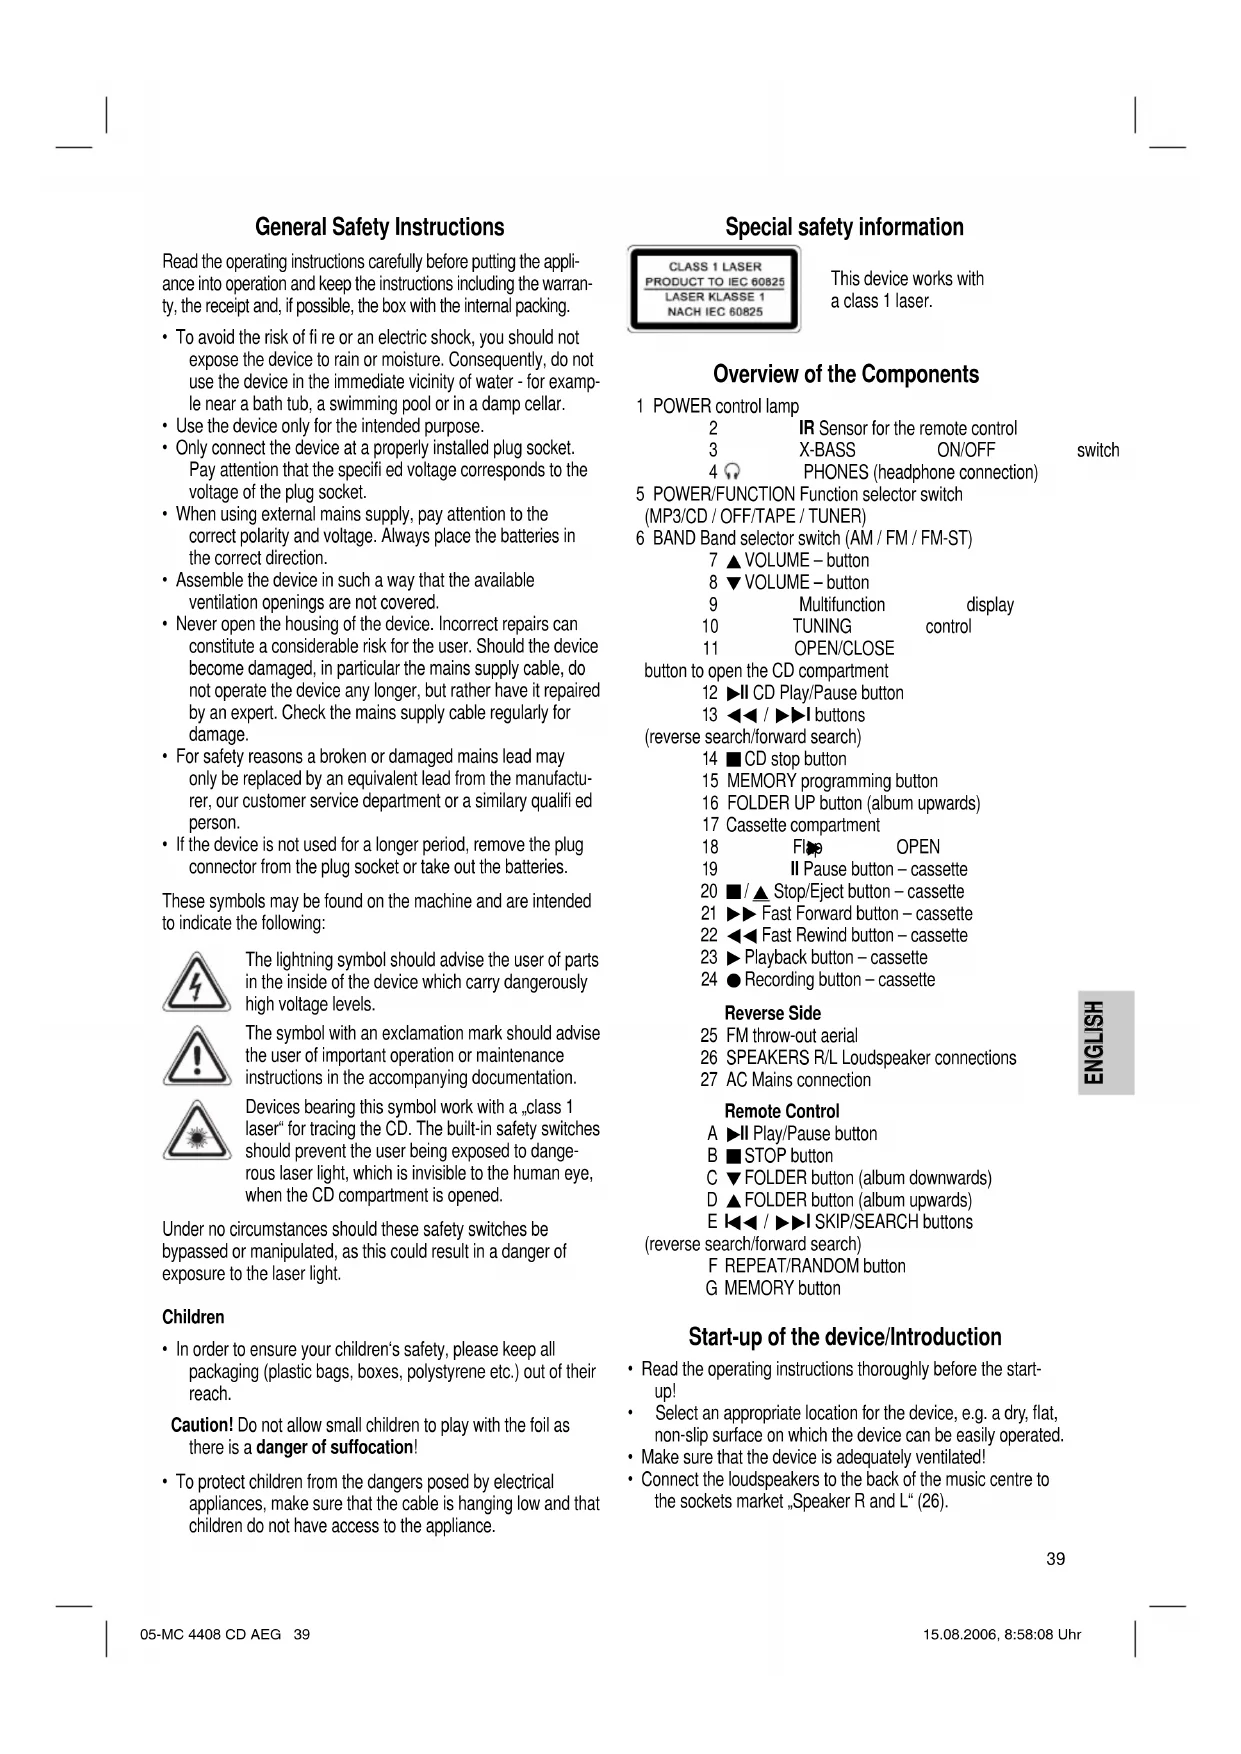
Overview of the Components
1 POWER control lamp
2 IR Sensor for the remote control 3 X-BASS ON/OFF
4 PHONES (headphone connection)
5 POWER/FUNCTION Function selector switch
(MP3/CD / OFF/TAPE / TUNER)
6 BAND Band selector switch (AM / FM / FM-ST)
7 VOLUME - button
8 VOLUME - button
9 Multifunction display
10 TUNING control
11 OPEN/CLOSE
button to open the CD compartment
12 CD Play/Pause button
13按钮
(reverse search/forward search)
14 CD stop button
15 MEMORY programming button
16 FOLDER UP button (album upwards)
17 Cassette compartment
18 FIO OPEN
19 II Pause button - cassette
20 / Stop/Eject button - cassette
21 Fast Forward button - cassette
22 Fast Rewind button - cassette
23▶Playback button-cassette
24 Recording button - cassette
Reverse Side
25 FM throw-out aerial
26 SPEAKERS R/L Loudspeaker connections
27 AC Mains connection
Remote Control
A II Play/Pause button
B STOP button
C FOLDER button (album downwards)
D FOLDER button (album upwards)
E SKIP/SEARCH buttons
(reverse search/forward search)
F REPEAT/RANDOM button
G MEMORY button
Start-up of the device/Introduction
- Read the operating instructions thoroughly before the start-up!
- Select an appropriate location for the device, e.g. a dry, flat, non-slip surface on which the device can be easily operated.
- Make sure that the device is adequately ventilated!
- Connect the loudspeakers to the back of the music centre to the sockets market „Speaker R and L" (26).
CD deck transport protection
- Please open the CD compartment by pressing the OPEN/CLOSE button (11).
- Remove the transport protection from the CD player if present before use.
Power supply
- Insert the plug (27) into a properly installed 230 V,50 Hz power socket.
- The POWER (1) control lamp shows the function.
- Please ensure that the mains voltage corresponds to the information on the type plate.
Inserting the Batteries (not supplied)
- Open the lid of the battery compartment on the back of the remote control.
- Insert 2 batteries of type R03 „AAA“ 1.5 V. Please ensure that the polarity is correct (see the floor of the battery compartment or the inscription on the outside)!
If the remote control is not used for a prolonged period, remove the batteries in order to prevent battery acid leaking.
Now close the battery compartment. - Different battery types or new and used batteries must not be used together.
Warning: batteries are not to be disposed of together with domestic wastes. Dispose of the used batteries at the relevant collection bin or at your dealer's.
Never throw batteries into the fire.
General Operation
POWER/FUNCTION (5)
Switches the unit to „ready for operation" or to „off". The POWER (1) control lamp shows the function.
Switch-off
The machine is turned off when the function selector switch (5) is in the TAPE/OFF position and all tape functions are switched off. The POWER (1) control lamp goes off. Unplug the device.
X-BASS ON/OFF (3)
To increase or decrease the bass output. The switch can be in one of two positions
ON or OFF.
Volume
You can set the desired volume using the VOLUME control (7/8).
PHONES (4)
Insert the plug of a set of headphones into the headphone socket - the loudspeakers are ,muted". If your headphone plug does not fit, please use a suitable adapter.
Loudspeakers
Connect the loudspeakers to the back of the music center to the sockets market „Speaker R and L" (26).
Infrared remote control
For operating the music centre from a distance of up to 5 metres without a lead. If the range of the remote control is reduced, the batteries have to be replaced. During operation ensure that there is nothing blocking the direct line between the remote control and the sensor (2) on the machine.
Listening to the Radio
- Turn the function selector switch (5) to the TUNER position.
- Select the desired frequency band with the band selection switch (6).
Medium wave = AM (mono); VHF = FM; VHF = FM ST.
- Tune in the desired station with the station adjustment knob TUNING (10).
- The (STEC) control lamp (in the display) (9) only lights up when you have selected FM stereo and the station is being received in stereo quality. If reception is too weak and there is noise on the station being received, this lamp will flicker. Try to improve reception by turning and bending or twisting and altering the length of the antenna (25).
- An aerial is integrated into the device for the reception of AM stations. The machine can be aligned to the station by turning it. In this frequency band programs are transmitted in "mono" only.
Cassette Operation
Playing Cassettes
- Select the function OFF/TAPE (5).
- Open the flap (18).
- Press th / Stop/Eject button (20) in order to open the cassette compartment (17).
- Push a recorded audio cassette, with the OFF/TAPE downwards and the listening side facing forwards, into the compartment. Close the cassette compartment.
- Press the playback key (23) to listen to the OFF/TAPE.
- With th ■ / ▲stop/eject key (20) you can stop playback.
- Wind the OFF/TAPE forwards or backwards if necessary in the direction of the arrow keys.
$$ \triangleright \triangleright = f o r w a r d s (2 1), \triangleleft = r e v e r s e (2 2). $$
Always press stop/eject key (20) when changing the direction or stopping the OFF/TAPE. This prevents damage to the machine and the OFF/TAPE.
- If th ■ / ▲ stop/eject button (20) is pressed again the fl ap of the cassette compartment opens.
- In order to interrupt playback briefly, press the II pause button (19). Pressing again continues playback.
Recording Cassettes
-
Insert an audiocassette with the side on which you wish to record facing forwards. Ensure that the cassette is not copy-protected (the copy protection tab on the top narrow side of the cassette must not have been removed).
-
Select the source from which you wish to record with the function switch (5) and then start playback from this source if necessary. The sound source which you are listening to is the one from which the recording is made. The recording level is controlled automatically. Any changes to the sound and volume do not affect the recording.
- Please press the record button (24) (the playback button is automatically pressed down at the same time). Recording now begins. All previous recordings are automatically erased.
- The recording can be interrupted briefly using the II pause key (19), or stopped by means of the / stop/eject button (20).
Playing CDs
This is how you play a CD
- Turn the function selector switch (5) to the „MP3/CD“ position.
- In order to open the CD compartment, press the OPEN/ CLOSE button (11).
- Insert an audio CD with the printed side facing upwards on to the central cone so that the CD clicks into place and then close the lid of the CD compartment.
- "appears in the display (9) followed by the number of tracks.
- Press th II button (12/A) in order to play the CD. The CD will play from the fi rst title. The track currently being played, or MP3 are shown in the display (9).
- To remove a CD, press the STOP key (14/B), open the CD deck with the OPEN/CLOSE key (11) and take out the CD carefully.
Always keep the CD deck closed.
Note: If a disc has been inserted the wrong way round, or no disc has been inserted, the symbol " _ " appears in the display followed by "no".
Note:Playback of CDs produced by the user cannot be guaranteed due to the large variety of software and CD media available.
Description of the CD buttons
II (12/A)
You can briefly interrupt and resume playback using this button. The symbol fl ashes in the display. Pressing again continues playback.


With an audio CD or a CD in MP3 format playing:
With (13/E) you can jump to the next or previous track etc.
- If the button is kept pressed down, the machine starts to search through the tracks.
- If the button is kept pressed down in stop mode the machine quickly plays through the songs until the desired track is reached. When the button is pressed the track begins to play back.
The 1 button (13/E) can be used as follows:
Press once = This starts the current track again from the beginning.
Press twice = This jumps back to the previous track.
Press three times = This plays the song before etc. If the button is kept pressed down, the machine starts to search through the tracks. If the button is kept pressed down in stop mode the machine quickly plays through the songs until the desired track is reached. When the button is pressed the track begins to play back.
STOP (14/B)
The CD stops.
REPEAT/RANDOM (F on the remote control)
Press once: (the emits light). The current track is repeated continuously.
Press twice: (the REPEAT emits a fixed light). The whole CD is played continuously.
Press three times: The display (9) contains the word RANDOM and the track number that is to be played first. All tracks are played back in random order.
Press four times: All functions are cancelled. The normal play mode is resumed.
Only for CDs in MP3 format
Press once: The current track is repeated continuously REPEAT appears in the display).
Press twice: The selected folder of the MP3 CD is repeated continuously (REPEAT FOLDER appears in the display). The individual folders can be selected with the / FOLDER buttons (C/D on the remote control) and FOLDER UP (16 on the device).
Press three times: the whole CD is played continuously appears in the display
Press four times: The display (9) contains the word RANDOM, MP3 and the track number that is to be played first. All tracks are played back in random order.
Press five times: The function is deactivated and the CD is played in the normal mode.
FOLDER (C on the remote control)
Press this button during playback to change to a folder further down. The display, e.g. FOLDER 001, fl ashes briefy. Then the CD begins to play back automatically. If the button is pressed in stop mode the display also fl ashes. Then start playback with the button.
FOLDER UP /▲ (16) (D on the remote control)
Press this button during playback to change to a higher folder. See the above paragraph for the following step.
Note: Some keys are to be found both on the device itself and on the remote control. Keys with the same designation have the same function.
Programmed Play
This can be used to program any desired sequence of tracks.
- Press STOP key (14/B).
- Press the MEMORY key (15/G). The number P01 (storage location) and the symbol MEMORY fl ash in the display (9). Use the I / I buttons (13/E) to select the desired track and then press the MEMORY button (15/G) again. The display changes to memory slot P02.
Note: In the case of CDs in MP3 format only the titles within the current folder are selected. Press the FOLDER / keys (C/D on the remote control) to change the folder.
- Select the next track with the I / key and press the MEMORY key again. Repeat the procedure until all the desired tracks are selected.
- Press the key (12/A). The playback starts. The selected track numbers are shown in the display in the correct order and the symbol or MP3 and MEMORY light up. Press this button to pause briefly the playback.
- Press once the STOP key (14/B) to stop the playback while retaining the program.
- To resume the playback of the program press first the MEMORY key (15/G) once and then the key (12/A).
- To delete the program, press the STOP key (14/B) twice. The MEMORY control lamp goes out.
The device stops automatically once the entire sequence of programmed tracks is completed. The programmed order of tracks remains in the memory until you change to a different mode, remove the CD from the CD compartment or switch off the device.
It is also possible to combine the programmed tracks with the REPEAT function. After you have programmed and started the device, please press the REPEAT/RANDOM button (F on the remote control) up to three times and then you can use the functions as described under "REPEAT/RANDOM".
Playing back Music in MP3 Format
With this device it is possible to play back pieces of music in MP3 format. The device also supports all standard CD types: CD, CD-RW, CD-R.
This machine of is able to play MP3 CDs. Up to 200 tracks can be compressed and stored on these CDs. Your machine detects an MP3 CD automatically (the total number of tracks and MP3s appears in the display). If you would like to play one of these CDs, proceed as described under „Playing CDs". Tracks can be programmed as described under „Playing Back Programmed Tracks".
Please note:
There are a number of different recording and compression methods, as well as quality differences between CDs and self-recorded CDs.
Furthermore, the music industry does not adhere to fixed standards (copy protection).
For these reasons it is possible that in rare cases there are problems with the playback of CDs and MP3 CDs. This is not a malfunction of the device.
Cleaning and Maintenance
Always remove the mains plug before cleaning the machine.
- Any marks on the surface can be wiped off with a slightly damp cloth without any additives.
Note: Compact Disks
- This device is able to play CDs with a diameter of 8 cm and 12 cm.
Note: Only place one disc in the CD compartment at a time.
- Only audio CDs, CD-R and CD-RW disks can be played on this machine.
- Always place the CD into the CD compartment with the label facing upwards. Compact discs can only be played on one side.
- Fingersprints and dust should be carefully removed from the recorded side of the CD (the side without the label) with a soft cloth. Wipe off in straight lines from the centre to the edge.
After being played, CDs should be returned to their case so that they do not become scratched. - Do not expose CDs to direct sunlight, high humidity levels or prolonged high temperatures in order to prevent them from warping.
- Do not adhere any paper to the CD or write on it.
- Do not spray any cleaning agents or antistatic sprays on to the CD as in the case of phonographs.
Technical Data
Model: MC 4408 CD/MP3
Power supply: 230 V, 50 Hz
Output rating: 100 W PMPO
Protection class: II
Radio section:
Frequency ranges: FM 87.5 ~ 108.0 MHz AM 535 ~ 1650 kHz
This device has been tested according to all relevant current CE guidelines, such as electromagnetic compatibility and low voltage directives, and has been constructed in accordance with the latest safety regulations.
Subject to technical changes without prior notice!
Guarantee
The device supplied by our Company is covered by a 24 month guarantee starting on the date of purchase (receipt).
During the life of the guarantee any fault of the device or its accessories ascribable to material or manufacturing defects will be eliminated free of charge by repairing or, at our discretion, by replacing it. The guarantee services do not entail an extension of the life of the guarantee nor do they give rise to any right to a new guarantee!
Proof of the guarantee is provided by the proof of purchase. Without proof of purchase no free replacement or repair will be carried out.
If you wish to make a claim under the guarantee please return the entire machine in the original packaging to your dealer together with the receipt.
Defects to consumables or parts subject to wearing as well as cleaning, maintenance or the replacement of said parts are not covered by the guarantee and hence are to be paid!
The guarantee lapses in case of unauthorized tampering.
After the expiry of the guarantee
After the expiry of the guarantee repairs can be carried by the competent dealer or repair service against the payment of the ensuing costs.
Meaning of the "Dustbin" Symbol
Protect our environment: do not dispose of electrical equipment in the domestic waste.
Please return any electrical equipment that you will no longer use to the collection points provided for their disposal.
This helps avoid the potential effects of incorrect disposal on the environment and human health.
This will contribute to the recycling and other forms of reutilisation of electrical and electronic equipment.
Information concerning where the equipment can be disposed of can be obtained from your local authority.
Kozephullam = AM (mono); URH = FM; URH = FM ST.
BCTaBHeHHe 6aTaapeek
(6aTapeKBNKOMNKeT NOCTaBKNHEBXOaRIT)
- OTKpoIte KpbIuKy OTCeKa 6aTaapeek Ha o6paTHoN CTOpOHe IJy.
BCTaBbTe B Hero 26atapeKu TnTa R03"AAA HAnpRKeHEm 1,5 B.CneIte 3a npaBnHoi NOJIrpHOCTbO (CMOTPi DnO OTcKa)!
EcnI Iy DOnIOe Bpem He nCNoJIb3yeTcB, BbHbTe 6aTapeKn N3 OTEKa, YTO6bl PpeDToBpaTb "BbITEKaHMe" UeNoOu N3 HIX.
3akpoTe oTcK 6paTHo.
HnB Koem Cnyae He MeuAaTe HOBbIe 6atapeKIN CO CTapbIMn, a TaKKe C 6atapeKAMm DpyrNx TINOB.
BHHMaHHe BbIbpaCbIbAte 6aTapeKn B DomaHm Mycop. IooKaIyIcTa CdaIte OtraToAHbIe 6aTapeKn Ha cneHaJIbHbI pyHKT pInema HINB TropBOYTOkY.
HnB Koem clyae He 6pocaiTe 6atapeKn B oroHb.
06uhe npabHla noJIb3ObaHHa
POWER/FUNCTION (5)
BknHouTe nnn BbKnHouTe ceHtp. KOnTpObnHaJnAmNoKa "POWER" (1) cnHann3npyET BkHouHeHne.
BbIKnHOeep
Pnp6op BbIKIOeH,ecn FyHKUHOHaIbHbI nepeKIOUATEIb (5) HaxoITcR B NOIOKeHHN OFF/TAPE n HeTOnpoTARHbIMexAHm3BbIKIOeH.KoHTpOJIbHbI CBETOnHINKaTOP POWER (1) NotyxHET. B 3aKIOUeHH N bIHbTe WtENCeH Ib3 p03eTKI.
X-BASSON/OFF (3)
CnykntIyucneneHnIIOcna6neHn86accOB.IonoKeHne nepeKIOUOATEJI:
$$ O N = B K I N O U E H O, O F F = B b K I N O U E H O. $$
PerynnpobKa rPomKocTn
POMKoCTb 3Byka peRyIInpyETc npn NOMOuN KHOJKN "VOLUME" (7/8).
PHONES (4)
EcnI WtencB ITOBbIX TeNEFOHO BCTaBHeN B THe3do, TO KOIOHN OTKIOUaOTc. EcnI WtencB He NOxOHT K THe3dy, NO6bpTe NoXoHnI nepeXoHNK.
AkkyctHueeCKHe KOJIOHNK
Подкночи Te KonoHнК rHe3dAm "Speaker R" n "Speaker L" (26), Ha 3aJNe CTOpOHe ueHTpa.
HnφpaKpaChbIpy
Ig6ecnpoBHOrO ynpaBHeHnC pacctOHHIO 5 MetpoB. EcnI nCTaHnY yMeHbUaTeC HEOxOdmo CmEHtB 6atapeKn. IpocTaPcHCTBO MExdy Ny n CeHCOPOM (2)Ha My3bKaJIbHOM ueHTpe DoJIKHO 6bTb CBO60dHbIMt.
PpocnyuBaanHe paadnonepepa
1.ПepeBnHbTeФyHKUHOHaNbHbI nepeKluOaTeIb(5)В nolokhenE TUNER.
2.Пи пomoшпpekeнчateЯднana30HOB(6)БbIePHTe He6xOIMMbДnana3OH.
CpeHnne BoHnbl = AM (MOHO); YKB = FM; YKB = FM ST.
- HacptpoTecb Ha HyxHyIpaIIOCTaHUNo npn NOMOupeyIaTopa "TUNING" (10).
- KOnthpObnHnAamNochka" (9) CBETNCTOJbKO B TOM Cnyae,ecnBbI6pan Dnana3OH YKB CTpeo n PnHHMaemar PaIOCTaHnTpaHcInpyeT B peKmE "CTepeo".Ecnn PnEm nIOxO h c NOMexAmn, IaMNoUkKa 6yJeT MIRATb. NOnpo6yHe yNJuWHTb PnEm, BpaUa,CKpyuBaHnI pACKpyuBaH aHTEHy (25).
5.Длгприма радионердаь в дианазоhe CB (AM)В ueHtp BCTpoeha aHTeHHa.Врашаги ИИн ISMeHHA ee NOIOKeHne HactpoItecb Ha padinoctaunIO. B 3tOM dHana3OHe padinonepedaqu TpahcInpyiTOc TOlbKO b peKIMe "MOHO".
KaccetbMmHHToOH
Bocnpon3BeDHeNe 3aIncese
- BbIbepepeHMM "OFF/TAPE" (5).
-
OtkpoiTe KpbilKy (18).
-
HAnMnTe / ▲ KHOHky /cton/BbIbOpoc (20), YTO6bl OTKpbITb KaCCeTHNK (17).
- BCTaBtBe BOTcK ayDnO-KaccTey CO 3ByKO3anncbIO,JeHToBHN3 HPOCnyuBaEMo CTopoHOH K Ce6e.3aKpOteQTCEK.
5.ДЯВOCPON3BedeHIN3aHnCnHaKMITEKHOKNy"23). - KhoIkoI / ▲cton/Bbl6poc (20) MoXHO OCTaHOBnTB BOCnpO3BeDeHne.
- Pn Heo6xOIMOCn KACCETy MOKHO NpeMOTaB BnepeI Hn Ha3aI pN NOMOUI KNONOK CO CTpeJIkAMN.
$$ \triangleright \triangleright = \text {B n e p e} _ {\Delta} (2 1), \triangleleft = \text {H a s a} _ {\Delta} (2 2). $$
Mekdy nepekIIOUeHnAMn,ДЯ OCTaHOBKn IeHTbI, BcERda HAKHMaiTe KhoNkY /△CTON/BBIOpc.3TO cTpaxyET OT NOLOMKJIeHTOINpOTaIKHO MEXaHN3Ma I HaHeCEHHI NOBPEKJDeHn IeHTe.
- NoBtOpHoe HaKaTne KhoNk ■/▲ CTon/BbIbPoc (20) OTKpbBaet KpbIuKy OTCeKa KaCCTebl.
- Tpo npeocTaHOBnTB BOCpOn3BeDeHne KaccetbHa KOpOTKe BpemHaKmTe KNkNy Na3a "II" (19). NOBtOphoe HkaTne KONKn npoDJIKNB OBCpOn3BeDeHne.
3aHbHaKaccTeY
1.BCTaBbTe BOTcEK NcyTyo ayDIO-KaccTeY,3aINCbBaEMoN CTOpOH K C6e (NONHAR KATyUk DOJKNa 6bITb CNpABa).IPOBepbTe,He 3aunueHa IIN KACCeta OT 3aHNCI (PiactMaCCOBbI Ra3uOK C y3KoN CTOpOH kaccTeH He D0JIKeH 6bITb BbJOMaH).
2.Пи nOMOuIФyHKUHOHaJIbHOro nepeKInOuATEJIa (5) BbI6epnTe HcTOUHk 3aINCH bKbIOHTe erO.3aINCbBaETcT O, YTO BbCbIuHTe. YPOBeHb 3aINCH perynIpYETcA BTOMaTHueckn. BpaueHne perynIpOBOK rPOMKOCTn I TEMbpa He BnIaRt Ha 3aINCb.
3. HAnMInTe KHOINKy"3aINcB (24), (KHOINKa) BOCnpoIN3BeDHeHae HAKeTcA aBTOMaTHeCKN).HaHHaETc3aINcB. Bce npdeI dyuie 3aHcN HaJeHTe aBTOMaTHeCKN CTpaIOTcR.
4. 3aHcMb MoHHo NpeOCTaHOBnTb Ha KOpOTKoe BpEmr, HaxaB KHONKy nay3a "II" (19) INN OCTaHOBnTb COBCem, HaxaB KHONKy / ▲ CTOn/BbI6poc (20).
PpOINrpBbAHHe CD
Tak npoHrpBaetcKOMnKaT-Dnck
- PpeBnHbTe FyHKUHOHaIbHbI nepeKIOHaTeIb (5) B nOIOKeHHe.MP3/CDa.
- OTKpoTe oTceK CD, HauKaB KhoNky "OPEN/CLOSE" (11).
3.BCTaBtBe BOTcE,Ha CEHTpnpuyIOuI HUN,KOMnAKT-DNCK C 3aHNCbIO,3TNKETKOBBepx N3aKPOTe KpblkU OTCeKa. - Ha dncnnee (9) noBntcra --a 3aTeM uCNo necen Ha KOMNaKT-DNCKE.
-
HAnMITE KHOIKI ^面 (12/A), YTO6bI cTAPTOBaTb BOCnpon3BeDeHne. BOCnpo3BeDeHne HaHTcra C nepBOI neCHn DnCKa. BOCpO3BODmAR dopOka HA COO6eHne MP3 6yDt OTo6paKaTbCnHa DnCnIee (9).
-
6TObb BbHbTyb KOMnAaT-DnCK HaKMITE ChaAna KHONKy STOP" (14/B), OTKpOte OTEc NpN NOMOn KNHONKn "OPEN/CLOSE" (11) n octopoXHO BBHbTe DNCK.
KOMnAKT-DmCK OCTaHOBNTCA.
REPEAT/RANDOM (KhoIIka F ha IIy)
1x pa3 Haxatb: ( CcRnPcAHTenpepbIBHO). BocnpoIN3BOIDIMaH daHHbI MOMeHT neChra 6ydt HENpepbIBHO NOBTOPTbCRA.
2x pa3a HaKaTb: ( cBcTnC HEnpepbIBHO). BeCb KOMnAkrDnck BydTe HEnpepbIBHO NOBTOrTaC.
3x pa3a HaKaTb:HaIncIIee (9) NOBHTc COo6ueHHe RANDOMn HOMep 3aHcN, KOtOpA8yTe BOCpOu3BOIDITbCn nepBo. Bce 3aHcN 6yDyT BOCpOu3BOIDITbCn OJHa 3a DpyrO B CnyauHOM npAKe.
4x pa3a HaKaTb: Bce cyHKun BBKIOHauOTcBocpnou3BeHeHne npOoJHKtbcB HOpMaJIbHOM peKIMe.
TolbkoDNCDINCKOB3aINcBbΦopMaTe MP3
1x pa3 haKaTb: Tekuza Iopokka 6yIe NOCTOARHNOBTOpTaBCa (Ha DCnPee NOBNTCA REPEAT).
2x pa3a HaKaTb: Bb6paHnHa nanka CD dNcKa c 3aIncbHo BΦopMaTE MP3 6yDet NOCTORHHO BOCpON3BODHTCB (Ha DnCnEe NOBHTCR REPEAT FOLDER). Pn NOMOu KNHOKONOK ▼FOLDER (Homep C/D Ha IY) INF FOLDER UP (Homep 16 Ha nepeJHei NaHeIb) MoKHO Bb6paTb OTdJIbHbI aIb6om.
3x pa3a HkaTb: Becb CD- nck 6yed NOCTOARHNOBTOPAbca (Ha dncnnee noRBMTC
4x pa3a Haukab: Ha nncnlee (9) noBHTC COO6eHne RANDOM, MP3 uHomep 3aHNC, KOtopa 6ydt Bocnpn3BOuNTbcn nepBoi. Bce 3aHcNbDyT BOCPON3BOUHTbcn OHa 3a npYrOB B CnyaHOM nopAKe.
5x pa3a HauKaTb: DeakTNBpyETcN BOCPON3BeENHe CDnCKa nepeIeT B HopMaJIbHbI peKHM.
FOLDER (KhoNka C Ha Iy)
HaKMnTe 3Ty KHNKy BO BpEm RAocpnOn3BeDeHnR, YTO6bI nepeTn Ha Ody NaKy HnKe. Coo6eHne, K npImepy FOLDER 001, Miraet HeKOTOpoe Bpmr. Nocne 3TorO abTomatueckn CTapTyETcBocpnOn3BeDeHne CD-DnCKa. Ecnn DEpaKaTb 3Ty KHNkY HAKatoB PpeKmE Stop, To Ha DnCnIee TaKHe 6yDet MraTb COo6eHne. Nocne 3TorO CTapTyIte BOCpnOn3BeHne pni NOMou n KHONKn II.
FOLDER UP /▲ (16) (KHONka D ha ΠДУ)
HaKMITE 3Tu KHONKy BO Bpemr BOCPOnsBeDeHn, YTo6bI nepeHTn Ha OHy nanky Bblwe. DaJIbHeuWne Warr CMOTpn Ha a63au Bblwe.
PpHMeaHHe: HeKOTOpBie KHNKn HmEOTc KaK Ha Pnleepe, TaK Ha Ndy. OdnKaOBbIe KONKn HmEOT OdnKaOBbIe _YHKU
PporpamnpoBaHne npaKa BocpnOn3BeDeHH
Ionyckaetra IIO6oI npaDOK BOCnpoN3BeDeHn necen.
- HακMιTe KΗΝΚΙ STΟΡa (14/B).
- Haxmte KhoNky"MEMORY"(15/G).HaIncnlee(9) HaHET MInatb P01"Homep RyeKn nAmrTn HAnPiNcB "MEMORY".Pnp NMOOu KNHOOK"1< />■(13/E)
Bb6epnte HxHHyIO neCHIO HAKMITE NOBTOPO KHOKNKY "MEMORY" (15/G). Ioka3aHnI DaCnIepepeyT Ha cIeMyoJyO rHeyKy namrTn P02".
PpmeaHHe: Bb6op 3aHcN Ha CD nCke BΦOpMaTe MP3 Bo3MOxKe TOnbKO BHyTpN Bb6paHHo nnKn.ДЯ Bb6opa NaKn HaxmajTe KhONKn FOLDER / ▲(C/D Ha npIbTe DnCTaHIOHHO ynpaBHeHa).
3.Пипимошн.KHONOK"1</>I"Быберге сдушуho
песчю и нажмITE NOВTOPHO KHONKY "MEMORY".
Повторгerte 3у пpoцуdo tex nop, noka He Быберге
BCE ПЕСИ.
4. Haxmte KhoNky "II" (12/A). Haunhaetc Bocnpoun3BeHeHne. Ha dinCnlee 6yUyt noBnTbCn Homepa Bbipahnblx DOpOKeK B nopRkE BOCpoun3BeHnH N CBeNTbc COo6uHne MP3 nn MEMORY. Haxab 3ty KhoNky MoKHo npepBaTb nporpymMy BOCpoun3BeHnHa KOPOTKoe Bpemr.
5. OndokpatHoe HaKaTne KOnKn " STOP" (14/B) octaHaBnBaet BocIpOn3BeJeHne, npOrpaMa JHe coxpaHaTeC. KoHTpOlbHa NaMNoUka "MEMORY" CBETNTCA.
6.ДЯ HOBOrO CTaPra nporpaMMbHaHKMITE CHaJaIa OIN pa3 Ha KhoNky MEMORY (15/G), a 3aTeM KhoNky II (12/A).
7. Tto6bI notywnb nporpammy haKmnte 2 pa3a KhoNky STOP" (14/B). KoHTpoJIbHaJ lamIOHka "MEMORY" notyxhET.
Iocne BOCPON3BedeHn BCex neceH nporpamMa aBTOMaTueckn OCTaHOBNTc. 3anporpammnpoBaHHb noPdOK BOCPON3BedeHn XpaHnTcB nAmrN n CTpaETc TOLbKO B TOM Cnyae, ecnn My3bKaJIbHbI CEHTp ByET nepeKIOUeH B DpyrO pEXMM, KOMnAaT-DnCK bdyet BbyHyT n3 OTcKa IIN NcHTp ByET npocTo BbIKIOueH.
IMeetcB03MOXHOCTbKOM6HNHPOBaTb 3aIporpammnoBaHHbe neCHn C yHKuHei REPEAT. IocLe nporpammnoBaHHn H CTapTa nporpammbl HaKMITE KhoNKy "REPEAT/RANDOM" (F Ha Nylte DInCTaHNOHNOHOrO ynpabNeHH),do 3 pa3, IN BCE cyHm MOHNO pIMMeHTb Ha nporpamMy, KaK 3TO OINcaHo B pa3dJe "REPEAT/RANDOM".
Bocnpon3BeDHeHne My3bIKn B φopMaTe MP3
HMeetcB03MOXHOCTb BOCnPOH3BOOHTb 3ByKO3aHNC, cElaHHBe BΦopMaTe MP3. Kpome 3toro nIeep uHTaET noTHBce paocnpoctpaehHHBe BNbI dNCKOB: CD, CD-RW, CD-R.
PiEEP BOCPON3BODNT CD-DCN C 3aHNCMn B oOpMaTe MP3. Ha noo6hB nnCKe MOxHO 3aHncatb do 200
dopoxek. PiEEP paCNO3Haet 3TOT oOpMaT aBtOMaTHueckn (Ha nCpIee nOaBnTcB oUe ee uCNo 3aHncen mMP3). DnA BOCPON3BeDEHnE 3aHncen B 3ToM oOpMaTe noCTyNaTe
kak 3TO ONCaHO B rIabe "BoCpON3BeHne CD-DiCKOB".
PiorpaMMPOBaHHe nopAka BOCPON3BeDEHnE
MOxHO pON3BeDHTe NO pOcEdype, ONcaHOB rIabe "PiorpaMMPOBaHHe npAdka BOCPON3BeDEHnE".
Ponnycta yuTHe:
CyueCTBye 60lbwoe pa3Hoo6pa3ne nporpaMM nI KOMPpeccn H 3aIHCn daHHbIX, a TaKKe pa3JIuHn B KaueCTBe nyctbix n 3aIncAHbIX CD nnCKOB.
KpOme 3ToR My3bKaJIbHaI npOMbIJIeHHOCtB He npINepKnBaETCyTBepKJdeHHbIX CTaHdApTOB (3aUNTa OT KONIPOBAHN).
No 30n npuHHe, B peKHX CnyaX, MOYT BO3HNKHyTb npo6Nembl CteHnEM CD nCKOB u nCKOB C 3aIncBIO B opMaTe MP3. 3To npOxCoJIT He no npuHHe HncnpabHOCTbIO DaHHOrO h3dEINr.
UHCTka n yxOa

- FRANÇAIS
- JEZYK POLSKI
- Sommaire
- Volum
- PHONES (4)
- Spille inn kassetter
- Spille av CD-er
- Silk spiller du av en CD
- General Safety Instructions
- Children
- Special safety information
- Overview of the Components
- Reverse Side
- Remote Control
- Start-up of the device/Introduction
- CD deck transport protection
- Power supply
- Inserting the Batteries (not supplied)
- General Operation
- POWER/FUNCTION (5)
- Switch-off
- X-BASS ON/OFF (3)
- Volume
- Loudspeakers
- Infrared remote control
- Listening to the Radio
- Cassette Operation
- Playing Cassettes
- Recording Cassettes
- Playing CDs
- This is how you play a CD
- Description of the CD buttons
- II (12/A)
- STOP (14/B)
- REPEAT/RANDOM (F on the remote control)
- Only for CDs in MP3 format
- FOLDER (C on the remote control)
- FOLDER UP /▲ (16) (D on the remote control)
- Programmed Play
- Playing back Music in MP3 Format
- Please note:
- Cleaning and Maintenance
- Note: Compact Disks
- Technical Data
- Guarantee
- After the expiry of the guarantee
- Meaning of the "Dustbin" Symbol
- BCTaBHeHHe 6aTaapeek
- 06uhe npabHla noJIb3ObaHHa
- BbIKnHOeep
- X-BASSON/OFF (3)
- PerynnpobKa rPomKocTn
- AkkyctHueeCKHe KOJIOHNK
- HnφpaKpaChbIpy
- PpocnyuBaanHe paadnonepepa
- KaccetbMmHHToOH
- Bocnpon3BeDHeNe 3aIncese
- 3aHbHaKaccTeY
- PpOINrpBbAHHe CD
- Tak npoHrpBaetcKOMnKaT-Dnck
- REPEAT/RANDOM (KhoIIka F ha IIy)
- FOLDER (KhoNka C Ha Iy)
- FOLDER UP /▲ (16) (KHONka D ha ΠДУ)
- PporpamnpoBaHne npaKa BocpnOn3BeDeHH
- Bocnpon3BeDHeHne My3bIKn B φopMaTe MP3
- Ponnycta yuTHe:
- UHCTka n yxOa
Brand : AEG
Model : MC 4408 CDMP3
Category : Hi-fi system