MC 4414 CDMP3 - Hi-fi system AEG - Free user manual and instructions
Find the device manual for free MC 4414 CDMP3 AEG in PDF.
| Product type | Hi-fi system |
| Brand | AEG |
| Model | MC 4414 CDMP3 |
| Net weight | 4.7 kg |
| Power supply | 230 V, 50 Hz |
| Output power | 100 W PMPO |
| Protection class | II |
| Supported formats | CD audio, CD-R, CD-RW, MP3 |
| Radio tuner | FM (87.5-108 MHz) and AM (520-1710 kHz) |
| Playback functions | Play, pause, stop, search, repeat (1, all, album), programming, intro, anti-shock (ESP) |
| Equalizer | Modes Classic, Rock, Pop, Jazz, Pass |
| Connectivity | USB, AUX Line In (RCA), subwoofer output, headphone jack 3.5 mm |
| Remote control | Yes (infrared, range up to 5 m) |
| Timer | Programmable standby (on/off), Sleep (10-90 min) |
| Display | LCD screen |
| Speakers included | Yes (2 speakers) |
| Antenna | FM flexible antenna, built-in AM antenna |
| Backup batteries | 2 AA batteries (not included) for memory |
| Maintenance | Clean with a slightly damp cloth, unplug before |
| Warranty | 24 months |
| Safety | Class 1 laser, child protection, do not expose to moisture |
| Product code | AEG MC 4414 CDMP3 |
Frequently Asked Questions - MC 4414 CDMP3 AEG
User questions about MC 4414 CDMP3 AEG
0 question about this device. Answer the ones you know or ask your own.
Ask a new question about this device
Download the instructions for your Hi-fi system in PDF format for free! Find your manual MC 4414 CDMP3 - AEG and take your electronic device back in hand. On this page are published all the documents necessary for the use of your device. MC 4414 CDMP3 by AEG.
USER MANUAL MC 4414 CDMP3 AEG
Overview of the Components.. 3
Instruction Manual. 53
Technical Data 58
Guarantee
FRANÇAIS
JEZYK POLSKI
Sommaire
Listedesifferentéselementsdecommande.. Page3
Mode d'emploi.. 18
SUBWOOFER OUTPUT Buchse (23)
UKW = FM, Mittelwelle = AM (Mono)
D-47906 Kempen/Germany

UKW = FM, middengolf = AM (Mono)
FIND/ESP\*DISPLAY (9)
(^* Vis non fournies)
Télécommande
1 IInuHpePAUSE (lecture/pause)
2
3 TUNE/DOWN
(recherche
arrière/avant)
$$ A M = \text {m a t i n}, P M = \text {a p r e s - m i d i}. $$
Conector SUBWOOFER OUTPUT (23)
▶II PLAY/PAUSE (14/1)
FIND/ESP-DISPLAY (9)
INTRO (7 do commando)
| CLASS 1 LASER PRODUCT TO IEC 60825 |
| LASER KLASSE 1 |
| NACH IEC 60825 |
UKW = FM, Onda Media = AM (Mono)
▶II PLAY/PAUSE (14/1)
4 ON/OFF knapp (Pá/Av)
5 VOL. DOWN -/UP + (lydstyrke) bryter
6 FUNCTION Knapp for funksjonsvalg
7 USB tilkobling
8 NIEBACK/DOWN knapper (soking framover/tilbake)
9 FIND/ESP·DISPLAY knapp
10 PROGRAM knapp (lagring/klokkeslett) 11 CD-spiller
12 OPEN/CLOSE (apne/lukke) CD-spiller
13 LCD-display
14 II PLAY/PAUSE knapp (avspillings-/pause)
MEM ^+ /MEM UP (19/4)
For CD i MP3-format:
Trykk pa donne knappen under avspillingen for a skifte til mappen under. Deoste trinnene er forklart i forrige avsnitt.
For radio:
For a stille inn onsket radiokanal.
SLEEP (14 pa fjernbetjeningen)
General Safety Instructions
Read the operating instructions carefully before putting the appliance into operation and keep the instructions including the warranty, the receipt and, if possible, the box with the internal packing. If you give this device to other people, please also pass on the operating instructions.
- To avoid the risk of fire or an electric shock, you should not expose the device to rain or moisture. Consequently, do not use the device in the immediate vicinity of water - for example near a bath tub, a swimming pool or in a damp cellar.
- Use the device only for the intended purpose.
- Only connect the device at a properly installed plug socket. Pay attention that the specified voltage corresponds to the voltage of the plug socket.
- When using external mains supply, pay attention to the correct polarity and voltage. Always place the batteries in the correct direction.
- Assemble the device in such a way that the available ventilation openings are not covered.
- Never open the housing of the device. Incorrect repairs can constitute a considerable risk for the user. Should the device become damaged, in particular the mains supply cable, do not operate the device any longer, but rather have it repaired by an expert. Check the mains supply cable regularly for damage.
- For safety reasons a broken or damaged mains lead may only be replaced by an equivalent lead from the manufacturer, our customer service department or a similary qualified person.
- If the device is not used for a longer period, remove the plug connector from the plug socket or take out the batteries.
These symbols may be found on the machine and are intended to indicate the following:

The lightning symbol should advise the user of parts in the inside of the device which carry dangerously high voltage levels.

The symbol with an exclamation mark should advise the user of important operation or maintenance instructions in the accompanying documentation.

Devices bearing this symbol work with a ,class 1 laser for tracing the CD. The built-in safety switches should prevent the user being exposed to dangerous laser light, which is invisible to the human eye, when the CD compartment is opened.
Under no circumstances should these safety switches be bypassed or manipulated, as this could result in a danger of exposure to the laser light.
Children and Frail Individuals
- In order to ensure your children's safety, please keep all packaging (plastic bags, boxes, polystyrene etc.) out of their reach.
Caution! Do not allow small children to play with the foil as there is a danger of suffocation!
- In order to protect children or frail individuals from the hazards of electrical equipment, please ensure that this device
is only used under supervision. This device is not a toy. Do not allow small children to play with it.
Symbols in these Instructions for Use
Important information for your safety is specially marked. It is essential to comply with these instructions in order to avoid accidents and prevent damage to the machine:
WARNING:
This warns you of dangers to your health and indicates possible injury risks.
CAUTION:
This refers to possible hazards to the machine or other objects.
NOTE: This highlights tips and information.
Special safety information
This device works with a class 1 laser.
Overview of the Components
1 SLEEP button 2 TUNER/BAND button 3 IR Sensor for the remote control
4 ON/OFF button
5 VOL. DOWN -/UP + (volume) control
6 FUNCTION Function selector button
7 USB connection
8 NEBACK/DOWN 1 buttons
(forward search/reverse search)
9 FIND/ESP·DISPLAY button
10 PROGRAM button (memory/time)
11 CD compartment
12 OPEN/CLOSE CD compartment
13 LCD display
14 II PLAY/PAUSE button
15 REPEAT button
16 STOP button
17 TIMER button
18 EQ button
19 MEM-/MEM+ buttons
Right-Hand Side
20 SPEAKERS R/L Loudspeaker connections
21 PHONES Headphones connection
22 Throw-out aerial
23 SUBWOOFER OUTPUT socket
24 AUDIO LINE IN (DVD/AUX) input sockets
Reverse Side
25 Mains connection
26 Battery compartment (station/time storage)
27 Hangers (for attachment to a wall) (screws not supplied)
Remote Control
1▶II PLAY/PAUSE button
2 STOP button
3 TUNE/UP /TUNE/DOWN buttons
(reverse search/forward search)
4 MEM DOWN/MEM UP buttons
(down/up album/Radio memory preset)
5 REPEAT button
6 PROG. button
7 INTRO button
8 FUNC. Function selector button
9 MUTE button
10 VUUMme) buttons
11 FIND/M/S button
12 POWER button
13 BAND button
14 SLEEP button
15 TIMER button
16 EQ button
17 Number buttons
Start-up of the device/Introduction
- Read the operating instructions thoroughly before the start-up!
- Select an appropriate location for the device, e.g. a dry, flat, non-slip surface on which the device can be easily operated.
- Make sure that the device is adequately ventilated!
- Connect the loudspeakers to the back of the music centre to the sockets market „Speaker R and L" (20).
- Insert the plug into a properly installed 230V, 50Hz power socket. Please ensure that the mains voltage corresponds to the information on the type plate.
- The stored time and stations are lost as soon as the power supply is interrupted. In order to prevent this, insert the power reserve batteries into the battery compartment (26) on the rear of the device.
Inserting the battery/batteries (battery/batteries not supplied)
If there is a power cut or the mains plug has been removed from the power socket, the settings will be retained if the power reserve batteries are inserted.
- Open the battery compartment (26) on the rear of the device. Insert 2 batteries of type R6,AA"1,5 V. Ensure that the polarity is correct (see the floor of the battery compartment)!
- Close the battery compartment again.
- If the device is not used for a prolonged period of time, please take the batteries out in order to prevent leakage of battery acid.
- Different battery types or new and used batteries must not be used together.
CAUTION:
Batteries are not to be disposed of together with domestic wastes. Disposc of the used batteries at the relevant collection bin or at your dealer's.
WARNING:
Do not expose the batteries to high temperatures or direct sunlight. Never throw batteries into the fire. There is a danger of explosion!
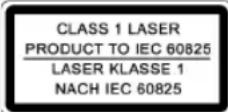
Assembling the Feet
If you do not wish to hang up the device on a wall, please attach the feet as follows:
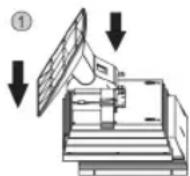
(1)
Place the foot as shown into the holder on the rear of the device or loudspeakers.
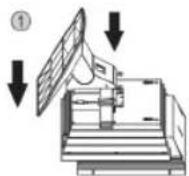
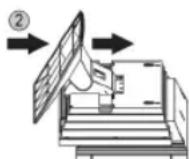
(2)
Now push the foot upwards as shown until it locks in place.
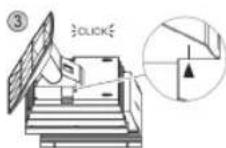
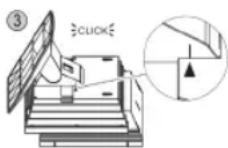
(3)
The foot has locked in place if you hear it ,click" and the marks are positioned one above the other (see illustration).
Setting the Time (in Standby Mode)
- Keep the PROGRAM button (10/6) held down for approx. 3 seconds. The words .24 HOUR appear in the display.
- Use the UP/NEXT▶I / BACK/DOWN I▼按钮 (8/3) to choose between the 24 hour and 12 hour display. Press the PROGRAM button (10/6) to confirm.
i NOTE:
The following appears in the case of the 12 hour display AM = in the morning, PM = in the afternoon/evening.
- Press the UP/NEXT BACK/DOWN I- buttons (8/3) to set the hours. Keep the button pressed down until the desired hour is reached. Press the PROGRAM button (10/6) to confirm.
- Press the UP/NEXT▶I/ BACK/DOWN I (8/3) button in order to set the minutes. Keep the button pressed down until the desired minutes are reached.
- Press the PROGRAM button (10/6) again to store the time.
Remote Control Batteries (not supplied)
- Open the lid of the battery compartment on the back of the remote control.
- Insert 2 batteries of type R03 ,AAA" 1,5 V. Ensure that the polarity is correct (see the floor of the battery compartment)!
- Close the battery compartment again.
- If the remote control is not used for a prolonged period, remove the batteries in order to prevent battery acid leaking.
- Different battery types or new and used batteries must not be used together.

CAUTION:
Batteries are not to be disposed of together with domestic wastes. Disposc of the used batteries at the relevant collection bin or at your dealer's.

WARNING:
Do not expose the batteries to high temperatures or direct sunlight. Never throw batteries into the fire. There is a danger of explosion!
CD deck transport protection
- Press the FUNCTION button (6/8) repeatedly until CD^a appears in the display.
- Please open the CD compartment (11) by pressing the OPEN/CLOSE button (12). The CD compartment opens upwards.
- Remove the transport protection from the CD player if present before use.
- Press the OPEN/CLOSE button (12) to close the CD compartment (11) again.
General Operation
I NOTE:
Some keys are to be found both on the device itself and on the remote control. Keys with the same designation have the same function.
ON/OFF/POWER(4/12)
Switch the device to the standby mode with the ON/OFF / POWER button (the time is displayed). If this button is pressed once more, the device switches on again.
Volume (5/10)
This is used to set the individual volume. The letters ,VOL" and a figure appear in the display (13). This corresponds to the volume that has been set as far as ,VOL 30" or ,VOL 00".

PHONES Headphone Socket (21)
Please use headphones with a 3.5mm stereo jack plug; these should be inserted into the headphone socket. The loudspeakers are then switched off.
INTRO (7 on the remote control)
Press the INTRO button (INTRO appears in the display). Each track on the CD is played for 10 seconds. Press this button again to stop searching. The currently selected track is played.
Infrared remote control
For operating the music center from a distance of up to 5 metres without a lead. If the range of the remote control is reduced, the batteries have to be replaced. During operation ensure that there is nothing blocking the direct line between the remote control and the sensor (3) on the machine.
USB Connexion (7)
This device has been developed in accordance with the latest technical developments in the USB fi eld. Unfortunately the large number of different types of USB storage media on offer today makes it impossible to guarantee full compatibility with all USB storage media. For this reason there may be problems in rare cases with playing back from USB storage media. This is not a malfunction of the device.
- In order to switch on the device please press the ON/OFF / POWER switch (4/12).
- Now press the FUNCTION button (6/8) to select the CARD-USB mode.
- Connect a USB storage medium. After a few seconds the word "STOP" appears in the display together with the number of folders, e.g. 04, and the total number of tracks.
- Press II PLAY/PAUSE (14/1) to play back the music data.
For the method of operation, please see the section ,Playing CDs/MP3s*.
I NOTE:
The FIND function is restricted.
- With the MEM+/MEM-(MEM UP/MEM DOWN) buttons (19/4) you can select the individual folders.

CAUTION:
Before removing the USB storage medium, switch the device to TUNER operation using the TUNER/BAND button (2/13).
AUDIO LINE IN (DVD/AUX) Input Sockets (24)
To connect analogue replay devices. With these sockets you can also hear the sound from other playback devices such MP3 players, CD players etc through the loudspeakers.
- Please connect the external device with an appropriate cinch cable (2x RCA) to the AUDIO LINE IN sockets (24).
- Press the FUNCTION button (6/8) repeatedly until ,AUX appears in the display.
- Through the loudspeakers you now hear the sound from the external device; with the VOLUME buttons (5/10) you can change the volume
- For the remaining procedure please see the operating instructions of the external sound source.
I NOTE:
Adjust the volume of the external device to a comfortable level.
SUBWOOFER OUTPUT Socket (23)
In order to obtain better bass playback you can also connect an active subwoofer.
- Connect the active subwoofer with a cinch cable (1x RCA) to the SUBWOOFER OUTPUT socket on the side of the device.
Listening to the Radio
- Press the FUNCTION button (6/8) repeatedly until "TUNER" appears in the display.
- Press the TUNER/BAND button (2/13) to select between FM or AM.
VHF = FM Medium wave = AM (mono)
- Tune in to the desired station with the help of the UP/NEXT BACK/DOWN I buttons (8/3).
- The FM.ST control lamp ((ST)) (in the display) only lights up if the selected station is being received in stereo quality. If reception is too weak and there is noise on the station being received, this lamp will flicker. Try to improve reception by turning and bending or twisting and altering the length of the antenna (22). In the case of FM stations you can use the FIND/M/S button (11 on the remote control) to switch between MONO and STEREO reception. Where reception is bad we recommend switching to MONO.
- An aerial is integrated into the device for the reception of AM stations. The machine can be aligned to the station by turning it. In this frequency band programs are transmitted in "mono" only.
- If you have found the desired station, press the PROGRAM button (10/6). The word MEMORY lights up and the station memory number flashes.
- In order to select the program location, press the MEM+/MEM-(MEM UP/MEM DOWN) buttons (19/4).
- To store this position, press the PROGRAM button (10/6). Please note that the programme storage location must be entered within five seconds as the procedure is then cancelled.
To select a stored station press the MEM + (MEM UP) or MEM - (MEM DOWN) button (19/4).
NOTE: By pressing the TUNER/BAND button (2/13) you can also switch over to radio mode.
Playing CDs/MP3
This is how you play a CD
- Press the FUNCTION button (6/8) repeatedly until CD appears in the display.
- In order to open the CD compartment (11), press the OPEN/ CLOSE button (12). The CD compartment opens upwards.
- Place an audio CD with the printed side facing upwards on to the central cone so that the CD locks into place. Then close the CD compartment lid by pressing the OPEN/CLOSE button (12) again.
- AUDIO CDs: In the display the symbols "Cd" and "ESP" appear together with the number of tracks and the total playing time. Press the II PLAY/PAUSE button (14/1) to play back the CD. The CD is played from the first track onwards. The track currently being played and the time that has elapsed are shown in the display.
CDs in MP3 Format:
In the display the symbols "STOP" and "ESP" appear together with the number of folders e.g. 04 and the total number of tracks. Press the PLAY/PAUSE key (14/1) to play the CD. The CD is played back from the fi rst track onwards and from the fi rst folder. The song currently being played and the time that has elapsed are shown in the display. With the MEM + (MEM UP) or MEM - (MEM DOWN) (19/4) you can select the individual folders.
- To remove a CD, press the STOP key (16) (2 on the remote control), open the CD deck with the OPEN/CLOSE key (12) and take out the CD carefully.
Always keep the CD deck closed.
I NOTE:
- The CD compartment can only be opened and closed in CD mode.
- If a disc is inserted incorrectly or no disc is inserted, the letters CD READ and "NO DISC appear in the display.
- Playback of CDs produced by the user cannot be guaranteed due to the large variety of software and CD media available.
Description of the CD buttons
II PLAY/PAUSE (14/1)
You can briefly interrupt and resume playback using this button. The playing time that has elapsed fl ashes in the display. Pressing again continues playback.
UP/NEXT▶I/BACK/DOWN (8/3)
With an audio CD or a CD in MP3 format playing:
With UP/NEXT (8/3) you can jump to the next or previous track etc. If the button is kept pressed down, the machine starts to search through the tracks (the sound is muted).
The BACK/DOWN 1 button (8/3) can be used as follows:
Press once = This starts the current track again from the beginning.
Press twice = This jumps back to the previous track.
Press three times = This plays the song before etc. If the button is kept pressed down, the machine starts to search through the tracks (the sound is muted).
In radio mode:
To tune the desired radio station.
STOP (16/2)
The CD stops.
Number buttons (17 on the remote control)
For entering the desired track or radio storage location directly.
MUTE (9 on the remote control)
Used for switching off the sound immediately. The volume bars in the display (next to VOLUME) flash. To cancel this function, press the MUTE key again.
EQ (18/16)
(Preset equalizer function). Various sound modes are available (CLASSIC, ROCK, POP, JAZZ, PASS).
FIND/ESP-DISPLAY (9)
(FIND/M/S) (11 on the remote control)
In FM radio mode:
Only FIND/M/S button: To change between STEREO and MONO.
For an audio CD:
ESP (Anti-Shock Function)
It fills the 40-second electronic memory to protect against the jumping of the CD. If the player is jolted, the CD music data is read out continuously from an intermediate memory (not in MP3 mode). Reading errors are corrected subsequently in the intermediate memory. After the player has been switched on this appears in the display to show that the anti-shock function has been activated and the memory is being charged. Press the FIND/ESP*DISPLAY (FIND/M/S) button if you want to deactivate this function.
For a CD in MP3 format:
You can search for the content on the CD (if burned on the MP3) as follows:
Press once: The name of the first track with the initial
"A" is shown in the display. If the word "A-NONE" appears there is no track available with the initial "A". With the UP/NEXT
I / BACK/DOWN I buttons (8/3) it is possible to select the fi rst track of the following initial "A-Z" and "0-9".
I NOTE:
Keep the UP/NEXT button (8/3) pressed down for approx. 2 seconds. The current initial letter fl ashes. Now you can use the UP/NEXT / BACK/DOWN buttons (8/3) to search through all the tracks that begin with this letter. Keep the UP/NEXT button (8/3) pressed down again for approx. 2 seconds to select a different letter.
With the PLAY/PAUSE button the first track
with the selected initial is played back.
Press twice: The track of the fi rst folder appears in the display. Use the UP/NEXT / BACK/ DOWN I- buttons (8/3) to select the desired folder and press the PLAY/PAUSE button. Playback begins with the fi rst track of this folder.
Press three times: The display changes to normal operation.
Keep pressed down: If ID-3 Tag information has been stored this appears in the display in the form of an LED ticker display. Keep the button pressed down again to switch the function off again.
REPEAT (15/5)
Press once: (the REPEAT emits a fixed light). The current track is repeated continuously.
Press twice: (the REPEAT ALL emits a fixed light). The whole CD is played continuously.
Press three times: all functions are cancelled. The normal play mode is resumed.
Only for CDs in MP3 format
Press once: the current track is repeated continuously (REPEAT appears in the display).
Press twice: the whole CD is played continuously (REPEAT ALL appears in the display).
Press three times: the selected folder of the MP3 CD is repeated continuously (REPEAT ALBUM appears in the display). With the MEM+/MEM - (MEM UP/MEM DOWN) buttons (19/4) you can select the individual folders.
Press four times: the function is deactivated and the CD is played in the normal mode.
MEM -/MEM DOWN (19/4)
For a CD in MP3 format:
Press this button during playback to change to a folder further down. Playback of the MP3 CD begins automatically.
In radio mode:
To tune the desired radio station.
MEM +/MEM UP (19/4)
For a CD in MP3 format:
Press this button during playback to change to a higher folder. See the above paragraph for the following step.
In radio mode:
To tune the desired radio station.
SLEEP (14 on the remote control)
With the device switched on this sets the period in 10-minute steps from 90 to 10 minutes after which the device switches to standby. Press the button repeatedly until the required duration is shown in the display. With this function activated the word SLEEP appears in the display. The device switches off automatically after the set time.
In order to call up the remaining time press the SLEEP button. This time can also be subsequently shortened or switched off again (00 Min).
TIMER (15 on the remote control)
You can set the device so that it switches on and off again at a certain time.
- Keep the TIMER button pressed down until ON" appears in the display. The hours fi gure begins to fl ash.
- Use the UP/NEXT BACKDOWN 1 buttons (8/3) to select the switch-on time (hours).
- Press the TIMER button and use the UP/NEXT BACK/DOWNI buttons (8/3) to select the switch-on time (minutes).
- When the TIMER button is pressed the word , FF appears in the display. The hours fi gure begins to fl ash.
- When setting the switch-off time, please proceed in the same way as described above.
- Press the TIMER button and use the UP/NEXT BACK/DOWN button (8/3) to select in which mode the radio should switch on (TUNER or CD).
- Press the TIMER button and use the UP/NEXT BACK/DOWN buttons (8/3) to select the switch-on volume VOL.
- Press the TIMER button again. The settings are shown in the display briefly one after the other and then the device switches back to the normal display. It appears in the display and the timer is activated.
- Then switch the device to standby operation with the ON/OFF / POWER button (4/12).
In order to deactivate the timer, briefly press the TIMER button. The word disappears from the display.
PROGRAM (10/6)
This is used for setting the time, storing stations and programming playback.
Keep this button pressed down fur approx. 3 seconds to call up the time on the display. Press this button once more to return to the radio frequency or CD/MP3 track display.
Programmed Play
This can be used to program any desired sequence of tracks.
- Press the STOP key (16/2).
- Press the PROGRAM key (10/6). .00 P-01" (memory location) appears in the display (13) together with the word MEMORY. In MP3 format the number of the file (00) fl ashes, while the track number (000), the word MEMORY and the memory storage number P-01 are shown. Use the UP/NEXT / BACK/DOWN I buttons (8/3) to select the desired track and then press the PROGRAM button (10/6) again. The display changes to memory slot P-02.
-
Select the next track with the UP/NEXT BACK/DOWN I key and press the PROGRAM key again. Repeat the procedure until all the desired tracks are selected. In MP3 format first select the folder. Press the PROGRAM button and then select the desired track.
-
Press th II PLAY/PAUSE key (14/1). The playback starts. The first track number selected appears in the display. The words "Cd", "ESP" and "MEMORY" appear in the display. Press this button to pause briefly the playback.
- Press once the STOP key (16/2) to stop the playback while retaining the program. The MEMORY control lamp goes out.
- To resume the playback of the program press first the PROGRAM key once and then the PLAY/PAUSE key.
- To delete the program (in stop mode) first press the PROGRAM button and then the STOP button.
The device stops automatically once the entire sequence of programmed tracks is completed. The MEMORY control lamp goes out. The programmed order of tracks remains in the memory until you change to a different mode, remove the CD from the CD compartment or switch off the device.
It is also possible to combine the programmed tracks with the REPEAT function. After you have programmed and started the device, please press the REPEAT button (15/5) up to three times and then you can use the functions as described under "REPEAT".
Playing back Music in MP3 Format
With this device it is possible to play back pieces of music in MP3 format. The device also supports all standard CD types: CD, CD-RW, CD-R.
This machine of is able to play MP3 CDs. Up to 200 tracks can be compressed and stored on these CDs. Your machine detects an MP3 CD automatically (the total number of tracks and folders appears in the display). If you would like to play one of these CDs, proceed as described under „Playing CDs/MP3". Tracks can be programmed as described under „Playing Back Programmed Tracks".
Please note:
There are a number of different recording and compression methods, as well as quality differences between CDs and self-recorded CDs.
Furthermore, the music industry does not adhere to fixed standards (copy protection).
For these reasons it is possible that in rare cases there are problems with the playback of CDs and MP3 CDs. This is not a malfunction of the device.
Cleaning and Maintenance
Always remove the mains plug before cleaning the machine.
- Any marks on the surface can be wiped off with a slightly damp cloth without any additives.
Technical Data
Model: MC 4414 CD/MP3
Power supply: 230 V, 50 Hz
Output rating: 100 W PMPO
Protection class: II
Net weight: 4,7 kg
Radio section:
Frequency ranges: VHF / FM 87,5 ~ 108,0 MHz
...MW/AM520\~1710kHz
This device has been tested according to all relevant current CE guidelines, such as electromagnetic compatibility and low voltage directives, and has been constructed in accordance with the latest safety regulations.
Subject to technical changes without prior notice!
Guarantee
The device supplied by our Company is covered by a 24 month guarantee starting on the date of purchase (receipt).
During the life of the guarantee any fault of the device or its accessories ascribable to material or manufacturing defects will be eliminated free of charge by repairing or, at our discretion, by replacing it. The guarantee services do not entail an extension of the life of the guarantee nor do they give rise to any right to a new guarantee!
Proof of the guarantee is provided by the proof of purchase. Without proof of purchase no free replacement or repair will be carried out.
If you wish to make a claim under the guarantee please return the entire machine in the original packaging to your dealer together with the receipt.
Defects to consumables or parts subject to wearing as well as cleaning, maintenance or the replacement of said parts are not covered by the guarantee and hence are to be paid!
The guarantee lapses in case of unauthorized tampering.
After the expiry of the guarantee
After the expiry of the guarantee repairs can be carried by the competent dealer or repair service against the payment of the ensuing costs.
Meaning of the "Dustbin" Symbol
Protect our environment: do not dispose of electrical equipment in the domestic waste.
Please return any electrical equipment that you will no longer use to the collection points provided for their disposal.
This helps avoid the potential effects of incorrect disposal on the environment and human health.
This will contribute to the recycling and other forms of reutilisation of electrical and electronic equipment.
Information concerning where the equipment can be disposed of can be obtained from your local authority.
m = 311
NEBACK/DOWN gombok
▶II PLAY/PAUSE (14/1)
Yka3Baet Ha BO3MOKHyO ONaCHOCTb, Hn H3JeHn H npyTHX OKpyKaIOIIHX IpeIMTOB.

IPMHEAYAHNE:JaetcoBteHnHHΦopMaHIO.
CneunalbHbe yka3aHH no 6e3onacHOCTn
JaHHOE H3JHNE OCHIeHO JIa3epHBIM MOyIeM KJIacca 1.
O63op Detanei np6opa
1
Khoika
SLEEP
2
Khoonka
TUNER/BAND
3
IR DaTy
NtBtaJINCTaH
4
KhoNka
ON/OFF
(BKIL/BBKIL)
5 PerynTop VOL. DOWN -/UP + (rpomkoctb)
6
ΦyHKU
Ha KHOIIKa
7
THe3do
USB
8
KhoNkn
INEXCK/DOWN
(NONCK
BIIpeJn/Ha3aJn
9
KhoNka
FIND/ESP·DISPLAY
10 KhoIIka PROGRAM (TAMrB/BpeMa)
11
OTCEK
CD
12 OPEN/CLOSE (OTKpbTb/3aKpbTb) OTeK CD
13 DnCJIeH Ha JxDkHx KpHCTaIIax
14
Tlaikd
LAY/PAUS
E (Bocpon3BeDHeH/Play3a)
15 Tlacitko REPEAT (noBrop)
16 KhoTka STOP
17 KhoNka TIMER
18 Khonka EQ
19 KhoNk MEM-/MEM+
PpaBar
CTOPOHa
20 Thea nodkluoyen KonoHOK SPEAKERS R/L
21 PHONES THe3do nOdkIIOUeHnCtepeOHayHHKOB
22 PpOBoNoUHa aHTeHHa
23 THe3do SUBWOOFER OUTPUT
24 BxOndhe rHe3da AUDIO LINE IN (DVD/AUX)
06paTHa
CTOPOHA
25 He3do noiknIOUeHnCeTH
26
OTCEK
dna
batapei
(3anomnHaHne
paIIOpeDaTnKa/BpeMeH)
27 Pnncno6neHNE IINIOBBeUNBaHN (IIN HACTeHHORO MOHTaKa*)
^* BnHtB BObE M NOCTaBKn He BXOaIIT
Nyt dntaHcHNOHHo ynpabJeHH
4 KhoNkMEMDOWN/MEMUP
(BHn3/BBepx aIb6om/Ryeyka nomr npaHO)
5 KhoNka REPEAT (noBtop)
6 KHonka PROG.
7 KhoNka INTRO
8 ΦyHKUHOHaJIbHaK HONKa FUNC.
9 KhoIka MUTE (BbIKIOueHne 3Byka)
10 KhoNKn VOLU (rpoMkoCTb)
11 Khonka FIND/M/S
12 KhoNka POWER
13 KhoNka BAND
14 KhoNka SLEEP
15 Khonka TIMER
6 KhoKa EQ.
17 LcfoBbIX KnaBn
Ioirotobka K BkJIOeHNO/BBeJeHne
- Ipeed BkIIOHHeM TuaTeJIbHO npOHTaTe pyKOBoDCTBO noJIb30BaTeJIa!
Ioi6epnte IoxoJ Ruee MeCTO JyCTaHOBKn CEHTpa H KOHOK. IoxoJIMM RBnETCa cyXoe, POBHO E HeCKoJIb3KOE MeCTO, HA KOTOPOM 6yDet yIO6HO IOJIb3OBaTbCg CEHTPOM. - PpocneIte 3a TeM, YTo6bI ueHtp xopoIo o6yBaIcR BO3dyXOM!
-Подкючite Колонки Гиздам "Speaker R"и "Speaker L" (20),на заден ссторе центра.
Bctabte cetebyu Bnky buo3ky C hAnpKeHneM ceTn 230 B,50 Tc, yCTaHOBHeHHy Bo COOTBeTcBn C npEtncaHnMn. Y6eInTeCb B TOM, YTO HApRKeHne 3NeKtpocetn CoBnaAaet C HAnpKeHneM nHTaHnIeHTpa, yKa3aHHoe Ha TINOBOM apblke. - YctaHOBKn acTPOHOOMUeCKoB BpeMeHN paAINOCTAHnnponaIaKOT,ecnI npepbIbAeTcNpoaHa 3NeKTPo3Heprn.Bo n36eKaHne 3TO RBOJHXITE 6aTaapeKn 3anaca XoJaBOTCEK DnI 6aTaape (26) Ha o6paTHO CTOpOHe pni6opa.
BcTabka 6aTapeKn/6aTapeek
(6aTapeiKa/6aTaapeiKn He KOMPiKeTMyOTcA)
Ha cnyaai c6oEB 3NEKTPOCETNI INI ECNI CTeBaB NJIKA 6ydt BbHyTA I3 po3ETKN, BCTaBHeHhBe 6aTapeN KcNcykata pe3epbOM XOJa YacOB INCOxpaHRT IporpaMMnPOBaHne.
- OTKpoIte OTcEK DJI8 6aTapei (26) Ha o6paTHoI CTOpOHe npnbopa.BCTaBbTe COTcEK 2 6aTapeiKn IIO 1,5 B TnPa R6 "AA".CneHTe 3a npabInbHoN NOJpHocTbHO (CMOTpn IHO OTcKa)!
- 3akpoTe OTEcK Dnla6aTapeek 6paTHO.
3.Ecn 3eKpnnpoD pONrE BpMa He NcNtBsyETC BbHbTe 6atapeMn H3 Hero, YTObI npEDOTBpaNTb I) "BbTEKaHHe" 9eJOnHn HnHx. - Hn B KOEM Cnyuae He Meuai Te HOBbIe 6aTapeKcN Co CTapbIMn, a TaKKe C 6aTapeKamM dpynx TINOB.

BHIMAHHE:
He bIbapcsbIaIte batapeKn B domaunHm Mycop.
TkoJauNyIcTa cJaTe Otpa6oTaHbIe 6batapeKn Ha
CneuHbIpyHKTnpHemaUNBTOPOBOYTOky.

IPEyIPEXJEHNE:
He noDBepraTe 6atapeKn CINbHOMy HArpeBy nnn Bo3deIcTBIO npMbIX COInHeuHbIX Lyuei. HnKOrJa He 6pocaiTe 6atapeKn B OROh. CyIecCTByET OnaCHocTb B3pbBa!
MOHTAH HOHEK-CTOEK
PnHHeJenAHnIOBBeuBaT np6Op Ha CTHy MOHTpyTe HOKKn-CTOKN CKeKyUoMm 6pa30m:
(1)
BCTaBbTe HOKKy-CTOky, KaK NOKa3aHO Ha pncyHKe, B KpeJIeHHe Ha o6paTHo CTOpOHe np60opa Hnn 3ByKOBbIX KOLOHOK.
(2)
A Tepeb noBnHbTe HOKky-CTOky, KaK noka3aHO Ha pncyHKe, Habepx, nka OHa He BOJdET B KaHaBky.
(3)
Hoxka-CTOka BOWla B KaHaBky, ecn6bnyet CblweH ,ueeHOK" m MapknpoBKn 6byDyH haoDmTBc Dpyr Hnd pyrom (CMOTpn pncyHOK).
IporpammmpoBaHne yacob (BpeKHe OAnDaHn Standby)
- Подэрхите нажатои Кногку PROGRAM (10/6) npn6n. 3 секуны. Ha дсглпee NOBnreTc coo6шeHne 24 HOUR".
- Bb6epnte npn nmoos KhoNOK UP/NEXT / BACK/DOWN I (8/3) 24-x nn 12-n acobyto Hndkauno BpemeHn. Pocne Bb6opa hKmte dIra noTBepeJdeHHa KhoNky PROGRAM (10/6).
IIPIMEYAHHE:
Bcnyae BbOopa 12-uaCobOB HnDnkaaun NoBtca
AM=do noJyHRA,PM=nocne noJyHRA.
- 406bB BBeCTN NOKa3AHNAcOB HAKMMAte KONKUP/NEXT I/ BACK/DOWNI (8/3).JepKiteee HAKATO DO YCTAHOBEnHryKbIX NOKa3AH.NIPOITBEpKDeHNAKMTe KONKy PROGRAM (10/6).
- Yto6bI yctaHOBNTb NOKa3aHmNMyHT HaKMnTe KHOIky UP/NEXT I/ BACK/DOWN I-8/3.DepKHe ee HAKaTOn Do yCTaHOBNEHmHyKhBx NOKa3aHm.
- HaxMMTE KhoNky PROGRAM (10/6) eue pa3, yTo6bl 3aONMHnB BpeM.
BaTapeKn Ndy
(6aTapeKBNKOMNNEKTNOCTaKBnHEBXOANT)
- OTKpoIe KpbIuKy OTCeKa 6aTaapeek Ha o6paTHoN CTOpOHe Iy.
BCTaBbTe COTcE K 26aTapeKn IIO 1,5BTnA R03 ,AAA CNeIte 3a npABnIbHO NIOIrpHOCTbIO (CMOTpN DHO OTcKa)!
3akpoIteOTcEKNJ6ataeekObaTHo.
EcnI Iy Dnrooe Bpemr He nCIOB3yeTcBbHbTe 6aTaapeKn H3 OTCEKa, YTO6bl IppeDToBpaTb "BbITEKaHne" UeNoCH N3 HIX.
HnB KOem cnyae He MeaJte HOBle 6atapeKKn CO CTapbIMn, a TAKKe C 6atapeKamm Dpynx TINOB.

BHIMAHNE:
He Bb6paBcBAIte 6atapeKn B DomaunHm Mycop. POnkanyIcta cAaTe Otpa6oTAnHbIe 6atapeKn Ha CneuaJIbHbI PyHKT PpHema HINB TropOByTOky.

PENEYIPPEKHEHNE:
He noBepraTe 6atapeKn CnHbHomy HarpBeBy nnn B03deCTBnIO npMbx COHcHbIX nyey. HIKoRda He 6pocai Te 6atapeKn BOHOh. CyueCTByeT onaCHOctb B3pbIba!
TpaHcnpTHa ynakOBka CD npeepa
HaHIMMaTe KHOIky FUNCTION (6/8) Do tex nop, noKa Ha DnCnnee He NoBHTcR COO6eHHe .CD".
- OTKpoIte OTceK CD (11), Hax Kab KhoIky "OPEN/CLOSE (OTKpbITb/3aKpbITb)" (12). OTceK CD BXoIHT HaBepx B 3aJaHHbI peKMIM.
IpeepnepBbIM BkHIOHeHMe Heo6xOIMMo ydaNTb 30CEKa CD TpaHcnpTHyO ynaKOBky,ecn TaKOBa HMeETCA.
- Hαχmnte CHOba Ha KhoHcy OPEN/CLOSE (12), Κθo6bl CHOba 3aKpbItb OTeCk CD (11).
06nne npabHla nolb3OBaHH
I PIMMEAHHE:
HeKOTOpBle KHOHKn HMeHTcKa KaHa nIeepe, TaK Ha Iy. OAnHakOBbIe KHOHKn HMeHT OAnHakOBbIe fynkunn.
ON/OFF / POWER (4/12)
IpeeknoHTecb npn noomou Khonk ON/OFF/ POWER b peKIM OxndaHn Standby (noBraHOTc noka3aHn yacOB). Ecn HkaTb 3Ty KhoNky eue pa3, My3bKaJIbHbI ueHtp OJrTB BKNHOHTCRA.
PerynipobKa rpoMkoctn (5/10)
Cnyknt dna perylnpOBKn HnHbNyaJbHOBr pOMKoCTn. Ha nCnnee (13) noBnTcR "VOL" uNCNo. OHO COOTBeTcByeY cTaHOBHeHHOMy yPobHIO rPOMKoCTn B dHaana3Oe OTe "VOL 30" do "VOL 00".
PHONES Theo noikHouenHauyuHKnOB (21)
IpyocnyuBaHn3Byko3aniceNoIb3yntecb CTpeohayuHnKamn co CTpeo-BnIOchKo 3,5 MM, KOTOPAR BCTaBHeTcB BTHe3Do. HAMNKPiN3OM OTKIOUaOTC
INTRO (KhoNka 7 Ha Ndy)
HaKMMTe KnaBnuy INTRO (Ha dncnnee noBHTcRaHaDnncb "INTRO").KaJdAOTdeBHa3aNcB Ha CD 6ydet npOnrpbBaTcB r TeueHne 10 cekHyd. YTo6bl npepBaTb nonck, HAKMMte Ha 3Tu KnaBnuy eue pa3. PocJeYet BOCPOn3BeDeHne BB6paHHo 3AnNCi.
HΦpaKpaChbI Πy
IaB6cnpoBHOrO ynpabHeHnC paccToHHn Do 5 MetpoB. EcnI nCTaHnY mEhBwaeTcH HeoXoHmO CMeHnTb 6atapeKn. IpocpaHCTBO MeKdy Pny CeHCOPOM (3) Ha My3bKaJIbHOM ueHTpe DOJIKHO 6bIb CBOOdHbIMt.
Pa3beM USB (7)
JaHHoe h3dJeNE cKOHCTpyHPOBaHO C yHTOM NocneHnX texHnuecknx DOCTNKeHn B 0bIaTn nepeaun DaHHbIX uepe3 USB npOT. OJnako 6oJIbOe KOJImEcTBo BHeUHnx 3aONMaHooX ycToPcTb USB pa3NIuHoN KOHCTpyKUn, KOTOpoe cerOJn PpeJnaeracT TropOBNe, He rapaTHpyIOT, K CoJxaneHIO, Hx POnHOB COBMecTmOCtH Dpyr C DpyrOM. ITOI npUHHe, B peKHX CnyaR, MOrY T NOBNTC IpOBeMbl C BOCpOIN3BedeHNEM C MylbTMeHaJIbHO NAMrTH, IMeHOse pa3bE m USB. 3To npOxCoxOHT He nO npUHHe HEnCIPaBHOCTbO DAHHOR h3dJIeN.
- BkHouHte H3deJIne, HαKab KhoNky ON/OFF / POWER (4/12).
- Пи поюш Кногн FUNCTION (6/8) Вьберпе peжIM CARD-USB.
3.BCTaBtBe BTHe3do USB BHeUHHe 3aONMHaIOoee yCTpoIcTBO. Ype3 HeckOJIbKO cEkyHd Ha IINCIIne IOBnIeTcN "STOP"YncNo nanok, Hapr.04 nO6uee YncNo 3aIncei. - Haxmte KhoNII PLAY/PAUSE (14/1), yTo6bl BkIIOHTb YTeHHe My3bIKaJIbHbIX daHHbIX.
IJIyO6CnYKINBAHnOpneHTnpyTeCb, noKaanyIcTa, pa3dIOM Bocpon3BedeHHe CDs/MP3.
I INPIMEUYAHNE:
- PeXIM FIND dyHKUOHNpyet C HeKOTOpbIMN OpaHueHHaMn.
KhoNkAMM MEM+/MEM-(MEM UP/MEM DOWN) (19/4) MoKeTe Bb6paTb OTdEhBHe IaKN.
BHIMAHHE:
Ipeep TeKak ydaJIbMbIbTMHeaJIbHyIO nAMrTb C pa3bEMOM USB, IpeekInOHTe np6Op npn NMOUKN KHOJKN TUNER/BAND (2/13)B pexm TunER.
BxOndhe rHe3da AUDIO LINE IN (DVD/AUX) (24)
Длг NOДКИLOЧЕНАнANOROBbIX npOIMpbIbATENE.БlaNOdAp 3Tm THe3dAm Bbl MoKTe CbluWATb 3Byk DpyrNx yCTpOInCTB BOCPOn3BeDEHnA, TAKNX KAK PIIeep MP3, CD-PIIeep nT.D. uepe3 3ByKObBE KOLOHKN.
- PtoKIOHHTe, noXaIyIcTa, BHeUHHn npHbOp npH nomOuIN COOTBETCTByoUeRo Ka6eNc pa3bEOM TIna (2x RCA) K rHe3dAm AUDIO LINE IN (24).
- Haxmamte KhoNky FUNCTION (6/8) cTobko pa3, noKa Ha DnCnIe He NoBHTcAUX".
- Yepe3 3ByKObIe KOLOHKn Bbl CnblWte BOCpON3BeDeHne 3Byka N3 BHeUHero np60pa, KHOKNaMn 3ByKOBbIX KOLOHOK VOLUME (5/10) Bbl MoKeTe HmEHTb rPOMKoCTb.
- NopraDOK daIbHeMx DeIcTBn npOHTaTe B HcTpyKuIN NO 3KcNpyataun BHeUHero nCTouHnKa 3Byka.
I PIMMEUHNE:
Otperynpyte rpoMKocB BHeuHero np60paD ocoTBeCTbYIOuei Baewemy cyxyrpoMKocTN.
THe3do SUBWOOFER OUTPUT (23)
IINIOOHTNKeHnI LyuWero BOCnPOH3BeEHeHH 6aCCOBbIX 3ByKOB, y Bac eCTb BO3MOXHOCTb DOnONHHTeBHO NOKIIOHHTb aKTHBbI Subwoofer.
- PoiKIOHHTe AKTINBHy SubWoofer npi NOMOu Ka6eIc pa3bEOM Tnna (1x RCA) K rHe3Ny SUBWOOFER OUTPUT c 60KOBoCtOpHO np6opa.
PpocnyuBaanHe paHonepea
- HaxmmaTe KhoNky FUNCTION (6/8) Do tex nop, noka Ha dncnnee He noBHTc cooSchene "TUNER".
- Haximam KhoNky TUNER/BAND (2/13) cdeNaTe BbOp MeKdy FM n AM dnaanaohm.
$$ \mathrm {Y K B} = \mathrm {F M}, \mathrm {c p e} _ {\text {D H N E}} \text {B O L N H b l} = \mathrm {A M} (\mathrm {M O H O}) $$
- HactpoTecb npn NMOOu KHONoK UP/NEXT 1/ BACK/DOWN (8/3) HaKeNaeMyu paNIOCTaHIO.
4.CBToHnHnKAtop FM.ST((ST))(HaDnCnnee)CBTeNTcTOIbKO B TOM CnYae,ecnBb6paHHa paNIOCTaHnnpHHMaETcBpeXmte Stereo.Ecn npEm nIOxoiNCOMExAMN,JAMNOUka byET MIRatb.IONpObyTeyUyuHTb npEM,Bpaua,ckpyuBaBnnpackpyuBaAnTEHNy(22).Bo BPema npEma paNIOCTaHnB DnnaNa3OHe YKB(FM)IMeTcBAo3MOXHOCTBepeKluOeHHn3peXmTaSTEREO Ha MONOpn
nomooun KhoonkFNIND/M/S (Khoonka 11 Ha Ndy). B cnuyae nnoxoro npheMa pekomehyetc nepeKnHouHbCra Ha peekm MONO.
5.Длгпнema paHonepeaB bHaanapa3Ohe CB (AM) B ueHtp BCTpoeha aHTehHa. BpauaH nINn H3MeHHA ee NIOJKeHHe NaCTpoIteCb Ha paHIOCTaHcHb. B 3tOM dHaHana3OHe paHonepeaau TpAHCLNpyIOTca TOlbKO B peKHMe "MOHO".
6. Korda 6ydt haIeHa Heo6xOIMma paIOCTaHnra, HaKMnte KhoNky "PROGRAM" (10/6). Ha dncnnee 3acBETITc coo6ueHne MEMORY n HauHET Mrratb Homep rHeKn NaMrtn.
7.ДЯ BBbopa Raeykn NaamTn HauKMaTe KhoNk MEM+/ MEM-(MEM UP/MEM DOWN) (19/4).
8.ДЯЗANOMHHaHnHaKmMtE KhoNky"PROGRAM"(10/6).YHTte,уTO HOpEЯeHn PAmTn Heo6xOJMo 3aJaTB TeeyHn5 cekyHd,Haue npoueDpya nppeBpTeCra.
Yro6bI bI3BaTb n3 naMHTn 3aONMeHHyIO paHIOCTaHIO Haxmnte OndHy n3 KhoNOK MEM + (MEM UP) nn MEM - (MEM DOWN) (19/4).
IIPIMEUYAHNE:
HaKaB KhoNky TUNER/BAND (2/13) MoKHO nepeKnIOuHTbcR B peKIM paHOpnpema.
PpOINrpBbAHe CD/MP3
Tak npoHrpBaetcKOMnKT-Dnck
- Haxmaite KhoNky FUNCTION (6/8) do tex nop, noKa Ha DnCIIee He NoBHTc COoSueHne CD
- OTKpoIte OTCek CD (11), HauKab KhoNky "OPEN/CLOSE (OTKpbIb/3aKpbIb)" (12). OTCek CD BXoJIT HaBepx B 3aJaHHb peKM.
3.BCTaBtE DnCK Audio CD c OTNcKOM BnpeEd TaH NaeHTpnpyHouuin KOHyC, YTObI CD MexAHnueckn BOUeIN KaHaBky.A NOTOM 3aKpOte KpbIuKy OTCeKa CD,CHOBa HAnKaB Ha KNoKy OPEN/CLOSE (12). - YteHne ncka AUDIO CD: Ha nncnne noBnTc coo6eHne "Cd" ESP" uNcno 3aIncei n o6ue Bpem RAocpon3BeDeHHa. HAKMTe KhoNky II PLAY/PAUSE (14/1), TcObbl cTAPoBaTb YteHne CD ncka. Bocnpon3BeHne NaHHTc C npBoi 3aInCn CD ncka. Ha nncnnee noBnTc Ha3BaHne 3aInCn n NCTekuee Bpem RAocpon3BeDeHH.
YteHne CD dncsca c 3aIncbo B foOpMaTe MP3:
Ha dnncnnee noBHTcra coo6ueHne ,STOP" ,ESP" KOHHecTBO nAnok, K npimepy 04 nObuee YnCNo 3aIncen. Haxmte KhoNky II PLAY/PAUSE (14/1), TTObI cTAPTOBaTb YTeHne CD nCkA. BocnpOn3BeDeHne hauHETcC n PEPBO 3annc n PEPBO nnKn CD nCkA. Ha dnccnnee noBHTcra Ha3BaHne 3anncn HCTeKUee BpeM BOCpOn3BeDHeHn. PnP nomoun KhoNOK MEM + (MEM UP) nn MEM - (MEM DOWN) (19/4) moXHO BBipatb Heo6xOdmyo nanky.
5. YTObBi BByHbT KOMnAaT-DnCK HaKMITE ChaYana KHONKy "STOP" (16) (KHONKa 2 Ha Ndy), OTKpOte OTcEK npi NOMouN KHOJIKN "OPEN/CLOSE (OTKpbITb/3aKpbITb)" (12) n OCTOpOxHO BbHbTe DnCK.
UteHne coedeKHMoro CD dNcKa (B cnyae fOpMaTa MP3) OcyueeCTbIeTcNeDyIOUM o6pa30M:
1 pa3 haKaTb: Ha nCnIe NOBHTcH aHaBaHne nepBOH 3aHnCn HauHnA c6yKbbl A".EcIn nOBHTc COOSeHHe ,A-NONE",TO Ha dNcKe HET 3aHnCn HauHnAIOUeHc C 6yKBbl "A".PpH NOMOu KNHOK UP/NEXT ▶/ BACK/DOWN I (8/3) MoXHo BblpaTb nepByo 3aHnCb co cIeDyUoSei 6yKBoH "A-Z" Homepom "0-9".
I PIMMEAHHE:
HaKaTHe KHOKNI II PLAY/PAUSE CTaPTyeT BOCnpoIN3BJeHne BbIbpaHnoi 3aPiNCn.
2 pa3a HaKaTaB:Ha Hcncnnee noRbTcRa3BaHne nepBoi 3aIncn nepBoi npKn. BbIbePte npn NOMOuK HONOK UP/NEXT I / BACK/ DOWN I (8/3) Heo6xoDmUy npKn y HaKMITE KhoNky II PLAY/PAUSE. BocnpOn3BeDeHne NaHETcR c nepBoi 3aIncn BbIpaHHoN pAnKn.
3 pa3a HkaTb: Bo3BpAr B HopMaIbHbI peKIM BOCPOn3BeDeHnR.
HnHaTpoiHKn HaJKeMaEMyo paNHOCTaHcIO.
SLEEP (KhoNka 14 Ha I,dy)
3Decb HMeETc BO3MOXHOCbY cTaHOBnTb BpEmr, Waaramn no 10 MmHT B dHaana3OHe 10-90 MmHT, nO hCTeEHn KOTOPoro N3DeJne nepeKIOUHTcB pEKIM rTOBHOCTN (Standby). HaKMmaTe KHONky Do Tex nop, nOKa Ha DnCnnee He NOBtCA HyKHOE BpEMr. EcIn 3aФyHKuRn AKTMBn3npoBaHa, To HA DnCnnee CBETTCa COO6UeHne SLEEP. No hCTeEHn 3aDaHHOro BpEMHn N3DeJIne ABToMaTHueCKN BbIKIOHTcR.
Yro6b y3HaBt Bpem, OCTaBueeecr Do BBkIIOueHn, HaxMMTe KhoNky SLEEP. 3To Bpem MoXHo NOKoppeKTIpoBaTb BHN3 HmYMeHbWHTb COBcEM (00 MHyT).
TIMER (KhoHa 15 Ha Nv)
Pnp6op MOxH0 3aIpOpaMMnpoBaTb TAK, YTO OH Byet BKIOUATbCn BbIKIOUATcB HJXHOE BpEMr.
1.Деркнite KhoNky TIMER haKaToI,poKa Ha nCnPlee He NOBHTcR COO6UeHHe 一 _ 一 ^ 一 ON" POKa3aHnHa cOB HAuHaOT MmTaTb.
2.Пи помоши КногкUn UP/NEXT /BACK/DOWNI(8/3)BBeINTe noka3aHnuaCob.
3. Haxmte KhoNky TIMER IN BBeDnTe npn nOmoi KhoNkUP/NEXT I/ BACK/DOWN I (8/3) noKa3aHnMHyT.
4. HaxMMTe KhoNky TIMER, Ha DCINJIe NOBHTc8 coo6ueHne, OFF". Ioka3aHHa YacOB HaHHaHT MInrTaTb.
5.Длгпрогамнороваь Времен Вькючени NOCTYNAITE KAK 3TO 6bIIO OINCAHO BbIe.
6. Haxmnte KhoNky TIMER n BbIepeHte npri NMOUIN KhoNkUP/NEXT I/ BACK/DOWN I (8/3) peJHM paOToBpaDnO (TUNER nn CD).
7. HaxMMTE KhoNky TIMER u yctaHOBnTe npn nomOuIN KhoNk UP/NEXT / BACK/DOWNI (8/3) NaHaJIbHyO rpoMkoCTb VOL.
8. Haxmnte KhoNky TIMER eue pa3. Ha dinCnnee nocledoBateNBHO NOKaKyTcBce CSeNaHHbIe N3MeHeHn, a B 3aKlIOUeHn OH nepeKIIIOHTcRa HOpMaJIbHbI peXHM INdKaun. Ha dinCnnee NOBtTCr, BVIOHHTcra TaMep.
9. Tocne 3TOB0 BKNIOHTe np6op KHOIKOJ ON/OFF/POWER (4/12)BpeKIM OKINDAHNA.
IINBbIKHHeHH TaHMeepa HAKMITE KOPOTKO KHONKY TIMER. Coo6ueHHe,Ha dncnnee nOtyxHET.
PROGRAM (10/6)
CnykntIyycTaHOBKn acTPOHOmUeCKoR O BpeMeHN, 3aONMHaHnpaDIOCTaHcN IN BOCpOIN3BeEHH 3aPOrpAMIpOBAHHORO
EcnBb6yTe DeepKaTh 3Ty KnaBnUHa KaTOn IpnM.
3 cekHyDb, To Ha dncPiee 6yTeYkA3aHO aCtPOHmUeCKoe BpMa. TnTO, YTO6b CHOBa BNDetb Ha dncPiee
paiaOuactOTy INn FyHKcNn CD/MP3, ChoBa hXmIte 3Ty KnaBnUy.
IporpamnpoBaHne npraKa BocpnOn3VeDeHH
IonyckaetcIIO6oI npaDOK BOCpOn3BeHnNEcen.
- Haxmte KhoNky"STOP" (16/2).
- Haxmte KhoNky "PROGRAM" (10/6). Ha dinCnlee (13) NOBHeTcR .00 P-01" (rueKeIa NamrIn) n COo6eHne ME-MORY.BpeKmte MP3 Mrraet Homep nAnki (00), a TaKHe CBeTnCTc Homep 3anncn (000), COo6eHne MEMORY n Hoomep RneKn NAMrtn P-01. Ppr NMOOIN KHOONK "UP/ NEXT I / BACK/DOWN " (8/3) Bb6epTe HJxHcyIO neCHIO n Haxmte NoBtOpHo KhoNkY "PROGRAM" (10/6). POKa3aHnI DaCnIe NepeyDyt Ha CNeDuOuIy RoeyKy naMrtn P-02".
3.Пи nOmoUH KHOON "UP/NEXT I/ BACK/DOWN 1 BbI6epHTe CNeDyOuYIO NecHIO HAnKMITE NOBTOPOKHO KhoNky"PROGRAM".NoBTOpAte 3Ty npOeDpy Do TEXnop,poKa He BbI6epHTe BCE neCHN.BpeKmE MP3 ChaHaTa BcERda Heo6xOJIMO BbI6paTb NaKy.3aTeM HAnKMITE KHOONy PROGRAM H BbI6epHTe HyyHHyIO 3aNtCb.
4. HauMMte KhoNky II PLAY/PAUSE" (14/1). Haunhaetc BOCnpo3BedeHHe. Ha dncnnee NOBtC HOpem nepBOB Bb6paHHo 3aHcN. Ha dncnnee NOBtC COOSeHHe "Cd", ESP" nIN, MEMORY". HaKab 3Ty KhoNky MoXHo npepBaTb nporpyMMy BOCnpo3BedeHn Ha KopoTKeB BpEMr.
5. Ondokpathoe haxahtne KhoNk "STOP" (16/2) octaHabnBaet Bocnpou3BeJeHne, nporpaMa Jc coxpanHeTc. KoHTpOlbHaJ lamNoquKa "MEMORY" notyXHeT.
6. Дяг Новогостара поррамьи нажмite счада однога раз на Кнонку PROGRAM, a заlem Кнонку II PLAY/PAUSE.
7. TRObI NToTMyInb NpOprpAMMy (B peKmte Stop) HauKMITE CHaHana KhoNkY PROGRAM, a 3aTeM STOP.
Iocne BOCPON3BedeHn BCex neceH nporpAmma ABTomatueckn octaHOBHTc. KOHTpObHaJ lamnocha MEMORY notxHET. 3anporpammpoBaHHn nopraDOK BOCPON3BedeHn XpaHNTCn B nAMrTH n CTpaeTcT OJIbKO TOM Clyae, eCN My3bKaJIbHbN CEHTp 6yET nepeKJIIOUeH BdpYr peXHM, KOMPAKT-DINCK 6yET BByHT n3 OTCEKA IIM CEHTp 6yET nPoCTO BvIKIOUeH.
HMeetcB03MOxHOCTb KOM6HNHPOBaTb 3anporpammnoBaHHbe neCHN C fynKHeRePEAT. Iocne nporpammnoBaHHn CTapTa nporpammbl HaKMITE KHOIky REPEAT (15/5),do 3 pa3, n BCE fHyHm MOxHo npImeHTb Ha nporpamMy, kak 3TO ONcaHO B pa3dJe "REPEAT".
Bocnpoh3BeDeHne My3bIKN B fOpMaTe MP3
HMeetcB03MOXHOCTb BOCPON3BOOHTb 3BYKO3aNNCH, CdeNaHHBé BΦopMaTe MP3. Kpome 3TOrO pIeep YHTaET NOHTB BCEpacipocTpaHeHHBé BNdbI DNCKOB:CD, CD-RW, CD-R.
Плелер BOCPON3BODHT CD-DINCSK C 3aINSCMn B FOPMATE MP3. Ha NOIO6HbI DING KE MOXHO 3aINCAt b Do 200 DOPOXeK. Плелер paN03Haet 3OT FOPMAT ABOMATUeCKN (Ha INCJIeE NOBJIETcO OUIEE KOINCTBO HA3BaHIn N faiNOB).ДЯ BOCPON3BEdENH 3aINCEY B 3TOM FOPMATE NOCTyNAITE KAK 3TO ONICAH BO rAbe "BOCPON3BEdENHe CD-IMCKOB/ MP3".ПогрмнрOBAHne NOPdKa BOCPON3BEdENH MOnHHo POn3BEdITE no ppoedype, ONICAHOB B rIabe "PogpmmPobAHne nopRdKa BOCPON3BEdENH".
Ponanycta yuTne:
CyueTBye60bIoe pa3Hoo6pa3ne nporpaMM nIaKOMPpeCCNm 3aIINc DaHHbIX, a TaKKe pa3JIuHnB KaueCTBeYcTBx I3aIncAHbIX CD DnCKOB.
Kpome 3Toro My3bkaIbHaI npOMbiUJIeHHOCTb He npIepKInBaetcYTBepXDeHHbIX CTaHdApTOB (3aUHTa OT KOnIpOBaHn).
No 3toi npuHHe, B peKHX CnyaX, MOrYb Bo3HNKHyTb np6JIeMbI c TteHEm CD nCKOB u NcKOB c 3aNcBIO
88
BΦopMaTe MP3. 3To npOxCoJNT He no npuHHe HEnCnPabHObTbIO DaHOrO H3DeJIIN.
UncTkau yxOa
-ПередчисковынмайтEBИКУи3po3ETKN.
- PAnHa ChapyKn KOpnyCa MoJHo ydaJIb cIeRka BnaKHO TpIKNo, 6e3 npImeHeHnMoUox CpeCTB.
TexHnueeckne daHHbIe
MoIeIb: MC 4414 CD/MP3
3JIeKtpoNTaHHe: 230 V, 50 Hz
BbIXOHaM MoUHocTB: 100 W PMPO
Klacc 3aunTbI: II
Bec HETTO: 4.7 K
PdAnOpnpeMnHK:
TapaHTN TepReTc npB BCKpbITn H3dJIIN NOCTOPOHHIMN JIuamn.
Pocne rapaHTM
Iocne oKoHuaHn cpoKa rapaHTn, peMOHT n3deJn npOn3BODNTcra 3a OnLaty, COOTBeTCTByUOUMM MaCTepCKHM nnnyHKtAmn cepBnCHOr 06ClyKuBaHn.
GARANTIE-KARTE
Garantiebewijs · Carte de garantie