7537N1 - Car stereo ELTA - Free user manual and instructions
Find the device manual for free 7537N1 ELTA in PDF.
User questions about 7537N1 ELTA
0 question about this device. Answer the ones you know or ask your own.
Ask a new question about this device
Download the instructions for your Car stereo in PDF format for free! Find your manual 7537N1 - ELTA and take your electronic device back in hand. On this page are published all the documents necessary for the use of your device. 7537N1 by ELTA.
USER MANUAL 7537N1 ELTA
text_image
8 2 1 3 6 14 13 CD-ROM drive / CD-ROM & C/MPB 10 7 15 12 5 4 11 9 A E F G H I J K L M N O P Q R S T U V W X Y Z A B C D E F G H I J K L M N O P Q R S T U V W X Y Ztext_image
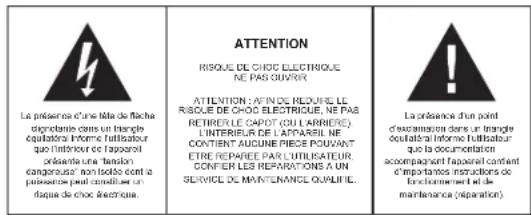
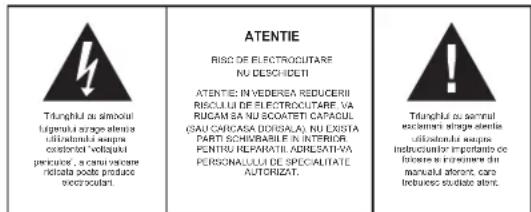
The triangular symbol with the lighting ball warns the user to be presence of dangerous non-irradiated voltage on the Inside of this device which may cause an electric shock. WARNING DANGER OF A HAZAWDOUS ELECTRIC SHOCK. DO NOT OPEN WARNING. TO REDUCE THE RISK OF AN ELECTRIC SHOCK. DO NOT REMOVE. THE FRONT ON BACK COVERS. INSIDE THE UNIT, THERE ARE. NO PARTS THAT CAN BE REPAIRED OR ADJUSTED BY THE USER. PLEASE REFER TO QUALIFIED TECHNICians. The triangular symbol with the explosion slightly by important points of which the user should refer to the renata regarding maintenance and repair.FURTHER INFORMATION

Beware of small pieces and batteries, do not swallow them. It may be hazardous to your health and lead into suffocation. Please, Make sure to keep small devices and batteries out of the reach of children.

Important advice regarding hearing protection
Caution:
You care for your hearing, and so do we.
Therefore, use caution while using this appliance.
Our recommendation: Avoid high volumes.
Children should be supervised while using headphones; make sure that the appliance is not set to high volume
Caution!
High volumes may cause irreparable damage to children's ears.

NEVER let allow anyone, especially children, to put objects into the holes, slots or openings on this devise. This may lead into death due to electric shock. The device must only be opened by a qualified assistant.

Only use the appliance for its intended purpose.
This device may only be used in housings and business premises.

Please keep this instruction manual for further reference

Instructions on environment protection
Do not dispose of this product in the usual household garbage at the end of its life cycle; hand it over at a collection point for the recycling of electrical and electronic appliances. The symbol on the product, the instructions for use or the packing will inform about the methods for disposal.
The materials are recyclable as mentioned in its marking. By recycling, material recycling or other forms of re-utilization of old appliances, you are making an important contribution to protect our environment.
Please inquire at the community administration for the authorized disposal location.

Do not obstruct the ventilation of the device. Make sure, that no curtains, newspapers, furniture or any other type of object are blocking the ventilation system of the apparatus. The ventilation system must be clear of objects at all times! Overheating may lead into serious damage of the device and reduce its performance and lifespan.

Heat and warmth
Do not expose the appliance to direct sunlight. Make sure that the appliance is not subject to direct heat sources such as heaters or open fire. Make sure that the ventilation slots of the appliance are not covered.

Moisture and cleaning
This appliance is not waterproof! Do not immerse player in water. Do not allow player to come in contact with water. If water gets inside the player it may cause serious damage. Do not use cleaning agents that contain alcohol, ammoniac, benzene or abrasives as these could damage the player. For cleaning, use a soft, moistened cloth.

Professional recycling
Batteries and packaging should not be disposed of in the trash. Batteries must be handed over to a collection centre for used batteries. Separating disposable packaging materials is ecologically friendly.
SAFETY INSTRUCTIONS
- READ INSTRUCTIONS - All the safety and operating instructions should be read before the unit is operated.
- RETAIN INSTRUCTIONS - The safety and operating instruction should be retained for future reference.
- HEED WARNINGS - All warnings on the unit and in the operating instructions should be adhered to.
- FOLLOW INSTRUCTIONS - All operating instructions should be followed.
- WATER AND MOISTURE - The unit should not be used near water, for example, near a bathtub, washbowl, kitchen sink, laundry tub, swimming pool or in a wet basement.
- VENTILATION - Openings in the device serve its proper ventilation, are necessary for the operation and prevent overheating. The unit should be situated so that its location or position does not interfere with its proper ventilation. Do not place on bed, sofa, rug or similar surface that may block the ventilation openings, in a built-in installation, such as a bookcase or cabinet that may impede the flow of air through the ventilation openings.
- HEAT - The unit should be situated away from heat sources such as radiators, stoves, or other appliances (including amplifiers) that produce heat.
- POWER SOURCE - The unit should be connected to power supply only of the type described in the operating instructions or as marked on the unit.
- POWER CORD PROTECTION - Power supply cords should be routed so that they are not likely to be walked on or pinched by items placed upon or against them.
- NON-USE - During longer periods of non-use please disconnect from mains power supply and antenna.
- OBJECT and LIQUID ENTRY - Care should be taken so that objects do not fall and liquids are not spilled into the enclosure through openings.
-
DAMAGE REQUIRING SERVICE - The unit should be serviced by qualified service personnel when:
a. The power-supply cord or plug has been damaged.
b. Objects have fallen into, or liquid has been spilled into the unit enclosure.
c. The unit has been exposed to rain or moisture.
d. The unit does not appear to operate normally. Only use the units and controls as described in this manual.
e. The unit has been dropped, or the enclosure damaged.
f. The unit displays serious changes in its performance. -
SERVICING - The user should not attempt to service the unit beyond that described in the user operating instructions. All other servicing should be referred to qualified service personnel.
- CLEANING - Disconnect from mains power supply before cleaning. Do not use liquid or spray cleaners, only use a damp cloth. Follow the care and maintenance instructions in this manual.
- LIGHTNING - During lightning and longer periods of non-use please disconnect from mains power supply and antenna.
- SAFETY CHECK - After servicing the unit ask the customer service for a safety check.
- OVERLOAD - To avoid fire and electric shock do not overload wall outlets and convenience receptacles.
- ELECTROSTATIC DISCHARGE - Disconnect from mains power supply and remove batteries if unit malfunctions. Reconnect after a short time.
CAUTION
THIS CD PLAYER IS A CLASS I LASER PRODUCT. HOWEVER, THIS CD PLAYER USES A VISIBLE/INVISIBLE LASER BEAM, WHICH COULD CAUSE HAZARDOUS RADIATION EXPOSURE IF DIRECTED. BE SURE TO OPERATE THE CD PLAYER CORRECTLY AS INSTRUCTED.
USE OF CONTROLS OR ADJUSTMENTS OR PERFORMANCE OF PROCEDURES OTHER THAN THOSE SPECIFIED HEREIN MAY RESULT IN HAZARDOUS RADIATION EXPOSURE. DO NOT OPEN COVERS AND DO NOT REPAIR THE DEVICE YOURSELF. REFER SERVICING TO QUALIFIED PERSONNEL.
TO REDUCE THE RISK OF FIRE OR ELECTRIC SHOCK AND ANNOYING INTERFERENCE USE ONLY THE RECOMMENDED ACCESSORIES.
INSTALLATION
Select the mounting location where the unit will not interfere with the normal driving function of the driver.
Before finally installing the unit, connect the wiring temporarily and make sure it is all connected up properly and the unit and the system work properly.
Use only the parts included with the unit to ensure proper installation. The use of unauthorized parts can cause malfunctions.
Consult with your nearest dealer if installation requires the drilling of holes or other modifications of the vehicle.
Install the unit where it does not get in the driver's way and cannot injure the passengers if there is a sudden stop, like an emergency stop.
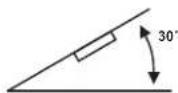
If the installation angle exceeds 30^ the unit might not perform well.
Avoid installing the unit where it is subjected to high temperature, such as from direct sunlight, hot air from the heating ducts, or where subjected to dust, dirt or excessive vibration.
GB
WIRING DIAGRAM

flowchart
graph TD
    A["ANTENNA PLUG"] --> B["ISO CONNECTOR"]
    C["MEMORY (B+)"] --> D["FUSED FILTER BOX 1A & 7A FUSES"]
    E["BLACK (GND)"] --> D
    F["RED (B+)"] --> D
    G["BLUE AUTO ANT"] --> H["FUSE"]
    I["FRONT"] --> J["WHITE / BLACK"]
    K["LEFT SP"] --> L["GREEN"]
    M["REAR"] --> N["GREEN / BLACK"]
    O["RCA LINE OUT"] --> P["RED R"]
    O --> Q["WHITE L"]
    R["GRAY"] --> S["FRONT"]
    T["VIOLET"] --> U["RIGHT SP"]
    V["VIOLET / BLACK"] --> W["REAR"]
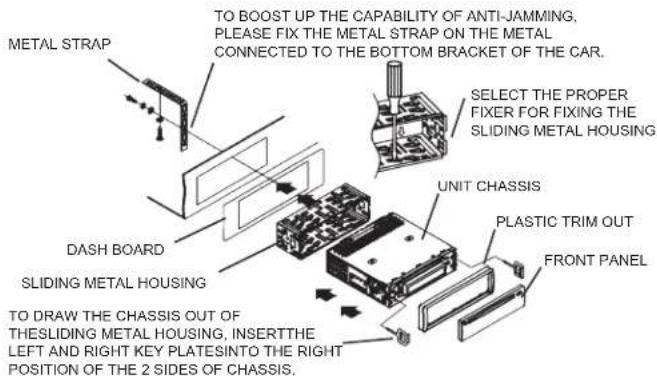
DIN front / rear-mount
This unit can be properly installed either from "front" (conventional DIN front-mount) or "rear" (DIN rear-mount installation, utilizing threaded screw holes at the sides of the unit chassis). For details, refer to the following illustrated installation methods.
text_image
METAL STRAP TO BOOST UP THE CAPABILITY OF ANTI-JAMMING, PLEASE FIX THE METAL STRAP ON THE METAL CONNECTED TO THE BOTTOM BRACKET OF THE CAR. SELECT THE PROPER FIXER FOR FIXING THE SLIDING METAL HOUSING. UNIT CHASSIS PLASTIC TRIM OUT FRONT PANEL DASH BOARD SLIDING METAL HOUSING TO DRAW THE CHASSIS OUT OF THESLIDING METAL HOUSING, INSERTTHE LEFT AND RIGHT KEY PLATESINTO THE RIGHT POSITION OF THE 2 SIDES OF CHASSIS.GB
19.1
PLEASE NOTE:
- Must use 4Ω impedance speakers.
- Do not short circuit antenna and earth cables.
- The unit is designed for negative terminal of the battery, which is connected to the vehicle metal. Please confirm it before installation.
- Do not short circuit speaker cables as this may damage unit or speakers
- Connect all cables before attaching the front panel.
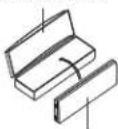
How to remove and install the front panel
When detaching or attaching the control panel, be careful not to damage the connectors on the back of the control panel and on the panel holder and ensure the unit is switched off.
1. Press the release button and the left hand side of the front panel will release.
2. Remove the front panel and keep the front panel in the protective case.
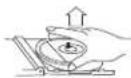
Installing the front panel
First insert the right hand side of the front panel into the housing of the unit, then push the left hand side of the front panel and make sure the panel is properly installed, now press SEL briefly to switch the device on.
NOTE
- If the car interior is extremely hot after being parked in the sun, do not use the player until the car has been driven for a while to cool off the interior.
- Keep the front panel in its protective case.
PROTECTIVE CASE
FRONT PANEL
DISC CLEANING AND MAINTENANCE
Please note:
In addition to normal audio CDs, this unit can play CD-R and CD-RW discs that contain audio tracks as well. However, depending on the conditions of the recording equipment, recording program or the CD-R or CD-RW disc itself, some CD-R or CD-RW may not play.
When burning music to CD-R or CD-RW discs, too high recording speed may result in poor signal quality and therefore it is recommended to select 24X or lower speed for CD recording and 4X lower speed for CD-RW recording.
Handling of CDs
* Remove the CD from its cover.
* Do not touch the surfaces.
* Do not attach stickers to CDs and do not write on them.
* Do not bend CDs.

Storage
* Always store CDs in their cover.
* Do not subject discs to direct sunlight, dirty, dusty and damp areas or car heaters.
Cleaning
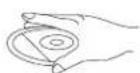
* Clean CDs with a soft cloth.
* Clean CDs from the center to the edge.
FROM THE CENTRE TO THE EDGE
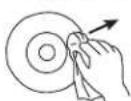
CORRECT

INCORRECT
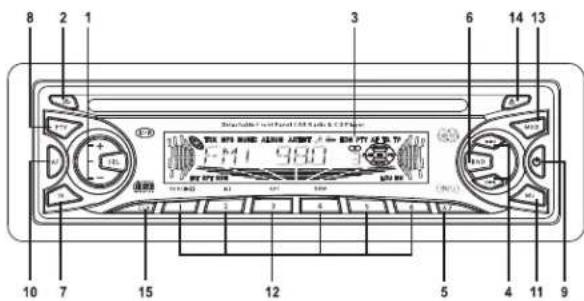
LOCATION OF CONTROLS AND FUNCTIONS
text_image
8 2 1 3 6 14 13 10 7 15 12 5 4 11 9 DC-RAM-1.0000000000000000000000000000000000000000000000000000000000000000000000000000000000 DC-RAM-1.00000000000000000000000000000000000000000000000 DC-RAM-1.5 1 2 3 4 5 6 7 8 9 10 11 12 13 14 15 16 17 18 19 20 21 22 23 24 25 26 27 28 29 30 31 32 33 34 35 36 37 38 39 40 41 42 43 44 45 46 47 48 49 50 51 52 53 54 55 56 57 58 59 60 61 62 63 64 65 66 67 68 69 70 71 72 73 74 75 76 77 78 79 801. SEL (MODE SELECT) / VOLUME +/-
(1) Press SEL repeatedly to access the modes: VOL → BAS → TRB → BAL → FAD
1) VOLUME CONTROL
A. The volume level can be adjusted at any time by pressing + or - as the select mode has been initially defaulted at volume mode.
B. The volume level can also be adjusted by cycling through the SEL modes until VOL is displayed; now press + or - to adjust the sound level.
2) BASS
A. Press SEL repeatedly until BAS is displayed.
B. Adjust the bass level with + or -.
3) TREBLE
A. Press SEL repeatedly until TRE is displayed.
B. Adjust the treble level with + or -
4) BALANCE
A. Press SEL repeatedly until BAL is displayed.
B. Adjust the balance setting with + or -.
5) FADER
A. Press SEL repeatedly until FAD is displayed.
B. Adjust the fader setting with + or -
(2) Press and hold SEL for more than 2 seconds to access TA SEEK/TA ALARM mode, then repeatedly press SEL to select PI SOUND/PI MUTE, RETUNE L/RETUNE S, MASK DPI/MASK ALL, BEEP 2ND/BEEP ALL/BEEP OFF, SEEK1/SEEK2 (in radio mode), DSP OFF/FLAT/POP M/CLASSICS/ROCK, LOUD OFF/LOUD ON, SUBW OFF/ON (with optional subwoofer output), STEREO/MONO (in radio mode). DX/LOCAL (in radio mode), VOL LAST/ VOL ADJUST (in VOL ADJUST mode the next mode will be A-VOL after VOL ADJUST mode to adjust the volume level; the minimum value of the volume level you can set is 10) and ESP10/ESP40. After selecting the desired mode, press + or - to adjust the value.
1) TA SEEK / TA ALARM:
TA SEEK: If a newly tuned station does not receive TP information for 5 seconds, the radio returns to the next station, which has not the same PI code as the previous station, but contains TP information.
If the TP information gets lost at the current station in RETUNE S (60 seconds) or RETUNE L (90 seconds) setting, the radio starts to return to next station with the same PI code. If the same PI station is not found during 1 search cycle, the radio returns to next station with TP information.
TA ALARM: In this mode the automatic return mode is not activated, only a double beep (alarm) is sounded.
If the newly tuned station does not receive TP information for 5 seconds, the radio returns to next station which has not the same PI code as the last station, but contains TP information. If the newly tuned station has no RDS signal, PI SEEK is suppressed.
2) PI SOUND / PI MUTE:
PI SOUND: When cruising the critical area back and forth, the same PI code may be received from different stations. In PI SOUND setting a short switching sound will be heard. PI MUTE: In PI MUTE setting no switching sound is audible.
3) RETUNE L / RETUNE S
The initial time of automatic return after losing a TA signal. When the same PI station cannot be found within 1 search cycle, the radio tunes to previous station and waits for 4-5 minutes before returning.
RETUNE L: 90 seconds.
RETUNE S: 60 seconds.
4) MASK DPI / MASK ALL:
MASK DPI: Masking only alternative frequencies with different PI code.
MASK ALL: Masking alternative frequencies with different PI code and no RDS signal.
BEEP 2ND: Key tone is only generated when a second key function is pressed.
BEEP ALL: Key tone is activated (except POWER and release buttons).
BEEP OFF: Key tone is deactivated.
6) SEEK1 / SEEK2:
SEEK1: Press and hold / ▶▶Idsearch for a station with stronger signal. On reception of a stronger signal the search is stopped.
SEEK2: Press / ▶▶Itd search for a station with a stronger signal. On reception of a stronger signal the search is not stopped. After releasing the button the next station with a strong signal is tuned into.
- RELEASE BUTTON FRONT PANEL
Press to release the front panel.
-
LCD (LIQUID CRYSTAL DISPLAY)
-
▶! ◀BUTTONS
1) In radio mode repeatedly press manually tune up or down to the desired radio station. Press and hold / for more than 0.5 seconds to automatically tune up or down to the radio station.
2) In disc mode press play the next track. Press to play the current track from the beginning, press twice to play the previous track. Press and hold to search forward or backward.
5. AUTO MEMORY / PRESET MEMORY SCAN BUTTON A.P
1) In radio mode press A.P to introduce all station memory for 5 seconds while station memory and frequency flash in the LCD. Press and hold for more than 2 seconds to search for stations on the current frequency band and store to preset memory. When the auto storage operation is completed, it will automatically introduce each station for 5 seconds. After 1 memory scan cycle the first preset station will be tuned into.
2) In MP3 disc mode press repeatedly A.P to select TRACK SEARCH, FIRST CHARACTER SEARCH or DIRECTORY SEARCH mode.
In TRACK SEARCH mode the LCD displays MP3 T 000. Press + or - to select the flashing digit between 0 and 9. Press SEL to confirm, the next 0 flashes. Continue as before. Afterwards confirm with SEL and play the selected track.
In FIRST CHARACTER SEARCH mode the LCD displays A--..... If there are files stored with first character A, these are displayed in alphabetical and numeric order. Are no files with A stored, press + or - to select a different character. Press ▶▶/◀◀ to select a file and press SEL to start playback.
In DIRECTORY SEARCH mode the LCD displays the root folder. Press + or - to select your desired folder and press ▶▶/ ▶◀ to select your desired file. Press SEL to start playback.
6. BND BUTTON
Press BND repeatedly to select your desired radio band in radio mode.
In MP3 disc mode repeatedly press BND to display file name, folder name, song title, artist and album.
If the currently playing MP3 disc contains relevant ID3 tag information in version 1.0 / 2.0, song title, artist and album will be scrolling on the LCD display.
In CD / MP3 mixed disc playback mode press and hold BND to toggle between the modes.
7. TRAFFIC ANNOUNCEMENT BUTTON TA
(1) Press TA to activate/deactivate.
In TA mode (TA is displayed) the unit searches for a station with traffic announcements and TA SEEK is displayed for a few seconds.
When a traffic announcement is transmitted:
1) In CD playback mode the unit switches to radio mode.
2) The unit temporarily switches to EON station if EON detects a traffic announcement on a different station; TP is displayed.
3) If the volume level was set to 20 or less, it is now increased to 20 and returns to its original setting after the traffic announcement.
If the volume level is changed during a traffic announcement, it only affects the traffic announcement.
* TA interruption
If you interrupt the traffic announcement by pressing TA, TA mode is not deactivated.
* With TA activated you only have search and auto memory functions for stations with PI code.
(2) Press and hold TA to toggle between EONTA LOCAL and EONTA DISTANCE.
The purpose of this key is to reduce unwanted EON TA switching.
1) EONTA LOCAL: If the field strength of an EON station is below the threshold level, the radio does not tune to that station. When selecting EONTA LOCAL, the display shows EONTA LO for a few seconds.
2) EONTA DISTANCE: In this setting EONTA DX is displayed for a few seconds.
8. PROGRAM TYPE BUTTON PTY
Repeatedly press PTY to cycle through the program types: PTY MUSIC → PTY SPEECH →
PTY OFF.
Select program type with memory buttons.
If PTY MUSIC or PTY SPEECH is selected, the previous PTY setting is displayed. If no further button is pressed, the radio searches with the previous setting. If no corresponding PTY station is detected, NO PTY flashes and the unit returns to normal radio mode.
9. ON / OFF
Press any button (except EJECT and RELEASE) to turn the unit on.
Loading a disc also turns the unit on.
Press and hold POWER for 0.5 seconds to turn the unit off.
10. ALTERNATIVE FREQUENCIES BUTOON AF
Press AF to select the setting of AF segment on the displays.
Segment off: AF switching mode is deactivated.
Segment on: AF switching mode is activated and RDS information are received.
Segment flashes: AF switching mode is activated, RDS information are not yet received.
If AF switching mode is selected, the radio checks the signal strength of AF all the time. The interval of each AF depends on the signal strength of the current station, from a few minutes for a strong station to a few seconds for weak station. Every time a new AF is stronger than the current station the unit switches for very short time to that alternative frequency and NEW FREQUENCY is
displayed for a few seconds. As the mute time of AF switching is very short, it is almost inaudible In FM mode with AF SEEK activated, the scan and auto memory functions can only receive and save RDS programs.
Press and hold AF to activate / deactivate REGION ON / OFF.
REGIONAL MODE ON: AF switching or PI SEEK activated for stations with same PI code as current station.
REGIONAL MODE OFF: The regional code in the PI code is ignored for AF switching or PI SEEK.
11. MUTE BUTTON MU
Press MU to mute the sound. Press MU again or MOD, BND, +, - or SEL to unmute the sound.
12. PRESET STATIONS 1-6 (TOP /▶II, INT, RPT, RDM)
A) In radio mode press 1-6 to access the preset radio stations directly and press and hold to
save new stations.
In PTY mode the preset buttons share the following functions:
| PTY music group PTY speech group PTY OFF | |||
| 1 | POP M, ROCK M 1 NEWS, AFFAIRS, INFO | ||
| 2 | EASY M, LIGHT M 2 SPORTS, EDUCATE, DRAMA | ||
| 3 | CLASSIC, OTHER M 3 CULTURE, SCIENCE, VARIED | ||
| 4 | JAZZ, COUNTRY | 4 WEATHER, FINANCE, CHILDREN | |
| 5 | NATIONAL M, OLDIES 5 SOCIAL, RELIGION, PHONE-IN | ||
| 6 | FOLK M | 6 TRAVEL, LEISURE, DOCUMENT | |
B) In disc playback mode press TOP /▶II to pause playback; press TOP /▶II again to resume playback. Press and hold to play the first track of the disc.
C) In CD / MP3 playback mode press INT to play the first 10 seconds of each track, S-INT is displayed. Press and hold INT to play the first 10 seconds of each track in the current folder, D-INT is displayed. Press INT again to access the previous playback mode.
D) In CD / MP3 playback mode press RPT to repeat the current track, S-RPT is displayed. Press and hold RPT to repeat the current folder and D-RPT is displayed. Press RPT again to exit repeat mode.
E) In CD / MP3 playback mode press RDM to randomly repeat the all tracks, S-RDM is displayed. Press and hold RDM to randomly repeat all tracks in the folder, D-RDM is displayed. Press RDM again to exit random mode.
F) In MP3 playback mode the preset station buttons 5 and 6 access a 10-track skip up and down.
13. MODE BUTTON MOD
Toggle between radio and CD / MP3 modes.
14. EJECT BUTTON
Press to eject the disc from the CD drive.
15. CLOCK BUTTON CLK
1) In radio mode repeatedly press CLK to cycle through the display: PS NAME → FREQUENCY → CURRENT TIME → PTY.
If no RDS data are received the display shows: FREQUENCY → CURRENT TIME → PTY.
2) In playback mode press to display the current time for 5 seconds. The display returns automatically to the previous display.
3) To set the current time press and hold CLK, until the time flashes in the display; set hours and minutes with + or -.
TROUBLESHOOTING
To solve the common problems, read and follow the troubleshooting list. If you still cannot solve the problem, consult your nearest service dealer.
| Symptom Cause | Solution | |
| No power | The car ignition is not on. | If the power supply is properly connected to the car accessory switch, turn the ignition key to ACC. |
| The fuse is blown. Replace the fuse. | ||
| Disc cannot be loaded | Presence of CD disc inside the player. | Remove the disc in the player and insert a new disc with the label up. |
| Disc cannot be read | Disc is inserted upside down. | Insert the compact disc with the label facing up. |
| Compact disc is extremely dirty or defective. | Clean the disc or try to play a new one. | |
| Temperature inside the car is too high. | Cool off until the ambient temperature returns to normal. | |
| No sound | Volume is set to minimum. Adjust volume to desired level. | |
| Wiring is not properly connected. Check wiring. | ||
| The function keys do not work | The built-in microcomputer is not operating properly due to noise. | Press the RESET button. |
| Front panel is not properly fix into its place. | Reinstall the front panel. | |
| Sound skips | The installation angle is more than 30^ | Adjust the installation angle to less than 30^ . |
| The disc is extremely dirty or defective. | Clean the compact disc or play a new one. | |
| The radio does not work; the auto search function does not work | The antenna cable is not connected. | Connect the antenna cable firmly. |
| The signals are too weak. Select a station manually. | ||
TECHNICAL SPECIFICATIONS
GENERAL
| Power supply DC 12V | |
| Power consumption | max. 7A |
| Power output | 4 X 25 W (@ 14.4V) |
| LINE-OUT | CD max. 800mV |
FM
| Frequency range | 87.5MHz - 108.0MHz |
| Sensitivity | 3 μV |
| IF frequency | 10.7MHz |
AM
| Frequency range | 522kHz - 1620kHz |
| Sensitivity | 40dB |
| IF frequency | 450kHz |
CD PLAYER
| System | Compact Disc Audio System |
| Compatible disc formats | CD / CD-R / CD-RW / MP3 |
| Signal format | Sampling frequency 44.1kHz |
| Frequency characteristics | 20-100Hz ≤ 5dB |
| 10-20kHz ≤ 5dB | |
| S/N ratio CD | 50dB @ 1kHz |
| Channels | 2 (Stereo) |
| Dimensions | approx. 178 x 50 x 188 mm |
| Weight | approx. 1.6 kg |
SUBJECT TO CHANGES WITHOUT PRIOR NOTICE.
MODELL 7537N1
AUTORADIO AVEC LECTEUR MP3 / CD ET RDS
MANUELD'UTILISATION
INSTRUCTIONS RELATIVES À LA SÉCURITÉ
Notre recommandations: Evitez les volumes forts.
text_image
POIS REPE GAUC DREPLACEZ LE COTE
GAUCHE
DANS LE
CHASSIS DE
L'APPAREIL
EN LE
POUSSANT
TILL OK.
APPUYEZ SUR CE BOUTON POUR DÊTACHER LE PANNEAU AVANT DE LA TÊTE DE L'APPAREIL PUIS RETIRER LE PANNEAU AVANT DE LA TÊTE DE L'APPAREIL.
PRECAUTIONS ET MAINTENANCE
text_image
8 2 1 3 6 14 13 Detalulule 1 and Front/AS Route & OFF 15 10 7 15 12 5 4 11 9 A B C D E F G H I J K L M N O P Q R S T U V W X Y Z A B C D E F G H I J K L M N O P Q R S T U V W X Y Z1. SEL (MODE SELECT) / VOLUME +/-
text_image
8 2 1 3 6 14 13 Davellside car front panel, Buses & CDFs 10 7 15 12 5 4 11 9 A B C D E F G H I J K L M N O P Q R S T U V W X Y Z A B C D E F G H I J K L M N O P Q R S T U V W X1. SEL (ÜZEMÓDVÁLASZTÓ) / HANGERŐ +/-
- ELÓLAP KIOLDÓ GOMBJA
text_image
8 2 1 3 6 14 13 10 7 15 12 5 4 11 9 DC-RAM-DRAM-DRAM-DRAM-DRAM-DRAM-DRAM-DRAM-DRAM-DRAM-DRAM-DRAM-DRAM-DRAM-DRAM-DRAM-DRAM-DRAM-DRAM-DRAM-DRAM-DRAM-DRAM-DRAM-DRAM-DRAM-DRAM-DRAM-DRAM-DRAM-DRAM-DRAM-DRAM-DRAM-DRM1. SEL (MODALITÀ DI SELEZIONE) / VOLUME +/-
text_image
8 2 1 3 6 14 13 CD-ROM drive front CD-ROM & CDF 10 7 15 12 5 4 11 9 A B C D E F G H I J K L M N O P Q R S T U V W X Y Z A B C D E F G H I J K L M N O P Q R S T U V W X Y ZMANUAL DE INSTRUÇÕES
PRECAUÇÕES DE SEGURANÇA

text_image
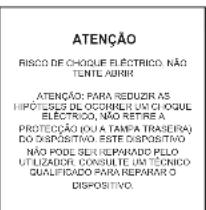
ATENÇÃO RISCO DE CHOQUE ELECTRICO, NÃO TENTE AURIN ATENÇÃO: PARA REDUZIR AS HIPÓTESES DE OCEMBER UO CHOQUE ELECTRICO, NÃO RETRE A PROTECÇÃO (OU TA TAPPA TRASEIRA) DO DISPOSITIVO. ESTE DISPOSITIVO NÃO PODE SER REPARADO PELLO UTILIZADOR, CONSULTE UM TÉCNICO QUALIFICADO PARA REPARAR O DISPOSITIVO.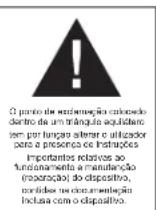
MAIS INFORMAÇÕES

text_image
8 2 1 3 6 14 13 10 7 15 12 5 4 11 9 A B C D E F G H I J K L M N O P Q R S T U V W X Y Z A B C D E F G H I J K L M N O P Q R S T U V W X Y Z1. SEL (MODO SLECCIONAR) / VOLUME +/-
text_image
8 2 1 3 6 14 13 Deleased with Fuel/ATP Guide & OFF 10 7 15 12 5 4 11 9 A B C D E F G H I J K L M N O P Q R S T U V W X Y Z A B C D E F G H I J K L M N O P Q R S T U V W X Y Z1. SEL (WYBÓR TRYBU)/GŁOŚNOŚĆ +/-
12. ZAPROGRAMOWANE STACJE 1-6 (TOP /▶II, INT, RPT, RDM)
8. PROGRAMMA TYPE KNOP PTY
12. PRESET STATIONS 1-6 (TOP /▶II, INT, RPT, RDM)
DOPLŇUJÍCÍ INFORMACE

natural_image
Three hand diagrams showing different mechanical or electrical states: a press, a coil, and a cross symbol (no text or labels)Skladováni
MANUAL CU INSTRUCTIUNI
INSTRUCTIUNI DE SIGURANTA
text_image
Trifuglui cu smalou lugenula sarge atenta ultrabunul spas exctorid volegul pencure, a caru vascare ridata poote produce exceucutari ATENTIE RISO DE ELECTROCUTARE NU DESCHIDITI ATENTE: IN VEDEREA REDUCERII RISICULU DE ELECTROCUTARE, VA RUGAM SA NU SOCATETI CAPACUL (SAU CARCASA DORSALA), NU EXISTA DARTI SCHIVABILE IN INTERIOR, PENTRU REPARATII ADRESATIVA PERSONALUUI DE SPECIALitate AUTORIZAT. Trifuglui cu smalou exclamati sarge atenta ultrabunul spas instructorilor importanto de locate in volumere din manuali atarent, care reduces studate atent.INFORMATII SUPLIMENTARE

natural_image
Three hand-drawn diagrams showing different states of a mechanical or electrical operation: upward motion, circular dial with cross symbol, and X-shaped symbol (no text or labels)Depozitare
* Pastrati CD-urile intoldeauna in carcasele prevazute.
* Nu lasati discurile in lumina directa a soarelui, in praf, mizerie, in zone umede, sau langa sistemele de incalzire ale masinii.
Curatare
natural_image
Three hand-drawn diagrams showing different states of a device or tool, with no visible text or symbols.Хранение
text_image
8 2 1 3 6 14 13 10 7 15 12 5 4 11 9 A B C D E F G H I J K L M N O P Q R S T U V W X Y Z A B C D E F G H I J K L M N O P Q R S T U V W X Y Z• The following table