
HWK950 - Pregnant SAMSUNG - Free user manual and instructions
Find the device manual for free HWK950 SAMSUNG in PDF.
| Product Type | Soundbar with wireless subwoofer and wireless surround speakers |
| Brand | Samsung |
| Model | HWK950 |
| Dimensions (Main Unit) | 1210.2 x 81.7 x 131.4 mm (W x H x D) |
| Weight (Main Unit) | 6.7 kg |
| Dimensions (Subwoofer) | 203.9 x 399.0 x 414.3 mm (W x H x D) |
| Weight (Subwoofer) | 9.6 kg |
| Dimensions (Surround Speaker) | 120.2 x 210.9 x 141.0 mm (W x H x D) |
| Weight (Surround Speaker) | 2.0 kg (each) |
| Power Supply | AC/DC adapter (19V), 3 power cords provided |
| Rated Output Power (Main Unit) | 18 W x 11, 4 Ω, THD ≤ 10 % |
| Rated Output Power (Subwoofer) | 162 W, 3 Ω, THD ≤ 10 % |
| Rated Output Power (Surround Speakers) | 35 W x 4, 4 Ω, THD ≤ 10 % |
| Supported Audio Formats | LPCM 2ch, Dolby Digital, Dolby Atmos (TrueHD/Digital Plus), DTS |
| Connectivity | HDMI (ARC), HDMI IN (x2), Optical Digital, Analog AUX, Bluetooth, Wi-Fi |
| Key Features | Dolby Atmos 5.1.4 channels, surround sound, sound modes (Standard, Music, Clear Voice, Sports, Movie, Night), Samsung Multiroom app, automatic software update |
| Operating Temperature | +5 °C to +35 °C |
| Operating Humidity | 10 % to 75 % |
| Standby Power Consumption (Network On) | 5.8 W |
| Included Accessories | Remote control (AA batteries), power cords (x3), AC/DC adapter, HDMI cable, wall mounting guide, mounting screws, wall brackets |
| Cleaning and Maintenance | Unplug the device before cleaning. Use a soft, dry cloth. Do not use chemicals or water. |
| Safety | Do not expose to rain or moisture. Plug into a grounded outlet. Do not block ventilation openings. Use only the provided adapter. |
Frequently Asked Questions - HWK950 SAMSUNG
User questions about HWK950 SAMSUNG
0 question about this device. Answer the ones you know or ask your own.
Ask a new question about this device
Download the instructions for your Pregnant in PDF format for free! Find your manual HWK950 - SAMSUNG and take your electronic device back in hand. On this page are published all the documents necessary for the use of your device. HWK950 by SAMSUNG.
USER MANUAL HWK950 SAMSUNG
Thank you for purchasing this Samsung product. To receive more complete service, please register your product at www.samsung.com/register
SAFETY INFORMATION
SAFETY WARNINGS
TO REDUCE THE RISK OF ELECTRIC SHOCK, DO NOT REMOVE THE COVER (OR BACK).
NO USER-SERVICEABLE PARTS ARE INSIDE. REFER SERVICING TO QUALIFIED SERVICE PERSONNEL.
 | CAUTIONRISK OF ELECTRIC SHOCK.DO NOT OPEN. | This symbol indicates that high voltage is present inside. It is dangerous to make any kind of contact with any internal part of this product. | ||
| This symbol indicates that this product has included important literature concerning operation and maintenance. |
 | Class II product : This symbol indicates that it does not require a safety connection to electrical earth (ground). |
 | AC voltage : This symbol indicates that the rated voltage marked with the symbol is AC voltage. |
 | DC voltage : This symbol indicates that the rated voltage marked with the symbol is DC voltage. |
 | Caution, Consult instructions for use : This symbol instructs the user to consult the user manual for further safety related information. |
WARNING : To reduce the risk of fire or electric shock, do not expose this appliance to rain or moisture.
CAUTION : TO PREVENT ELECTRIC SHOCK, MATCH WIDE BLADE OF PLUG TO WIDE SLOT, FULLY INSERT.
- This apparatus shall always be connected to a AC outlet with a protective grounding connection.
- To disconnect the apparatus from the mains, the plug must be pulled out from the mains socket, therefore the mains plug shall be readily operable.
CAUTION
- Do not expose this apparatus to dripping or splashing. Do not put objects filled with liquids, such as vases on the apparatus.
- To turn this apparatus off completely, you must pull the power plug out of the wall socket. Consequently, the power plug must be easily and readily accessible at all times.
PRECAUTIONS
text_image
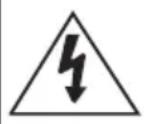
99.1mm 99.1mm 99.1mm 68.6mmEnsure that the AC power supply in your house complies with the power requirements listed on the identification sticker located on the back of your product. Install your product horizontally, on a suitable base (furniture), with enough space around it for ventilation (7\~10 cm). Make sure the ventilation slots are not covered. Do not place the unit on amplifiers or other equipment which may become hot. This unit is designed for continuous use. To fully turn off the unit, disconnect the AC plug from the wall outlet. Unplug the unit if you intend to leave it unused for a long period of time.

text_image
Safety warning symbols including no sign, lightning bolt, and plug with a power outletDuring thunderstorms, disconnect the AC plug from the wall outlet. Voltage peaks due to lightning could damage the unit.
natural_image
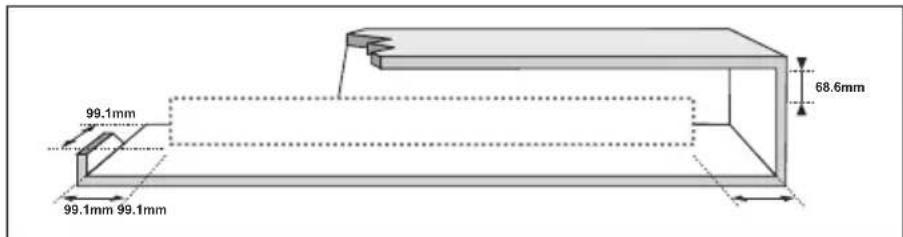
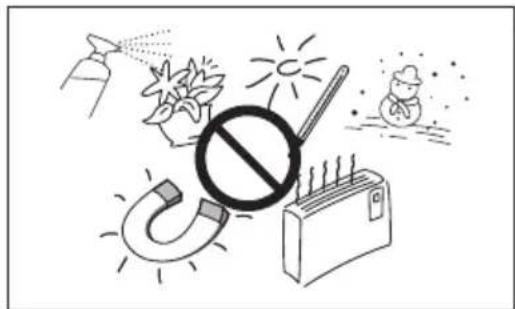
Illustration of various symbols including a prohibition sign, sun, magnet, and money bag (no text or labels)Protect the product from moisture (i.e. vases), and excess heat (e.g. a fireplace) or equipment creating strong magnetic or electric fields. Disconnect the power cable from the AC supply if the unit malfunctions. Your product is not intended for industrial use. It is for personal use only. Condensation may occur if your product has been stored in cold temperatures. If transporting the unit during the winter, wait approximately 2 hours until the unit has reached room temperature before using.
text_image
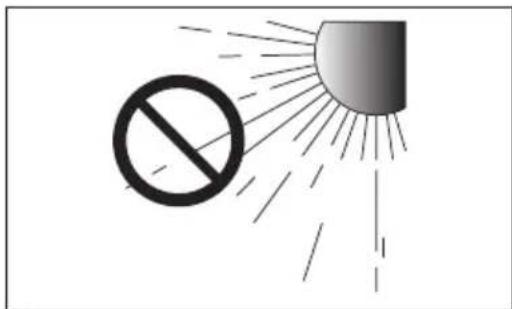
Safety warning symbol showing a prohibition sign and a sun with radiating lines, indicating radiation hazard.Do not expose the unit to direct sunlight or other heat sources. This could lead to overheating and cause the unit to malfunction.
text_image
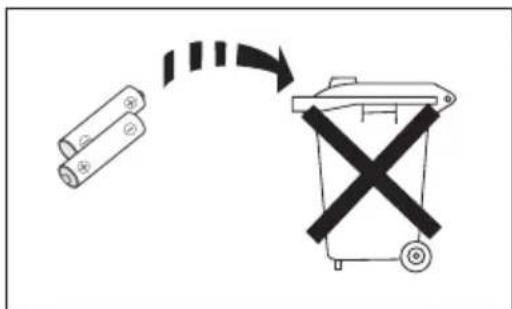
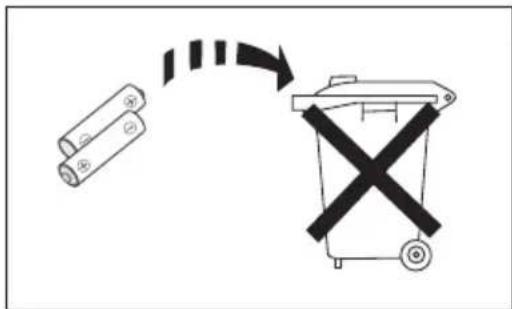
Diagram showing a battery and a trash bin with a crossed-out symbol, indicating a process or disposal.The batteries used with this product contain chemicals that are harmful to the environment. Do not dispose of batteries in the general household trash. Do not dispose of batteries in a fire. Do not short circuit, disassemble, or overheat the batteries. There is a danger of explosion if the battery is incorrectly replaced. Replace only with the same or equivalent type.
DOLBY ATMOS®
This product supports Dolby Atmos®.
natural_image
Illustration of a robotic vehicle with sensor beams and head-mounted sensors, no text or symbols present\* What is Dolby Atmos®?
Atmos technology enhances existing 5.1 channel surround sound systems by adding an overhead speaker. This envelops the listener in 360 degrees of sound, delivering an immersive, high-definition, rich, detailed, and deeper experience. See page 24 to learn how to connect the system.
CONTENTS
2 GETTING STARTED
2 Safety Information
4 Dolby Atmos®
6 What's Included
7 DESCRIPTIONS
7 Front / Right Side Panel
8 Bottom Panel
9 Remote Control
14 INSTALLATION
14 Installing the Soundbar
14 Installing the Wall Mount
17 Detaching the Soundbar from the Wall
18 Installing the Surround Speakers on a Wall
19 CONNECTIONS
19 Connecting the Subwoofer and Surround Speakers
22 Connecting to a TV
22 Connecting to a TV Using an HDMI (Digital) Cable
23 Connecting to a TV Using a Digital Optical Cable
24 Connecting to External Devices
24 Connecting Devices in Order to Use Dolby Atmos®
25 HDMI Cable
26 Optical or Analogue Audio Cable
27 FUNCTIONS
27 Input Mode
28 Bluetooth
30 Using the Multiroom App
32 Using the Network Standby On Function
33 Software Update
35 TROUBLESHOOTING
35 Troubleshooting
36 APPENDIX
36 Specifications
- Figures and illustrations in this User Manual are provided for reference only and may differ from actual product appearance.
• An administration fee may be charged if either
(a) an engineer is called out at your request and there is no defect with the product (i.e. where the user manual has not been read).
(b) you bring the unit to a repair centre and there is no defect with the product (i.e. where the user manual has not been read). - You will be informed of the administration fee amount before a technician visits.
WHAT'S INCLUDED
BEFORE READING THE USER'S MANUAL
Note the following terms before reading the user manual.
▶Icons used in this manual
| Icon Term Definition | ||
 | Caution | Indicates a situation where a function does not operate or settings may be cancelled. |
 | Note | Indicates tips or instructions on the page that help you operate a function. |
Check for the supplied accessories shown below.

Remote Control / Batteries (AA Size)

Power Cord : 3 EA

AC/DC Adapter (for main unit)

HDMI Cable

Wall Mount Guide
Holder-Screw : 2 EA

Screw : 2 EA
Bracket-Wall Mount : 2 EA

AC Plug
(Depending on the country and model)

Connect the AC plug to the adapter until you hear a "snapping" sound to ensure they are securely fastened.
Do not detach the AC plug from the adapter (it will not be removed once it has been attached).

- The appearance of the accessories may differ slightly from the illustrations above.
- To distinguish the left surround speaker from the right, check the label on the rear of each speaker.
- Depending on the region, the AC plug may vary in appearance, or it may be supplied integrated with the adapter.
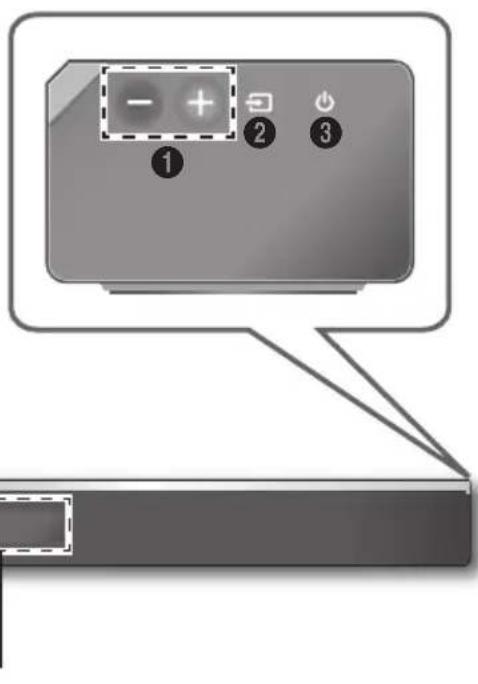
Controls the volume level.
The numeric value of the volume level appears in the front panel display.
② (Source) Button
Selects the D.IN, AUX, HDMI1, HDMI2, or BT input.
- To turn on BT PAIRING mode, press and hold this button in BT mode.
③ (Power) Button
Turns the power on and off.
Right Side
text_image
Diagram showing a device control panel with labeled buttons and a zoomed-in section viewDisplays the current mode.

- When you plug in the AC cord, the power button will begin working in 4 to 6 seconds. When you press the power button, there will be a 20 second delay before the unit produces sound.
- When you turn on this unit, there will be a 4 to 5 second delay before it produces sound.
- If you want to enjoy sound only from the Soundbar, you must turn off the TV's speakers in the Audio Setup menu of your TV. Refer to the owner's manual supplied with your TV.
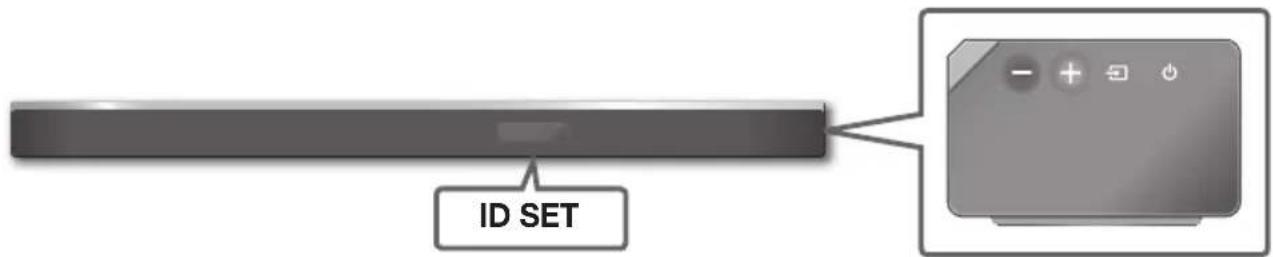
BOTTOM PANEL
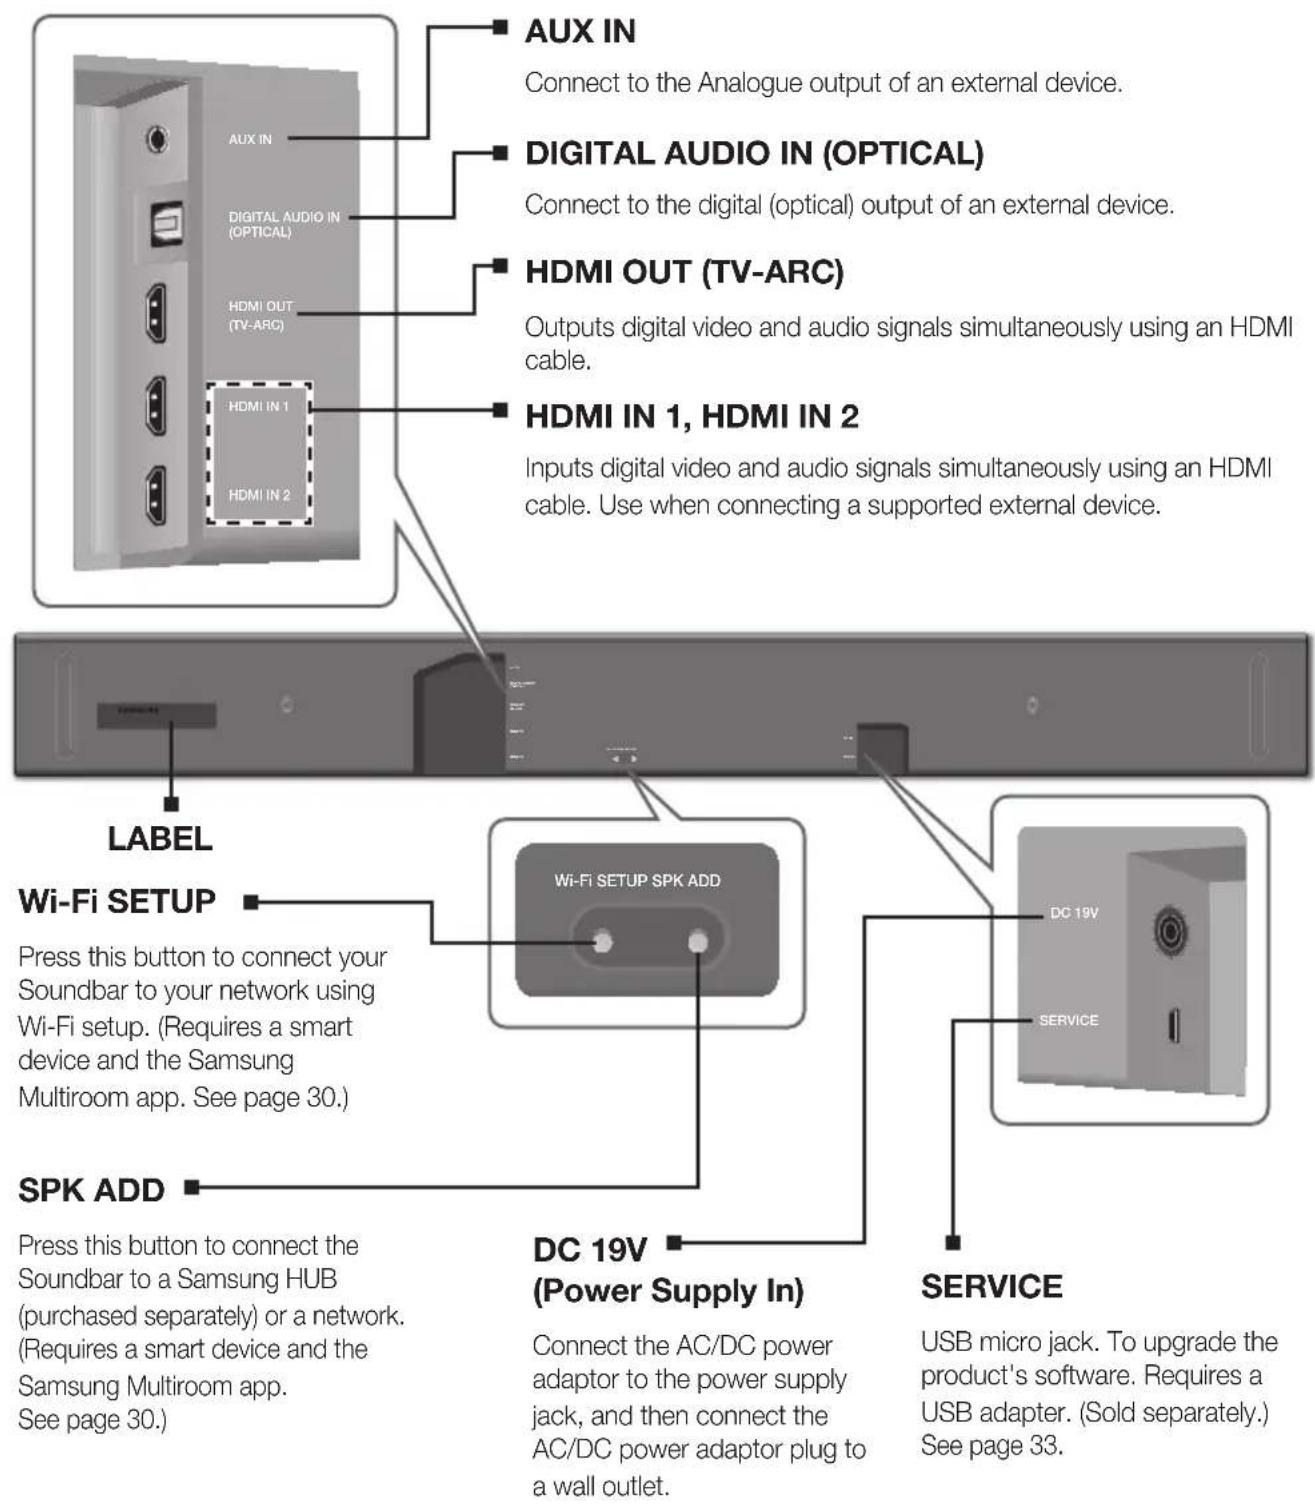
text_image
AUX IN Connect to the Analogue output of an external device. DIGITAL AUDIO IN (OPTICAL) Connect to the digital (optical) output of an external device. HDMI OUT (TV-ARC) Outputs digital video and audio signals simultaneously using an HDMI cable. HDMI IN 1, HDMI IN 2 Inputs digital video and audio signals simultaneously using an HDMI cable. Use when connecting a supported external device. LABEL Wi-Fi SETUP Press this button to connect your Soundbar to your network using Wi-Fi setup. (Requires a smart device and the Samsung Multiroom app. See page 30.) SPK ADD Press this button to connect the Soundbar to a Samsung HUB (purchased separately) or a network. (Requires a smart device and the Samsung Multiroom app. See page 30.) DC 19V (Power Supply In) Connect the AC/DC power adaptor to the power supply jack, and then connect the AC/DC power adaptor plug to a wall outlet. SERVICE USB micro jack. To upgrade the product's software. Requires a USB adapter. (Sold separately.) See page 33.
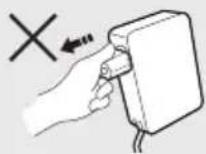
- When disconnecting the power cable of the AC power adaptor from a wall outlet, pull the plug. Do not pull the cable.
- Do not connect this unit or other components to an AC outlet until all connections between components are complete.
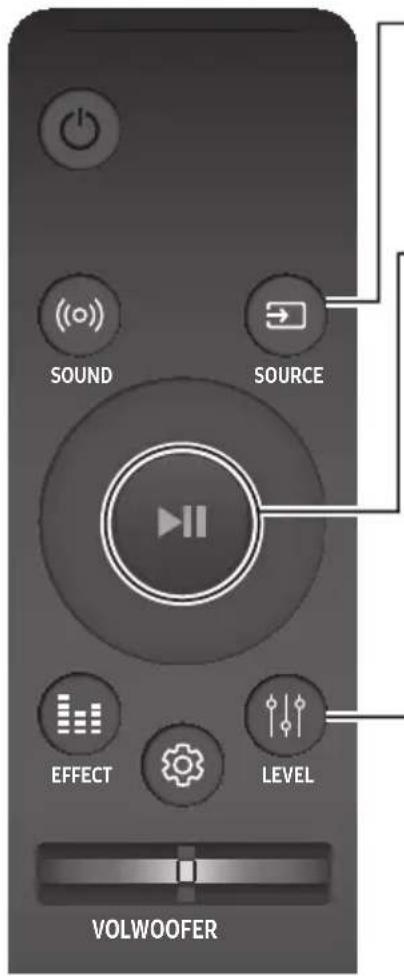
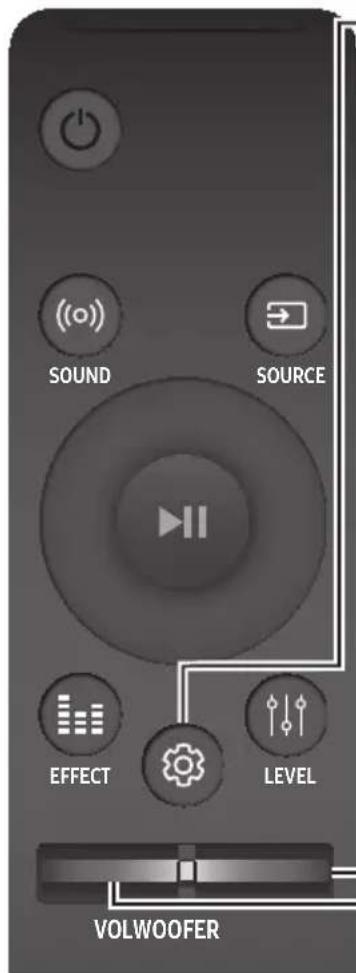
REMOTE CONTROL

text_image
Power Turns the Soundbar on and off. (○) SOUND Surround Sound adds depth and spaciousness to the sound. Pressing the (○) SOUND button repeatedly cycles through the Surround Sound settings : ON - SURROUND SOUND, OFF - SURROUND SOUND • ON: Play sound over all the speakers. • OFF: Play sound through the original source channel. Up/Down/Left/Right Press the indicated areas to select Up/Down/Left/Right. Press Up/Down/ Left/Right on the button to select or set functions. You can also activate the Wi-Fi SETUP function by pressing and holding the Up button on the remote for more than 5 seconds. You can also activate the SPK ADD function of the Soundbar by pressing and holding the Down button of the remote for more than 5 seconds. Music Skip Press the Right button to select the next music; press the Left button to select the previous music. Anynet+ Press and hold the Right button for about 5 seconds to turn the Anynet+ function on or off. (Default : ON - ANYNET+ or OFF - ANYNET+) The Anynet+ function lets you control the Soundbar with the remote from an Anynet+ compatible Samsung TV. The Soundbar must be connected to the TV via an HDMI cable. Auto Power Link Press and hold the Left button for about 5 seconds to turn the Auto Power Link function on or off. (Default : OFF - POWER LINK or ON - POWER LINK) Synchronizes the Soundbar to a connected Optical source via the Optical jack so it turns on automatically when you turn on your TV. (See page 23) The Auto Power Link function is only available in the D.IN mode. EFFECTYou can select from 6 sound modes - STANDARD (Original Sound), MUSIC, CLEAR VOICE, SPORTS, MOVIE, and NIGHT - depending on the content you want to listen to. Select the STANDARD mode if you want to enjoy the original sound.
* DRC (Dynamic Range Control) Lets you apply dynamic range control to Dolby Digital tracks. Press and hold the EFFECT button for about 5 seconds in standby mode to toggle the DRC (Dynamic Range Control) function ON - DRC and OFF - DRC.

- Operate the TV using the TV's remote control.
text_image
SOUND SOURCE EFFECT LEVEL VOLWOOFERSOURCE
Press to select a source connected to the Soundbar.
\* BT PAIRING mode
To turn on BT PAIRING mode in Bluetooth function, press and hold the SOURCE button for more than 5 seconds.
Play / Pause (BT / WIFI)
Press the ▶|| button to pause a music temporarily.
Press the ▶II button again to play the selected music.
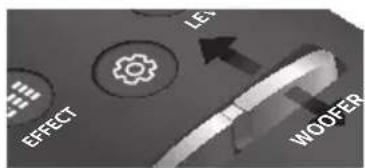
LEVEL
The ATMOS Soundbar has 5.1.4 channel sound. Use this button to adjust the volume of each of the speakers. Press this button, use the Left/Right buttons to select a speaker, and then use the Up/Down buttons to increase or decrease the level (volume).

text_image
FL FR C FTR-FL Main Unit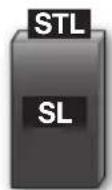
Surround
Speaker L
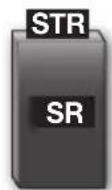
Surround
Speaker R
| Speaker | Displayed on OLED when adjusting the level | |
| Main Unit | Front Left FL | |
| Front Top Left FTL | ||
| Centre C | ||
| Front Right FR | ||
| Front Top Right FTR | ||
| Surround Speaker L | Surround Left SL | |
| Surround Top Left STL | ||
| Surround Speaker R | Surround Right SR | |
| Surround Top Right STR | ||
\* Network Standby On/Off
Press and hold the LEVEL button for about 5 seconds to turn the Network Standby on or off. (See page 32)
text_image
SOUND SOURCE EFFECT LEVEL VOLWOOFER(Sound Control)
Press to select TREBLE, BASS, or AUDIO SYNC. Then, use the Up/Down buttons to adjust the TREBLE or BASS volume from -3 \~ +3.
Press and hold the Sound Control) button for about 5 seconds to adjust the sound for each frequency band. 150Hz, 300Hz, 600Hz, 1.2KHz, 2.5KHz, 5KHz, and 10KHz are selectable (Left/Right) and each can be adjusted to a setting between -6 \~ +6 (Up/Down).
If the Soundbar is connected to a digital TV and the video appears out of sync with the audio, press the (Sound Control) button to sync the audio with the video. Use the Up/Down buttons to set the audio delay between 0 ms \~ 300 ms. In BT mode, the Audio Sync function may not available.
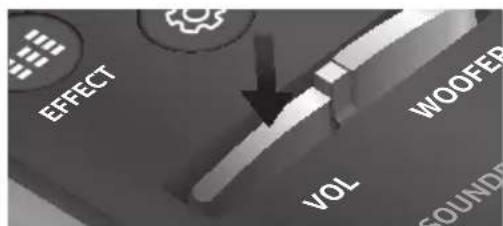
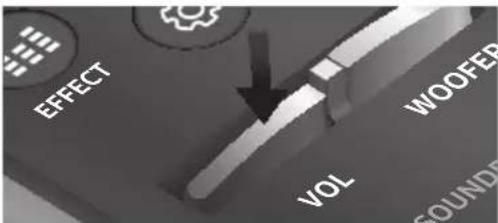
WOOFER
Push the button up or down to adjust the volume of the subwoofer to -12 or -6 to +6.
Pressing the button reverts the subwoofer volume to level 0.
text_image
EFFECT LE WOOFER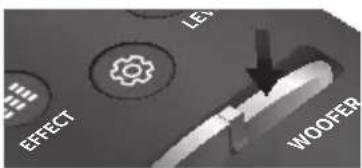
text_image
EFFECT LES WOOFERVOL
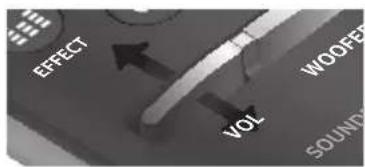
Push the button up or down to adjust the volume.
Mute
Press the VOL button to mute the sound. Press it again to unmute the sound.
text_image
EFFECT VOL WOOFFER SOUND
text_image
EFFECT VOL WOOFER GOUND▶Controlling the Volume of Soundbar by using Your TV Remote Control
- Press and hold the ((o)) SOUND button for more than 5 seconds while the Soundbar is turned on.
- "ON - TV REMOTE" appears on the Soundbar's display.
- In the TV's menu, set the TV speaker to external speaker.

- Not available in TV ARC, BT, HDMI1 and HDMI2 modes. (Available only in D.IN (optical) and AUX modes)
- On the TV remote control, only the volume and mute buttons are available. Other buttons are disabled.
- TV menus differ by manufacturer and model. Refer to the TV's user manual for further information.
• Manufacturers supporting this function:
- VIZIO, LG, Sony, Sharp, PHILIPS, PANASONIC, TOSHIBA, GRUNDIG, Hisense, RCA
- This function may not be compatible with your TV's remote depending on the remote control's manufacturer.
- To turn off this function, press the SOUND button for 5 seconds.
"OFF - TV REMOTE" appears on the Soundbar's display.
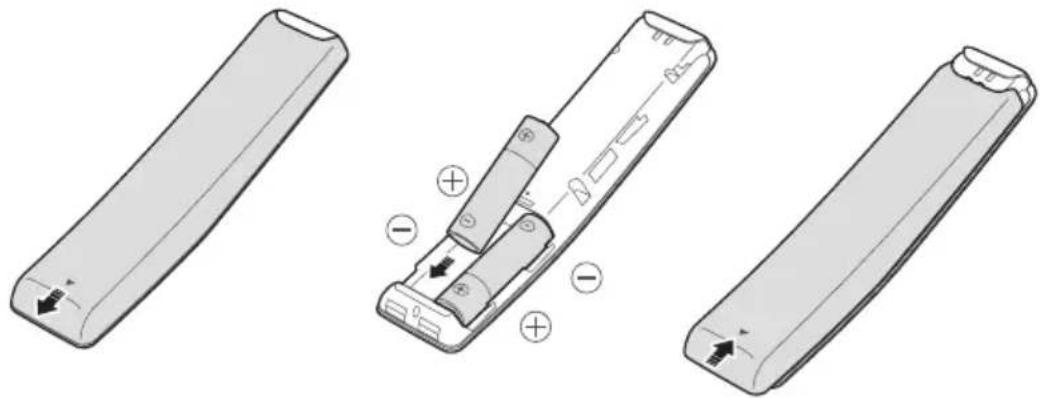
INSERTING BATTERIES (AA BATTERY X2)
Slide the battery cover in the direction of the arrow until it is completely removed. Insert 2 AA batteries (1.5V) in the correct +/- polarity. Slide the battery cover back into position.
natural_image
Three technical illustrations of a remote control casing showing internal components and directional arrows (no text or symbols)USING THE HIDDEN BUTTONS
| Hidden Button | Reference page | |
| Remote Control Button Function | ||
| ((o)) SOUND | TV remote control On/Off P | age 11 |
| SOURCE | BT Paring P | age 28 |
| ▶II (Play / Pause) | Auto Power Down On/Off (AUX mode) P | age 27 |
| VOL | ID SET P | age 20 |
| Up | WIFI SETUP P | age 9 |
| Down | ADD SPEAKER P | age 9 |
| Left | Auto Power Link On/Off P | age 23 |
| Right | Anynet+ On/Off P | age 9 |
| (Sound Control) | 7 Band EQ P | age 11 |
| EFFECT | DRC On/Off P | age 9 |
| LEVEL | Network Standby On/Off P | age 32 |
OUTPUT SPECIFICATIONS FOR THE DIFFERENT MODES OF SOUND EFFECT
| Input Effect Output | |||
| 2 ch |  SOUND SOUND | ON | 5.1.4 ch |
| 5.1 ch 5.1.4 ch | |||
| 2 ch |  EFFECT EFFECT | STANDARD | 2.1 ch |
| 5.1 ch 5.1 ch | |||
| 2 ch |  EFFECT EFFECT | MUSIC | 2.1 ch |
| 5.1 ch 5.1 ch | |||
| 2 ch |  EFFECT EFFECT | CLEAR VOICE | 3.1 ch |
| 5.1 ch 5.1 ch | |||
| 2 ch |  EFFECT EFFECT | SPORTS | 5.1.4 ch |
| 5.1 ch 5.1.4 ch | |||
| 2 ch |  EFFECT EFFECT | MOVIE | 5.1.4 ch |
| 5.1 ch 5.1.4 ch | |||
| 2 ch |  EFFECT EFFECT | NIGHT | 3.1 ch |
| 5.1 ch 5.1 ch | |||
* If the input source is Dolby Atmos®, 5.1.4 channel is outputted. The sound effect is not available.
INSTALLING THE SOUNDBAR
INSTALLING THE WALL MOUNT
▶Installation Precautions
• Install on a vertical wall only.
- For the installation, avoid a location with high temperature or humidity, or a wall that cannot sustain the weight of the set.
- Check the strength of the wall. If the wall is not strong enough to support the unit, reinforce the wall or install the unit on a different wall that can support the unit's weight.
- Purchase and use the fixing screws or anchors appropriate for the kind of wall you have (plaster board, iron board, wood, etc.). If possible, fix the support screws into wall studs.
● Purchase wall mounting screws according to the type and thickness of the wall you will mount the Soundbar on.
-Diameter: M5
-Length: 35 mm or longer recommended.
- Connect cables from the unit to external devices before you install it on the wall.
- Make sure the unit is turned off and unplugged before you install it. Otherwise, it may cause an electric shock.
text_image
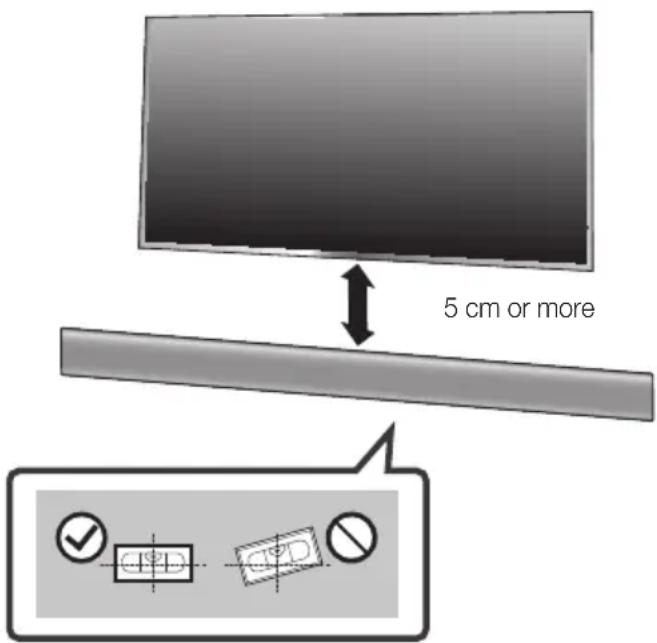
5 cm or more- Place the Wall Mount Guide against the wall surface.
• The Wall Mount Guide must be level.
- If the TV is mounted on the wall, install the Soundbar at least 5 cm below the TV.
text_image
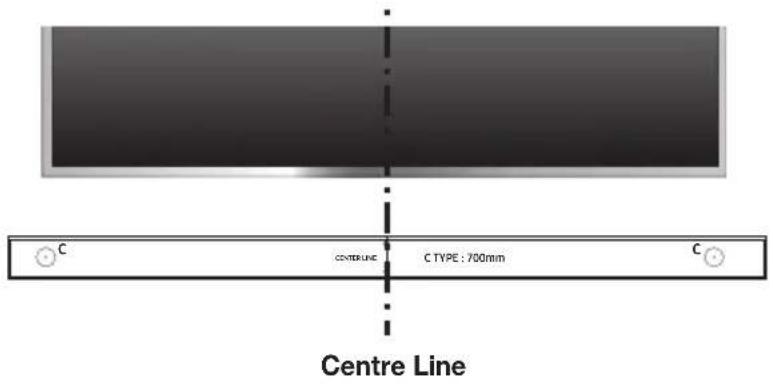
C CENTERLINE C TYPE : 700mm Centre Line- Align the Paper Template's Centre Line with the centre of your TV (if you are mounting the Soundbar below your TV), and then fix the Wall Mount Guide to the wall using tape.

- If you are not mounting below a TV, place the Centre Line in the centre of the installation area.
text_image
C CURVE TO LIFT C TYPE: 700mm C-
Push a pen tip or sharpened pencil tip through the centre of the C-TYPE images on each end of the Guide to mark the holes for the supporting screws, and then remove the Wall Mount Guide.
-
Using an appropriately sized drill bit, drill a hole in the wall at each marking.

- If the markings do not correspond to the positions of studs, make sure you insert appropriate anchors or mollies into the holes before you insert the support screws. If you use anchors or mollies, make sure the holes you drill are large enough for the anchors or mollies you use.
natural_image
Diagram of a mechanical component with directional arrows indicating motion (no text or symbols)- Push a screw (not supplied) through each Holder-Screw, and then screw each screw firmly into a support screw hole.
text_image
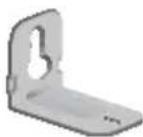
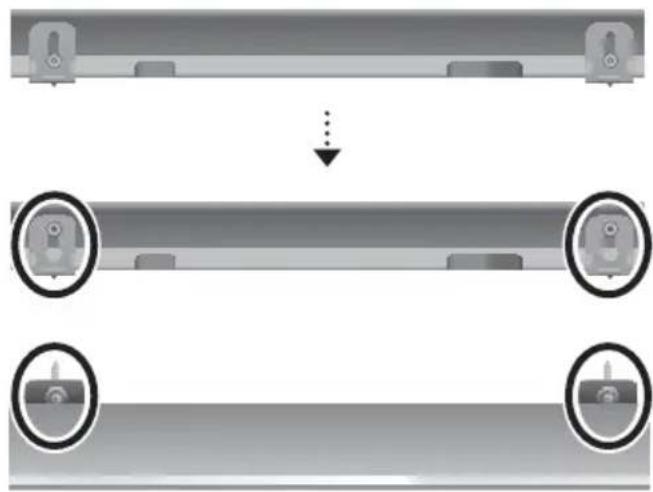
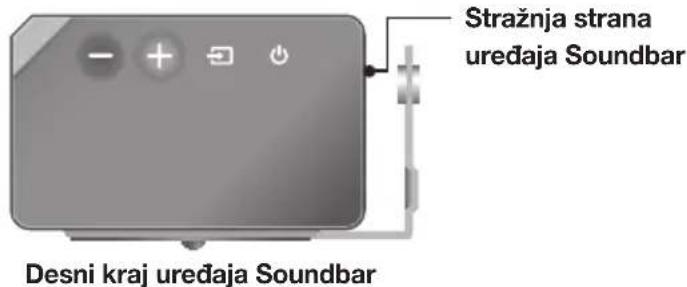
r_A C_p- Install 2 Bracket-Wall Mounts in the right orientation on the bottom of the Soundbar, using 2 Screws (M4 x L12).

text_image
Rear of the SoundbarRight end of the Soundbar
- When assembling, make sure the hanger parts of the Bracket-Wall Mounts are located behind the rear of the Soundbar. See the illustration above.
natural_image
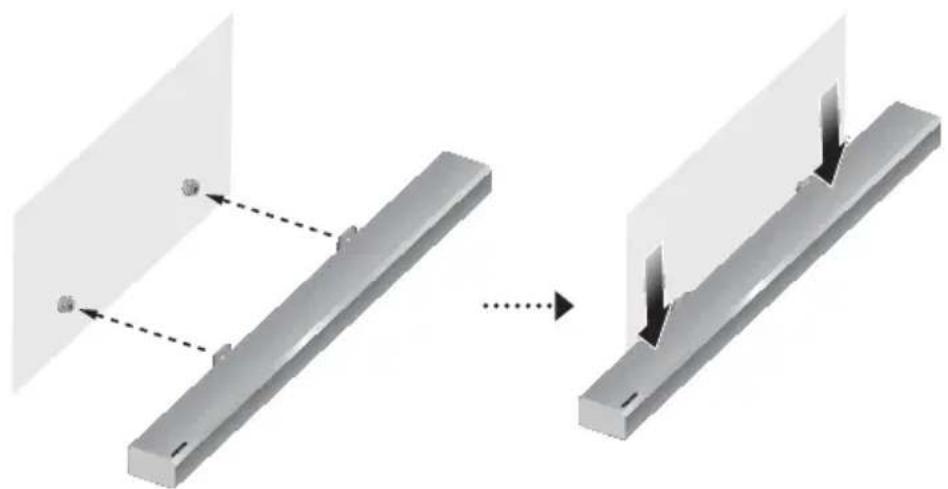
Diagram showing a structural change from a beam with fixed supports to a vertical support with downward force arrows (no text or symbols)- Install the Soundbar with the attached Bracket-Wall Mounts by hanging the Bracket-Wall Mounts on the Holder-Screws on the wall.
natural_image
Diagram showing a mechanical assembly with two parts and a downward arrow, no text or symbols present.- Slide the Soundbar down as shown above so that the Bracket-Wall Mounts rest securely on the Holder-Screws.

- Slide the Bracket-Wall Mounts down from the bottom to install it onto the Holder-Screws.
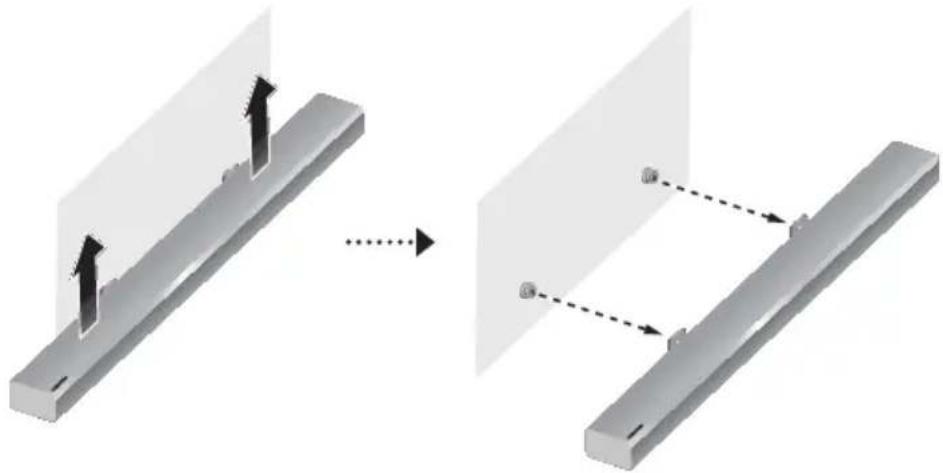
DETACHING THE SOUNDBAR FROM THE WALL
- To separate the Soundbar from the wall mount, push it in the direction of arrow.
natural_image
Diagram showing structural change from a beam with upward force arrows to a Y-shaped beam with dashed connection points (no text or symbols)
- Do not hang onto the installed unit and avoid striking or dropping the unit.
- Secure the unit firmly to the wall so that it does not fall off. If the unit falls off, it may cause an injury or damage the product.
- When the unit is installed on a wall, please make sure that children do not pull any of the connecting cables, as this may cause it to fall.
- For the optimal performance of a wall mount installation, install the speaker system at least 5 cm below the TV, if the TV is mounted on the wall.
- For your safety, if you do not mount the unit on the wall, install it on a secure, flat surface where it is unlikely to fall.
You can purchase wall mounts separately to install the surround speakers on a wall.
▶ Considerations for purchasing
• Endurable load : Above 8.0 Kg
• Hole size : 1/4 - 20 threaded insert

- Since wall mount installation is optional, you must purchase the corresponding accessories separately.
- Please have a qualified installer install the surround speaker Wall Mount Brackets.
- Ask a professional installation company to mount your product on the wall.
- Check the strength of the wall before you install the Wall Mount Brackets. If the strength is insufficient, make sure to reinforce the wall before installing the Wall Mount Brackets and the speakers on the wall.
- For more information, please refer to the Wall Mount's manual.
- Samsung Electronics is not liable for any damage to the product due to the product being installed inappropriately.
• Take care not to install the speakers sideways or upside down.
CONNECTING THE SUBWOOFER AND SURROUND SPEAKERS

- Do not connect the power cord of this product or your TV to a wall outlet until all connections between components are complete.
- Before moving or installing this product, be sure to turn off the power and disconnect the power cord.
- If the main unit is powered off, the wireless subwoofer and surround speaker will go into stand-by mode and the STANDBY LED on the rear will be Red after blinking Blue several times.
- If you use a device that uses the same frequency (2.4GHz) as the Soundbar near the Soundbar, interference may cause some sound interruption.
- The maximum transmission distance of the wireless signal of the main unit is about 10 meters, but may vary depending on your operating environment. If a steel-concrete or metallic wall is between the main unit and the wireless subwoofer or surround speaker, the system may not operate at all, because the wireless signal cannot penetrate metal.

- Wireless receiving antennas are built into the wireless subwoofer and surround speakers. Keep the units away from water and moisture.
- For optimal listening performance, make sure that the area around the wireless subwoofer and surround speakers location is clear of any obstructions.
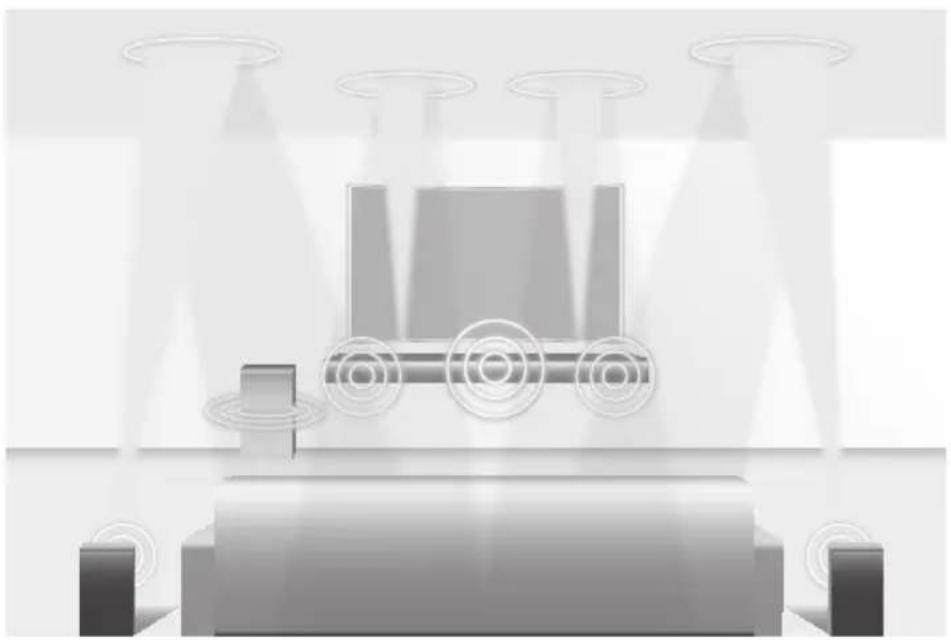
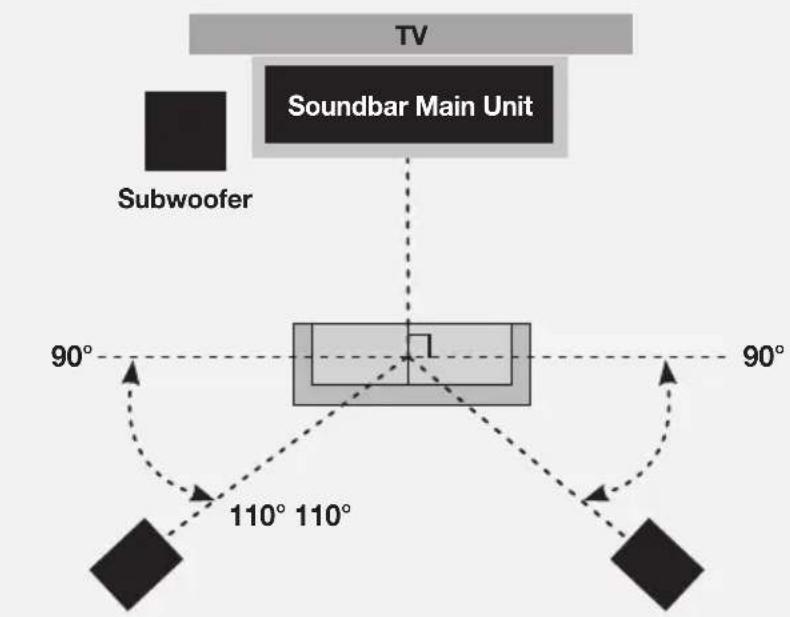
Recommended Speaker Layout
text_image
TV Soundbar Main Unit Subwoofer 90° 110° 110° 90°Surround Speaker L Surround Speaker R
AUTOMATIC CONNECTION
- Connect a power supply to the subwoofer and surround sound speakers.
- Connect a power supply to the Soundbar, and then press the ⏻ button on the remote control or on the right side of the Soundbar.
- The subwoofer and surround sound speakers are automatically connected to the Soundbar.
- When auto pairing is complete, the blue indicators at the rear of the subwoofer and surround speakers turn on.

- If the red indicator at the rear of the subwoofer or surround speakers is on or the blue indicator flashes continuously, auto pairing cannot occur. If this happens, connect each of the speakers manually.
- You can enjoy better sound from the wireless subwoofer by selecting a Sound Effect. (See page 9.)
- Important: Before you begin, put the batteries into the remote. See page 12 for instructions.
text_image
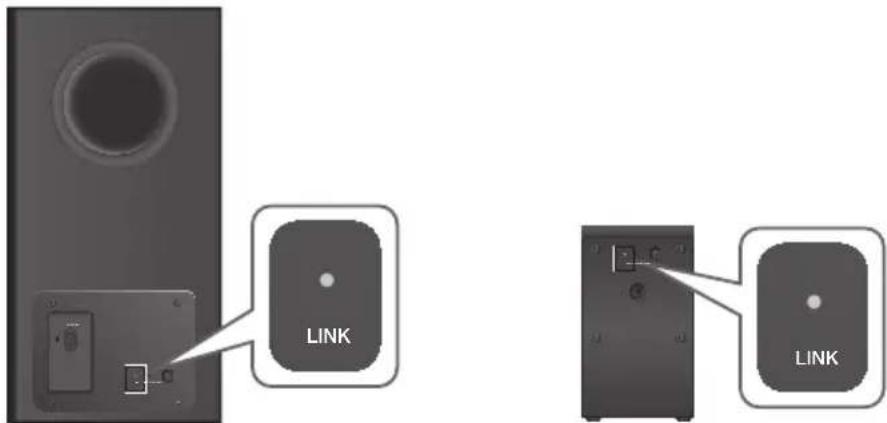
LINK LINKRear of Subwoofer Rear of Surround Speaker
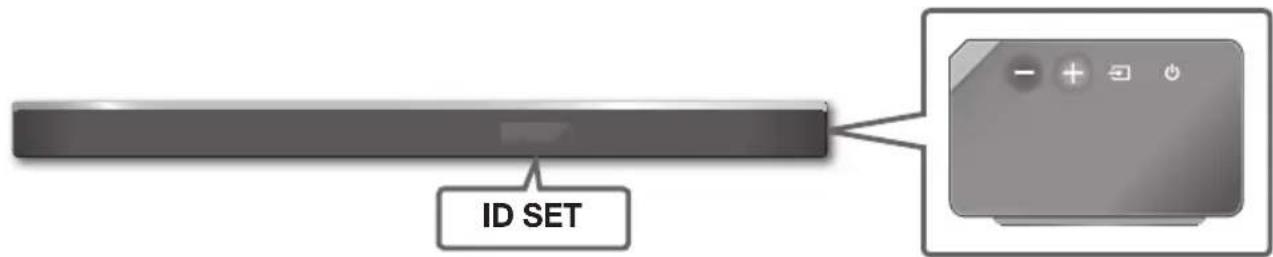
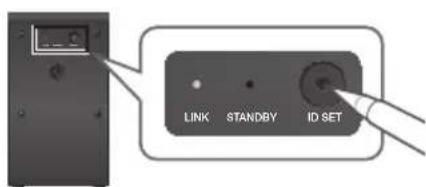
CONNECTING THE SUBWOOFER AND SURROUND SPEAKERS MANUALLY IF THE AUTOMATIC CONNECTION FAILS
▶ Before You Begin
-
Make sure that the Soundbar, the subwoofer, and the surround speakers are plugged in.
• Make sure that the Soundbar is turned on. -
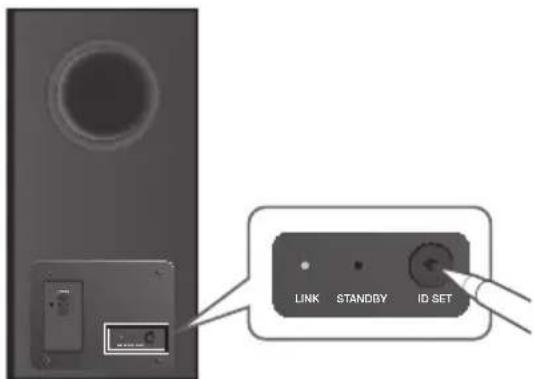
Press and hold ID SET on the rear of the subwoofer and surround speakers for at least 5 seconds. The red indicator at the rear of each speaker turns off and the blue indicator blinks.
text_image
LINK STANDBY ID SETRear of Subwoofer
text_image
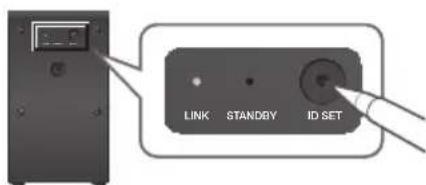
LINK STANDBY ID SETRear of the Left and Right Surround Speakers
- Turn off the Soundbar.
- Press and hold the VOL button on the remote control for at least 5 seconds with the Soundbar turned off (OFF).
text_image
EFFECT WOOFER VOL SOUNDEENG
- The ID SET message appears on the display of the Soundbar for a short period of time, and then disappears.
text_image
ID SETRight Side of the Soundbar
- When the blue indicators on the subwoofer and surround sound speakers blink, turn on the power by pressing ⏻ button on the right side of the main unit or on the remote control.
- When the connection is successfully established, the blue indicators on the rear of the subwoofer and surround speakers turn on without blinking.

- If the connection process fails, the blue indicators will flash continuously. Go to Step 1 and start again.
LED INDICATOR LAMP STATUS ON SUBWOOFER AND SURROUND SOUND SPEAKERS
| LED Status | Description Resolution | ||
| Red On | Standby (with the Soundbar main unit turned off) | Check the power supply to the Soundbar main unit | |
| Connection failed | Connect again(refer to the instructions on manual connection in the user manual) | ||
| Blue | On | Successfully connected(normal operation) | - |
| Blinking | Standby (with the Soundbar main unit turned off) | Check the power supply to the Soundbar main unit | |
| Connection failed | Connect again(refer to the instructions on manual connection in the user manual) | ||
| Red and blue Blinking Malfunction | Contact the service centre. | ||
CONNECTING TO A TV

- Important: Before you begin, put the batteries into the remote. See page 12 for instructions.
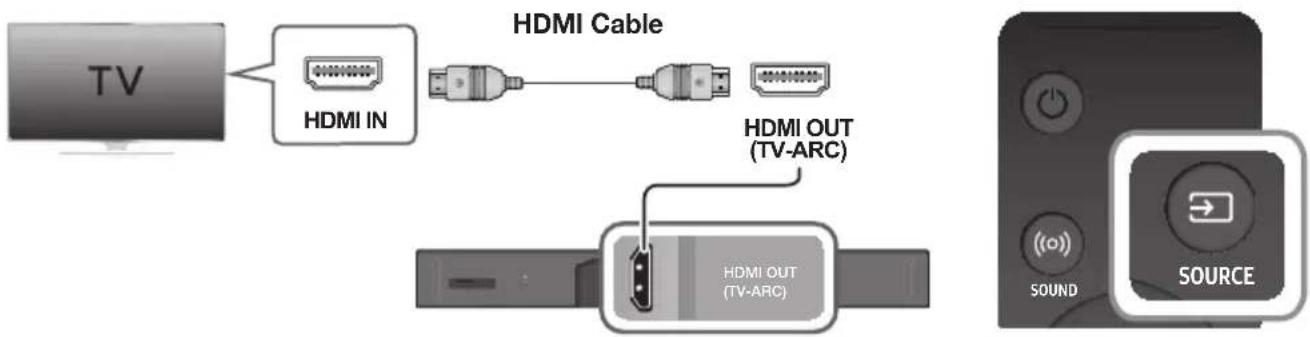
CONNECTING TO A TV USING AN HDMI (DIGITAL) CABLE
text_image
TV HDMI IN HDMI Cable HDMI OUT (TV-ARC) HDMI OUT (TV-ARC) SOUND SOURCE- Connect an HDMI cable from the HDMI OUT (TV-ARC) jack on the bottom of the product to the HDMI IN jack on your TV.
- Press the ➕ button on the right side of the Soundbar or the SOURCE button on the remote control to select the D.IN mode.

- HDMI is an interface that enables the digital transmission of video and audio data with just a single connector.
- If the TV provides an ARC port, connect the HDMI cable to the HDMI IN (ARC) port.
- We recommend you use a coreless HDMI cable if possible. If you use a cored HDMI cable, use one whose diameter is less than 14 mm.
• Anynet+ must be turned on.
- This function is not available if the HDMI cable does not support ARC.
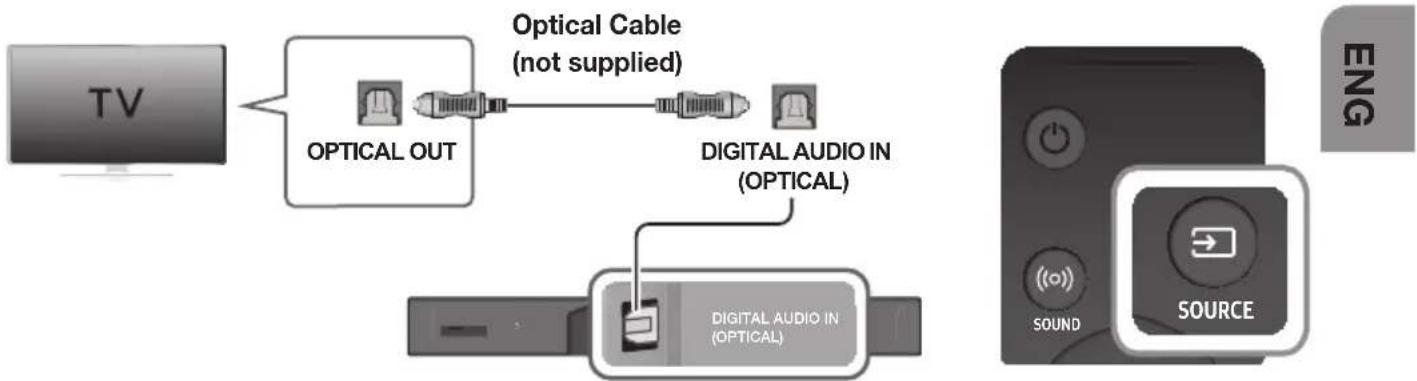
CONNECTING TO A TV USING A DIGITAL OPTICAL CABLE
flowchart
graph LR
    TV["TV"] --> OpticalOut["Optical OUT"]
    OpticalOut --> OpticalCable["Optical Cable (not supplied)"]
    OpticalCable --> DigitalAudioIn["Digital Audio In (Optical)"]
    DigitalAudioIn --> DigitalAudioInIn["Digital Audio In (Optical)"]
    DigitalAudioInIn --> DigitalAudioInIn["Digital Audio In (Optical)"]
    DigitalAudioInIn --> Sound["SOUND"]
    DigitalAudioInIn --> Source["SOURCE"]
-
Connect the DIGITAL AUDIO IN (OPTICAL) (Audio) jack on the Soundbar to the OPTICAL OUT jack of the TV with a digital optical cable (not supplied).
-
Press the button on the right side of the Soundbar or the SOURCE button on the remote control to select the D.IN mode.
▶ Auto Power Link
If you have connected the main unit to a TV with a digital optical cable, you can set the Auto Power function ON to have the Soundbar turn on automatically when you turn the TV on.
- Connect the Soundbar and a TV with a digital optical cable (not supplied).
- Press the button on the main unit's right side or the SOURCE button on the remote control to select the D.IN mode.
- Press the Left button on the remote control for 5 seconds to turn Auto Power Link on or off.

• Auto Power Link is set to ON by default.
- Depending on the connected device, Auto Power Link may not function.
• This function is only available in the D.IN mode.
CONNECTING TO EXTERNAL DEVICES
HDMI is the standard digital interface for connecting to TVs, projectors, DVD players, Blu-ray players, set top boxes, and more.
HDMI prevents any degradation to the signal due to conversion to analogue and maintains the video and audio quality of the original digital source.
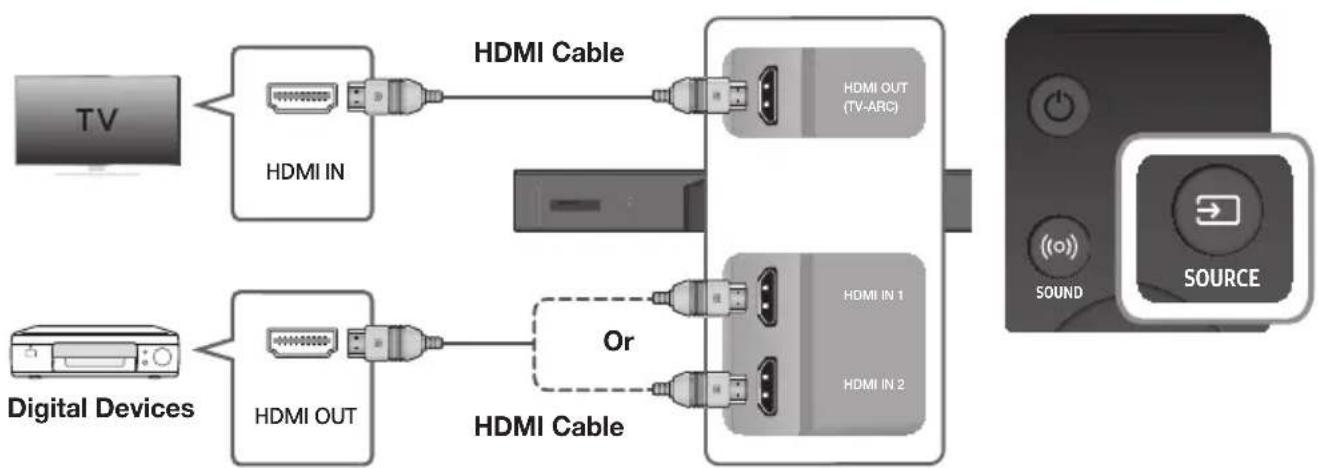
CONNECTING DEVICES IN ORDER TO USE DOLBY ATMOS®
This product supports Dolby Atmos®.

- Important: Dolby Atmos® is available only in HDMI mode.

flowchart
graph LR
    TV["TV"] --> HDMI1["HDMI IN"]
    HDMI1 --> HDMI2["HDMI OUT (TV-ARC)"]
    HDMI2 --> HDMI3["HDMI IN 1"]
    HDMI2 --> HDMI4["HDMI IN 2"]
    DigitalDevices["Digital Devices"] --> HDMI5["HDMI OUT"]
    HDMI5 --> HDMI6["HDMI Cable"]
    HDMI6 --> Or["Or"]
    Or -.-> HDMI7["HDMI Cable"]
    OR -.-> HDMI8["HDMI Cable"]
    HDMI7 --> Sound["SOUND"]
    Sound --> SOURCE["SOURCE"]
- Connect an HDMI cable from the HDMI IN 1 or HDMI IN 2 jack on the back of the product to the HDMI OUT jack on your digital device.
- Press the → button on the right side of the Soundbar or the SOURCE button on the remote control to select the HDMI1 or HDMI2 mode.
- The selected HDMI mode is displayed on the Soundbar display panel and sound plays.

- When Dolby Atmos® operated, the Blue LED on the right edge of the Soundbar will turn on and glow.
4. Configuring Dolby Atmos® on your BD player, or other device.
- Check the audio output options using the settings menu on your BD player, or other device.
- Make sure that "No Encoding" is selected for bitstream in the audio output options.
e.g., On a Samsung Player: Home menu → Settings → Sound → Digital Output: Select Bitstream (unprocessed).
• If the Audio Output options include Secondary Audio, make sure it is set to Off.

- Dolby Atmos® works only in HDMI mode. It is not compatible with other input sources.
- Dolby Atmos® works only on 5.1.4 channels.
• Make sure that the content supports Dolby Atmos®.
HDMI CABLE
flowchart
graph LR
    TV["TV"] --> HDMI1["HDMI IN"]
    HDMI1 --> HDMI2["HDMI OUT (TV-ARC)"]
    HDMI2 --> HDMI3["HDMI IN 1"]
    HDMI2 --> HDMI4["HDMI IN 2"]
    DigitalDevices["Digital Devices"] --> HDMI5["HDMI OUT"]
    HDMI5 --> HDMI6["HDMI Cable"]
    HDMI6 --> Or["Or"]
    Or -.-> HDMI7["HDMI Cable"]
    HDMI7 --> Sound["SOUND"]
    Sound --> SOURCE["SOURCE"]
- Connect an HDMI cable from the HDMI IN 1 or HDMI IN 2 jack on the back of the product to the HDMI OUT jack on your digital device.
- Press the button on the right side of the Soundbar or the SOURCE button on the remote control to select the HDMI1 or HDMI2 mode.
- The selected HDMI mode is displayed on the Soundbar display panel and sound plays.
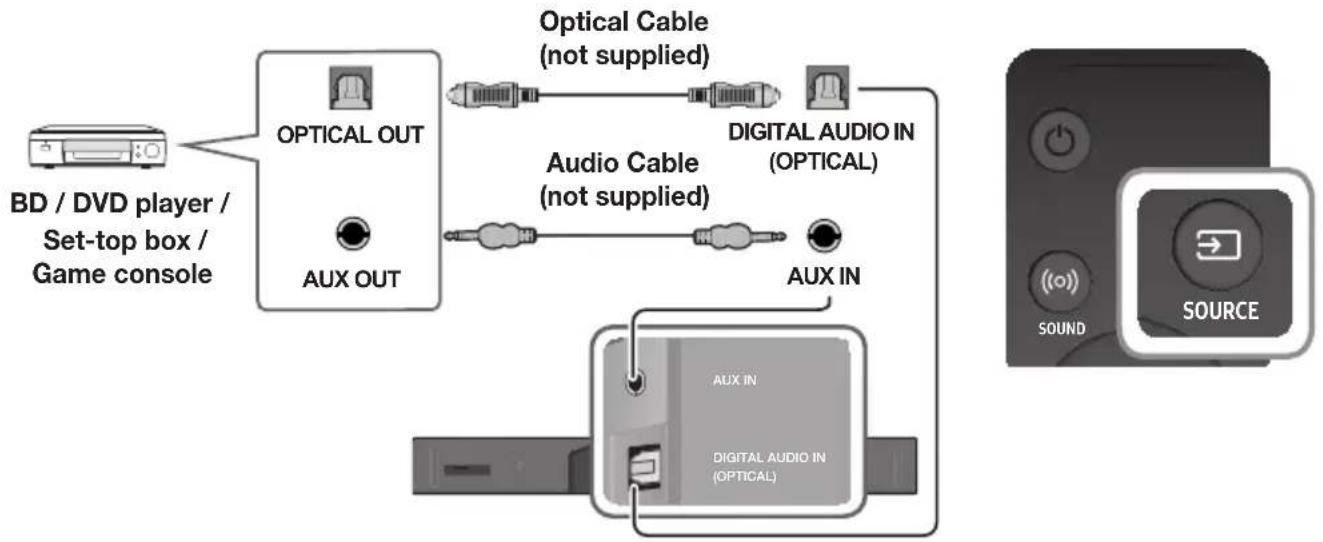
OPTICAL OR ANALOGUE AUDIO CABLE
This unit comes equipped with one digital optical in jack and one analogue audio (AUX) in jack, giving you two ways to connect it to external devices.
flowchart
graph TD
    A["BD / DVD player / Set-top box / Game console"] --> B["OPTICAL OUT"]
    B --> C["Optical Cable (not supplied)"]
    B --> D["AUX OUT"]
    C --> E["DIGITAL AUDIO IN (OPTICAL)"]
    D --> F["Audio Cable (not supplied)"]
    F --> G["AUX IN"]
    G --> H["DIGITAL AUDIO IN (OPTICAL)"]
    H --> I["SOUND SOURCE"]
▶ AUX Cable
- Connect AUX IN (Audio) on the main unit to the AUDIO OUT jack of the Source Device using an audio cable.
- Press the → button on the right side of the Soundbar or the SOURCE button on the remote control to select the AUX mode.
▶Optical Cable
-
Connect DIGITAL AUDIO IN (OPTICAL) (Audio) on the main unit to the OPTICAL OUT jack of the Source Device using a digital optical cable.
-
Press the → button on the right side of the Soundbar or the SOURCE button on the remote control to select the D.IN mode.
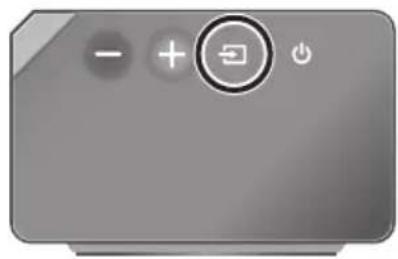
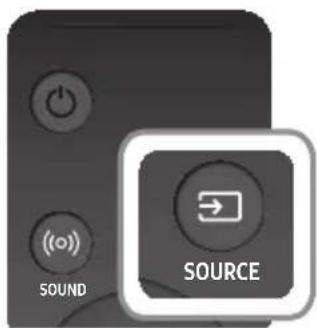
INPUT MODE
Press the button on the main unit's you want.
right side or the SOURCE button on the remote control to select the mode
natural_image
Gray rectangular button with control buttons and playback icons (no text or symbols)Right Side of the Soundbar
text_image
SOUND SOURCE| Input mode Display | |
| Optical Digital inputARC (HDMI OUT) input | D.IN |
| AUX input | AUX |
| HDMI input HDMI1, HDMI2 | |
| BLUETOOTH mode | BT |
The unit turns off automatically in the following situations.
• D.IN / BT Mode
-If there is no audio signal for 5 minutes.
- HDMI1 / HDMI2 Mode
- If there is no audio signal for 15 minutes.
- AUX Mode
-If the AUX cable is disconnected for 5 minutes.
- If there is no KEY input for 8 hours when the AUX cable is connected. (Auto Power Down function can be turned off only in that case.)
To turn off Auto Power Down function, while in AUX mode, press and hold the ▶II button for 5 seconds. ON - AUTO POWER DOWN / OFF - AUTO POWER DOWN appears on the display.
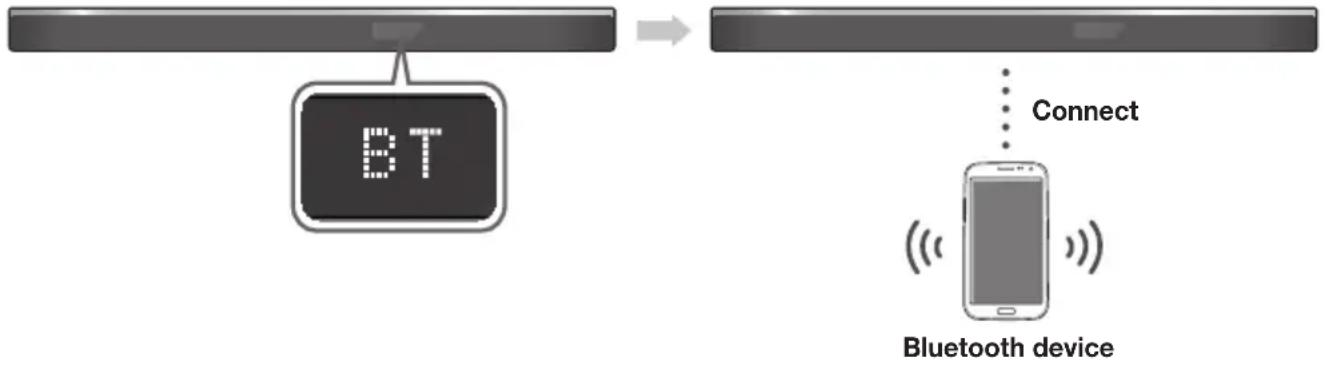
BLUETOOTH
You can connect a Bluetooth device to the Soundbar and enjoy music with stereo sound, all without wires!
TO CONNECT THE SOUNDBAR TO A BLUETOOTH DEVICE
Check if the Bluetooth device supports the Bluetooth compliant stereo headset function.
flowchart
graph LR
    A["BT Signal"] --> B["Bluetooth Device"]
    B --> C["Connect"]
- Press the button on the main unit's right side or the mode.
SOURCE button on the remote control to select the BT
- You will see BT READY or BT PAIRING on the front display of the Soundbar.
-
Select the Bluetooth menu on the Bluetooth device you want to connect. (Refer to the Bluetooth device's user manual.)
-
Select "[AV] Samsung Soundbar Kxxx" from the list.
-
When the Soundbar is connected to the Bluetooth device, it will display [Bluetooth device name] → BT on the front display.
- The device name can only be displayed in English. An underline " _ " will be displayed if the name is not in English.
-
If the Bluetooth device has failed to pair with the Soundbar, delete the previous [AV] Samsung Soundbar Kxxx" found by the Bluetooth device, switch to BT PAIRING mode by pressing and holding the → button on the main unit's right side or the SOURCE button on the remote control, and then have the Bluetooth device search for the Soundbar again.
-
Play music on the connected device.
• You can listen to the music playing on the connected Bluetooth device over the Soundbar.
- In BT mode, the Play / Pause / Next / Prev functions are not available. However, these functions are available on Bluetooth devices supporting AVRCP.

- If asked for a PIN code when connecting a Bluetooth device, enter <0000>.
- Only one Bluetooth device can be paired at a time.
- The Bluetooth connection will be terminated when you turn the Soundbar off.
- The Soundbar may not perform Bluetooth search or connection correctly under the following circumstances:
-If there is a strong electrical field around the Soundbar.
- If several Bluetooth devices are simultaneously paired with the Soundbar.
- If the Bluetooth device is turned off, not in place, or malfunctions.
- Note that such devices as microwave ovens, wireless LAN adaptors, fluorescent lights, and gas stoves use the same frequency range as the Bluetooth device, which can cause electric interference.
• The Soundbar supports SBC data (44.1kHz, 48kHz).
- Connect only to a Bluetooth device that supports the A2DP (AV) function.
- You cannot connect the Soundbar to a Bluetooth device that supports only the HF (Hands Free) function.
- Once you have paired the Soundbar to a Bluetooth device, selecting "[AV] Samsung Soundbar Kxxx" from the device's scanned devices list will automatically change the Soundbar to BT mode.
- Available only if the Soundbar is listed among the Bluetooth device's paired devices. (The Bluetooth device and the Soundbar must have been previously paired at least once.)
- Soundbar will appear in the Bluetooth device's searched devices list only when the Soundbar is displaying BT PAIRING.
TO DISCONNECT A BLUETOOTH DEVICE FROM THE SOUNDBAR
You can disconnect a Bluetooth device from the Soundbar. For instructions, see the Bluetooth device's user manual.
• The Soundbar will be disconnected.
- When the Soundbar is disconnected from the Bluetooth device, the Soundbar will display BT DISCONNECTED on the front display.
TO DISCONNECT THE SOUNDBAR FROM A BLUETOOTH DEVICE
Press the SOURCE button on the remote control or the button on the product's right side to switch from BT to another mode or turn off the Soundbar.
- The connected Bluetooth device will wait a certain amount of time for a response from the Soundbar before terminating the connection. (Disconnection time may differ, depending on the Bluetooth device)

- In Bluetooth connection mode, the Bluetooth connection will be lost if the distance between the Soundbar and the Bluetooth device exceeds 10 meters.
- The Soundbar automatically turns off after 5 minutes in the Ready state.
▶ More About Bluetooth
Bluetooth is a technology that enables Bluetooth-compliant devices to interconnect easily with each other using a short wireless connection.
- A Bluetooth device may cause noise or malfunction, depending on usage, if:
- A part of your body is in contact with the receiving/transmitting system of the Bluetooth device or the Soundbar.
- It is subject to electrical variation from obstructions caused by a wall, corner, or office partition.
-
It is exposed to electrical interference from same frequency-band devices including medical equipment, microwave ovens, and wireless LANs.
-
Pair the Soundbar with the Bluetooth device while they are close together.
- The further the distance between the Soundbar and Bluetooth device, the worse the quality is. If the distance exceeds the Bluetooth operational range, the connection is lost.
- In poor reception areas, the Bluetooth connection may not work properly.
- The Bluetooth connection only works when it is close to the unit. The connection will be automatically cut off if the Bluetooth device is out of range. Even within range, the sound quality may be degraded by obstacles such as walls or doors.
- This wireless device may cause electric interference during its operation.
USING THE MULTIROOM APP
The Samsung Multiroom app lets you connect the Soundbar to a smart device, your network, and the Internet. Once the Soundbar is connected to a smart device that has the Multiroom App installed, you can also connect the Soundbar and multiple Samsung Multiroom devices together wirelessly and play audio through them.
BEFORE YOU BEGIN
▶Communication Basics

flowchart
graph LR
    A["Internet Wireless Router"] <--> B["Router"]
    B <--> C["Smart Device: Android or iOS (App Control)"]
Requirements:
- A Wireless Router and a Smart Device.
- The wireless router must be connected to the Internet.
- The smart device must be connected to the router via a Wi-Fi connection.
INSTALLING THE SAMSUNG MULTIROOM APP
To use the Soundbar with the Samsung Multiroom App, you must download and then install the Samsung Multiroom App on your smart device. You can download the app from Google Play or the App Store. With the Samsung Multiroom App installed, you can play music on your Soundbar that is stored on your smart device, located on other connected devices, provided by other content providers, or streamed from Internet radio stations.
▶Android or iOS
Download the Samsung Multiroom app from Google Play or the App Store of your smart device.
* Market search : Samsung Multiroom

text_image
GET IT ON Google Playor

▶ Launching the Samsung Multiroom App
To launch the Samsung Multiroom app, tap the Multiroom app icon on your smart device.
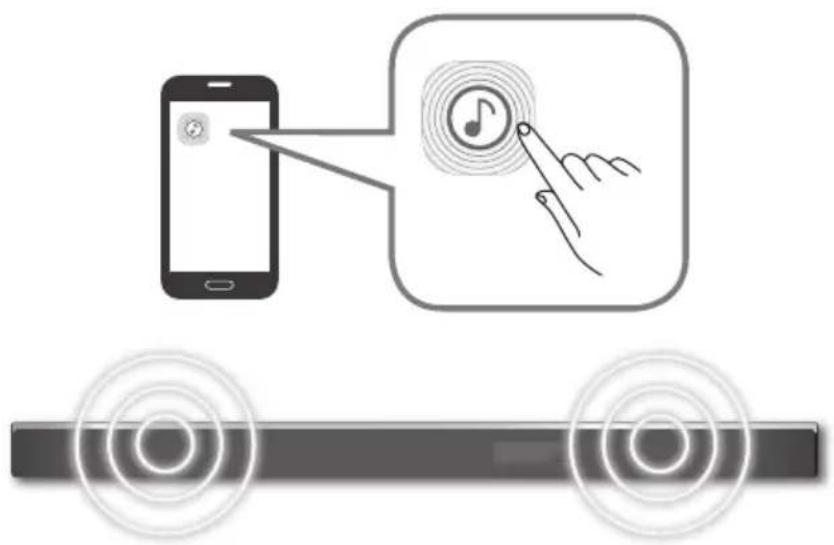
text_image
Diagram illustrating a mobile phone interface with a finger pointing to a music note icon and a car track below, likely for smart audio or digital tracking.CONNECTING THE SOUNDBAR TO YOUR NETWORK
On your smart device, select the Samsung Multiroom app. Follow the directions on your smart device's screen. You can use the following music sources with the Samsung Multiroom app.
- Music files stored in your mobile phone, various music sources, and Internet radio.
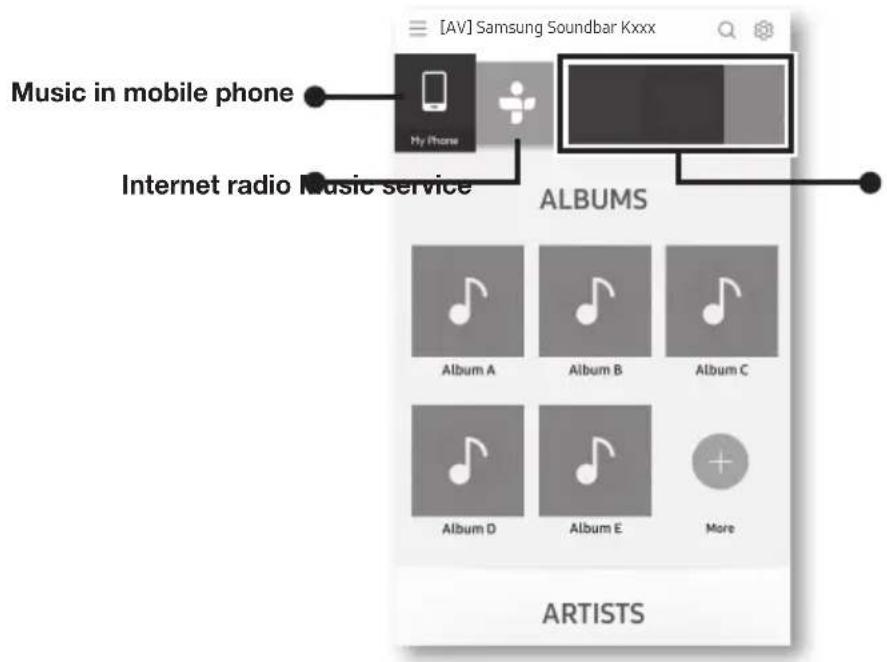
text_image
[AV] Samsung Soundbar Kxxx Music in mobile phone My Phone Internet radio Music service ALBUMS Album A Album B Album C Album D Album E More ARTISTSUSING THE NETWORK STANDBY ON FUNCTION
The Network Standby On function becomes available if a wireless connection has been properly established between a smart device and the Soundbar. This function turns on the Soundbar automatically when a smart device attempts to connect to the Soundbar via Bluetooth or Wi-Fi. If you turn the Soundbar on via a Bluetooth connection, its input mode is set to BT automatically. To turn the Soundbar on via Wi-Fi, you must have the Samsung Multiroom App installed on your smart device.
- Connect the smart device to your Soundbar.
- Turn on the Network Standby On function by pressing the LEVEL button on the Soundbar's remote for more than 5 seconds. You can turn the function off by pressing the LEVEL button again for more than 5 seconds.

- Network Standby On is available only if the Soundbar is listed among the smart device's paired devices. (The Smart device and the Soundbar must have been previously paired at least once.)
- Soundbar will appear in the smart device's searched devices list only when the Soundbar is displaying [BT READY] or [WiFi READY].
- If the Network Standby On function did not work:
-The Network Standby On is set to Off. Set it to ON.
- The Wi-Fi connection to the Soundbar will be terminated if the Soundbar's power cord is disconnected or the power is cut off. If the power is cut off, turn on the Soundbar and reconnect it.
SOFTWARE UPDATE
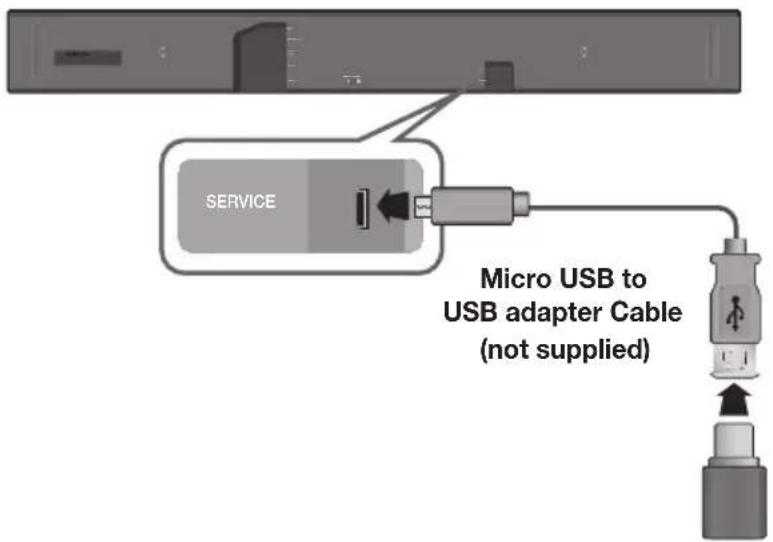
text_image
SERVICE Micro USB to USB adapter Cable (not supplied)UPDATING WITH USB
Samsung may offer updates for the Soundbar's system firmware in the future.
If an update is offered, you can update the firmware by connecting a USB device with the firmware update stored on it to the USB port on your Soundbar.
Note that if there are multiple update files, you must load them onto the USB device singly and use them to update the firmware one file at a time.
Please visit samsung.com or contact the Samsung call centre to receive more information about downloading update files.
▶ Updating Procedure
- Connect a Micro USB to USB adapter cable with a male USB 2.0 Micro USB plug (Type B) on one end and a standard female 2.0 USB jack (Type A) on the other end to the micro USB jack on your Soundbar.

- The Micro USB to USB adapter cable is sold separately. To purchase, contact a Samsung Service Centre or Samsung Customer Care.
- Follow the steps below to download the product software:
Go to the Samsung website at (samsung.com/sec) → search for the model name - select the customer support option (the option name is subject to change) - Save the downloaded software to a USB stick and select "Extract to the folder name" to unzip the folder.
- Turn off the Soundbar and connect the USB stick containing the software update to the female port on a Micro USB adapter cable.
- Turn on the Soundbar. Within 3 minutes, UPDATE is displayed and updating begins.
- After the update is complete, the Soundbar turns off and on again.

- If the input source has been changed after an update or a reconnection of the power cable, change the input source to TV, or the desired source.
▶If UPDATE was not displayed
- Turn off the Soundbar, connect the USB storage device that contains update files to the Soundbar's USB port.
- Disconnect the power cord, reconnect it, and then turn on the Soundbar.

- Insert a USB device containing the firmware update into the USB port on the main unit.
- Updating firmware may not work properly if audio files supported by the Soundbar are stored in the USB storage device.
- Do not disconnect the power or remove the USB device while updates are being applied. The main unit will turn off automatically after completing the firmware update.
- After update is completed, the user setup in Soundbar is initialised. We recommend you write down your settings so that you can easily reset them after the update. Note that updating firmware resets the subwoofer connection too.
If the connection to the subwoofer is not re-established automatically after the update, refer to page 19. If the software update fails, check that the USB stick is not defective.
• Mac OS users should use MS-DOS (FAT) as the USB format.
- Depending on the manufacturer, some USB devices may not be supported.
AUTO UPDATE
If the Soundbar is connected to the Internet, it will automatically check for the latest firmware and update when new firmware becomes available, even if it is turned off.

- The Soundbar is configured to run Auto Update by default.
- To use the Auto Update function, the Soundbar must be connected to the Internet.
- The Wi-Fi connection to the Soundbar will be terminated if its power cord is disconnected or the power is cut off. If the power is cut off, turn on the Soundbar and reconnect it.
TROUBLESHOOTING
Before requesting service, please check the following.
| The unit will not turn on. | |
| • Is the power cord plugged into the outlet? | → Connect the power plug to the outlet. |
| A function does not work when the button is pressed. | |
| • Is there static electricity in the air? | → Disconnect the power plug and connect it again. |
| Sound is not produced. | |
| Is the Mute function on?Is the volume set to minimum? | → Press the VOL button to cancel the Mute function.→ Adjust the volume. |
| The remote control does not work. | |
| Are the batteries drained?Is the distance between the remote control and main unit too far? | → Replace with new batteries.→ Move closer to the unit. |
| The red LED on the subwoofer blinks and the subwoofer is not producing sound. | |
| • Your subwoofer may not be connected to the main unit of the product. | → Try to connect your subwoofer again.(See Page 19) |
| The subwoofer drones and vibrates noticeably. | |
| Try to adjust the vibration of your subwoofer. | → Push the WOOFER button on your remote control up or down to adjust its value (between -12, -6 ~ +6). |
SPECIFICATIONS
| GENERAL | Weight | Soundbar Main Unit | 6.7 kg |
| Subwoofer (PS-KW1-2) | 9.6 kg | ||
| Surround Speaker (PS-KS2-1 (L), PS-KS2-2 (R)) | 2.0 kg | ||
| Dimensions (W x H x D) | Soundbar Main Unit | 1210.2 x 81.7 x 131.4 mm | |
| Subwoofer (PS-KW1-2) | 203.9 x 399.0 x 414.3 mm | ||
| Surround Speaker (PS-KS2-1 (L), PS-KS2-2 (R)) | 120.2 x 210.9 x 141.0 mm | ||
| Operating Temperature Range | +5°C to +35°C | ||
| Operating Humidity Range | 10 % to 75 % | ||
| HDMI Video | 1080p,1080i, 720p, 576p, 480p2160p@24/25/30Hz 4:4:42160p@60/50Hz 4:2:0 | ||
| AMPLIFIER | Rated Output Power | Soundbar Main Unit | 18W x 11, 4 ohm, THD≤10% |
| Subwoofer (PS-KW1-2) | 162W, 3 ohm, THD≤10% | ||
| Surround Speaker (PS-KS2-1 (L), PS-KS2-2 (R)) | 35W x 4, 4 ohm, THD≤10% | ||
| Supported play formats | LPCM 2ch, Dolby Digital, Dolby Atmos (True HD/Digital Plus), DTS | ||
| Wireless device output power | BT max transmitter power | 100mW at 2.4GHz - 2.4835GHz | |
| Wi-Fi max transmitter power | 100mW at 2.4GHz - 2.4835GHz, 5.15GHz - 5.35GHz & 5.47GHz-5.725GHz | ||
| SRD max transmitter power | 100mW at 2.4GHz - 2.4835GHz and 5.15GHz - 5.25GHz/25mW at 5.725GHz - 5.825GHz | ||
* Design, specifications and App screen are subject to change without prior notice.
* Nominal specification
- Samsung Electronics Co., Ltd reserves the right to change the specifications without notice.
-Weight and dimensions are approximate.
- For more information about the power supply and power consumption, refer to the label attached to the product. (Label : Bottom of main unit)
※ Precaution : The product will restart automatically if you turn on/off Wi-Fi/Ethernet.
| Overall Standby Power Consumption (W)(All the network ports are “ON” condition) | 5.8W | |
| Wi-Fi/Ethernet Port deactivation method | Press Wi-Fi SETUP button on the product for 30 seconds to turn Wi-Fi/Ethernet On / Off. | |
| Bluetooth Port deactivation method | Press SPK ADD button on the product for 30 seconds to turn Bluetooth On / Off. | |
※ Open Source Licence Notice
- For further information on Open Sources used in this product, please visit the website: http://opensource.samsung.com

LSpotify
- The Spotify Software is subject to third party licences found here: www.spotify.com/connect/third-party-licenses.
- For more information about Spotify Connect, please visit www.spotify.com/connect
LICENCES

DOLBY ATMOS
Manufactured under license from Dolby Laboratories. Dolby, Dolby Atmos, Dolby Audio, Dolby Digital Plus, Pro Logic, and the double-D symbol are trademarks of Dolby Laboratories.


Digital Surround
For DTS patents, see http://patents.dts.com. Manufactured under license from DTS Licensing Limited. DTS, the Symbol, DTS in combination with the Symbol, and DTS Digital Surround are registered trademarks or trademarks of DTS, Inc. in the United States and/or other countries. © DTS, Inc. All Rights Reserved.

HIGH-DEFINITION MULTIMEDIA INTERFACE
The terms HDMI and HDMI High-Definition Multimedia Interface, and the HDMI Logo are trademarks or registered trademarks of HDMI Licensing LLC in the United States and other countries.
- Hereby, Samsung Electronics, declares that this equipment is in compliance with Directive 2014/53/EU.
The full text of the EU declaration of conformity is available at the following internet address: http://www.samsung.com go to Support > Search Product Support and enter the model name.
This equipment may be operated in all EU countries.
The 5GHz WLAN(Wi-Fi or SRD) function of this equipment may only be operated indoors.

Contact SAMSUNG WORLD WIDE
If you have any questions or comments relating to Samsung products, please contact the SAMSUNG customer care Centre.
| Country | Contact Centre | Web Site |
| ■ Europe | ||
| UK 0330 SAMSUNG | 7267864) www.samsung.com/uk/support | |
| IRELAND (EIRE) 0818 | 717100 www.samsung.com/le/support | |
| GERMANY 06196 77 | 555 77 www.samsung.com/dc/support | |
| FRANCE 01 48 63 00 | 00 www.samsung.com/fr/support | |
| ITALIA 800-SAMSUNG | (800.7267864) www.samsung.com/lt/support | |
| SPAIN 00349021726 | 678 www.samsung.com/es/support | |
| PORTUGAL 808 207 | 267 www.samsung.com/pt/support | |
| LUXEMBURG | 261 03 710 | www.samsung.com/be_fr/support |
| NETHERLANDS 088 | 90 90 100 www.samsung.com/nl/support | |
| BELGIUM | 02-201-24-18 | www.samsung.com/be/support (Dutch)www.samsung.com/be_fr/support (French) |
| NORWAY | 815 56480 | www.samsung.com/nc/support |
| DENMARK 707 019 | 70 www.samsung.com/dk/support | |
| FINLAND | 030-6227 515 | www.samsung.com/fi/support |
| SWEDEN | 0771 726 786 | www.samsung.com/se/support |
| POLAND | 801-172-678* lub +48 22 607-93-33** (koszt połączenia według taryfy operatora) | http://www.samsung.com/pl/support/ |
| HUNGARY | 0680SAMSUNG (0680-726-7864) | www.samsung.com/hu/support |
| AUSTRIA | 0800-SAMSUNG (0800-7267864)[Only for Dealers] 0810-112233 | www.samsung.com/at/support |
| Country Contact Centre | Web Site | |
| SWITZERLAND | 0800 726 78 64 (0800-SAMSUNG) | www.samsung.com/ch/support (German)www.samsung.com/ch_fr/support (French) |
| CZECH | 800 - SAMSUNG (800-726786) www.samsung.com/cz/support | |
| SLOVAKIA | 0800 - SAMSUNG (0800-726 786) | www.samsung.com/sk/support |
| CROATIA | 072 726 786 | www.samsung.com/hr/support |
| BOSN/A | 055 233 999 | www.samsung.com/support |
| MONTENEGRO | 020 405 888 | |
| SLOVENIA | 080 697 267 (brezplačna številka) | www.samsung.com/si/support |
| SERBIA | 011 321 6899 | www.samsung.com/rs/support |
| ALBANIA | 045 620 202 | www.samsung.com/al/support |
| BULGARIA | '3000 Цена в мрежата0800 111 31 , безплатна телефонна линия | www.samsung.com/bg/support |
| ROMANIA | '8000 (apel in retea)08008-726-78-64 (08008-SAMSUNG)Apel GRATUIT | www.samsung.com/ro/support |
| CYPRUS 8009 4000 | only from landline, toll free | www.samsung.com/gr/support |
| GREECE | 80111-SAMSUNG (80111 726 7864)only from land line(+30) 210 6897691 from mobileand land line | |
| LITHUANIA | 8-800-77777 | www.samsung.com/lt/support |
| LATVIA | 8000-7267 | www.samsung.com/lv/support |
| ESTONIA | 800-7267 | www.samsung.com/ee/support |

[Correct disposal of batteries in this product]
(Applicable in countries with separate collection systems)
This marking on the battery, manual or packaging indicates that the batteries in this product should not be disposed of with other household waste at the end of their working life. Where marked, the chemical symbols Hg, Cd or Pb indicate that the battery contains mercury, cadmium or lead above the reference levels in EC Directive 2006/66. If batteries are not properly disposed of, these substances can cause harm to human health or the environment.
To protect natural resources and to promote material reuse, please separate batteries from other types of waste and recycle them through your local, free battery return system.
Correct Disposal of This Product (Waste Electrical & Electronic Equipment)
(Applicable in countries with separate collection systems)
This marking on the product, accessories or literature indicates that the product and its electronic accessories (e.g. charger, headset, USB cable) should not be disposed of with other household waste at the end of their working life. To prevent possible harm to the environment or human health from uncontrolled waste disposal, please separate these items from other types of waste and recycle them responsibly to promote the sustainable reuse of material resources.
Household users should contact either the retailer where they purchased this product, or their local government office, for details of where and how they can take these items for environmentally safe recycling.
Business users should contact their supplier and check the terms and conditions of the purchase contract. This product and its electronic accessories should not be mixed with other commercial wastes for disposal.
text_image
99.1mm 99.1mm 99.1mm 99.1mm 68.6mmtext_image
Safety warning symbol image showing no protection, a lightning bolt, and an electrical plug with a fuse.text_image
Safety warning symbol showing a prohibition sign and a sun with radiating lines, indicating radiation hazard.natural_image
Illustration of symbolic items including a magnifying glass over a U-turn, sun, spray bottle, and snowman (no text or labels)text_image
Diagram showing a battery and a trash bin with a crossed-out box, indicating a process or disposal scenario.natural_image
Illustration of a robotic vehicle with sensor beams and control points, no text or symbols presenttext_image
Diagram showing a device control panel with labeled buttons and a zoomed-in section viewПоказва текущия режим.

text_image
SOUND SOURCE EFFECT LEVEL VOLWOOFERtext_image
SOUND SOURCE EFFECT LEVEL VOLWOOFERSOURCE
text_image
FL FR C FTR FEОсновно устройство
text_image
SOUND SOURCE EFFECT LEVEL VOLWOOFERtext_image
EFFECT LEV WOOFERVOL
Натиснете бутона нагоре или надолу, за да регулирате силата на звука.
Заглушаване
text_image
EFFECT VOL WOOFER SOUND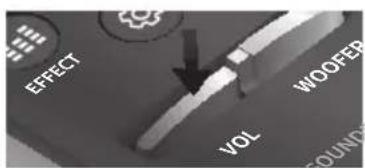
text_image
EFFECT VOL WOOFER COUNDnatural_image
Three technical diagrams showing a remote control panel with labeled ports and directional arrows (no text or symbols present)ИЗПОЛЗВАНЕ НА СКРИТИТЕ БУТОНИ
natural_image
Diagram showing a mechanical assembly with a pin and lever mechanism, no text or symbols presentnatural_image
Diagram showing a mechanical assembly before and after transformation, with no visible text or symbolsnatural_image
Diagram showing a mechanical assembly with two components and a downward arrow indicating transformation (no text or symbols)natural_image
Diagram showing two mechanical components before and after assembly, with arrows indicating motion direction (no text or symbols)
text_image
LINK STANDBY ID SETЗадна страна на субуфера
text_image
LINK STANDBY ID SETtext_image
EFFECT VOL WOOFER SOUNDBUL
natural_image
Gray rectangular button with control buttons and a play icon (no text or symbols)text_image
SOUND SOURCEtext_image
Diagram illustrating a mobile phone interface with a finger pointing to a music note icon and a car wheel, likely for app or smart device use.СВЪРЗВАНЕ НА SOUNDBAR КЪМ МРЕЖАТА ВИ
Manufactured under license from Dolby Laboratories. Dolby, Dolby Atmos, Dolby Audio, Dolby Digital Plus, Pro Logic, and the double-D symbol are trademarks of Dolby Laboratories.


Digital Surround
For DTS patents, see http://patents.dts.com. Manufactured under license from DTS Licensing Limited. DTS, the Symbol, DTS in combination with the Symbol, and DTS Digital Surround are registered trademarks or trademarks of DTS, Inc. in the United States and/or other countries. © DTS, Inc. All Rights Reserved.

HIGH-DEFINITION MULTIMEDIA INTERFACE
The terms HDMI and HDMI High-Definition Multimedia Interface, and the HDMI Logo are trademarks or registered trademarks of HDMI Licensing LLC in the United States and other countries.
text_image
99.1mm 99.1mm 99.1mm 68.6mmCRO
Osigurajte da napajanje izmjeničnom strujom u vašem domaćinstvu odgovara identifikacijskoj naljepnici koja se nalazi na poledini proizvoda. Proizvod postavite vodoravno na prikladnu površinu (namještaj) s dovoljno prostora za ventilaciju 7\~10 cm. Pobrinite se da ventilacijski otvori ne budu prekriveni. Ne postavljajte jedinicu na pojačala ili drugu opremu koja se grije. Ova jedinica dizajnirana je za neprekidnu uporabu. Za potpuno isključivanje jedinice izvucite strujni utikač iz zidne utičnice. Ako ne namjeravate upotrebljavati jedinicu dulje vrijeme, izvucite utikač.

text_image
Safety warning symbols including no sign, lightning bolt, and plug with a power outletZa vrijeme olujnog nevremena izvucite utikač za napajanje izmjeničnom strujom iz zidne utičnice. Vršni naponi zbog munja mogu oštetiti uređaj.
natural_image
Illustration of symbolic items including a prohibition sign, magnet, dollar bill, and cartoon characters (no text or labels)text_image
Safety warning symbol showing a prohibition sign and a sun with radiating lines, indicating no protection or radiation.Ne izlažite uređaj izravnoj sunčevoj svjetlosti ili drugim izvorima topline. To može dovesti do pregrijavanja i kvara uređaja.
text_image
Diagram showing a battery and a trash bin with a crossed-out box, indicating a process or disposal scenario.Baterije korištene s ovim proizvodom sadržavaju kemikalije koje su štetne za okoliš. Ne odlazite baterije s otpadom kućanstva. Baterije nemojte bacati u vatru. Nemojte kratko spajati, rastavljati, ili pregrijavati baterije. U slučaju zamjene neodgovarajućim baterijama postoji opasnost od eksplozije. Baterije mijenjajte samo baterijama iste ili ekvivalentne vrste.
DOLBY ATMOS®
Ovaj proizvod podržava Dolby Atmos®.

natural_image
Illustration of a robotic vehicle with sensor beams and head-mounted sensors, no text or symbols present\* Što je Dolby Atmos®?
Atmos tehnologija unapređuje postojeće 5.1-kanalne sustave surround zvuka dodavanjem gornjeg zvučnika. Time je slušatelj sa svih strana okružen zvukom pa je doživljaj sveobuhvatan, visoke kvalitete, bogat, detaljan i dublji. Pogledajte stranicu 24 da biste saznali kako spojiti sustav.
SADRŽAJ
2 POČETAK
text_image
Diagram showing a device control panel with labeled buttons and a zoomed-in section viewPrikazuje trenutni način rada.

- Kad priključite kabel napajanja, tipka napajanja radi još 4 do 6 sekundi. Kada pritisnete gumb napajanja, prije nego što se oglasi jedinica proći će 20 sekundi.
- Kad uključite napajanje ove jedinice, početak reprodukcije zvuka kasnit će 4 do 5 sekundi.
- Ako želite uživati u zvuku koji se reproducira samo putem uredaja Soundbar, zvučnike televizora morate isključiti u izborniku Postavke zvuka televizora. Pogledajte priručnik TV-a koji je isporučen uz TV.
DONJA PLOČA
text_image
AUX IN Spojite na analogni izlaz vanjskog uređaja. DIGITAL AUDIO IN (OPTICAL) Spojite na digitalni (optički) izlaz vanjskog uređaja. HDMI OUT (TV-ARC) Istodobno šalje digitalne video i audiosignale putem HDMI kabela. HDMI IN 1, HDMI IN 2 Istodobno prima digitalne video i audiosignale putem HDMI kabela. Rabite prilikom povezivanja podržanog vanjskog uređaja. OZNAKA Wi-Fi SETUP Pritisnite taj gumb da biste Soundbar povezali s mrežom putem Wi-Fi mreže. (Potreban je pametni uredaj i aplikacija Samsung Multiroom. Pogledajte stranicu 30.) SPK ADD Pritisnite gumb za povezivanje uredaja Soundbar na Samsung HUB (kupuje se zasebno) ili na mrežu. (Potreban je pametni uredaj i aplikacija Samsung Multiroom. Pogledajte stranicu 30.) DC 19V (Uključeno Napajanje) Spojite strujni prilagodnik u priključak napajanja, a zatim spojite priključak strujnog prilagodnika u zidnu utičnicu. SERVICE USB micro priključak. Za nadogradnju softvera proizvoda.Potreban je USB prilagodnik. (Prodaje se zasebno.) Pogledajte stranicu 33.
- Prilikom isključivanja iz zidne utičnice, kabel za napajanje adaptera izmjenične struje držite za utikač. Ne vucite kabel.
- Ne spajajte ovu jedinicu ili druge komponente na utičnicu za napajanje izmjeničnom strujom dok u potpunosti ne spojite sve komponente.
DALJINSKI UPRAVLJAČ
Za uključivanje
Gore/Dolje/Lijevo/Desno
Pritisnite označene površine za odabir Gore/Dolje/Lijevo/Desno. Pritisnite
Gore/Dolje/Lijevo/Desno na gumbu za odabir ili postavljanje funkcija.
text_image
SOUND SOURCE EFFECT LEVEL VOLWOOFER
text_image
SOUND SOURCE EFFECT LEVEL VOLWOOFERSOURCE
Pritisnite za odabir izvora povezanog s uređajem Soundbar.
\* Način BT PAIRING
Za uključivanje načina BT PAIRING u Bluetooth funkciji pritisnite i držite gumb SOURCE više od 5 sekundi.
Reproducija/Pauza (BT / WIFI)
text_image
FL FR C FTR-FLGlavni uređaj
Surround zvučnik L
Surround zvučnik D
text_image
SOUND SOURCE EFFECT LEVEL VOLWOOFER(Kontrola zvuka)
Pritisnite da biste odabrali TREBLE, BASS ili AUDIO SYNC.
Potom gumbima Gore/Dolje prilagodite glasnoću za TREBLE ili BASS od -3 \~ +3.
Pritisnite i držite gumb 🎨 (Kontrola zvuka) oko 5 sekundi da biste podesili zvuk za svaki frekventni opseg. 150 Hz, 300 Hz, 600 Hz, 1,2 KHz, 2,5 KHz, 5 KHz i 10 KHz mogu se odabrati (Lijevo/Desno) te se svaki može namjestiti na postavku između -6 \~ +6 (Gore/Dolje).
text_image
EFFECT LEV WOOFERVOL
text_image
EFFECT VOL WOOFER SOUND
text_image
EFFECT VOL WOOFER GOUND▶ Upravljanje glasnoćom uređaja Soundbar pomoću daljinskog upravljača televizora
- Pritisnite i držite gumb ((o)) SOUND duže od 5 sekundi dok je zvučnik Soundbar uključen.
- Na zaslonu zvučnika Soundbar pojavljuje se poruka „ON - TV REMOTE".
- U izborniku televizora namjestite zvučnik televizora na vanjski zvučnik.

- Nije dostupno u načinima TV ARC, BT, HDMI1 i HDMI2. (Dostupno samo u načinima D.IN (optički) i AUX)
- Na daljinskom upravljaču televizora raspoloživi su samo gumbi glasnoće i isključivanja zvuka. Drugi su gumbi onemogućeni.
- TV izbornici se razlikuju ovisno o proizvođaču i modelu. Za više informacija pogledajte korisničke upute televizora.
• Proizvođači koji imaju podržanu ovu funkciju:
- VIZIO, LG, Sony, Sharp, PHILIPS, PANASONIC, TOSHIBA, GRUNDIG, Hisense, RCA
- Ova značajka možda nije kompatibilna s vašim daljinskim upravljačem televizora ovisno o proizvođaču daljinskog upravljača.
- Za isključivanje ove funkcije pritisnite gurno) SOUND na 5 sekundi.
Na zaslonu zvučnika Soundbar pojavljuje se poruka „OFF - TV REMOTE“.
UMETANJE BATERIJA (2 AA BATERIJE)
natural_image
Three technical illustrations of a remote control case showing internal components and directional arrows (no text or symbols)natural_image
Diagram of a mechanical assembly with two components and directional arrows indicating motion (no text or symbols)- Gurnite vijak (nije priloženo) kroz svaki Vijak držača, a zatim čvrsto zategnite svaki vijak u otvor potpornog vijka.
text_image
F1 F2 CUP- Montirajte 2 Zidni nosač usmjerena desno na podnožje uređaja Soundbar pomoću 2 Vijak (M4 x L12).

text_image
Stražnja strana uređaja Soundbar Desni kraj uređaja Soundbarnatural_image
Diagram showing a mechanical assembly before and after transformation, with no visible text or symbols- Montirajte Soundbar s pričvršćenim Zidni nosač tako da objesite Zidni nosač na Vijak držača na zidu.

natural_image
Diagram showing a mechanical assembly with two components and a downward arrow indicating transformation (no text or symbols)natural_image
Diagram showing two 3D structural components before and after modification, with arrows indicating direction of movement (no text or symbols present)
text_image
LINK STANDBY ID SETPozadina subwoofera

text_image
LINK STANDBY ID SETPozadina lijevog i desnog surround zvučnika
- Isključite Soundbar.
- Pritisnite i držite gumb VOL na daljinskom upravljaču najmanje 5 sekundi dok je Soundbar isključen (ISKLJUČENO).
text_image
EFFECT WOOFER VOL SOUNDE- Poruka ID SET kratko se prikazuje na zaslonu uređaja Soundbar, a zatim nestaje.
text_image
ID SETnatural_image
Gray rectangular button with control buttons and a play icon (no text or symbols)text_image
SOUND SOURCE| Način ulaza Zaslon | |
| Optički Digitalni ulazARC (HDMI OUT) ulaz | D.IN |
| Ulaz AUX | AUX |
| Ulaz HDMI | HDMI1, HDMI2 |
| BLUETOOTH Način | BT |
FUNKCIJA AUTO POWER DOWN
text_image
Diagram illustrating smartphone touch screen interaction with a musical note icon and finger pointing to the screen, alongside a vehicle with circular sensor patterns.POVEZIVANJE UREĐAJA SOUNDBAR S MREŽOM
Na pametnom uređaju odaberite aplikaciju Samsung Multiroom. Slijedite upute na zaslonu pametnog uređaja. Uz aplikaciju Samsung Multiroom na raspolaganju su vam sljedeće funkcije.
Manufactured under license from Dolby Laboratories. Dolby, Dolby Atmos, Dolby Audio, Dolby Digital Plus, Pro Logic, and the double-D symbol are trademarks of Dolby Laboratories.


Digital Surround
For DTS patents, see http://patents.dts.com. Manufactured under license from DTS Licensing Limited. DTS, the Symbol, DTS in combination with the Symbol, and DTS Digital Surround are registered trademarks or trademarks of DTS, Inc. in the United States and/or other countries. © DTS, Inc. All Rights Reserved.

HIGH-DEFINITION MULTIMEDIA INTERFACE
The terms HDMI and HDMI High-Definition Multimedia Interface, and the HDMI Logo are trademarks or registered trademarks of HDMI Licensing LLC in the United States and other countries.
- Tvrtka Samsung Electronics ovime izjavljuje da je ovaj proizvod usklađen sa zahtjevima Direktive 2014/53/EU. Potpuni tekst Izjave o usklađenosti sa zahtjevima EU-a dostupan je na sljedećoj web-adresi: http://www.samsung.com, idite na Podrška > Pretraživanje podrške za proizvod i unesite naziv modela. Ova oprema smije se upotrebljavati u svim zemljama EU-a. Funkcija WLAN(Wi-Fi ili SRD) od 5 GHz ove opreme smije se koristiti samo u zatvorenom prostoru.

Kontaktirajte SAMSUNG U CIJELOME SVIJETU
Ako imate pitanja ili komentare vezano uz Samsung proizvode, kontaktirajte SAMSUNG centar za korisnike.
| Country | Contact Centre | Web Site |
| ■ Europe | ||
| UK 0330 SAMSUNG | 7267864) www.samsung.com/uk/support | |
| IRELAND (EIRE) 0818 | 717100 www.samsung.com/le/support | |
| GERMANY 06196 77 | 555 77 www.samsung.com/dc/support | |
| FRANCE 01 48 63 00 | 00 www.samsung.com/fr/support | |
| ITALIA 800-SAMSUNG | (800.7267864) www.samsung.com/lt/support | |
| SPAIN 0034902172 | 678 www.samsung.com/es/support | |
| PORTUGAL 808 207 | 267 www.samsung.com/pt/support | |
| LUXEMBURG | 261 03 710 | www.samsung.com/be_fr/support |
| NETHERLANDS 088 | 90 90 100 www.samsung.com/nl/support | |
| BELGIUM | 02-201-24-18 | www.samsung.com/be/support (Dutch)www.samsung.com/be_fr/support (French) |
| NORWAY | 815 56480 | www.samsung.com/nc/support |
| DENMARK 707 019 | 70 www.samsung.com/dk/support | |
| FINLAND | 030-6227 515 | www.samsung.com/fi/support |
| SWEDEN | 0771 726 786 | www.samsung.com/se/support |
| POLAND | 801-172-678* lub +48 22 607-93-33** (koszt połączenia według taryfy operatora) | http://www.samsung.com/pl/support/ |
| HUNGARY | 0680SAMSUNG (0680-726-7864) | www.samsung.com/hu/support |
| AUSTRIA | 0800-SAMSUNG (0800-7267864)[Only for Dealers] 0810-112233 | www.samsung.com/at/support |
| Country Contact Centre | Web Site | |
| SWITZERLAND | 0800 726 78 64 (0800-SAMSUNG) | www.samsung.com/ch/support (German)www.samsung.com/ch_fr/support (French) |
| CZECH | 800 - SAMSUNG (800-726786) www.samsung.com/cz/support | |
| SLOVAKIA | 0800 - SAMSUNG (0800-726 786) | www.samsung.com/sk/support |
| CROATIA | 072 726 786 www.samsung.com/hr/support | |
| BOSN/A | 055 233 999 | www.samsung.com/support |
| MONTENEGRO | 020 405 888 | |
| SLOVENIA | 080 697 267 (brezplačna številka) | www.samsung.com/si/support |
| SERBIA | 011 321 6899 | www.samsung.com/rs/support |
| ALBANIA | 045 620 202 www.samsung.com/al/support | |
| BULGARIA | *3000 Цена в мрежата0800 111 31 , безплатна телефонна линия | www.samsung.com/bg/support |
| ROMANIA | *8000 (apel in retea)08008-726-78-64 (08008-SAMSUNG)Apel GRATUIT | www.samsung.com/ro/support |
| CYPRUS 8009 4000 | only from landline, toll free | www.samsung.com/gr/support |
| GREECE | 80111-SAMSUNG (80111 726 7864)only from land line(+30) 210 6897691 from mobileand land line | |
| LITHUANIA | 8-800-77777 | www.samsung.com/lt/support |
| LATVIA | 8000-7267 | www.samsung.com/w/support |
| ESTONIA | 800-7267 | www.samsung.com/ee/support |
text_image
99.1mm 99.1mm 99.1mm 68.6mmCZE
text_image
Safety warning symbols including no prohibition sign, lightning bolt, and plug-in socketnatural_image
Illustration of weather-related symbols including a prohibition sign, sun, magnet, and cartoon character (no text or labels)natural_image
Illustration of a prohibition symbol and a sun with radiating lines, no text or labels presenttext_image
Diagram showing battery discharge process with a crossed-out trash bin and battery, indicating waste disposal or recycling.natural_image
Illustration of a robotic vehicle under high light with sensor beams and no visible text or symbols\* Co je technologie Dolby Atmos®?
text_image
Diagram showing a device control panel with labeled buttons and a zoomed-in button, likely illustrating a function or operation.text_image
SOUND SOURCE EFFECT LEVEL VOLWOOFER
text_image
SOUND SOURCE EFFECT LEVEL VOLWOOFERSOURCE
text_image
SOUND SOURCE EFFECT LEVEL VOLWOOFER(Ovládání zvuku)
text_image
LEV EFFECT WOOFERVOL
text_image
EFFECT VOL WOOFER SOUNDS
text_image
EFFECT VOL WOOFER SOUNDSnatural_image
Three technical illustrations of a remote control case showing internal components and directional arrows (no text or symbols)POUŽÍVÁNÍ SKRYTÝCH TLAČÍTEK
| Skryté tlačítko | Referenční strana | |
| Tlačítko dálkového ovladače | Funkce | |
| ((o)) SOUND | Dálkovém ovladači televizoru Zapnuto/Vypnuto | Strana 11 |
| SOURCE | Párování BT | Strana 28 |
| ►II (Přehrát/Pozastavit) | Auto Power Down Zapnuto/Vypnuto (režim AUX) | Strana 27 |
| VOL | ID SET | Strana 20 |
| Nahoru | WIFI SETUP | Strana 9 |
| Dolů | ADD SPEAKER | Strana 9 |
| Levý | Auto Power Link Zapnuto/Vypnuto | Strana 23 |
| Pravý | Anynet+ Zapnuto/Vypnuto | Strana 9 |
| (Ovládání zvuku) | 7pásmový EQ | Strana 11 |
| EFFECT | DRC Zapnuto/Vypnuto | Strana 9 |
| LEVEL | Network Standby Zapnuto/Vypnuto | Strana 32 |
SPECIFIKACE VÝSTUPU PRO RŮZNÉ REŽIMY ZVUKOVÉHO EFEKTU
| Vstup Efekt Výstup | |||
| 2 kanály | SOUND | ON | 5.1.4 kanály |
| 5.1 kanály 5.1.4 kanály | |||
| 2 kanály | EFFECT | STANDARD | 2.1 kanály |
| 5.1 kanály 5.1 kanály | |||
| 2 kanály | EFFECT | MUSIC | 2.1 kanály |
| 5.1 kanály 5.1 kanály | |||
| 2 kanály | EFFECT | CLEAR VOICE | 3.1 kanály |
| 5.1 kanály 5.1 kanály | |||
| 2 kanály | EFFECT | SPORTS | 5.1.4 kanály |
| 5.1 kanály 5.1.4 kanály | |||
| 2 kanály | EFFECT | MOVIE | 5.1.4 kanály |
| 5.1 kanály 5.1.4 kanály | |||
| 2 kanály |  EFFECT EFFECT | NIGHT | 3.1 kanály |
| 5.1 kanály 5.1 kanály | |||
INSTALACE PŘÍSTROJE SOUNDBAR
INSTALACE DRŽÁKU NA ZEĐ
natural_image
Diagram showing a mechanical assembly with a knob and rotating arm, no text or symbols presentnatural_image
Diagram showing a mechanical assembly before and after transformation, with no visible text or symbolsnatural_image
Diagram showing a mechanical assembly with two components and a downward arrow indicating transformation (no text or symbols)natural_image
Diagram showing two mechanical components with arrows indicating motion, one solid and one dashed, both without any text or symbols.
text_image
LINK STANDBY ID SETtext_image
LINK STANDBY ID SETtext_image
EFFECT VOL WOOFER SOUNDnatural_image
Gray rectangular button with control buttons and a play icon (no text or symbols)text_image
SOUND SOURCEtext_image
Diagram illustrating smartphone touch screen interaction with a musical note icon and finger pointing to the screen, alongside a vehicle with circular sensor patterns.PŘIPOJENÍ PŘÍSTROJE SOUNDBAR K SÍTI
Manufactured under license from Dolby Laboratories. Dolby, Dolby Atmos, Dolby Audio, Dolby Digital Plus, Pro Logic, and the double-D symbol are trademarks of Dolby Laboratories.


Digital Surround
For DTS patents, see http://patents.dts.com. Manufactured under license from DTS Licensing Limited. DTS, the Symbol, DTS in combination with the Symbol, and DTS Digital Surround are registered trademarks or trademarks of DTS, Inc. in the United States and/or other countries. © DTS, Inc. All Rights Reserved.

HIGH-DEFINITION MULTIMEDIA INTERFACE
The terms HDMI and HDMI High-Definition Multimedia Interface, and the HDMI Logo are trademarks or registered trademarks of HDMI Licensing LLC in the United States and other countries.
text_image
99.1mm 99.1mm 99.1mm 68.6mmDEU
text_image
Safety warning symbol image showing no prohibition sign, lightning bolt, and plug with power outletnatural_image
Illustration of various symbols including a prohibition sign, sun, magnet, and a thermometer (no text or labels)text_image
Safety warning symbol showing a prohibition sign and a sun with rays, indicating no protection or radiation.text_image
Diagram showing battery recycling process with battery, battery, and waste bin marked with Xnatural_image
Illustration of a robotic vehicle under high light with sensor beams and no visible text or symbolstext_image
SOUND SOURCE EFFECT LEVEL VOLWOOFERtext_image
SOUND SOURCE EFFECT LEVEL VOLWOOFERSOURCE
text_image
FL FR C FTR-FLHauptgerät
text_image
SOUND SOURCE EFFECT LEVEL VOLWOOFER(Klangsteuerung)
text_image
LE EFFECT WOOFER EFFECT LE WOOFERVOL
natural_image
Three technical illustrations of a remote control casing showing internal components and battery structure (no text or symbols)VERWENDEN DER VERBORGENEN TASTEN
text_image
C control unit C TYPE: 700mm Cnatural_image
Diagram showing a mechanical assembly with a lever and gear, connected by dashed arrows indicating motion (no text or symbols)text_image
F_{A} + \rho C_{D}natural_image
Diagram showing a structural change from a beam with fixed supports to a folded beam with downward force arrows (no text or symbols)natural_image
Diagram showing a mechanical assembly with two components and a downward arrow indicating transformation (no text or symbols)natural_image
Diagram showing two mechanical components before and after assembly, with arrows indicating motion direction (no text or symbols)
text_image
LINK STANDBY ID SETtext_image
LINK STANDBY ID SETtext_image
EFFECT WOOFER VOL SOUNDflowchart
graph LR
    TV["TV"] --> HDMI_IN["HDMI IN"]
    HDMI_IN --> HDMI_Kabel["HDMI-Kabel"]
    HDMI_Kabel --> HDMI_OUT["HDMI OUT (TV-ARC)"]
    HDMI_OUT --> HDMI_OUTOUT["HDMI OUT (TV-ARC)"]
    HDMI_OUTOUT --> SOURCE["SOURCE"]
natural_image
Gray rectangular button with control buttons and a plus/minus icon (no text or symbols)text_image
SOUND SOURCEtext_image
Diagram illustrating a mobile phone interface with a finger pointing to a music note icon and a circular sensor array below.ANSCHLIESSEN DER SOUNDBAR AN IHR NETZWERK
Manufactured under license from Dolby Laboratories. Dolby, Dolby Atmos, Dolby Audio, Dolby Digital Plus, Pro Logic, and the double-D symbol are trademarks of Dolby Laboratories.


Digital Surround
For DTS patents, see http://patents.dts.com. Manufactured under license from DTS Licensing Limited. DTS, the Symbol, DTS in combination with the Symbol, and DTS Digital Surround are registered trademarks or trademarks of DTS, Inc. in the United States and/or other countries. © DTS, Inc. All Rights Reserved.

HIGH-DEFINITION MULTIMEDIA INTERFACE
The terms HDMI and HDMI High-Definition Multimedia Interface, and the HDMI Logo are trademarks or registered trademarks of HDMI Licensing LLC in the United States and other countries.
text_image
99.1mm 99.1mm 99.1mm 68.6mmEST
text_image
Safety warning symbols including no prohibition sign, lightning bolt, and plug-in socketnatural_image
Illustration of weather-related symbols including a prohibition sign, sun, magnet, and document (no text or labels)natural_image
Illustration of a prohibition symbol emitting radiating light rays toward a shaded dome (no text or labels)text_image
Diagram showing battery recycling process with battery, battery, and waste bin marked with Xnatural_image
Illustration of a robotic vehicle with sensor beams and control points, no text or symbols present\* Mis on Dolby Atmos®?
text_image
Diagram of a remote control panel with labeled buttons and a zoomed-in section viewtext_image
SOUND SOURCE EFFECT LEVEL VOLWOOFERSOURCE
text_image
FL FR C FTR-FLPõhiseade
text_image
SOUND SOURCE EFFECT LEVEL VOLWOOFER(Heli juhtimine)
text_image
LE EFFECT WOOFER
text_image
EFFECT LE WOOFERVOL
text_image
EFFECT WOOFED VOL SOUND
text_image
EFFECT WODFED VOL SOUNDSnatural_image
Three technical illustrations of a remote control case showing internal components and directional arrows (no text or symbols)VARJATUD NUPPUDE KASUTAMINE
natural_image
Diagram showing a mechanical assembly with a pin and lever mechanism, no text or symbols presentnatural_image
Diagram showing a structural change from a beam with fixed supports to a vertical support with downward force arrows (no text or symbols)- Paigaldage Soundbar koos selle külge kinnitatud Seinakinnituskronsteini, riputades Seinakinnituskronsteini seinal olevatele Hoidikkruvi.
natural_image
Diagram showing a mechanical assembly with two parts and a downward arrow indicating transformation (no text or symbols)
- Libistage Soundbari alla, nagu on näidatud allpool, et Seinakinnituskronsteini toetuksid Hoidikkruvi.

- Libistage Seinakinnituskronsteini alla, et paigaldada need Hoidikkruvi
SOUNDBARI EEMALDAMINE SEINALT
natural_image
Diagram showing two mechanical components before and after assembly, with arrows indicating motion direction (no text or symbols)
text_image
LINK STANDBY ID SETtext_image
LINK STANDBY ID SETtext_image
EFFECT VOL WOOFER SOUNDEST
natural_image
Gray rectangular device with control buttons and playback icons (no text or symbols)Heliriba parempoolne ots
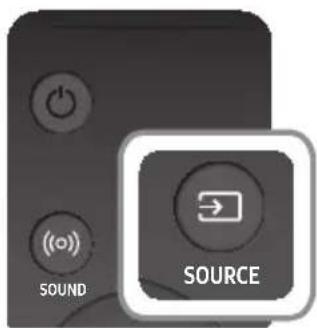
text_image
SOUND SOURCE| Sisendrežiim Kuva | |
| Optiline digitaalne sisendARC (HDMI OUT) sisend | D.IN |
| AUX-sisend | AUX |
| HDMI-sisend HDMI1, HDMI2 | |
| BLUETOOTH-režiim | BT |
text_image
Diagram illustrating a mobile phone interface with a finger pointing to a music note icon and a car wheel, symbolizing app interaction or navigation.SOUNDBARI ÜHENDAMINE OMA VÖRKU
Manufactured under license from Dolby Laboratories. Dolby, Dolby Atmos, Dolby Audio, Dolby Digital Plus, Pro Logic, and the double-D symbol are trademarks of Dolby Laboratories.


Digital Surround
For DTS patents, see http://patents.dts.com. Manufactured under license from DTS Licensing Limited. DTS, the Symbol, DTS in combination with the Symbol, and DTS Digital Surround are registered trademarks or trademarks of DTS, Inc. in the United States and/or other countries. © DTS, Inc. All Rights Reserved.

HIGH-DEFINITION MULTIMEDIA INTERFACE
The terms HDMI and HDMI High-Definition Multimedia Interface, and the HDMI Logo are trademarks or registered trademarks of HDMI Licensing LLC in the United States and other countries.
text_image
99.1mm 99.1mm 99.1mm 68.6mmFRA
text_image
Safety warning symbol image showing no prohibition sign, lightning bolt, and plug with power outletnatural_image
Illustration of various symbols including a prohibition sign, sun, magnet, and a thermometer (no text or labels)text_image
Safety warning illustration showing a prohibition symbol and a spray gun emitting raystext_image
Diagram showing battery recycling process with battery, battery, and waste bin marked with Xnatural_image
Illustration of a robotic vehicle under high light with sensor beams and no visible text or symbols③ Bouton (Alimentation)
text_image
Diagram showing a device control panel with labeled buttons and a highlighted button, likely for display or navigation.Haut/Bas/Gauche/Droite
text_image
SOUND SOURCE EFFECT LEVEL VOLWOOFERtext_image
SOUND SOURCE EFFECT LEVEL VOLWOOFERSOURCE
Lecture/Pause (BT / WIFI)
text_image
FL FR C FTR-FLUnité principale
Enceinte surround G
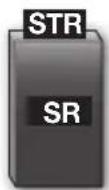
Enceinte surround D
\* Network Standby Activer/Désactiver
text_image
SOUND SOURCE EFFECT LEVEL VOLWOOFER(Contrôle du son)
text_image
EFFECT LET WOOFER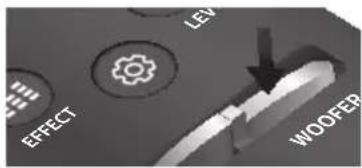
text_image
EFFECT LEV WOOFERVOL
text_image
EFFECT VOL WOOFFER SOUND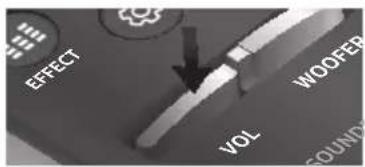
text_image
EFFECT WOOFER VOL SOUNDnatural_image
Three technical illustrations of a remote control casing showing internal components and directional arrows (no text or symbols)UTILISATION DES TOUCHES DISSIMULÉES
text_image
5 cm minimumtext_image
C TYPE: 700mm C Cnatural_image
Diagram showing a mechanical component with a key inserted into a housing, connected by a dashed line indicating rotation (no text or symbols)natural_image
Diagram showing a mechanical assembly before and after transformation, with no visible text or symbolsnatural_image
Diagram showing a mechanical assembly with two components and a downward arrow indicating transformation (no text or symbols)FRA
natural_image
Diagram showing two mechanical components with arrows indicating motion, one solid and one dashed, both without any text or symbols.
text_image
LINK STANDBY ID SETtext_image
LINK STANDBY ID SETtext_image
EFFECT VOL WOOFER SOUNDSFRA
flowchart
graph LR
    TV["TV"] --> HDMI_IN["HDMI IN"]
    HDMI_IN --> Cable["HDMI"]
    Cable --> HDMI_OUT["TV-ARC"]
    HDMI_OUT --> HDMI_OUTOUT["TV-ARC"]
    HDMI_OUTOUT --> Sound["SOUND"]
    Sound --> SOURCE["SOURCE"]
natural_image
Gray rectangular button with control buttons and playback icons (no text or symbols)text_image
SOUND SOURCEtext_image
Diagram illustrating smartphone touch screen interaction with a musical note icon and finger pointing to the screen, alongside a vehicle with circular sensor patterns.CONNEXION DE LA SOUNDBAR À VOTRE RÉSEAU
Manufactured under license from Dolby Laboratories. Dolby, Dolby Atmos, Dolby Audio, Dolby Digital Plus, Pro Logic, and the double-D symbol are trademarks of Dolby Laboratories.

dts®
Digital Surround
For DTS patents, see http://patents.dts.com. Manufactured under license from DTS Licensing Limited. DTS, the Symbol, DTS in combination with the Symbol, and DTS Digital Surround are registered trademarks or trademarks of DTS, Inc. in the United States and/or other countries. © DTS, Inc. All Rights Reserved.

HIGH-DEFINITION MULTIMEDIA INTERFACE
The terms HDMI and HDMI High-Definition Multimedia Interface, and the HDMI Logo are trademarks or registered trademarks of HDMI Licensing LLC in the United States and other countries.
text_image
99.1mm 99.1mm 99.1mm 68.6mmtext_image
Safety warning symbol image showing no prohibition sign, lightning bolt, and plug with a power outlettext_image
Safety warning illustration showing a prohibition symbol and a sun with radiating lines, indicating radiation or hazard.natural_image
Illustration of various symbols including a prohibition sign, sun, magnet, and a wallet (no text or labels)text_image
Diagram showing battery discharge process with a crossed-out trash bin and battery, indicating waste disposal or recycling.natural_image
Illustration of a robotic vehicle with sensor beams and head-mounted sensors, no text or symbols presenttext_image
Diagram showing a device control panel with labeled buttons and a zoomed-in button, likely illustrating a function or operation.text_image
SOUND SOURCE EFFECT LEVEL VOLWOOFER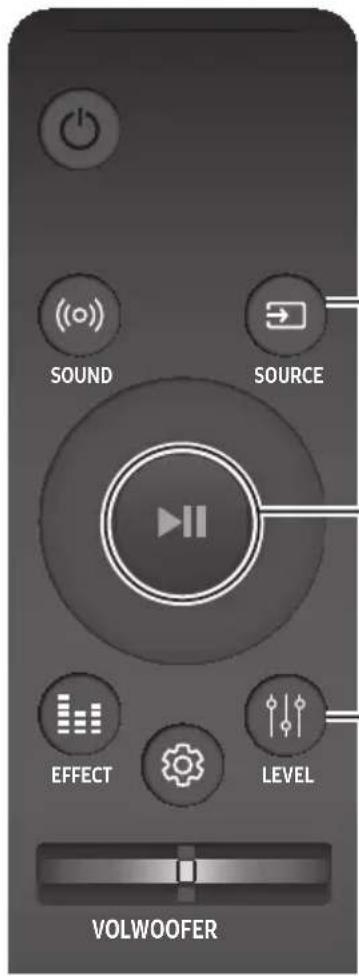
text_image
SOUND SOURCE EFFECT LEVEL VOLWOOFERSOURCE
text_image
FL FR C FTR-FLΚύρια μονάδα
text_image
SOUND SOURCE EFFECT LEVEL VOLWOOFER(Ελέγχος ήχου)
text_image
EFFECT LEV WOOFER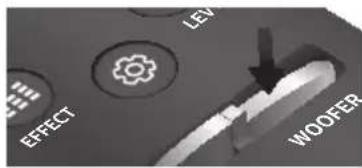
text_image
LEV EFFECT WOOTERVOL
text_image
EFFECT VOL WOOFE SOUND
text_image
EFFECT VOL WOOFER SOUNDnatural_image
Three views of a remote control casing showing internal components and battery structure (no text or symbols)natural_image
Diagram of a mechanical assembly with a pin and lever, showing motion direction (no text or symbols)natural_image
Diagram showing a mechanical assembly before and after transformation, with no visible text or symbolsnatural_image
Diagram showing a mechanical assembly with two parts and a downward arrow indicating transformation (no text or symbols)natural_image
Diagram showing two mechanical components before and after assembly, with arrows indicating motion direction (no text or symbols)
text_image
LINK STANDBY ID SETtext_image
LINK STANDBY ID SETtext_image
EFFECT WOOFER VOL SOUNDSGRE
flowchart
graph LR
    TV["TV"] --> HDMI_IN["HDMI IN"]
    HDMI_IN --> HDMI_OUT["HDMI OUT (TV-ARC)"]
    HDMI_OUT --> HDMI_OUTOUT["HDMI OUT (TV-ARC)"]
    HDMI_OUTOUT --> SOURCE["SOUND SOURCE"]
natural_image
Gray electronic device control panel with buttons and playback icons (no readable text)text_image
SOUND SOURCEtext_image
Diagram illustrating a mobile phone interface with a finger pointing to a music note icon and a separate sensor ball on a road ahead.Manufactured under license from Dolby Laboratories. Dolby, Dolby Atmos, Dolby Audio, Dolby Digital Plus, Pro Logic, and the double-D symbol are trademarks of Dolby Laboratories.


Digital Surround
For DTS patents, see http://patents.dts.com. Manufactured under license from DTS Licensing Limited. DTS, the Symbol, DTS in combination with the Symbol, and DTS Digital Surround are registered trademarks or trademarks of DTS, Inc. in the United States and/or other countries. © DTS, Inc. All Rights Reserved.

HIGH-DEFINITION MULTIMEDIA INTERFACE
The terms HDMI and HDMI High-Definition Multimedia Interface, and the HDMI Logo are trademarks or registered trademarks of HDMI Licensing LLC in the United States and other countries.
text_image
99.1mm 99.1mm 99.1mm 68.6mmtext_image
Safety warning symbols including no prohibition sign, lightning bolt, and plug-in socketnatural_image
Illustration of various symbols including a prohibition sign, sun, magnet, and cartoon character (no text or labels)text_image
Safety warning illustration showing a prohibition symbol and a sun with radiating lines, indicating hazardous or hazardous conditions.text_image
Diagram showing battery discharge and a trash bin with a crossed-out symbol, indicating waste disposal or restriction.natural_image
Illustration of a robotic vehicle with sensor beams and head-mounted sensors, no text or symbols present\* Mi a Dolby Atmos®?
text_image
SOUND SOURCE EFFECT LEVEL VOLWOOFER
text_image
SOUND SOURCE EFFECT LEVEL VOLWOOFERSOURCE
text_image
SOUND SOURCE EFFECT LEVEL VOLWOOFER(Hangvezérlés)
text_image
EFFECT LEV WOOFERVOL
text_image
EFFECT VOL WOOFER SOUNDS
text_image
EFFECT WOOFER VOL SOUNDSnatural_image
Three technical illustrations of a remote control casing showing internal components and directional arrows (no text or symbols)A REJTETT GOMBOK HASZNÁLATA
natural_image
Diagram showing a mechanical assembly with a pin, lever, and curved arrows indicating motion (no text or symbols)natural_image
Diagram showing a structural change from a beam with fixed supports to a vertical support with downward force arrows (no text or symbols)natural_image
Diagram showing a mechanical assembly with two parts and a downward arrow indicating transformation (no text or symbols)natural_image
Diagram showing two mechanical components with arrows indicating motion, one solid and one dashed, both without any text or symbols.
text_image
LINK STANDBY ID SETtext_image
LINK STANDBY ID SETtext_image
EFFECT VOL WOOFER SOUNDEnatural_image
Gray rectangular button with control buttons and a play icon (no text or symbols)text_image
SOUND SOURCEtext_image
Diagram illustrating a mobile phone interface with a finger pointing to a music note icon and a car with circular indicators below.A SOUNDBAR CSATLAKOZTATÁSA A HÁLÓZATHOZ
Manufactured under license from Dolby Laboratories. Dolby, Dolby Atmos, Dolby Audio, Dolby Digital Plus, Pro Logic, and the double-D symbol are trademarks of Dolby Laboratories.


Digital Surround
For DTS patents, see http://patents.dts.com. Manufactured under license from DTS Licensing Limited. DTS, the Symbol, DTS in combination with the Symbol, and DTS Digital Surround are registered trademarks or trademarks of DTS, Inc. in the United States and/or other countries. © DTS, Inc. All Rights Reserved.

HIGH-DEFINITION MULTIMEDIA INTERFACE
The terms HDMI and HDMI High-Definition Multimedia Interface, and the HDMI Logo are trademarks or registered trademarks of HDMI Licensing LLC in the United States and other countries.
text_image
99.1mm 99.1mm 99.1mm 68.6mmITA
text_image
Safety warning symbol image showing no protection, a plug, and a lightning bolttext_image
Safety warning symbol showing a prohibition sign and a sun with radiating lines, indicating radiation hazard.natural_image
Illustration of various symbols including a prohibition sign, sun, magnet, and a document (no text or labels)text_image
Diagram showing battery recycling process with battery, battery, and waste bin marked with Xnatural_image
Illustration of a robotic vehicle with sensor beams and head-mounted sensors, no text or symbols presenttext_image
Diagram showing a device control panel with labeled buttons and a zoomed-in section viewtext_image
SOUND SOURCE EFFECT LEVEL VOLWOOFER
text_image
SOUND SOURCE EFFECT LEVEL VOLWOOFERSOURCE
text_image
FL FR C FTR-FLUnità principale
text_image
SOUND SOURCE EFFECT LEVEL VOLWOOFER(Comando audio)
text_image
EFFECT LEV WOOFER
text_image
LEV EFFECT WOOFERVOL
text_image
EFFECT VOL WOOFFER SOUND
text_image
EFFECT VOL WOOFER ROUNDnatural_image
Three technical illustrations of a remote control casing showing internal components and movement (no text or symbols)UTILIZZO DEI TASTI NASCOSTI
text_image
C C TYPE: 700mm Cnatural_image
Diagram of a mechanical component with dashed and solid arrows indicating motion (no text or symbols)natural_image
Diagram showing a structural change from a rectangular beam to a vertical plate, with dashed arrows indicating direction of movement (no text or symbols present)natural_image
Diagram showing a mechanical assembly with two parts and a downward arrow indicating transformation (no text or symbols)ITA
natural_image
Diagram showing two mechanical components before and after assembly, with arrows indicating motion direction (no text or symbols)
text_image
LINK STANDBY ID SETRetro del subwoofer
text_image
LINK STANDBY ID SETtext_image
EFFECT WOOFER VOL SOUNDITA
flowchart
graph LR
    TV["TV"] -->|OPTICAL OUT| CavoOttico["Cavo Ottico (non fornito)"]
    CavoOttico --> DigitalAudioInDigitalAudioAudioAudioAudioAudioAudioAudioAudioAudioAudioAudioAudioAudioAudioAudioAudioAudioAudioAudioAudioAudioAudioAudioAudioAudioAudioAudioAudioAudioAudioAudioAudioAudioAudioAudioAudioAudioAudioAudioAudioAudioAudioAudioAudioAudioAudioAudioAudioAudioAudioAudioAudioAudioAudioAudioAudioAudioAudioAudioAudioAudioAudioAudioAudioAudioAudioAudioAudioAudioAudioAudioAudioAudioAudioAudioAudioAudioAudioAudioAudioAudioAudioAudioAudioAudioAudioAudioAudioAudioAudioAudioAudioAudioAudioAudioAudioAudioAudioAudioAudioRadio
    TV --> DigitalAudioInDigitalAudioAudioAudioAudioAudioAudioAudioAudioAudioAudioAudioAudioAudioAudioAudioAudioAudioAudioAudioAudioAudioAudioAudioAudioAudioAudioAudioAudioAudioAudioAudioAudioAudioAudioAudioAudioAudioAudioAudioAudioAudioAudioAudioAudioAudioAudioAudioAudioAudioAudioAudioAudioAudioAudioAudioAudioAudioAudioAudioAudioAudioAudioAudioAudioAudioAudioAudioAudioAudioAudioAudioAudioAudioAudioAudioAudioAudioAudioAudioAudioAudioAudioAudioAudioAudioAudioRadio
    DigitalRadio --> Sound["Sound"]
    DigitalRadio --> Source["Source"]
ITA
natural_image
Gray rectangular device with control buttons and playback icons (no text or symbols)text_image
SOUND SOURCEtext_image
Diagram illustrating a mobile phone interface with a finger pointing to a music note icon and a car with circular sensor patterns below.Manufactured under license from Dolby Laboratories. Dolby, Dolby Atmos, Dolby Audio, Dolby Digital Plus, Pro Logic, and the double-D symbol are trademarks of Dolby Laboratories.


Digital Surround
For DTS patents, see http://patents.dts.com. Manufactured under license from DTS Licensing Limited. DTS, the Symbol, DTS in combination with the Symbol, and DTS Digital Surround are registered trademarks or trademarks of DTS, Inc. in the United States and/or other countries. © DTS, Inc. All Rights Reserved.

HIGH-DEFINITION MULTIMEDIA INTERFACE
The terms HDMI and HDMI High-Definition Multimedia Interface, and the HDMI Logo are trademarks or registered trademarks of HDMI Licensing LLC in the United States and other countries.
text_image
99.1mm 99.1mm 99.1mm 68.6mm
text_image
Safety warning symbol image showing no prohibition sign, lightning bolt, and plug with a fusenatural_image
Illustration of various symbols including a prohibition sign, sun, magnet, and a thermometer (no text or labels)text_image
Safety warning illustration showing a prohibition symbol and a sun with radiating lines, indicating radiation shielding or hazard.text_image
Diagram showing battery recycling process with battery, battery, and waste bin marked with Xnatural_image
Illustration of a robotic vehicle under high light with sensor beams and no visible text or symbols\* Kas ir Dolby Atmos®?
text_image
SOUND SOURCE EFFECT LEVEL VOLWOOFER
text_image
SOUND SOURCE EFFECT LEVEL VOLWOOFERSOURCE
text_image
FL FR C FTR-FLGalvenā ierīce
text_image
SOUND SOURCE EFFECT LEVEL VOLWOOFER(Skañas kontrole)
Nospiediet, lai atlasītu opciju TREBLE, BASS vai AUDIO SYNC.
text_image
EFFECT LEV WOOFER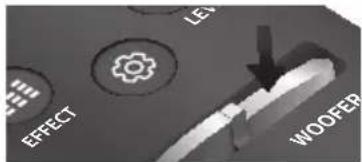
text_image
EFFECT LEV WOOFEBVOL
text_image
EFFECT VOL WOOFER SOUNDS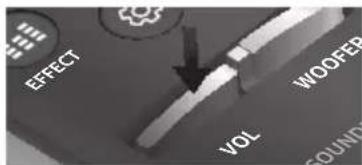
text_image
EFFECT WOOFER VOL SOUNDnatural_image
Three technical illustrations of a remote control case showing internal components and directional arrows (no text or symbols)SLĘPTO POGU IZMANTOŠANA
natural_image
Diagram showing a mechanical assembly with a pin and lever, no text or symbols presentnatural_image
Diagram showing a structural change from a rectangular beam to a vertical plate, with dashed arrows indicating direction of movement (no text or symbols present)natural_image
Diagram showing a mechanical assembly with two components and a downward arrow indicating transformation (no text or symbols)
natural_image
Diagram showing two mechanical components before and after assembly, with arrows indicating motion direction (no text or symbols)
text_image
LINK STANDBY ID SETZemfrekvences skalruṇa aizmugure
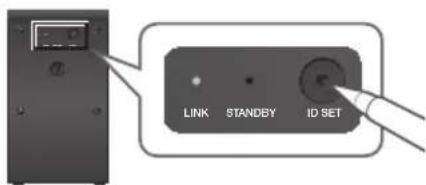
text_image
LINK STANDBY ID SETtext_image
EFFECT WOOFER VOL SOUNDLAT
natural_image
Gray rectangular button with control buttons and playback icon (no text or symbols)Soundbar labā mala
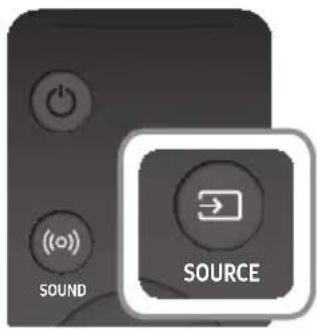
text_image
SOUND SOURCEtext_image
Diagram illustrating a mobile phone interface with a finger pointing to a music note icon and a car wheel, symbolizing app interaction or navigation.SISTEMAS SOUNDBAR SAVIENOJUMA AR TIKLU IZVEIDOŠANA
Manufactured under license from Dolby Laboratories. Dolby, Dolby Atmos, Dolby Audio, Dolby Digital Plus, Pro Logic, and the double-D symbol are trademarks of Dolby Laboratories.


Digital Surround
For DTS patents, see http://patents.dts.com. Manufactured under license from DTS Licensing Limited. DTS, the Symbol, DTS in combination with the Symbol, and DTS Digital Surround are registered trademarks or trademarks of DTS, Inc. in the United States and/or other countries. © DTS, Inc. All Rights Reserved.

HIGH-DEFINITION MULTIMEDIA INTERFACE
The terms HDMI and HDMI High-Definition Multimedia Interface, and the HDMI Logo are trademarks or registered trademarks of HDMI Licensing LLC in the United States and other countries.
text_image
99.1mm 99.1mm 99.1mm 68.6mmLTU
text_image
Safety warning symbol image showing no prohibition sign, lightning bolt, and plug-in socketnatural_image
Illustration of weather-related symbols including a prohibition sign, sun, magnet, and a thermometer (no text or labels)text_image
Safety warning illustration showing a prohibition symbol and a sun with radiating lines, indicating radiation shielding or hazard.text_image
Diagram showing battery recycling process with battery, battery, and waste bin marked with Xnatural_image
Illustration of a robotic vehicle under high light with sensor beams and no visible text or symbolstext_image
SOUND SOURCE EFFECT LEVEL VOLWOOFERtext_image
SOUND SOURCE EFFECT LEVEL VOLWOOFERSOURCE
text_image
FL FR C FTR-FLtext_image
SOUND SOURCE EFFECT LEVEL VOLWOOFER(Garso valdymas)
text_image
LEV EFFECT WOOFERVOL
text_image
EFFECT VOL WOOFFER SOUND
text_image
EFFECT VOL WOOFER GOUNDnatural_image
Three technical illustrations of a remote control case showing internal components and directional arrows (no text or symbols)PASLĖPTŲ MYGTUKŲ NAUDOJIMAS
text_image
C C TYPE: 700mm Cnatural_image
Diagram of a mechanical component with directional arrows indicating motion (no text or symbols)natural_image
Diagram showing a structural change from a beam with fixed supports to a folded panel with triangular supports (no text or symbols present)natural_image
Diagram showing a mechanical assembly with two parts and a downward arrow, no text or symbols present.LTU
natural_image
Diagram showing two mechanical components with upward arrows, one solid and one dashed, both without any text or symbols.
text_image
LINK STANDBY ID SETtext_image
LINK STANDBY ID SETtext_image
EFFECT WOUFE VOL FOUNDLTU
- „Soundbar“ ekrane trumpai bus rodomas pranešimas ID SET, tada jis pradings.
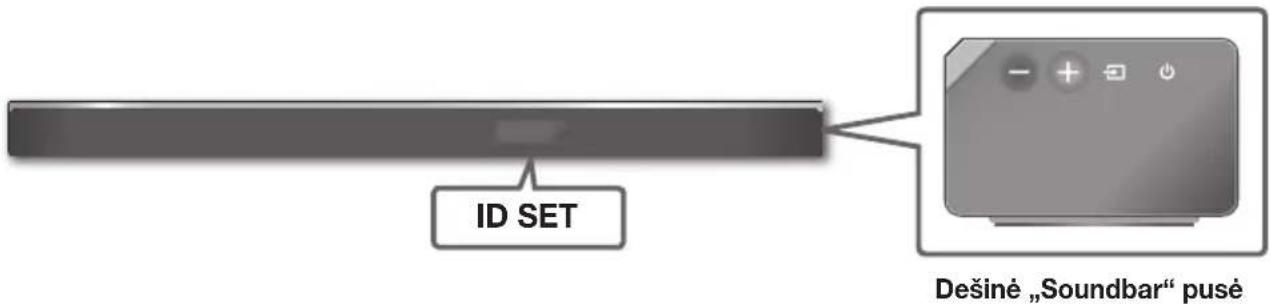
text_image
ID SET Dešiné „Soundbar“ pusěnatural_image
Generic computer control panel icon with buttons and playback controls (no text or symbols)text_image
SOUND SOURCEtext_image
Diagram illustrating a mobile phone interface with a finger pointing to a music note icon and a car with circular sensor patterns below.„SOUNDBAR“ GARSIAKALBIO PRIJUNGIMAS PRIE TINKLO
Manufactured under license from Dolby Laboratories. Dolby, Dolby Atmos, Dolby Audio, Dolby Digital Plus, Pro Logic, and the double-D symbol are trademarks of Dolby Laboratories.


Digital Surround
For DTS patents, see http://patents.dts.com. Manufactured under license from DTS Licensing Limited. DTS, the Symbol, DTS in combination with the Symbol, and DTS Digital Surround are registered trademarks or trademarks of DTS, Inc. in the United States and/or other countries. © DTS, Inc. All Rights Reserved.

HIGH-DEFINITION MULTIMEDIA INTERFACE
The terms HDMI and HDMI High-Definition Multimedia Interface, and the HDMI Logo are trademarks or registered trademarks of HDMI Licensing LLC in the United States and other countries.
text_image
99.1mm 99.1mm 99.1mm 68.6mmPOL
text_image
Safety warning symbols including no sign, lightning bolt, and plug with a fusenatural_image
Illustration of various symbols including a prohibition sign, sun, magnet, and a thermometer (no text or labels)text_image
Safety warning illustration showing a prohibition symbol and a sun with radiating lines, indicating radiation or hazard.text_image
Diagram showing battery recycling process with battery, battery, and waste bin marked with Xnatural_image
Illustration of a robotic vehicle with sensor beams and no visible text or symbolstext_image
Diagram showing a device control panel with labeled buttons and a zoomed-in section viewtext_image
SOUND SOURCE EFFECT LEVEL VOLWOOFERSOURCE
text_image
FL FR C FTR-FLUrządzenie główne
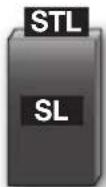
text_image
SOUND SOURCE EFFECT LEVEL VOLWOOFER(Kontrola dźwięku)
text_image
EFFECT LE WOOFER
text_image
EFFECT LES WOOFERVOL
text_image
EFFECT VOL WOOFFER SOUND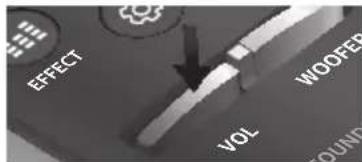
text_image
EFFECT VOL WOOFER SOUNDnatural_image
Three technical illustrations of a remote control casing showing internal components and directional arrows (no text or symbols)UŻYWANIE UKRYTYCH PRZYCISKÓW
text_image
C TYPE: 700mm C Cnatural_image
Diagram showing a mechanical assembly with a pin, shaft, and gear (no text or symbols)text_image
F_{A} + \rho C_{D}natural_image
Diagram showing a structural change from a beam with fixed supports to a folded beam with downward force arrows (no text or symbols)natural_image
Diagram showing a mechanical component with two parts and a downward arrow, no text or symbols presentnatural_image
Diagram showing two mechanical components before and after assembly, with arrows indicating motion direction (no text or symbols)
text_image
LINK STANDBY ID SETtext_image
EFFECT WOOFED VOL SOUNDPOL
natural_image
Gray rectangular button with control buttons and a play icon (no text or symbols)text_image
SOUND SOURCEtext_image
Diagram illustrating smartphone touch screen interaction with a musical note icon and finger pointing to the screen, alongside a smart car with circular indicators.PODŁĄCZANIE LISTWY SOUNDBAR DO SIECI
Manufactured under license from Dolby Laboratories. Dolby, Dolby Atmos, Dolby Audio, Dolby Digital Plus, Pro Logic, and the double-D symbol are trademarks of Dolby Laboratories.


Digital Surround
For DTS patents, see http://patents.dts.com. Manufactured under license from DTS Licensing Limited. DTS, the Symbol, DTS in combination with the Symbol, and DTS Digital Surround are registered trademarks or trademarks of DTS, Inc. in the United States and/or other countries. © DTS, Inc. All Rights Reserved.

HIGH-DEFINITION MULTIMEDIA INTERFACE
The terms HDMI and HDMI High-Definition Multimedia Interface, and the HDMI Logo are trademarks or registered trademarks of HDMI Licensing LLC in the United States and other countries.
text_image
99.1mm 99.1mm 99.1mm 68.6mmtext_image
Safety warning symbol image showing no prohibition sign, lightning bolt, and plug with power outletnatural_image
Illustration of weather-related symbols including a prohibition sign, sun, magnet, and cartoon character (no text or labels)text_image
Safety warning symbol showing a prohibition sign and a sun with radiating lines, indicating hazardous or radioactive exposure.text_image
Diagram showing battery discharge and a trash bin with a crossed-out symbol, indicating waste disposal or recycling.natural_image
Illustration of a robotic vehicle with sensor beams and no visible text or symbols\* Ce este Dolby Atmos®?
text_image
SOUND SOURCE EFFECT LEVEL VOLWOOFERSOURCE
text_image
FL FR C FTR-FLUnitate principală
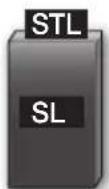
Difuzor Surround S
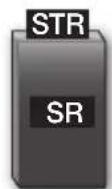
Difuzor surround D
text_image
SOUND SOURCE EFFECT LEVEL VOLWOOFER(Control sunet)
text_image
LEV EFFECT WOOFER EFFECT LEV WOOFERVOL
text_image
EFFECT WOOFER VOL SOUND EFFECT WOOFER VOL SOUNDnatural_image
Three views of a remote control case showing internal components and battery status indicators (no text or symbols present)UTILIZAREA BUTOANELOR ASCUNSE
| Buton ascuns | Pagină de referință | |
| Buton telecomandă Functie | ||
| ((o)) SOUND | Telecomanda televizorului Pornit/Oprit | Pagina 11 |
| SOURCE Asociere Bluetooth | Pagina 28 | |
| ►II (Redare/Pauză) | Auto Power Down Pornit/Oprit (modul AUX) | Pagina 27 |
| VOL ID SET | Pagina 20 | |
| Sus WIFI SETUP | Pagina 9 | |
| Jos ADD SPEAKER | Pagina 9 | |
| Stânga Auto Power | Link Pornit/Oprit | Pagina 23 |
| Dreapta Anynet+ Pornit/Oprit | Pagina 9 | |
| (Control sunet) | EQ 7 benzi | Pagina 11 |
| EFFECT DRC Pornit/Oprit | Pagina 9 | |
| LEVEL Network Standby Pornit/Oprit | Pagina 32 | |
SPECIFICAȚII IEȘIRE PENTRU DIFERITELE MODURI DE EFECT SUNET
natural_image
Diagram of a mechanical assembly with two components and directional arrows indicating motion (no text or symbols)text_image
F_{A}, G C/U_Dnatural_image
Gray electronic device with control buttons and power/charge symbols (no readable text or labels)natural_image
Diagram showing a structural change from a beam with fixed supports to a folded panel with downward force arrows (no text or symbols)natural_image
Diagram showing a mechanical assembly with two components and a downward arrow indicating transformation (no text or symbols)natural_image
Diagram showing two mechanical components before and after assembly, with arrows indicating motion direction (no text or symbols)
text_image
LINK STANDBY ID SETtext_image
LINK STANDBY ID SETtext_image
EFFECT WOOFER VOL SOUNDSROOM
natural_image
Gray rectangular button with control buttons and a plus/minus icon (no text or symbols)text_image
SOUND SOURCE| Mod intrare Afişaj | |
| Intrarea digitală opticăIntrare ARC (HDMI OUT) | D.IN |
| Intrare AUX AUX | |
| Intrarea HDMI HDMI1, HDMI2 | |
| Modul BLUETOOTH BT |
FUNCTIA AUTO POWER DOWN
text_image
Diagram illustrating a mobile phone interface with a finger pointing to a music note icon and a car-mounted track below.CONECTAREA SISTEMULUI SOUNDBAR ÎN RETEA
Manufactured under license from Dolby Laboratories. Dolby, Dolby Atmos, Dolby Audio, Dolby Digital Plus, Pro Logic, and the double-D symbol are trademarks of Dolby Laboratories.


Digital Surround
For DTS patents, see http://patents.dts.com. Manufactured under license from DTS Licensing Limited. DTS, the Symbol, DTS in combination with the Symbol, and DTS Digital Surround are registered trademarks or trademarks of DTS, Inc. in the United States and/or other countries. © DTS, Inc. All Rights Reserved.

HIGH-DEFINITION MULTIMEDIA INTERFACE
The terms HDMI and HDMI High-Definition Multimedia Interface, and the HDMI Logo are trademarks or registered trademarks of HDMI Licensing LLC in the United States and other countries.
text_image
99.1mm 99.1mm 99.1mm 68.6mmOsigurajte da AC mrežni napon u vašem domu bude u skladu sa nalepnicom na zadnjoj ploči proizvoda. Proizvod instalirajte horizontalno, na odgovarajućoj podlozi (nameštaj), tako da oko njega ima dovoljno prostora za ventilaciju 7\~10 cm. Uverite se da otvori za ventilaciju nisu pokriveni. Ne stavljajte uređaj na pojačala ili drugu opremu koja može da se zagreje. Ovaj uređaj je namenjen za stalnu upotrebu. Da biste u potpunosti isključili uređaj, isključite AC priključak iz zidne utičnice. Isključite uređaj ako ne nameravate da ga koristite u dužem vremenskom periodu.
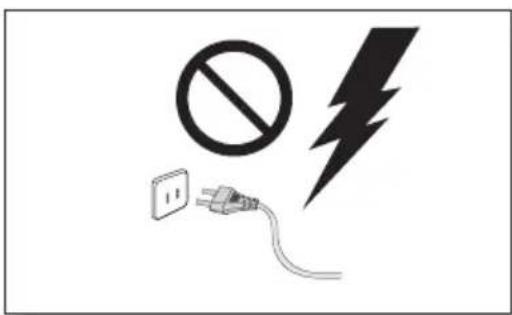
text_image
Safety warning symbols including no prohibition sign, lightning bolt, and plug-in socketZa vreme grmljavine izvucite mrežni utikač iz utičnice. Pikovi napona zbog grmljavine mogu oštetiti uređaj.
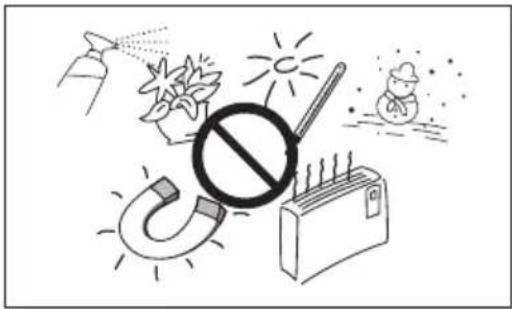
natural_image
Illustration of weather-related symbols including a prohibition sign, sun, magnet, and cartoon character (no text or labels)text_image
Safety warning illustration showing a prohibition symbol and a sun with radiating lines, indicating radiation or hazard.Ne izlažite uređaj direktnom sunčevom zračenju ili drugim izvorima toplote. To može da dovede do pregrevanja i kvara uređaja.
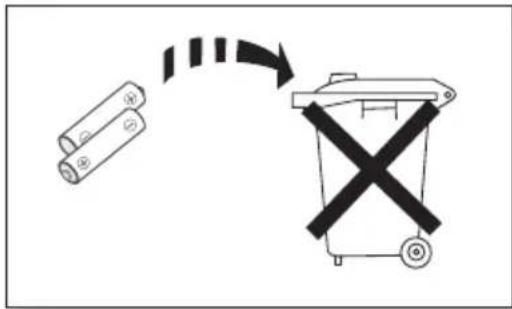
text_image
Diagram showing a battery and a trash bin with a crossed-out X symbol, indicating a recycling or disposal process.Baterije koje se koriste sa ovim proizvodom sadrže hemikalije koje su štetne po okolinu. Ne stavljajte baterije u kućni otpad. Nemojte odlagati baterije u vatru. Nemojte kratkospajati, rastavljati niti previše zagrevati baterije. U slučaju nepravilne zamene baterija postoji opasnost od eksplozije. Baterije zamenite isključivo novim baterijama istog tipa.
DOLBY ATMOS®
Ovaj proizvod podržava Dolby Atmos®.
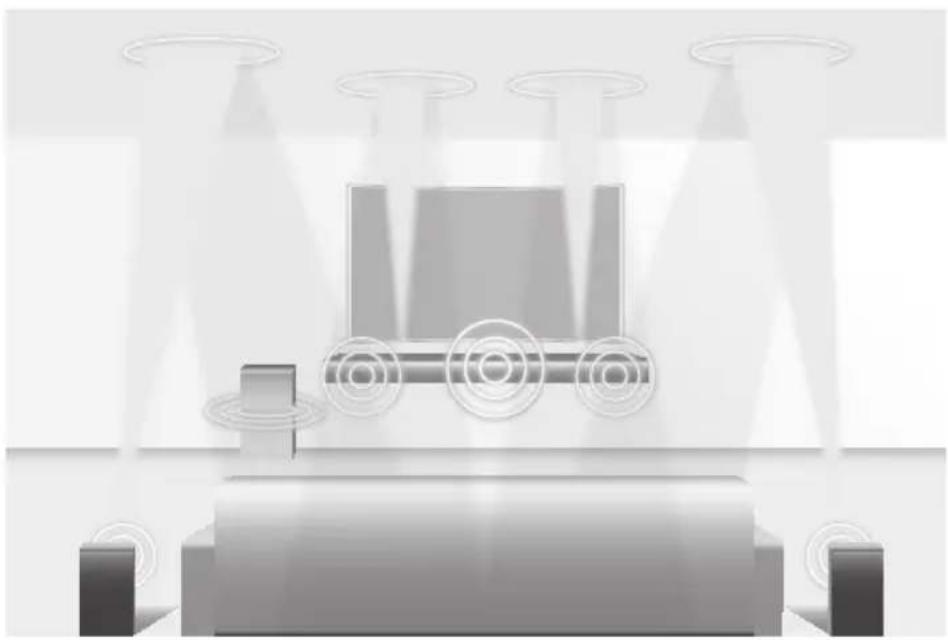
natural_image
Illustration of a robotic vehicle under high light with sensor beams and no visible text or symbolstext_image
Diagram showing a device control panel with labeled buttons and directional indicators, highlighting one button with minus sign.Prikazuje trenutni mod.

text_image
SOUND SOURCE EFFECT LEVEL VOLWOOFER
- Upravljajte televizorom pomoću daljinskog upravljača televizora.
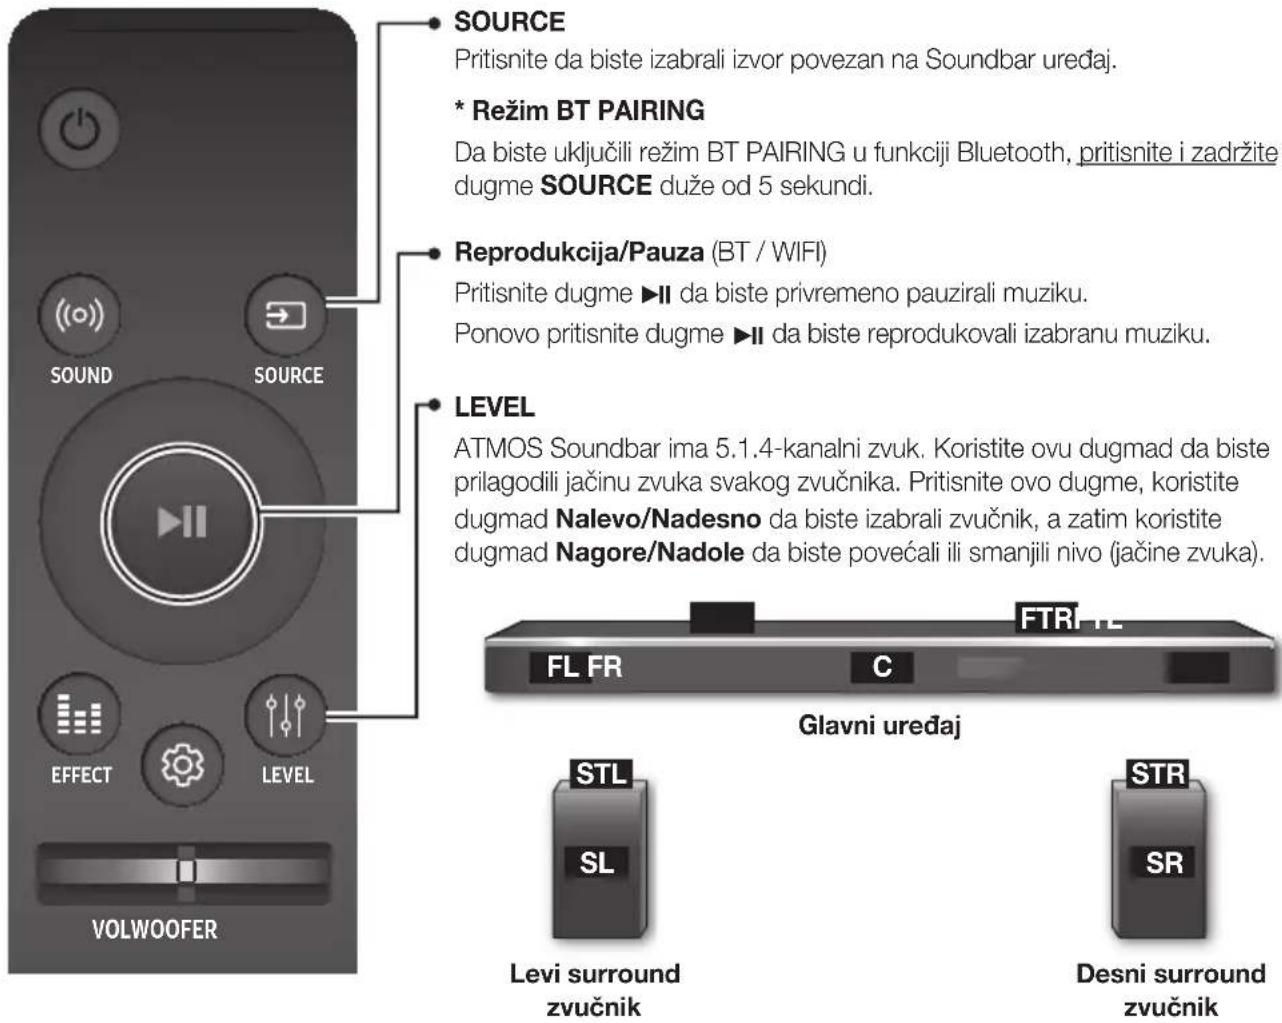
text_image
SOURCE Pritisnite da biste izabrali izvor povezan na Soundbar uređaj. * Režim BT PAIRING Da biste uključili režim BT PAIRING u funkciji Bluetooth, pritisnite i zadržite dugme SOURCE duže od 5 sekundi. Reprodukcija/Pauza (BT / WIFI) Pritisnite dugme ▶II da biste privremeno pauzirali muziku. Ponovo pritisnite dugme ▶II da biste reprodukovali izabranu muziku. LEVEL ATMOS Soundbar ima 5.1.4-kanalni zvuk. Koristite ovu dugmad da biste prilagodili jačinu zvuka svakog zvučnika. Pritisnite ovo dugme, koristite dugmad Nalevo/Nadesno da biste izabrali zvučnik, a zatim koristite dugmad Nagore/Nadole da biste povećali ili smanjili nivo (jačine zvuka). FTR+L FL FR C Glavni uređaj STL STR SL SR Levi surround zvučnik Desni surround zvučniktext_image
SOUND SOURCE EFFECT LEVEL VOLWOOFER(Kontrola zvuka)
Pritisnite da biste izabrali TREBLE, BASS, ili AUDIO SYNC. Zatim, koristite tastere Nagore/Nadole da biste podesili jačinu zvuka za visoke TREBLE ili BASS od -3 \~ +3.
Pritisnite i zadržite taster (Kontrola zvuka) oko 5 sekundi da biste podesili zvuk za svaki frekventni opseg. Mogu se izabrati 150 Hz, 300 Hz, 600 Hz, 1,2 KHz, 2,5 KHz, 5 KHz i 10 KHz (Nalevo/Nadesno) i svaka opcija se može podesiti na postavku između -6 i +6 (Nagore/Nadole).
Ako je Soundbar uređaj povezan na digitalni televizor i izgleda kao da video signal nije sinhronizovan sa audio signalom, pritisnite tastere za 🎨 (Kontrola zvuka) da biste sinhronizovali audio i video signal. Koristite tastere Nagore/Nadole da biste podesili kašnjenje zvuka između 0 ms \~ 300 ms. U režimu BT, funkcija Sinhronizacija zvuka možda nije dostupna.
WOOFER
Pritisnite dugme nagore ili nadole da biste prilagodili jačinu zvuka sabvufera od -12 ili -6 do +6. Nivo jačine zvuka sabfuvera se pritiskom na dugme vraća na 0.
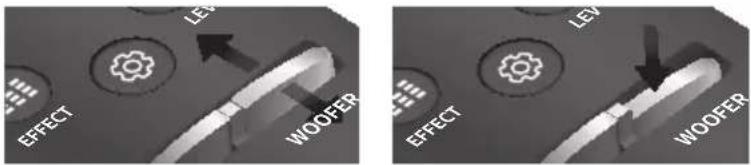
text_image
LEV EFFECT WOOFER EFFECT LEV WOOFERVOL
Pritisnite dugme nagore ili nadole da biste prilagodili jačinu zvuka.
Isključivanje zvuka
Pritisnite dugme VOL da biste isključili zvuk. Ponovo ga pritisnite da biste uključili zvuk.
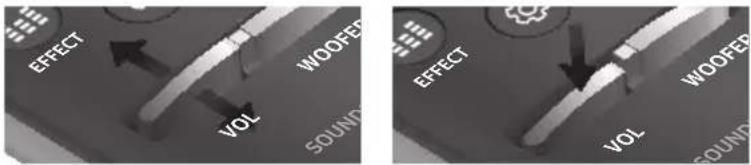
text_image
EFFECT WOOFER VOL SOUND EFFECT WOOFER VOL SOUND▶ Upravljanje jačinom zvuka uređaja Soundbar pomoću daljinskog upravljača televizora
- Pritisnite i držite dugme ((o)) SOUND duže od 5 sekundi dok je uređaj Soundbar uključen.
- Na ekranu uredaja Soundbar će se prikazati poruka „ON - TV REMOTE“.
- U meniju televizora podesite zvučnik televizora kao spoljni zvučnik.

- Nije dostupno u režimima TV ARC, BT, HDMI1 i HDMI2. (dostupno je samo u režimima D.IN (optički) i AUX)
- Na daljinskom upravljaču televizora su dostupna samo dugmad za jačinu i isključivanje zvuka. Druga dugmad su onemogućena.
- Meniji televizora razlikuju se s obzirom na proizvođača i model televizora. Više informacija potražite u priručniku za korisnike televizora.
• Proizvođači koji podržavaju ovu funkciju:
natural_image
Three technical illustrations of a remote control casing showing internal components and directional arrows (no text or symbols)KORIŠĆENJE SKRIVENE DUGMADI
| Skriveno dugme | Referentna stranica | |
| Dugme na daljinskom upravljaču | Funkcija | |
| ((o)) SOUND | Daljinski upravljač televizora Uključeno/isključeno | Stranica 11 |
| SOURCE | BT uparivanje | Stranica 28 |
| ►II (Reprodukcija/Pauza) | Auto Power Down Uključeno/isključeno (režim AUX) | Stranica 27 |
| VOL | ID SET | Stranica 20 |
| Nagore | WIFI SETUP | Stranica 9 |
| Nadole | ADD SPEAKER | Stranica 9 |
| Nalevo | Auto Power Link Uključeno/isključeno | Stranica 23 |
| Nadesno | Anynet+ Uključeno/isključeno | Stranica 9 |
| (Kontrola zvuka) | 7-kanalni EQ | Stranica 11 |
| EFFECT | DRC Uključeno/isključeno | Stranica 9 |
| LEVEL | Režim pripravnosti mreže Uključeno/isključeno | Stranica 32 |
SPECIFIKACIJE IZLAZA ZA RAZNE REŽIME FUNKCIJE ZVUČNI EFEKAT
| Ulaz Efekat Izlaz | |||
| 2 kanala | SOUND | ON | 5.1.4 kanala |
| 5.1 kanala 5.1.4 kanala | |||
| 2 kanala | EFFECT | STANDARD | 2.1 kanala |
| 5.1 kanala 5.1 kanala | |||
| 2 kanala | EFFECT | MUSIC | 2.1 kanala |
| 5.1 kanala 5.1 kanala | |||
| 2 kanala | EFFECT | CLEAR VOICE | 3.1 kanala |
| 5.1 kanala 5.1 kanala | |||
| 2 kanala | EFFECT | SPORTS | 5.1.4 kanala |
| 5.1 kanala 5.1.4 kanala | |||
| 2 kanala |  EFFECT EFFECT | MOVIE | 5.1.4 kanala |
| 5.1 kanala 5.1.4 kanala | |||
| 2 kanala |  EFFECT EFFECT | NIGHT | 3.1 kanala |
| 5.1 kanala 5.1 kanala | |||
* Ako je ulazni signal Dolby Atmos®, izlaz je 5.1.4 kanala. Funkcija zvučni efekat nije dostupna.
INSTALIRANJE SOUNDBAR UREĐAJA
INSTALIRANJE ZIDNE KONZOLE
▶Mere predostrožnosti za instaliranje
- Instalirajte samo na vertikalnom zidu.
- Prilikom instaliranja izbegavajte mesta na kojima vlada visoka temperatura ili vlažnost ili zid koji ne može da izdrži težinu uređaja.
- Proverite čvrstinu zida. Ako zid nije dovoljno čvrst da podrži uređaj, ojačajte zid ili uređaj montirajte na drugi zid koji može da podrži težinu uređaja.
- Kupite i koristite zavrtnje za učvršćivanje ili zidnu zategu koji su namenjeni za vrstu zida koji imate (gipsana ploča, gvozdena ploča, drvo, itd.). Ako je moguće, učvrstite potporne zavrtnje u stubove (nosače) zida.
- Kupite zavrtnje za zidnu montažu na osnovu tipa i debljine zida na koji ćete montirati Soundbar uređaj.
-Prečnik : M5
-Dužina : preporučuje se L 35 mm ili duži
natural_image
Diagram showing a mechanical assembly with a screw and nut, connected by a dashed line indicating motion (no text or symbols)natural_image
Diagram showing a structural change from a beam with fixed supports to a folded beam with downward load (no text or symbols present)- Postavite uređaj Soundbar sa pričvršćenim Nosača za montažu na zid tako što ćete okačiti Nosača za montažu na zid na Zavrtanj držača na zidu.
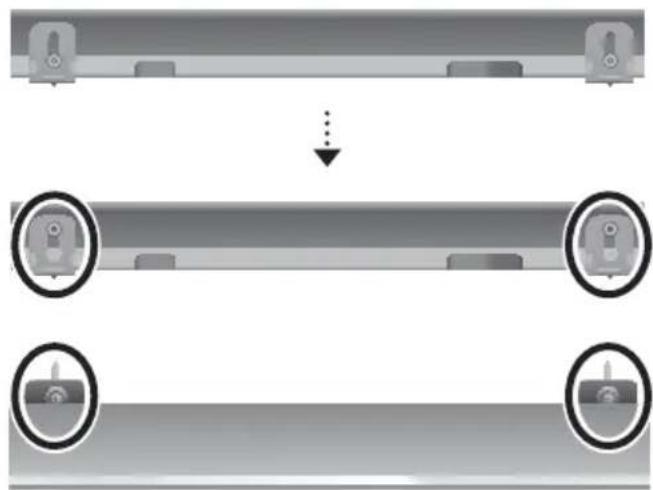
natural_image
Diagram showing a mechanical assembly with two parts and a downward arrow, no text or symbols present.natural_image
Diagram showing two mechanical components before and after assembly, with arrows indicating motion direction (no text or symbols)
text_image
LINK STANDBY ID SETZadnja strana sabvufera
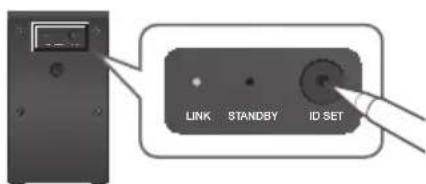
text_image
LINK STANDBY ID SETZadnji deo levog i desnog surround zvučnika
- Isključite uređaj Soundbar.
- Pritisnite i držite dugme VOL na daljinskom upravljaču barem 5 sekundi dok je uređaj Soundbar isključen (ISKLJUČENO).
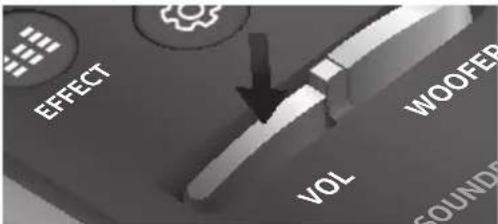
text_image
EFFECT VOL WOOFED SOUNDEnatural_image
Gray rectangular button with control buttons and a play icon (no text or symbols)text_image
SOUND SOURCE| Mod ulaza Displej | |
| Optički digitalni ulazARC (HDMI IZLAZ) ulaz | D.IN |
| AUX ulaz | AUX |
| HDMI ulaz | HDMI1, HDMI2 |
| BLUETOOTH režim | BT |
FUNKCIJA AUTO POWER DOWN
text_image
Diagram illustrating smartphone touch screen interaction with a musical note icon and finger pointing to the screen, alongside a vehicle with circular sensor patterns.POVEZIVANJE SOUNDBAR UREĐAJA SA MREŽOM
Na vašem pametnom uređaju izaberite aplikaciju Samsung Multiroom. Pratite uputstva na ekranu vašeg pametnog uređaja.
Manufactured under license from Dolby Laboratories. Dolby, Dolby Atmos, Dolby Audio, Dolby Digital Plus, Pro Logic, and the double-D symbol are trademarks of Dolby Laboratories.


Digital Surround
For DTS patents, see http://patents.dts.com. Manufactured under license from DTS Licensing Limited. DTS, the Symbol, DTS in combination with the Symbol, and DTS Digital Surround are registered trademarks or trademarks of DTS, Inc. in the United States and/or other countries. © DTS, Inc. All Rights Reserved.

HIGH-DEFINITION MULTIMEDIA INTERFACE
The terms HDMI and HDMI High-Definition Multimedia Interface, and the HDMI Logo are trademarks or registered trademarks of HDMI Licensing LLC in the United States and other countries.
- Ovim putem Samsung Electronics izjavljuje da je ova oprema u skladu sa direktivom 2014/53/EU.
text_image
99.1mm 99.1mm 99.1mm 68.6mmtext_image
Safety warning symbol image showing no prohibition sign, lightning bolt, and plug with power outletnatural_image
Illustration of various symbols including a prohibition sign, sun, magnet, and a document (no text or labels present)natural_image
Illustration of a prohibition symbol emitting radiating light rays toward a shaded circular object (no text or symbols present)text_image
Diagram showing a battery and a trash bin with a crossed-out symbol, indicating a process or disposal.natural_image
Illustration of a robotic vehicle under high light with sensor beams and no visible text or symbols\* Čo je to Dolby Atmos®?
text_image
SOUND SOURCE EFFECT LEVEL VOLWOOFERtext_image
SOUND SOURCE EFFECT LEVEL VOLWOOFERSOURCE
text_image
FL FR C FTR-FLHlavná jednotka
text_image
SOUND SOURCE EFFECT LEVEL VOLWOOFER(Ovládanie zvuku)
Stlačením vyberte položky TREBLE, BASS, alebo AUDIO SYNC. Následne použite tlačidlá Hore/Dole aby ste nastavili hlasitost' TREBLE a BASS v rozsahu -3 \~ +3.
text_image
EFFECT LEA WOOFER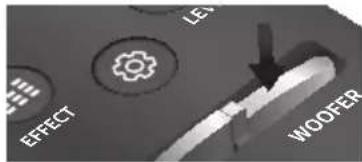
text_image
EFFECT LES WOOFERVOL
text_image
EFFECT VOL WOOFFER SOUND
text_image
EFFECT VOL WOOFER GOUNDnatural_image
Three technical illustrations of a remote control casing showing internal components and directional arrows (no text or symbols)POUŽÍVANIE SKRYTÝCH TLAČIDIEL
| Skryté tlačidlo | Referenčná strana | |
| Tlačidlo na dial'kovom ovládaní | Funkcia | |
| (○) SOUND | Dial'kového ovládania televízora zap./vyp. | Strana 11 |
| SOURCE | Párovanie BT | Strana 28 |
| ▶II (Prehrat'/pozastavit') | Auto Power Down zap./vyp. (režim AUX) | Strana 27 |
| VOL | ID SET | Strana 20 |
| Hore | WIFI SETUP | Strana 9 |
| Dole | ADD SPEAKER | Strana 9 |
| VI'avo | Auto Power Link zap./vyp. | Strana 23 |
| Vpravo | Anynet+ zap./vyp. | Strana 9 |
| ○ (Ovládanie zvuku) | 7-pásmový EQ | Strana 11 |
| EFFECT | DRC zap./vyp. | Strana 9 |
| LEVEL | Siet'ový pohotovostný režim zap./vyp. | Strana 32 |
ŠPECIFIKÁCIE VÝSTUPU PRE RÔZNE REŽIMY NASTAVENIA ZVUKOVÝ EFEKT
text_image
C C TYPE: 700mm Cnatural_image
Diagram showing a mechanical assembly with a pin, lever, and curved arrows indicating motion (no text or symbols)text_image
F_{A} + \rho C_{D}natural_image
Gray electronic device with control buttons and power/charge indicators (no readable text or symbols)Zadná strana zariadenia Soundbar
Pravý koniec zariadenia Soundbar
natural_image
Diagram showing a structural change from a beam with fixed supports to a folded beam with downward load (no text or symbols present)natural_image
Diagram showing a mechanical assembly with two components and a downward arrow indicating transformation (no text or symbols)natural_image
Diagram showing two mechanical components before and after assembly, with arrows indicating motion direction (no text or symbols)
text_image
LINK STANDBY ID SETtext_image
EFFECT VOL WOOFER SOUNDE- Na displeji zariadenia Soundbar sa nakrátko zobrazí hlásenie ID SET a potom zmizne.
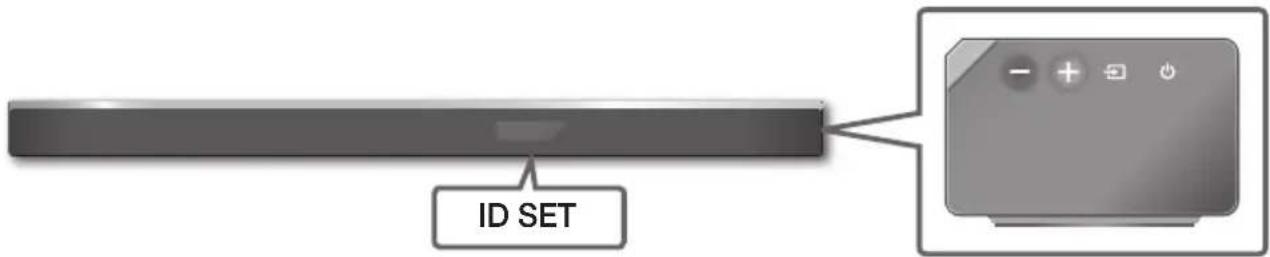
text_image
ID SETPravá strana zariadenia Soundbar
natural_image
Gray computer monitor control panel with buttons and playback icons (no text or symbols)Pravý koniec zariadenia Soundbar
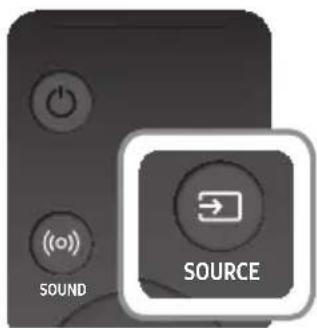
text_image
SOUND SOURCEtext_image
Diagram illustrating a mobile phone interface with a finger pointing to a music note icon and a separate sensor device below.PRIPOJENIE ZARIADENIA SOUNDBAR K SIETI
Na inteligentnom zariadení vyberte aplikáciu Samsung Multiroom. Postupujte podl'a pokynov na obrazovke inteligentného zariadenia.
Manufactured under license from Dolby Laboratories. Dolby, Dolby Atmos, Dolby Audio, Dolby Digital Plus, Pro Logic, and the double-D symbol are trademarks of Dolby Laboratories.


Digital Surround
For DTS patents, see http://patents.dts.com. Manufactured under license from DTS Licensing Limited. DTS, the Symbol, DTS in combination with the Symbol, and DTS Digital Surround are registered trademarks or trademarks of DTS, Inc. in the United States and/or other countries. © DTS, Inc. All Rights Reserved.

HIGH-DEFINITION MULTIMEDIA INTERFACE
The terms HDMI and HDMI High-Definition Multimedia Interface, and the HDMI Logo are trademarks or registered trademarks of HDMI Licensing LLC in the United States and other countries.
text_image
99.1mm 99.1mm 99.1mm 68.6mmtext_image
Safety warning symbol image showing no protection, a plug, and a lightning boltnatural_image
Illustration of various symbols including a prohibition sign, sun, thermometer, and spray bottle (no text or labels)text_image
Safety warning symbol showing a prohibition sign and a sun with radiating lines, indicating radiation hazard.text_image
Diagram showing battery recycling process with battery, battery, and waste bin marked with Xnatural_image
Illustration of a robotic vehicle under high light with sensor beams and no visible text or symbols\* Kaj je Dolby Atmos®?
① Gumb +/ (Glasnost)
text_image
Diagram of a device control panel with labeled buttons and directional indicatorstext_image
SOUND SOURCE EFFECT LEVEL VOLWOOFERSOURCE
S tem gumbom izbirate med viri, ki so povezani z zvočnikom Soundbar.
\* Način BT PAIRING
Za vklop načina BT PAIRING v funkciji Bluetooth pritisnite in pridržite gumb SOURCE dlje kot 5 sekund.
Predvajanje/premor (BT / WIFI)
Pritisnite gumb ▶II, da začasno zaustavite glasbo.
Znova pritisnite gumb ▶II, da predvajate izbrano glasbo.
LEVEL
text_image
FL FR C FTR-FLGlavna enota
Zvočnik za prostorski zvok (L)
text_image
SOUND SOURCE EFFECT LEVEL VOLWOOFER(Upravljanje zvoka)
Izberite TREBLE, BASS ali AUDIO SYNC. Nato z gumboma Gor/Dol nastavite TREBLE ali BASS tone v območju od -3 \~ +3.
text_image
LE EFFECT WOOFER EFFECT LE WOOFERVOL
Za prilagoditev glasnosti pritisnite gumb gor ali dol.
Nemo
Za utišanje zvoka pritisnite gumb VOL. Za ponovni vklop zvoka pritisnite gumb še enkrat.
text_image
EFFECT WOOFER VOL SOUND EFFECT WOOFER VOL SOUND▶ Upravljanje glasnosti zvočnika Soundbar z daljinskim upravljalnikom za televizor
natural_image
Three technical illustrations of a remote control casing showing internal components and directional arrows (no text or symbols)UPORABA SKRITIH GUMBOV
| Skriti gumbi | Referenčna stran | |
| Gumb za daljinsko upravljanje | Funkcija | |
| ((o)) SOUND | Vklop/izklop funkcije Daljinski upravljalnik za televizor | Stran 11 |
| SOURCE | Povezovanje BT | Stran 28 |
| ►II (Predvajanje/premor) | Vklop/izklop funkcije Auto Power Down (način AUX) | Stran 27 |
| VOL | ID SET | Stran 20 |
| Gor | WIFI SETUP | Stran 9 |
| Dol | ADD SPEAKER | Stran 9 |
| Levo | Vklop/izklop funkcije Auto Power Link | Stran 23 |
| Desno | Vklop/izklop funkcije Anynet+ | Stran 9 |
| (Upravljanje zvoka) | 7 Band EQ | Stran 11 |
| EFFECT | Vklop/izklop funkcije DRC | Stran 9 |
| LEVEL | Vklop/izklop funkcije Omrežje v pripravljenosti | Stran 32 |
IZHODNE SPECIFIKACIJE ZA RAZLIČNE NAČINE ZVOČNIH UČINKOV
| Vhod Učinek Izhod | |||
| 2 kanala | SOUND | ON | 5.1.4 kanala |
| 5.1 kanala 5.1.4 kanala | |||
| 2 kanala | EFFECT | STANDARD | 2.1 kanala |
| 5.1 kanala 5.1 kanala | |||
| 2 kanala | EFFECT | MUSIC | 2.1 kanala |
| 5.1 kanala 5.1 kanala | |||
| 2 kanala | EFFECT | CLEAR VOICE | 3.1 kanala |
| 5.1 kanala 5.1 kanala | |||
| 2 kanala | EFFECT | SPORTS | 5.1.4 kanala |
| 5.1 kanala 5.1.4 kanala | |||
| 2 kanala | EFFECT | MOVIE | 5.1.4 kanala |
| 5.1 kanala 5.1.4 kanala | |||
| 2 kanala | EFFECT | NIGHT | 3.1 kanala |
| 5.1 kanala 5.1 kanala | |||
text_image
C C TYPE: 700mm Cnatural_image
Diagram of a mechanical assembly with two components and directional arrows indicating motion (no text or symbols)- Vijak (ni priložen) potisnite skozi Vijak nosilca in nato oba vijaka čvrsto privijte v luknjo podpornega vijaka.

text_image
F14 g C1/Pnatural_image
Diagram showing a structural change from a beam to a vertical plate with internal cutouts, with no text or symbols present.- Zvočnik Soundbar namestite s priloženim Stenskega nosilca, tako da stenski nosilec obesite na Vijak nosilca na steni.
natural_image
Diagram showing a mechanical assembly with two components and a downward arrow indicating transformation (no text or symbols)natural_image
Diagram showing two mechanical components before and after assembly, with arrows indicating motion direction (no text or symbols)
text_image
LINK STANDBY ID SETtext_image
LINK STANDBY ID SETZadnja stran levega in desnega zvočnika za prostorski zvok
natural_image
Gray rectangular button with control buttons and playback icons (no text or symbols)text_image
SOUND SOURCE| Vhodni način Prikaz | |
| Optični digitalni vhodVhod ARC (HDMI OUT) | D.IN |
| Vhod AUX | AUX |
| Vhod HDMI | HDMI1, HDMI2 |
| Način BLUETOOTH | BT |
FUNKCIJA AUTO POWER DOWN
text_image
Diagram illustrating a mobile phone interface with a finger pointing to a music note icon and a car track below, likely for smart or digital tracking.POVEZAVA ZVOČNIKA SOUNDBAR Z OMREŽJEM
Na pametni napravi izberite aplikacijo Samsung Multiroom. Sledite navodilom na zaslonu pametne naprave. V aplikaciji Samsung Multiroom so na voljo spodnje funkcije.
Manufactured under license from Dolby Laboratories. Dolby, Dolby Atmos, Dolby Audio, Dolby Digital Plus, Pro Logic, and the double-D symbol are trademarks of Dolby Laboratories.

dts
Digital Surround
For DTS patents, see http://patents.dts.com. Manufactured under license from DTS Licensing Limited. DTS, the Symbol, DTS in combination with the Symbol, and DTS Digital Surround are registered trademarks or trademarks of DTS, Inc. in the United States and/or other countries. © DTS, Inc. All Rights Reserved.

HIGH-DEFINITION MULTIMEDIA INTERFACE
The terms HDMI and HDMI High-Definition Multimedia Interface, and the HDMI Logo are trademarks or registered trademarks of HDMI Licensing LLC in the United States and other countries.