
HAVSB300 - Home Theater System KONIG - Free user manual and instructions
Find the device manual for free HAVSB300 KONIG in PDF.

| Product type | Home cinema system |
| Brand | Konig |
| Model | HAVSB300 |
| Main unit dimensions | 1240 x 205 x 460 mm |
| Speaker dimensions | 462 x 452 x 405 mm |
| Total weight | Approximately 66 kg (31.5 + 34.5 kg) |
| Power supply | ~110-240 V / 50-60 Hz |
| Power | 60 W |
| Frequency response | 20 Hz - 20 kHz ± 2.5 dB |
| Signal-to-noise ratio | > 90 dB (1 kHz) |
| Dynamic range | > 106 dB (1 kHz) |
| Supported video formats | DVD, VCD, MPEG-4, JPEG |
| Supported audio formats | Dolby Digital, PCM, MP3 |
| Inputs/outputs | HDMI, SCART, S-Video, Y/Cb/Cr, optical, coaxial, USB, SD/MMC card, AUX input, microphones |
| Radio | FM/AM, 40 stations memory |
| Card reader | SD/MMC |
| Video output | 1.0 V (P-P) 75 Ω (Y), 0.286 V (P-P) (C) for S-Video |
| Audio output | 2 V (P-P) |
| Maintenance | Clean with a dry cloth, do not use solvents |
| Safety | Disconnect if any problem, do not expose to water or moisture |
| Repairability | Opening only by a qualified technician |
| General information | Keep the manual and packaging for future reference |
Frequently Asked Questions - HAVSB300 KONIG
User questions about HAVSB300 KONIG
0 question about this device. Answer the ones you know or ask your own.
Ask a new question about this device
Download the instructions for your Home Theater System in PDF format for free! Find your manual HAVSB300 - KONIG and take your electronic device back in hand. On this page are published all the documents necessary for the use of your device. HAVSB300 by KONIG.
USER MANUAL HAVSB300 KONIG
HAV-SB300

natural_image
Front panel of a CD-ROM drive with multiple buttons and a central control unit (no visible text or labels)MANUAL (p. 2)
MEDIA CENTER
MODE D'EMPLOI (p. 16)
CENTRE MULTIMEDIA
MANUALE (p. 30)
CENTRO MULTIMEDIALE
HASZNÁLATI ÚTMUTATÓ (o. 44.)
MÉDIA CENTER
MANUAL DE USO (p. 37)
CENTRO MULTIMEDIA
KÄYTTÖOHJE (s. 51)
MEDIAKESKUS
5.5 Preference Setup....6
5.5.1 TV Type....6
5.5.2 Audio setup 6
5.5.3 Subtitle 7
5.5.4 Disc menu 7
5.5.5 Parental 7
5.5.6 Password....7
5.5.7 Default....7
- JPEG/MPEG-4/USB/CARD/FM/AM 7
6.1 JPEG Pictures ....7
6.2 MPEG-4 7
6.3 USB/CARD function....7
6.4 AM/FM Radio....7
1. REMOTE CONTROL
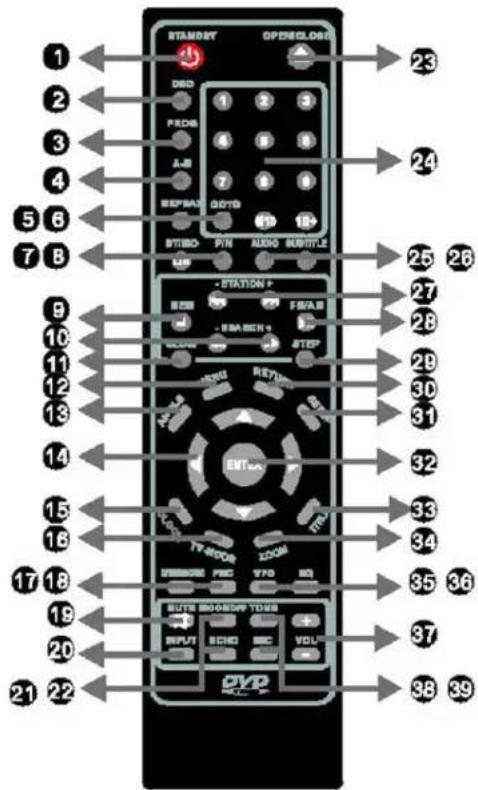
| 1. Standby Used to put the device in standby | |
| 2. OSD will show current situation, time, remaining time and other functions | |
| 3. Program Press to display the program menu | |
| 4. A-B repeat Let's you repeat your favourite scene | |
| 5. Repeat Press to repeat the current track, press again to continue | |
| 6. Go to Press Go to and the chapter to instantly skip to that chapter | |
| 7. st/mo l/r Switch between Stereo, Mono, Left and Right | |
| 8. p/n Switch between PAL, NTSC and Auto | |
| 9. Memory/stop While in radio mode press this button to memorize the radio station.In playback mode this button is used to stop playback | |
| 10. Quick forward/backward/forward/backward search | Press and hold the key three second to search forward or backward.Press the key shortly to select between 2x/4x/8x/16x/32x fast forward/backward. Press pause to resume normal playback |
| 11. Slow Press this key in playback to active slower playback, press pause to resume to normal playback | |
| 12. Menu Press this menu during DVD playback to go to the main menu | |
| 13. Angle Some DVDs offer different viewing angles, use this button to select the desired angle | |
| 14. Direction keys While in menu use these keys to navigate | |
| 15. Clock While in standby use the directional keys to adjust the time | |
| 16. TV-mode During playback push this button to choose between S-Video or YUV | |
| 17. DVD/USB/card While in DVD mode press this button to switch between DVD/USB/CARD mode | |
| 18. PBC | During playback of VCD 1.1 or later disc, press this key to display the PBC menu |
| 19. Mute | Press this button to mute the sound, press again to cancel |
| 20. Input | Press to change input (DVD/iPod®/AUX/RADIO) |
| 21. Mic on/off | Press to turn the mic on/off |
| 22. Echo selection | While the mic is on press this key to adjust the echo effect. Use the Vol +/- to adjust the effect |
| 23. Open/close Press to open/c | close the CD/DVD tray |
| 24. Numeric keys The 0-9 keys | can be used to directly select a program. For numbers of 10 or above press 10+ |
| 25. Audio Press to change the audio (if available) of the disc | |
| 26. Subtitle Press to change the | subtitle language (if available on disc) |
| 27. Previous/next track Previous/next station | After pressing the memory key, use these to change the number (or press numerical keys). Use the key to select a station. Press during playback to skip to the next or previous track |
| 28. Play/pause and am/fm While | the radio is active use these to change between FM to AM.During playback you can use this key to pause |
| 29. Step Press this key to view a sequence image by image | |
| 30. Return Press this key when playing disc to return to the title menu | |
| 31. Setup Press to enter general setup/audio setup/Dolby setup/video setup/preference setup. Use directional keys to navigate. Press again to exit menu | |
| 32. Enter Press this key to confirm selections in the menu displayed on the screen | |
| 33. Title Press this key to return to the title menu of the DVD disc | |
| 34. Zoom Press this key when playing a DVD/VCD, the original picture will be increased by 2x,3x,4x | |
| 35. VFD Press this key to adjust the balance (up or down) | |
| 36. EQ Use to switch the EQ settings (Jazz, Classic, Rock, Pop, DSP on/off) | |
| 37. Volume+/- Press the keys to adjust the volume | |
| 38. Tone Press to select the main volume, bass, treble and subwoofer volume.Use Vol +/- to adjust the effect | |
| 39. Mic volume When the Mic is activated use these key to adjust the volume | |
System connection illustration
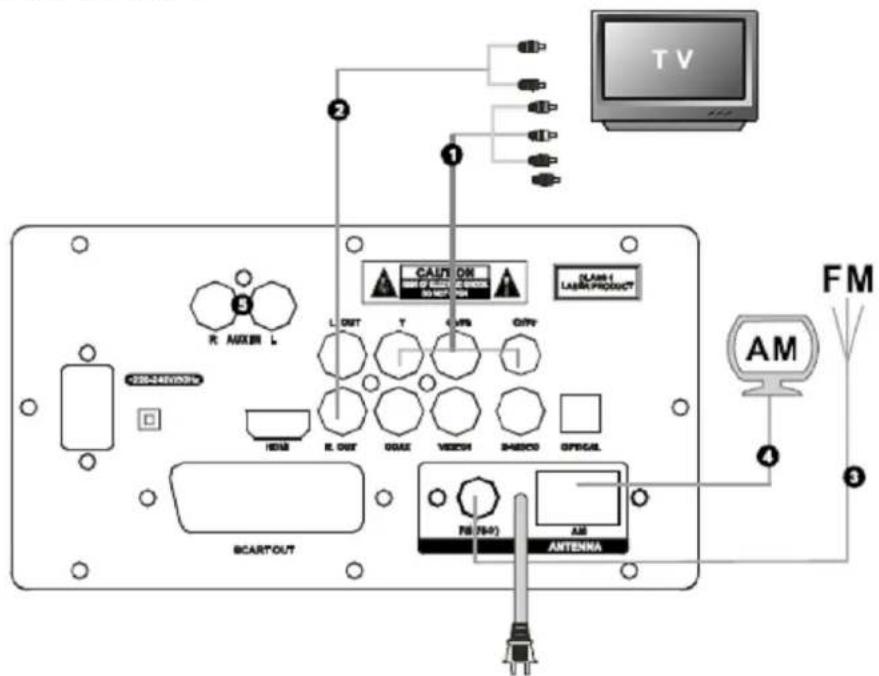
Power input: \~110V-240V/50-60Hz
- Connect with Y, Cb, Cr video input socket
- Connect with Audio signal input socket (Audio component)
- Connect with FM antenna
- Connect with AM antenna
- AUX input socket
WARNING: DO NOT PLACE SPEAKERS CLOSE TO TV, PLEASE ENSURE TO KEEP AT LEAST 20cm BETWEEN TV AND SPEAKERS.
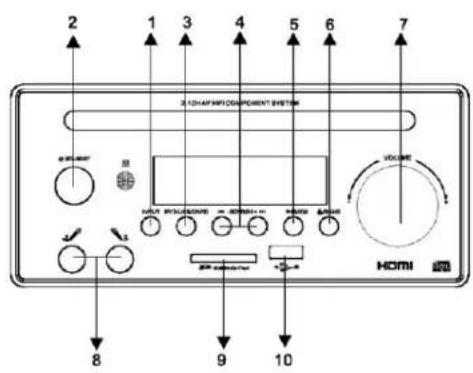
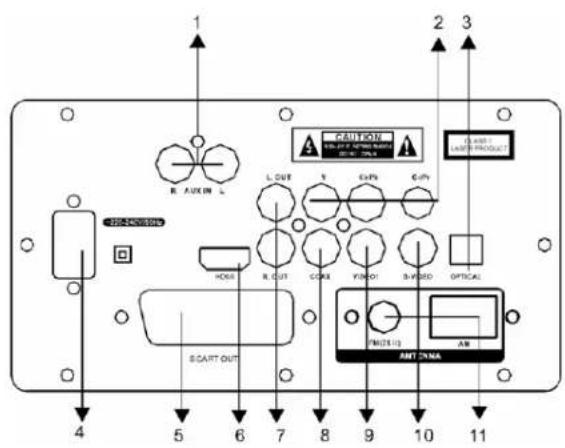
2. PANEL/BACK BOARD ILLUSTRATION
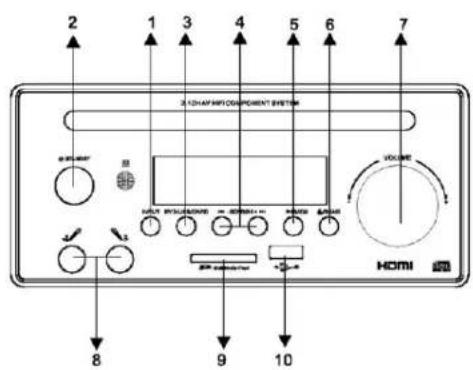
| 1. INPUT Channel conversion | |
| 2. ⏻ STANDBY Standby | |
| 3. DVD/USB/CARD DVD/USB/CARD | |
| 4. ◀◀-SEARCH+ ▶▶ | DVD: Quick forwards/backwardsRadio: Forwards/Backwards search |
| 5. ■/MEM Stop/memory station | |
| 6. ▶/BAND Play/Pause/AM/FM | |
| 7.-VOLUME+ Main Volume control | |
| 8. MIC1 MIC2 Microphone socket | |
| 9.SD MultiMedia Card SD/MMC card slot | |
| 10. ➔ | USB input |
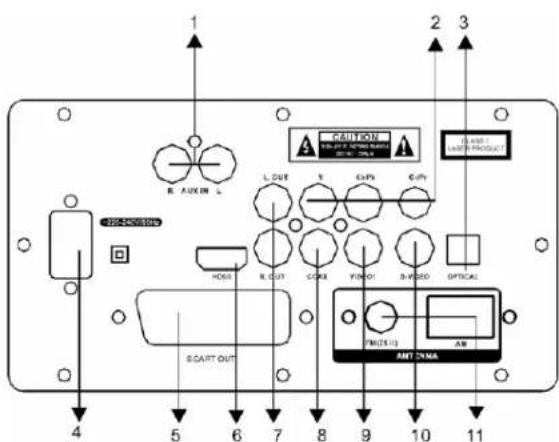
| 1. R AUX IN L AUX input socket | |
| 2. Y Cb/Pb Cr/Pr Y,Cb,Cr video output socket | |
| 3. OPTICAL Digital audio optical output socket | |
| 4. ~110-220V/50-60Hz Power | |
| 5. SCART OUT Scart output | |
| 6. HDMI HDMI output socket | |
| 7. L.OUT R.OUT Left/right mix audio coaxial output | |
| 8. COAX Digital audio output | |
| 9. VIDEO 1 DVD video output | |
| 10. S-VIDEO | S-video video output socket |
| 11. FM, AM | FM/AM antenna |
3. CONNECTING THE SYSTEM TO YOUR TV
The system has multiple connections to connect it to your TV. Depending on the input options of your TV choose the one that suits the situation. If your TV has a Y, Cb Cr input we advise you to use that connection since it offers the best quality.
4. CONNECTING THE SYSTEM TO YOUR AMPLIFIER
You can connect the system to an amplifier using the optical audio output or you can connect the device directly to two speakers via the left/right audio output socket.
5. SYSTEM SETUP
When you press SETUP on the remote control, the setup menu will be displayed. Navigate the SETUP menu using the arrow keys, confirm a selection using the ENTER button. By pressing the left button while in a menu you'll return to the previous menu. To exit the setup menu press the SETUP button again.
5.1 General setup
In the general setup menu you can change all the general settings.
5.1.1 TV-display
Here you can select and change the display format and the screen of the TV.
5.1.2 Angle mark
When a DVD offers multiple angles you can choose which angle you want to watch the movie in.
5.1.3 OSD Language
Here it's possible to select the language of the different menus.
5.1.4 Captions
Some discs offer a recorded explanatory caption for the hearing-impaired. Activate them in this menu
5.1.5 Screen saver
When the screen saver is set to on, a moving object will appear when the unit is in stop mode.
5.1.6 Last Memory
When you press stop, this system can remember the position you've pressed stop to resume playback from that position when you press PLAY again. Here you turn this function on/off.
5.2 Audio Setup Page
Used to change the audio settings of the device.
5.2.1 Downmix
The down mix mode allows you to choose between LT/RT and stereo.
5.2.2 Front speaker
In this menu you can select the size of your front speakers.
5.2.3 SPDIF Output
In this menu you can select the different audio outputs. You can select between:
SPDIF OFF: An analogue surround sound format uses the back-panel connections for 2-CH audio.
SPDIF/RAW or SPDIF/PCM: A surround sound format which you can use to send to your Dolby digital decoder through the optical and coaxial connectors.
When you have selected the SPDIF/RAW state you will not be able to adjust the volume of CD/DVD but only the volume of MP3 files.
5.3 Dolby Digital Setup
In the Dolby Digital menu you can select how the Dolby digital signal is send through.
5.3.1 Dual Mono
In the dual mono menu you can select the audio output. You can select stereo/left mono/right mono/mixed mono
5.3.2 Dynamic
The dynamic function allows you dynamically lower the volume but still keep the original tone quality. This is especially useful when you are playing high volume programs at night, but do not want to disturb your neighbors.
5.4 Video Setup
In this menu you can set the video output of the device.
5.4.1 Component
Offers you the option to choose the output. The available options are S-Video and Yuv.
5.4.2 TV Mode
Here you can select the desired TV mode, you can select between P-Scan and Interlace
5.4.3 Sharpness
Allows you to adjust the sharpness level of the video output.
5.4.4 Brightness
Allows you to adjust the brightness of the video output. Press the right button to enter the menu and use the left and right button to adjust the setting
5.4.5 Contrast
Allows you to adjust the contrast of the video output. Works the same as brightness.
5.5 Preference Setup
The setting in this menu are applicable each time the device starts and only active when no disc is inserted.
5.5.1 TV Type
Allows you to change the TV output. You can select between AUTO, NTSC or PAL.
5.5.2 Audio setup
In this menu you can select the "default" preferred language. Any DVD you insert will automatically play in this language (if available).
5.5.3 Subtitle
In this menu you can select the "default" preferred subtitle language. Any DVD you insert will automatically play in this language (if available).
5.5.4 Disc menu
In this menu you can select the "default" preferred menu language. Any DVD you insert will automatically play in this language (if available).
5.5.5 Parental
In this menu you can activate or disable the parental function of this system. If a DVD is equipped with the same parental control functionalities, the system will prevent a DVD from playing when it exceeds the inserted value of this menu.
5.5.6 Password
In his menu you can change the password of the system. The password must consist of 4 numbers. The initial/default password is 9999
5.5.7 Default
Resets the system to all default settings, except for the password. Press ENTER to perform the reset.
6. JPEG/MPEG-4/USB/CARD/FM/AM
The system can display JPEG pictures and MPEG4 movies which are burned on a disc or from a USB device and cards.
6.1 JPEG Pictures
To play photos from a disc insert the disc and choose the photo you want to display by pressing ENTER or typing in the number of the photo. To start an automated slide show press PLAY. If you would like to skip to the next or previous picture during playback you can use the directional keys or press the previous/next track buttons. Press STOP to return to the menu.
While playing JPEG files you can pause, or repeat playback using the similar buttons. With the ZOOM button you can zoom in, hold the key to zoom in further. Press the ZOOM button again to go back to normal playback. To enlarge a picture between 50% and 200% press the ZOOM button and ◀◀ ▶▶. When ZOOM is not activated use the directional buttons to rotate the image.
6.2 MPEG-4
MPEG-4 is a new multi-media standard which can record DVD-quality movies on to CD's. To play an MPEG-4 disc put the disc inside the tray and press the PLAY button.
6.3 USB/CARD function
To activate the USB/CARD mode press the DVD/USB/CARD button, once playback from the USB device begins press it again to start playback from a SD card. If you press a third time it will go back to DVD playback.
6.4 AM/FM Radio
Before use, connect the FM/AM antenna to the socket on the back. Press the INPUT button on the remote control to select Radio mode. Use the FM/AM button to switch to the desired frequency band. You can now use the STATION+ and STATION- buttons to search for the desired frequency. If you hold the button the system will automatically search for the next available station.
When the system receives a station, the frequency will be displayed on the screen. To store the station in the system's memory press the MEM button. To store the station under a number press the MEM button again. If you would like to change the number on which the station is stored press the MEM button once again and input the desired number with the numerical keys or by using the STATION+ or STATION- buttons.
The radio can store up to 40 radio stations.
DVD video
| Power supply ~110 | -220V/50-60HZ Signal mode PAL | ||
| Power 60W Frequency 20Hz-20KHz±2.5db | |||
| N W 31.5KG S/N >90db (1KHz) | |||
| G.W 34.5KG Audioscope >106db(1KHz) | |||
| Size Speaker: 462 | x452x405mmMain unit: 1240x205x460mm | Conditions for use Temperature: 5°C-35°CPosition: Horizontal | |
Output
| Video output 1.0V(P-P) 75Ω Digital audio output | (BISTREAM/PCM COAXAL) | 0.5V(P-P) 75Ω |
| S-VIDEO (Y)1.0 V(P-P) 75Ω(C)0.286 V(P-P) 75Ω | Audio output 2V(P-P) | |
| Y/Cb/Cr output (Y)1.0 V(P-P) 75Ω(Pb)(Pr)0.7 V(P-P) 75Ω |
REMARKS
* The quality of JPEG photos and the speed with which they can be opened depend on the resolution & the compression ratio of the photos.
Some JPEG photos may not be played due to disc quality and formats.
** Some DVD+R/RW, DVD-R/RW discs may not be played due to the quality or burning conditions.
*** During using the machine, the machine might be wrong when it was disturbed or reading bad condition discs. Restarting the system could recover to normal condition.
Safety precautions:


To reduce risk of electric shock, this product should ONLY be opened by an authorized technician when service is required. Disconnect the product from mains and other equipment if a problem should occur. Do not expose the product to water or moisture.
Maintenance:
Clean only with a dry cloth. Do not use cleaning solvents or abrasives.
Warranty:
No guarantee or liability can be accepted for any changes and modifications of the product or damage caused due to incorrect use of this product.
General:
Designs and specifications are subject to change without notice.
All logos brands and product names are trademarks or registered trademarks of their respective holders and are hereby recognized as such.
Keep this manual and packaging for future reference.
Attention:

This product is marked with this symbol. It means that used electrical and electronic products should not be mixed with general household waste. There is a separate collections system for these products.
DEUTSCH
Alimentation : \~110 V-240 V/50-60 Hz
Vermogen-ingang: \~110V-240V/50-60Hz
5.5.5 Parental control
Potencia de entrada: \~110V-240V/50-60Hz
Tápbemenet: \~110V-240V/50-60Hz
Tuloteho: \~110 V - 240 V /50 - 60 Hz
Intrare alimentare: \~110V-240V/50-60Hz
Strømindgang: \~110V-240V/50-60Hz
- Tilslut til Y,Cb,Cr videoindgang
- Tilslut til lydsignal indgang (lyd komponent)
- Tilslut til FM antenne
- Tilslut til AM antenne
- AUX ingang
ADVARSEL: PLACER IKKE H∅JTTALERE NÆR VED ET TV, S∅RG VENLIGST FOR AT HOLDE EN AFSTAND PÅ MINDST 20 cm MELLEM TV OG H∅JTTALERE.
Effektinput: \~110 V-240 V/50-60 Hz
- Koble med Y, Cb, Cr videoinngangskontakt
- Koble med inngangskontakt med audiosignal (audiokomponent)
- Koble til FM-antenne
- Koble til AM-antenne
- AUX-inngangskontakt
ADVARSEL: PLASSER IKKE H∅YTTALERNE NÆR TV, PASS PÅ AT DET ER MINST 20cm MELLOM TV OG H∅YTTALERE.
2. ILLUSTRASJON AV PANEL/BAKSIDE
| 1. INPUT Kanalkonvertering | |
| 2. ⏻ STANDBY Ventemodus | |
| 3. DVD/USB/CARD DVD/USB/KORT | |
 | DVD: Hurtig frem/tilbakeRadio: Søk forover/bakover |
| 5. ■ /MEM Stopp/minne stasjon | |
| 6. ▶ /BÄND Play/Pause/AM/FM | |
| 7. -VOLUME+ Hovedvolumkontroll | |
| 8. MIK1 MIK2 Mikrofonkontakt | |
| 9. S→ MultiMedia Card SD/MMC kort-spor | |
| 10. ←→ | USB-inngang |
| 1. R AUX IN L AUX-inngang |
| 2. Y Cb/Pb Cr/Pr Y,Cb,Cr videoutgangskontakt |
| 3. OPTISK Digital audio optisk utgangs kontakt |
| 4. ~110-220 V/50-60 Hz Strøm |
| 5. SCART OUT Scartutgang |
| 6. HDMI HDMI utgangskontakt |
| 7. L.OUT R.OUT Venstre/høyre audio koaksialutgang |
| 8. COAX Digital audioutgang |
| 9. VIDEO 1 DVD video-utgang |
| 10. S-VIDEO Utgangskontakt for S-video |
| 11. FM, AM FM/AM-antenne |
3. TILKOBLING AV SYSTEMET TIL DIN TV
Description: MEDIA CENTER