HCBM51 - Baby monitors KONIG - Free user manual and instructions
Find the device manual for free HCBM51 KONIG in PDF.

User questions about HCBM51 KONIG
0 question about this device. Answer the ones you know or ask your own.
Ask a new question about this device
Download the instructions for your Baby monitors in PDF format for free! Find your manual HCBM51 - KONIG and take your electronic device back in hand. On this page are published all the documents necessary for the use of your device. HCBM51 by KONIG.
USER MANUAL HCBM51 KONIG
MANUAL (p. 2) Baby Monitor
MANUALE (p. 24) Baby Monitor
MANUAL DE USO (p. 30) Monitor para bebés
VEILEDNING (p. 75) Babymonitor
ENGLISH
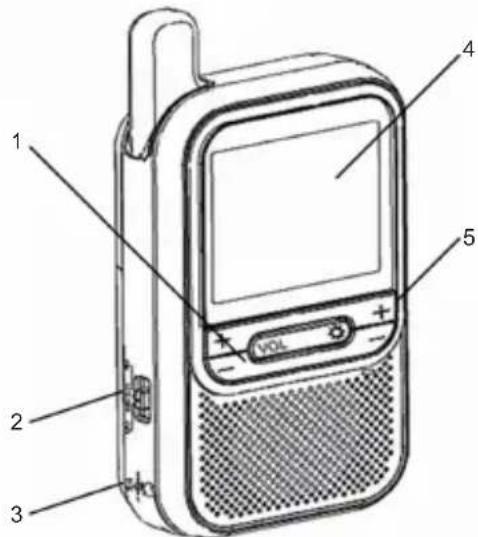
PICTURE OF MONITOR UNIT
- Volume adjustment buttons
- ON/LCD OFF/OFF button
- 6 V DC jack
- LCD display
- Brightness adjustment buttons
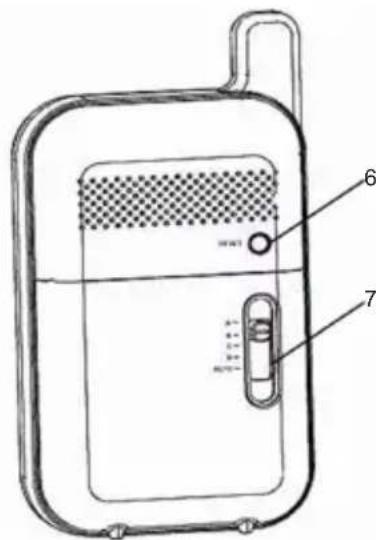
- RESET button
- Channel selection button (pre-set to "1")
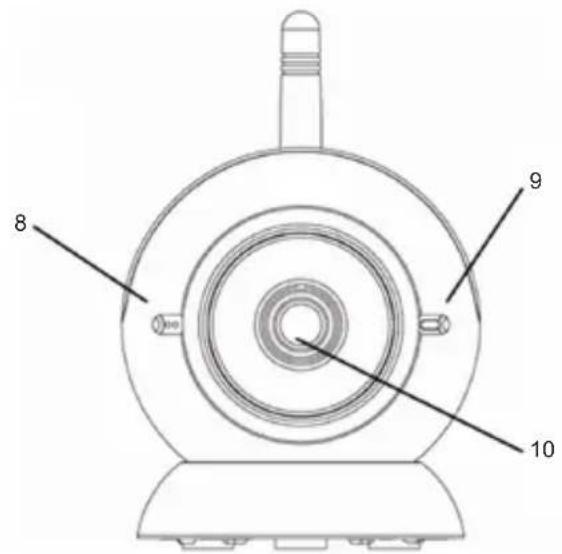
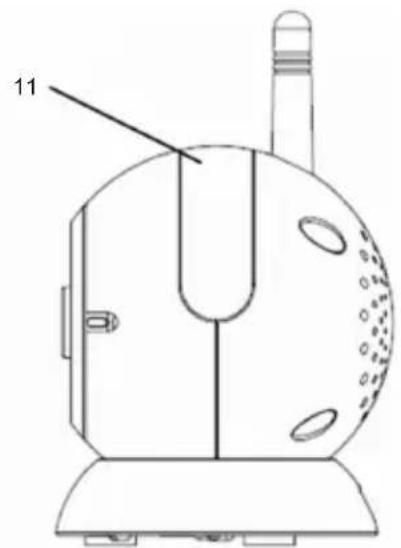
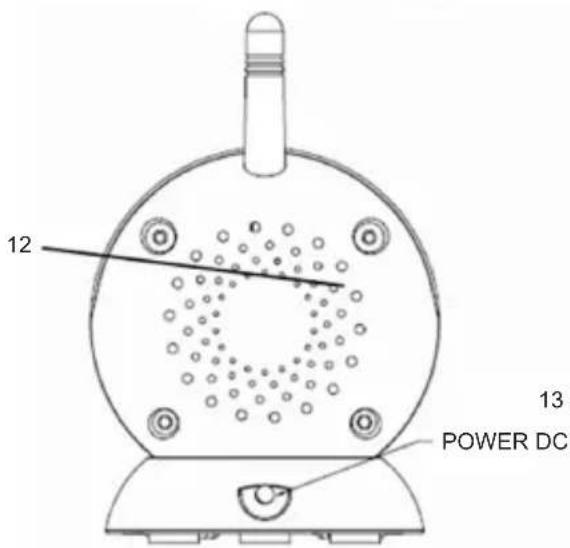
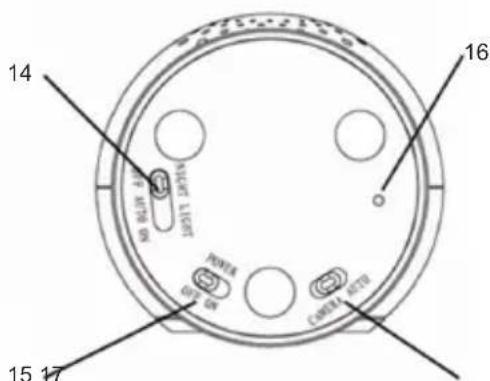
PICTURE OF CAMERA UNIT
- Microphone
- Power ON/OFF indicator
- Camera lens
- Rainbow night light
- Light sensor for automatic night vision
- 6V DC jack
- Night light OFF/AUTO/ON switch
- Power ON/OFF switch
- Matching (Pairing) button
- Camera/AUTO switch
SAFETY INSTRUCTIONS
Please observe the following precautions to prevent fire, personal injury, and product damage:
Read Instructions:
All the safety and operating instructions should be read before the baby monitor is operated.
Retain Instructions:
The safety and operating instructions should be retained for future reference.
Follow Instructions:
All operating instructions should be followed.
Water and Moisture:
This product is designed for indoor use only. The unit should not be exposed to dripping or splashing liquids and no objects filled with liquids, such as vases, must be placed on the unit. The item should not be used near water; for example, near a bath tub, wash bowl, kitchen sink, laundry tub, in a wet basement, near a swimming pool, etc.
Ventilation:
The baby monitor should not be situated on a bed, sofa, rug, or similar surface that may block the ventilation openings, or placed in an enclosed area such as a bookcase or cabinet that may impede the flow of air through the ventilation openings.
Heat:
The baby monitor should be situated away from heat sources such as radiators, heat registers, cookers, or other appliances that produce heat. No naked flame sources, such as lighted candles, should be placed on the device.
Power Source:
The baby monitor should be connected to a power supply only of the type described in this operating instruction:
Camera and Monitor: AC/DC adaptors: 6 V 800 mA (centre positive)
Cleaning:
Use a dry cotton cloth to keep the baby monitor free of dust. Do not use water!
Non-Use Periods:
Always unplug the AC adaptors from wall outlets during long periods of non-use.
Object and Liquid Entry:
Care should be taken so that objects and liquids do not get into the enclosure through the openings.
Damage Requiring Services:
The baby monitor should be serviced by qualified service personnel when:
a. Objects have fallen or liquid has been spilled onto/into the products; or
b. The units have been exposed to rain; or
c. The units do not appear to operate normally or exhibit a marked change in performance; or
d. The units have been dropped or the enclosure has been damaged.
Caution:
a. This product cannot replace responsible adult supervision of a child. You should personally check your child's activity at regular intervals.
b. Never use this baby monitor to a degree where your life or health, the life or health of others, or integrity of property depends on its function! The manufacturer will not accept any responsibility or claim for death and injury of any person or for loss and damage of any property due to malfunction or misuse of the product.
STATEMENT ON REGULATION
These limits are designed to provide reasonable protection against harmful interference in a residential installation. This equipment generates uses and can radiate radio frequencies and if not installed and used in accordance with the instructions, may cause harmful interference to radio communications. However, using the device according to this manual is no guarantee that interference will not occur in a particular installation. If this equipment does cause harmful interference to radio or television reception, which can be determined by turning the equipment off and on, the user is encouraged to try to correct the interference by one or more of the following measures:
- Reorient or relocate the receiving antenna.
-
Increase the distance between the equipment and receiver.
-
Connect the equipment to an outlet on a different circuit than that to which the receiver is connected.
- Consult the dealer or an experienced radio/TV technician for help.
Operation with non-approved equipment or unshielded cables is likely to result in interference to radio or TV reception. The user is cautioned that changes and modifications made to the equipment without the approval of the manufacturer could void the user's authority to operate this equipment.
INSTALLATION
INSTALLING THE AC/DC ADAPTOR:
- Install the plug of the AC adapter to the DC jack of the unit.
- Plug the AC adapter into a standard wall AC power outlet.
- Switch on the unit with the power ON/OFF switch.
- The power indicator will be illuminated.
Warning: Use only the AC adapters which came with this package. Improper use of the adapter may cause malfunction of the units. Please consult your dealer for any queries.
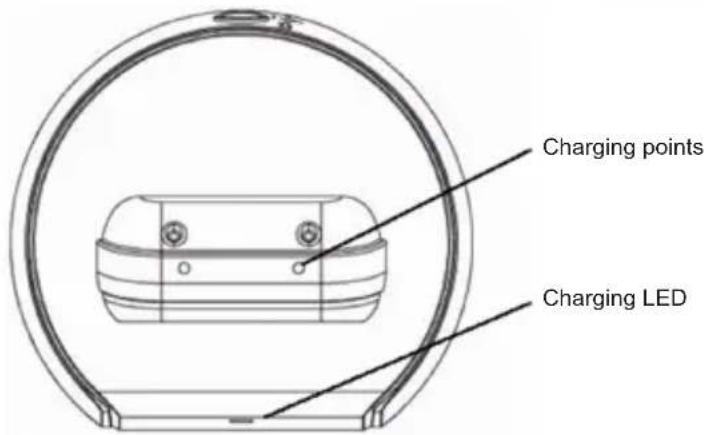
USING THE BATTERIES:
- The Monitor unit requires a Li-ion rechargeable battery in order to operate. If non-approved batteries are used, DO NOT connect the mains adapter to either unit.
- One Li-ion rechargeable battery is supplied with the package. Use the rechargeable battery to operate the Monitor unit away from the remote location. Reconnect the Monitor unit to the adapter or place it on the charging base whenever possible to maintain the portable viewing function.
- If you require another Li-ion rechargeable battery for the Camera unit, please contact your designated local supplier.
CAMERA OPERATION
Power ON/OFF
Use the Power ON/OFF sliding switch at the bottom of the Camera unit to turn it ON/OFF.
Voice Activated Camera (CAMERA/AUTO switch)
To Activate: Switch to AUTO by sliding the CAMERA/AUTO switch at the base of the Camera unit.
When the sound level of the unit's surrounding area reaches the preset level, the Camera unit will transmit the captured image to the Monitor unit.
When the surrounding sound level is below the preset level, transmission will be automatically switched off and the LCD on the Monitor unit will also be switched off.
To Deactivate: Switch to CAMERA by sliding the CAMERA/AUTO switch at the base of the Camera unit. The Camera unit will transmit the CAMERA signal continuously.
Rainbow Night Light
Switch to ON or OFF by sliding the OFF/AUTO/ON switch at the base of the Camera unit. The night light will be illuminated continuously in different colours at the top of the Camera unit.
Voice Activated (AUTO) Night Light:
Slide the OFF/AUTO/ON switch to AUTO.
When the sound level of the unit's surrounding area reaches the preset level, the night light will be turned on. When the surrounding sound level is below the preset level, the night light will be turned off.
Automatic Infra-Red Night Vision
The infra-red night vision of the Camera unit allows the camera to take pictures in the dark. The function will switch on automatically when the level of light surrounding the camera is low.
Only black and white images will be displayed on the Monitor and only objects placed within 6ft/2m can be seen.
MONITOR OPERATION
Power ON/LCD OFF/OFF
Use the ON/LCD OFF/OFF switch on the side of the unit to turn the unit as well as the LCD display on/off.
Channel Selection
All Monitor and Camera units will initially be set to Channel "1" by the manufacturer. The system allows a total of 4 Cameras be used with the same Monitor. Refer to Matching (Pairing) procedures to use additional camera(s).
Volume Control
Press the (+) and (-) button located on the LEFT side of the front panel to increase and decrease the volume of the Monitor.
LCD Brightness Control
Press the (+) and (-) button located on the RIGHT side of the front panel to increase and decrease the brightness of the LCD display.
RESET BUTTON
Press the RESET button located at the back of the Monitor unit to re-initialize it to its original manufacturer settings.
MATCHING (PAIRING)
WARNING!!
This product has already been matched (paired) in production and users DO NOT NEED TO perform any matching procedure under normal conditions. Follow these steps to re-match the Monitor unit with the Camera unit only when it is ABSOLUTELY NECESSARY:
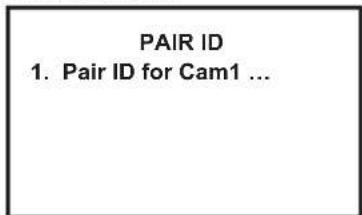
- Press and hold the (+) button of the brightness control and turn on the Monitor unit at the same time. The LCD shows:
- Press the hidden Matching (Pairing) Button through the small hole at the base of Camera unit (1). The Power LED on the Camera unit will start blinking.
- The pairing operation will complete automatically for Camera unit (1). The Monitor shows:
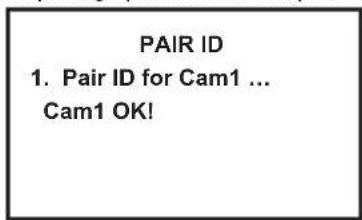
- Repeat steps 2 and 3 for Cameras (2); (3) and (4).
- Turn the Monitor unit off then on again to return to normal operation.
TROUBLESHOOTING
| Problem Possible Cause - | things to do/check |
| No reception on the Monitor unit • The unit has not been switched on. • The AC/DC adaptor has not been connected. • The camera may not be transmitting. (Power is not on or is in voice activation mode) • Wrong Channel. (Manufacturer has preset the system to Channel “1”) | |
| Only Black & White pictures are displayed | • The camera has switched to “Infra-red Night Vision” mode. |
| No transmission on the Camera unit • The unit has not been switched on. • The AC/DC adaptor has not been connected. • Check if the voice activation mode is switched to Auto Mode. | |
Safety precautions:

CAUTION
DISK OF ELECTRIC SHOCK
DO NOT OPEN

To reduce risk of electric shock, this product should ONLY be opened by an authorized technician when service is required. Disconnect the product from mains and other equipment if a problem should occur. Do not expose the
product to water or moisture.
Maintenance:
Clean only with a dry cloth. Do not use cleaning solvents or abrasives.
Warranty:
No guarantee or liability can be accepted for any changes and modifications of the product or damage caused due to incorrect use of this product.
General:
Designs and specifications are subject to change without notice.
All logos brands and product names are trademarks or registered trademarks of their respective holders and are hereby recognized as such.
Keep this manual for future reference.
Attention:

This product is marked with this symbol. It means that used electrical and electronic products should not be mixed with general household waste. There is a separate collections system for these products.
DEUTsCH
m = 311 ;
RISQUE DE CHCC ELEK
NE PAS OUIWIP

COINCIDENCI(APREAMIENTO)
JADVERTENCIA!
PROHLÁSENÍ OHLEDNÉ NOREM
Tylo limity jsou navrzeny za ucelem poskytnuti primene ochrany proti skodlivemu ru Seni v domovni instalaci. Toto zaifzeni vytvar, vuiziva a vyzaruje radiofrekvencni energii a nen-li nainstalovano a pouzivano v souladu
s pouy, muze byt pricinou skodlivhe rou sieni radovych komunikaci. Avsak nenif zaru ceno, ze k ruen
v konkrtni instalaci nedojde. Zpusobi-li toto zaifeni skodlive ru seni prijmu radia nebo televize, ktere Ize zjistit vypnutim a zaputim zaifeni, doporucuje se uzivateli pokusit se odstranit ru Seni Jednim nebo nekolika nasledujicimi oparenimi: