AF 5105MS - Digital photo frame AGFAPHOTO - Free user manual and instructions
Find the device manual for free AF 5105MS AGFAPHOTO in PDF.
| Product type | Digital photo frame |
| Brand | AgfaPhoto |
| Model | AF 5105MS |
| Screen size (diagonal) | 10.2 inches |
| Screen format | 16:9 |
| Screen resolution | 800 x 480 pixels |
| Screen type | LCD TFT |
| Internal memory | 256 MB (NAND) |
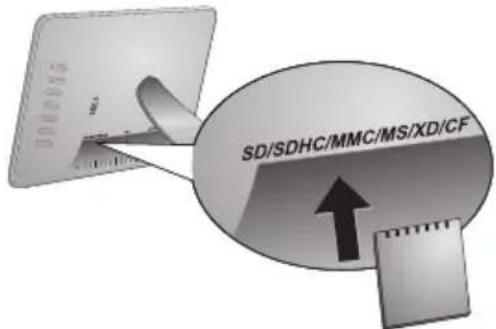
| Memory card reader | SD, SDHC, MMC, MS, XD, CF |
| Compatible photo formats | JPEG |
| Compatible music formats | MP3 |
| Compatible video formats | Motion JPEG, MPEG-4 |
| Dimensions (W x H x D) | 293 x 200.5 x 23 mm |
| Weight | 0.74 kg |
| Power supply | 100-240 V AC, 50/60 Hz (power adapter 5 V, 2 A) |
| Audio output | 2 x 1 W |
| Operating temperature | 10 to 45 °C |
| Operating relative humidity | 20 to 80 % |
| Time and date display | Yes |
| Alarm function | Yes, with customizable music |
| Programmed automatic shutdown | Yes |
| Slideshow with background music | Yes |
| Rotation and display format change | Rotation 90°, format 4:3 or 16:9 |
| Remote control included | Yes (with battery) |
| USB connectivity | USB OTG (for PC) |
| Removable interchangeable frame | Yes, magnetic attachment |
| Screen cleaning | Soft, dry cloth |
| Repairs | Entrust only to an approved specialist |
Frequently Asked Questions - AF 5105MS AGFAPHOTO
User questions about AF 5105MS AGFAPHOTO
0 question about this device. Answer the ones you know or ask your own.
Ask a new question about this device
Download the instructions for your Digital photo frame in PDF format for free! Find your manual AF 5105MS - AGFAPHOTO and take your electronic device back in hand. On this page are published all the documents necessary for the use of your device. AF 5105MS by AGFAPHOTO.
USER MANUAL AF 5105MS AGFAPHOTO
Copyright © 2008 Sagem Communications
Très cher client,
Supports mémoire photo
Cartes mémoire photo compatibles..SD/SDHC/MS/XD
/MMC/CF
Formats compatibles
Format Photo .JPEG
Copyright © 2008 Sagem Communications

Dear Customer,
Thank you for purchasing our photo frame. Get ready to experience photography like never before! The photo frame allows you to view photos, audio and video files—all without a computer.
High definition LCD screen
Your digital photo frame includes 256MB of built-in memory, a memory card slot and a USB port. Files on the built-in memory can be deleted and files on memory card and USB-disc can be copied.
The included remote control makes it simple to select photo-, music- and movies files, change settings and more.
Supports browse mode (thumbnails of nine images per page at a time). Your digital photo frame supports photo rotate and stretch function.
An automatic, continuous slide show with background music lets you enjoy all of your photos with ease.
Additional functions like time and date display, alarm clock and an automatic on and off switch are also available.
We hope you enjoy your machine and its many functions!
About this User Manual
With the installation guide on the following pages, you can start using your machine quickly and easily. Detailed descriptions can be found in the following sections of this user manual.
Read the entire user manual carefully. Follow all safety instructions in order to ensure proper operation of your machine. The manufacturer accepts no liability if these instructions are not followed.
Symbols Used

Warns about dangers for people, damage to the device or other objects as well as possible loss of data. Injuries or damage can result from improper handling.

This symbol designates tips that will help you to use your machine more effectively and easily.

1 Safety Instructions and Recommendations
Do not make any changes or settings that are not described in this user manual.
Setting Up the Device
The unit is for indoor use only. The device should rest securely on a stabile, flat surface. Position all cables in such a way that no one will stumble on them, thus avoiding possible injuries to persons or damage to the device itself.
Always handle the unit with care. Avoid touching the LCD screen. Never place heavy or sharp objects on the LCD panel, frame or power cord.
Protect the device against direct sunlight, heat, large temperature fluctuations and moisture. Do not place the device in the vicinity of heaters or air conditioners. Observe the information on temperature and humidity in the technical data.
In the event that the device becomes too hot, or if you see smoke coming from the device, you must immediately pull the power cable out of the power socket. Have your device examined by trained professionals at a technical service location. To prevent the spread of fire, open flames should be kept away from the device.
Do not plug in the device in moist rooms. Never touch the mains cable or the mains connection with wet hands.
Do not allow liquids to enter into the device. Disconnect the device from the power socket if liquids or foreign objects have entered the device and have your device examined by trained professionals at a technical service location.
Do not allow children to handle the device without supervision. The packing materials should be kept out of the hands of children.
Power Supply
Use only the enclosed power adapter (see chapter Appendix / Technical Data). Check whether the mains voltage of your device (indicated on the type label) matches the mains voltage available at the setup location. This equipment complies with the voltage type specified on the unit.
Never touch the power cable if the insulation is damaged.
Before cleaning the surface of your device, disconnect it from the power network. Never use liquid, gaseous or easily flammable cleansers (sprays, abrasives, polishes, alcohol).
Only clean the display with a dry, soft cloth. If the display breaks, a mildly corrosive liquid may escape. Avoid all contact with your skin and eyes.
Repairs
Do not make any repairs to the device yourself. Improper maintenance can result in injuries or damage to the device. Only have your device repaired by an authorised service centre.
Do not remove the type label from your device; this would void the warranty.
Photo Memory Media
Only use storage media that are compatible with the device. In order to prevent damage to the card or the unit, please turn off the power before removing or inserting the card.
Never pull out the memory card while the device is accessing it. This could cause data to be damaged or lost.
Batteries
CAUTION! RISK OF EXPLOSION IF BATTERY IS REPLACED BY AN INCORRECT TYPE.
If the player is not used for a long time, take out the batteries. So you can prevent leakage and possible damage to the remote control.
The batteries used should be disposed of according to the recycling regulations of your country.
2 Overview
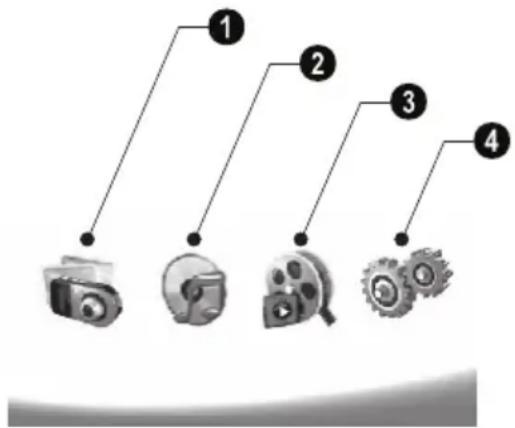
Overview of the Menu Functions
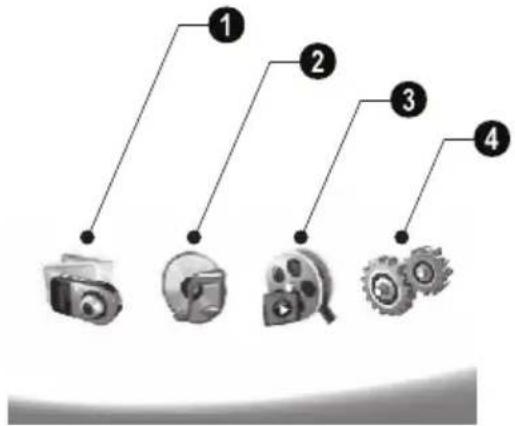
There are four items on the main menu.
Photo Menu
Music Menu
3 Video Menu
4 Settings
Navigating in the Menu
1 Press on the remote control.
2 Select the desired menu using / .
3 Confirm with
You can also call up the menus using the corresponding keys on the back of the device.
Call up menus directly
Press on the remote control to calling the photo menu.
Press on the remote control to calling the music menu.
Press on the remote control to calling the video menu.
Symbols on the LCD Display
Using the keys on the back of the device, you can call up the corresponding function which is shown on the display.

If there is no operation within five seconds after pressing the button on the rear, the on-screen con will disappear.
Photo- / Music- / Movie- Mode
3—Return to the previous menu level
Move up
V—Move down
Move left
Move right
Delete the files from the internal memory
Copy files to the internal memory
- Confirm selection
Slide Show Mode
3—Return to the previous menu level
To the next photo file
To the previous photo file
Starts or pauses the playback.
- Adjustment menu for Brightness (3), contrast (9) and color saturation (1). Press the corresponding button on the rear of the photo frame to enter the adjustment menu. Repeatedly pressing the corresponding button to adjust the brightness, contrast and saturation.
- Optional menu to rotating the image (⑤), to changing the aspect ratio (⑥) and adjusting the slide show speed (⑦). Press the corresponding button on the rear of the photo frame to enter the options menu. Repeatedly pressing the corresponding button to get different effects.
Background music setting menu
Music-/Movie-Playback Mode
-Return to the previous menu level
To the next music or movie file
To the previous music or movie file
Starts or pauses the playback.
Adjust the volume
i—Shows current music or video title

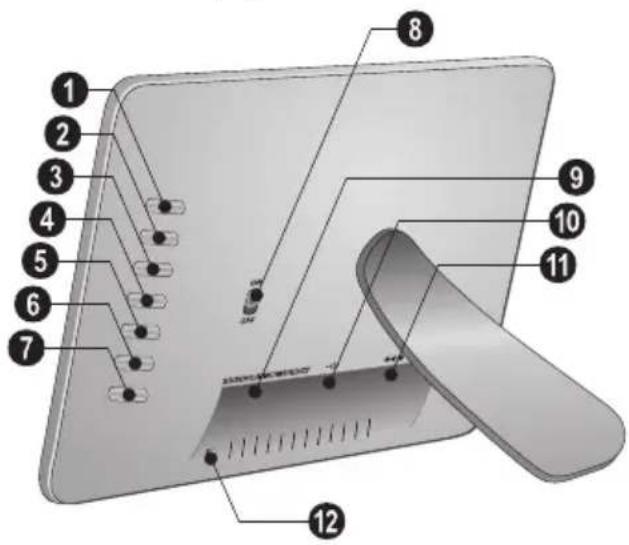
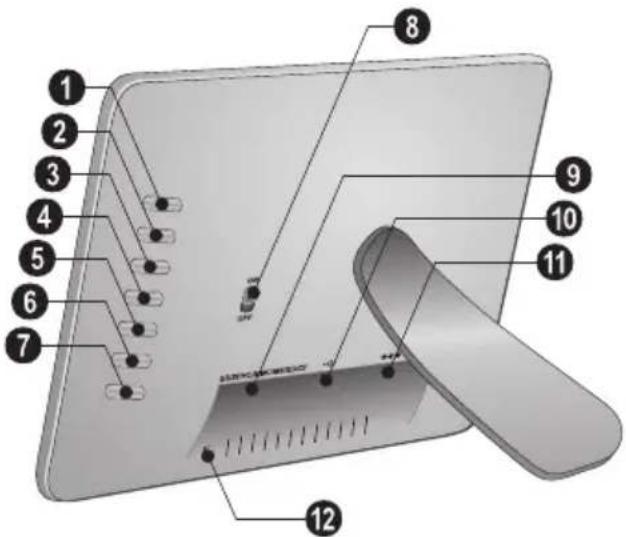
Device Overview
Using the keys on the back of the device, you can call up the corresponding function which is shown on the display.
1 3- Calling the menu functions / Return to the previous menu level
-Calling the menu functions / Navigating in the Menu / Skips to the next image, music or movie / Increase the brightness
3V- Calling the menu functions / Navigating in the Menu / Skips to the previous image, music or movie / Decrcase the brightness
4 D—Calling the menu functions / Navigating in the Menu / Start or pauses the playback / Increase the contrast / To adjust the slide show delay
- Calling the menu functions / Navigating in the Menu / Enters the adjustment menu for brightness, contrast and colour saturation / Decrease the contrast / Increase the brightness.
6 /A—Calling the menu functions / Copy or delete the file / Enters options menu / Decrease the volume
7 Confirms the selection / Start slide show
ON/OFF - On/Off switch
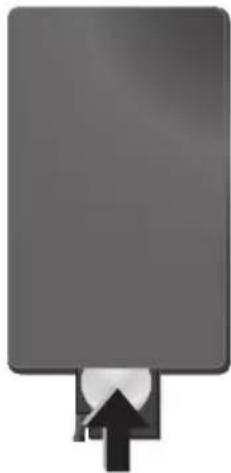
SD/SDHC/MMC/MS/XD/CF-Slot for Memory card
-socket—USB port for PC
11 ee -socketMains cable socket
12 button for changing the frame
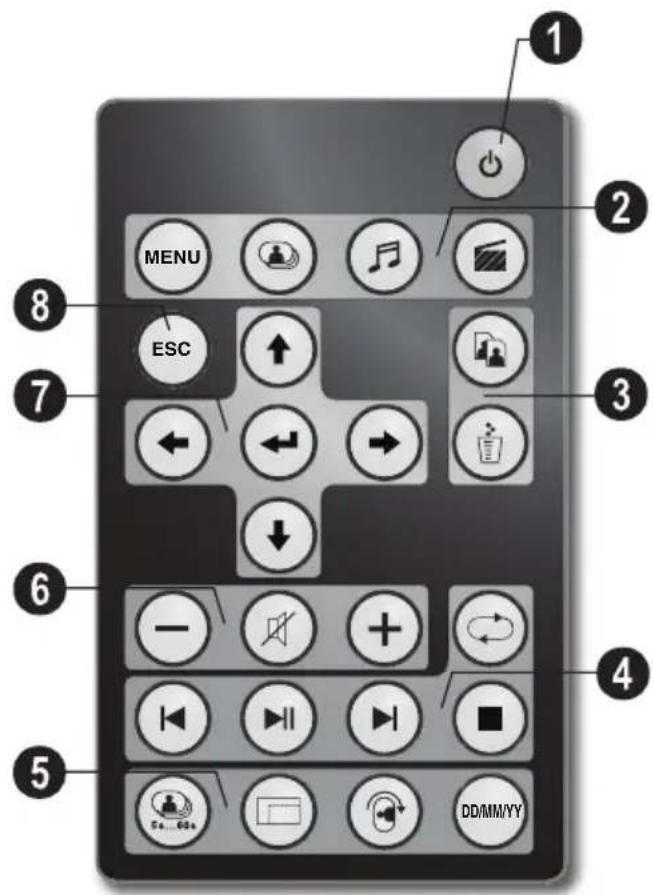
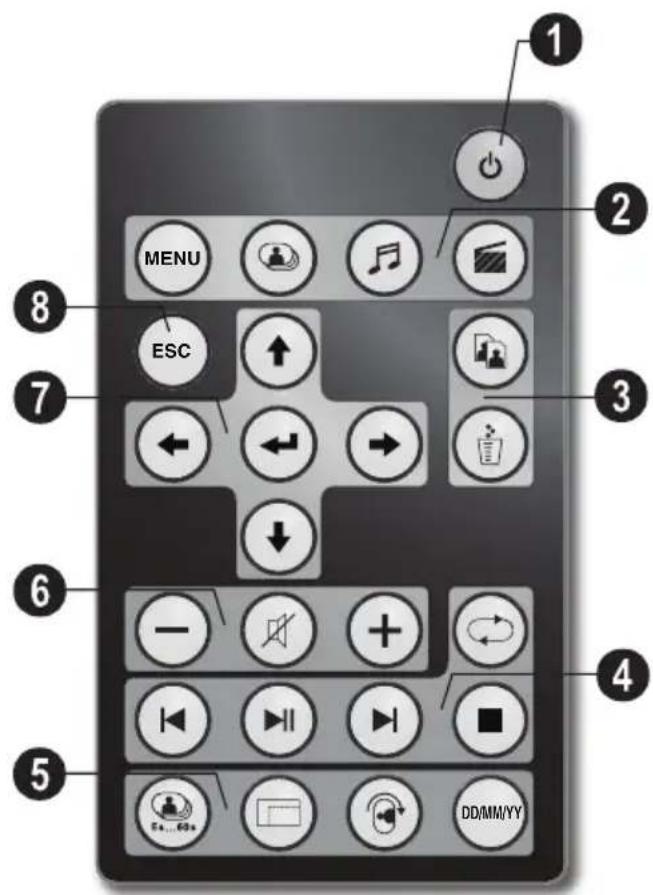
Remote Control
Switching On and Off
- On/Off / Standby mode
Calling the menu functions
- Calling the menu functions
- Calling the photo menu
—Calling the music menu
—Calling the video menu
Copy/DeleteFiles
- In the photo, music, video menu: copy files
- In the photo, music, video menu: delete files
④ playback functions
- While enjoy a single image, a music, a movie: To the previous image, music or movie file
-Starts or pauses the playback. - While enjoy a single image, a music, a movie: To the next image, music or movie file
-Stop playback / Return to the previous menu level
Repeat playback of image, music, video file
Additional Functions
Press repeatedly: display of the various slide show speeds
Switches aspect ratio (4:3 or 16:9)
To rotate the orientation of an image while enjoy a single photo or slide show with one image.
During playback, press to display or hide the time information that you set on the setting menu.
Adjusting Volume Level
/ Adjust the volume
Mute mode
7/8 Direction Buttons
/ / / —Navigating in the Menu / Select options
- Calling the menu functions / confirming input
Esc Return to the previous menu level
EN

3 Initial Operation
Packing Contents
Digital photo frame with bracket
Interchangeable frames
A remote control (with battery)
4 Power supply
USB cable
User Guide (not depicted)


If one of the parts is missing or damaged, please contact your retailer or our customer service.
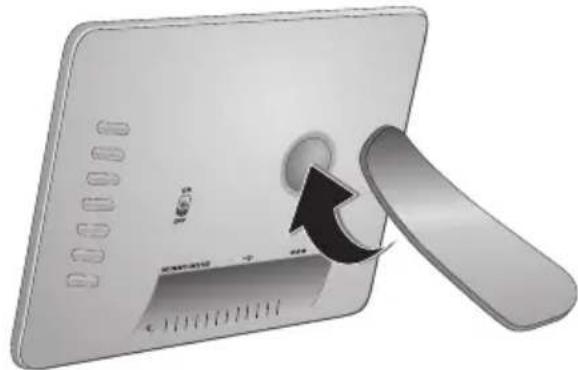
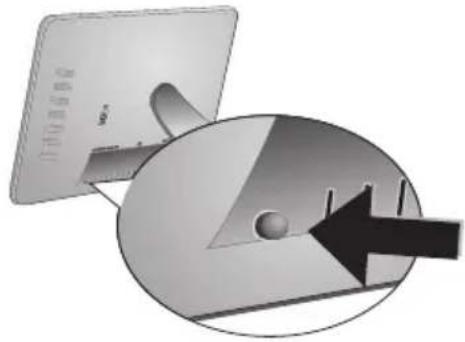
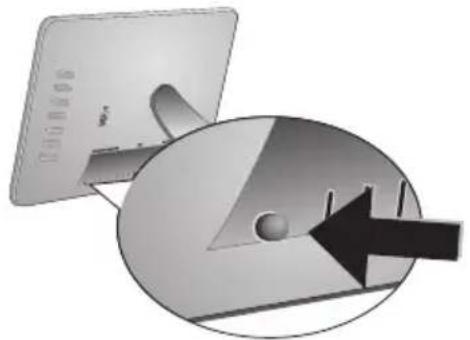
Mount the Bracket
Assemble the Photo Frame bracket on the back to prop the player up.
Connecting the Mains Cable

Check whether the mains voltage of your device (indicated on the type label) matches the mains voltage available at the setup location.
1 Insert the mains cable into the connection located on the rear side of the device. Connect the mains cable to the electrical socket. Do not switch on the device!

Connecting to a PC
Using the USB cable, you can connect your photo frame to a computer to transfer files between the internal memory and computer.

If you connected the photo frame to a computer, the inserted memory card can not be recognized.
1 Switch the device off using the on/off switch on the rear.
2 With the photo frame turned off, connect the small end of the cable to the frame and the large end to your computer.
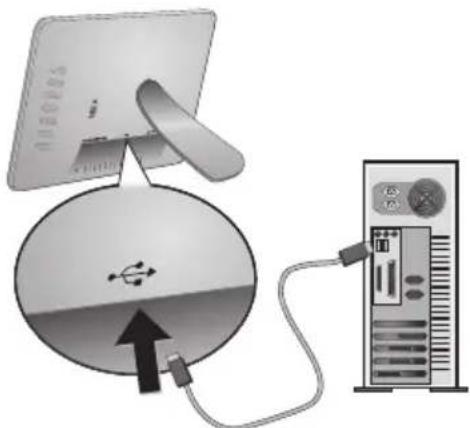
3 Switch the device on using the on/off switch on the rear. Allow the computer a few moments to recognize the new hardware. Compatible photo, music and video files can be copied using Explorer onto the internal memory
Inserting a Memory Card
1 Switch the device off using the on/off switch on the rear.
2 Insert a memory card into the appropriate card slot at the rear of the device. Your photo frame supports the following memory cards: SD/SDHC/MMC/MS/XD/ CF.

Only use storage media that are compatible with the device. In order to prevent damage to the card or the unit, please turn off the power before removing or inserting the card.
Never pull out the memory card while the device is accessing it. This could cause data to be damaged or lost.
3 Switch the device on using the on/off switch on the rear. The player will start slide show after the start screen be displayed. Press Esc on the remote control to stop the slide show.
Installing or Changing the Batteries of the Remote Control
CAUTION! RISK OF EXPLOSION IF BATTERY IS REPLACED BY AN INCORRECT TYPE.
1 Take the battery compartment from the remote control by opening the locking mechanism (1) and pulling out the battery compartment (2).
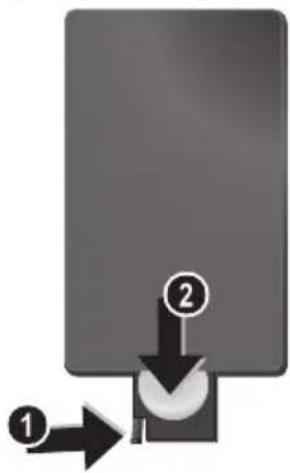
2 Insert the new batteries into the battery compartment with the positive and negative polcs as shown on the back of the remote control. Make sure the polarities (+) and -) are aligned correctly.
3 Push the battery compartment back into the remote control until the locking mechanism engages.

Normally the batteries will last for around one year. If the remote control does not work, please replace the batteries. If the player is not used for a long time, take out the batteries. So you can prevent leakage and possible damage to the remote control.
The batteries used should be disposed of according to the recycling regulations of your country.
Using the Remote Control
Point the remote control to the remote sensor on the front panel of the device. Its working limits is within an angle of 30 degrees and a distance of 2 meter. When using the remote control, no obstacle should be placed between the remote control and remote sensor.

4Playback
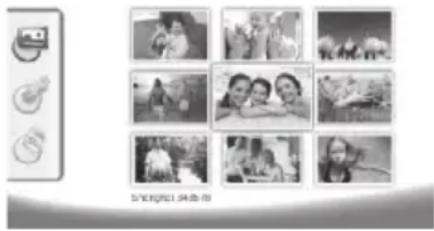
Photo Playback
1 Select the photo menu in the main menu and confirm using. A screen with memory type icons will appear.
You can call the photo menu also using on the remote control.
2 Follow the steps on the Internal Memory and Memory Card Slot section to select the memory type and press
3 Then the frame will display nine thumbnail images per page as below.
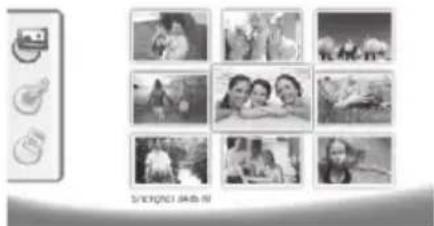
4 Select the image you want to view using or on the remote control.
5 Press to start the slide show.
During playback call up the menu usingMenu. During a slide show, you can press to view
During a slide show, you can press to view a single image. Press to skip top the previous or next image.
Rotate Photos
When a single image is displayed, you can rotate the image using button on the remote and finally return to original image. Every time you press this button, the image rotates 90 degrees clockwise.
Switches the Aspect Ratio
The digital photo frame has a wide screen with 16:9 aspect ratio. However most of the consumer camera's take photo in 4:3 aspect ratio. You can alternate aspect ratios between 16:9 and 4:3 by repeatedly pressing on the remote control. If you change the display aspect ratio to 4:3, the images will appear in the middle of the screen with black bars on both sides.
Set up Slide Show
Adjust the slide show speed
The slide show speed can be changed using on the remote control. Repeatedly pressing this button will get different time delay such as 5s, 10s, 30s and 60s.
Setting the Background Music of the Slide Show
As background music, you can only use files that are stored together with the photos in the internal memory on the memory card or the USB connection.
1 Press on the symbol on the back of the device during a slideshow. The settings menu for the background music appears.
2 Press to start the background music.
Using 12 = 12 set the volume. You can skip to the previous or next song by using the or button on the remote control.
MusicPlayback
1 Select the music menu in the main menu and confirm using . A screen with memory type icons will appear.
You can call the music menu also using on the remote control.
2 Follow the steps on the Internal Memory and Memory Card Slot section to select the memory type and press
3 Select the file you want to play back using / or / on the remote control.
4 Press to start playback. To stop press or on the remote control.
During playback, you can skip to the previous or next song by using 回 /oder 回 on the remote control.
During playback, press the on the remote control to pause and to resume playback.
Using to select if the actual song is repeated, all songs are repeated or to switch off the repeat function.
Adjusting Volume Level
During playback you can adjust the volume using on the remote control. Press or repeatedly to switch off the volume (mute function).
Movie Playback
1 Select the movie menu in the main menu and confirm using . A screen with memory type icons will appear.
You can call the movie menu also using on the remote control.
2 Follow the steps on the Internal Memory and Memory Card Slot section to select the memory type and press
3 Select the file you want to play back using / or / on the remote control.
4 Press to start playback. To stop press or on the remote control.
During playback, you can skip to the previous or next song by using 回 /回 oder 回 /回 on the remote control.
During playback, press the 10 on the remote control to pause and to resume playback.
Using to select if the actual song is repeated, all songs are repeated or to switch off the repeat function.
Adjusting Volume Level
During playback you can adjust the volume using - / + on the remote control. Press or repeatedly to switch off the volume (mute function).
5 Settings
EN
Modifying the Settings
1 Select the settings menu in the main menu and confirm using
2 Use () / () to select the setting you would like to allocate.
3 Confirm with
You can allocate the following settings:
(Clock)—Setting the time and date. Press to display the time on the screen.
(Brightness, Contrast, Colour saturation)—This setting allows you to adjust the brightness, contrast, color saturation of the LCD screen.
(Transition Effects)—Allows you to choose different styles of slide show effects.
(Alarm & Power off)
Alarm: The alarm can be set to ring at a specific time each day. The hours and minutes are set in the same manner as used in setting the clock.
Power Off: Allows the frame to automatically power off at a particular time of the day. The Power icon must be set to .
(Auto Start)—Allows you to set different auto start playback item among Main Menu, Slide show with one image, Slide Show with four images and Play video). The photo frame will play the corresponding content after the start-up screen logo be displayed.
Default)--Select to restore the settings to the factory default.
4 Select the desired setting using () / () .
5 Confirm with
Press or to close the menu and return to the starting mode.
Copy / Delete Files
Images, music and video files in the internal memory can be deleted. Images, music and video files on the memory card or USB disk can be copied.
Copy Files
1 Highlight the file you want to copy.
2 Press on the remote control.
3 Highlight icon and press to start copying.
4 The screen will display the processing bar. After finish copying, you can find the image in the internal memory.
Highlight × icon and press to exit the current operation menu.
Delete Files
1 Highlight the file you want to delete.
2 Press on the remote control.
3 Highlight icon and press to delete the file.
Highlight icon and press to exit the current operation menu.
Setting Music and time for the Alarm Function
Ensure that a memory card is inserted in the device or an USB connections to a computer exists.
1 Press on the remote control.
2 Using 1 / 1 select the USB connection or a memory card as the source.
3 Confirm with
4 Using / or / select the file that you would like to set as music for the alarm function.
5 Press on the remote control.
6 Select the symbol for the alarm function ( ) using / .
7 Confirm with . The music will be copied to the internal memory and be set the as the alarm music.
8 Press on the remote control to highlight the setting symbol (图).
9 Confirm with
10 Using / select
11 Follow the steps on the Setting the Alarm Time. The Alarm Mode must be set to MP3.
6 Service
Changing the frame
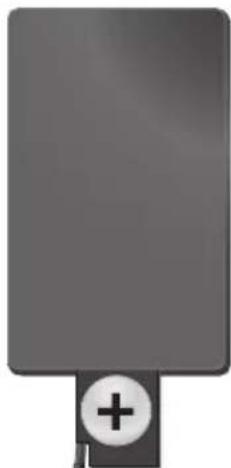
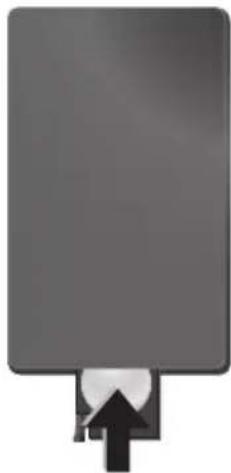
You can change the frame of the device using the picture frames supplied. The frames are held with magnets.
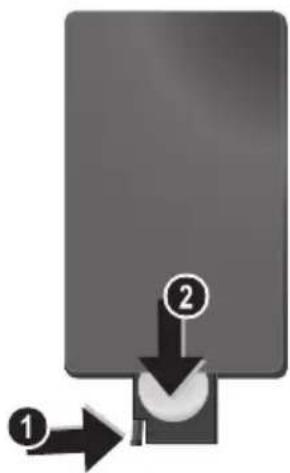
1 Press on the change frames button on the back of the device. Remove the frame.
2 Place the picture frame onto the device until it engages on the magnets.

EN
Information
| Problems Solutions | |
| Photo Frame does not power on. Check that you connect the AC adapter to the photo frame properly. | |
| Cannot save files Make sure that enough internal memory | is available. Re-start the picture frame and delete some files in order to free up memory space. |
| No sound Make sure the file format is supported, the computer and the frame are correct connected or the memory card is not damaged. | |
| Memory card can not be recognized | If you connected the photo frame to a computer, the inserted memory card can not be recognized. |

7 Appendix
Technical Data AF 5086MS
Overview
Dimensions (L× H× W) 232,5x192x22,5mm
Weight 0,575 kg
Mains Connection....Input: 100 - 240V /50 - 60Hz Output: 5V = - / 2A
Audio Output. 2× 1 W
Recommended Ambient. 10-45°C
Relative humidity 20-80%
Display
Screen size 8
Aspect ratio. 4:3
Resolution 800x600 Pixel
Memory
Internal memory. 256 MB-NAND-Memory
Connections
USB port.. USB OTG
Compatible Memory Cards.SD/SDHC/MS/XD/MMC/ CF
Supported formats
Photo formats.JPEG
Music formats.. MP3
Video formats........Motion Jpeg, Mpeg-4
Technical Data AF 5105MS
Overview
Dimensions (L× H× W) 293x200,5x23mm
Weight 0,74kg
Mains Connection....Input: 100 - 240V /50 - 60Hz Output: 5V = /2A
Audio Output. 2× 1W
Recommended Ambient. 10-45°C
Relative humidity 20-80%
Display
Screen size 10,2
Aspect ratio. 16:9
Resolution 800x480 Pixel
Memory
Internal memory. 256 MB-NAND-Memory
Connections
USB port....USB OTG
Compatible Memory Cards.SD/SDHC/MS/XD/MMC/ CF
Supported formats
Photo formats.JPEG
Music formats.. MP3
Video formats........Motion Jpeg, Mpeg-4
Technical Data AF 5135MS
Overview
Dimensions (L× H× W) . 356× 249× 24mm
Weight. 1,168kg
Mains Connection ....... Input: 100 - 240V / 50 - 60Hz
Output: 12V = /1,5A
Audio Output. 2× 1W
Recommended Ambient. 10 - 45^
Relative humidity. 20-80%
Display
Screen size. 13,3
Aspect ratio. 16:9
Resolution. 1280 x 800 Pixel
Memory
Internal memory. 256 MB-NAND-Memory
Connections
USB port USB OTG
Compatible Memory Cards SD/SDHC/MS/XD/MMC/
CF
Supported formats
Photo formats .JPEG
Music formats.. MP3
Video formats Motion Jpeg, Mpeg-4
All data are provided for reference purposes only.
AgfaPhoto reserves the right to make any changes without prior notice.
AgfaPhoto Holding GmbH: AGFAPHOTO is used under license of Agfa-Gevaert NV &
Co.KG. Agfa-Gevaert NV & Co.KG does not manufacture these products or provide any product warranty or support.
Contact: www.agfaphoto.com
For service, support and warranty information, contact the distributor or manufacturer:sold and distributed by Sagem Communications.
Contact: www.sagem-communications.com

The CE marking certifies that the product meets the main requirements of the European Parliament and Council directive 1999/5/CE on telecommunications terminal equipment, regarding safety and health of users and regarding electromagnetic interference.
The declaration of compliance can be consulted on the site www.agfaphoto.com
Preservation of the environment as part of a sustainable development logic is an essential concern of AgfaPhoto. The desire of AgfaPhoto is to operate systems observing the environment and consequently it has decided to integrate environmental performances in the life cycle of this products, from manufacturing to commissioning use and elimination.

Packaging: The presence of the logo (green dot) means that a contribution is paid to an approved national organisation to improve package recovery and recycling infrastructures to facilitate. Please respect the sorting rules set up locally for this kind of waste.
Batteries: If your product contains batteries, they must be disposed of at appropriate collection points.

Product: The crossed-out waste bin stuck on the product means that the product belongs to the family of electrical and electronic equipment. In this respect, the European regulations ask you to dispose of it selectively;
- At sales points in the event of the purchase of similar equipment.
- At the collection points made available to you locally (drop-off centre, selective collection, etc.).
In this way you can participate in the re-use and upgrading of Electrical and Electronic Equipment Waste, which can have an effect on the environment and human health.
This user manual was printed on recycled paper bleached without chlorine. This satisfies the highest standards for low environmental impact. The cardboard packaging used and the packaging inserts of paper and cardboard can be disposed of as waste paper. The plastic foil may be submitted for recycling or disposed of with waste not intended for recycling, depending on the requirements in your country.
Trademarks: The references mentioned in this manual are trademarks of the respective companies. The lack of the symbols and does not justify the assumption that these dedicated terms are free trademarks. Other product names used herein are for identification purposes only and may be trademarks of their respective owners. AgfaPhoto disclaims any and all rights in those marks.
Neither AgfaPhoto nor its affiliates shall be liable to the purchaser of this product or third parties for damages, losses, costs, or expenses incurred by the purchaser or third parties as a result of accident, misuse, or abuse of this product or unauthorized modifications, repairs, or alterations to this product, or failure to strictly comply with AgfaPhoto operating and maintenance instructions.
AgfaPhoto shall not be liable for any damages or problems arising from the use of any options or any consumable materials other than those designated as original AgfaPhoto products or AgfaPhoto approved products.
AgfaPhoto shall not be held liable for any damage resulting from electromagnetic interference that occurs from the use of any interface cables other than those designated as AgfaPhoto products.
All rights reserved. No part of this publication may be reproduced, stored in a retrieval system or transmitted in any form or by any means, electronic, mechanical, photocopying, recording, or otherwise, without the prior written permission of AgfaPhoto. The information contained herein is designed only for use with this product. AgfaPhoto is not responsible, if this information is applied to other devices.
This user manual is a document that does not represent a contract.
Errors, printing errors and changes are reserved.
Copyright © 2008 Sagem Communications

Stimato cliente,
Copia/cancella i file
Copyright © 2008 Sagem Communications
Geachte klant,
Copyright © 2008 Sagem Communications

Estimado cliente:
Copyright © 2008 Sagem Communications

Estimado cliente,
Copyright © 2008 Sagem Communications

Bästa/bästekund,
Copyright © 2008 Sagem Communications

Vázeny zákazníku,
Copyright © 2008 Sagem Communications

Tiszelt vásáró!
Copyright © 2008 Sagem Communications

Szanowy kliencie,
Copyright © 2008 Sagem Communications

Stimate client,
Vä multumim ca ati achizitionat Rama foto digitala commercialata de compania noastr. Vä recomandam sa fiti pregatit fiindc va t experimentation arta fotografici asacum nu ati mai facut-o pana acum! Noua D-voastr rama fotodigitala va permite sa vizualizati fotografii, filmele si sa asculati muzica -toate acestea fara calculator
Ecran de cristale lichide de inalta calitate
Copyright © 2008 Sagem Communications


Vázeny zákaznik,
dakujeme vam, ze ste si zakupili tento fotoramcck. Pripravte sa zait fotografovanic tak, ako ste ho cste nikdy nevideli! Fotoramcck vam umoznue zobrazovat fotografic a prehravat zvukove a video sibory bez poctaca.
Copyright © 2008 Sagem Communications

Sayin musterimiz,
Copyright © 2008 Sagem Communications

AyannTe nελaTη,
EvxqoTobue noe axtae to yqaxo wtooyqxio
naiotno ts eaoia c xc. Eotpaoteite yia uax evea o vao
wtooyqxixn epia! Me to veo yqaxo wtooyqxio
naiio 0a c npoeite va deite wtooyqxie xai bivxo axi vao
pialete mouoxh -wqic naxtovxio noloyoiotn.
Ypnnsnovotntac00dvTNFT-LCD
To e q i n h vynm 256 MByte, eva axvovotn xagtwv pvtns xai dxovseon USB. Ta axyeia npogov vdxayqopovxo tnv sowteqixn pvnnn na vaxavtyqapov oic xqotec pvnhns n es USB stick.
Me to tnexetioo nou npoxeyet a uopoeite me euxolia va enlete axeia wotoyqiwv, oovnks, xai bivteo, v' alae tig quthetais, xai noa a
Suvonpi nqoepoxoyn (nqo3oan muaotob9 9
Wtooyopawv taotoxov).To ynpano wtooyopin
Paiio oac unootnqiei th otqopn xu tv aalxyn qoqa
Tc sivovac.
Deite eunolia tic toyoqqiec 1e to autopato slideshow pouo.
Eiongs, 8o0eTe eipoo00tec aeitougyte c noos p0o0a
Oxax ax npovmivxc, oynthoi, xia aotopat
Leiouyix avmuatox ax oBnoiuato.
aexyopae TnAeuyagoteepieigc nOoxooh
-1qoβαλa to exσtoe moosxoxmuατ h βivteo
Σύνοψη συσκεύης
Me ta xtoa topiowepoc ts oxoeu npopeite va
xalete tyv axloyn letouyix nou 0o paoaalaaetau stny
ooovn.
1 ByaTe Tn a 0eaeoogovovtac to pIooiaqiox (1) xai taoobvtae Tny aio tn ooxey (2).
2 Balle tn vea aataqia stny aataqioohn me toos
thetaxobs ax aovntixobc paoos oonodvotatoo
oxedio ts aataqiooohns oto iow epos tou
tnexaygiotnoi. Awote npoooy n oyokotnai!

3 2npoWte ty mataqiooohxno tnaeoiotno pexo vX naiidogost.
Suvthos n ddoxix Gws tov maatgiv elva eoxovoc.Av to thaxeiotno de laitougyel, axiaataothe tnv mataqia. Av dev npoeiata vXeogpoanoiote to wotoyoxipio paiio yia ayao Xovixo diotnua, xapigote ts mataqies. Etai aiopebyete tv xivduo biagoo xai toxov cetae oto tnlexieiogio.
Φασασγσγσγσγσγσγσγσγσγσγσγσγσγσγσγσγσγσγσγσγσγσγσγσγσγσγσγσγσγσγσγσγσγσγσγσγσγσγσγσγσγσγσγσγσγσγσγσγσγσγσ
Copyright © 2008 Sagem Communications
YBaXaEmbI NOKyNaTeA,b,
BaIaOaapn BAc 3a IIpHObpeTeHHe AaHHo IIpoAkyuHII. IIpHIOTOBBTEcB K 3aMeateAbHOMy IIyTeHecTBHO B MHP fOTOrpaHIN! BO3MOKHOCTb IIPOCMOTpa fOTOrpaHIN, BIAeOpAOHKO8, a TaKke IIpOCAYHINBAHHM My3bIKI 6e3 HcHOAB3OBAHII KOMTBIOTepa
BbCOKOKaueCTBeHHHJKNAKOKPnCTaAHuecknAHCnAe
YcIpoHCTBO COAcpKHT BcTPOCHHyHO HAMITb 256 M6, CAOT AA YcTaHOBKH KapTI HAMITn I USB IOpT. BO3MOXHOCTb yAAaTb caiAB Co BcTPOCHHOII HAMITn, a TAKKC BO3MOxHOCTb KOIHPOBAHH c KaTHI HAMITN HAN USB-HOCHTCAH
BXOABHIN B KOMHAEKT HOCTABKN IAY IO3BOAIEAERKOBIOHPaTB FOOTOPaOHN, My3bIKY, BNApOAnKH,HNMeHHb HAcTPOH N AeAAbMIOFOE APyTOE.
IpeBapHTeALHbI IPOCMOTp yMeHbIIeHHbIX H3OpaKeHH (IOKa3 AO AeBHTI yMeHbIIeHHbIX H3OpaKeHH OHOBPcEmHo).LHΦPOBOc yCTpoIcTBo- φOTOPaMka IO3BOAerT IOBOPaHbAtb CTpaHHbI H 3McHbIbHX φOpMaT.
PPOCMOTp fOToIpaΦHn B pCKHmec ABTOMATHECKOIO CAAHA-HIOY C MY3bKaAaHBM COIIPOBOKAEHHEM.
HMeIOTc TaKke AIOHOAHHTeAHBtE cyHKINH, HApPmep, HHAHKAHH BpeMeHH II AaTb, 6yAHABHHK, TaHmep BKAIOOeHHN BBkAIoOeHH.
MHaACMCRA,TO BIOAAYHCTyAOBOABCTBHCOT pa60tbcnnapatomnCROMHOROHCACHHHxdyHKIN
O6 3TOM pyKOBoACTBe NOAb3OBaTeA
C IOMOIBIO INHBeAeHHORO DaAee pyKOBOACTBa IO yCTAHOBKE Bn CMOKeTe 6bICTPO INpHcTyrHtB K EKIIAYaTIINn BaIIIErO aIITapTa. NoAPoHOe OIIHCAnHe YHKINI INPHEAEO B NOCAEyTOHINx pa3AeAAx pyKOBOACTBA II0AB3OBATCAJ.
BHMMATCAbHO 03HaKOMBTECb C pyKOBOACTBOM IOAB3OBATEA. AAR O6ecHueeHHN 6e3OHaCHO paOHTI aIIHapATA CO6AIoAAHTE BCE YKa3AHHH TEXHHKN 6e3OHTACIOCTH.N3rTOBHTeAB HIE HIEcET OTBETCEIIIOCTH B CAYaee IEC6AOAEHH INPABH TExHHK 6e3OHTACIOCTH.
NcnoA63yeMbIe 06o3HaueHn

Pcayppckdact 06 OHACHOC1X AAR AHOAcH, BO3MOKHOCTH IOBpCKAChn aIIIapata HAN APYHX ycipOCHB, a TAKKE O BO3MOKHOH IOTepc AaHHbIX. HcIIpaBHbHa 3KCIAYaTaN MOKeT IIpHBecTH K TpaBMAM HAN IOBpeKaehIO aIIIapata.

TOT CHMBOA 0603Haayact COBcIb, KOTOpbc IOMORAOT HAnOoAee 9ΦΦeKTHBHO HCIOAB3OBaTB aIIIapat.
1 Pekomehdaци по Тхнke 6e30napochtn
IHe BHOCHTe HHKaKNIX H3MeHeHHH II HaCTpoE, He OIIINCAHHbIX B 3TOM pyKOBOACTBE IIOAB3OBaTEA.
PpoceAypa HactpoKn annapata
TO yCTpOCTBO IpcHa3HaCHO TOABKO AAR HANBNAyAaBHORO HCIOAB3OBAHIN. ANIpaT CAeAyET yCTaHOBBt Ha IIAOCKyO yTOOHBYIO HOBCpxHOCtB. PaIOAAraNTC BCC IIHYpbN Ka6cAn TaKIM O6pa3OM, YTObHNIKO Hc MOI HAOTYINTB Ha HIX HAN CHOTKHcyr, 3TO HCKAIoHTe BO3MOJHOCTb TpaBMnPOBAHHAIOAEII IOBpeKdEHCAmO r aIIIapata.
YcpoiCBOIpcAHa3HaueCHO AANKCIAYaTauHH BHYtpH NOMeIIeHH. He npKacaiTebc KKK-ACnAeIO.He pa3McIaIITc TAKCaIE HAn OcIpIbe IpcAMetb Ha KK3KpaHe, pAmke HAn IIHype 3AEKTPOIHHTAHH.
3aHHHaaTRe aHaparOT HONAAHIN HPMORO COAHeuHOro CBeta, BO3AeHCTBn HTeAA, pe3KHX HepeHaOB TEMepaTyb H BAAH. He pa3MeHaaTRe aHapar BOAH3H HarpeBaTeAeH KOHAHIOHEPOB BO3Ayxa.CMOTPHTE HOpMaHIO O AOYNCTHMOn TEHepaType H BAaKHOCTH BO3AYxa B TEXHNueCKHX XapaKTepHCnKax.
EcaH BaIaIapAT CAHIKOM CHABHO HApeCTc HAN BbYBANTC BIXOADIIH N3 HCIO ABIM, TO HCMCAACHHOOTKAHOHTTE IIHPc CTeBOrO 3AeKTPoIHHTAHN H3 PO3ETKN.
OaIre BaII aIIIapAT AIA OCMOTpa KbaHΦHIIPOBaIIbM CIIeIIAANCTAM HAI B IIeITp cepBHCIOO6cAYKBaIIHA.AI IpeAOIBpaIIIEIHO3ROPAIIIAETCNIOAHOCHTbK aIIIAPAty HCTOHHKI OTKpbTOTO HAaMeHH.
HIKORa He IIOKAHOaIte aIInapaT K ceTH N K TeAeOHHoI AHHN B cbpIX NOMEIIeHHX. HIKORa He KacaITcB cTeBOI BHAKH N PO3cTKH TcAcOHHOr pa3bMa BAaKHBMn pykAMH.
He OIOIyckaIIre HIOIaAaHHH JHKAKOCTB BHYtpb aIIIapara.
EcAn BHytpb aIIIapara HIOIaA JHKAKOCTb HAN IOCTOPOHHH IIpeAMET, HEMeAAeHHO OTKAIOHTe IIHyp 3AcKTPoIHITaHH N OTdAHTe aIIIapAT AAR OCMOtpa KBAAHΦHIIIPOBaHHBM CIEIIHaHCTAM HAI B IeHTp ccpBnCHOrO OBCAYKIBaHH.
He IO3BOAHTe AeTm IIOAB3OBAbC aIITapATOM 6e3 IIpHcMOIpa. He AOIIyCKaHTe AETe K yIiAKOBQHHM MATEPHaAM.
3AeKtpnueckoe nHTaHne
IcIOAB3yIte TOABKO 6AOK IHTAHINB XOADHIN B KOMIAEKT IOCTABKII (CMOTPHTe PnHOKeHHE / TexHHueckHC aHHbc).PiOBepTE, COOTBETCTBYET AN TTHI 3ACKTPOINTAHNBAHICRO aHApata (yKa3aHa H HINABANKC) THIy 3ACKTPOINTAHNBA MCTC yCTaHOBKN aHApata. HAUPKCHNC B CTH INPCMcMHORTO TOKA BCCTDA AOAKHO COOTBCCTBOBABy Ka3aHHOMY Ha H3AcHH.
He kacaTecb Hypa 0Aekrponrrnna CIOBpeKaeHIOHIOAHHne.
IpeA OCHKOI IOBepxHocTH aIInapaTa 063aTeABHOOTKAIOHTe erO ot ceTH 3AEKTPoITAHn. He IIpHMHeHrTe AAOHCTKH KHAkHX, rA3OOpa3HBIX IROPouHx OOHCTHCAC (a3po3oAH, a6pa3HBHe n IIOAHPyHOHne cpeACTBa, cINHPt).
OuHuaTe AHCHAei TOABKO MRAKOI cyXOH TKAHBIO.EcAH AHCHAei Ha KHAKHX KPHCTAAAX 6yAcT pa30H,TO H3 HERO MOKET BBTEU yMEpeHHO eAKaJ KNAKOCb. H3oeraTe AIOOoro KOITAKTa KApTPHAKei C BaIIeH KOKeH I RAa3AMN.
PemOH
He IIbTaTCCb cAmOCTORTCABHO pCMOHTHPOBAb aIIHApAT. HcIpaBnAbHbI pcMOHT MOKcTI npHBcTIN K TpaBMam IIOBpcKaChHHo aIIHapata. BaII aIIHapat MOKHOpemOHTHPOBaTb TOABKO B yHOAHOMOeHHOM CcpBHCHOM IIeHTpe.
He CHHMaIe 3aBOACKOINIIABANK c aIIIapata, INPHOTOM OTMeHHOTcRAPaIHTHHbIE O83aTeABCTBa.
HocnteIb namrtn foToIpafo
HcHOAB3yIe TOABKO COBMECTHMbIE C yCPOINCTBOM HOCHTAH HHΦOPMaIIHH. BceIa OTKAHOaJIte 3AekTPOHNHTaIIHe yCtPOINCTBA IIpeKaIe, Yem H3Baueh H3 HIEO KAPrY IAMrN BO H36EkaIIHH IOBpeKaIIHH KAPrIb IAMrTH ANo OyCtPOINCTBa.
HnKorAa He BbTackHbAHTe KApTy NAMrTH, KOtOpa HcIOA3yETcB TeKyIIMMOMeHT. 3TO MOKeT PpHBecTH KIOBpeKaEHHIO HAH KYTpate AAHbIX.
AKKMyAToPbI
BIINMAHIE! B CAYyae HcNOAB3OBAHN 3AeMCHTOB IITAHIII HeIpaBnAbHO TnIa cyIecTByet BEPOHTIOCTb B3pBa.
EcaHΦOTopamKa Hc HcHIOAB3yecraB TcYCHNACANTcHBO BpemHH, H3BAeKHTe AKKMyAHTOPHIE6aTapeKn. Blaaroapn 3tOMy OHn HE BHTeKyI HcIOBpcAHT IIyABT ANCTAHUHOHOYIIpaBACHN.
HcnoAo3OBAHHbIe aKKMyAaTOpHbIe 6aTapeKHeoOxAHO yTHAH3HPOBaTB cOaCHO AeCTByIOHMAHNOHAAbHM IIpaBHaAM HOPMaYTHA3aHH.
2 O6иne cBeaehnna
O63opФункиМehIO
1'AaBHOe MeHHo COCTOHT H3 YeTHbIpex IyHKTOB.
1 MCHIO FOIO
MeHIO My3bika
3 McHRO BnAco
4 HacrpojuKu
Habirraunno cnCTemMe MeHIO
1 HaKMHTc Ha Y (20
2 BbBepHTe HxKHOe MeHIO C HOMOITbIO 1/
3 IoATBepaHTe BbOop c NOMONIBIO KHONK

MCHIO TAKKc MOKHO OTKpbBaTb HPN HOMOIIH COOTBETCTBYIOIIX KHOIOK HA OpaTHOH CTOPOHe yCTPOINCTBA.
PpAmO AocTyn K MeHIO
IIaKMnIe Ha IAnV ④, YTObI OTKpIbI MeHIO FOTo.
HaPiY 10bO bOtB MCHo My3bKa.
HaMMTe Ha Iy, yTO6bI OTKpbTb MeHIO BHaEO.
СИМВОАБI Ha эКране ДИСПАЕ LCD
Pn HOMOHN KHOIOK Ha oopohcTOpHe yctpoNCTBa BbepHre COOTBETCTBYIOHyO cyHKINIO, KOtOpAaTe OTo6paKeHa Ha AnCIIAee.

ECAH HN ODAH KHOIIKA He HAKIMaeTcB TeCHHe IIN CCKyHA IOCA HAKATNA KHOIIHa 3aAHcI CTOPOHC yCTPOHCTBa, OTOpKaCMn CHMBOA HCUC3act.
PeknM OTo / My3bika / BnAeo
B-Bo3bpat K IpcabIaIyIICMY yPOBHHo MCHFO
A-BBepx
- BHH3
-BAeBO
BnpaBO
-YdaaHTb aHHHeI H3 BHyTpHeHHeI IaMHTH
- KoHnPoBaTb DaHHbIC BO BHyIpcHHFOIO HAMrTb
-ⅡoATBepAHTB BbOop
Pexm cAaIa-woy
B-Bo3bpar K IIpeAbyIeMy yPoBHO MCHIO
KcAeArytonneiΦoTOrpaHn
-K npcaBaiyicn foorpaan
-CTapr/πay3a BOCIPON3BeAeHHN
-
MeHIO HAcTPOINI KpKoCTH (3), KOHTpacta (9) INBcETHOCTH (1).IIaKaTb COOTBeTCTBYOHI KHOIIky HA 3aHEi CTOpOHe H3AEAHN DAA BXODA B MEHIO HAcTpoEK. IyTEM IOCAeAOBATEABHOHO HAJIMAHIN COOTBeTCTBYOHIX KHOIIOK HAcTPOITc KpKoCTb, KOHTpact H IIcBTHOCTb.
-
MeHIO OIIIN AAR BpaIeHHN H3O6paKeHH (), IIIMeIIeHHHΦOpMaTc TpaIHINb ()H NaCTPOIKN BpeMeHH 3aAepKKN B peKHMc CAA-HIOY ()。HaKaTaB COOTBETCTBYIOHyIO KHOHNy HA 3aAHEn CTOPOE H3AEAHN AA BXoAA B MEHIO OIIINH. NocAeAOBATEABHO HAKHMaTb COOTBETCTBYIOHnE KHOHN H3aAHEn CTOPOE H3AEAHN AApeYApOBKn COOTBETCTBYIOHero IapameTpA.
-
MCHHOHACPTPOCKoHOBOMy3IKH
Pexkm BocnpOn3BeAeHnMy3bIKN/BnAeo
B-Bo3bpat K npeAbyIeMy yPoBIO MeHIO
KcAeayrnoemy ayAHO- HAN BnBncoaHny
-KIpcBHyMCMyayHO-HHBNBACoaaNy
-CTapr/panay3aBOcipnoH3BeAeHHN
Φ/Φ=-IHaCTPOIIKa IpOMKOCTII
- Oro6paKCHNE TckyHcero 3aROAOBka ayAHO- HAN BnAcopaIIa

O63op annapata
Pn HOMOHN KHOHOK Ha 06paTHOH cTPOHc YEtPOHCTBa BBOpEPIIE COOTBCTCTByIOHyo FOYHKINHO, KOtOPa8yAcT OTOOpaKeHa HA ANCHAAe.
B-Bo3OB yHKm MeHIO/Bo3BpaT K npeAMyyPOBHO MEHIO
2△-Bb3OB cyHKnn MCHNO/HaBnraHnB MCHNO/ IepcxOA K CACAYIOICMY H3O6paKCHNO, ayHO- HAI BHAcoopaay/YBCAHueHHe RPKoCTH
Bb3OB cyHKIN MeHIO/HaBHraIIN B MeHO/ IepxoA K IIpcABAYCMy H3O6paKcEHNO, ayANo- HAn BHaEOdaay/YMeHbIIeHHe npKocTH
4 -Bb3OB cyHKHm MeHIO/HaBHnAIIIB MEHIO/ 3aIyck HAn OCTaHOBka BOCPTPOHN3BeEHHN/IOBBHHeHNE KOHTpacta/HAcTPOHKa BpeMeHH 3aApEKH N peKHMcCAaH-A-IIIoy
Bb3OB cyHKnH MCHHO/HabHraaHBA MCHO/ OcIyK MCHHO HAcIPOCK RPKOCIN, KOHTpACrA H BCTHOYMCHBIIHCNC KOHTpAcra/YBCAHCHNC RPKO11
61Bb3OByHKINMeIO/KoHnPOBaHHe HAYaAeHne paHOB/AocTyIK MeHO OITIN/YMeHbHHeHrPOMKCTI 3Byka
7 -PiOaTBepKdChnE Bb6opa/3aayck cAai-Ⅲoy
ON/OFF-BbIKAFOaTcAb
SD/SDHC/MMC/MS/XD/CF - CAOT AAR KAPT
-Pa3bEM - NOPT USB AANI IOAKAOueHHKOMITbIOTepa
10- -Pa3bcm Aa KaocAa 3ACKTPOINTAHH
12 KHOIIKA cMeHH paMKH
IyAbT AnctaHcNoHHOrO ynpabAeHn
1 BKAIOUeyHe N BBIAIOUoyHne
-BAIOueHHe/BbKaIOeHHe/PeKIMROTOBHOCTI
2 Bbl3OB yHKm MeHIO
BMBOBAAABHOTMOHEO
BMBMCHFOΦOTO
Bb3OB MCHIO My3bika
BbIOB MeIO BnAeO
3 KonnopoBaHne/ydaAeHne paAIOB
B MeHIO ΦOTO, My3bIka HAn BHaeo: KOnnpoBaHne
B MCHIO ΦOTO, My3bKa HAN BnACo: YaaAChnc
4ΦyHKUHN BOCnpon3BeAeHn
Bo BpcMa OAnHOHOrO BOCIpON3BcAChn:K CAcAyIOIci fOToIpaΦHH,ayHO-HAN BHAcOphiAiAy
-CTapr/na3aBOcnpoH3BeAeHH
BoBpeMa OAnHOHOrO BocPOn3BeAeHHa:K npCbAByuicnΦoToIpaΦHH,ayAoH- HnBnAcOpaA
OCTaHOBHTB OBCIpyON3BcAChHC/Bo3BpaT K IpeAByIeMy yPOBIO MOHIO
-IOBTOPTb BOCIIPOH3BEaEHHe IpeAHyIeH pOToRpaΦHH,ayHO-HH BN BHaeOpaa
5 AOnoAHnTeaHbHbe FyHKcHm
- HaKaTb NecKOaBko pa3: OTo6paKeHHe pa3HbX 3HaueHH BpeMeHH 3aAepKII B peKHe CaaH-A-IHOY
-13mchcnhncΦopMaTa əKpaHa(4:3 n11 16:9) - NoBopOT IIIo6paKeHHH INH INPOCMOTpe OAHOH
00 -Oto6paKeHc 3aHaHHoBpcmchn BO BpcMBOCpPOn3BeAeHHN
6 HactpoJa rPOMKocTH
- HactpoHaKa rpoMkoCTH
-OTKAFOCHHc3BYKa
7/8 HaBnraζnoHHbIe KhoNkM
1/0/0-HaBnraHbMCHHO/BbOpOnnn
- Bb3OB yHKnHm MeHIO/HoATBcPkAeHHe BBOa
ESC -BO3BpAT K IUPCAbIaYILcMy yPOBHHo MCHFO
YcTaHOBKa KapTbI NaMaTn
1 BbKAHOHTC yCTPOIcIBO HIN HOMOHN BbKAHOATCAH a ObaTHoI cTPOHC.
2 BCTABTE KAPITY HAMHTB COOTBECTBYIOH C AOT HA 6opATIOH CTOPOHE yCTPOINCTBA. OHO IOAAepKHBAOI T KAPTHI HAMHTN CAeAeyIOHIX φOpMaTOB: SD/SDHC/MMC/MS/XD/CF.
HcIOAB3yIe TOAko COBMCEHMbIC yctpoiCTBOM HOCHTEAH HHΦOpMaIIHH. BceIAA OTKAIOUaIte 3AEKTPOINITAHIE yctpoiCTBa IIpeKaE, YEM H3BAeYb H3 HeRo KapTy IaMHTN BO H36eKaIIHN IOBpeKaIIHN KaTb IaMHTN AHO yctpoiCTBa.
HnKOrAa He BbTaCKnBaHte KapTy nAMrTH, KOTopaa HcIOA3yEtCB TEkyIIM MOMeHT. 3TO MOKeT IIpHBecTH K IOBpeKaEHHIO IAH K YTpate AaHHBX.
3 BKAOHTE yIPOHCTBO HIN HOMOHN BHKAOATCAHA O6pAHOH CTOPHE. IocAE IIOBAeHHN 3KpaHa-3aCTABKN 3aIIyckaeTcraAaH-HIOY. HaKMHTe HA IAYE, TTObIOCTAHOBHTb cAAH-HIOY.
YcTaHOBka HAn 3aMeHa 6aTapeek B PdY
BHIMAHHE! B CAyac HcHIOAB3OBaHHN 3ACMCHTOB HITraHH NcHpaBnAbHOTo TINHa cyIIECTByET BepoTTHOCb B3pBa.
1 AAn3aMeHb6aTapeekIΔVOTKpoHTeΦHKcaTOp (1) H3BAeKHTe 6AOKc6aTapeiKaMn (2).

2BCTABTc HOBBc 6aTAPcKn B 6AOK 6aTAPcck, COBAHOAA HJXHHyIO IOAHPoCTb IIOAKAOUeHHI IOAOKHTEAbHbIX H OTPHaTeABHbIX IIOAIOCOB corAACHO CXEM HA o6patIOH cTOpOHe IAY. BcerAA coBAIOAAHTe IOAHPoCTb!
3 BcTaBBte 6AOK 6aTapeck B IIAV AO IIICAYKa φHKcatopa.
CpOK CAYK6bI 6aTAPEN HIN HOPMaABHBIX yCAOBHIX KcHAYaTAAHH INPb6AH3HTTEABHO OAHN TOA. EcAN IADY He paB0TaER, 3aMeHHTe 6aTapeIO. EcaH FOtOpAMKa HHe HCNOAB3yETCR B TeueHHe AANTeABHoro BpeMeHH, H3BAeKHTe AKKYMyAHTOPHBe 6aTapeHH. BAATOApR OTOMY OHN HE BHTeKYr H He IOBpeAHT IIyABT ANCTAHIOHOHORO YPiPaBAEHIN.
HcnoA3OBAHHie aKKMyAHTOpHic 6aTapeKHeoXoAHMO yTHAn3HPOBaTb COIaCHO AcCTByHOHN HAHOHaABHM IpaBnAm HOPMaM yTHAN3aHH.
HcnoAb30BaHne PAY
HaipabBte Iy Ha AarHn HA HepeAHei HHeAH yctpoHCTBa. Iy KoppeKTHo paOaTaeH paacToHHn DO 2 M OT yctpoHCTBa H IIpy YIAC, HC IIpcBbIIaHOICM 30 IpaYcoB. VocHTcB, YTO HHKaHC IIpcAMCTH HC 3aIopakHBaOT IIPOCTpAHCTBO MCkAy Iy H IIpnHHMaHOICM CCHCOPOM Ha H3CAHN.

4 Bocnpon3BedeHne
Bocnpon3BeaHne foToRaΦn
1BbepHTe MeHIO ΦOTOB OCHOBHOM MEHIO H IOATBCpAHTC Bb6op IIHN IHOIMIH N. IORBHTc 3KpaH CTHIOM IAMrTH.

TaKcMOKHOOTKpbTbMeHHOΦOToHaIyABTC AHTAHIOHOHO yIpaBAeHHN IIpN IOMOIIIN
2IIOBTOPHTe 3Iy OIIepaHHO, TTO6b BbIpaTb BHYrPCHHHO HAMrH NAH KApIy HAMrH, 3aTCM HAKMITE KHOIIKy
3Ha 3KpaHc HOBHTCg ACBtB MHHHaTHOpHBIX H3O6paKCHn, KAKIOKA3aHO HIKc:
4 Bb6pcHrE Ha Iy HpH HOMOHN 1/ HAN 1 H306paKCHNC, KOTOPOC HCO6XoHMO OTO6pa3HTb.
5 Aa 3aIpycKa aAaH-IOy HaaKMHTe KHOITKy

PnI IOMOIIH MOKHO Bb3BaTb MEHIO BO BPCMABOCHIPOH3BCACHHA.
BpeKHMcAaHb-HIOy HAKMTTE KHOIky TTO6bI IOKa3aTb OAHNOHoe N3O6paKeHHe. HaKMNTc KHOIIKy I AAn HepcXoJa K IIpeABAYIeMy HAN CAeAyIOIeMy H3O6paKeHHIO.
BpaueHne foToRpaΦn
PnIPOCMOTpe OAnHOCHHO H3O6paKCHHcero MOKHO IOBOPaHbTb Pn IOMOHN KHOIN H 3aTeM BO3BpaHAtb K HCXOAHOMy PCKIMy OTOOpaKCHH. KaKaH pa3 Pn HkaATnn Ha 3Ty KHOIIky H3O6paKeHHe IOBOPaHbAeTcHa 90 rpaAcob N YoacOBOn CTpeAke.
N3meHeHne φopMaTa oTo6paKeHHa
ΦOTOPaMka HMeet HINPOKIN 3KpaH c pa3peHHeHEM 16:9. OHaKo 6OaBHHHCTBO ΦOTOKamep AeAAOT CHIMKH pa3peHHeHEM 4:3. MoKHO BbOpPaTb MEkAY peKHMAMn 16:9 n 4:3, NOCAeAOBaTeA bHO HaKHMAR KHOIIKy Ha IIy. Pn BbOpc pKaHMa 4:3 H3OpaKCHc 0yAcT pa3McIcCHO B IcHTpc 3KpaHa C YcpHbIMN IOLOCAMn IIO KpaM.
Hactpoika cAaHd-woy
I3MeHeHne BpeMeHN 3aAepKKn B peKmme cAaNd-woy
BpeM 3aAepKKn B peKHMe cAAH-IOY MOKHO H3MeHHTb IIHNOMOIIIN KHOIIKN Ha IAY. IooOepeAIO HAKMAR HA 3Ty KHOIIKY MOKHO BBipatb BpeM 3aAepKKN 5ceK.,10ceK.,30ceK.,60ceK.
YcTaHOBka OHOBOM My3bIKN AARpeXHMa CAAJ-A-Woy

B KaueCTBe FOIOBOO My3bIKN MOKHO HCIOAB3OBaTb TOAeKO Tc FaaHb, KOTOpbc COxpaHCHB BMCCTC C FOOTOPaΦHHMBO BHyTppeHHe HAMHTH, HA KapTe HAMTH HAn Ha HOCHTCAC, IOAKAOCHHOM HO HPOTOKOAY USB.
1 Bo Bpem CaaH-IOy HaKMITE Ha KHOITKY CHMBOAa Hha 6paTHO CTopoHE yCTPOINCTBA. OTKpoETc MEHO HAcIPOCK DOHOBOI My3bIKN.
2A3aIyckaBOCHPOH3BcAChnHOHOBOMy3bIKn HAKMHTC

HcnoA63yHTe KaabHnIy C/0- AAR peYAnpOBKn IpOMKocTH. IIpn HOMOHN HAH MOKIO HepeHTN K CAeAioIIeMy Ha3BaHHIO.
Bocnpon3BeaHne My3bIKN
1OTKpoIe MeIO My3bka B OCHOBHOM MEIO H IOATBepAHTe Bb6op IIpH IOMOIIH 念 .IOABHTcKpaH CTHIOM IaMTH.

TaKKe MoKHO OTKpBbMeHHO My3bIka Ha IyA bTe AHTaHIIOHOHorO yIpaABeHHn IIpy IIMOII
2IIOBTOPIE 3TY OIEpaHIO, TTObBbOpaTB BHyTpeHHIO HAMITb HAN KapTy HAMHTN, 3aTeM HAKMITE KHOIIKY
3 Bb6epHte Ha IApV npn HOMOHN 1/ HAN 1/ qaiA, KOTOpBn CAcayET BOCIIPOH3BcCTH.
4 AA3aHcycka BOCIPOH3BcAChHH AAR OCTaHOBKN HAKMHTC Ha IAV HAN ESC

Bo BpemBocponH3BeAeHHn IIpn HOMOIIH 1 HAN MOKHO IcpeHTN K IIpeAHAYIeMy HAN CAcAdYHOIIeMy 3aFOAOBky.
HaHAAV,TO6bI IpHOCTaHOBTb HAn IPOAOAKHTB BOCIIPOH3BEACHNC.
PnPi IOMOII IN BbOpHTe IOBTOp TeKyIeRo HAHMeHOBAHH, IOBTOp BCEX HAHMeHOBAHH HAIOTMEHIVIOBTOpa.
HactpoKa rPOMKocTn
BO BpcmBocHPOHN3BCACHHHa IAPYNIOMOOHN 1 MOJHO peYAnPObaTB rPOMKOCtB. HaKMHTe HAN IOBTOPOAARHOAHAOI0 BBKAHOCHHH 3ByKa.
Bocnpon3BeAeHne BnAeo
1OTKPOITMCMHBOHACOBOMMCHHO HIOATBepaHTe BbOOP IIHNOMONIH. IORBHTCR KpaH CTHIOMIAMRTH.
TaKKe MoKHO OTKpbTb MeHIO BHaeo Ha IyABTe AHCtAHHHORO ynpaBaeHHI pH IOMOH
2IIOBTOPHTE 3Iy OIIepaHHO, TTO6b BbIOpaTB BHYTPCHHHO HAMITb HAN KApIy HAMH, 3aTCM HAKMITE KHOIIKY
3 Bb6epHrHe HAny HnH TOMOHN 1/ HAN 1/ 10aHa, KOTOpBn CaeAyeT BOCIIPOH3BecTH.
4 AA3aIycka BOCIIPOH3BcAeHHN A. AAn OCTaHOBKN HaKMHTe Ha IAAV HAN ESC
Bo BpcmBocpon3BCaCHnH npH HOMOHN IHN HIOHO MOKHO IcpcnI HPCbIAYMCMy HAN CAcAByOIMCMy 3aROAOBKy.
HaPiY,TO6bI pHIOCTaIOBHTB HAn IPOAOAKNTB BOCITPOHN3BeAeHHe.
Pn HOMOIIH BIOePHTe IOBTOpeKyIero HAHMCHOBAHN, IOBTOp BCCX HAHMCHOBAHN HAN OTMeHy IOBTOpa.
HactpoKa rPOMKocTH
BOBpEMBAOIOHN3BeAeHHHnHaIAYHpHIOMOHn O MOKHOpeYAnPOBaTb rPOMKOCTb.HaKMHTe HAN IOBOTOPHOAAHOAIHOIATO BbKAIOyeHHN 3Byka.
5 Hac tropon
N3MeHeHne HaCTpoEK
1OTKPOIe MeHIO HAcTpoE K B OCHOBOM MeHIO H IOATBCPANTC BBOp IIP NHOMOIN
2 HcIOAB3yIe KAAABHIIy AAB BBIOpa HAc1POIKH, KOITOPYHO HCOOxOAnMO BBIIOAHHIb.
3 IoATBepaHTe BbOop c HOMONIO bIO KIOIKn
MOxHO BbHIOAHHTB CACyFOHNC HAcTPOJIK:
(Hac)YCTAHOBKaAaTbH BpeMeHH.HaKMHTe AAA OTOOpaKeHHBpeMeHH CYTK HaAHCHee.
(KoCTb, KOHTpact, peryAHPOBKa IIBeTHOCTH) PeryAHPOBKa KPOCTH, KOHTpacta, IIBeTHOCTH KK-ACnAer.
(@ΦΦcKTH HcpcxOa) - Bb6op pa3AHHbIX ΦΦΦcKTOB B PCXHMC CaaH-Ⅲoy
(OyAHABHINK IN BbIKAIOTCHIIIE)
ByAnbHKn: ByAnbHnK MoKHO yCTaHOBHTb Ha OITpeAeEHNOE BpEMcpaTaBHAA KAKABN AEHB. YcTAHOBKa BpEmHH CpaTaBHAA 6yANbHnKa aHaONHHa yCTaHOBKe HAcOB.
BbIKIOUOHeHNE: ABOTOMaTHueeCKoe BbIKAOUeHHe B OIIpcACCHHOC BPCMg cyTOK. CHMBOA BbIKAOUChHH 3ACKTPOINHTaHHI IIPII 3OM AOJCKH HAXOAHITbcB IHOAOKCHH
(aBTOMATHueeCKoe BKAIOYEHN) - HAcTPOKa pa3ANHbIX BapHAHTOB ABOTOMATHeCKOTO BKAIOYEHHYCTPOIcTBa B TAABIOM MEHIO (CAAIA-HIOY C OAHIM IHOpaKeHHEM, CAHA-HIOY C YeTbIPMB H3OpaKeHHMIIH BHaEO).PiocAE HOBOTO 3aIycka COOTBeTCTBYOTIIIE cOAdepKHMoe OTOpKaAETCH IOCAe CTAPTOBORO AOITIIA.
(NaCTPOIKN HNO yMOAuaHnHO)-BbOcprntc AABBO3BPATA K 3aBOADKHM YCTaHOBkAM.
4 Be6epHTe HxKHyIO HAcTPOiKy cHOMOIIbIO 1/
5 IoATBepAHTe BbOop C HOMONIOBIO KHOINK
IIaKMHTe eH HAN AAA 3aKpBbAHn MEHIO I BO3BpaIiCHHn BHCXoAHbPiCKHM.
KoHnpOBaHne n ydaaleHne paAIOB
MOKHO yaaTb foTOrpaΦH,ayAHO- H BHaEOΦaH BO BHTpeHHeHnAMrH. MoKHO KOHHPOBaTb foTOrpaΦH, ayAHO- H BHaEOΦaHc KaPTb HAMrH HAN CΦAeH-KapTb USB.
KoHnpobAHne paHa
1BbAeAHTEaH, KOTOpH HcO6XoAHMO CKOINPOBaTb.
2HaKMHTc HaI△V
3 BbAaHrC CHMBOA Hn HaKMHTc AAR 3aIycka IIPOUCApybKOIIIOPOBAHH.
4HaAHCIIeepoBHTcnoOocao6paobTKI.No OKOHaHHKOHIIpOBAHJFaHb6yAEcoXpaHHe BO BHTpeHIEHnAMHTNycPoCTBa.
BbIcAHTC CHMBOA H HAKMHTC AAR BbIXOa H3 MEHIO OpaOToKn.
YdaIeHne paIa
1BbAeANTe qaH, KOTOpbH Heo6xOAMO yAaAHtB.
2HaKMITE Ha V
3 BbAcaHITc CHMBOA HHaKMNTC AaYdaAChnIa
BbAeAnTe CHMBOA HnHaKMHTe AAR BbIXOa H3 MeHIO Opa6OTKn.
YcTaHOBnTb My3bIKy N BpeMa AIA 6yAnbHnka
Y6eAHTecb B TOM, YTO B yCTPOINCTBO yCTAHOBAeHa KaPra IAMTH HAN OHO IOAKAIOHeH K KOMITBIOTepy Hepe3 USB-pa3bem.
1HaKMITc HaIAY
2 II pH HOMOHN BbIeepHTe HOAKIOeHHe IHO HPTOKOAY USB HAN Kapry NaMnB KaueCTBe HCTOUYHKA.
3PiATBepaHTe BIOOP cHOMONIOIbKOHNKII
4IpnHIOOMOHN HANBIOcPHTCpaIIA, KOITOpbI 6yAcT 3ByuATb npH cpaBaBHn 6yAnABHHKa.
5 HaKMITE Ia IAY (A).
6 PnH IOMOHN BbOepHTe CHMBOA FyHKINN 6yAHABHHKa (图).
7 IIOATBepAHTe BbOop C HOMOIIbIO KIOIKN OyAnOdaKoIHpyETc BO BHyTpEHHIO IAMITb 3aAaeTc B KaueCTBe MY3bIK AANbHIIKA.
HaKMITE Ha IAY,TOOBBBAACHTB CHMBOA HactpoKII.
9PiATBCpAHCTBIOOPC HOMOIOIOKHOIOIKH
10 PpOKpyTnTe AO yKa3aHHOIO HyHKTa C HOMOIBK KaABHII
11 CaeAye Te yKa3aHnHm H No HactpoKe BpeMeHH cp6aTaBbAHn 6yAnbHnKa. PeKHM 6yAnbHnKa AOJKCH 6bTb yCTaHOBACH Ha MP3.
6 Texnueckoe o6cayxnbahne
N3meHeHne paMKn
Pamky yctpoicBa MOKHO MeHTb Ha apTyIO, BXOAnyIO B KOMIIaekI IOCTaBKn. PAMKn YApEKNBAHOTc IIpH IOMOHN MaHHTOB.
1IaKMHTc Ha 3aHcH cTOpOc yCTPOHCTBa KHOIIky AAR CMeHb paMOK. CHMMHTe paMKy.
2 YcTAHOBHc CMCHHYo pAMky Ha ycIpOcIBO, TIObO OHa 3aΦHKCHPOBaAacb Ha MaHHTax.

PekomeHaaun
| Henschpapabnoctn yctpahehne | |
| YcrtpoiCTBO He BKAIOUaETc. V6eAHNTecb, YTO 6AOK IIITaHIN | ПОАКAOчЕн K yctpoiCTBy |
| He coxpaIIHOOTc PhaiMbly V6eAHNTecb B TOM, YTO BO BIVIpye | ПeI ПAMrTH yctpoiCTBa ИМСТСЯ CB6OAOHOC MCTO. 3aIIyCITIC φOTOPAMKу 3aHOBO и YdaAHTC HCKOTOpbic PhaiMbI, YTObI OCOBO6OAnTb MCTO В ПAMrTH |
| ОсутCTByeT 3Byk V6eAHNTecb B TOM, YTO φOpMaT PhaiAOB | ПОАСРЖИВаCTe YcrtpoiCTBOM, a TAOKe B TOM, YTO φOTOPAMKa I КOMПБIOTep COeAHIIeHb IaAIAeKaIIHIM OБрAZOM I KapTa ПAMrTH He NOBpeKAEHa. |
| Ile paIIO3HaETc KaPTa ПAMrTH ПprN ПОAKAHO | СИИ N YcrtpoiCTBa K KOMПБIOTepy, YcIaHOBACHHaB Y cIcPoiCTBc KapTa ПAMrTH Hc 6yAcTe ОПОЗHAbaTbCS. |
7 Ппуножке
TexHHueckne DaHHbIe AF 5086MS
06uhe cBeDeHHa
Ia6apHTHbpea3Mepu(IIxBx1).232,5×192×22,5MM
Bec. 0,575K
Cetb 3AeKtpoHHTaHH. BxOa: Iepm. Tok 100-240B-/
50-60Γ
BbIXOa:IOCT.TOK5B-/2Γu
AyIOBExOa. 2x1BT
PCKOMCHyCMbIC yCAOBH N KCHAYaTAAHH 10-45°C
OTHOCHTaBHa BAaKHOCTb BO3AyxA 20-80%
Ancnaeem
Pa3Mep IIO AnarOHaAN 8
CoothonneHHe cToPOH. 4:3
Pa3peIIeHHe: 800x600 PnKceA
3anomnhaiooee yctpoiCTBO
BHytpCHHnIaMnTb 256 McBOoHOIO npocipHaCTBa
HHTeppecbbl
Iopr USB.. USBOTG
COBMECTTMBIE KAPTBI NAMRTI .SD/SDHC/MS/XD/
MMC/CF
IopAdepKnBaemble fOpMaTbI
ΦoToΦopMaTHI.....JPEG
AyAoOpMaTb MP3
BHaCoOpMaTbMotionJpeg,Mpeg-4
TexHHueckne DaHHbIe AF 5105MS
06uhe cBeDeHHa
Ia6apHTHbIe pa3MePH (IIIXBx1')...... 293×200,5×23 MM
Bec. 0,74K
Cetb 3AeKtpoIIHTaHH. BxOa: IIpcm. ToK 100-240B-/
50-60Γ
BbIXOa:IOcT.TOK5B\~/2Γu
AyHOBBIXOA. 2× 1B_
PcKOMCHyCMbIC yCAOBHn 3KCHyataaHHn ...10-45°C
OTHOCHEbHABBAaKHOCTbBO3Ayxa 20-80%
Ancnaeem
Pa3Mep IIO ANaTOHaAH 10,2
CoothoHHeHHe cToPOH. 16:9
Pa3peIIeHHe: 800×480 PnKceA
3anomnhaiooee yctpoiCTBO
BHytpcHHraIaMraTb 256Mo cBOOHOHO IpocipaHCTBa
HHTeppecbbl
PiopT USB.. USBOTG
CoBmecTIMbIe KapTb IaMHTH ....SD/SDHC/MS/XD/
MMC/CF
NoAdepKnBaembIe fOpMaTbI
ΦoToOpopMaTbI............JPEG
AyAoOpMaTbI MP3
BHaoeOpMaTbM .Motion Jpeg, Mpeg-4
TexHHueckne DaHHbIe AF 5135MS
06uhe cBeDeHHa
Ta6apHTHme pa3Mepb(IIIxBxI).356×249×24MM
Bec 1,168K
Cetb 3AcKtpoHHTaHHBxOa: Iepm. Tok 100-240B-/
50-60Γ
BbIXOa:IOCT.TOK12B- /1,5T
AyHOBBHXO.. 2× 1B
PcKOMCHAYcMbIC yCAOBHn 3KCHAYaTauHH.10-45oC
OTHOCHTCAbHa BAaKHOCTb BO3Aya. 20-80%
Ancnaeem
Pa3mep IIO AnarOHaA.. 13,3
CoothomeHHe cTOpOH 16:9
Pa3peIIeHHe: 1280x800 PnKceA
3aONMHaIOUe yCTpoIcTBO
BHytpCHHHaAMTb.256McBOOHOIO npocipaHCTBa
HHTeppehcbi
PiopT USB. USBOTG
COBmecTIMbIe KapTbI NAMrTH. SD/SDHC/MS/XD/
MMC/CF
NoAdepXnBaemble oopMaTbl
ΦoToOpMaTbJ .JPEG
AyAnoΦopMaTbI MP3
BHaCoOpMaTbM Motion Jpeg, Mpeg-4
BceAaHHbIe IINHBeAeHb HCKAIIOHTeABHO CIIpaBOOHbIX IIeAIX. AgfaPhoto OCTaBAJET 3a COoON IIpaBO BHOCHNT bIObIE H3MeHeHHB KOHCTpyKINHO H3AEHN6e3 IIpcBaPHTcABHOYO YBCADOMACHNIA.
AgfaPhoto Holding GmbH: H3AeAnr noA Toproboi MapKo8 AGFAPHOTO npOn3BOaTcra No Anueh3nn Agfa-Gevaert NV & Co. KG.
Agfa-Gevaert NV & Co. KG He npo3BOAHT
DaHHoe N3eAne, a TaKxHe NoAepKnBaet rapaHTnHbIe HAN nHbIe 063aTeAbcTBA B OTHoWeHH DaHHORn3eAAn.
KoHTaKTHa HhOpMaunr: www.agfaphoto.com
No Bopocam 06caykHBaHn, rapaHTn HAM NOAdepKKn H3DeAHA O6paauTecb K BaWeMy AnCTpN6bIbTOpy HAn npOn3BOaHTeALo: PpOaKy n c6blt ocyuectBaaret Sagem Communications.
KoHTaKTHaMHΦOpMaun:
www.sagem-communications.com

MapKnPOBka CE yOCTOBepa, TTO ycTPOINCTBO COOTBetCTByET OCHOBHbIM TpeoBAHHM ANPEKTHBBI 1999/5/CE Ebponeckoro NapAameHTu COBeta IIO TeAekOMMyHkauHOHOMy TepMHHaABOMY OOpOyOBAHIO, KacaOHxC8OC301AACHOCTH, 3AOPOBBI IOAb3OBATEAcH N AACKTPOMaHTHbIX HOMEX.
CceptHOKATOM COOTBETCTBHHMOKIO O3HAKOMITbci HacTc www.agfaphoto.com.
Oxpana OkpykaioHcpeAaKaq Yactb paHIOHaABHO pa3pa0taHIOIaIIa HBAeTcB BAKIOH COCTABAOHIOIe pa0tbi AgfaPhoto. AgfaPhoto pa3pa0taHBaET 2KOAOHTHHe cHCTEMbl. IooTOMy AgfaPhoto HHTerPpuyet AeHCTBnI IO 3aHITte OKpyKaHOIIe cpeAbB KHN3HeHHb INK4 N3AEAH, OT HX IIPOH3BOAcTBa AO BBOA B OKCIAYaTAAHIO, HCHOA63OBaHHN HYTHAN3aHHN.

YnaKOBka:HaHnue AaHIO AOOTnHa (3eAeHHa TOKa) O3Haayet,TO BHeceH BKAA B HAHOHaBHyO oPraHn3aHIO NO yAyHHeHIO HHpactpykTpyM IO BTOPIHOMy HcIOAB3OBAHIO yNtKOBKn. IOnKaAYncta, CAeAynTe MeCTHbIM IIpaBnAm IIO yTHAn3aHnN YNaKOBKn.
AkkMyAANTOpB: ECAH B yCPOIcTbc HIOAB3yOTcra AKKMyAHTOpB, TO IOCAE HCTeueHH CPOKa HX KCHAYaTAHN HX HCOOXOAHO M CAABaTB CIEUHaABHbIC IIYHKTB IIpHeMa AA AALBeHIIe YTHAN3aIII.

IpoAkyT: H3o6paKCHHe IepcpeKHyToi KOp3HHb AAR Mycopa O3Haayet, YTO yCTPOHCTBO OTHOCHTCK KAteOropn HAcKTPHueCKORO H AcKTPoHORO 06opyoBAHn. CorAacHO EbponeeckHM HOpMaTHBaM yc1pOHCTBO HCOoXoAMO yTHAN3HPOBAtb CACAYOIMM 0opa3OM:
B TOPOBbIX TOUkax IIpH IIpHoOpTeHHn aHaAOHTHQO 06OpYIOBAHIN.
B MCCTHbIX HnHKrax Ccopa (HaIIpHmep, UCHITpAX IIpHCMA OtpaOoTABIIEIO OOppyAOBaHH, HNHKrax BblOpOHIO IpiHema HAp.).
IIOAOBIM Oopa3OM BMOKTe yactBOBATB IPOIpAMMC IO UcpcpaOOTK H IOBOTOPHOMY IICIOAB3OBAHIO 3AEKTPuYeCKORO H 3AEKTPOHHORO O6OpyaOBAHIA HAIIpaBAChHO Ha COXpAHCHNC OKpyKaIOHIIe CpeA BI 3AOPOBBAIIOAE.
3TO pyKOBOACTBO IOAB3OBAteA HAneYATAIO Ha BTOPHHON IpepebaOTAHHO 6ymare,OT6eAHHO 6e3 IIpHMHeHHX XaOpA.3TO yAOBaeTbOPnET Tpe6OBaHHM CAMbIX CTPOIHX CTAHAptOB Hn3KOrO BO3AECTBHa HA
KOAOTHO. HcIOA63OBaHHa KAPTOHHa YIaKOBKa H3AEAHn BHyTpeH-HHe 3aIHITbE KApTOHHie BKAaAKH H3ROTOBAAHbH3 BTO-pHIObMyMaH MoYr BTOpHIO HepepaOaTBbATbC, KaK ObHuHa b MyMa. IaactIKOBbE HaKeTb MOKHO HApaBAHTb Ha NepepaBOTky HAyTHAN3HPOBaTb BMeCTe C He Nepepa-TbJBAeMbIM OTXoAMn COAacHO AeHCTBYIOHM PpaBHAm BaIIIEc CTpaHBi.
Toprobbie MapKn: Pa3AHHHe Ha3BaHHa, YIOMHHACMHBC B 3OTM pyKOBOACTBC, IBAHOTc TOPROBIMH MAPKAM COOTBCCTBYOHNX KOMHaHH. OTCYCTBNC CHMBOAB H Hc O3HaAcT, YTO DaHHbc TcPMHHI RAHOTc Hc 3apCINCTpHOBAHHMn TOPOBBHM MAPKAMN. YIOMHHAHC B pyKOBOACTBC Ha3BaHHApYHX IIICAAH CACAHO TOABKO AAR HAcHTHΦHKAIHH, OHN MOITy 6bTTb TOPROBMn MAPKAM COOTBeTCTBYOHIX BAACAbCB. KOMHaHH AgfPhoto lotKa3bIbactc r OT KAKHX-AHIO IIpaB Ha TAKHC MAPKn.
Hn KOMHaHn AgfaPhoto, Hn ee OTAEeHHn He Hecyt HnKAOK OHETCTBEHHOCHT HepeA NOKyHateAem 3TOI H3AEAHn HAN TpeTbe CTOPHOH 3a yInep6, IOBpeKAEHHe, pacxoABn Hn 3atpaTb, nIOHeCEHbte IOKyHATEAEM HAN TpeTbe CTOPHOH B pe3yABtare HeCueACTHO CAYA, HnPpABHAHOH Hn Hn HAeKaHIero HCNOAB3OBAHN 3TO10 H3AEAHn Hn BHeceHHn B Hero HeCAHKIIHOHHPoBAHHx H3MeHeHH, PEMOHTA HAN IIpeAeAKN 3TO10 H3AEAHn Hn HcO6AoHEHne Yk3aHHN KOIMHaHH AgfaPhoto n OKJIAYaTaHH INTEXHHIECKMOY OBCAYKHBAHHO.
KOMHaHn AgfaPhoto HC HCCCT HnKaOoI OTBCTCBHHOCTH 3a AHOo yuepo Hn HPO6AeMb, BO3HHKAHOHc H3-3a HcHOAB3OBAHn AHObIX IIpHnAAeKnHOCTe Hn paCXOAHBx MaTePhaAOB, OTAHnBX OT TEX, KOTOpbc Oo3NaueHb KaO pHnIIaABJIbe H3AeAn AgfaPhoto Hn H3AeAn, pCKOMCHAOBAHHbc KOMHaHnC AgfaPhoto.
KOMHaHn AgfaPhoto He Hecet HIKaKoH OTBcTcBeHHOCHT3a AI06Oy uep6, BO3HnKaIOuHn H3-3a 3AeKTPOMaHTHTHX IOMEX, CB3aHHbX C HIOAB3OBaHIHEM AIO6bIX HITeppeCNbIX Ka6eAen, OTAuHaONHXCROTex, KOTOpBle PpeAHa3HaYeHbAA H3AeAHN KOMTaHn AgfaPhoto.
Bce npaba 3aHINHeHb. IHKkyo Yactb 30oi IyOAnKaiHH HeAB3B BOCIPOH3BOAHITb, XpaHHTB B apxNBHO CHCTcMe HAn HcpeDaBaTB B AIOOBΦopMaTe HAObIMn CpcACTBaMH, B TOM YHCAC 3ACKTPOHHBMn, MCxAHHCCKMn, IIYTCMΦOTOKOIHPoBAHn, 3AHHN AIObIMn APYHMn 6c3 IPCABAPHTCAHBIO IOAYCHN INCBMCHHO pa3pIHChn O'T KOMIIAHn AgfaPhoto. YKa3aHHa 3AcB IHΦOpMAHn OTHOCHrTOABoK AaiHOMy H3AEAHIO. KomIIAHn AgfaPhoto He Hecet OTBeCTCBEHOCIn B CAYae IIPIHMeHEN 3TOI HΦOpMAHn K ApYHM H3AEAHm.
PyKOBOACTBO HOAB3OBATEA RAHETCAOKyMeHTOM, KOTOpB HN KaKo CTeIeHH HeA3paCCMaTpHBaTb B KaHeCTBe AOTOBOPa.
BO3MOKHO HAHNC OIeYATOK, THIOIpaΦckHX OHn6OK Hn3MCHCHII.
Copyright © 2008 Sagem Communications