BHC 18 - Drill FESTOOL - Free user manual and instructions
Find the device manual for free BHC 18 FESTOOL in PDF.
User questions about BHC 18 FESTOOL
0 question about this device. Answer the ones you know or ask your own.
Ask a new question about this device
Download the instructions for your Drill in PDF format for free! Find your manual BHC 18 - FESTOOL and take your electronic device back in hand. On this page are published all the documents necessary for the use of your device. BHC 18 by FESTOOL.
USER MANUAL BHC 18 FESTOOL
natural_image
Black and green Fertzel 190R electric drill put tool (no visible text or symbols)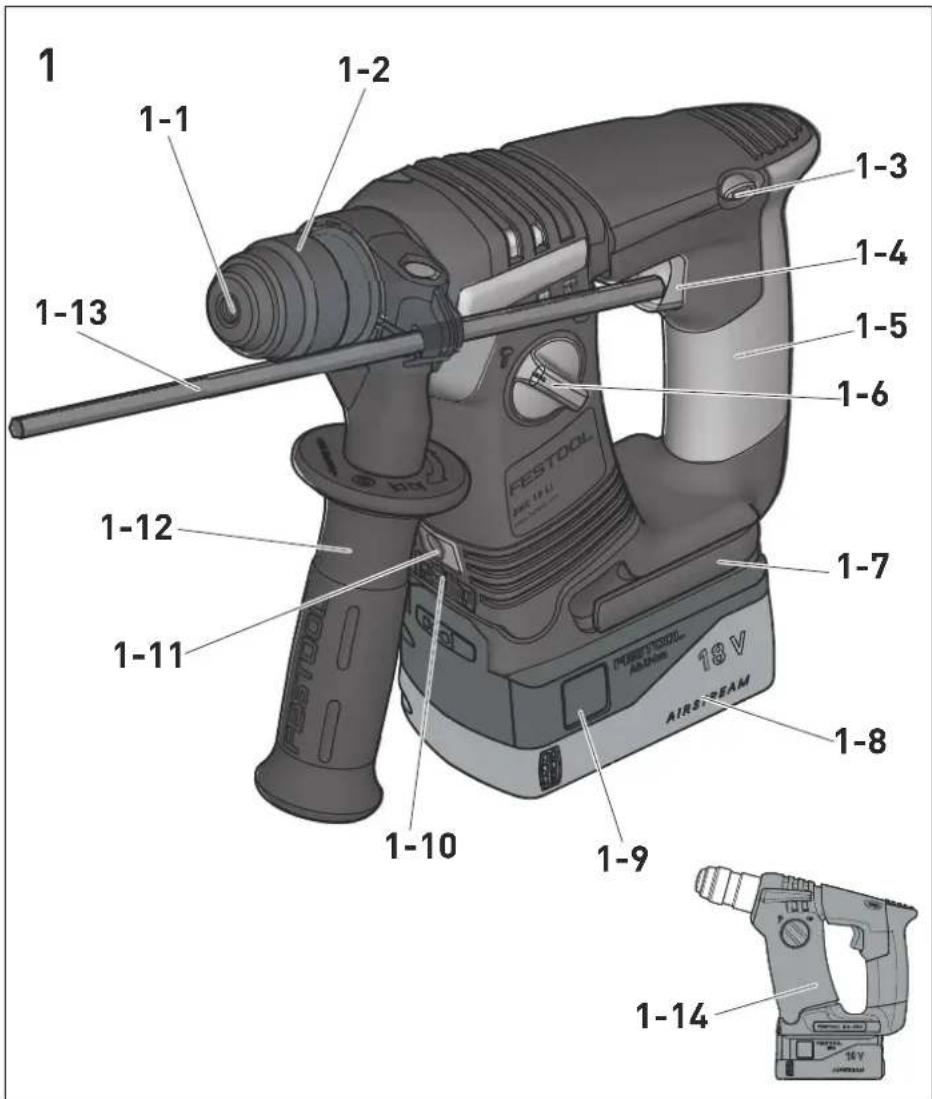
text_image
1 1-1 1-2 1-3 1-4 1-5 1-6 1-7 1-8 1-9 1-10 1-11 1-12 1-13 FESTOOL AIRSEAM 18 V AIRSEAM 1-14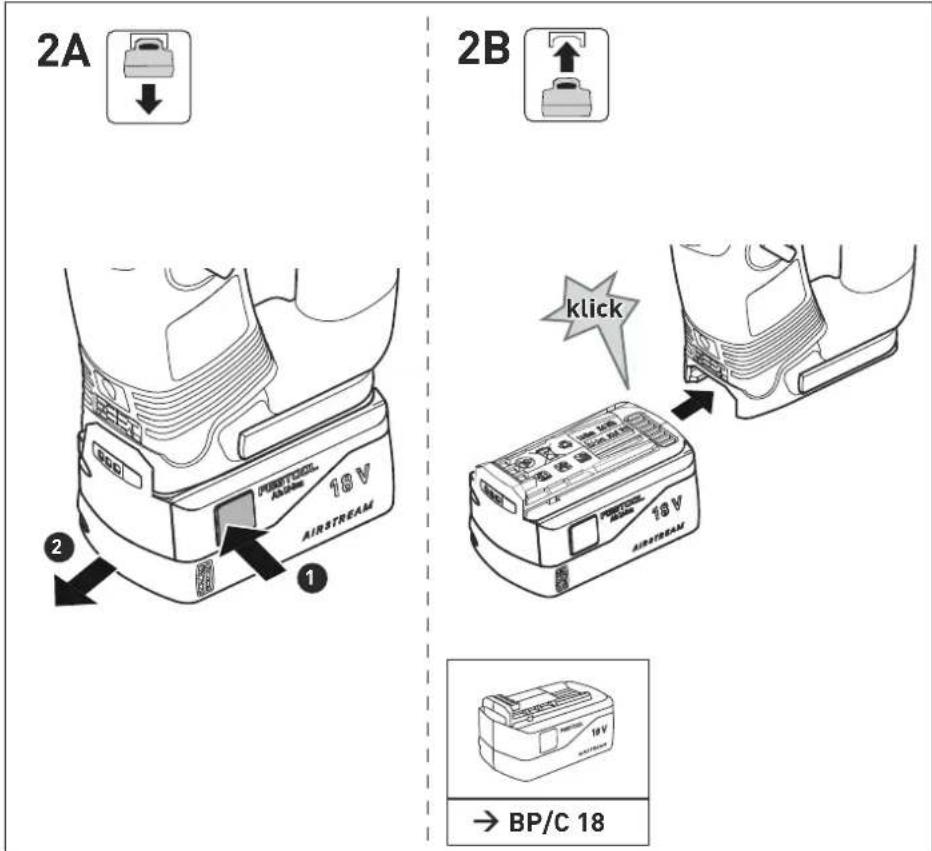
text_image
2A 2B klick → BP/C 18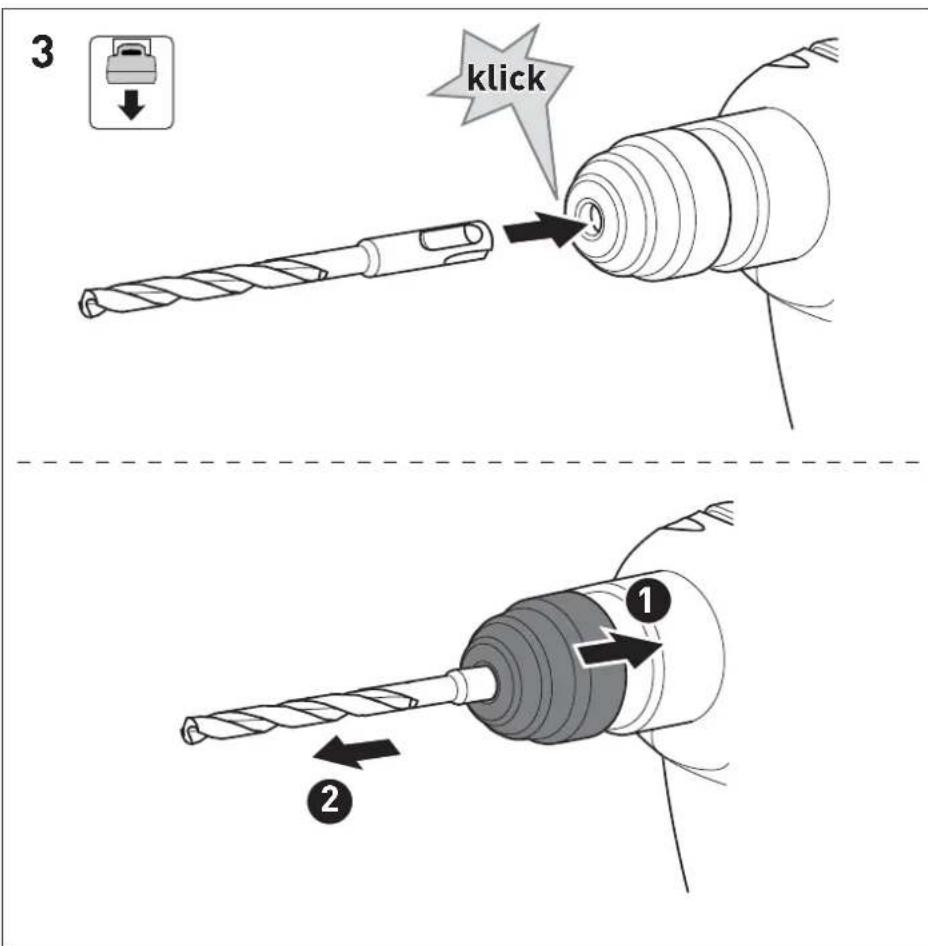
text_image
4 1 2 3 klick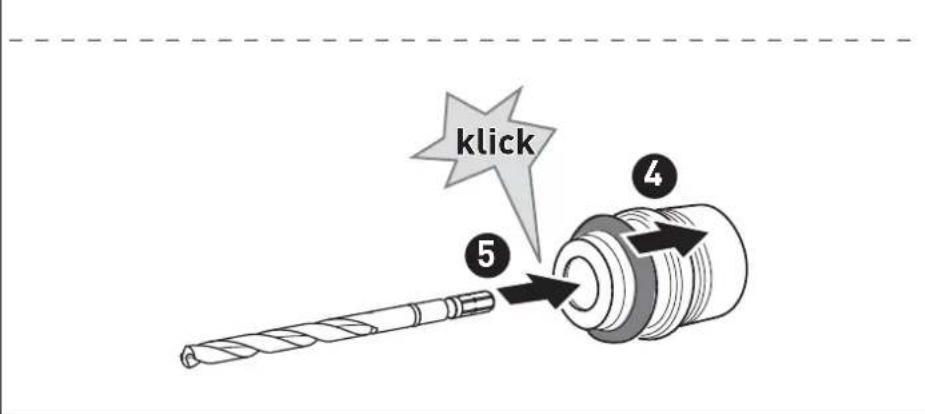
text_image
klick ⑤ ④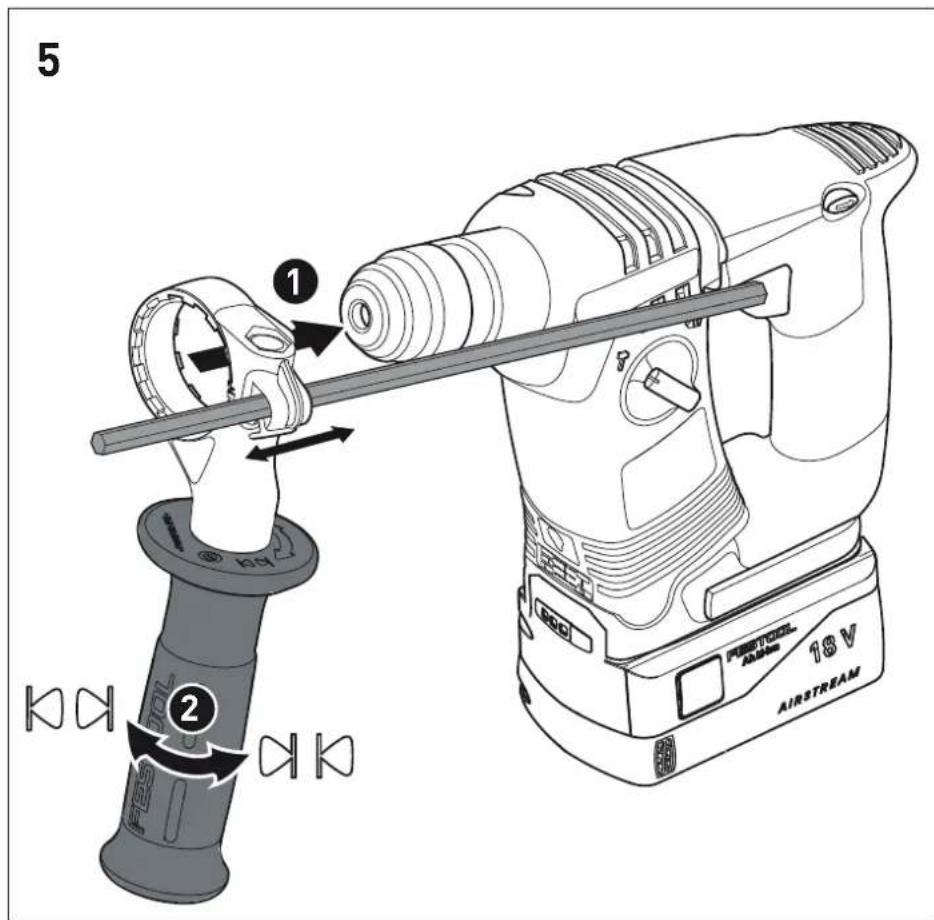
text_image
5 1 2 AUSTREAM 16V AIRSTREAM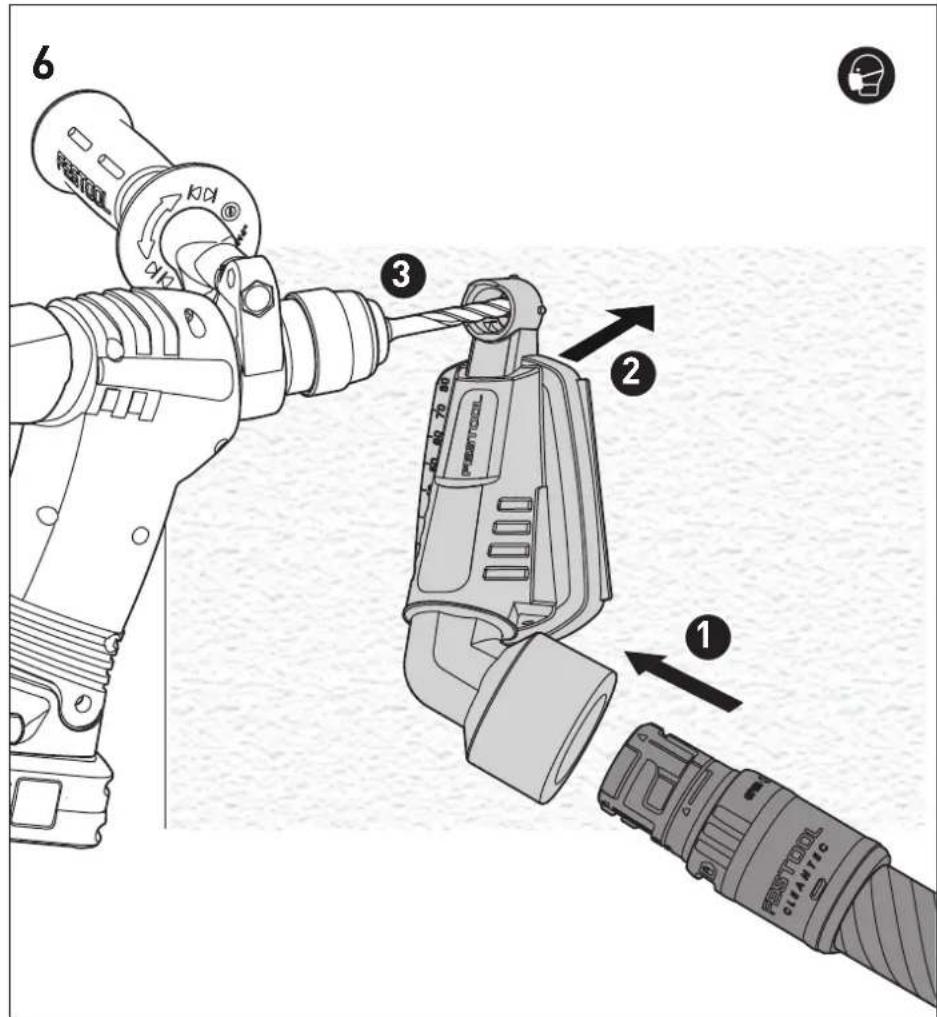
text_image
6 3 2 1BHC 18 10673286
We as the manufacturer declare under our sole responsibility that the product(s) fulfill(s) all the relevant provisions of the following UK Regulations and are manufactured in accordance with the following designated standards:
S.I. 2008/1597 Supply of Machinery (Safety) Regulations 2008
S.I. 2016/1091 Electromagnetic Compatibility Regulations 2016
S.I. 2017/1206 Radio Equipment Regulations 2017
S.I. 2012/3032 Restriction of the Use of Certain Hazardous Substances in Electrical and Electronic Equipment Regulations 2012
BS EN 62841-1:2015 BS EN IEC 62841-2-6:2020 + A11:2020 BS EN 55014-1:2017 + A11:2020 BS EN 55014-2:2015 EN 300 328 V2.2.2 EN 303 446-1 V1.2.1 EN 301 489-1 V2.2.3 EN 301 489-17 V3.2.4 BS EN IEC 63000:2018
Signed on behalf of and in name of

Festool GmbH
Wertstr. 20, 73240 Wendlingen, GERMANY
Place and date of declaration: Wendlingen, 2022-11-10
Head of Product Development

text_image
i. V. DolenerDenis Drobner
Head of Product Conformity
Akku-Bohrhammer
Seriennummer *
Cordless rotary hammer
Serial number *
EN IEC 62841-2-6:2020 + A11:2020,
EN 55014-1:2017 + A11:2020, EN 55014-2:2015,
EN 55032:2015 + A11:2020, EN 300 328 V2.2.2,
EN 303 446-1 V1.2.1, EN 301 489-1 V2.2.3,
EN 301 489-17 V3.2.4, EN IEC 63000:2018

Signed on behalf of and in name of/
Head of Product Development

text_image
i.V. D dalenDenis Drobner
Head of Product Conformity
1 Symbols....14
2 Safety warnings....14
3 Intended use....16
4 Technical data.... 16
5 Parts of the device....16
6 Battery pack.... 16
7 Commissioning....16
8 Settings....17
9 Tool holder, attachments.....17
10 Working with the electric power tool.....18
11 Service and maintenance....18
12 Environment....18
13 General information....19
1 Symbols

Warning of general danger

Warning of electric shock

Read the operating instructions and safety instructions.

Wear ear protection.

Wear a dust mask.

Wear protective goggles.

Wear protective gloves when changing tools!

Inserting the battery pack.

Remove the battery pack.

Do not dispose of it with domestic waste.

CE marking: Confirms the conformity of the power tool with the European Community directives.

UKCA marking: The United Kingdom Conformity Assessed symbol is a marking for products being placed on the market in the United Kingdom. It is a manufacturers indication that the product is in conformance with the relevant regulations in the UK.

Hammer drilling

Screwdriving/drilling

Tip or advice

Handling instruction
2 Safety warnings
2.1 General power tool safety warnings

WARNING! Read all safety warnings, instructions, illustrations and specifications provided with this power tool. Failure to follow all instructions listed below may result in electric shock, fire and/or serious injury.
Save all warnings and instructions for future reference.
The term "power tool" in the warnings refers to your mains-operated (corded) power tool or battery-operated (cordless) power tool.
Follow the operating manual for the charger and the battery pack.
2.2 Machine-specific safety notices
- Wear ear protectors. Exposure to noise can cause hearing loss.
- Use auxiliary handle(s), if supplied with the tool. Loss of control can cause personal injury.
- Hold the power tool by insulated gripping surfaces, when performing an operation where the cutting accessory or fasteners may contact hidden wiring. Cutting accessory contacting a "live" wire may make exposed metal parts of the power tool "live" and could give the operator an electric shock.
- Use appropriate detection devices to look for any hidden supply lines or consult your local utility company. If the insertion tool makes contact with live cables, it can result in fire and electric shock. Damage to a gas pipe can lead to an explosion. Penetration of a water pipe can result in damage to property.
- Keep the power tool away from magnetic fields. The power tool may switch on unexpectedly and cause injury.
- Harmful/toxic dust may be produced during your work (e.g. paint containing lead,
certain types of wood or metals). Contact with or inhalation of this dust may pose a risk for the operating personnel or persons in the vicinity. Comply with the safety regulations that apply in your country.
- Wear suitable breathing protection to protect your health. In enclosed spaces, ensure that there is sufficient ventilation.
- Use a dust extractor when working with dust.

Wear suitable personal protective equipment: Ear protection, safety goggles, a dust mask for work that generates dust.

CAUTION! Power tool can jam and cause sudden kickback! Switch off immediately!
- If a tool becomes stuck in the material, it can be removed simply by reversing the rotational direction of the machine.
- Do not use the power tool in the rain or in damp surroundings. Moisture in the power tool may cause a short circuit and fire.
- Do not manipulate or block controls, e.g. the on/off switch.
- Do not use power supply units or third-party battery packs to operate cordless power tools. Do not use third-party chargers to charge the battery packs. The use of accessories not expressly authorised by the manufacturer can result in electric shocks and/or serious accidents.
- Do not use any insertion tools or accessories that the manufacturer has not specially designed or recommended for this power tool. Just because you can attach accessories or insertion tools to your power tool does not guarantee that they can be used safely. This may increase the risk of injury, accelerate the wear on the power tool and decrease the quality of the working results.
- Depending on the type and use of the accessory, particles, the insertion tool or parts of the insertion tool could come loose. This can lead to increased exposure to dust and to unexpected movements.
Wear suitable personal protective equipment. Be prepared for a high reaction torque, which may cause the power tool to turn and lead to injury.
- Only for AS/NZS: The tool shall always be supplied via residual current device with a rated residual current of 30 mA or less.
2.3 Safety instructions when using long drill bits
- Always start drilling at low speed and with the bit tip in contact with the workpiece. At higher speeds, the bit is likely to bend if allowed to rotate freely without contacting the workpiece, resulting in personal injury.
- Apply pressure only in direct line with the bit and do not apply excessive pressure.
Bits can bend causing breakage or loss of control, resulting in personal injury.
2.4 Emission levels
The levels determined in accordance with EN 62841 are typically:
Hammer drilling in concrete
Sound pressure level L _PA = 87 dB(A)
Sound power level L _WA = 98 dB(A)
Uncertainty K = 3 dB

CAUTION
Noise generated when working Risk of damage to hearing
▶ Use ear protection.
Vibration emission level a_h (vector sum for three directions) and uncertainty K measured in accordance with EN 62841:
Hammer drilling in concrete a_h = 11 m/s^2
$$ K = 3 \mathrm{m} / \mathrm{s} ^ {2} $$
The specified emission levels (vibration, noise)
- are used to compare machines.
- They are also used for making preliminary estimates regarding vibration and noise load during operation.
- They represent the primary applications of the power tool.

CAUTION
The emission values may deviate from the specified values. This is dependent on how the tool is used and the type of workpiece being machined.
▶ The actual load during the entire operating cycle must be evaluated.
▶ Depending on the actual load, suitable protective measures must be defined in order to protect the operator.
3 Intended use
Cordless rotary hammer suitable
- for hammer drilling in concrete, brick and stone,
- for drilling in wood, metal, ceramic and plastic with no impact function,
- for inserting and tightening screws.
- intended for use with BP Festool battery packs of the same voltage class.

The user is liable for improper or non-in-tended use.
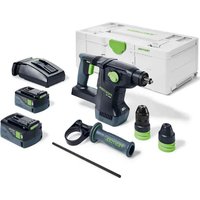
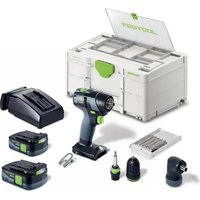
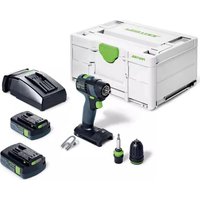
4 Technical data
Cordless hammer drill BHC 18
| Motor voltage 18 V | --- |
| Idle engine speed | 0 - 1100 min ^-1 |
| Impact energy 1.8 J | |
| Flange 43 mm | |
| Tool holder SDS-plus | |
| Max. drill diameter: | |
| Steel 10 mm | |
| Wood 25 mm | |
| Hammer drilling in concrete 18 mm | |
| Weight incl. additional handle, excl. battery pack | 1.9 kg |
5 Parts of the device
[1-1] Tool holder
[1-2] Unlocking sleeve
[1-3] Rotational direction switch
[1-4] On/off switch
[1-5] Handle
[1-6] Drilling/hammer drilling selector switch
[1-7] Belt clip
[1-8] Battery pack
[1-9] Button for releasing the battery pack
[1-10] Capacity indicator
[1-11] LED light
[1-12] Auxiliary handle
[1-13] Depth stop
[1-14] Insulated gripping surfaces (grey shaded area)
Accessories shown or described are not always included in the scope of delivery.
The specified illustrations appear at the beginning of the Operating Instructions.
6 Battery pack
Before using the battery pack, check that the battery interface is clean. Any contamination of the battery interface may impair correct contact and lead to the contacts being damaged.
A faulty contact may result in the machine overheating or being damaged.
[2 A] Remove the battery pack.
[2 B] klick Insert the battery pack – until it clicks into place.
i Further information about the charger and battery pack with capacity indicator can be found in the corresponding operating manual.
7 Commissioning

CAUTION
Risk of injury
▶ Only assemble when the power tool is switched off!
7.1 On/Off switch [1-4]
Press = ON, release = OFF
The speed of the machine depends on how far the on/off switch is pressed in.
7.2 Lighting and battery capacity indicator

The LED [1-11] provides light and acts as a battery capacity indicator [1-10].
When the on/off switch [1-4] is pressed, the LED automatically displays the state of charge of the battery pack (not for NiCd and NiMH battery packs).


Green LED - steady light:
State of charge > 60%


Green LED - flashing
slowly: State of charge
30%-60%


Green LED - flashing
quickly: State of charge
0%-30%


Yellow LED - steady light:
Battery is flat


Red LED - steady light:
Temperature of the battery, electronics or motor is outside the permitted range.


Red LED – flashing: General fault indicator, e.g. not in full contact, short circuit, faulty battery pack, etc.
When the battery pack is empty, or if there is a power failure or the mains plug is removed, move the on/off switch immediately to the Off position. This prevents uncontrolled restarting.
8 Settings

CAUTION
Risk of injury
▶ Only adjust the settings when the power tool is switched off.
8.1 Changing direction of rotation [1-3]
- Switch to the left = clockwise rotation
- Switch to the right = counterclockwise rotation
8.2 Selecting the operating mode

Hammer drilling
Set selector switch [1-6] to hammer symbol.

Screwdriving/drilling
Set selector switch [1-6] to drill symbol.
9 Tool holder, attachments

WARNING
Risk of injury
- Remove the battery pack from the power tool before performing any work on the power tool.


CAUTION
Risk of injury from hot and sharp insertion tool
- Do not use any blunt or faulty insertion tools.
▶ Wear protective gloves when handling an insertion tool.
9.1 Changing tools [3]
i Drills are clamped by means of the SDS-plus system without using a wrench.
Inserting the tool
- Clean the tool shank and apply a coating of multipurpose grease.
- Do not retract the release sleeve [1-2], but insert the tool in the tool holder [1-1] and turn until it engages.
▶ Check that the tool is seated correctly.
Removing the tool
▶ Push the unlocking sleeve [1-2] back and remove the tool.
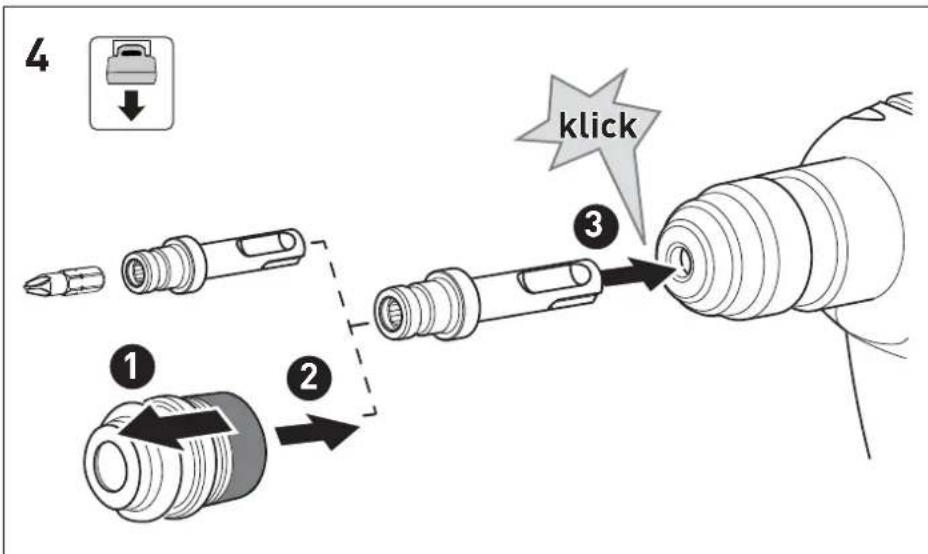
9.2 CENTROTEC tool chuck [4]
Fast changeover of tools with CENTROTEC shaft.
WARNING! Only clamp CENTROTEC tools in CENTROTEC tool chucks.
![FESTOOL BHC 18 - CENTROTEC tool chuck [4] - 1](/content/2026/02/365063/images/b1c7a77635af30af21ca10374d2045da597d27cc01aa407e14fc179b75e773b3.jpg)
Wear gloves when replacing tools.
▶ Before working with the CENTROTEC tool chuck, set the selector switch [1-6] to the drill symbol.
9.3 Auxiliary handle [1-12]
WARNING! Always use the auxiliary handle [1-12].
Fitting the auxiliary handle [5]
▶ Set the auxiliary handle [1-12] on the gear neck. Select a suitable position for the activity.
▶ Tighten the grip on the auxiliary handle [1-12] until the auxiliary handle is firmly attached to the power tool.
9.4 Depth stop [1-13]
i The drilling depth can be adjusted using the depth stop [1-13].
Attaching the depth stop [1-13]
▶ Unscrew the additional handle [1-12] by turning the grip anticlockwise.
▶ Insert the depth stop [1-13] in the additional handle [1-12].
▶ Pull out the depth stop [1-13] until the distance between the tip of the drill and the tip of the depth stop corresponds to the desired drilling depth.
▶ Tighten the grip on the additional handle [1-12] again.
9.5 Extraction
Please observe the safety regulations applicable in your country for dust. The relevant limit values must be observed at the workstation. A dust extractor may be required for corresponding dust exposure and depending on regulations. Festool offers a drilling dust nozzle in the accessories system.
Using the drill dust nozzle [6]
If the mobile dust extractor has an automatic cleaning system, it must be deactivated.
- Connect and switch on the mobile dust extractor.
▶ Install the drill dust nozzle on the wall, ground or ceiling.
The drill dust nozzle will adhere to the surface.
▶ Position the drill.
10 Working with the electric power tool

WARNING
Risk of injury
▶ Always secure the workpiece in such a manner that it cannot move during machining.
▶ Keep hands away from the rotating tools.

CAUTION
Risk of burns
The tool holder and tool may become very hot during operation.
- Allow them to cool down before attaching them to the belt clip.
10.1 Belt clip [1-7]
The belt clip (right/left) allows the tool to be attached to work attire for brief periods.
10.2 Acoustic warning signal
Acoustic warning signals sound and the power tool switches off in the following operating states:

Battery flat or power tool overloaded:
peep
▶ Change the battery
▶ Reducing the load on the power tool
11 Service and maintenance

WARNING
Risk of injury, electric shock
▶ Always remove the battery pack from the power tool before performing any maintenance or service work.
▶ All maintenance and repair work which requires the motor housing to be opened should always be carried out by an authorised service workshop.

Customer service and repairs must only be carried out by the manufacturer or service workshops. Find the nearest address at:
www.festool.co.uk/service

Always use original Festool spare parts. Order no. at:
www.festool.co.uk/service
To ensure constant air circulation, always keep the cooling air openings in the motor housing clean and free of blockages.
Do not clean the power tool with compressed air.
Keep the contacts on the power tool, charger and battery pack clean.
12 Environment

Do not dispose of the device in the household waste! Recycle devices, accessories and packaging. Observe appli-national regulations.
Before disposal, users must remove discharged batteries, accumulators that are not enclosed by the device and lights that can be removed from the old device without causing damage, if
these are present. The old batteries and rechargeable batteries can then be recycled systematically.
In accordance with the European Directive on waste electrical and electronic equipment and implementation in national law, used power tools must be collected separately and handed in for environmentally friendly recycling.
Information on collection points for proper disposal can be found at www.festool.co.uk/recycling.
Information on REACH: www.festool.co.uk/reach
13 General information
Imported into the UK by
Festool UK Ltd
1 Anglo Saxon Way
Bury St Edmunds
IP30 9XH
Great Britain
Sommaire
Appuyer = MARCHE, relâcher = ARRÊT
9.2 Mandril CENTROTEC [4]
Pressione = ON, rilascio = OFF
Premir = ON, soltar = OFF