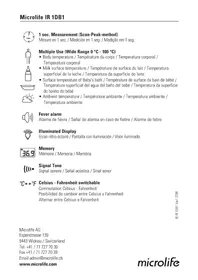
IFR 100 - Thermometer MICROLIFE - Free user manual and instructions
Find the device manual for free IFR 100 MICROLIFE in PDF.
User questions about IFR 100 MICROLIFE
0 question about this device. Answer the ones you know or ask your own.
Ask a new question about this device
Download the instructions for your Thermometer in PDF format for free! Find your manual IFR 100 - MICROLIFE and take your electronic device back in hand. On this page are published all the documents necessary for the use of your device. IFR 100 by MICROLIFE.
USER MANUAL IFR 100 MICROLIFE
Guarantee Card FR 100
图

(1)
Europe/Middle East/Middle East
(1)A(1.5)
□2017年5月3日
and
图2
M
112.10
102.52-1.38
b2a2(/)
Industries and Industry
North/ Central/South America
用
C#
备查文件
and so on
- 实验方法
Microlithi IFR 100 Microilte IFR 100
microlife


microlife


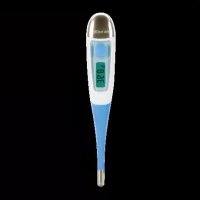
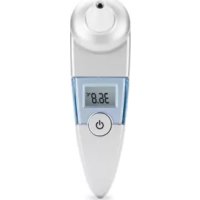
Microlife IPB 100

Moricfdu Dual Voe Thermometer (FR 100

m = 311
Guarantee Card 1PR 100
- The Advantages of this Thermometer
- Important Safety Instructions
- How this Thermometer measures Temperature
- Control Displays and Symbols
- Changing between Forehead and Ear Mode
- Directions for Use
- Changing between Celsius and Fahrenheit
- How to recall 12 readings in Memory Mode
- Error Messages
10.Cleaning and Disinfecting - Battery Replacement
12.Guarantee - Technical Specifications
- www.microlife.com
Guarantee Card (see Back Cover)
1. The Advantages of this Thermometer
Multiple uses (wide range of measurement)
This thermometer offers a wide measurement range feature from 0 - 100.0 °C / 32.0 - 212.0 °F, meaning the unit can be used as a forehead or an ear thermometer to measure body temperature or it can be used to measure surface temperature of the following:
- Milk surface temperature in a baby's bottle
- Surface temperature of a baby's bath
- Ambient temperature
Probe cover free
This thermometer is more user-friendly and more cost-effective since a probe cover is not required.
Measures in a matter of seconds
The innovative infrared technology allows measurement of ear temperature in only 1 second and forehead temperature in only 3 seconds.
Accurate and reliable
The unique probe assembly construction incorporates an advanced infrared sensor, ensuring that each measurement is accurate and reliable.
Gentle and easy to use
- The ergonomic design enables simple and easy use of the thermometer.
- This thermometer can even be used on a sleeping child without causing any interruption.
- This thermometer is quick, therefore child-friendly.
Auto-Display Memory
The last reading is automatically displayed for 2 seconds when the unit is switched ON.
Multiple readings recall
Users will be able to recall the last 12 readings when entering the recall mode, enabling efficient tracking of temperature variations.
-
No risk of broken glass or mercury ingestion.
-
Completely safe for use on children.
-
Cleaning of the probe can be done with an alcohol-moistened cotton tissue, making this thermometer completely hygienic for use by the whole family.
Fever alarm
10 short beeps and a red LCD backlight alert the patient that he/she may have a temperature equal to or higher than 37.5^
2. Important Safety Instructions
- This device may only be used for the purposes described in these instructions. The manufacturer cannot be held liable for damage caused by incorrect application.
- Never immerse this device in water or other liquids. For cleaning please follow the instructions in the «Cleaning and Disinfecting» section.
-
Do not use this device if you think it is damaged or notice anything unusual.
-
Never open this device.
- Earwax in the ear canal may cause a lower temperature reading. Therefore it is important to ensure the subject's ear canal is clean.
- A basic physiologic effect called vasoconstriction can occur in the early stages of fever, resulting in a cool skin effect, the recorded temperature using a forehead thermometer can, therefore, be unusually low.
If the measurement result is not consistent with the patient's finding or unusually low, repeat the measurement every 15 minutes or double check the result by another core body temperature measurement. - This device comprises sensitive components and must be treated with caution. Observe the storage and operating conditions described in the «Technical Specifications» section.
- Ensure that children do not use this device unsupervised; some parts are small enough to be swallowed.
-
Protect it from:
-
extreme temperatures
- impact and dropping
- contamination and dust
-
direct sunlight
-heat and cold -
If the device is not going to be used for a prolonged period the battery should be removed.
WARNING: Use of this device is not intended as a
substitute for consultation with your physician. This
device is NOT waterproof so do not immer in liquids.
3. How this Thermometer measures Temperature
This thermometer measures forehead and ear temperature. Forehead measurement
This thermometer measures infrared energy radiated from the skin above the eyebrow area and the surrounding tissue. This energy is collected through the lens and converted to a temperature value.
Temperature readings obtained by scanning above the eyebrow area will provide the greatest accuracy.
Ear measurement
This thermometer measures infrared energy radiated from the eardrum and the surrounding tissue. This energy is collected through the lens and converted to a temperature value. The measured reading obtained directly from the eardrum (Tympanic Membrane) ensures the most accurate ear temperature.
Measurements taken from the surrounding tissue of the ear canal generate lower readings and may result in misdiagnosis of fever.
To avoid an inaccurate measurement
- Switch on the thermometer by pressing the ON/OFF button ④.
- After one beep is heard (and the temperature scale icon is flashing), straighten the ear canal by gently pulling the middle of the ear back and up.
- Place the probe ① firmly into the ear canal, press the START button ② and keep the probe in the ear until the thermometer beeps to signal the completion of the measurement.
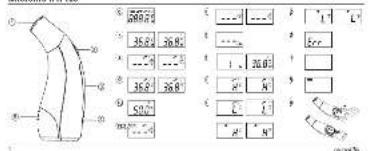
4. Control Displays and Symbols
- All segments displayed (6): Press the ON/OFF button (4) to turn on the unit; all segments will be shown for 2 seconds.
Memory 7: The last reading will automatically be shown on the display for 2 seconds. - Ready for measurement (8): The unit is ready for measurement, the «°C» or «°F» icon will keep flashing while the mode icon (ear or forehead) will be displayed.
-
Measurement complete (9): The reading will be shown on the display (3) with the «°C» or «°F» icon and the mode icon steady. The unit is ready for the next measurement as soon as the «°C» or «°F» icon is flashing again.
-
Surface temperature indication: A crossed-ear icon will appear on the display when the reading in the ear mode is outside the range 32.0 42.2^ C / 89.6 108.0^ F .
- Low battery indicator ⑪: When the unit is turned on, the battery icon will keep flashing to remind the user to replace the battery.
5. Changing between Forehead and Ear Mode
To change from forehead to ear mode, take off the removable cap (1) from the thermometer tip. The device will immediately switch to ear mode. The ear icon will be shown on the display and the «°C» or «°F» icon will flash to indicate that the device is ready for measurement.
To change back to the forehead mode, place the removable cap (1) on the thermometer tip and the device will immediately switch back to forehead mode. The forehead icon will be shown on the display and the ^ or ^ icon will flash to indicate that the device is ready for measurement.
6. Directions for Use
-
Press the ON/OFF button ④. The display ③ is activated to show all segments for 2 seconds.
-
The last measurement reading will automatically be shown on the display for 2 seconds with the «M» icon (7).
- When the «°C» or «°F» icon is flashing, a beep sound is heard and the thermometer is ready for measuring (8).
Forehead measurement
Place the probe gently onto the area approximately 1cm above the center of the eyebrow. If the eyebrow area is covered with hair, sweat or dirt, please remove the obstacle beforehand to improve the reading accuracy.
Press the START button ② once and release it. Start to move the device steadily from 1 cm above the center of the eyebrow to the temple area. A long beep sound will emit after 3 seconds to acknowledge the completion of measurement. If the probe movement is too slow to reach the temple area before the long beep sound is heard, repeat the measurement as described above, but simply move the probe a little quicker this time.
Read the recorded temperature from the LCD display. NOTE:
Patients and thermometer should stay in similar room condition for at least 30 minutes.
- Don't take a measurement while or immediately after nursing a baby.
- Don't use the thermometer in high humidity environments.
Patients should not drink, eat or exercise before/while taking the measurement.
- Before placing the thermometer probe onto the measurement area, remove dirt, hair, or sweat.
- Don't move the measurement device from the measuring area before hearing the termination beep.
- Always take the temperature in the same location, since temperature readings may vary according to locations.
- 10 short beeps and a red LCD backlight alert the patient that he/she may have a temperature equal to or higher than 37.5^ .
Ear measurement
Straighten the ear canal by pulling the ear up and back to give a clear view of the eardrum.
- For children under 1 year; pull the ear straight back.
- For children of 1 year to adult; pull the ear up and back.
Also refer to the short instructions at the front.
While gently pulling the ear, insert the probe snugly into the ear canal (about 1 sec.) and immediately press the START button (2). Release the button and wait for the beep sound. This indicates the end of the measurement.
Remove the thermometer from the ear canal. The display shows the measured temperature (9).

NOTE:
To ensure accurate readings, wait at least 30 sec. after 3-5 continuous measurements.
- Accumulation of earwax on the probe can result in less accurate temperature readings or cross infection between users. Therefore, it is essential that the probe is clean before each measurement. For cleaning, follow the instructions in the «Cleaning and Disinfecting» section.
After cleaning the measuring sensor 1 with alcohol, wait 5 minutes before taking the next measurement in order to allow the thermometer to reach its operating reference temperature.
- For an infant, it is best to have the child lying flat with his/her head sideways so the ear is facing upwards. For an older child or adult, it is best to stand behind and slightly to the side of the patient.
Always take the temperature in the same ear, since the temperature readings may be different from ear to ear.
- In the following situations it is recommended that three temperatures in the same ear be taken and the highest one taken as the reading:
1. New born infants in the first 100 days.
2. Children under three years of age with a compromised immune system and for whom the presence or absence of fever is critical.
- When the user is learning how to use the thermometer for the first time until he/she has familiarized himself/ herself with the device and obtains consistent readings
- If the measurement is surprisingly low.
7. Changing between Celsius and Fahrenheit
This thermometer can display temperature readings in either Fahrenheit or Celsius. To switch the display between ^ C and ^ F , simply turn OFF the unit, press and hold the START button (2) for 5 seconds; after 5 seconds, the current measurement scale ( ^ C ) or ( ^ F ) icon) will flash on the display (1). Change the measurement scale between ^ C and ^ F by pressing the START button (2). When the measurement scale has been chosen, wait for 5 seconds and the unit will automatically enter the ready for measuring mode.
8. How to recall 12 readings in Memory Mode
This thermometer can recall the last 12 readings.
- Recall mode ①3: Press the START button ② to enter Recall mode when power is off. The memory icon «M» will flash.
-
Reading 1 - the last reading ① : Press and release the START button ② to recall the last reading. Display 1 alone with memory icon.
-
Reading 12 - readings in succession: Press and release the START button (2) consecutively to recall the last 12 readings in succession.
Pressing and releasing the START button (2) after the last 12 readings have been recalled will resume the above sequence from reading 1.
9. Error Messages
- Measured temperature too high 15: Displays «H» when measured temperature is higher than 100.0^/212.0^ in the ear mode or 42.2^/108.0^ in the forehead mode.
Measured temperature too low 16: Displays L when measured temperature is lower than 0^ / 32.0^ in the ear mode or 34.0^ / 93.2^ in the forehead mode. - Ambient temperature too high (1): Displays «H» in conjunction with the «▲» when ambient temperature is higher than 40.0^ / 104.0^ .
- Ambient temperature too low (18): Display «L» in conjunction with the «▼» when ambient temperature is lower than 10.0^ / 50.0^ in the ear mode or 16^ / 60.8^ in the forehead mode.
-
Error function display: The system has a malfunction.
-
Blank display 20: Check if the battery has been loaded correctly. Also check polarity (< + ) and - of the battery.
- Flat battery indication: If the steady battery icon is the only symbol shown on the display, the battery should be replaced immediately.
10.Cleaning and Disinfecting
Use an alcohol swab or cotton tissue moistened with alcohol (70% Isopropyl) to clean the thermometer casing and the measuring sensor. Ensure that no liquid enters the interior of the device. Never use abrasive cleaning agents, thinners or benzene for cleaning and never immerse the device in water or other cleaning liquids. Take care not to scratch the surface of the sensor lens and the display.
11.Battery Replacement
This device is supplied with one lithium battery, type CR2032. Replace with a new CR2032 battery when the flashing battery symbol appears on the display ②1. Remove the battery cover ②2 by sliding it in the direction shown. Insert the new battery with the + at the top.

Batteries and electronic devices must be disposed of in accordance with the locally applicable regulations, not with domestic waste.
12.Guarantee
This device is covered by a 2 year guarantee from the date of purchase. The guarantee is valid only on presentation of the guarantee card completed by the dealer (see back) confirming date of purchase or the receipt.
-
The guarantee covers the device. The battery and packaging are not included.
-
Opening or altering the device invalidates the guarantee.
-
The guarantee does not cover damage caused by improper handling, a discharged battery, accidents or non-compliance with the operating instructions.
Please contact Microlife-service.
13. Technical Specifications
Type: Dual Mode Thermometer IFR 100
Measurement Ear Mode: 0-100.0 °C / 32-212.0 °F
range: Forehead Mode: 34-42.2 °C / 93.2-108.0 °F
Resolution: 0.1^ / ^
Measurement Laboratory:
accuracy: ±0.2°C, 32.0 - 42.2°C ±0.4°F, 89.6 - 108.0°F
Display: L liquid Crystal Display, 4 digits plus special icons
Acoustic: The unit is turned ON and ready for the measurement: 1 short beep. Complete the measurement: 1 long beep (1 sec.) if the reading is less than 37.5^ / 99.5^ 10 short beep sounds, if the reading is equal to or greater than 37.5^ / 99.5^ System error or malfunction: 3 short «bi» sounds.
Memory: Auto-Display the last measured temperature 12 readings recall in the Memory Mode
Backlight: The display light will be GREEN for 4 seconds, when the unit is turned ON. The display light will be GREEN for 5 seconds, when a measurement is completed with a reading less than 37.5^ / 99.5^
The display light will be RED for 5 seconds, when a measurement is completed with a reading equal to or higher than 37.5^ / 99.5^ .
Operating Ear Mode: 10-40.0 °C / 50-104.0 °F
temperature: Forehead Mode: 16-40.0 °C / 60.8-104.0 °F
Storage -25-+55°C/-13-+131°F
temperature: 15-95% relative maximum humidity
Automatic Approx. 1 minute after last measurement
Switch-off: has been taken.
Battery: 1 x CR2032 battery 3V - at least 1000 measurements
Dimensions: 107 × 50 × 34 ~mm
Weight: 55 g (with battery), 52 g (w/o battery)
Reference to EN 12470-5;ASTM E1965
standards: IEC 60601-1; IEC 60601-1-2 (EMC)
This device complies with the requirements of the Medical
Device Directive 93/42/EEC.
Technical alterations reserved.
According to the Medical Product User Act a biennial tech
nical inspection is recommended for professional users.
Please observe the applicable disposal regulations.
14. www.microlife.com
Detailed user information about our thermometers and blood pressure monitors as well as services can be found at www.microlife.com.
±0.4°F, 89.6 ~ 108.0°F
±0.4°F, 89.6 ~ 108.0°F
Referencia a EN 12470-5; ASTM E1965;
los estandares: IEC 60601-1; IEC 60601-1-2 (EMC)
Igili stan- EN 12470-5; ASTM E1965;
dartlar: IEC 60601-1; IEC 60601-1-2 (EMC)
±0.4°F, 89.6 ~ 108.0°F
Toepuóetpoivai evpyooinévo (ON)
kai etoiyoiaétpnən: 1ovvtuo μmπ.
Oakipwn ts metpnns: 1 mnn diapkeias (1 deur.) eav n metpnon elvai xanloTe np an 37,5oC/99,5oF, 10 ouvtoua mnn eav n metpnon elvai ion neyauTe np an 37,5oC/99,5oF.
Zpaua oovtnjatoc h duoeitouya: 3 ouvtoua mnn.
Autouatn EvbEtn Tc TeLeutaiacetpnns
Theoepokpata
Enavaopopa 12 eptnosew an to m pvnn
Owntoos
o8ovns:
Hoovn 0a avaei e IPAINO xpua n
4 DEUTEPOAETTIA, 6TAV TO 8EPUOJETPO EVEP- yOTIOINeI.
HoBovnTaavaymuPNAINSXpuuεπi
5 6eutepeAETTia, 0tAV n mEPTpon oAoKnPwEe iai n EvEiEg iivai mKpTeep aTTO 37.5°C /99.5°C
Hoovn 8a avaiye iKOKKINO xpwa eti 5 deutepoAETTia, oav n meton ooknpuwei kai n evdeig eivai i an neyalutepn ato 37,5^ / 99,5^.
Oeepokpaoia
Méθoδoc αιτίου: 10-40,0 °C / 50-104,0°F
MeTOooC meTOWIOU:16-40,0°C /60,8-104,0°F
Oeprkpaia
-25+55°C/-13+131°F
Bo n36eKaHHe HeToUHocTe H3MepeHn
1.BKIOHHTeTePMOMETp HaxaTmem KhoNk BKN/BblKI(4).
2.YCbIbIaB KopoTki 3ByKOBi CINHaN (noCte HeoIKOKA TemnepaTypHoi IkaJIb 3aMiraet), BbInpMaTe YUHOK HANAI, AkypatTHO NtIOHNYBa 3epeCINHy YA h3ad M INBEXP
3.ToHNO NOMECTNE UyN-NH3Y ① npM0 B yUshO H KaHAn, H aKMMTE KONKY START ② uNepKbMaTe UyN-NH3Y B yXe Do TEP nop, NOKA 3ByKOBOB CNHaHn TepMOMETpa HE M3BecHTT O TOM, YTO K3MepeHne 3aBePUEHO.
4.Индикаги И симьлblу npabNeHn
- Oto6paXeHHe Bcex 3neMeHToB (6): HaxMMTe KHOHkYK BKN/BlkI (4) nA BKnUeHn pNpBa, Tbe HeHe 2 cekHyd 6ydt OTO6paXaTcS Bce ceMeHbI.
PamrB7:BteueHne2cekyndabTOMaTHeCKn6ydet OTo6paKaTaBCNaCHeHneN3MepeHHoe3HaueHne. - TOTOBHOCTb KNCNOb3OBAHmHO 8: PnI6Op roTOB K NCNOJb3OBAHmHO, OTO6PaxKeHHa NIOHKA 心 C INI 心 F IPOdoJINaeT MIRaTB To BpEmA KaK CINMBON peXIMa (yxo INI no5) rotip nocToHnHO.
- N3MepeHHe 3aBepueHO 9: 3HaueHHe OTo6paTmTc Ha DCNnEE ③ BMECT CMMBOONOM ^ INN ^ IN CMMBOON pexkma. Pnp6op 6yET cHOBA roTOB K CneIyIOUeMy N3MepeHNO, KAK TOnbKO IKOHKA ^ INN ^ HauHET MInrA Tb.
-Индыкая TemпаТурьл NOBepxHocTh 10:ИКОнka
песчЕРКHYTOE YXO NOBHTCЯ ДИССПЕ (3) ECIN
Знayehme ИЗмeperнь ВУЛHоР рAOВИЕ ВБIXODIT 3a
пpendenby 32,0~42,2°C /89,6~108.0°F.
HnDnKaunpa3Pda6batape 11: Pnp BknoeHOM np6ope NOKka 6aTaep 6ydt HnepepbHO MraTb, HanomHaHnIb3ObaTeIO O Heo6XoMocTn 3aMeHb6batape.
5.ПepeknIOueHne peKIMoB n3MepeHnHa 6bI b yuho paKOBnHe
Tc6bI N3MeHnBpeKIM C3MepeHnHaJIbHaN3MepeHne B yUHOI paKOBHe, CHMNTe CbeMHb HAKOHeYHMK ① C bEpxHKnACTn TepMOmETpa. Ipn6Op HEmdJeHNOpeKIOHTCB PexHM N3MepeHnBA UHOHpaKOBHe. KOrDa Ha dncNee NOBHTC NOKKa YXO H6yDet MNRaTb NKHOKA «C» nIN «F», np6Op rotOB K cNOnb3oBaHNIO.
Tc6bI BEpytBCB PEXKM N3MepeHnHA Jb, HadehTe cbEMHb ① KONPAOH Ka HAKOHeYHK TepMOMeTpA, IN np6Op HEmdJeHNO nepeKIOHTCB PexKM N3MepeHnHa Jb. KOrDa HA NcNCEE NOBHTC NKHOKA NOB H6yDet MNRaTb NKHOKA «C» ININ «F», np6Op rotOB K cNOnb3oBaHNIO.
6. Yka3aHnno nCNoB3ObaHnO
1.HaKMMTe KHOKNBkBNBbIKN ④. DmCnnei 3 AKTNBPyeTc n B TeueHHe 2 cekHy oTo6paKaet BCE aMeENTbl.
2.DaHbIe nocnEnero n3MepeHnOTo6paKaIOTcHa HmCnPee ABTomATuYeCKn B TeueHne 2 cekyHd co3HaYKOM «M》(7).
3.Пибор ROTOB K INCINOLSBOAHMHIO, KOrda IOKOHKA «Ф» ИИN «Ф» HENpepbIbHO MInaTe N pOStByaH cMnHaN ROTOBHOCHT (8).
H3mepeHne HaJI6y
A AkypaTHO npINOKHTe ⅢyINH3Y K yuaCTky np6NnTeBHO Ha 1 CM BbIe cepedHBb 6pOB. ECNI HAD6pOBHAA6PbTb NOKpTa BONOCAMN, NOTOM INI rpa3Ho, NOKAJyHCTa, CHaHaJyDAJIte NOmExn, YTO6b IyBEInHtB TOOHCTb NOKa3AHN.
Hakmte KhoNky START 20dn pa3 nOtnyctnfe. HauHMeI nnBHO nepEmeauBn HHTcPmEHT n3 TOKHN, paONIOKeHHo B 1 CMnAD cepENHOb6pOBn, B BnCOHyO o6NaTb.Ype3 3CekHybl npO3ByNT dNNHb CnHAn, NOdTBePdAaOHU 3aBepWeHe N3MepeHna. Ecnu yn-nHn3a nepemueanacb cnWkoM MeNeHNO Hne DOCTnFA BnCOHOObNACTN KMOMETY CNHa, NOBTOPiN 3MepeHne, KAK ONCAHO BbIE, HO HA 3OT PAa nepemuaae UyN-nTHvHEMHOro bScTepe.
CHTaIe nokaHHe TEMpePaTybIc KK-dncnner.

BHIMAHHE:
- PAnuMeHTbI DoJIKNbI XOT8 6bI Ha npotraKeHHN 30 MnHyt HaxoHNTbcB NOMEeHHN C HeH3MeHHbIMN yCIOBnHM.
He n3mepnTe Tempepatypy Bo Bpemn npn cpa3y nocne Kopmnenra rpyndoro pe6enka.
He nIb3yItecb TepMOMETPOM BycnOBmX NOBIIeHHoB BLaXHOCTH.
- Péné à 3MépeHnem Tempapatypb iNIN BO BpEmr Hero NaueHent He DOnJKeH pInHMaTb NIIU, NITb INI BblONHtB Φ3NueckyO pa60Ty.
- PpepaMaMeuHem DaTuHka TempeaTpbyB 0bnaactn H3mepeHHydaNtepra, BONocbi NOT.
He y6npuIe n3MePntelbHoe yCTpoCTBO n3 oBlaCTn n3MepeHnDo BbIaun CmHaJo 3aBepWeHN.
BcerdaH3mepaTe Tempeatypy B ODHOM TOMKe MeCe, TAK KAK NOKa3AHnMOrTy pa3nUaTbCBy Pa3hBix MeCTax.
10 kopoTkX 3ByKOBbX CmHAnOB n KpaChra NoCBeTkaKKD npdynpexdaIOT naueHTo oTom, Yo y Hero MoKeT6bItb Tempepatypa paBHaN nn ppeBbIaOuca 37.5°C.
I3MepeHne B yuhoi paKOBnHe
BbIprrnme yuHoi KaHAn,NotaHyB xO BBepx Ha3an, YTO6bl OTKpbItb DoCTyn K bapaabHnn nepenOHke.
KpOMeToro,pyKOBoDCTByTeCb,NoXaNyIcTa,KpaTMMu yKa3aHnMaHa nepeDHe nAHe!
AkkypaTHO NOTAHyB 3a yxo, NIOHO BCTAbTe UyN-NH3Y B yuHOH KANAH (OKONO 1cK) HEMeDneHNO HAKMMTE KHONKY START 2. OtNyCTnTE KHOKNI XKNTe 3ByKOBORO CINHana.3TOT CINHAN O603HaTe AEBPeSHNE MMEpeHHA
BbHbTe TepMometn yuHoro KaHana. DmCnnne oTo6paKaet N3MepeHHyTO Tempepatyq (9).
BHIMAHHE:
- DЯ obecneuehen ToHocTH nokaahn, nocIe 3-5 mpeHn, cHaeNaHBx noPraH, Heo6xoJmo noOdoXdTaH He MeHee 30 cKyuH.
CkONJIeHHe yuHcH cepbHa uyn-1nH3e MoKET npINBCTN KCHIKEHNO TOHOCn NOKa3AHm TEMpepaTpyI INpeHocHy INPekmM MEXy HnCaAM, INoTb3yIOUIMn pIn6Op. IOnToMy Ype3BbYaHNo BaxHo JnA kXdoRIO h3MepeHHN cNOnb 3OBaTB YnCTyo Uynn3Hy.ДЯ OUYCTKn CLEdYte NHTCPyKUHM B pa3dJe «OChtKa n De3HNFeKUJIa.
Pocnie OHHCTKIN3MEpHTeBbHO rceHCopa ① cInrTOM, HEOxOIMO NOIOXdTa5 MmHT nepeD BInOnHEHEM CnEDyUoEro N3MepeHNeI DAnTO, TOp6bl TePMoMeTp pinnHnNcXoHy pa6oHyu Temnepatyp. - PnN3MepeHn TMepaTpybI y MnaJeHcB, NyUe Bcero IOnoKntb pe6EHaKa HnI NocKyO NOBepxHOCTb N HAKIOHbI rOBOy HABOK, TAK YTObI yxo 6blNo HAnpaBHeHO BEPX. IpOBoJr3MepeHne TMepaTpybI y Detey
CTAPJERO B03PACTa N B3PocNbIX, NyUHcTe CTOrB c3aDn N yTb C6Oky OT NaUmHeTA.
BcerdaIaIeMpeAte TEmpeAtpy B ODHOM I TOM Xe YXe, nockOblky noka3AnH TempeAtpby B nebOM n npAbom yXe MOrT 6b1b TaPnNHyb.
B CneDuOuX CNyAaX PeKoMeH dyTea TPOKbl aMaepRb TMpePAty B ODbHom I TOM XyeY, n3 aApabNbHOe pInHMAt HAnBOBSeIe 3N 3MpeHbHex 3XHeAHen.
1.ДЯ MЛаDEHUEB NepBbIe 100dHeJxN3Hn
2.Длгдети do Tpx net cocnaBneHHOn HMMYHHOCHCTMeHOMaTAKKeDnTEx,TnKOrKo HANmYe INOTCYTCBNE NOBbIeHHOH TeMpeApTybl IMeetOCO6yBO BAXHOCTb.
3.ДЯТЕ,КTOТькоЗнAKOMTССРпборм,ИЗУАТЕпинци erо DeIeTBnI NОЛУАТЕ рп ИЗМЕрEHAX NOXOXIME,Но He a6CONIOTHO nIeHITMHHbIpe 93yJIbTaBtS.
4. Ecnm3MepeHHaTemepaTpyoNoOpO3pTeJbHo Hn3ka.
7.Bo3MOxHocTb nepeKlnHoueHn MeXy
TePMoTeP cnocoben oTo6paKaTb pe3yNbTaBt bN3MepeHnI TEmnepatpyb no uKane PapeHreTaN60 no uKane LcEbn.ДЯ nepeknIOHeM nCnIe NmEaY CnF, npOCTo BkKnIOHTE np6Op, hAKMnTE yJeDpKaBnAte KhoNKy START ③ B TeCeHHe 5 cekHy; cpe3 5 cekHy,
MOKHO 6ydtYBnTeMbMraOuTyEkyTuN3MepeTebHyu kany(IKOKHa «C»)Nn(°F)HaDcNPee②.TOBtOpHbIM HaxaTMEM KKnKNT START kNkAaN3MepeHna CHOBa nepeKnUoaeTc Mekdy C N F③.NoCe Bblbopa uKanbl N3MepeHnIPOdoQMtte 5 cekyH, n npbop abOTMATueckn NepeHETB peKM IrotOBHOCTN K3MepeHIO.
8. Bocnpoun3BeHeHne nocLeHnX 12 pe3yntaTOB n3MepeHn B pexnme naTIn
TePMOMETMOKETBOCPOIN3BODITbNOCNEHNE 12peyIbTA0B N3MEPEHNI.
PexMM Bocnpo3BeeneH3: HaxMITE KhoNky START ② npepexoDa B pexMM BOCpO3BeeneH, KOrna TepMometp BbIKIOye. IKoHka NAMRTN MrrAet.
- Pe3yIbTaT 1 - nocnEnHn pe3yIbTaT ①: HaxmTe HOTyCTHe KONky START ②,ДЯ BbIOBa nocnEnHero pe3yIbTaT. Ha dnCIIee BmecTe C NOKHOK O NaMTrn ZAMrAe 1.
- Pe3yIbTaT 12 - nocJeDoBaTeBHeCHTbHaHne: HaxkmaIte IOTryckaiTe KhoNky START ② dny noce-doBaTeBHO BOCnpoN3BeDEnH NO 12 noceDnHx pe3yIbTaTOB.
HaKMMAR OITNYCKA KHONKY START ② NOCNE BOCNPOIN3BcDeHHN NOCEINHIX 12 pe3yNbTaTOB,MOXHO epe pa3 npocMOTPeB xix NOCNEIOBATeNBHOCTb HauHHa c pe3yNbTaTata 1.
9. Coo6eHn8 o6 owH6kax
- N3mpeHHa TEMnepatypa cnHbKOM BbICOKaY (15): OTo6paXaaetc CImBON (H), ecnn n3mpeHHa TEMnepatypa bIwe 100,0°C/212,0°F B pexMme n3mpeHHa B yshO paKOBHe HN 42,2°C / 108,0°F B pexMme N3mpeHHa Hn6y.
- N3MepeHHaTeMnepaTpycCNIuKOM Hn3KaJ 16: OTo6paKaeTcR cIMBON «L», ecNn N3MepeHHaTeMnepeTpya Hnke 0°C / 32,0°F B pexMe N3MepeHHa B yUHoi pakOBHe Hn 34,0°C / 93,2°F B pexMe N3MepeHHa Na 56y.
- TemnepaTpaOkpykaHOeI cpeblcnnukom BICOKA17:CMBOB(H)BMcTeC CMBBOJOM(AOb6paXaIOc,ecnMnpaTpaOkpykaHOeI cpeblBbue 40.0°C / 104.0°F.
TEmnepaTypoOkpykaIouee CpeblCnHskOM Hn3kA 18: CMMBON L B MBECTe C CMMBOJOM OTObpaKaHOTCN, ecnn TempeIaTypo OkpykaIouee Cpebl HnKe 10,0°C / 50.0°F B pexmme HmEpeHHa B uHoiPAKOBHe nI 16°C / 60.8°F B pexmme HmEpeHHa Ha N6y. -
OTo6paXeHHe oUH6Kn 19: Pn HEnOJaKe CnCTEmbl.
-PyctoIuCnIe 20:PiokanyIcTa, npOBepTe npaBunbHocTb yCTaHOBKn 6aTapen. IpOBepTe TaKe NOIpaHOCtB (<> n <->) 6aTapen. -
NnDnKaaJna pa3pAaNBWeC8 6aTapeu (2): EcJI Na DnCnIe He OTo6paXaETcH NHyero, KpOme NoCToRHHORO CmBbOJa 6aTapeu, To 6aTapeo cJeDeyE He3aMeDNITeBHo 3aMeHHTb.
10.OuHCTka Hde3nHΦekun
Дяочнтук Корпуca ТермОмeТра ИИЗмeртЕль"Hои шУн-нИнЗы ИСНОьБУ YeТа TMПОн ИИ XNONIOВYTO TKAHb, ССМОЧЕНБI B CYNPTOBOM PACTBОPE (70%-pactBOP ИЗОПОПИОВОТ CYNPTA). Y6eДNTeС, YTO BHYTpB TepM OMeTЯ He NOПАдETЖIDKOCb. H.NKOrDA He NcONЛБ3YTe ДЯ Oчнтук abpa3aNBHbI YeCHTЯNE CpeDCTBA, pactBOPu- TEEN IINI BSEHON, И NOKOrda He nORpykaIte pnpBOP B BOU YINI INHbI YeCHTЯNE XJIDKOCtI. CTapaIteCb He NoцapanaTb NOBepxHocTN IShY-нINH3bI I NDCnPNe.
11.3aMeHa 6aTapeu
Pn6pnoocTbIeTcC OHOH JInmEBo6BaTapee TnCR2032.3aMeHa 6bapen Ha HOByo Tnna CR2032 npom3BODHTcPn NOBHeHH Ha DnCnIee MrrAooero CmBOJb6bapen (21).
OTKPOITE KpbIbHKy 6batapeHOrO OTCsKa 22.3aMeHHTe HcNoJIb3OBaHHyO 6BaTepeIO, yCTaHOVB HOByO 3HaKOM + BBePx.

Batape n 3neKtpOnHbIe npn6Opblc cneyet yTmIMN3P0BaTB B COOTBeCTBm C pINHrTbIMN HOPMaMn N He Bb6paCbBAbTB BMecTe C bIoTOBbIMN OTXoDAmN.
12.Fapantna
Ha npn6op pacnpocptpaHReTc rapantna B TeHeHne 2 net DaTbI npnO6peTeHN. rapaHTN DEiCTBtEnbHa TOnkBo npn HAIuMn rapaTnHOro TaHO, 3aONHeHORO dInepom (cm. cObaTHoC tOPOh), nOdTBepKDaIOeero DaTy npdoaKn, nn KaccOBOrO YeKa.
FapantnI npKpbBaet yctpOietBO. Batape n ytnaKOBKn He BKIOUeHbI.
BckpbTme m MexaHueeCKne NOBpeKdeHn npmbodr K ytpate rapaHTm.
- FapantHHe paccnpoctpaHReTc H NaOBpeXeHnH, Bb3BaHbHBe He npBAnlbHbIM ObpaIeHnEM,pazprKeHHoB 6aTaapee,HEcuaCTbHMnCJyAaRMnNHeBbIOJIneHnEM MHCETPVKNU NO KCNPTATAU.
PtoKnyIcTa, 6paTneB 6bnKaIyHraPaTHmHyO MaCTepckyo MknponaФ.
13.TexnuecknxapaKtepncnkn
Tun: INchpaKpaChbI TePmOMeTp IFR 100
Диаэзон PekIM n3MpeHnB yuHoi paKOBnHe:
n3MepeHn: 0-100,0°C/32-212,0°F
PekIM n3MpeHnHa n6y: 34-42,2°C/93,2-108,0°F
MHHMaJIbHbI
war
HHdkauH: 0,1°C/°F
ToHocTb
± 0.2^,32.0 42.2^
±0.4°F, 89.6~108.0°F
Dmcnnen:
KIOKPICTAJIYUeCKM DNCIIEE, 43naka co CNEunaiNbHbIM INKOHKAH
3ByKobBie
CnHnbl:
PnB6p BkIOUeH nIroTOB Kn3MepeHIO: 1 KOPOTKm 3ByKOBoi CnHAn.
3aBePeHne n3MepeHn: 1nnHHbI
CnHAn (1 cek.), eCNn 3haueHne MeHbIe 37,5°C/99,5°F, 10 KOpOTKnx 3ByKOBx
CnHAnO, eCNn 3haueHne paBHO nn
BbIe 37,5°C/99,5°F.
CnCTeMna OUIN6ka IINn HcNpBaHocTe
3 KOpOTKnx 3ByKOBoi CnHana.
Pamr:
ABTomuueckoe OTo6paKeHne nocJeHn H3MepeHHo TempeAtypb BoCnpou3BeHeHne 12 nocEnHnx pe3ynb- TaTOB B pexHme naTIN
POncBETka:
PnBKNHHeHHnpbOpaDcNne3acBeTnTc43ELEHbIMuBToHa4ceHydbl.
Pn3aBepHHeHHm3MepeHnncnCnny-
yHeHbIM 3NaueHHeM MeHbIe 37,5oC/
99,5oF DnCnne3acBETnTc3ELEHbIM
UBeTOM Ha5 cKeHyd.
Pn3aBepHHeHHm3MepeHnncnCnny-
yHeHbIM 3NaueHHeM PABbHIM nnn npBbI
WauOHH37,5oC/99,5oF,DnCnne3acBETnTc KPACHbIM uBToMa 5 ceHyd.
Dnana3OH
Pekmm n3MepeHn B yuho paKOBHe: 10-40,0°C/50-104,0°F Pekmm n3MepeHn Ha 6y:16-40,0°C, 60,8-104,0°F
TemnepaTpa
-25- +55°C/-13+131°F
MAKCHMajbHAR OTHOCHTeJIbHAR Bnax-HocTb 15-95%
ABTomaHTue- Pnp6op OTKIOUoAeTcPn6Bn3TeIbHOCKoe uepe3 1 MHHy NocNE BblIOJIHeHBAIKIOUeHHe: nocJeHrero I3MepeHnR.
Batape: 1xCR2032 BatapeV3-He MeHcE 1000 H3MepeHHI
Pa3Mepbl: 107 x 50 x 34 MM
Macca: 55 r (BmecTe c 6aTaapee), 52 r (6e3 6aTapei)
COOTBETCTBNE EN 12470-5;ASTM E1965; CTAnDapTAM: IEC 60601-1; IEC 60601-1-2 (EMC)
DAnHHn npB6op COOTBcTcBye Tpe6oBaHmIM nPeKTHBB E3C O MeuHnHcKOM ObOpyOBAHm 93/42/EEC. IpaBo HA BHeceHne TEXHmecKHX kMHeHem coXpaHaTeC. PekOMeHyETcRaB rOg npovAoHbTB texHmecKyIOpOBepKy IN3dJIpynpocceCNOHaNbHom NcNoIb30BaHMn. PoXaYnCTa, Co6LIOaJte pnpiaeraMeI npabInna KcKnpyaTaun np6oBa.
14. www.microlife.ru
Noipob6Hyo NoIb3OBeTaBcKyo HfOpMaUH0 o HaJIHX TePOMometpax INTOHometpax, a takoce cepBCHOM 06cnyXBAHN Bbl haJeTe HaHaew cTpaHnue www.microlife.ru.
Szabvany: EN 12470-5; ASTM E1965; IEC 60601-1; IEC 60601-1-2 (EMC)
PENDYNPEXKDEHME:No3BaHeToHaTo3nPi6bOp He 3aMeHARoKoCypTaUmIe C BaUHJIeNepK. To3nPi6bOp HE E BoOyocToHIV HIKOFA He ro NotanTae B TeuHOCTn.
3. KaK To3N TepMOMeTbp Mepn TempepaTypa?
To3n TepMometb np 3mepBa TempepaTpyaHa YeIto NByxOTo.
N3MepBaHe Ha TempepaTypaHa YeNoTo
To3n TepMometb np 3MepBa INHppauepeBHeataeheprna n3IbyeHa OT KOKATA NaB BEXNITe N OKpbKaBaAutaTn TBkaH. Ta3n eHepraCe Cb6npa pne3 Neuata n ce npeo-6pa3yba Do TEmpepaTyPha cToHocT.
Ha-rotmaToHocHTaNoyehnTe TemnepaTpHn Noka3AHNOCmpyBa CkaHnPaHe Ha 3OHATA Hd BEKnTe.
H3mepBaHe Ha TemnepaTypaB yxoto
To3n TepMOMeTbp H3MepBa HINΦpauepeBHeHa eHeprna, H3NbYBaHAOTbNaHcTeo OKpbXabaata roTbKaH. Ta3n eHeprrce Ce c6bupa npe3 neaata Na ce pneobpa3yBa BVtemepaTypha CTOHocT. H3MepeHOTo Nokaahme, B3eTo HappBOOTbNaHcTeO,OCnypraBA hai-Tohata TempePa-tya Ha yXoTc.
M3meBaHnraTAtOKoJIHaTa TBKaHHa yuHmKaHaI MoRaT DaTeHePnpaTNo-HNCKn Noka3aHmN DaDObeDaT Do NorpeWHa DnaHrO3a 3a BmCoka TempepaTypa.
3a da n36eHHeTe HeToUHo H3MePbAHe
-
BkIOUoye TepMOMeTbpa C HATNCKaHe Ha 6yTOHa 3a BKIOUBAHe N N3KIOUBAHe 4.
2.CneKatoyyeTeEINCHnHAn(NIKOHATA3aTEMnepaTpyhatackanaMnra),I3npabeteywnHaKaHAn,KATO N3dbpnaTe cpeData Ha yXOTo HA3aH Harope. -
NocTabete cohdata ① nIbTHO B yUHnRA KaHJ, HATNCHETe 6yToHa START (CTAPT) ② nIpbXte coHdTa B yXoTo, DOKATO TepMOMeTbPbT CINHAnImnPa 3a 3aBbPbBaHe Ha I3MEpBaHeto.
4. KohtpOHHn DnCnIe N CmB0JI
- NokaBaHe Ha BcNk CemHeTH 6:HaTNCHeTe 6yToHa BKn/M3Kn.4 3a BKnIOVAHe Ha yCTpoIcTBoto. BcNk CeMeHTn 1e ce nokaxat 3a 2 cekyHn.
Pamet⑦:PiocneHnToNOKa3aHHeABTOMaTHoUe ce nokae Ha dncnner 3a 2 cekyHn. - TOTOBHOCT 3a H3MEpBAHe (8): YCTPOJCTBOTo e FOTOBO 3a H3MEpBAHe, INOHATA «C» INN «F» Ie npDJIKN DA MInrA DOKATO INHOKATA 3a PekIMa HA H3MEpBAHe (3a yXO INN 3a HeNo) 6bDe NOK3AHa.
- 3MepBaHeTo e3aBbPseHo9; 3MepEHaTc cToHooCT ue ce NOKae Ha NcNpNee(3) c KHOA 已 ^ 已 C )nniF 3aEDHO c HEnoDnBuKHa KHOA 3aN5paHnpeXHM. YctpoHCTBOTo e rOtBO a CneBdAUTo M3MepBaHO, KOrATO INOHATA (^) nIN ^F 3AnOpHe da Mmra OTHOBO.
-ндикачиятtemпаура Na noBbpxHocTtHaДmCnNNeIe ce NOBnIOKa Ha yxo npeceHeO C KpbCT③,KORATOOTcHTeHnIrtpe3yITaT B pexIM Ha NImepBaH e BxOTo e N3BbI rpaHnITe 32.0-42. ^ C /89.6-108.0F.
-ндкалязаиstoшабateру 11:Korato yctpoiCTBOTO bde BKNHcHEno,ИKOHATA c batepnaTa ige npOdbNkM da Mnra,3a da HAnOMHn Ha Notpe6nteIa dacMeHn batepnaTa.
5.CMaHa MExxDy PexnHa n3MepBaHe Ha HeNoTo H PeXnHa n3MepBaHe B yxoto
3a da npomeHnte ot pexm HA n3MepBaHe Ha yeNoTo Bpexm HA n3MepBaHe B yXOTo, CBaIe Te cMeHReMnA hakpaHnik 1OT bBpxa HA TepMOMeTbpa. YcptoNCTBOTo BeHaHa Ie npemHe KbM pexm HA n3MepBaHe B yXOTo. IKoHa Yxo) 6E 6Je NOKa3Ha HA dncnner N (°C)nnN 广 F IKoHaTa 6e MNa, 3a Da NOKaKe, YeYcTpoNCTBOTo e TOBOTO 3a n3MepBaHe.
3a da npomeHHTe obpaTHO KbM pexMM Ha N3MepBaHe Ha YenOTO, NOCTABe TcMeHNEMN HApnHUK ① Ha BbPxA Ha TepMometbpaN yCtPOINBTO BeHNHa ige Ce BbPHTe KbM pexMM Ha N3MepBaHe Ha YenOTO. IKAHO «Yeo» ⑥ 6bDe nOKA3Ha HA DmNpEe N «O» MInN «O» INKoHATA ige MMra, 3a Da NOKaKe, Ye cTPOINBTO e rTOBO 3a N3MepBaHe.
6. Yka3aHnHa 3a nOJI3BaHe
-
HATNCHETe 6yToHa BKn./M3Kn. ④. DmCnneT ③ ce aKTHBnpa, 3a Da nokaxe BCNUK CemMeHTn 3a 2 CekyHdN.
-
NocneHnTo nok3aHHe ABTomAtuHo ce nokae Ha DnCnner 3a 2 cekyHn CnKoHaTa «M» Do Hero(7).
- Korato INKOHATA 心 INIIN 心 MIRA, ce yBa cInHan IN TepMometbpbTe roTOB 3a H3MePBAhe (8).
N3mepBaHe Ha TEMpepaTpata Ha YeNoTo
IocTabete coHATA BHHMATEHIO Bbpyx MCTO OKONO 1CM HAD CEHTBa HA BEXData.AKO Oblacta OKONBOBEXdaTe a 3AmBpcHeA,NOTHa HIN NOKPITc KOCMOJI,OTcPaHete IN npedapertHe,3a Da ce NOobpN ToHcctTa HAtOHtAHEo
HATNCHE6yToHaCTAP ② BeINbIKnroocboOede. 3anoHHe Ta MeCtNE INcTpyMeHTa paBHOmePHO Ha 1cm.Had ueHbpa HABeKDaTa KMBoN6NaTt Ha cNoO OuyTe.CnE3 CekHyDn Ue NpO3Byu Dblr3ykoB CnHAn, H3BcTeBaU pNkIIOVA He HA3MepBAHETo.AKO dBHXeHmTO HaCoDA t e TBpDe 6aBH0,3a Da DCtNfHcNeooHTo npeDn aCeYe3yBOKBaT CnHAn, NOBToPeTe INmEBPAHETo KAKTe oONCAHO No-rope,Ho TOn NbT DBMKeTe COHdA t MaNKo No-5bp30.
PpoyeTe oTeTeHaTatempeaTypo aT LCDnne.

3ABEJIEXKA:
- PiauHeNTeI TepMometbtpTpr6BaDa ca npeToaB B cTaC eDnakBv ycNoBna, Hau-MaNko 30 MInHyTN npEni N3MePbaHeTo.
He n3mepBaIte no BpeMe Ha nnBcHara cneKbpmHe.
He n3no13BaIte TepMometbpbT B cpea C BncoKa BnaX-HoCT.
- PauuHNTte He Tp8Ba Da NnT, RaT aNm N3BbPwBt UnpaxHeHn IpeDn INI NO BpeMe Ha 3MepBaHeto.
- Ппелд д поста TeCDAна НТЕРМОмeТьрТВБpXY MICTOTAO 3AИЗМерBaH经,NHTCTeT O3aMbpcBAHINKONJINIOT.
He npemecBaIte yctpoCTBOTo OT MCTOTo HA nMepBaHne npedn da YyeTe 3yKOBn CnHaN,OTnHTaU Kpa HA nMepBAHETO.
BINAHUN3MepBaIte TempepatypataHa eHNO Hcbo MoCTO, TbIKaTO TempepatPHITE pezHTaTN MOrat da BapnPATB 3ABNCMOCT OT MCTOTO.
10Kbcn3BykOBN CnHnA N OcBeTeB U cepBHeO DnCnnne npdeynpeXdABaT, Ye naueHentb Moxe da HMaTEMnepatypa paBaHa Na nnNo-BmcoKa ot 37.5°C.
N3mepBaHe Ha TemnepaTypaB yxoto
M3npabete yuHnKaHa n Cn3dbpBaHe Ha yxOTo Harope HnHa3a, 3a da noJyUHTpe npKa BmIMOCt KbM TbNaHcyTe.
3a deua noi 1 roinHa: N3dbpnaTe yxTo npabo H3aI.
3a deca hα 1 roHn Hb3pactHn: H3IbPnaTe yxTo Harope Hhaad.
MOna, BnKTe CbIoo n KpaTkoTo yKa3aHHe Otnpe!
Pa3nojokete coHdaTBA yuHnKaHAn yD06Ho,doKATO BHIMATEHNO DbpNaTe yXoTo H3aJd (okono 1 cekyHna) N BeDHara HATNCHEte 6yToHa START (CTAPT) ②. PycHeTe 6yToHa n3uakaIte CnHana. Toba o6o3Ha-aba 3abpUbahe Ha m3mepeBaHeto.
V3BaTe TepMometbpa OTyHnHaKan. Ha Dcnnner ce NOKa3Ba N3MepeHATA TempehTypa 9
3A6EJIEXKA:
3a da cncnOCHpyrTe ToHn NOKa3AHn,MOJI,IN3yakBaiTe nOte 30 cekyn CneI 3-5 nocneIOBaTeHNH3MEpBAHH.
HaTpynBaHeTo Ha YuHa KaINo CoHata MoKe da DoBeGe do No-HeTOUHN3MEpBaHn HA TempePaTypa IIN B3aMMHO 3apa3BaHe Ha NOtpe6bnteNe. 3aTOBa e N3KNIOUYeTIHO BAXBO npEiN BCKO N3MePBAHe Da ce N0J3Ba YcCTA CoHda. 3a NoHCTBaHe cneBaeYk3a-HnraTa B pa3Da Na (TPOHCTBaHe NdeEHNfpeKuPape).
CneI KaTo NoUcHTNe H3MepBaun DaTnK ① cbc cnpt, Heo6XoJIMo Da N3yakate 5 MNHyTN, npedi Da HanpaBte CneJBAuO To H3MepBaHe, 3a da No3BOJITe Ha TepMOMeTbpa Da NOCTHRe CBOrTa HOMHaJIHa paBoTHa TEMNepaTypa.
3a deTe eHaH-do6pe To da Jn EKnx HEnoBmXHo Ha EaHa CTpana cyxo o6bphato Harope. 3a no-roJMO dete nn
Bb3pacteH eHaH-dOpe da ce cToI OT3aN I neko BCTPAH NT NaunehTa.
BmHn 3mepeaTte TmepaTpyata B eIHO u CbIoo yxo TaB KATO TmepaTpyata B IABOTO n DcHOTO yxo M0xe da ce pa3nnuBa.
B CnEeHHTe CNTyaunu Ce npenopbUba Da ce HappaT TpN IN3MEpBaHnHa TEmNEpApTa B ENo H cbIoo yXo Hn Hn-BnCOKTo NOKa3aHHe Da CE CHTA 3a BRHO:
1.HobopoJeHn IpE3 PbBNTe 100dHn.
2.ДeuаNotTprOToHINCHAPUHENAIMYHNA CNTeMa, 3A KOTOn HANUMETO INIINCATAHABICOKA TEMNEPA-TyPa e OTKPINTNHO3HAueHMe.
3. Korato notpe6nteTcE yuK da noJ3Ba TepMoMeTbpa 3a npBb TbT,doKaTo ce 3aI03Hae Do6pe C np6opa n 3aONHe da npABn TOHN 3MepBaHn.
4.AKO N3MEpBaHTo e N3HaHeDBAuO HmCKo.
7. Bb3MOXHOCT 3a npeBKLIOUBAHe MeJxNy CeI3nNΦapeHxAaT
To3n TepMOMeTbP MoKeJa nOKa3Ba Temnepatyata KaKTo nO
FaepHxAit, TaKa N IO IeI3N. 3a Da npBekIIOHTe NOk3BaH
TeMe MekJYoC N F, IpocTo NK3IOHTe YCTPOCTBOTo, HATm
Chete n3aPbXte6yToHa START (CTAPT) ② 3a5 cekyHn.
Korato nycheTe 6yToHa START (CTAPT) ② cne1 5cekyHn.
TekyuTa CkaJa 3a N3MepeBaHe IKoHa (oC uHn oF) Ue ce
nOKaxe Ha nINcIe12. MoKeTe Ha npEKBIOHte cKaIATA 3a 3MnEPBAHe MEXyD C nF C hAtnCKae Ha b6TyOHa START (CTAPT) ② OTHBO. Korato cKaIATA 3a 3MnEPBAHe 6bJe 3N6pHa, 3MAKaiye 5 cekyHn yCtpoiCTBOTo ⅢBne3 ABOTAMUHO B pEXIM HA rTOOBHO 3MnEPBAHe.
8. KaK ce N3BnKBaT 12 noka3aHnB peXnM Ha 3anaMetraHe
To3n TepMometbpoMoKe Da 3aONMnIocneHHTe 12 noka3AHJ.
PexHM 3a noka3BaHe Ha 3aONOMHEH CTOHCTn 13: HATNCHTe 6yToHa START (CTAPT) 23a Da Bne3e Tbe pexHMa 3a noka3BaHe Ha 3aONOMHEH CTOHCTn, KORATO TEPMOMeTbpTe E3KIOUeH. IOKHATA 3a NAMET MMRNA
- Noka3aHHe 1 - nocnEhOto nok3aHHe ①:HaTmCHeTe n OtnyChTe 6byToHa START (CTAPT) ② 3a nok3aBaHe Ha noCnEhata n3Mepeha cToHoc. Dncnne 1 camo c IKOHATA 3a naMet.
- Noka3aHHe 12 - nocneBObatEno Noka3BaHe:HaTn-CheTe n OTyChete 6yToHa START (CTAPT)② nocneBObaTeHNo,3a Da BnJaTe Noka3aHnTa eHDo cneI dpyro,do nocneHnTO 12-to Noka3aHHe.
HaTnCKaHTo nOITnyckAHToHa START (CTAPT) ② CNEI NOKa3BaHe Ha NOCJIeHNITE 12aONMHeHcN CTOHocIn, Ue BbPHe NopeucaTa KbM NOKa3AHne 1.
9. Cb6eHn3a rpeoka
- N3MepeHATA TempeHATy e TBbPde BnCoka 15: Poka3Ba «H» npH N3MepeHa TEmpeHATy pO-BnCoka OT 100.0 °C/212.0 °F B pexMM Ha N3MepeBAe H yXoTo WIM N3MepeHata TempeHATy e NO-BnCoka OT 42.2 °C /108.0 °F B pexMM Ha N3MepeBAe Ha YenTo.
- N3MepeHaTeMnePaTepbpeHncka 18: Poka3Ba «L» npu N3MepeHa TempePaTpo NO-HnCKa OT 0°C/32.0°F B pexkHM Ha N3MePBAe B yXOTo INN N3MepeHaTe TMpePaTepa e No-BnCoka O t 34.0°C / 93.2°F B pexkHM Ha N3MePBAe HcHnOTO.
- Okonhata TemnepaTypa e TBbPde BncoKa 17: NkazBa H BcHTaHne C «▲» npTemnpaHa okonhata cpea no-BncoKa oT 40.0 °C / 104.0 °F.
- OKONHATA Tempehatae TbBpde Hncka 8: DcNnnei «B B cBHeTahne C « Pnp TMepaHa TA KOJNHATA cpea no-HnCKA ot 10.0°C / 50.0°F B pexHM Ha N3MepBahe B yXOTo INN INMepHaTempehatae TmepaHa e No-BnCoka OT 16°C / 60.8°F B pexHM Ha N3MepBaHe Ha Yenoto.
- POKa3BaHe Na cyHKuOnHaJIHa rpeWka 19:Korato B CNTeMaTn HRAKaBA HeH3npaBHOCT.
-
Ppa3eH dncnne 20 MoJ, npOBepTe danH bATEpNtA e nOCTaBeHa npABmHIO. PpOBepTe cbIoo Taka IONIOcTte (< + >) Hb aTEpNtTa.
-
INHnkaa3a 3nstoeha 6atepna 2) Ako HnoDmK-Hata mKoHa c 6atepna e eHNCTBeHNrT NOKa3AH CMMBOH Ha DnCnIe, 6atepna TpRbBa Da ce CMHe Hes3a6abHO.
10.Почнствае Идзифкцupahe
TAMNHNINNAmyHbKaHnHOeHcBcCnIPT (70% H30npnIN) 3a NOUHCTBaHe HA KOpnyca HA TepMOMeTba pa IN3MEPABATENHATA COHDA. BHIMABAITE DA He IPOHNIke TEHOCHT BbB bTpueHOCHTHa TepMOMeTba. HNKORA HE NIO3BAITe a6pa3HNHNOuHCTBaUN ppepAni, pa3TBOPNTEN INN B6H3O3 NaOHNCBAHE INHKORA HE NOTANJTE pnpBOPA BbB BODA INN dpyTN NOUHCTBaUN TEHOCHT. BHIMABAITE DA He HADPACKATE NOBbPxHOCTTa HNeuta HCoNDATA INDCNNEA
11.CmHa Ha 6aTepuHte
To3n np6op ce doctabc c edha nTneba 6aTepey, TIN CR2032.CMeHJeTc HOBa 6aTepey CR2032 npn noBaTa Ha mHa aCmBOn 3a 6aTepey Ha dncnner (2) OTBpOe Tana KaKa ha 6aTepeRta 22 Kato ro nnb3HeTe B yka3aHata nocoka. CMeHete n3no3BaHata 6aTepey, NoCTabeTe HOBA Cbc 3HaK +Harope.

BaTeepnIte n enEeKtpoHnIte ypeDn Tpr6Ba da ce 3X8BbPJIrT cBtIaCHO MEcTHIte pNIOxIMn pa3- nopeDn, a He c BntOBIne OTnaDbu.
12.Гаранця
To3n ypeE c 2-roMnHa rapaHnO r O DaTAt Ha 3aknyBaHe. RaapauHnTa Baxn cAmo npn NOKa3BaHe Ha rapaHmOHnHa T KAPTa, nonbInHeA OT npOdaBau (BIXTe OT3aD) C nO TBpKdHeMe 3a DaTAt Ha NOKyNk M KacOBa BcEnExka.
- RapaHnraTa nokpmba npnbopa. Batepyn onakOBn He ca BkIOueHN B rapaHnraTa.
OTBapraHToIINMOiMnΦnKaunTeNo npnbopa npabrt rapaHnTa HeBaJnHa. - FapanuTa He NokpBa NOBpei, npUHHeH O T HnpabnHO No3BaHe, 30ToeHa 6aTepy, 310NoTyKm HecnaBaHa Ha yka3aHaTtA 3a ekCnloatau. MoIc CbPkeTe ce c Microlife 3a o6cnyXbaHe.
13.TexnueckcnneuKauu
TIN: EneKtpoHEn DBypeXImeH TepMOMeTbp IFR 100
06xBaHa PekHM Ha 3MepBaH ByxOTo:
m3MepBaHa: 0-100.0 ^ C /32-212.0 F PekHM Ha 3MepBaHa HeYoTO: 34-42.2 C/93.2-108.0 F
PazdeleniTeHa cnoco6Hoct:
ToHocT Ha N3MepBaHe:
Dncnnn: 3Byu:
Namet:
Ja6opatopn: ± 0.2^ 32.0 42.2^ ± 0.4^,89.6 108.0^
TeHOKPnCTaJIeH DnCnIeN,4UΦpπ PIIOC CNEUJAHIN IKOHN
YCTPOINCTBOTO E BKNIOHEn e IOTOBO 3a
N3MepBaHe: 1KbC CnHaJ.
3aBpUbaHe Ha N3MepBaHTo: 1 DbNbr CnHAn (1 cek.), aKO OTeHTEHnT pe3yNTat eNoMaTBk O T37.5°C / 99.5°F, 10 Kbnc 3ByKOBn CnHana, aKO OTeHTEHnT pe3yNTat e pABen HnNo nOroJrAm O T37.5°C / 99.5°F.
Pepka B CnCTeMaTa HJIN HeH3npaBHOCT: 3KbCn 3ByKOb CNrHa.
AToMaTuHOnoKa3BaHe HaNoCneHaTa
n3MepeHa TempepaTypa
Ioka3BaHe Ha 12 3anomHeH CTOHOCTn
B pexIM namET
CBetlnnHa Pnp BKIOUOVAHE Ha yctpoCTBOTo
HnDnkaunHa OCBeTneHHeTo Ha dncnner ue CBeTN 4 cekydn B3EIEHO.
HeTO hCbeTneHHe To Hdncnner ue CBeTN 5cekyndB3EIEHO, KOrato m3MepBa- HeTO e3aBbPunnoeOTHTEHpe3yIAT
no-HncbKOT 37.5oC/99.5oF. OCBeTneHHeTo Ha dncnner ue CBeTN 5cekyndnBcYPBEO, KOrato n3MepBaHeTo e3abpwnnoeOTHTEH pe3yIAT paBENnNo-BNCOK
OT 37.5oC/99.5oF.
PaboHa Temne-PeKIM Ha N3MepBaHe B yXOTo: 10-40.0°C /50-104.0°F PeKIM Ha N3MepBaHe Ha Yenoto: 16-40.0°C /60.8-104.0°F TemnepaTpya -25+55°C/-13+131°Ha cbxpaHHe: 15-95%OTHOCTENHa MAKCMAMHa BNAJXHOCT
AByOMaTHNo Pn65J.1 MNHyTa cNeI nOcJIeHTo
N3KJIIOUVAHe: N3MepBaHe.
BaTePn: 1xCR20326aTePn3V-MMHmym1000
N3MepBaHn
107x50x34MM
Tero: 55 r (c 6aTePn), 52 r (6e3 6aTePn)
PpenpaKa KbM EN 12470-5;ASTM E1965
ctanaptn: IEC 60601-1; IEC 60601-1-2 (EMC)
TOBA n3dne MOTROBAPa Ha n3nCKBaHnra Ta Ha DnpeKTNBata 3a MeDnHckn n3dne 93/42/EEC.
3ana3Ba npaBTo Cn Ha TexHnueckn npOmeHn.
No Medical Product User Act (3aKaHa 3a Notpe6nTeHa MeuHcNk n3eHn) 3a npocenHOANHTne Notpe6nTeH e Heo6XoIMMa TexHnCeCKa npOBepKa Ha BcEkn DBe roDHN. Mon, cnaBaiTe cBoTBeTHnPe TaPnope6n 3a NxHBpJnHE.
14. www.microlife.bg
Ioppo6ha HnFopmaun 3a noTpeBnten 3a haWntepermotn anapatn 3a cneDehe Ha KpbBHO HAJIraHe, KaKTo n 3a HauHTe ycnyi, MoKeTe da HaMepuHa www.microlife.bg.
Microlife Termometru digital dual IFR 100
Souvisejci EN 12470-5; ASTM E1965; normy: IEC 60601-1; IEC 60601-1-2 (EMC)
±0.4°F, 89.6 - 108.0°F
Displej: Liquid Crystal Display, 4 cislice + zvlastne ikony
jai jia jia jia jia jia jia jia jia jia jia jia jia jia jia jia jia jia jia jia jia jia jia jia jia jia jia jia jia jia jia jia jia jia jia jia jia jia jia jia jia

BF bai aie jia o jia

| الله�� الله�� الله�� الله�� الله�� الله�� الله�� الله�� الله�� الله�� الله�� الله�� الله�� الله�� الله�� الله�� الله�� الله�� الله�� الله�� الله�� الله�� الله�� الله�� الله�� الله�� | الله�� الله�� الله�� الله�� الله�� الله�� الله�� الله�� الله�� الله�� الله�� الله�� الله�� الله�� الله�� الله�� الله�� الله�� الله�� الله�� الله�� الله�� الله�� الله�� الله雄 الله�� الله�� الله�� الله�� الله�� الله�� الله�� الله�� الله�� الله�� الله�� الله�� الله�� الله�� الله�� الله�� الله�� الله�� الله�� الله�� الله�� الله�� الله�� الله�� الله雄 | الله�� الله�� الله�� الله�� الله�� الله�� الله�� الله�� الله�� الله�� الله�� الله�� الله�� الله�� الله�� الله�� الله�� الله�� الله�� الله�� الله�� الله�� الله�� الله�� الله腎 الله腎 الله腎 الله腎 الله腎 الله腎 الله腎 الله腎 الله腎 الله腎 الله腎 الله腎 الله腎 الله腎 الله腎 الله腎 الله腎 الله腎 الله腎 الله腎 الله腤 الله腎 الله腎 الله腎 الله腎 الله腎 الله腎 الله腎 الله腎 الله腎 الله腎 الله腎 الله腎 الله腎 الله腎 الله腎 الله腎 الله腎 الله腎 الله腎 الله腲 الله腎 الله腎 الله腎 الله腎 الله腎 الله腎 الله腎 الله腎 الله腎 الله腎 الله腎 الله腎 الله腎 الله腎 الله腎 الله腎 الله腎 الله腎 الله腎 الله腅 الله腎 الله腎 الله腎 الله腎 الله腎 الله腎 الله腎 الله腎 الله腎 الله腎 الله腎 الله腎 الله腎 الfalls الfalls الfalls الfalls الfalls الfalls الfalls الfalls الfalls الfalls الfalls الfalls الfalls الfalls الfalls الfalls الfalls الfalls الfalls الfalls الfalls الfalls الfalls الfalls الfalls الfalls الfalls الfalls الfalls الfalls الfalls الfalls الfalls الfalls |
1
4 1/2j j k aaiy jll J
4j j jao y jao i el ay
jslal aolil jbl jnl slil jn p. jall
ably ggl all jll
② ③
psill jgsg cllal.
JyUjUjUjUjUjUjUjUjUjUjUjUjUjUjUjUjUjUjUjUjUjUjUjUjUjUjUjUjUjUjUjUjUjUjUjUjUjUjUjUjUjUjUjUjUjUjUjUjUjUjUJ UJ UJ UJ UJ UJ UJ UJ UJ UJ UJ UJ UJ UJ UJ UJ UJ UJ UJ UJ UJ UJ UJ UJ UJ UJ UJ UJ UJ UJ UJ UJ UJ UJ UJ UJ UJ UJ UJ UJ UJ UJ UJ UJ UJ UJ UJ UJ UJ UJ UJ
jai jai jai jai
2.3.1.3
y 1
a
J 1
a a a a a a a a a a a a a a a a a a a a a a a a a a a a a a a a a a a a a a a a
J 1000000000000000000000000000000000000000000000
a 1 aal al aal al aal al aal aal aal aal aal aal aal aal aal aal aal aal aal aal aal aal aal aal aal aal aal aal aal aal aal aal aal aal aal aal aal aal aal aal aal aal aal aal aal aal aal aal aal aal aal aal aal aal aal aal aAL
a
g jgl g jgl jgl i jgl i jgl jgl i jgl i jgl i jgl i jgl i jgl i jgl i jgl i jgl i jgl i jgl i jgl i jgl i jgl i jgl i jgl i jgl i jgl i jgl i jgl i jgl i jgl i jgl i jgl i jgl i jgl i jgl i jgl i jgl i jgl i jgl i jgl i jgl i jgl i
a 1
1 1
a 1234567890123456789012345678901234567890123456789012345678901234567890123456789012345678901234567890123456789
10 10 Jus 100
J 1
jgl 12
J 100000000000000000000000000000000000000000000000000000000000000000000000000000000
a 10 c b a j
e 3 j a 1
i 1
j 1
j 1
j 1
j 1
j 1
j 1
j 1
j 1
j 1
j 1
j 1
j 1
j 1
j 1
j 1
j 1
j 1
j 1
j 1
j 1
j 1
j 1
j 1
j 1
j 1
J 1
J 1
J 1
J 1
J 1
J 1
J 1
J 1
J 1
J 1
J 1
J 1
J 1
J 1
J 1
J 1
J 1
J 1
J 1
J 1
《H》:① 124567890123456789012345678901234567890123456789012345678901234567890123456789012345678901234567890123456789012
aill 1.
J 1 J 1 J 1 J 1 J 1 J 1 J 1 J 1 J 1 J 1 J 1 J 1 J 1 J 1 J 1 J 1 J 1 J 1 J 1 J 1 J 1 J 1 J 1 J 1 J 1 J 1 J 1 J 1 J 1 J 1 J 1 J 1 J 1 J 1 J
y
a 1234567890123456789012345678901234567890123456789012345678901234567890123456789012345678901234567890123456789
| EN 12470-5; ASTM E1965; : IEC 60601-1; IEC 60601-1-2 (EMC) | : Crl. (###) ### ## ## ## ## ## ## ## ## ## ## ## ## ## ## ## ## ## ## ## ## ## ## ## ## ## ## ## ## ## ## ## ## ## ## ## ## ## ## ## ## ## ## ## ## ## ## ## ## ## ## ## ## ## ## ## ## ## ## ## ## ## ## ## ## ## ## ## ## ## ## ## ## ## ## ## ## ## ## ## ## ## ## ## ## ## ## ## ## ## ## ## ## ## ## ## ## ## ## ## ## # ## # # # # # # # # # # # # # # # # # # # # # # # # # # # # # # # # # # # # # # # # # # # # # # # # # # # # # # # # # # # # # # # # # # # # # # # # # # # # # # # # # # # # # # # # # # # # # # # # # # # # # :93/42/EEC, P# , ### , R## , R#### , R#### , R#### , R#### , R#### , R#### , R#### , R#### , R#### , R#### , R#### , R#### , R#### , R#### , R#### , R#### , R#### , R#### , R#### , R#### , R#### , R#### , R#### , R#### , R#### , R#### , R#### , R#### , R#### , R#### , R#### , R#### , R#### , R####, :### , ### , ### , ### , ### , ### , ### , ### , ### , ### , ### , ### , ### , ### , ### , ### , ### , ### , ### , ### , ### , ### , ### , ### , ### , ### , ### , ### , ### , ### , ### , ### , ### , ### , ### , ### , ### , ### , ### , ### , ### , ### , ### , ### , ### , ### , ### , ### , ### , ### , ### ,### , ### , ### , ### , ### , ### , ### , ### , ### , ### , ### , ### , ### , ### , ### , ### , ### , ### , ### , ### , ### , ### , ### , ### , ### , ### , ### , ### , ### , ### , ### , ### , ### , ### , ### , ### , ### , ### , ### , ### , ### , ### , ### , ### , ### , ### , ### , ### , ### , ### , :### , ### , ### , ### , ### , ### , ### , ### , ### , ### , ### , ### , ### , ### , ### , ### , ### , ### , ### , ### , ### , ### , ### , ### , ### , ### , ### , ### , ### , ### , ### , ### , ### , ### , ### , ### , ### , ### , ### , ### , ### , ### , ### , ### , ### , ### , ### , ### , ### ,### ,### ,### ,### ,### ,### ,### ,### ,### ,### ,### ,### ,### ,### ,### ,### ,### ,### ,### ,### ,### ,### ,### ,### ,### ,### ,### ,### ,### ,### ,### ,### ,### ,### ,### ,### ,### ,### ,### ,### ,### ,### ,### ,### ,### ,### ,### ,### ,### ,### ,### :### , ### , ### , ### , ### , ### , ### , ### , ### , ### , ### , ### , ### , ### , ### , ### , ### , ### , ### , ### , ### , ### , ### , ### , ### , ### , ### , ### , ### , ### , ### , ### , ### , ### , ### , ### , ### , ### , ### , ### , ### , ### , ### , ### , ### , ### , ### , ### , ### , ### :### , ### , ### , ### , ### , ### , ### , ### , ### , ### , ### , ### , ### , ### , ### , ### , ### , ### , ### , ### , ### , ### , ### , ### , ### , ### , ### , ### , ### , ### , ### , ### , ### , ### , ### , ### , ### , ### , ### , ### , ### , ### , ### , ### , ### , ### , ### , ### , ### ,### :### , ### , ### , ### , ### , ### , ### , ### , ### , ### , ### , ### , ### , ### , ### , ### , ### , ### , ### , ### , ### , ### , ### , ### , ### , ### , ### , ### , ### , ### , ### , ### , ### , ### , ### , ### , ### , ### , ### , ### , ### , ### , ### , ### , ### , ### , ### , ### ,### ,### , ### ,### ,### ,### ,### ,### ,### ,### ,### ,### ,### ,### ,### ,### ,### ,### ,### ,### ,### ,### ,### ,### ,### ,### ,### ,### ,### ,### ,### ,### ,### ,### ,### ,### ,### ,### ,### ,### ,### ,### ,### ,### ,### ,### ,### ,### ,### ,### ,### ,### : ### , ### , ### , ### , ### , ### , ### , ### , ### , ### , ### , ### , ### , ### , ### , ### , ### , ### , ### , ### , ### , ### , ### , ### , ### , ### , ### , ### , ### , ### , ### , ### , ### , ### , ### , ### , ### , ### , ### , ### , ### , ### , ### , ### , ### , ### , ### , ### , ### , ### . |
y 1 yu 1 yu 1 yu 1 yu 1 yu 1 yu 1 yu 1 yu 1 yu 1 yu 1 yu 1 yu 1 yu 1 yu 1 yu 1 yu 1 yu 1 yu 1 yu 1 yu 1 yu 1 yu 1 yu 1 yu 1 yu 1 y
1 234567890
y j 234567890
j y j 234567890
j y j 234567890
j y j 234567890
j y j 234567890
j y j 234567890
j y j 234567890
j y j 234567890
j y j j 234567890
j y j j 234567890
j y j j 234567890
j y j j 234567890
j y j j 234567890
j y j j 234567890
j y j j 2345678
12
13
14
15
16
17
18
19
20
21
22
1
START 2
3
4
5
6
7
8
9
10
11
1 1

(BF)

J 100000000000000000000000000000000000000000000000000000000000000000000
g 1000000000000000000000000000000000000000000000000000000000000000000000
s 5 s 5 s 5 o jdl
s p 5 s 5 s 5 s 5 o jdl
j 5 s 5
s 5
a 1234567890100000000000000000000000000000000000000000000000000000000
1 j 100000000000000000000000000000000000000000000000000000000000000000000000
C 1
1
1
1
1
1
1
1
1
1
1
1
1
1
1
1
1
1
1
1
1
1
1
1
1
1
1
1
1
1
1
1
1
1
1
1
1
1
1
1
1
1
1
1
1
1
1
1
1
1
1
1
11 2 START a d0d
j 1
EN 12470-5,ASTM E1965;
IEC 60601-1; IEC 60601-1-2 (EMC)
j j 1
Dc Dc Dc Dc Dc Dc Dc Dc Dc Dc Dc Dc Dc Dc Dc Dc Dc Dc Dc Dc Dc Dc Dc Dc Dc Dc Dc Dc Dc Dc Dc Dc Dc Dc Dc Dc Dc Dc Dc Dc Dc Dc Dc Dc Dc Dc Dc Dc Dc Dc Dc
1 2
J 150
www.microlife.com.
jusnssuusususususususususususususususususususususususususususususususususususususususususususususususususususususususususususususususususususususus
S EDF = S ADE = S ABC + S COD + S BDO + S DCE + S_ CFD
4
45
yTV/2j j y
S APQ = S AQP + S_ PQQ
15
()
1234567890
44444444444444444444444
99/01 25
4d 4
y 1
45 45
99/0/21 jyjv1/2 jj jyj
2018 新课标2卷第4题
4.2.1.
1 1
1
1.4
y 1
y1 = - 4x,y2 = 4x
Cilias.14
Cuiu Cuiu Cuiu J 102
4501115 2jgjg jgi gioi jy cillia i jS 1111
1
A 1
15
1.2g 1
j 1
yai jai Cai Lai Jci j 5