
NC400 - Thermometer MICROLIFE - Free user manual and instructions
Find the device manual for free NC400 MICROLIFE in PDF.


| Product Type | Non-Contact Infrared Thermometer |
| Model | Microlife NC 400 |
| Measurement Range (Body) | 34.0 - 43.0 °C / 93.2 - 109.4 °F |
| Measurement Range (Object) | 0.1 - 99.9 °C / 32.2 - 211.8 °F |
| Accuracy (Body) | ±0.2 °C (35.0-42.0 °C) / ±0.3 °C (34.0-34.9 & 42.1-43.0 °C) |
| Accuracy (Object) | ±1.0 °C (0.1-99.9 °C) |
| Display | Liquid Crystal Display, 4 digits plus icons |
| Memory | 30 readings with date and time |
| Fever Alarm | 10 short beeps and red backlight for readings ≥37.5 °C / 99.5 °F |
| Backlight | Green when turned on and for normal readings; red for fever |
| Auto-Off | Approximately 1 minute after last measurement |
| Battery | 2 x 1.5V AAA alkaline batteries |
| Battery Life | Approximately 2000 measurements |
| Dimensions | 167 x 46.6 x 44 mm |
| Weight | 103.5 g (with batteries), 81 g (without batteries) |
| Operating Conditions | Body mode: 10-40 °C; Object mode: 5-40 °C; 15-95% RH |
| Storage Conditions | -25 to +55 °C; 15-95% RH |
| IP Class | IP22 |
| Cleaning | Clean casing and sensor with 70% isopropyl alcohol swab; do not immerse |
| Safety | No direct skin contact; no risk of broken glass or mercury; safe for children |
| Expected Service Life | 5 years or 12,000 measurements |
Frequently Asked Questions - NC400 MICROLIFE
User questions about NC400 MICROLIFE
0 question about this device. Answer the ones you know or ask your own.
Ask a new question about this device
Download the instructions for your Thermometer in PDF format for free! Find your manual NC400 - MICROLIFE and take your electronic device back in hand. On this page are published all the documents necessary for the use of your device. NC400 by MICROLIFE.
USER MANUAL NC400 MICROLIFE
08227 Minus/Lithuania
microlife

86/48 2715
(1) 2017年1月1日
NC400
Non Contact Thermometer


Microlife NC 400


Microlife Non Contact Thermometer NC 400
EN
| 1. Food intake | |
| 2. Transport | |
| 3. Transport | |
| 4. Energy | |
| 5. Energy and energy | |
| 6. CO2 supply | |
| 7. CO2 emissions | |
| 8. Energy consumption | |
| 9. Energy demand | |
| 10. Energy consumption | |
| 11. Energy supply | |
| 12. Energy demand | |
| 13. Energy consumption | |
| 14. Energy supply | |
| 15. Energy demand | |
| 16. Energy consumption | |
| 17. Energy supply | |
| 18. Energy demand | |
| 19. Energy consumption | |
| 20. Energy supply | |
| 21. Energy demand | |
| 22. Energy consumption | |
| 23. Energy supply | |
| 24. Energy demand | |
| 25. Energy consumption | |
| 26. Energy supply | |
| 27. Energy demand | |
| 28. Energy consumption | |
| 29. Energy supply | |
| 30. Energy demand | |
| 31. Energy consumption | |
| 32. Energy supply | |
| 33. Energy demand | |
| 34. Energy consumption | |
| 35. Energy supply | |
| 36. Energy demand | |
| 37. Energy consumption | |
| 38. Energy supply | |
| 39. Energy demand | |
| 40. Energy consumption | |
| 41. Energy supply | |
| 42. Energy demand | |
| 43. Energy consumption | |
| 44. Energy supply | |
| 45. Energy demand | |
| 46. Energy consumption | |
| 47. Energy supply | |
| 48. Energy demand | |
| 49. Energy consumption | |
| 50. Energy supply | |
| 51. Energy demand | |
| 52. Energy consumption | |
| 53. Energy supply | |
| 54. Energy demand | |
| 55. Energy consumption | |
| 56. Energy supply | |
| 57. Energy demand | |
| 58. Energy consumption | |
| 59. Energy supply | |
| 60. Energy demand | |
| 61. Energy consumption | |
| 62. Energy supply | |
| 63. Energy demand | |
| 64. Energy consumption | |
| 65. Energy supply | |
| 66. Energy demand | |
| 67. Energy consumption | |
| 68. Energy supply | |
| 69. Energy demand | |
| 70. Energy consumption | |
| 71. Energy supply | |
| 72. Energy demand | |
| 73. Energy consumption | |
| 74. Energy supply | |
| 75. Energy demand | |
| 76. Energy consumption | |
| 77. Energy supply | |
| 78. Energy demand | |
| 79. Energy consumption | |
| 80. Energy supply | |
| 81. Energy demand | |
| 82. Energy consumption | |
| 83. Energy supply | |
| 84. Energy demand | |
| 85. Energy consumption | |
| 86. Energy supply | |
| 87. Energy demand | |
| 88. Energy consumption | |
| 89. Energy supply | |
| 90. Energy demand | |
| 91. Energy consumption | |
| 92. Energy supply | |
| 93. Energy demand | |
| 94. Energy consumption | |
| 95. Energy supply | |
| 96. Energy demand | |
| 97. Energy consumption | |
| 98. Energy supply | |
| 99. Energy demand | |
| 100. Energy consumption |
Guarantee Card NC 400Microlile NC 400
| No. of the name / M.O. (e.g. 2013/15) and no. of the name / hana/compens/ve/ |
| Inte transderapies / Inere acgion / Hera alostris - tre is a trice a per- |
| Inere acgion / Hera alostris - tre is a trice a per- |
| S###, ### (###) | ### |
| Lakes of Puccinon / (Tortezia) | (1) | (2) | (3) |
| Puccinon | (4) | (5) | (6) |
| Puccinon | (7) | (8) | (9) |
| Puccinon | (10) | (11) | (12) |
| Puccinon | (13) | (14) | (15) |
| Puccinon | (16) | (17) | (18) |
| Puccinon | (19) | (20) | (21) |
| Puccinon | (22) | (23) | (24) |
| Puccinon | (25) | (26) | (27) |
| Puccinon | (28) | (29) | (30) |
| Puccinon | (31) | (32) | (33) |
| Puccinon | (34) | (35) | (36) |
| Puccinon | (37) | (38) | (39) |
| Puccinon | (40) | (41) | (42) |
| Puccinon | (43) | (44) | (45) |
| Puccinon | (46) | (47) | (48) |
| Puccinon | (49) | (50) | (51) |
| Puccinon | (52) | (53) | (54) |
| Puccinon | (55) | (56) | (57) |
| Puccinon | (58) | (59) | (60) |
| Puccinon | (61) | (62) | (63) |
| Puccinon | (64) | (65) | (66) |
| Puccinon | (67) | (68) | (69) |
| Puccinon | (70) | (71) | (72) |
| Puccinon | (73) | (74) | (75) |
| Puccinon | (76) | (77) | (78) |
| Puccinon | (79) | (80) | (81) |
| Puccinon | (82) | (83) | (84) |
| Puccinon | (85) | (86) | (87) |
| Puccinon | (88) | (89) | (90) |
| Puccinon | (91) | (92) | (93) |
| Puccinon | (94) | (95) | (96) |
| Puccinon | (97) | (98) | (99) |
| Puccinon | (100) | (101) | (102) |
| Sparet en 10000000000000000000000000000000000000000000000000000000000000000000000000000000000000000000000000000 |
wood
microlife
microlife
Table of Contents
- The Advantages of this Thermometer
- Important Safety Instructions
- How this Thermometer measures Temperature
- Control Displays and Symbols
- Setting Date, Time and Beeper Functions
- Changing between Body and Object Mode
- Directions for Use
- Changing between Celsius and Fahrenheit
- How to recall 30 readings in Memory Mode
10.Error Messages
11.Cleaning and Disinfecting
12.Battery Replacement
13.Guarantee
14.Technical Specifications
15.www.microlife.com
Guarantee Card (see Back Cover)
1. The Advantages of this Thermometer
Measures in a matter of seconds
The innovative infrared technology allows the measurement without even touching the object. This guarantees safe and sanitary measurements within seconds.
Multiple uses (wide range of measurement)
This thermometer offers a wide range of measurement from 0.1 - 99.9 °C / 32.2 - 211.8 °F, meaning the unit can be used to measure body temperature or it also has a feature allowing it to be used to measure surface temperature of the following examples:
- Milk surface temperature in a baby's bottle
• Surface temperature of a baby's bath
- Ambient temperature
Accurate and reliable
The unique probe assembly construction incorporates an advanced infrared sensor, ensuring that each measurement is accurate and reliable.
Gentle and easy to use
- The ergonomic design enables simple and easy use of the thermometer.
- This thermometer can even be used on a sleeping child without causing any interruption.
- This thermometer is quick, therefore child-friendly.
Multiple readings recall
Users will be able to recall the last 30 readings with a record of both time and date when entering the recall mode, enabling efficient tracking of temperature variations.
Safe and hygienic
- No direct skin contact.
- No risk of broken glass or mercury ingestion.
• Completely safe for use on children.
Fever alarm
10 short beeps and a red LCD backlight alert the patient that he/she may have a temperature equal to or higher than 37.5 °C.
2. Important Safety Instructions
- Follow instructions for use. This document provides important product operation and safety information regarding this device. Please read this document thoroughly before using the device and keep for future reference.
- This device may only be used for the purposes described in these instructions. The manufacturer cannot be held liable for damage caused by incorrect application.
- Never immerse this device in water or other liquids. For cleaning please follow the instructions in the «Cleaning and Disinfecting» section.
- Do not use this device if you think it is damaged or notice anything unusual.
-
Never open this device.
-
A basic physiological effect called vasoconstriction can occur in the early stages of fever, resulting in a cool skin effect. The recorded temperature using this thermometer can, therefore, be unusually low.
- If the measurement result is not consistent with the patient's finding or unusually low, repeat the measurement every 15 minutes or double check the result by another core body temperature measurement.
- This device comprises sensitive components and must be treated with caution. Observe the storage and operating conditions described in the «Technical Specifications» section.
- Ensure that children do not use this device unsupervised; some parts are small enough to be swallowed.
- Do not use this device close to strong electromagnetic fields such as mobile telephones or radio installations. Keep a minimum distance of 3.3 m from such devices when using this device.
- Protect it from:
- extreme temperatures
- impact and dropping
- contamination and dust
- direct sunlight
- heat and cold
- If the device is not going to be used for a prolonged period the batteries should be removed.

WARNING: The measurement results given by this device is not a diagnosis. It is not replacing the need for the consultation of a physician, especially if not matching the patient's symptoms. Do not rely on the measurement result only, always consider other potentially occurring symptoms and the patient's feedback. Calling a doctor or an ambulance is advised if needed.

WARNING: This device is not a toy! Keep out of reach of children and do not leave children alone during use.
3. How this Thermometer measures Temperature
This thermometer measures infrared energy radiated from the forehead as well as objects. This energy is collected through the lens and converted to a temperature value.
4. Control Displays and Symbols
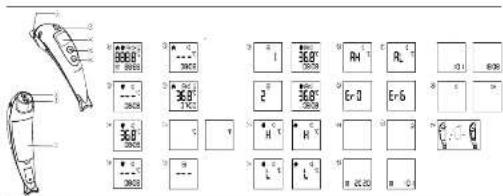
- All segments displayed ⑨: Press the START/IO button ⑦ to turn on the unit; all segments will be shown for 1 second.
- Ready for measuring ⑩: When the unit is ready for measuring, the «°C» or «°F» icon will keep flashing while the mode icon (body or object) will be displayed.
- Measurement complete (1): The reading will be shown on the display (4) with the «°C» or «°F» icon and the mode icon steady. The unit is ready for the next measurement as soon as the «°C» or «°F» icon is flashing again.
- Low battery Indicator ⑭: When the unit is turned on, the «battery» icon will keep flashing to remind the user to replace the batteries.
5. Setting Date, Time and Beeper Functions
Setting the date and time
- After the new batteries are fitted, the year number flashes in the display 25. You can set the year by pressing the MEMO-button 5. To confirm and then set the month, press the MODE button 6.
-
Press the MEMO-button ⑤ to set the month. Press the MODE button ⑥ to confirm and then set the day.
-
Follow the previously mentioned instructions to set the day, hours and minutes.
- Once you have set the minutes and pressed the START/IO button ⑦, the date and time are set and the time is displayed.
If no button is pressed for 20 seconds, the device automatically switches to ready for measuring 10.
Cancel time setup: Press the START/IO button ⑦ during time setup. The LCD will show Date/Time icons with «--». After that press the START/IO button ⑦ to start the measurement. If no further action is taken within 30 seconds, the device will automatically turn off.
Change current date and time: Press and hold the MODE button ⑥ for approx. 8 seconds until the year number starts to flash ②5. Now you can enter the new values as described above.
Setting the beeper
- Press and hold the MODE button ⑥ for 3 seconds to set the beeper ②6.
- Press the MEMO-button ⑤ to either turn the beeper on or off. The beeper is activated when the beeper icon ⑳ is shown without a cross.

When the beeper setting has been chosen, press the START/IO button ⑦ to enter the «ready for measuring» mode; otherwise the device automatically switches to ready for measuring after 10 seconds ⑩.
6. Changing between Body and Object Mode
- Press the START/IO button ⑦. The display ④ is activated to show all segments for 1 second.
- The default mode is body mode ⑫. Press the MODE button ⑥ to switch to object mode ⑬. For switching back to body mode, press the MODE button again.
7. Directions for Use
Always remove the protective cap ③ before use.
Measuring in body mode
- Press the START/IO button ⑦. The display ④ is activated to show all segments for 1 second.
- When the «°C» or «°F» icon is flashing, a beep sound is heard and the thermometer is ready for measuring ⑩.
- Remove any hair, sweat or dirt from the forehead before measuring to ensure the accuracy of the readings.
-
Aim the thermometer at the center of the forehead with a distance of no more than 5 cm.
-
Press the START/IO button ⑦ and ensure that the activated blue tracking light is aimed at the center of the forehead. After 3 seconds a long beep will verify the completion of measurement.
-
Read the recorded temperature from the LCD display.
- For the next measurement remove the thermometer from the forehead and wait until the «°C»/«°F» icon is flashing. Follow steps 4-5 above.
- Press and hold the START/IO button ⑦ for 3 seconds to turn off the device; otherwise the device will automatically switch off after approx. 30 seconds.
Measuring in object mode
- Press the START/IO button ⑦. The display ④ is activated to show all segments for 1 second.
- Press the MODE button ⑥ to switch to object mode.
- When the «°C» or «°F» icon is flashing, a beep sound is heard and the thermometer is ready for measuring ⑩.
- Aim the thermometer at the center of the object you want to measure with a distance of no more than 5 cm. Press the START/IO button ⑦. After 3 seconds a long beep will verify the completion of measurement.
- Read the recorded temperature from the LCD display.
-
For the next measurement wait until the «°C»/«°F» icon is flashing and follow steps 4-5 above.
-
Press and hold the START/IO button ⑦ for 3 seconds to turn off the device; otherwise the device will automatically switch off after approx. 30 seconds.

NOTE:
• Patients and thermometer should stay in similar room condition for at least 30 minutes.
- Don't take a measurement while or immediately after nursing a baby.
- Don't use the thermometer in high humidity environments.
• Patients should not drink, eat or exercise before/while taking the measurement.
- Don't move the measurement device from the measuring area before hearing the termination beep.
- 10 short beeps and a red LCD backlight alert the patient that he/she may have a temperature equal to or higher than 37.5°C .
- Always take the temperature in the same location, since temperature readings may vary according to locations.
- Doctors recommend rectal measurement for newborn infants within the first 6 months, as all other measuring methods might lead to ambiguous results. If using a non contact thermometer on those infants, we always recommend verifying the readings with a rectal measurement.
- In the following situations it is recommended that three temperatures are taken with the highest one taken as the reading:
-
Children under three years of age with a compromised immune system and for whom the presence or absence of fever is critical.
-
When the user is learning how to use the thermometer for the first time until he/she has familiarized himself/herself with the device and obtains consistent readings.
-
If the measurement is surprisingly low.
- Readings from different measuring sites should not be compared as the normal body temperature varies by measuring site and time of day, being highest in the evening and lowest about one hour before waking up. Normal body temperature ranges:
- Axillar: 34.7 - 37.3 °C / 94.5 - 99.1 °F
- Oral: 35.5 - 37.5 °C / 95.9 - 99.5 °F
- Rectal: 36.6 - 38.0 °C / 97.9 - 100.4 °F
- Microlife NC 400: 35.4 - 37.4 °C / 95.7 - 99.3 °F
8. Changing between Celsius and Fahrenheit
This thermometer can display temperature readings in either Fahrenheit or Celsius. To switch the display between °C and °F, press and hold the MODE button ⑥ for 3 seconds; the
beeper icon is shown on the display. Press the MODE button again; the current measurement scale ( ° C or ° F icon) will be shown on the display ⑮. Change the measurement scale between ° C and ° F by pressing the MEMO-button ⑤. When the measurement scale has been chosen, press the START/IO button ⑦ to enter the 'ready for measuring' mode; otherwise the device automatically switches to ready for measuring after 10 seconds ⑩.
9. How to recall 30 readings in Memory Mode
This thermometer can recall the last 30 readings with a record of both time and date.
- Recall mode ⑯: Press the MEMO-button ⑤ to enter recall mode when the power is off. The memory icon «M» will flash.
- Reading 1 - the last reading ⑰: Press and release the MEMO-button ⑤ to recall the last reading. Number «1» and a flashing «M» are displayed.
Pressing and releasing the MEMO-button ⑤ after the last 30 readings have been recalled will resume the above sequence from reading 1.
10.Error Messages
- Measured temperature too high 18 : Displays « H » when measured temperature is higher than 43.0 °C / 109.4 °F in body mode or 99.9 °C / 211.8 °F in object mode.
- Measured temperature too low ⑲: Displays «L» when measured temperature is lower than 34.0 °C / 93.2 °F in body mode or 0.1 °C / 32.2 °F in object mode.
- Ambient temperature too high ⑳: Displays «AH» when ambient temperature is higher than 40.0 °C / 104.0 °F.
- Ambient temperature too low ②: Displays «AL» when ambient temperature is lower than 5.0 °C / 41.0 °F in object mode.
- Error function display ②2:
- «Er 0» / «Er 6»: The system has a malfunction.
- Blank display ②3: Check if the batteries have been inserted correctly. Also check polarity (<++) and <->) of the batteries.
- Flat battery indicator 24: If only «battery» icon is shown on the display, the batteries should be replaced immediately.
11.Cleaning and Disinfecting
Use an alcohol swab or cotton tissue moistened with alcohol (70% Isopropyl) to clean the thermometer casing and the measuring sensor. Ensure that no liquid enters the interior of the device. Never use abrasive cleaning agents, thinners or benzene for cleaning and never immerse the device in water or other cleaning liquids. Take care not to scratch the surface of the sensor lens and the display.
12.Battery Replacement
This device is supplied with 2 new, long-life 1.5V, size AAA batteries. Batteries need replacing when this icon «battery» ②4 is the only symbol shown on the display. Open the battery cap ⑦ with a tool and lift it manually. Replace the batteries – ensure correct polarity as shown by the symbols in the compartment.

Batteries and electronic devices must be disposed of in accordance with the locally applicable regulations, not with domestic waste.
13.Guarantee
This device is covered by a 5 year guarantee from the date of purchase. During this guarantee period, at our discretion, Microlife will repair or replace the defective product free of charge.
Opening or altering the device invalidates the guarantee. The following items are excluded from the guarantee:
- Transport costs and risks of transport.
- Damage caused by incorrect application or non-compliance with the instructions for use.
• Damage caused by leaking batteries. - Damage caused by accident or misuse.
- Packaging/storage material and instructions for use.
- Regular checks and maintenance (calibration).
- Accessories and wearing parts: Batteries, Probe cover (optional).
Should guarantee service be required, please contact the dealer from where the product was purchased, or your local Microlife service. You may contact your local Microlife service through our website:
www.microlife.com/support
Compensation is limited to the value of the product. The guarantee will be granted if the complete product is returned with the original invoice. Repair or replacement within guarantee does not prolong or renew the guarantee period. The legal claims and rights of consumers are not limited by this guarantee.
- Technical Specifications
| Type: Adjusted mode Non Contact Thermometer NC 400 | |
| Mode type: Adjust mode | |
| Measuring site: Forehead | |
| Reference body site: Sublingual | |
| Measurement range: | Body mode: 34.0 - 43 °C / 93.2 - 109.4 °FObject mode: 0.1 - 99.9 °C / 32.2 - 211.8 °F |
| Resolution: | 0.1 °C / °F |
| Measurement accuracy (Laboratory): | Body mode: ±0.2 °C, 35.0 ~ 42.0 °C / ±0.4 °F, 95.0 ~ 107.6 °F±0.3 °C, 34.0 ~ 34.9 °C and 42.1 ~ 43.0 °C / ±0.5 °F, 93.2 ~ 94.8 °F and 107.8 ~ 109.4 °FObject mode: ±1.0 °C, 0.1 ~ 99.9 °C / ±2 °F, 32.2 ~ 211.8 °F |
| Clinical results: | Repeatability: 0.09 °CBias: 0.06 °CLimits of agreement: 0.54 °C |
| Display: | Liquid Crystal Display, 4 digits plus special icons |
| Acoustic: | The unit is turned ON and ready for the measurement: 1 short beep.Complete the measurement: 1 long beep (1 sec.) if the reading is less than 37.5 °C / 99.5 °F, 10 short «beep» sounds, if the reading is equal to or greater than 37.5 °C / 99.5 °F.System error or malfunction: 3 short «bi» sounds. |
| Memory: | 30 readings recall in the memory mode with a record of both time and date. |
| Backlight: | The display light will be GREEN for 1 second, when the unit is turned ON.The display light will be GREEN for 5 seconds, when a measurement is completed with a reading less than 37.5 °C / 99.5 °F .The display light will be RED for 5 seconds, when a measurement is completed with a reading equal to or higher than 37.5 °C / 99.5 °F . |
| Operating conditions: | Body mode: 10 - 40.0 °C / 50 - 104.0 °F Object mode: 5 - 40.0 °C / 41 - 104.0 °F 15 - 95 % relative maximum humidity |
| Storage conditions: | -25 - +55 °C / -13 - +131 °F 15 - 95 % relative maximum humidity |
| Automatic Switch-off: | Approx. 1 minute after last measurement has been taken. |
| Battery: | 2 × 1.5 V alkaline batteries; size AAA |
| Battery lifetime: | approx. 2000 measurements(using new batteries) |
| Dimensions: | 167 × 46.6 × 44 mm |
| Weight: | 103.5 g (with batteries), 81 g (w/o batteries) |
| IP Class: IP22 | |
Reference to ISO 80601-2-56; IEC 60601-1; IEC
standards: 60601-1-2 (EMC); IEC 60601-1-11
Expected service
life: 5 years or 12000 measurements
This device complies with the requirements of the Medical Device Directive 93/42/EEC.
Technical alterations reserved.
According to the Medical Product User Act a biennial technical inspection is recommended for professional users. Please observe the applicable disposal regulations.
15.www.microlife.com
Detailed user information about our thermometers and blood pressure monitors as well as services can be found at www.microlife.com.
www.microlife.com/support
www.microlife.com/support
Normy: ASTM E1965;IEC 60601-1; IEC 60601-1-2 (EMC); IEC 60601-1-11
Przewidywana



- TABLE OF CONTENTS
- THE ADVANTAGES OF THIS THERMOMETER
- MEASURES IN A MATTER OF SECONDS
- MULTIPLE USES (WIDE RANGE OF MEASUREMENT)
- ACCURATE AND RELIABLE
- GENTLE AND EASY TO USE
- MULTIPLE READINGS RECALL
- SAFE AND HYGIENIC
- FEVER ALARM
- IMPORTANT SAFETY INSTRUCTIONS
- HOW THIS THERMOMETER MEASURES TEMPERATURE
- CONTROL DISPLAYS AND SYMBOLS
- SETTING DATE, TIME AND BEEPER FUNCTIONS
- SETTING THE DATE AND TIME
- SETTING THE BEEPER
- CHANGING BETWEEN BODY AND OBJECT MODE
- DIRECTIONS FOR USE
- MEASURING IN BODY MODE
- MEASURING IN OBJECT MODE
- NOTE
- CHANGING BETWEEN CELSIUS AND FAHRENHEIT
- HOW TO RECALL 30 READINGS IN MEMORY MODE
- 10.ERROR MESSAGES
- 11.CLEANING AND DISINFECTING
- 12.BATTERY REPLACEMENT
- 13.GUARANTEE
- EXPECTED SERVICE
- 15.WWW.MICROLIFE.COM
Brand : MICROLIFE
Model : NC400
Category : Thermometer