KR 814 - Food Processor ECG - Free user manual and instructions
Find the device manual for free KR 814 ECG in PDF.
| Product type | Food processor |
| Brand | ECG |
| Model | KR 814 |
| Nominal power | 800 W |
| Nominal voltage | 230 V~ 50/60 Hz |
| Noise level | ≤ 85 dB |
| Blender capacity | 1.5 L |
| Meat grinder capacity | 1 kg (maximum) |
| Included accessories | Grinder with stainless steel blades, plastic dough kneader, beater with two whisks, mill with duster, coarse and fine slicing disc, slicing disc, grating disc, citrus press, mini chopper, juice extractor, spatula |
| Blade material | Stainless steel |
| Speed setting | Smooth speed control + pulse mode |
| Safety | Double locking against accidental start, indicator light, anti-slip feet |
| Maximum food temperature | < 80°C |
| Maximum operating time (grinder/blender) | 30 seconds, then cooling 1 minute after 3 cycles |
| Maximum operating time (other accessories) | 3 minutes, then cooling 30 minutes |
| Cleaning | Base: wipe with a dry cloth. Other parts: washable with water, then wipe dry |
| Weight (estimated) | Approximately 4.5 kg |
| Usage | Household use only |
| Certifications | Compliant with European directives (electromagnetic compatibility, electrical safety) |
Frequently Asked Questions - KR 814 ECG
User questions about KR 814 ECG
0 question about this device. Answer the ones you know or ask your own.
Ask a new question about this device
Download the instructions for your Food Processor in PDF format for free! Find your manual KR 814 - ECG and take your electronic device back in hand. On this page are published all the documents necessary for the use of your device. KR 814 by ECG.
USER MANUAL KR 814 ECG
natural_image
Assorted kitchen appliances including blender, blender, and kitchen knife with various kitchen utensils (no visible text or labels)KR 814
KUCHYŃSKÝ ROBOT
NÁVOD K OBSLUZE
KUCHYNSKÝ ROBOT
NÁVOD NA OBSLUHU
ROBOT KUCHENNY
INSTRUKCJA OBSŁUGI
KONYHAI ROBOTGÉP
HASZNÁLATI ÚTMUTATÓ
KÜCHENROBOTER
BEDIENUNGSANLEITUNG
FOOD PROCESSOR
INSTRUCTION MANUAL
UREĐAJ ZA OBRADU HRANE
UPUTE ZA UPORABU
NAPRAVA ZA VEČNAMENSKO OBDELAVO HRANE
NAVODILA
ROBOT DE CUISINE
MODE D'EMPLOI
ROBOT DA CUCINA
-
Pusher
-
Hopper
-
Lid
-
Work bowl
-
Removable drive shaft
-
Base
Accessories
-
Blender
-
Chopper with stainless steel blades
-
Plastic kneading attachment
-
Beater with two blades
-
Grinder with chute
-
Disc for coarse shredding and grating
-
Disc for fi ne shredding and grating
-
Disc for slicing
-
Disc for grating
-
Citrus fruit press
-
Container for mini processor with chopping attachment and stainless steel blades
-
Juicer
-
Spatula
HR/BIH
Uređaj
-
Graničnik
-
Grlo za punjenje (lijevak)
-
Poklopac
-
Radna posuda
-
Skidajuća pogonska osovina
-
Postolje
Dodaci
-
Blender (mješač)
-
Sjeckalica s noževima od nehrđajućeg čelika
-
Plastični dodatak za mućenje
-
Miješalica s dva noža
-
Konusna drobilica
-
Rešetka za grubo usitnjavanje i ribanje
-
Rešetka za fi no usitnjavanje i ribanje
-
Rešetka za odsijecanje
-
Rešetka za ribanje
-
Preša za citruse
-
Posuda s mini procesorom s dodatkom za sjeckanje i noževima od nehrđajućeg čelika
-
Sokovnik
-
Grabilica
SI
Food processor
text_image
Zacvaknouttext_image
Diagram illustrating the four-step assembly of a chemical reaction or filtration process, labeled with steps 1 to 4.text_image
Diagram showing three steps of a cooking or processing procedure: dropping, adding a tool, and adding a cup.Mixér
natural_image
Line drawings of a blender with three different types of kitchen appliances (no text or labels)text_image
J J 30° 90°Mlynek
natural_image
Technical line drawing of a mechanical component with a cylindrical top and flanged base (no text or symbols)text_image
Diagram illustrating the four-step assembly of a biological or chemical process, labeled with steps 1 to 4.Šlahač s dvojitou metlou a redukciou otáčok
text_image
Diagram showing three steps of a cooking or processing procedure: dropping, adding a tool, and adding a cup.Mixér
text_image
J J 30° 90°Mlynček
natural_image
Technical line drawing of a mechanical component with a cylindrical top and flanged base (no text or symbols)SK
text_image
Diagram showing a scientific apparatus with labeled parts, including a circular component above a beaker with liquid and a pipette inserted.text_image
Diagram showing three steps of cooking or processing: pouring into a container, adding a tool, and adding a cup.Mikser
natural_image
Line drawings of a blender with three different types of kitchen appliances (no text or labels)text_image
J J 30° 90°Młynek
natural_image
Technical line drawing of a mechanical component with a cylindrical top and flanged base (no text or symbols)text_image
Diagram illustrating the four-step assembly of a mechanical device with labeled parts and a tool in the final container.natural_image
Line drawings of a blender with three views: top, side, and front (no text or symbols)text_image
Diagram illustrating the step-by-step assembly of a coffee maker with labeled parts and anglesDaráló
natural_image
Technical line drawing of a mechanical component with a cylindrical top and flanged base (no text or symbols)
text_image
Diagram illustrating the four-step assembly of a biological or chemical process, labeled with steps 1 to 4.text_image
Diagram showing three-step cooking process: dropping funnel, pouring into a container, and adding a tool to a cup.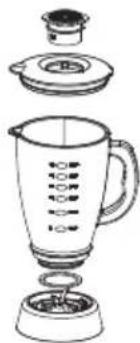
natural_image
Line drawing of a blender with lid, handle, and base (no text or symbols)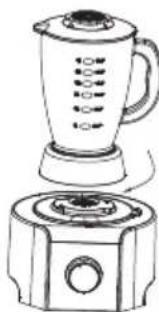
natural_image
Line drawing of a blender and a toaster (no text or symbols)
text_image
1 2 3 4 90° 30°Zitruspresse
text_image
Diagram showing a cooking process with labeled parts and angles, including a ladle, steamer, and pot.DE
Mühle
natural_image
Technical line drawing of a mechanical knob or knob component (no text or symbols)Read carefully and save for future use!
Warning: The safety measures and instructions, contained in this manual, do not include all conditions and situations possible. The user must understand that common sense, caution and care are factors that cannot be integrated into any product. Therefore, these factors shall be ensured by the user/s using and operating this appliance. We are not liable for damages occurring during transportation, by incorrect handling or by change or adjustment of any part of the device.
You should always maintain basic precautions using it, including the following:
- Make sure the voltage in your outlet corresponds to the voltage provided on the appliance label and that the socket is properly grounded. The outlet must be installed according to valid safety instructions.
- Never use the appliance if the power cord is damaged. All repairs including cord replacements shall be performed by a professional service centre! Do not remove protective covers of the appliance, risk of electric shock!
- Protect the appliance from sharp edges, heat sources, direct sunlight and humidity. Protect from a direct contact with water or other liquids to prevent electric shock.
- Do not use the appliance outside or in a wet environment and do not touch the power cord or the appliance with wet hands. Risk of electric shock. Unplug a damp or a wet appliance immediately.
- Pay extra attention if you use the appliance near children.
- Do not leave the appliance unattended when in operation. When you leave the work area, always switch the appliance off and unplug it. Do not pull the cord from the outlet by yanking the cord. Unplug the cord from the outlet by grasping the plug.
- Pay close attention when handling and cleaning, blades are very sharp and can cause injury.
- Use for processing food only. The maximum temperature of processed foods is <80 ^ . Do not use for foods at boiling temperatures!
- Switch all control elements OFF prior to disconnecting the cord from the outlet.
- Do not use the appliance close to heat sources, e.g. oven. Protect it from direct sunlight.
- Never cover the appliance and do not use it close to fl ammable materials, e. g. drapes, walls, etc.
- Do not plug it in the electrical outlet before attaching all the necessary accessories.
- Do not insert large pieces of food into the appliance. Never put in materials like paper, metal, cardboard, plastics, etc.
- Do not allow the cord to touch hot surfaces or lead the cord over sharp edges.
- Use only accessories recommended by the manufacturer, otherwise you risk losing the warranty.
- Use this appliance only in accordance with the instructions in this manual. This appliance is designed for domestic use only. The manufacturer is not liable for damages caused by the improper use of this appliance.
- This appliance can be used by children aged 8 years and older if they are supervised or have been instructed to use the product in a safe manner and understand the potential dangers. Cleaning and maintenance operations performed by the user shall not be carried out by children, if they are not older than 8 years and under supervision. Keep the appliance and its power supply out of reach of children younger than 8 years. The appliance may be used by persons with reduced physical, sensory or mental capacities or lack of experience and knowledge, if they are supervised or if they were instructed how to use the appliance safely and understand potential dangers. Children shall not play with the appliance.
Do not immerse in water!
Do not use the appliance if the rotating strainer is damaged!
OPERATING INSTRUCTIONS
Control
After assembling the necessary parts, you control the food processor using controller with continuous speed control. Turning to the right, the speed increases, to the left, the speed decreases. The pulse mode position is located to the left of the zero position. You will start the food processor by turning it into this position, when you release the controller, it will return to zero position and the food processor will stop.
Chopper with stainless steel blades/ Plastic kneading attachment
- Use the chopper when making cakes and deserts, to chop raw and cooked meats, vegetables and nuts, to prepare pates, pasta and puree, also to make bread crumbs from old bread or buns. The food processing time determines the structure of the food. To obtain a coarser structure, use the pulse mode. - Do not use the chopping or kneading attachment to mix flour.
Chop the meat prior to processing into about 3 × 3 cm cubes. Never put more than 1 kg of thus prepared meat into the work bowl. The meat will be finely ground within 1 minute.
To ensure longevity of the appliance, do not let it run continuously for more than 30 seconds and always let the motor cool down for at least a minute after three cycles.

text_image
SnapGB
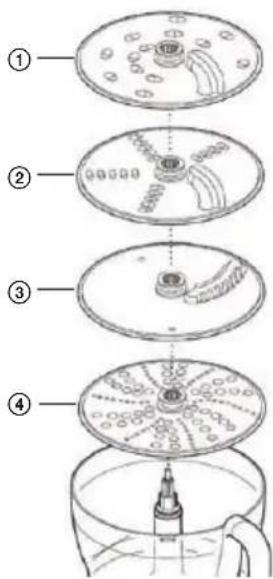
Discs for slicing, grating and cutting potatoes
- Double-sided disc for coarse shredding and grating
- Double-sided disc for fi ne shredding and grating
- Use the slicing disc for slicing carrots, potatoes, cabbage, cucumbers, zucchini, beets and onions and to slice cheeses.
- Disc for cutting slices of potatoes, fruits and vegetables
- Use the slicing disc to prepare potato slices, fi ne french fries, vegetable salads, garnishes and vegetables for stir-fry
- Disc with grater
- Use the grater for hard cheeses, carrots, potatoes and other foods with similar structure.
To ensure longevity of the appliance, do not let it run continuously for more than 3 minutes. Let it cool down for 30 seconds prior to using it again.
text_image
Diagram illustrating four steps of a cleaning or cleaning process with labeled componentsBeater with dual blade and speed reduction
- Use for light whipping of mixture of egg whites and condensed milk and for whipping sponge cake dough from eggs and sugar.
- Heavier mixtures with fat and fl our would damage the beater.
To ensure longevity of the appliance, do not let it run continuously for more than 3 minutes. Let it cool down for 30 seconds prior to using it again.
text_image
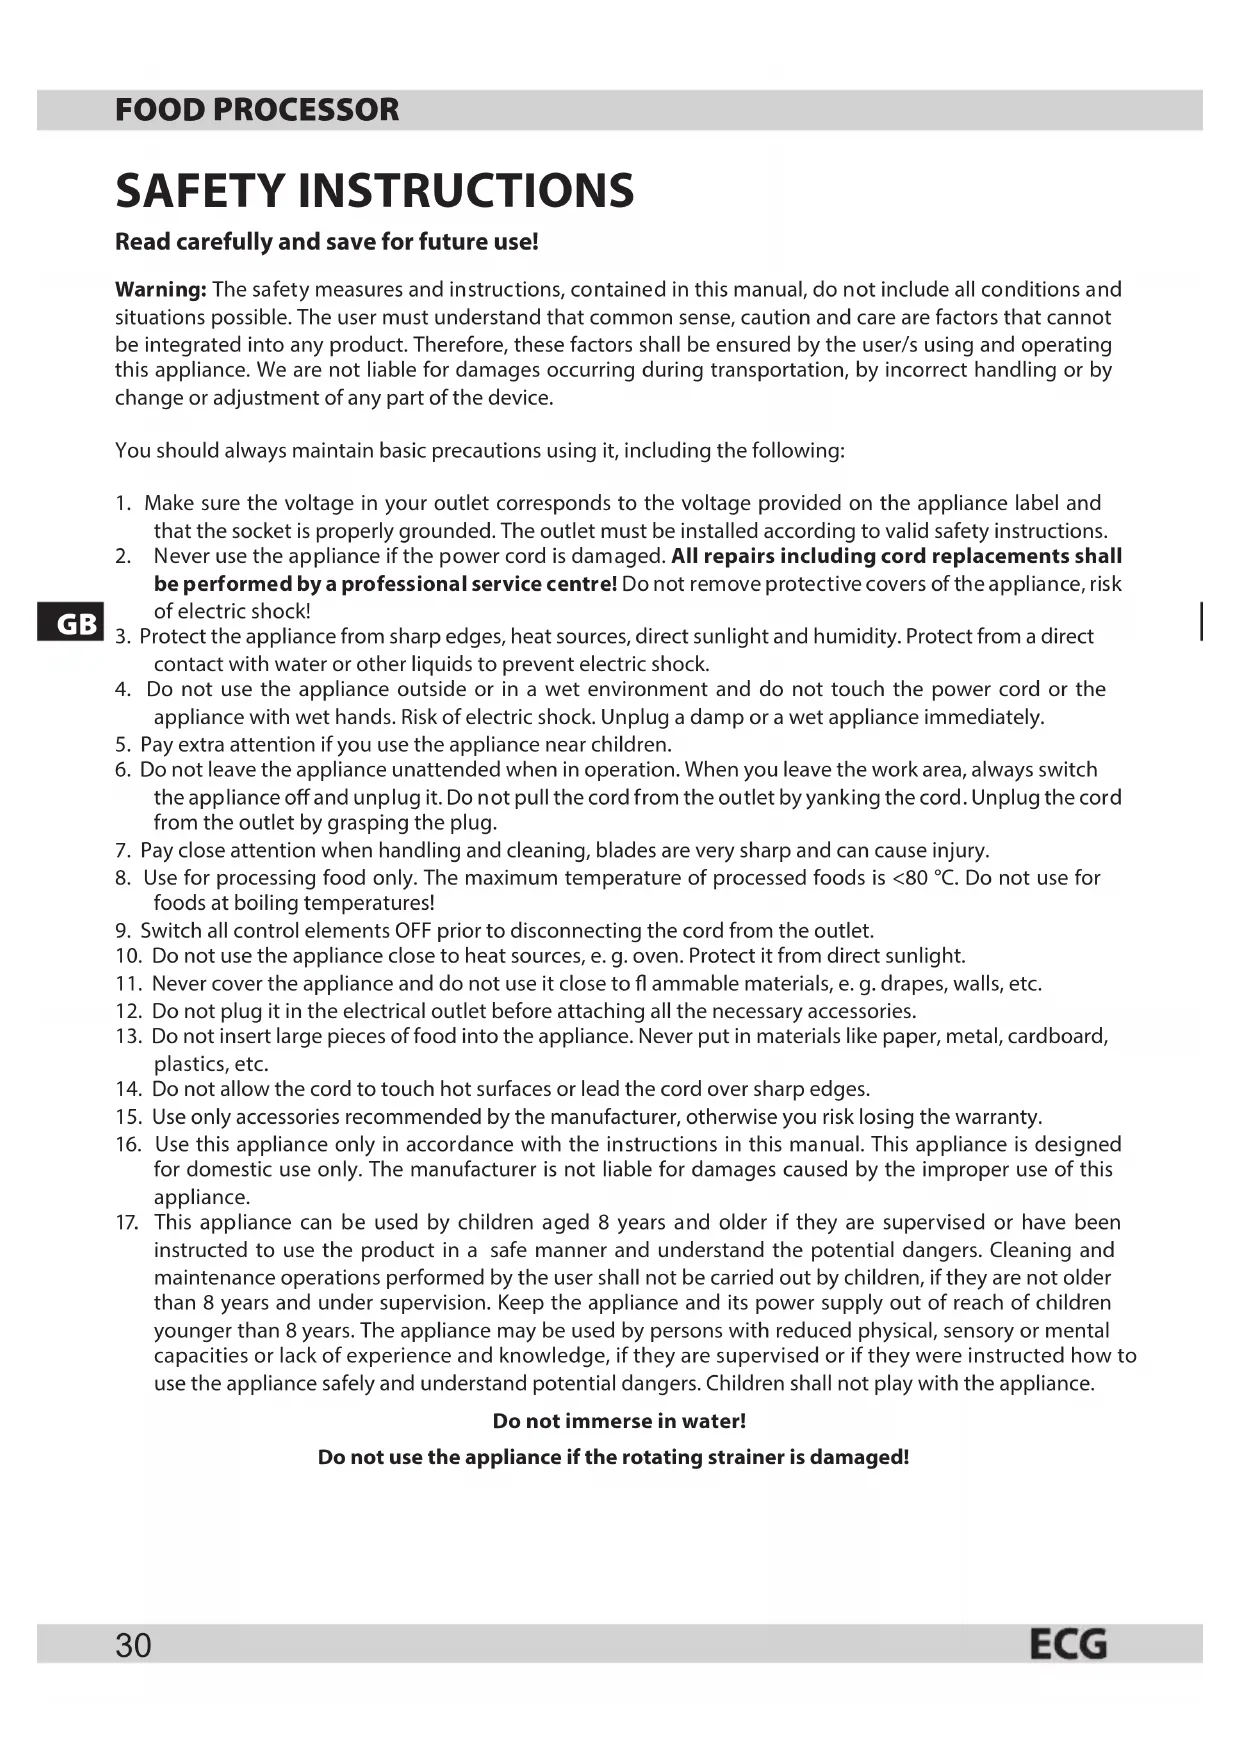
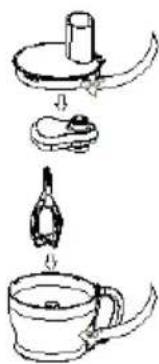
Diagram showing three-step cooking process: serving a lid, pressing a tool, and adding a spoon to a cup.Blender
- Insert carefully a sealing ring in the groove of the base of the blender. A damaged or improperly inserted sealing ring may cause content leakage.
- Fasten the blender container to the base of the blender.
- Put the ingredients in the container of the blender.
- Insert the filter cap in the lid and turn.
- Turn the lid clockwise to secure it to the container.
- Set the assembled blender in the base of the food processor and secure it by turning.
- Set speed or use the pulse mode.
- When the appliance is running, do not move the container, the lid or the filter cap.
- The maximum capacity of the blender container is 1,5 liters.

natural_image
Line drawings of a blender with three views: top, side, and front (no text or symbols)To ensure longevity of the appliance, do not let it run continuously for more than 30 seconds and always let the motor cool down for at least a minute after three cycles.
GB
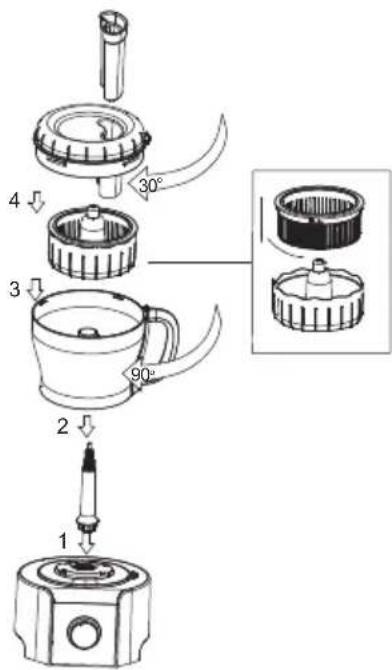
Juicer
- Use the juicer to produce juices from solid fruits and vegetables.
- Set the drive shaft and the juicer container in the base.
- Put the strainer in the inner bowl and secure it.
- Place the inner bowl in the work bowl of the food processor.
- Put the lid on the bowl and turn it to secure it in such a way that the feed tube is above the handle.
- Cut the foods in smaller pieces in order that they fit comfortably into the feed tube.
- Switch the food processor on and using the pusher, push the pieces down evenly. Never insert fingers in the feeding tube! Before you add the next portion, first process fully the previous one.
- After adding the last piece, let the appliance run for another 20 seconds to get all the juice off the strainer.
- Do not use the rotating strainer if it is damaged in any way.
To ensure longevity of the appliance, do not let it run continuously for more than 3 minutes. Let it cool down for 30 seconds prior to using it again.
text_image
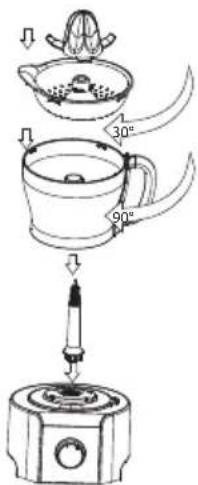
1 2 3 4 90° 30°Citrus fruit press
- Use the citrus fruit press to obtain juice from citrus fruit (e. g. oranges, lemons, limes and grapefruits).
To ensure longevity of the appliance, do not let it run continuously for more than 3 minutes. Let it cool down for 30 seconds prior to using it again.
text_image
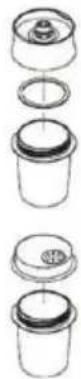
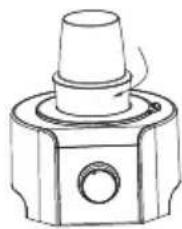
J J 30° 90°Grinder
- Use the grinder to grind herbs, nuts and coffee beans.
- Place the material in the bowl of the grinder. Fill half the space at most.
- Place a sealing ring on the base of the grinder.
- Turn the base of the grinder upside down and with the blades turned downward cover with it the bowl of the grinder.
- Screw it on the bowl and tighten firmly by hand.
- Set the assembled grinder on the base with the motor and turn it to secure it.
- Switch to maximum speed or use the pulse mode.
- After grinding, you can change the base with blades for the lid with chute and use it directly to sprinkle foods.
natural_image
Technical line drawing of a mechanical component with a cylindrical top and flanged base (no text or symbols)To ensure longevity of the appliance, do not let it run continuously for more than 3 minutes. Let it cool down for 30 seconds prior to using it again.
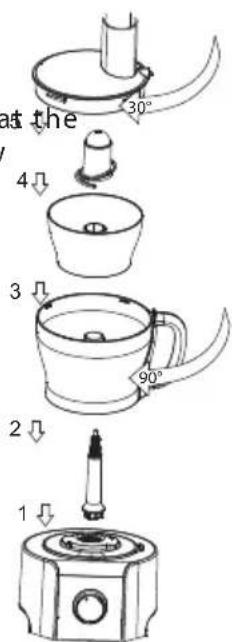
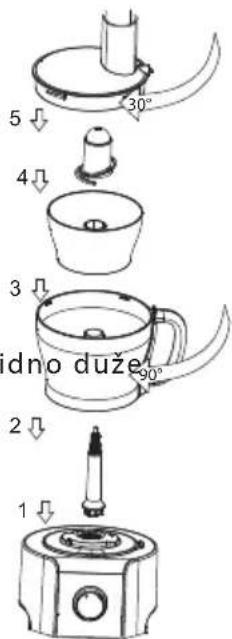
The bowl of the mini food processor
- Attach the drive shaft to the base of the food processor and the work bowl.
- Insert the bowl into the work bowl of the mini food processor. Make sure that ribs inside the hollow axis of the mini food processor fit into the slots in the hollow axis of the work bowl.
- Attach small chopper to the drive shaft.
- Put in the material, which you want to process.
- Place the lid on, secure and switch on.
To ensure longevity of the appliance, do not let it run continuously for more than 30 seconds and always let the motor cool down for at least a minute after three cycles.
text_image
at the 4 Ω 3 Ω 2 Ω 1 Ω 30° 90°CLEANING
- Prior to cleaning, switch the appliance off and unplug it.
- Be very careful when handling the attachments and discs – they are very sharp and may cause injury.
- Some foods may cause discoloration of plastics. This is entirely normal and it does not damage the plastics or affect the taste of foods. To remove the discoloration and to clean the surfaces, which are in contact with foods, wipe them with a cloth dipped in vegetable oil.
Cleaning the base: Clean the base using dry cloth.
Cleaning other parts of the food processor (except the base): Fill the sink halfway with water, put the parts, which you want to clean in water and wipe the parts with sponge. Afterwards, dry the parts with dry dish cloth.
TECHNICAL SPECIFICATIONS
Continuous speed control + pulse mode
Double safety lock to prevent accidental starting
Power on indicator
Non-slip feet for better stability
Nominal voltage: 230 V\~ 50/60 Hz
Nominal input power: 800 W
Noise level: ≤ 85 dB
USE AND DISPOSAL OF WASTE
Wrapping paper and corrugated paperboard – deliver to scrapyard. Packing foil, PE bags, plastic elements – throw into plastic recycling containers.
DISPOSAL OF PRODUCTS AT THE END OF LIFETIME
GB
Disposal of electric and electronic equipment (valid in EU member countries countries with an implemented recycling system)
The represented symbol on the product or package means the product shall not be treated as domestic waste.
Hand over the product to the specified location for recycling electric and electronic equipment. Prevent negative impacts on human health and the environment by properly recycling your product.
Recycling contributes to preserving natural resources. For more information on the recycling of this product, refer to your local authority, domestic waste processing organization or store, where you purchased the product.
and other Euro

08/05
This product complies with EU directive requirements on electromagnetic compatibility and electrical safety.

The instruction manual is available at website www.ecg-electro.eu.
Changes in text and technical parameters reserved.
SIGURNOSNE UPUTE
text_image
Diagram illustrating a four-step biological or chemical process in a container, labeled with steps 1 to 4.Dodatak za mućenje s dvostrukim nožem i redukcijom brzine
text_image
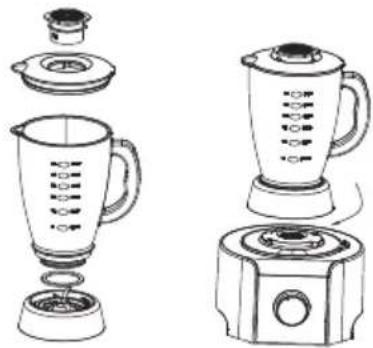
Diagram showing three steps of cooking or cooking process: dropping, adding a tool, and adding a cup.Blender (mješač)
natural_image
Line drawings of a blender with three views: top, side, and front (no text or symbols)Da bi se osigurala dugovječnost uređaja, nemojte ga ostaviti da radi neprekidno duže od 3 minute. Neka se ohladi 30 sekundi prije ponovnog korištenja.
Sokovnik
natural_image
Technical line drawing of a mechanical component with a cylindrical top and flanged base (no text or symbols)Da bi se osigurala dugovječnost uređaja, nemojte ga ostaviti da radi neprekidno duže od 3 minute. Neka se ohladi 30 sekundi prije ponovnog korištenja.
Posuda mini procesora
- Pogonsku osovinu zakačite za postolje uređaja i radnu posudu.
- Postavite unutrašnju posudu u radnu posudu mini procesora. Provjerite da rebra unutar šuplje osovine mini procesora nalegnu na otvore šuplje osovine na radnoj posudi.
- Postavite malu sjeckalicu na osovinu.
- Stavite unutra sadržaj koji želite obraditi.
- Postavite poklopac, učvrstite i uključite.
Da bi se osigurala dugovječnost uređaja, nemojte ga ostaviti u radu nep od 30 sekundi, a motor uvijek ostavite da se ohladi bar jednu minutu nakon tri ciklusa.
text_image
5 30° 4 3 dno duže 90° 2 1ČIŠĆENJE
- Prije čišćenja, isključite aparat i izvadite naponski kabel iz utičnice.
- Budite vrlo oprezni pri rukovanju s dodacima i rešetkama – oni su vrlo oštri i mogu uzrokovati povrede.
- Neke namirnice mogu uzrokovati promjenu boje plastike. To je sasvim normalno, ne oštećuje plast i ne utječe na ukus hrane. Za uklanjanje mrlja i čišćenje površina koje su u kontaktu s hranom koristi krpu umočenu u biljno ulje.
text_image
Diagram illustrating the four-step assembly of a biological or chemical apparatus, labeled with steps 1 to 4.text_image
Diagram showing three steps of a cooking or processing procedure: dropping, adding a tool, and adding a cup.Blender (mešalnik)
- Previdno namestite tesnilo v utor stojala blendera. Poškodovano ali nepravilno nameščeno tesnilo lahko povzroči puščanje vsebine.
- Pritrdite posodo blendera na stojalo blendera.
- Umetnite sestavine v posodo blendera.
- Vstavite pokrov filtra v pokrov in obrnite.
- Obrnite pokrov v smeri urinega kazalca, da bi ga pritrdili na posodo.
- Tako posloženi blender postavite na stojalo naprave in ga pritrdite.
- Izberite hitrost ali uporabite pulzni način delovanja.
- Ko naprava dela, ne premikajte pokrov ali pokrov fi Itra.
- Maksimalna zmogljivost posode blendera je 1,5 litra.
natural_image
Line drawings of a blender with three views: top, side, and front (no text or symbols)text_image
J J 30° 90°Drobilnik
natural_image
Technical line drawing of a mechanical component with a cylindrical top and flanged base (no text or symbols)text_image
Diagram illustrating the four-step assembly of a mechanical device with labeled parts and a bottle inside.text_image
Diagram showing three-step cooking process: serving a lid, adding sauce, and pouring liquid into a cup.Mixeur
natural_image
Line drawings of a blender with three views: top, side, and front (no text or symbols)text_image
J J 30° 90°Moulin
natural_image
Technical line drawing of a mechanical component with a cylindrical top and flanged base (no text or symbols)text_image
Diagram illustrating four steps of a medical procedure involving a device and a container, with numbered labels.text_image
Diagram showing three steps of a cooking or processing procedure: dropping, adding a tool, and adding a cup.Miscelatore
natural_image
Line drawings of a blender with three views: top, side, and front (no text or symbols)text_image
J J 30° 90°Macinino
natural_image
Technical line drawing of a mechanical component with a cylindrical top and flanged base (no text or symbols)text_image
Diagram illustrating the four-step assembly of a biological or chemical process, labeled with steps 1 to 4.text_image
Diagram showing three-step cooking process: serving a lid, holding a spoon, and pouring into a cup.Licuadora
natural_image
Line drawings of a blender with three views: top, side, and front (no text or symbols)text_image
J J 30° 90°Picadora
natural_image
Technical line drawing of a mechanical component with a cylindrical top and flanged base (no text or symbols)text_image
Diagram illustrating a four-step assembly of a mechanical or biological process, labeled with steps 1 to 4.Topeltteraga vahusti ja kiiruse piiramine
text_image
Diagram showing three-step cooking process: serving dish, holding cup, and pouring into a cup with lidKannmikser
natural_image
Line drawings of a blender with three views: top, side, and front (no text or symbols)text_image
J J 30° 90°Jahvatusveski
natural_image
Technical line drawing of a mechanical component with a cylindrical top and flanged base (no text or symbols)text_image
Diagram illustrating a four-step assembly of a mechanical or biological process, labeled with steps 1 to 4.text_image
Diagram showing three-step cooking process: serving dish, holding cup, and pouring into a cup with lidMaišytuvas
natural_image
Line drawings of a blender with three views: top, side, and front (no text or symbols)text_image
J J 30° 90°Malūnèlis
natural_image
Technical line drawing of a mechanical component with a cylindrical top and flanged base (no text or symbols)text_image
Diagram illustrating four steps of a medical procedure involving a device and a container, with numbered labels.text_image
Diagram showing three steps of cooking or cooking process: dropping a cylindrical object, adding a small pot, and adding a spoon to a cup.Blenderis
natural_image
Line drawings of a blender with three different parts: one with a lid, one with a blender, and one with a toaster (no text or symbols present)text_image
J J J 30° 90°Dzirnaviñas
natural_image
Technical line drawing of a mechanical component with a cylindrical top and flanged base (no text or symbols)PEČAT I POTPIS PRODAVATELJA
K+B Progres
PROIZVAJALEC ali DAJALEC GARANCIJE:
K+B Progres, a.s.; MBS: 61860123
250 69 Klíčany, Czech Rep. e-post: ECG@kbexpert.cz
K+B Progres, a.s.
U Expertu 91 tel.: +420 272 122 111
250 69 Klíčany, Czech Rep. el. paštas: ECG@kbexpert.cz
K+B Progres, a.s.
U Expertu 91 tel.: +420 272 122 111
250 69 Klíčany, Czech Rep. e-pasts: ECG@kbexpert.cz
■ Dovozce neruči za tiskové chyby obsažené v návodu k použití výrobku. ■ Dovozca neruči za tlačové chyby obsiahnuté v návode na použitie výrobku. ■ Importer nie ponosi odpowiedzialności za błędy drukarskie w instrukcji obsługi do produktu. ■ Az importör nem felel a termék használati útmutatójában fellelhető nyomdahibákért. ■ Der Importeur haftet nicht für Druckfehler in der Bedienungsanleitung des Produkts. ■ The importer takes no responsibility for printing errors contained in the product's user's manual. ■ Uvoznik ne snosi odgovornost za tiskarske greške u uputama. ■ Uvoznik ne jamči za morebitne tiskovne napake v navodilih za uporabo izdelka. ■ Le fournisseur ne peut être tenu responsable des erreurs d'impression contenues dans le mode d'emploi du produit. ■ L'importatore non sarà ritenuto responsabile per eventuali errori di stampa contenuti nel manuale dell'utente del prodotto. ■ El importador no asume ninguna responsabilidad por errores de impresión en el manual del usuario del producto. ■ Importija ei vastuta toote kasutusjuhendis leiduvate trükivigade eest. ■ Importuotojas neapsiima atsakomybės dėl spausdīnimo klaidų, pasitaikančių gaminio naudotojo vadove. ■ Ražotājs neuzņemas atbildību par drukas klūdām ierices rokasgrāmatā.