PPA250WD - Docking station PEAQ - Free user manual and instructions
Find the device manual for free PPA250WD PEAQ in PDF.
User questions about PPA250WD PEAQ
0 question about this device. Answer the ones you know or ask your own.
Ask a new question about this device
Download the instructions for your Docking station in PDF format for free! Find your manual PPA250WD - PEAQ and take your electronic device back in hand. On this page are published all the documents necessary for the use of your device. PPA250WD by PEAQ.
USER MANUAL PPA250WD PEAQ
Personal Audio Docking Station
PPA250-B/VD
DE Bedienungsanleitung
EL Odyieic xphonc
EN User Manual
ES Manual de instrucciones
FR Mode d'emploi
HU Kezelési leíras
Manuale dell'utente
NL Gebruiksaanwijzing
PL Instrukcja obslugi
PT Instruções de'utilisation
RU RykoBOcTBO NOJb3OBaTeJa
SV Bruksanvisning
TR Kullanim Kilavuzu
ZH 用户手册
Deutsch 4-13
Eaynvika 14-23
English 24-33
Espanol 34-43
Francais 44-53
Magyar 54-63
Italiano 64-73
Nederlands 74-83
Polski 84-93
Portugues 94-103
Pycckn y3bIK 104-113
Svenska 114-123
Türkce 124-133
汉语 134-143
The unit supports the listed iPod / iPhone / iPad devices (iPod / iPhone / iPad devices shown are not included)
iPod nano 1st generation 1GB 2GB 4GB

iPod nano 2nd generation (aluminum) 2GB 4GB 8GB

iPod nano 3rd generation (video) 4GB 8GB

iPod nano 4th generation (video) 8GB 16GB

iPod nano 5th generation (video camera) 8GB 16GB

iPod nano 6th generation 8GB 16GB

iPod 4th generation 20GB

4th generation 40GB

iPod 4th generation (color display) 20GB 30GB

iPod 4th generation (color display) 40GB 60GB

iPod
Sth generation
(video)
30GB

iPod 5th generation (video) 60GB 80GB

iPod touch 1st generation 8GB 16GB 32GB

iPod touch 2nd generation 8GB 16GB 32GB

iPod touch 3rd generation 32GB 64GB

iPod touch 4th generation 8GB 32GB 64GB
iPhone 4GB 8GB 16GB

iPhone 3G 8GB 16GB

iPhone 3GS 16GB 32GB

iPhone4 16GB32GB

iPad 16GB 32GB 64GB

iPad2 16GB 32GB 64GB
L/R CH (Nominal): 12 W+12 W THD= 10% 6 ohm
Risk of electric shock!
Do not open

CAUTION: To prevent the risk of electric shock, do not remove cover (or back). No user-serviceable parts inside. Refer servicing to qualified service personnel.
To onua Tou Kepauvou Moea e eva lo nIeupo Tpiuvo xnpouoioiTaW npoeBtoian yia To xpnoTn oxetika e Tnv utapen n movwvenc "ETIKIVDvnc Taonc" OTO EOWTEPIKO Tou KEluouc TNC ouokueuc, n Evtaon TNC oIoia uTopei va eivai TeToia rou va anoteleik kivduvo nAekponlqic.
To TaumaoTko mea oe eva 10nleupo Tpiywvo xnpouoieita wc npoeisdoonan yia To xpnoTOn oTu npoxov anuavtkec onnyie c aeitoupyiac kai ouvtnpone cta auovodutka evtuna autnc nC ouokue
- Tia loyouc aoopaaleiac, autn n ouakeun klaonc II napexetai uE dinn n evioxmuevn movwn onwc unoohwvei to oujoao
Piv ouvoeote tn oukeun otny npica, Bbaowtheite otn taon nou avypafetai otn oukeun eiva idia meyn taon tou nekpiokou sktuou.
IIAHKTPA AI2OHTHPQN AΦH
Ta nKpa a nC yia Tc aeitoupyie BCpokovta otyn oovn evdeEewv xepiaouTnc oukeunc. AyyTe ta ana yia va ta eeyponnoe.
EKKINHsH

ToioBETnTe To diakontn Eniloync duo Teoewv OTO TIOW HPOC TNC OOKeUNC OTN EON ON. STO napaBupo 0a EmuviotE i eva poloi. PatnoTe TO KOKKIO KOUPI STANDBY OTO TnExeiipoiPio. Avouovn
Tia va enioppei n ouakeun oe kaotaan avauoVNC, nataote to kokkivo kouuni STANDBY OTO TnExepioptno. Pataote Eava to koupi STANDBY, n ouakeun eniotpeei otny kavoivki n kataotaon aeitoupyiac, kai n evdeiEN LED eionpaivei tvpexoua pyn onuatoC kai tn pubuon Evtaongxou.
EvallaktiKa, mOpTe va natnoe T volume UP n VOLUME DOWN oTov nivaka aphi yia va eIiotpeTcE Otv kavovikn aeitoupyia. Patote tauToxpoVA VOLUME UP KAI VOLUME DOWN oTov nivaka aphi npokevou n oukeun va eIiotpeei OE aeitoupyia avapovnic.
MUTE (ΣΓAΣH)
Eav n eilvEvn Evtaon nxou unepbaive Tn 3a0da 10, natavtac pia fopto kouni oiva onc MUTE ae wotnv Evtaon oTo eio 10. Ephiavietai neovsien ATT.
NATWvTAC TO KOUpi OiyaOnc MUTE yia deTeepn oopn, n ouokun 0a eTaBcE oE Aitoupyia Oiyaoc kai otnv oovn 0a ePhiavioTei n EvdeIEN MUTE.
NatauvTac yia tpiTn fopá, n λειουρyia oγaonθa akupωθei kai θε εμφaviotéi n tpexouo paθμion Tnc Evtaonc hou.
ZHMEIOEH: Ecv n tpexouoa eiloyn Evtaonc εival ≤ 10, n λειουργia ATT θa παραειφει.
EIZO△OZ
To koupi IN oov npooio nivaKa TnC ouokue ng Ta oac eitpepsi va nepinythe tte otic oxetikec Etuoyec.
EvaalakTikα xpoaiouonoiote To TnλexeiioTnpio natawvtac ta koupiia iPod n AUX.
ENTAZH HXOY
Pntote to koupiia VOL +/- oTov nivaka apnC n patote ta koupiia VOL +/- oTo tnAExepioptnpio yia va puBmuTe Tny Kupia Evtaon.
Pntote TO VOL+ yia va auEnoeTe n To VOL- yia va ueoete Tny Evtaon.
H evdi EN LED eniuaive i n v eivyevn oaeu en taoc hou. H eviot n evtaon ivai 40dB, n elaxiot niinivai 0dB.
TREBLE (NPIMA)
NaTnOte TO TREBLE + / - 0TO TnAExepiOtnpio yia va puOIOeTe Ta npia.To EupocpuOIOnc eiva ± 14dB
BASS (MIIA2A)
Pntote TO BASS + / - 0TO TnAeipio npio yia va puEioTe ta mada Tou unoBauwikou nxiou (subwoofer.) To eupoc pOthionc ivai ± 14dB
PYOMIZHΩPAZ
Pntote to koupi ALARM.S oTo TnExepiotnpio.
Oa eupavotie n evdeiEN TIME.Pntote to koupi
ENTER.
Napakaoue putheta evaoya to koupi npouanipod. Eoayet to iPod/iPhone/ iPad oic npayatonoioe Tn pthetaion.

IMPORTANT SAFETY INSTRUCTIONS
READ CAREFULLY AND KEEP FOR FUTURE REFERENCE.

The lightning flash with arrowhead within an equilateral triangle is intended to alert the user to the presence of uninsulated "dangerous voltage" inside the enclosure of this appliance, which may be of sufficient magnitude to constitute a risk of electric shock to persons.
The exclamation point within an equi-lateral triangle is intended to alert the user to the presence of important operating and maintenance instructions in the literature accompanying this appliance
- For safety reasons, this class II appliance is provided with double or reinforced insulation as indicated by this symbol.
Before connecting the appliance to a socket outlet, make sure the voltage indicated on the appliance corresponds to your local mains.
The MAINS plug is used as the disconnect device; the disconnect device shall remain readily operable.
- If the supply cord is damaged, it must be replaced by the manufacturer or its service agent or similarly qualified person in order to avoid hazard.
WARNING: To reduce the risk of fire or electric shock, do not expose this appliance to rain or moisture. The apparatus shall not be exposed to dripping or splashing and no objects filled with liquids, such as vases, shall be placed on the apparatus.
- Regularly check if the supply cord, appliance or extension cable are defective. If
found defective, do not put appliance into operation. Immediately pull the plug.
-
Place the supply cord and, if necessary, an extension cable in such a way that pulling or tripping over it is impossible. Do not allow the supply cord to hang down within easy reach.
-
Do not jam, bend or pull the supply cord over sharp edges.
-
Protect the supply cord from being walked on or pinched particularly at the plug, convenience receptacles and the point where it exits from the appliance.
-
Never pull the plug by the supply cord or with wet hands.
-
Disconnect the mains plug in case of faults during use, during lightening storms, before cleaning and when not using the appliance for a longer period of time.
-
The appliance may not function properly or not react to the operation of any control due to electrostatic discharge. Switch off and disconnect the appliance; reconnect after a few seconds.
Refer all servicing to qualified service personnel. Do not attempt to repair the appliance yourself. Servicing is required when the appliance has been damaged in any way, such as the supply cord or plug are damaged, liquid has been spilled, objects have fallen into the appliance, the enclosure is damaged, the appliance has been exposed to rain or moisture, does not operate normally, or has been dropped.
-
Upon completion of any service or repairs to this product, ask the service technician to perform safety checks to determine that the product is in proper operating condition.
-
Do not use attachments or accessories other than recommended by the manufacturer or sold with this appliance. Install in accordance with this user manual.
-
When installing the appliance, leave sufficient space for ventilation. Do not install in bookcases, built-in cabinets or the like.
- The ventilation should not be impeded by covering the ventilation openings with items, such as newspapers, table-cloths, curtains, etc. Do not insert any objects.
- No naked flame sources, such as lighted candles, should be placed on the apparatus.
- Do not place any electronic equipment or toys on the appliance. Such items could fall from the top and cause product damage and/or personal injury.
- Do not install near any heat sources such as radiators, heat registers, stoves or other appliances (including amplifiers) that produce heat
- Do not apply excessive force to the front or top, as this could ultimately overturn the appliance.
- Do not shift or move the appliance when powered on.
- Do not touch, push or rub the surface of the appliance with any sharp or hard objects.
- Do not move the appliance from cold into warm places and vice versa. Condensation can cause damage to the appliance and electrical parts.
- For appliances with earphone jack: DANGER! Excessive sound pressure from earphones and headphones can cause hearing loss. If you listen to loud music for a long time, your hearing may be impaired. Set to moderate volume.
- For appliances with USB function: Reset appliance by disconnecting USB device from appliance in case of malfunction.
-
For appliances with USB function: If an USB data storage medium malfunctions as a result of electrostatic discharge and momentary electrical surges, disconnect the device from the appliance.
-
For appliances / accessories intended for use of batteries:
- CAUTION! Danger of explosion if batteries are incorrectly replaced. Replace only with the same or equivalent type. Observe correct polarity.
- Batteries (battery pack or batteries installed) shall not be exposed to excessive heat such as sunshine, fire or the like. Protect from mechanical shock. Keep dry and clean. Keep away from children.
- Do not open, dismantle, shred or short-circuit batteries. Do not mix old and new batteries.
- Dispose of properly. Pay attention to environmental aspects of battery disposal. Do not dispose of in household waste.
- Refer to safety and other instructions on the battery or its packaging.
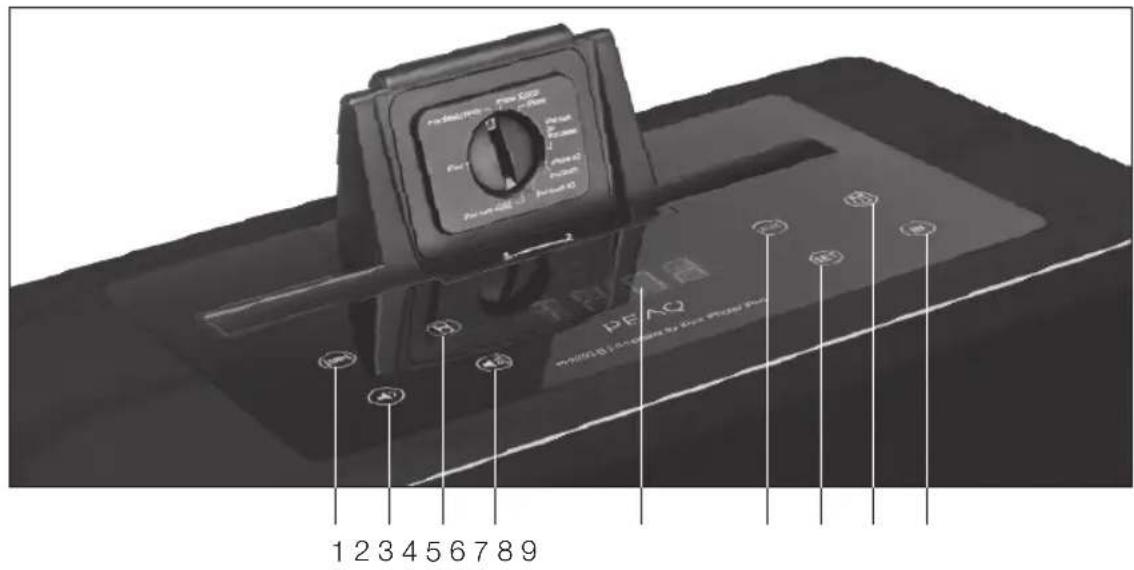
Main unit
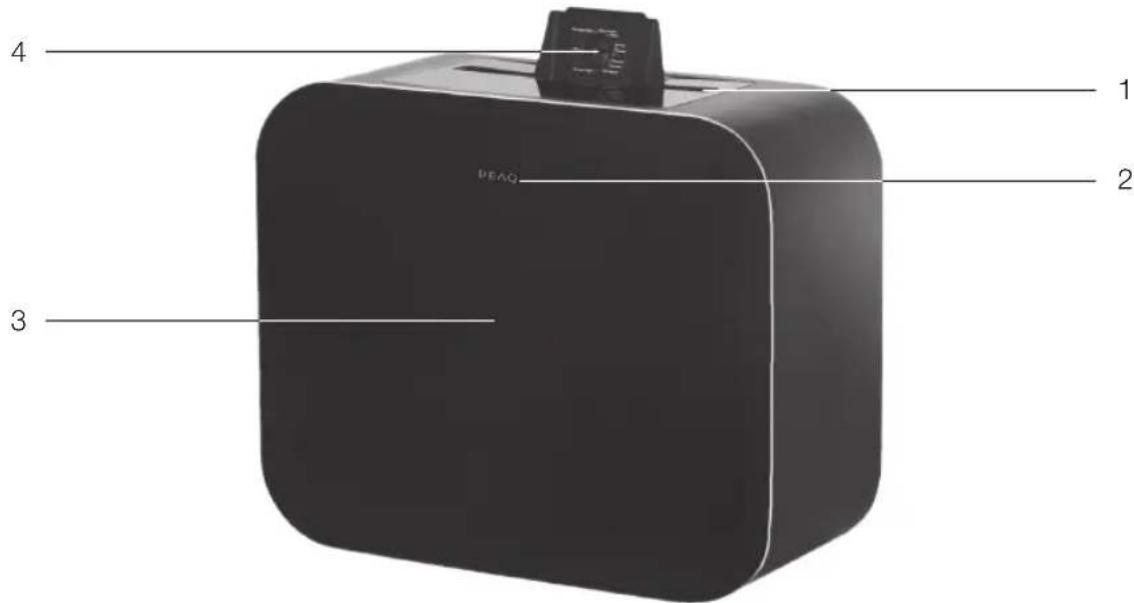
1 iPod/iPhone/iPad input
2 Remote control sensor
3 Speaker
4 iPod/iPhone/iPad adjustment knob
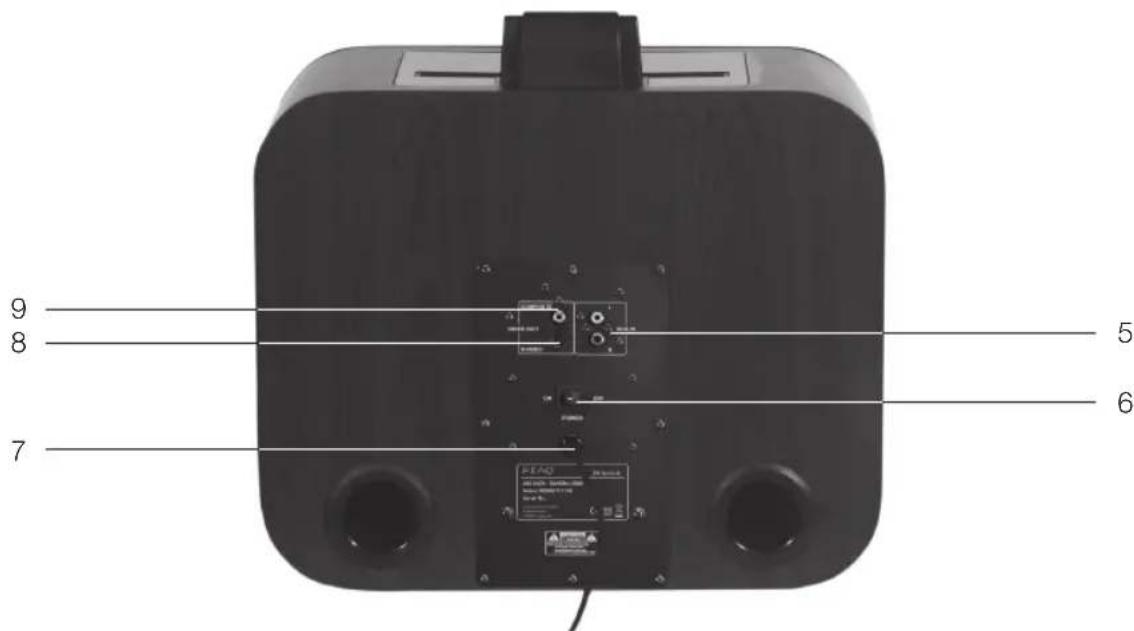
5 AUX input
6 Power switch
7 AC power supply cord
8 iPod S-Video out
9 iPod composite video out
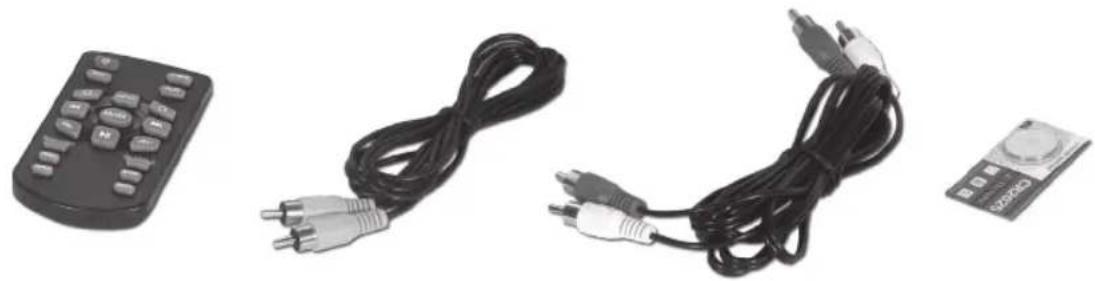
Accessories

1x Remote control
1x Video cable
2x Audio cables
1x Battery (3 V CR2025)
1x User Manual
INSERTING BATTERIES
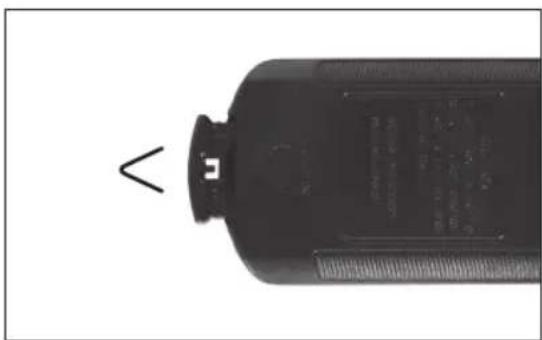
Pull out the battery holder. Install battery cell. Make sure that the battery polarity + matches the + marking on the holder/remote. Replace the battery holder.
Touch panel

1 SNOOZE
2 Volume down
3 iPod indicator
4 Volume up
5 LED display
6 AUX indicator
7 Set
8 Alarm indicator
9 Input selection
Remote control

Safety remark
Important safety instructions. Read carefully and keep for future reference.

The lightning flash with arrowhead within an equilateral triangle is intended to alert the user to the presence of uninsulated "dangerous voltage" inside the enclosure of this appliance, which may be of sufficient magnitude to constitute a risk of electric shock to persons and animals.
The exclamation point within an equilateral triangle is intended to alert the user to the presence of important operating and maintenance instructions in the literature accompanying this appliance. To reduce the risk of fire or electric shock, do not expose this appliance to rain or moisture. The appliance shall not be exposed to dripping or splashing. Objects filled with liquids, such as vases, shall not be placed on appliance.
Connections
CD/DVD/TV

Use audio and video cables (included) to connect the video output (yellow) to TV set and to connect the audio inputs (red/white) to CD/DVD/MP3 player.
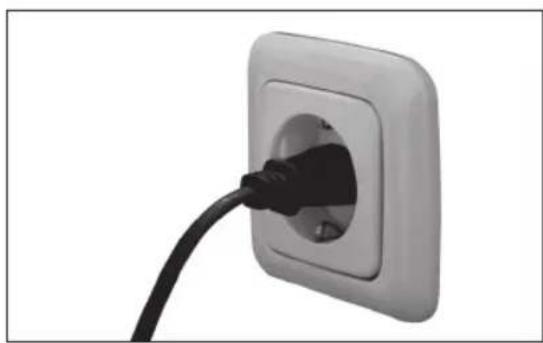
POWER SUPPLY
Plug in the appliance.
Operation
SENSOR BUTTONS
Sensor buttons for functions can be found on the panel of the appliance. Touch them gently to operate them.
START

Flick the toggle switch on the rear of the unit to the ON position. The display window will reveal a clock. Press the red STANDBY button on the remote control.
STANDBY
To turn the unit back into standby mode, press the red STANDBY button on the remote. Press STANDBY button once again, the unit returns to the normal operation mode, and LED displays the current input source and volume setting.
Alternatively, you can press either VOLUME UP or VOLUME DOWN on the touch panel to return to normal operation mode. Press VOLUME UP or VOLUME DOWN on the touch panel simultaneously to turn unit back to standby mode.
MUTE
If current volume level is higher than 10, pressing MUTE button once will decrease the volume to level 10. ATT is displayed.
By pressing MUTE button a second time, unit will go into mute mode and display will show MUTE.
By pressing a third time, mute mode will be cancelled, and current volume mode will be displayed.
NOTE: If current volume level is ≤ 10 , ATT function will be skipped.
INPUT
The IN button on the front panel of the unit will navigate through the relevant options. Alternatively use the remote control by pressing the iPod or AUX buttons.
VOLUME
Press the VOL +/- buttons on touch panel or press VOL +/- buttons on remote control to adjust the master volume.
Press VOL+ to increase or press VOL- to decrease the volume.
LED displays the volume level accordingly. The maximum volume is 40dB, the minimum value is 0dB.
TREBLE
Press the TREBLE +/- on remote control to adjust the treble. The adjusting range is ± 14dB
BASS
Press the BASS +/- on the remote control to adjust the bass of the subwoofer. The adjusting range is ± 14dB
TIME SETUP
- Press the ALARM.S button on the remote control. TIME will be displayed. Press the ENTER button.
- The hour digits will flash. Press OK buttons to adjust the hour. Press ENTER to confirm.
- Next the minutes digits will flash. Press the or buttons to adjust the minutes. Press ENTER to confirm. Please note that this clock is a 24 hour clock.
NOTE: Touch +/- on the front panel of the unit or press for remote control to adjust the hour or minutes.
SLEEP
Press the ALARM.S key twice. Current sleep setting is displayed, the indicator icon will flash. Press ENTER to confirm. Press or increase and decrease sleep intervals (5 min. steps from 00 to 30 min., 10 min. steps from 30 to 90 min.).
ALARM
- Press the ALARM.S button on the remote control three times. ALM is displayed and alarm icon will flicker. Press the ENTER button to confirm.
- ON will flicker on the display window. Press the ENTER button to confirm.
- To turn the alarm settings off, follow the steps above and press the button to switch from ON to OFF.
- Once ON is confirmed, the hour digits will flicker on the screen.
- Use the to select the hour of choice (please note that clock is a 24 hour clock).
- Confirm hour selection by pressing the ENTER button.
-
The back 2 digits ( minute selection) will flicker.
-
Use the or to select the minutes.
- Press ENTER button to confirm.
- Once minute selection has been confirmed, the system will then prompt four alarm options. Use the to scroll through the options and press ENTER to confirm.
- During the operation of alarm settings, if the interval time exceeds 6 seconds, the current setting will be cancelled.
- To halt the alarm when alarm rings. a. Press STANDBY button on the remote control to cancel the alarm directly. b. Touch any button on the front panel or remote control twice to cancel alarm.
- Press the STANDBY key once to turn the unit on, once alarm has been silenced.
SNOOZE
Touch any button on the front panel or press any button except STANDBY button on the remote control once, the alarm stops ringing and the unit enters into SNOOZE mode. Both SNOOZE and ALARM icons blink when the unit is in SNOOZE mode, the alarm stops ringing for 9 minutes, then continues to beep as a reminder.
SNOOZE mode can be cancelled by pressing STANDBY on remote control or VOL+ and VOL- simultaneously on touch panel.
DISPLAY MODE
Press the Display Mode button to turn the Clock Display ON or OFF (in Standby Mode).
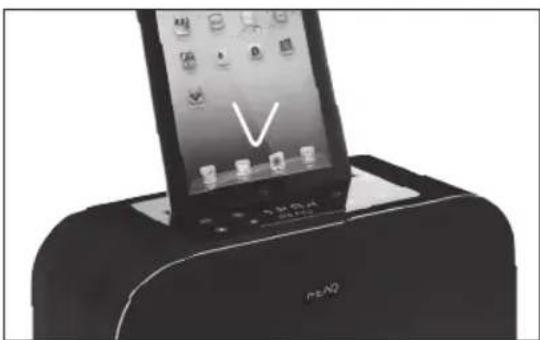
iPod/iPhone/iPad Connection
Please adjust the iPod adjustment knob accordingly. Insert the iPod/iPhone/iPad once the adjustment is made.

Ensure that the unit is set to iPod mode by pressing the iPod button on the remote control.
Use the iPod control buttons on the remote control for iPod operation. The buttons work similar as the iPod's click wheel. For more details, refer to the iPod instructions.

Specifications
Rated voltage: 230 - 240V /50 / 60Hz
Power consumption: 80 W
Power consumption standby: < 1 W
Output power:
L/R CH (Nominal): 12 W+12 W THD= 10% 6 ohm
Frequency response: L/R CH (60Hz-20KHz at +1 / -2dB)
Sensitivity: L/R:550mV
Overload source e.m.f.: >2V
Separation: >55dB
S/N: >70dB
Remote Control: >5m
Dimensions (W× H× D) .. 390× 320× 182mm
Weight: 7.8kg
Operating/ambient temperature: -10^ to +40^
iPod/iPhone/iPad
"Made for iPod", "Made for iPhone" and "Made for iPad" mean that an electronic accessory has been designed to connect specifically to iPod, iPhone or iPad respectively, and has been certified by the developer to meet Apple performance standards. Apple is not responsible for the operation of this device or its compliance with safety and regulatory standards. Please note that the use of this accessory with iPod, iPhone or iPad may affect wireless performance.
iPod, iPhone & iPad are trademarks of Apple Inc., registered in the U.S. and other countries.
INTENDED USE
This appliance is intended for recieving and playing audio and video signals. Only use according to these instructions. Improper use is dangerous and will void any warranty claim. Observe the safety instructions.
DISPOSAL
The crossed-out wheeled bin logo requires the separate collection of waste electric and electronic equipment (WEEE). Electric and electronic equipment may contain dangerous and hazardous substances. Do not dispose of this appliance as unsorted municipal waste. Return it to a designated collection point for the recycling of WEEE. By doing so, you will help to conserve resources and protect the environment. Contact your retailer or local authorities for more information.
L/R CH (Nominal): 12 W+12 W THD= 10% 6 ohmios
Consummationelectrique:80W
Consummationelectriqueveille: < 1 W
Canal G/D (nominal): 12 W+12 W THD= 10% 6 ohm
Risk of electric shock! Do not open

CAUTION: To prevent the risk of electric shock, do not remove cover (or back). No user-serviceable parts inside. Refer servicing to qualified service personnel.
L/R CH (névleges): 12 W+12 W OHT= 10% 6 ohm
Frekvenciamenet: L/R CH (60 Hz - 20 kHz +1 / -2 dB esetén)
Erzekenyseg: L/R: 550 mV
Tulterhelés, forras electromotoros >2V
ereje:
S/D CH (nominale): 12 W+12 W THD= 10% 6 ohm
Risk of electric shock! Do not open

CAUTION: To prevent the risk of electric shock, do not remove cover (or back). No user-serviceable parts inside. Refer servicing to qualified service personnel.
Ligaçao iPod/Phone/iPad
L/R CH (Nominal): 12 W+12 W THD= 10% 6 ohm
Risk of electric shock! Do not open

CAUTION: To prevent the risk of electric shock, do not remove cover (or back). No user-serviceable parts inside. Refer servicing to qualified service personnel.

CIMBOJ MOJIHN CO CTpeKoB BHyTpnpaB-HOCTOPOHHERTOpeYroIbHnKa Cnyknt, TTo6bl
PnBHeB BHIMAHme NOLb3OBaTeJI K HAIHmHO HeN3OJINPOBaHHOro "Onachoro HAnpJxKeHn" BHyTpN 3TOrO Pn6Opa, BeINHHa KOTOPo MOXe 6bITb DOCTaTOHON DnI NOPaKeHn IIOJe TOKOM.

BockJIuIaTeJIbHbI 3HaK BHyTpI paBHocToPOnHero TpeYroJIbHnKa cIyXnT, YTObI npI
BInbBHHMaHHe NIOJIb3OBATeJI K BaXHOI OIEpaUIMn Yka3aHmM NO OcJyXnBaHIO B IInTEpaTye, CoPBOxKaIouSeI 3TOT npi6op.
JaHHbI CnMBoI 063HaHaET, YTO no COO6paxeHnA M 6e3OpacHOCTN B ATOM PnIOBope KnaCCa IINCNoJIb3yETcR DAOBHAR NIN YCNHeHHa N3OJIaM
Ipeed noKIOHHeHem np60pa K cTeBOH po3eTke y6eNTecb, YTO HApRKeHne, Yka3aHHoe Ha CAMOM np6Ope, COOTBETCTByET HApRKeHIO B JOKaJIbHO CETN 3JIeKTpONITAHIN.
- CeteB0I WTeNCeJIb IcNoJIb3yETcB KaYeCTBe pa3beINHITeJIa; pa3beINHITeJIb DOJIKeH BCErDa HaxOINTBcR B INCpABHOM COCTOHN.
B Cnyae NOBpeKdEHNcIIOBOrO Ka6eJI Heo6XoIMo, YTO6bI IPOIN3BOIDNTeJIb, ERO cepBnCHbI aERHT NII INDpyOE KBAINIΦNlPObaHHOE NIO pOnI3BENI 3aMeHy Ka6eJI dJIy yCTpaHEHrA BO3MOX-HOH ONaCHOCTN.
PENEPYNPEXDEHNE:IymeHbWeHnOanHOCTNIOXapaUyapatoKOMHe NOBpeRaTe3OTnp6OpBO3eINCTBNOIOxJaNNBlaRn.BeprnteeroOTKanEnb6pb3r,HECTaBbTeHaHrO COCyDbICIKKOCTAM,HaPIMep,Ba3bl.
-Perynphno npOBepnTe 3Jektpueckn Ka6eB, Ka6eB camoro np6oopa nnn yDnHnTeNbHbN Ka6eB Ha npedmet Hauuynna NOBpeKdHn. B
CnyuaeOBnapxkHnIOBpeKdHnHe3KcNly- atnpyIe np6op.HezamEaIteJIbHOOTKIOHTe UTenCeIbHyO Bnky.
PacnonaraiTe cInoBoi Ka6eB n,ecn Heo6xO- DIMO,ydHHTeHbHbI Ka6eB TaKIM O6pa3OM, 7TO6bl NCKJIOHTb BEPOrTHOCTb TOFO, YTO KTOJIIO BO MOKeT HAcTyNtB uIN 3aueNITbcra 3a Hero. He donyckaTe npOBuCAHnI CInoBOr Ka6eB B JERKO DOCTyINbIX MecTaX.
-He 3axkmaTe, He cnaTe n He npotraBauTe CnIOBOI Ka6bIype3 ocTpbIyrgbl.
-He HactynaiTe Hne OpyckaTe 3aUeMneHnCnIOBOrO KaBEnI,OCo6eHNO BO3Ne UTeNcEJIbHOB BnKn.ObecneBte yD06Hoe paCNoJoxKeHne npi6opa OTHCNTbHO CTeBOI po3ETKn.
HkoIgHa He OTKIOUaIte WTeNCEbHyO BnIKy, NO-TaHyB 3a CInIOBOI uHyp, INI MOKpbIM pykam.
-
OTKIIOUaHTe CTeBOI UTENCeB B CInyae KOpOTKORO 3AmbKaHnB IPOUcECE 3KcnLyaTauIN, BOBpeMraP03bl, nepd y6bpKo, a TaKKe KOgda npu6Op He 3KcnLyATnpyETcR B TeueHne DInTeJIbHOBOPeMHn.
-
Pnp6op MoKet FyHKUOHNPOBaTb HeHaJLekaMm O6pa3OM NnHpeaInpoBaTb Ha KOMaHdbI IIO6bIX CpeiCTB UypaBHeNn NO npuHHe 3eKtPoCtAtnueckoro pa3Pra. BbIKIOHTe n OTKnIOHTe np6op OT CETn 3eKTPoNTaHn; NOBTOHO NOKIIIOHTe ERO No PPOJeeCTBn HECKOJIbKINCEkyHd.
-ObcIyKINBaHHe npmbopa DoJIKHO OcyuectBnTbCRA KBAInOuNUPOBaHHbIMn COTpydHnKAMn cepBnCHOro ueHTpa.He nbTaeTecb OTPeMOHTPOBaTb npnbop camocToTeJIbHO.ObcIyKINBaHne np60ba Tpe6yETcB Clyuae IIObIX NOBpexKeHn, HAnPmep, NobpeXDeHne CNIOBOr KOBeJIa NII UTENCEJBHO BUNK, PPOJINB XnIKoCTN, NaDEHne KaKIX-NIO BO ppeMeTOB Ha np6Op, NOBpeXDeHne KOPnyCa, NoJaHaHHe DOxJa NIN BnAri, cOOn B pa60te Wn PaNeHne camoro np60pa.
1 Bxod iPod/iPhone/iPad
3 HAMK
2 CeHcOp DnCTaHtUOHHO ynpabJIeHnIa
4 NepeKJIIOUaTeJIb iPod/iPhone/iPad

5 BxoAUX
8 BbIXoD S-Video nIy iPod
6 BbIKIOyateJIb NITaHnI
9 Komno3HTbB BnDeOBbIXoD nIy iPod
7 KaebIbnIITaHnIeNep.Toka
PnHaJIeXHoCTN
1 nyIbT dNCTaHcMOHHoro ynpabNeHn
1 BndeokabeB
2 aydnokabeng
1 6aTape8 (3 B CR2025)
1PykoBOCTBO NOJIb3OBATeIa
YCTAHOBKA BATAPEI

BCTABbTE iPOD/iPHONE/iPAD

3OHA YNPABJIENI INPUBIN3NTJEbHO 5 M
BbIaHInTe DepeKaTeJIb IJa 6aTapeN. BcTaBBte 6aTapeIO. YBeIITecb, YTO + 6aTapeN coOTBeTCTByET MapKnipOBKe + Ha DepeKaTeJIe/ NyIbTe Dv. ChOba yCTaHOBInTe DepeKaTeJIb 6aTapeN.
CehcopnnaheJIb
1 CπAùLΠ PΕχΚΜ
2ymeHbueHeHrPOMKoCTn
3 INДиКаТОп iPod
4 YBeJIuYeHne rPOMKoCTN
5 CBETOIOHOHy INHDMKATOp
6 INdikKaTop AUX
7 Hactpoika
8 INdkaTOp 6yDnJIbHnKa
9 Bb6op BxoJa
YbCTBNTeIbHOCTb:JIeB./IpaB.550MB
3DCA-NTOHTHK:>2B
Pa3dJeHHe: >55D6
CunHan/whm:>70dB
ДиТанцИОнhoeупраВлeнe:>5M
Pa3Mepb(BxLxΓ):390×320×182MM
Bec: 7,8 K
Pa6oay TemnepaTypa/Temne
paTpyaOkpykaIooJe cpebl: OT-10°C nO +40 C
iPod/iPhone/iPad
L/R CH (Nominal): 12 W+12 W THD= %10 6 ohm
Frekans tepkisi: L/R CH (60 Hz - 20 KHz, +1 / -2dB)
WARNING: SHOCK HAZARD-DO NOT OPEN
AVIS:RISQUE DE CHOC ÉLECTRIQUE-NE PAS OUVRIR