Bisel Freidora FHM 301 FR XS SP - Deep fryer FRANKE - Free user manual and instructions
Find the device manual for free Bisel Freidora FHM 301 FR XS SP FRANKE in PDF.
| Brand | Franke |
| Model | Bisel Freidora FHM 301 FR XS SP |
| Product type | Built-in deep fryer (class 3) |
| Power supply | 220-240 V ~ 50-60 Hz, 2300 W, 16 A |
| Oil tank capacity | 3 to 4 litres |
| Tank material | Stainless steel or enamel |
| Basket material | Metal (dishwasher safe) |
| Heating element | Part immersed in oil, cold part near the housing |
| Thermostat | Continuously adjustable, with temperature indicator light |
| Safety | Manual reset safety thermostat, cut-off in case of overheating or insufficient oil level |
| Indicator lights | Power indicator (C) and temperature indicator (D) |
| Included accessories | Basket, steel lid |
| Cleaning and maintenance | Manual cleaning with hot water and dish soap; basket dishwasher safe; do not wash control/heating unit in dishwasher |
| Installation | Built-in, requires opening in cabinet (dimensions not provided) |
| Electrical connection | Three-core cable with free ends (3×1.5 mm², type H05VV-F) |
| Standards | Compliant with EC directives: 73/23/EEC (Low Voltage), 89/336/EEC (EMC), 93/68/EEC |
| After-sales service | Approved Franke after-sales service, original spare parts |
| Warranty | See attached warranty certificate |
Frequently Asked Questions - Bisel Freidora FHM 301 FR XS SP FRANKE
User questions about Bisel Freidora FHM 301 FR XS SP FRANKE
0 question about this device. Answer the ones you know or ask your own.
Ask a new question about this device
Download the instructions for your Deep fryer in PDF format for free! Find your manual Bisel Freidora FHM 301 FR XS SP - FRANKE and take your electronic device back in hand. On this page are published all the documents necessary for the use of your device. Bisel Freidora FHM 301 FR XS SP by FRANKE.
USER MANUAL Bisel Freidora FHM 301 FR XS SP FRANKE
A close view 7
Using the appliance 8
Useful advice 9
Fryer cleaning and maintenance 9
Support 9
Safety instructions 10
Installation 11
Technical data 12
Introduction
Thank you for choosing a Franke product. Before using the appliance, please read all the instructions and advice contained in this manual. In this way you will be able to make best use of the appliance and also ensure its lasting efficiency. Keep this booklet for further reference.
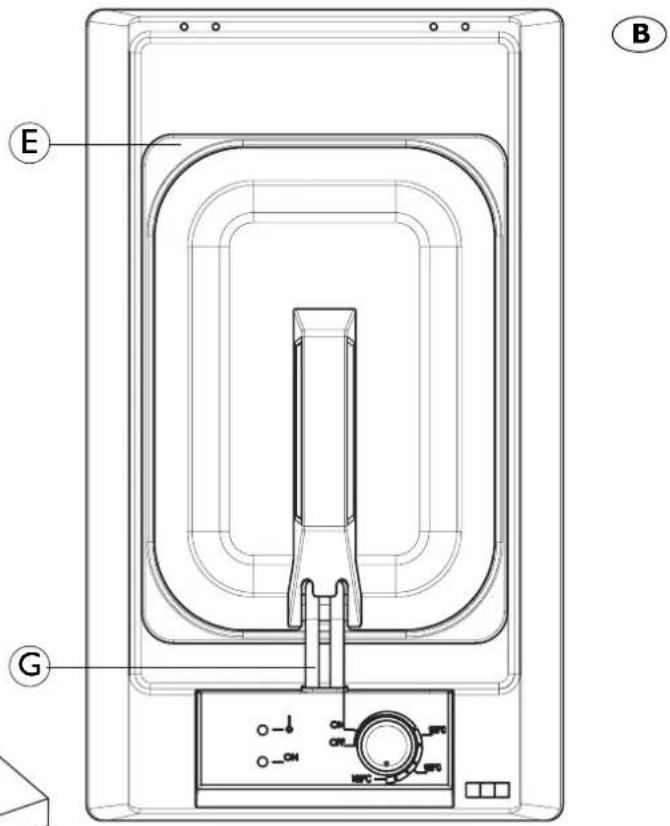
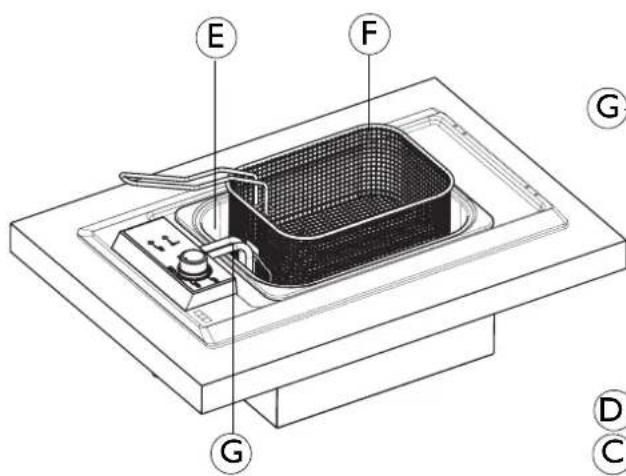
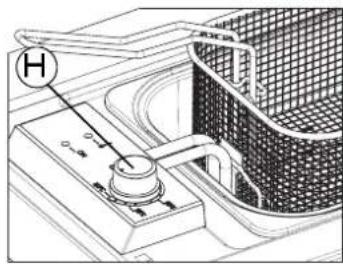
A close view
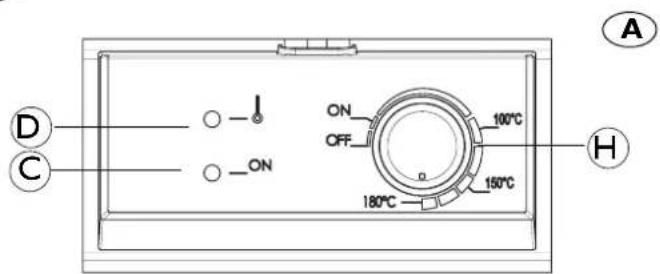
A Control Panel
B Fryer
C On indicator
Heating indicator
E Oil tank
F Basket
Heating element
H Temperature selector
Using the appliance
Switching on the first time
Before using the fryer carefully wash the basket, oil tank and the heating element part to be placed in the oil with hot water and dish washing soap, then dry thoroughly. It is advisable to repeat this operation at least every oil change (the basket can also be put in a dishwasher). After carrying out these operations, put all the parts back in their original seats.
Heating element activation
Before switching the fryer on, it is essential pour enough oil in the special tank to reach the min. level (approx. 3 litres) indicated on it. To avoid spilling or spattering of boiling oil, do not exceed the max. level indicated on the tank (approx. 4 litres).
Turn the knob clockwise (gradually increasing fryer power), setting the required temperature.
Note:
The On light (C) remains on during fryer operation, whereas the heating indicator (D) remains on only during the heating phases.
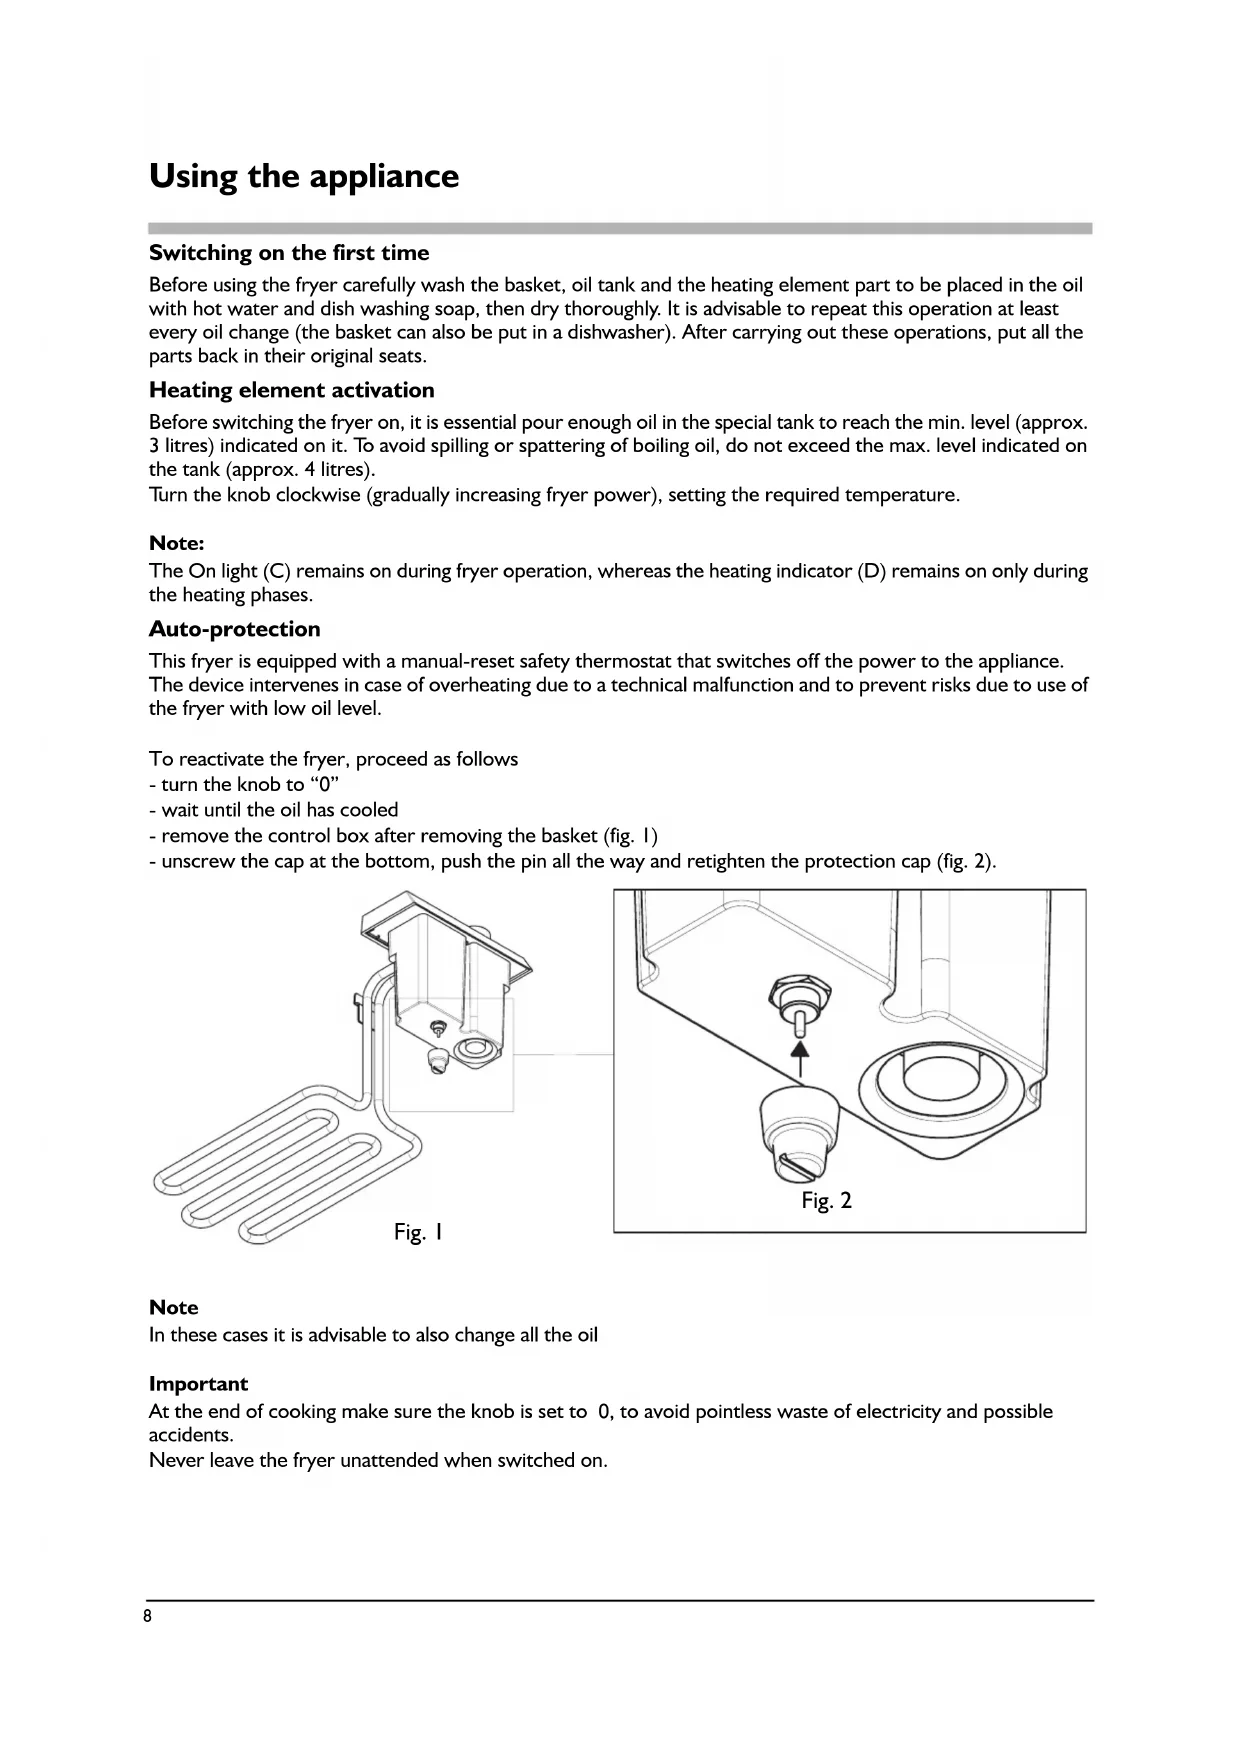
Auto-protection
This fryer is equipped with a manual-reset safety thermostat that switches off the power to the appliance. The device intervenes in case of overheating due to a technical malfunction and to prevent risks due to use of the fryer with low oil level.
To reactivate the fryer, proceed as follows
- turn the knob to "0"
- wait until the oil has cooled
- remove the control box after removing the basket (fig. 1)
- unscrew the cap at the bottom, push the pin all the way and retighten the protection cap (fig. 2).

Note
In these cases it is advisable to also change all the oil
Important
At the end of cooking make sure the knob is set to 0, to avoid pointless waste of electricity and possible accidents.
Never leave the fryer unattended when switched on.
Useful advice
Using the fryer
- Remove basket from the tank and place it on a dry worktop. Place food in the basket until about half full.
- Select the required frying temperature by turning the knob (H).
- At the end of cooking, the food can be drained by positioning the basket in the special hooking (see figure)
To obtain best cooking results the food should be completely immersed in the oil. It takes about 5 minutes to reach the optimum temperature of approx. 180^ , keeping the steel lid on the tank. During frying it is advisable for the glass cover (optional to remain open.
Make sure the oil has reached the set temperature (the heating D indicator goes off) before placing food in it. When the fryer is not operating, the basket handle can be closed forwards in order to be covered.
The part of the heating element near the control box is cold: the hot part of the heating element is only the part placed in the oil.
This fryer has a thermostat which prevents the oil from overheating, therefore repeated frying with the same oil is possible.
Note:
Each time after cooking always make sure that the oil has not fallen below the min. level; top-up if necessary. Make sure there is not an excessive amount of food residuals on the bottom of the tank: if necessary, filter or change the oil.
Fryer cleaning and maintenance
Before carrying out any fryer cleaning or maintenance, always unplug the appliance or disconnect the power by means of the main switch.
- Stainless steel and enamelled parts will remain pristine if regularly cleaned with water or using specific products, thoroughly drying them afterwards.
- Never use steam appliances, scouring pads, steel wool, muriatic acid or other products which could scratch or mark the surface.
- Do not leave acid or alkaline substances on the fryer.
- Never use sharp objects, as they could damage the seal between the trim and worktop.
- Do not use products containing sands, alkalis, acids, chlorides, oven sprays, detergents usually used for cleaning dishwashers.
- To prevent scale deposits from forming, always thoroughly dry the appliance after going over it with a damp cloth.
- Lastly, clean the fryer when it has cooled, as described above.
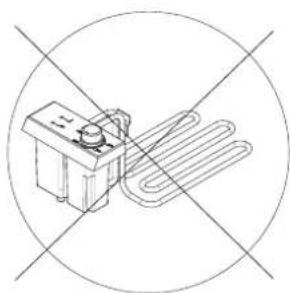
Note: Do not wash the heating element/control assembly in a dishwasher (see figure opposite)
Support
In case of any operation problems, contact the Franke Technical Service Centre (see attached list);
Never make use of unauthorised technicians.
Specify:
the type of fault;
the appliance model (Art.);
the serial number (S.N.);
This information is given on the appliance dataplate on the warranty certificate.
Always contact qualified personnel in the following cases:
- installation (refer to the installation section);
-doubts regarding operation.
Contact an authorised service centre in the following cases:
- immediately after unpacking, in case of doubts about the integrity of the appliance;
- appliance malfunction or poor operation, requesting original spare parts.
General instructions
To ensure safe and efficient operation of this appliance:
- only contact authorised service centres;
- always demand the use of original spare parts;
- the appliance is designed for non-professional, domestic use; do not modify its characteristics;
- the dataplate gives the symbols indicating the countries for which the instructions apply;
- appliance electrical safety is guaranteed only when it is connected to an earthing system in compliance with the current regulations;
- do not touch the cooking zones during or immediately after use, as they become very hot; keep children away;
- before any cleaning or maintenance operations, or in case of malfunction, disconnect the appliance from the mains power supply;
- always make sure the knobs are in the Off position when the appliance is not in use, or that the control zone is switched off.
Do not allow children to touch:
- the controls or the appliance in general;
- the packing components (bags, polystyrene, staples, etc.);
- the appliance, during and immediately after use, since the fryer becomes very hot;
- an unused appliance (make any potentially hazardous parts safe).
Do not:
- touch the appliance with wet parts of the body;
- use the appliance when barefoot;
- pull the appliance or power cable to unplug it;
- carry out improper or hazardous operations;
- leave the power cables of other electric appliances on hot parts of the appliance;
- expose the appliance to atmospheric agents;
- use the appliance as a support top;
- use flammable liquids near the appliance;
- use adapters, multi-sockets or extension leads;
- allow anyone except qualified personnel to install or repair the appliance.
Important
- Pay particular attention to the applicable regulations on ventilation. The use of a cooking appliance produces heat and humidity in the room where it is installed. Ensure the room is adequately ventilated: keep natural ventilation openings open, or install a mechanical ventilation device (extractor hood with exhaust duct). In case of intensive or prolonged use of the appliance, it may be necessary to provide additional ventilation, for example by opening a window, or more efficient ventilation, by increasing the fan speed (if present).
The manufacturer declines any liability for damage due to: incorrect installation, improper, incorrect or unreasonable use.
Installation
Operations for appliance installation are described below. These procedures must be carried out by qualified personnel in compliance with current local regulations, as installation by an unskilled person may constitute a hazard.
The manufacturer declines any liability for injury or damage due to non-compliance with these provisions.
Preparing the cabinet
This handbook refers to a class 3 built-in fryer.
Prepare the hole in the top according to the measurements given in fig. 1.

Fig.1
Fitting in the cabinet
After carrying out the operations for connecting the power cable to the power supply, following the relevant instructions, apply the sealing strip around the hole and position the fryer. Carefully tighten the fixing hooks (fig. 2). Remove any excess sealing strip.
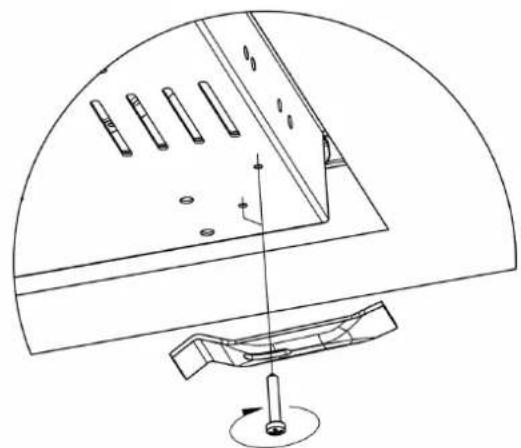
Fig. 2

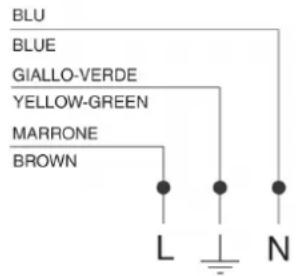
Connection to the power supply
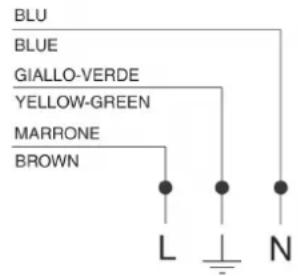
The FRANKE fryer comes with a 3-core power cable with free terminals.
If the fryer is permanently connected to the power supply, install a circuit breaker having a contact opening distance that allows complete disconnection in the conditions of overvoltage category III. Make sure:
a) the plug and socket are suitable for a 16A current
b) both are easily accessible and positioned so that no live part can be accessed when inserting or removing the plug
c) the plug can be inserted without difficulty and is accessible with the appliance installed
d) that when the plug is inserted, the fryer is not resting on it when installed in the cabinet
e) the terminals of two appliances are not connected to the same plug
f) a 3 × 1.5 ~mm^2 H05VV-F type cable is used when replacing the power cable.
g) to respect the polarities of the free terminals (Brown=Live Blue=Neutral Yellow/Green=Earth)
Important: Make sure the characteristics of your household electrical system (voltage, maximum power and current) are compatible with those of your FRANKE fryer.
Technical data
Power voltage and frequency:
220-240V50-60Hz

Total power and fuse capacity:
2300W-16A
The appliance complies with the following EC Directives:
-
73/23/EEC dated 19/02/73 (Low Voltage);
-
89/336/EEC dated 03/05/89 (Electromagnetic Compatibility);
-93/68/EEC dated 22/07/93.
INFORMATION FOR USERS
In compliance with Legislative Decree no. 15 dated 25 July "Implementation of Directives 2002/95/EC, 2002/96/EC and 2003/108/EC, on reducing the use of hazardous substances in electric and electronic appliances, and waste disposal"
The barred dustbin symbol given on the appliance indicates that at the end of its useful life the product must be collected separately from other waste.
Therefore, when the appliance has reached the end of its working life the user must take it to a suitable differentiated collection centre for electronic and electrotechnical waste, or return it to the dealer when purchasing a new appliance of equivalent type.

Adequate differentiated collection of the scrapped appliance for subsequent recycling, treatment and environmentally-friendly disposal will help prevent possible negative effects on the environment and the health of persons, and favours recycling of the materials of which it is made.
Improper disposal by the user involves application of the administrative penalties under Leg. Decree. no. 22/1997 (art. 50 et seq. Leg. Decree. no. 22/1997).
Sommaire
Iocne kaxdo npiroTOBHeH BaxHO npOBepTb, yTo6bI yPOBEHb MacJa He ONyCKaJIcHIXe MInHMMya; B IpOTNBHom Clyuae CJeDyeT DOJNTb MacNo.
PpOBepbTe,HTO6bHaDHe EMKOCn He CkAINBAAIOCb N3JINUHHee KOJIYecCTBO OCTaTKOB NIIuN: B npOTNBOM cnyae cIeNyET npoΦnNbTPOBaTb NIN 3aMeHNTb MacNo.
HaCTOaIaI HcTpyKUIN OTHOCITc K BCTpaINBaEMo FpNTIOHnE KJIACCA 3.
BbIOJIHnTe B CToJIeUHnue BbIpe3 C Co6JIoJeHnem pa3MePoB, npuBeJeHHbIX Ha pnc. 1.
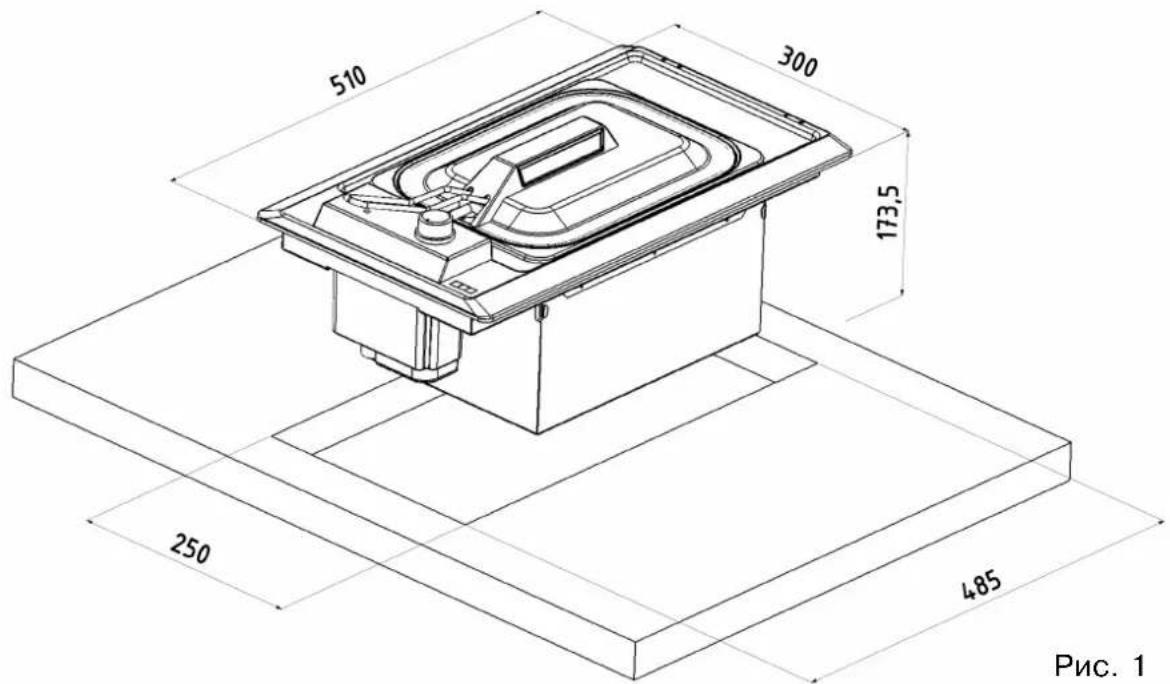

Pnc.1
BcTpaBaaHne p TIOpHnUcblKyXOHHyIOMe6eJIb
Iocne nodknoeHnKa6enr nTaHnK 3neKtpuecko CeTn B COOTBeCTBUN C npNBedeHHbIMN yka3aHnMn, HaeCNTe IeHTy n3 yNJIOTHNTeJbHO MactNKn Ha CTOJIeSHNUy BCEMY nepIMeTpypaHee BbINOHNHO BBpe3a, a 3aTeM NOCTabTe Ha Hee pntIOPHNUy. OcToPOXHO 3akpyuHBAR COOTBeTCTBYUOnE BNtbl, 3aTaNTE KpeJIeHn (pnc. 2). YdaJIte BbICTyNAIOUne qactn yNJIOTHNTeJbHO JIeHtbl.

Pnc. 2
IopknioueHne K 3neKtpnuecko cetu
ФрИTOHицA FRANKE NOCTABJIeTcB KOMNJIeKTe C TpEXNOLIOCHbIM KaBeIeM NITaHnA, JUJIbI KOToPOrO IMeIOT CBO6OHNbIe KOHcbl.
B clyuae ctaunohapHoro coeHNHeHnF pHTIOHnCb C 3JeKTPmecKo CeTbU HEO6xOIMN ppeyCMOTpeT b YCTPOINCTBO OT KJIIOUeHn OT cETn C paCCTOAHnEM MExdy pa3OMKHytBM N KOHTaKTAM, ObecneYBaHOUM NOHoe OTKIOUeHne npbopa OT cETn B yCNOBnX IpeHApJxHn KaTeOpn III. PpOBepIte CJeDyUouee:
a) BUNka n po3eTka dOJIxHbI 6bITb paCCHTaHbI Ha TOK 16A
b) KaK BnIka, TaK iPo3eTka DOnJXhbl 6bItb JeKo DoCTyHbI N yCTaHOBJIeHbI TaK, YTObI NCKJIIOHTb BO3MOxHOCTb PnIKOCHOBeHnK HaxOJaUMCn PoD HaPpJKeHNm YAcTAm Pn BBeJeHNn NINOTCOeDnHEHn WTeNCeJIbHOB BnIKN
c) BUNka DOJIXHa BCTaBnTbC8 6e3 npINIOxHeH yCnIny, NocIe ycTaHOBKn npINbOpa K HeN DoJXeHNMeTbC8 BeCnpEnrTCTBeHHbI DOCTyI
d) nocne yctaHOBKn BnIKN B po3eTKy 0pNTIOPHNuHa He DOJXHa OINpaTbcra Ha Hee npn BCTpanBaHn B Me6eJIb
e) K OJHOH po3eTKe He DoJIxHbI 6bITb NODKJIIOUeHbI Ka6JIIN NHTAHN IByX pInOOpOB
f) B cnyuae 3aMeHbI Ka6eJIra NITaHnI Heo6xOJIMo NCNOJb3OBaTb Ka6eJIb c xapaKTePncTnKaAMn 3 x 1,5 MM² Tnna H05W-F.
g npn NOKIOHcB06OHNbIX KOHcOB KINI OJXHa 6bITb 08a3aTeNbHO COJIIOHeHa npaBnIbHa nOJaPHOCtB (kopuHeBbI=pa3a CnHnI=HeITpaNb XeJITo-3eJIeHbI=3EmIa)
PpmeaHne: y6eDnTecb, YTO xapaKTePncTNk BaWe JOMaUHeN 3JIeKTpnuecko CeTu (HaIpyKeHne, MaKcMaJIbHaJ MOnHOCtB N Cnla TOka) COOTBeTCTBYOT HOMHaJIbHbIM xapaKTePncTnKam npNoOpTeHHo Bamn PpntIOpHnCb FRANKE.
TexHnueckne daHHbIe
HanpaxeHne n yactota nHTaHn: 220-240B50-60T
O6ua MoHocTb H npOnyckHa
CnOCo6HOCTb NlaBkoTO
npEdoXpaHnteJia:
2300 Bt - 16A

IaHHoe n3JeHne COOTBETCTBYeT CJIeDyIOUIM IInpeKTHiBAM EbponeNCKORO Co103a:
-73/23/EEC oT 19/02/73 no Hn3KOMy HaprjKeHIO;
-336/89/EEC or 03/05/89 no 3JIeKTpOMaHnTHoH COBMECTIMOCTH;
-93/68/CEE or 22/07/93.
INHOPMALUNI JIJI NOJb3OBATEJEI
B COOTBETCTBn CO CTaTbeNIOCTAHOBJIeHnI npaBHTeJIbCTBa OT 25 NIOJr No 15 "O BbINOJIHeHn IInpeKTHB 2002/95/EC, 2002/96/EC n 2003/108/EC no CHNXeHIO NcNoJIb3OBAHnIO ONaChbIX MaTePnaJIOB B 3JIeKTPnueCKOM n 3JIeKTPoHHOM O6OpyIDobAHnn, a TaXKe IIO nepepa6OToke OTxOIOB"
Imeuicnca Ha npnbope cunboj npepeepkHyto KOHTeHepa JMycopa yka3bBaet Ha TO, YTO 03aBepweHN Cpoka CnykbI DaHHoe I3dJIne IOnXHO bblydaJeHO B OTXoDbI OTDeJbHOOT ObUhIx OTXoIDOB.
I03TOMy I0JIb3OBeTJIb O6a3AH CdaTb yCTPOINCTBO C NCTEKUH M CPOKOM CJIyXbI B COOTBETCTByIOUHm UeHTp C6Opa 3JIeKTPoHHbIX N 3JIeKTPnueCKNX OTXODOB INJN JKe CDAtB yCTPOINCTBO B MaRa3INB MOMENT pnoobpeHnHOBO YCTPOINCTBa aHaJIoTNHOrO TIna, n3 paCheta OOnH K OOnHOMY.
Pa3dJIbHbI c6Op OTXoOB C nOcJIeDyIOUHMN 3KOJIoRnueCKn COBMeCTmblIMn nepepa6OTKoI yTINH3aUneI NO3BOJAE T NCKIIOHTb BO3MOXHbIE OTPNUaTeJIbHbIE BO3DeIcTBnHa OKpyXaIOUIO CpeNy I Ha 3IOPOBBe YeIOBeka, a TaKxe 6laIaONpNtCTByeT BTOPNHOMY NCIOJIb3OBAHIO MaTePnaIOB, pnpMeHReMbIX B O6OpyIDoBaHN.
BbIIOJIHeHHe NOpJb3OBeTeMe HHe3aKOHHO C6pOCA OToXoOB BJeueT 3a Co6oI pIIMeHHe aAMnHInCTpaTINBbIX CaHKUcN COrJaCHO 3aKOHOaTeNbHOMy aKtY. No. 22/1997 (CTaTbI 50 n daJeE aKaTa No. 22/1997).