TP431 - Cooker FRANKE - Free user manual and instructions
Find the device manual for free TP431 FRANKE in PDF.
User questions about TP431 FRANKE
0 question about this device. Answer the ones you know or ask your own.
Ask a new question about this device
Download the instructions for your Cooker in PDF format for free! Find your manual TP431 - FRANKE and take your electronic device back in hand. On this page are published all the documents necessary for the use of your device. TP431 by FRANKE.
USER MANUAL TP431 FRANKE
natural_image
Symbol of a trash bin crossed with a diagonal line, no text or numbers present1. Installation (Fig 1)
Installation is the buyer's responsibility. The manufacturer accepts no liability for this service. Any action that the manufacturer has to take due to an erroneous installation will not be covered by the guarantee.
The flush-mounted cook tops are designed for installation in work tops made of all kinds of material, providing they can withstand a temperature of 100^ C, and are between 25 and 40 mm thick. If the cook top is installed in a position so that the side of a kitchen unit comes up against its left-hand or right-hand side, the distance between the vertical panel and the edge of the cook top must always be at least 150 mm. The distance between the back wall and the edge of the cook top must be at least 55 mm. A partition made of insulating material (wood or the like) must be inserted between the cook top and the space below. This partition must be at least 25 mm from the underside of the cook top tray.
Fixing the cook top to the unit (Fig 2)
The cook top is fixed to the unit by means of the brackets and accessories provided. Holes are provided in the bottom of the tray where the tabs (A) are inserted so that you can attach the screws (C) that hold the brackets (B) in place.
Applying the seal (Fig 3)
Important - The figure shows how the seal must be attached all around the perimeter.
This cook top has been designed for non-professional, domestic use.
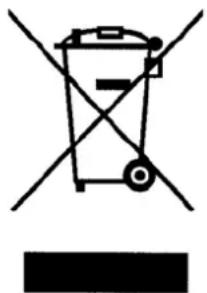
2. Electric connections (Fig 4)
Check the details given on the nameplate situated on the underside of the cook top, then make sure that the rated mains voltage and power available are suitable for its operation.
Before making the electric connections, check the efficiency of the earthing system. Earthing of the cook top is compulsory by law. The manufacturer will accept no liability for any personal injury or damage to property deriving from failure to comply with this requirement.
For models without a plug, fit a standard plug capable of withstanding the specified load on the power cord. The cord's earthing conductor is colored yellow and green. The plug must be accessible.
If you prefer to make a fixed connection to the mains, insert an all-pole circuit breaker with a breaking gap of at least 3 mm between the cook top and the mains.
To connect the cook top power cord, loosen and remove the cover on the terminal block in order to access the contacts inside. Make the connection, blocking the cord in place with the cable clamp provided and then close the terminal block cover again immediately.
If you have to change the cord, the earthing (yellow / green) conductor must always be 10 mm longer than the line conductors.
Use only rubber cable type H05RR-F.
DECLARATION OF CONFORMITY. In the parts destined to come into contact with foodstuffs, this appliance is in accordance with the requirements of the EC directive 89/109 transposed in the Italian Legislative Decree N° 108 of 25/01/92.
CE Appliance conforming to the European directives 89/336/EEC, 93/68/EEC, 73/23/EEC and subsequent revisions.
This appliance is marked according to the European directive 20002/96/EC on waste Electrical and electronic Equipment (WEEE). This guideline is the frame of a europeanwide validity of return and recycling on Waste electrical and electronic Equipment
INSTRUCTIONS FOR USE
Important: Before cooking with the appliance for the first time, it is important to clean the cook top. Then turn on all the heating elements, one as a time, with no pan on top, for 5 minutes on the maximum temperature setting. This will eliminate to the "new smell" and make any humidity that had accumulated on the heating elements evaporate. This is also essential to ensure that the electronic devices function properly.
CERAMIC GLASS COOK TOP WITH TOUCH CONTROLS
1. Description of the controls (Fig 6)
- On/off key (ON/OFF)
- Safety lock key
- Safety lock pilot light
4."Less" key - "More" key
- Setting display (residual heat)
- Decimal point on setting display (preheating)
- Dual-circuit key (ON/OFF)
- Dual-circuit pilot light
- "More" key Timer programming
- "Less" key Timer programming
- Timer programming displays
- Timer programming pilot light
- Triple-circuit key (ON/OFF)
- Triple-circuit pilot light
Touch controls
All operations are performed by means of touch controls (infrared sensors) situated on the front of the cook top.
Every action is confirmed by an acoustic signal.
2. Locking the cook top functions (Fig 6)
The whole appliance can be locked using the safety lock key (2), in order to prevent any unintentional use. The function also serves as a child safety device. A pilot light (3) indicates that the safety lock function has been enabled.
It will still be enabled when the cook top is turned on again.
As long as the safety lock function is enabled, any action on the keys has no effect.
3. Turning on and off (Fig 7)
- Touch the on/off button.(1)
The control is enabled: the setting level indicators (3) read "0".
The next step must be carried out within 10 seconds, otherwise the appliance goes off automatically.
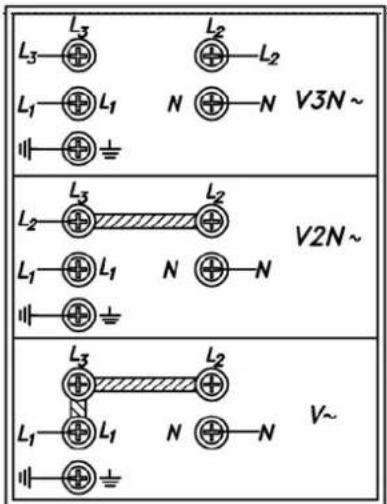
Turning on the burner (Fig 8)
After touching the on/off key (1), a burner must be selected within 10 seconds as follows:
Touch the "Plus" (5) and "minus" (4) keys for the burner required.
Adjust the setting from 1 to 9 by means of the “+” and “-” keys (5/4).
The “+” and “-” keys have a repeat function: pressing and holding one of these keys induces an increase or decrease in the setting value of one unit.
If the selected cooking zone will be switched ON by means of the MINUS key(4), the cooking zone starts at the maximum setting "9". When setting "0" is reached, there will be no further setting changed.
Turning off the burner (Fig 8)
- The burner must be on.
- Bring the setting down to "0" by means of the "-" key (4). After 3 seconds, the burner goes off automatically.
- If the cooking zone is "hot" "0" is displayed alternatively with "H"
Turning off the burner instantly:
- The burner concerned must be on.
- If you touch the "+" and "-" keys (5-4) simultaneously, the burner goes off immediately.
- If the cooking zone is "hot" "0" is displayed alternatively with "H".
Residual heat indicator (Fig 9)
As long as the temperature of the burner remains high enough to cause injury, the display corresponding to the burner shows the "H" symbol (residual heat) alternatively with "0" symbol. This indication only disappears when there is no longer any danger (at 60°C).
To save energy, turn off the burner in advance, in order to exploit the residual heat.
The residual heat indicator "H" is lost in the event of a mains power cut lasting more than 3 seconds.
Turning off the cook top (Fig 10)
The cook top can be turned off at any time by means of the on/off key (1).
The display shows a "H" as long as the temperature remains above 60°C.
4. Dual-circuit burners (Fig 11)
Some burners can be equipped with a second circuit: for instance, the burner is composed of a central disk and an outer ring. You can turn on the central disk alone (fig. A) or both elements (fig. B). This enables you to adapt the heated area to the size of the saucepan you are using.
Turning on a dual-circuit burner (Fig 12)
-
Select the required power setting (from 1 to 9) with the keys "+" e "-" (5/4).
-
Turn on the second circuit by means of the dual circuit key. (8).
The pilot light (9) relating to the burner concerned comes on; the second circuit comes on together with the first.
Turning off the burner's second circuit
-
The dual-circuit burner must be on.
-
Touch the dual-circuit key (8).
The pilot light (9) goes off and the second circuit on burner also goes off.
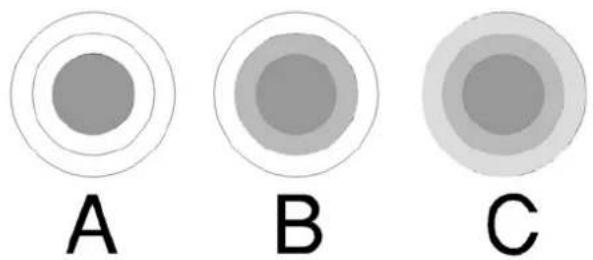
5. Triple-circuit burners (Fig 13)
Some burners can be equipped with a third circuit: for instance, the burner is composed of a central disk, an inner and an outer ring. You can turn on the central disk alone (fig. A), two elements (fig. B), or all the elements. This enables you to adapt the heated area to the size of the saucepan you are using.
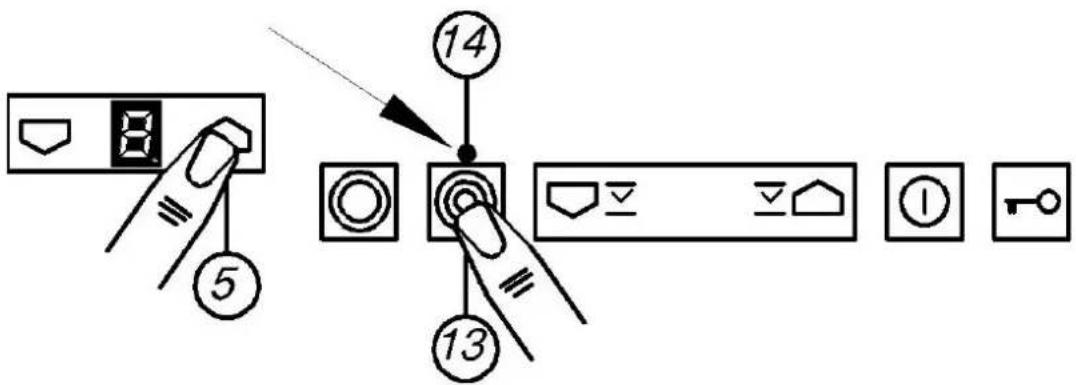
Turning on a triple-circuit burner (Fig 14)
-
Select the required power setting (from 1 to 9) with the keys "+" e "-" (5/4).
-
The dual-circuit burner must be on (10)
-
Turn on the triple circuit by means of the triple circuit key. (14).
The pilot light (15) relating to the burner concerned comes on; the third circuit comes on together with the others.
Turning off the burner's triple circuit
-
The triple-circuit burner must be on.
-
Touch the triple-circuit key (14).
The pilot light (15) goes off and the third circuit on burner also goes off.
6. Safety cut-out
If one or more burners are accidentally left on, the control automatically turns them off after a certain time has elapsed. The table below indicates the time interval, which depends on the power level setting.
| Level | Time limit (hours) | |
| 1 | 10 | |
| 2 -3 | 5 | |
| 4 | 4 | |
| 5 | 3 | |
| 6 - 8 | 2 | |
| 9 | 1 | |
If the safety cut-out has tripped, the symbol "H" is displayed.
To avoid the automatic cut-out being tripped, simply touch the burner selection key or the "+" or "-" keys before the time runs out.
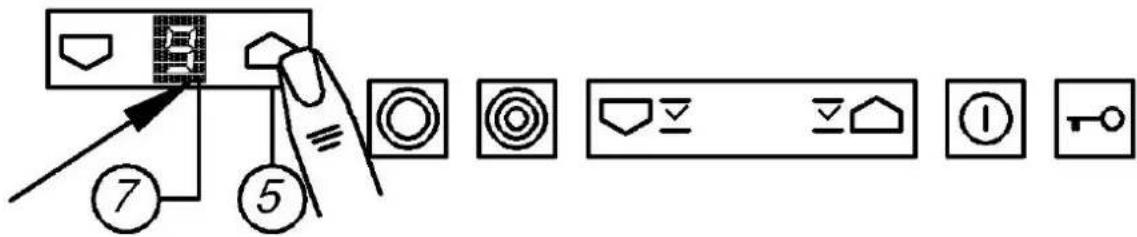
7. Automatic preheating
This automatic device facilitates the cooking process because you do not need to supervise the whole cooking cycle.
Enabling automatic preheating (Fig 15)
Select level 9 by means of the “-” key, then select level 9 with the “+” key.
The decimal point (7) in the related cooking zone display flash on.
Finally select the required power setting, e.g. level 6, with the “-” key.
Example: Select level 9 to enable automatic preheating with the “+” key. Then bring the level down to 6 using the “-” key. In this way, the burner will be preheated on full power for 1'11"1. After 1'11" the burner will return to the power level 6.
| Level | Time | limit |
| 2. | 1'11" | |
| 2. | 244" | |
| 3. | 4'47" | |
| 4. | 5'28" | |
| 5. | 6'29" | |
| 6. | 1'11" | |
| 7. | 2'44" | |
| 8. | 2'44" | |
| 9. | ...... |
Changing the power level in the automatic preheating phase
-
The burner involved must be on. The decimal point (7) for the corresponding burner must also be on.
-
Change the level by means of the "+" keys.
If the setting is raised, the new preheating time is recalculated taking the time that has already elapsed for the previous setting into account.
Disabling the automatic preheating function
-
The burner concerned must be on. The decimal point (7) for the corresponding burner must also be on.
-
Touch the “-” key (4)
8. Timer (Fig 16)
The control device can also have an incorporated timer, which can be assigned to one of the four areas.
-
Touch the "Plus" (10) and "minus" (11) keys of the timer. The timer display(12) will show "00", the other displays "t".
-
After setting the timer, a burner must be selected within 10 seconds. Select a cooKing zone with the "Plus" key (5).
-
Select the required time from 1 to 99 minutes with the keys "+" e "-" (10/11).
If the timer is selected by the "minus" key (11), the starting time would be "99" (maximum value).
- Select the required power setting (from 1 to 9) with the keys "+" e "-" (5/4).
The pilot light (13) relating to the burner concerned comes on.
The timer will be assigned to that area: Once countdown is complete the area will switch off automatically.
Once countdown is complete an acoustic signal will sound for 30".
If you touch the “+” and “-” keys (10-11) of the timer simultaneously, it goes off immediately.
CLEANING AND MAINTENANCE
A few cooking tips
Use only saucepans and frying pans with a sturdy, preferably thick bottom. This is particularly important when preparing food requiring high cooking temperatures, such as fried foods. If the bottom of the pan is not perfectly flat, the food takes longer to cook and uses up more energy. The best heat transfer is obtained when the saucepan and burner are the same size.
You can also use Pyrex and porcelain pans on the burners, providing the bottom of the pan is smooth. Refer to the instructions of the pan manufacturer on this point.
Any spillages from the pans should be wiped away immediately.
Important notes
Warning: the burner surface becomes red hot when in use, so it is always advisable to keep children well away from the cook top.
Avoid dropping any hard object on the cook top surface. In some conditions, the material is sensitive to mechanical loading. The shock of a sharp or pointed object can damage the cooking surface. In the event of any breakage, cracking or other damage being accidentally caused to the ceramic top, it is essential to stop using the cook top immediately and contact customer care.
Ceramic glass cook tops must never be used as a work surface. Do not use aluminum pan. Do not prepare food wrapped in aluminium foil or packaged in plastic. Never use the burner without a saucepan on it. Never place flammable, explosive or deformable objects in the vicinity of the cook top.
Fats and oils can catch fire if they are overheated: that is why foods requiring the use of fat or oil, e.g. French fries, must always be supervised while they are cooking.
Moreover, it is essential to make sure that the power cords and plugs of any other domestic appliances attached to sockets near the cook top can never come into contact with the hot cook top surfaces. No part of the power supply cable must reach an ambient temperature which is over 50^ C.
If damaged, the cable must be replaced with one supplied by the technical assistance service. If the glass surface breaks, unplug the device from the mains supply in order to avoid getting an electric shock.
The cook top must never be cleaned with steam or other such cleaning devices.
It is essential to clean the cook top - once it has cooled down - every time it has been used. Even the smallest food scraps would burn the next time it is used. Use only the recommended detergents. Wire wool, abrasive pads and powders will cause scratching. Oven-cleaning products are unsuitable because they are corrosive.
Mild soiling can be removed with the aid of a damp cloth or with hot soda. Any traces of detergent must be removed with cold water and the surfaces must then be accurately dried. Any signs of water that cannot be removed with boiling water can be eliminated with vinegar and lemon juice, or with a scale-remover fluid. If any of these detergents comes into contact with the cook top frame, it must be cleaned off immediately with a wet cloth, to avoid damaging the seal.
Any tenacious dirt can easily be removed with the aid of a glass scraper. The scraper handle must not be made of plastic because it could become stuck to the hot surfaces. Pay attention while using to scraper: it can cause injury.
Sugar and foods containing caramelized sugar must be removed immediately from the hot burner.
natural_image
Simple line drawing of a trash bin with crossed lines and a blank rectangular base (no text or symbols)This appliance is marked according to the European directive 2002/96/EC on Waste Electrical and Electronic Equipment (WEEE).
By ensuring this product is disposed of correctly, you will help prevent potential negative consequences for the environment and human health, which could otherwise be caused by inappropriate waste handling of this product.
The symbol on the product indicates that this product may not be treated as household waste. Instead it shall be handed over to the applicable collection point for the recycling of electrical and electronic equipment
Disposal must be carried out in accordance with local environmental regulations for waste disposal.
For more detailed information about treatment, recovery and recycling of this product, please contact your local city office, your household waste disposal service or the shop where you purchased the product.
TECHNICAL SUPPORT
Before calling in the technician:
- if the cook top does not work, we recommend you first make sure that the plug is fitted properly in the power socket.
If you cannot find any reason for the malfunction:
- turn off the appliance and do not manhandle it. Call in the technical support service.
The appliance comes with a guarantee certificate that entitles you to use the technical support service.
The guarantee must be duly completed, kept in a safe place, and exhibited to the authorized technician in case of need, together with the fiscally valid document issued by the retailer at the time of purchase (delivery bill, invoice, cash register receipt, etc.) indicating the name of the retailer, the date of delivery, details for identifying the product and the purchase price.
INSTRUCTIONS POUR LE MONTAGE
DONNÉES TECHNIQUES
| MODÈLES TP-431 | |
| Tension | 230V |
| Courant | 12A |
| Plaque hi-light 2700/1950/750W | 1 |
| Puissance maximum W 2.7kW | |
| Câble électrique 3x1,5 mm | ^2 |
1. Montage (Fig.1)
Application joint (Fig.3)
CE Appareil conforme aux directives européennes 89/336/CEE, 93/68/CEE, 73/23/CEE et modifications successives.
natural_image
Symbol of a trash bin crossed with a diagonal line and a horizontal bar below (no text or labels)natural_image
Simple line drawing of a trash bin with crossed lines indicating no waste or restriction (no text or symbols)text_image
40 mm 25 mm (MIN.)Fig.2-Abb.2- Σχ.2
(GB) Applying the seal
(F)Application joint
natural_image
Line drawing of two hands holding a long rod with a ruler, no text or symbols presentFig.4-Abb.4- .4
(ES) Posibilidad de conexión
(GB) Electric connections
(F) Branchement électrique
(D) Elektrischer Anschluss
(GR) Ηλεκτρική σύνδεση
text_image
L₃ L₃ L₁ L₁ N N V3N~ L₂ L₂ L₃ L₂ L₂ L₁ N N V2N~ L₃ L₂ L₁ L₁ N N V~ L₁ L₁ N N V~Fig.5-Abb.5 .5
(ES) Descripción de los mandos
(F) Description des commandes
text_image
Diagram showing five labeled icons with symbols and a finger pointing to a numbered circle, likely illustrating a control or interface mechanism.Fig.8-Abb.8- Σχ.8
(GB) Turning on the burner
natural_image
Pure electrical circuit symbols without any text or labelsFig.9-Abb.9- .9
(GB) Residual heat indicator
text_image
Hand-drawn diagram showing a finger pressing a button with a numbered circle labeled '1'Fig.11-Abb.11-Σχ.11
natural_image
Two circular shapes labeled A and B, no text or symbols presentFig.12-Abb.12 -Σχ.12
(ES) Encendido de una zona de doble circuito
(F) Allumage d'une zone à double circuit
(GR) Άνοιγμα μιας εστίας διπλού κυκλώματος
(GB) Turning on a dual-circuit burner (D) Einschalten einer Zweikreiszone
text_image
Diagram illustrating finger positioning and control buttons with numbered labels and iconsFig.13-Abb.13- Σχ.13
(ES) Zonas de cocción de triplo circuito
(GB) triple-circuit burners
(F) Zones de cuisson à triple circuit
(D) Dreikreis-Kochzonen
(GR) Εστίες τριπλού κυκλώματος
natural_image
Three concentric circles labeled A, B, and C, with no text or symbols beyond labelsFig.14-Abb.14- Σχ.14
(ES) Encendido de una zona de triplo circuito
(F) Allumage d'une zone à triplo circuit
(GR) Άνοιγμα μιας εστίας τριπλού κυκλώματος
(GB) Turning on a triple-circuit burner (D) Einschalten einer Dreikreiszone
text_image
Diagram showing finger pressing control buttons with numbered labels and iconsFig.15-Abb.15- Σχ.15
(ES) Activación del precalentamiento automático
(GB) Enabling automatic preheating
(F) Activation du préchauffage automatique
(D) Aktivierung des automatischen Vorwärmens
(GR) Ενεργοποίηση αυτόματης προθέρμανσης
text_image
Diagram showing a hand pointing to a control panel with labeled buttons and icons, likely illustrating a system or interface control.Fig.16-Abb.16- .16
text_image
Diagram showing various electrical or mechanical component symbols with numbered labels, including hand gestures and control buttons.FRANKE ESPAÑA, SAU