Bisel 705 FHM 705 4G TC XS C - Cooker FRANKE - Free user manual and instructions
Find the device manual for free Bisel 705 FHM 705 4G TC XS C FRANKE in PDF.
User questions about Bisel 705 FHM 705 4G TC XS C FRANKE
0 question about this device. Answer the ones you know or ask your own.
Ask a new question about this device
Download the instructions for your Cooker in PDF format for free! Find your manual Bisel 705 FHM 705 4G TC XS C - FRANKE and take your electronic device back in hand. On this page are published all the documents necessary for the use of your device. Bisel 705 FHM 705 4G TC XS C by FRANKE.
USER MANUAL Bisel 705 FHM 705 4G TC XS C FRANKE
User and installation instructions 9
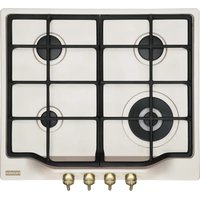
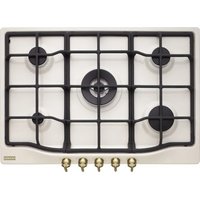
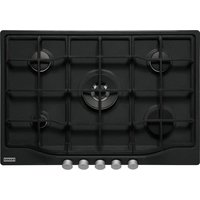
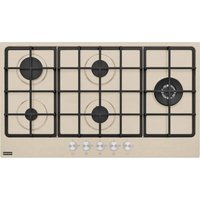
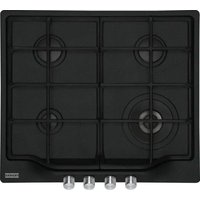
Built-in hob

Hob cleaning and maintenance 9
Support 10
Safety instructions 10
Installation 11
Technical Data 14
Introduction
Thank you for choosing a Franke product. Before using the appliance, please read all the instructions and advice contained in this manual. In this way you will be able to make best use of the appliance and also ensure its lasting efficiency. Keep this booklet for further reference.
Use
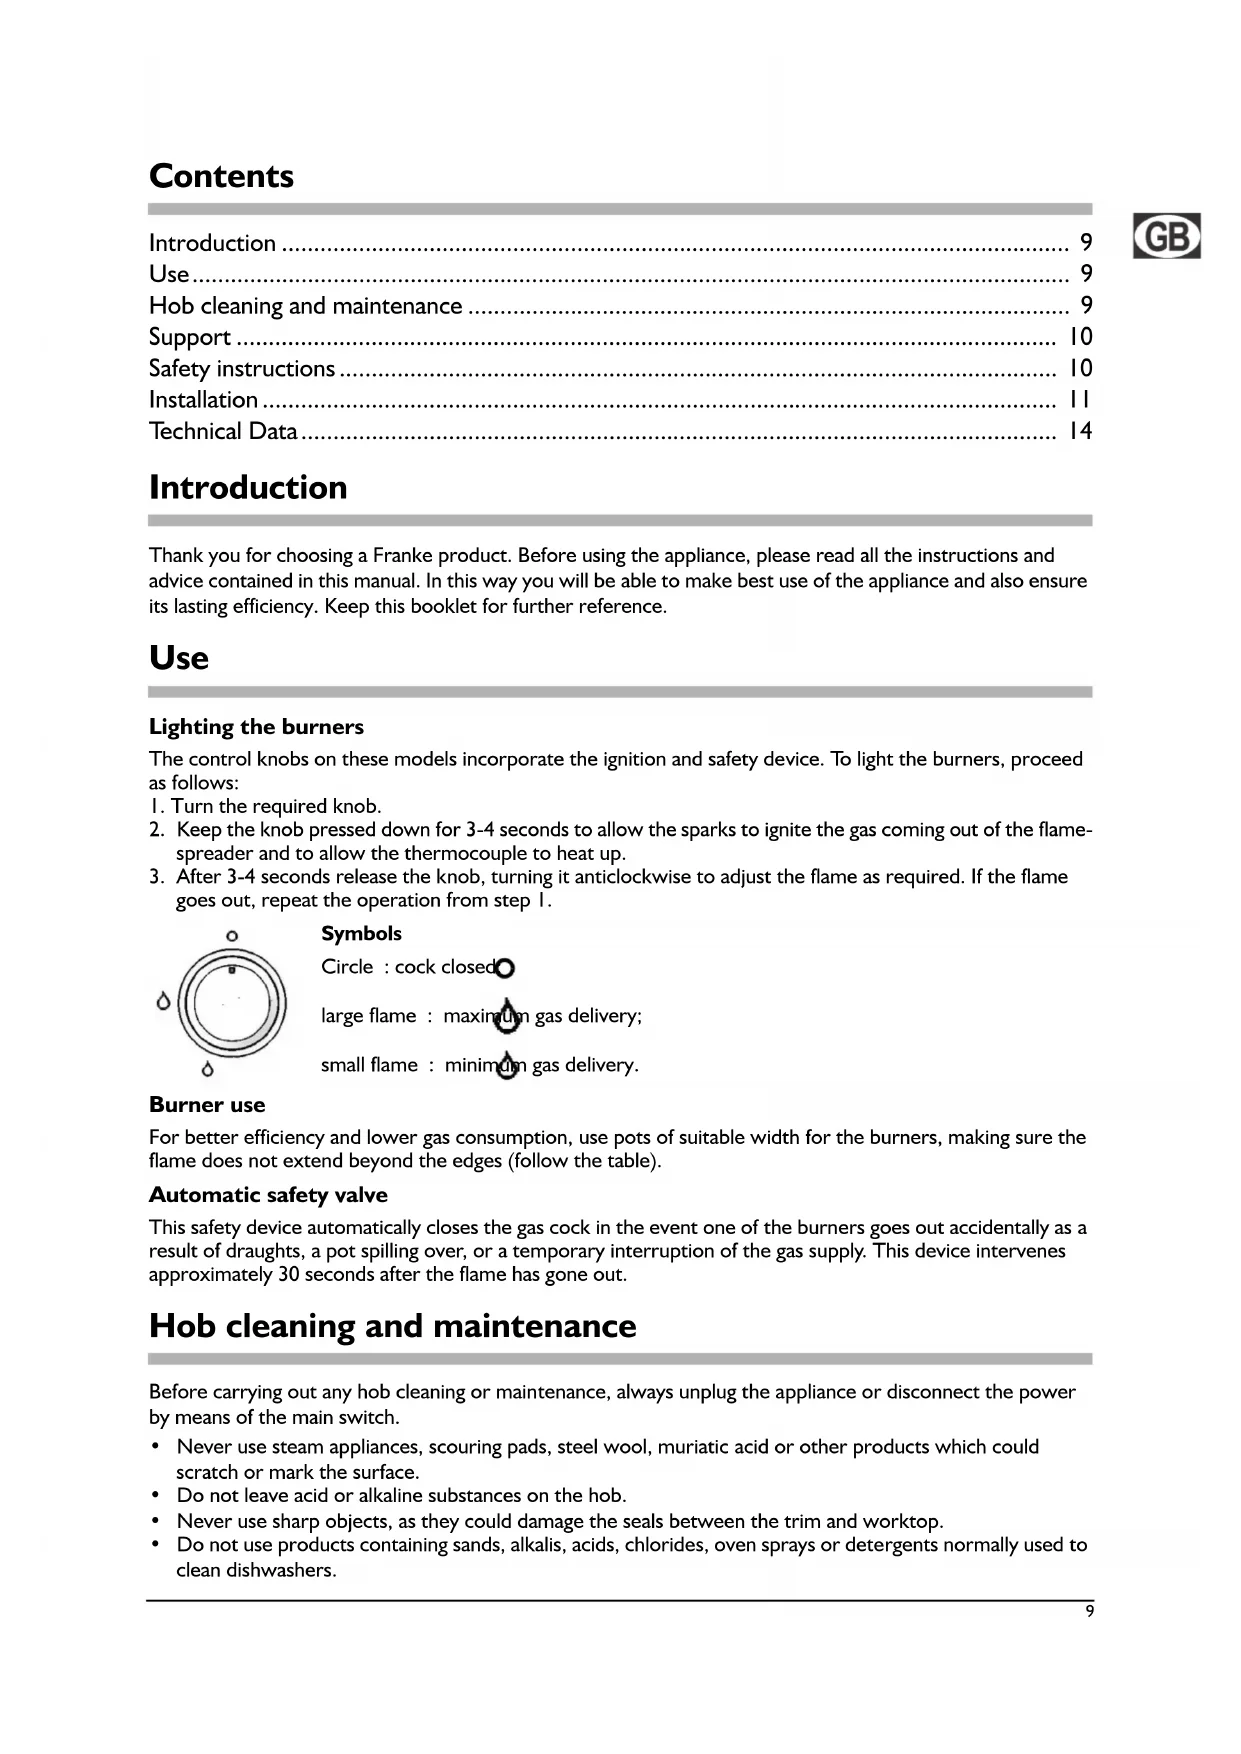
Lighting the burners
The control knobs on these models incorporate the ignition and safety device. To light the burners, proceed as follows:
I. Turn the required knob.
2. Keep the knob pressed down for 3-4 seconds to allow the sparks to ignite the gas coming out of the flame-spreader and to allow the thermocouple to heat up.
3. After 3-4 seconds release the knob, turning it anticlockwise to adjust the flame as required. If the flame goes out, repeat the operation from step I.
Symbols
Circle : cock closed
large flame : maximum gas delivery;
small flame : minimum gas delivery.
Burner use
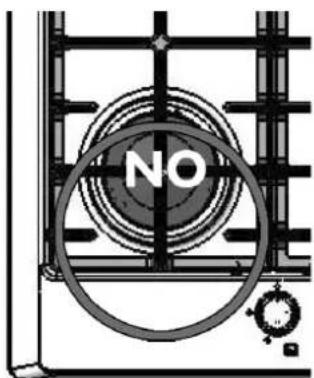
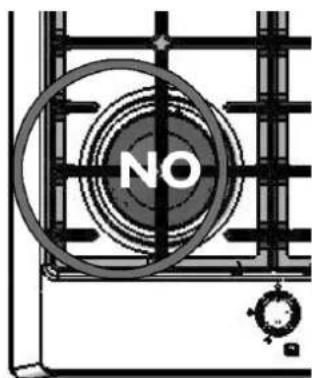
For better efficiency and lower gas consumption, use pots of suitable width for the burners, making sure the flame does not extend beyond the edges (follow the table).
Automatic safety valve
This safety device automatically closes the gas cock in the event one of the burners goes out accidentally as a result of draughts, a pot spilling over, or a temporary interruption of the gas supply. This device intervenes approximately 30 seconds after the flame has gone out.
Hob cleaning and maintenance
Before carrying out any hob cleaning or maintenance, always unplug the appliance or disconnect the power by means of the main switch.
- Never use steam appliances, scouring pads, steel wool, muriatic acid or other products which could scratch or mark the surface.
- Do not leave acid or alkaline substances on the hob.
- Never use sharp objects, as they could damage the seals between the trim and worktop.
- Do not use products containing sands, alkalis, acids, chlorides, oven sprays or detergents normally used to clean dishwashers.

- To prevent scale deposits from forming, always thoroughly dry the appliance after going over it with a damp cloth.
- Immediately remove any foods with high sugar content that spill onto the hob.
- Remove grime with a damp cloth.
- All the grates, burner caps and flame-spreaders can be cleaned (after removing them from the hob) with hot soapy water, making sure to carefully dry them. DO NOT CLEAN IN A DISHWASHER. Make sure the gas outlet zones are perfectly clean.
- The natural colour of the pot grids in the pot placing section may alter over time due to the heat.
Support
In case of any operation problems, contact the Franke Technical Service Centre (see attached list).
Never make use of unauthorised technicians.
Specify:
the type of fault;
the appliance model (Art.);
the serial number (S.N.).
This information is given on the appliance dataplate on the warranty certificate.
Safety instructions
Always contact qualified personnel in the following cases:
- installation (refer to the installation section);
-doubts regarding operation.
Contact an authorised service centre in the following cases:
- immediately after unpacking, in case of doubts about the integrity of the appliance;
- replacing or damaged power cable;
- appliance malfunction or poor operation, requesting original spare parts.
General instructions
To ensure safe and efficient operation of this appliance:
- only contact authorised service centres;
- always demand the use of original spare parts;
- the appliance is designed for non-professional, domestic use; do not modify its characteristics;
- the dataplate gives the symbols indicating the countries for which the instructions apply;
- appliance electrical safety is guaranteed only when it is connected to an earthing system in compliance with the current regulations;
- do not touch the pot grids during use, since they become very hot. Keep children away from the appliance;
- only use the appliance for cooking food;
- before any cleaning or maintenance operations, or in case of malfunction, disconnect the appliance from the mains power supply;
- always check that the control knobs are in the off position when the appliance is not in use.
Do not allow children to touch:
- the controls or the appliance in general;
- the packing elements (bags, polystyrene, staples, etc.);
- the appliance, during and immediately after use, since the hob becomes very hot;
- an unused appliance (make any potentially hazardous parts safe).
Do not:
- touch the appliance with wet parts of the body;
- use the appliance when barefoot;
- pull the appliance or power cable to unplug it;
- carry out improper or hazardous operations;
- leave the power cables of other electric appliances on hot parts of the appliance;
- expose the appliance to atmospheric agents;
- use the appliance as a support top;
- use flammable liquids near the appliance;
- use adapters, multi-sockets or extension leads;
- allow anyone except qualified personnel to install or repair the appliance.
Important
- Do not place unstable or deformed pots on the burners, since they may tip over or cause spills.
- If the appliance has a lid, make sure the burners are cold before closing it.
- Close the gas supply cock when the hob is not in use.
- Before installation, make sure the gas supply is compatible with appliance specifications. The type of gas for which the appliance is arranged is specified on the dataplate on the bottom of the tray. This appliance is not connected to a fume extraction device and must be installed and connected in compliance with the current regulations. Pay particular attention to the applicable regulations on ventilation. The use of a gas cooking appliance produces heat and humidity in the room where it is installed. Ensure the room is adequately ventilated: keep natural ventilation openings open, or install a mechanical ventilation device (extractor hood with exhaust duct). In case of intensive or prolonged use of the appliance, it may be necessary to provide additional ventilation, for example by opening a window, or more efficient ventilation, by increasing the fan speed (if present).
The manufacturer declines any liability for damage due to: incorrect installation, improper, incorrect or unreasonable use.
Installation
The necessary operations for installation, including gas and electrical connections, are described below. They must be carried out by qualified personnel in accordance with current regulations, since their performance by unskilled persons may constitute a hazard.
The manufacturer declines any liability for injury to persons or damage to things due to failure non-compliance with these provisions. The gas connection must comply with the regulations in force in the country at the time of installation.
Preparing the cabinet
This handbook refers to a class 3 built-in hob.
Prepare the hole in the top according to the measurements given in fig. 1.
In any case, it is essential to make the opening in the most convenient position, bearing in mind that the gas pipe must not come into contact with the sides of any oven under the hob.
Fitting in the cabinet
After carrying out the connection operations, apply the sealing strip around the hole and position the hob. Carefully tighten the fixing hooks (fig. 2). Remove any excess sealing strip.
Note
If the appliance is not installed above an oven, a separator baffle must be arranged (fig. 3).

Connection to the gas supply
Connect the appliance to the gas supply in compliance with the current regulations, only after making sure it is arranged for the type of gas to be used.
Otherwise, carry out the operations described in the section on "Replacing injectors" (page 13). For liquid gas use pressure regulators complying with the current regulations.
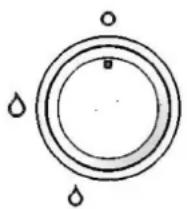
Connection to the gas supply can be made in two ways:
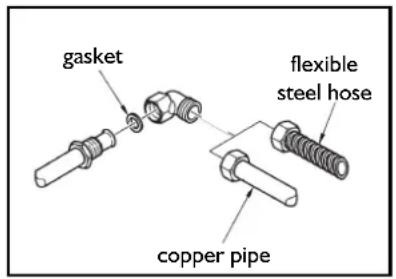
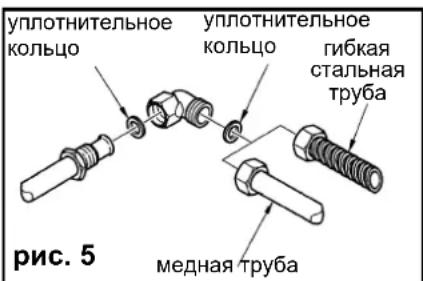
A Connect the gas hob using a 12 mm diameter rigid copper pipe, as shown in fig. 5. To ensure a good seal, use the elastomer gasket supplied as an accessory.
B Connect the hob using a continuous-surface flexible steel tube. Also in this case, to ensure a good seal use the gasket supplied as an accessory. Make sure to comply with the current regulations on gas systems.
After carrying out the connection use soapy water to check for any leaks.
For United Kingdom, Northern Ireland and Republic of Ireland
Ventilation of rooms
Make sure the room where the appliance is installed has permanent ventilation openings towards the outside or ventilation ducts to ensure an adequate air flow, as prescribed by the current regulations. All openings made must:
I. have a section of at least 100cm^2
2. be made in such a way that they cannot be obstructed from inside or outside;
3. be provided with suitable protection to ensure that the ventilation opening is not reduced;
4. be at a suitable height from floor so that they do not hinder the exhausting of fumes.
If openings are made in the wall of an adjacent room, the latter must have direct ventilation and must not be:
I. a bedroom;
2. a common area of the building;
3. a fire hazard area.
Before testing and inspecting the appliance, make sure the room in which the ventilation opening is made does not have low pressure due to the operation of another user and that the ventilation between the two rooms is guaranteed by permanent free openings, for example by increasing the gap between the bottom of the door and the floor. The exhausting of fumes must occur by means of a hood which, in turn, must be connected to a chimney, flue, or directly to the outside.
Accessing the hob
To access the tray containing the functional parts, proceed as follows:
- remove the grids, burner caps and flame-spreaders;
- remove the knobs, sliding them off their pins;
- remove the screws that fix the burners to the hob;
- lift the hob.
Connection to the power supply
The FRANKE cooking hob comes with a 3-core power cable with free terminals.
If the hob is permanently connected to the power supply, install a circuit breaker having a contact opening distance that allows complete disconnection in the conditions of overvoltage category III. Make sure:
a) the plug and socket are suitable for a 16 A current;
b) both are easily accessible and positioned so that no live part can be accessed when inserting or removing the plug;
c) the plug can be inserted without difficulty and is accessible with the appliance installed;
d) that when the plug is inserted, the hob is not resting on it when installed in the cabinet;
e) the terminals of two appliances are not connected to the same plug;
f) a 3 × 0.5 ~mm^2 H05VV-F type cable is used when replacing the power cable;
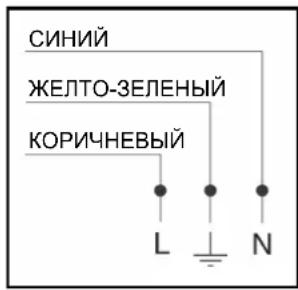
g) to respect the polarities of the free terminals (Brown=Live - Blue=Neutral - Yellow/Green=Earth).
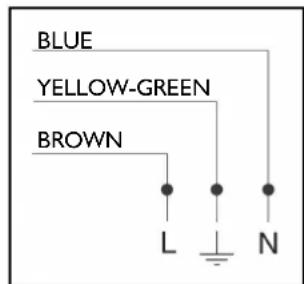
NB: Make sure the characteristics of your household electrical power supply (voltage, maximum output and current) are compatible with those of your FRANKE hob.
Replacing injectors
Important. All the appliances are factory-set for natural gas (G20).
If a different type of gas is to be used, change the injectors as follows:
I. remove the grids, burner caps and flame-spreaders;
2. unscrew the injectors and replace them with those provided and suitable for the gas supply, making sure the marking matches that given in the table (page 14);
3. refit the flame-spreaders, burner caps and grids;
4. these burners do not require air adjustment.
Important
When converting the appliance to a different type of gas, place the corresponding sticker (supplied as an accessory) in the special space on the dataplate. For operation with LPG. (G30 or G31), the minimum flame adjustment screw must be fully screwed down. These appliances are supplied in cat. II 2H3+.
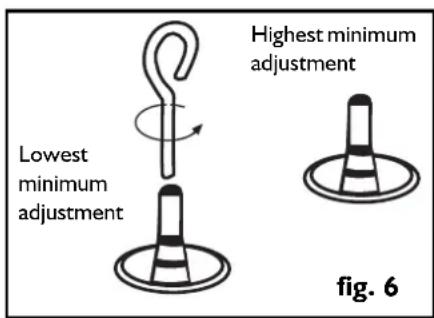
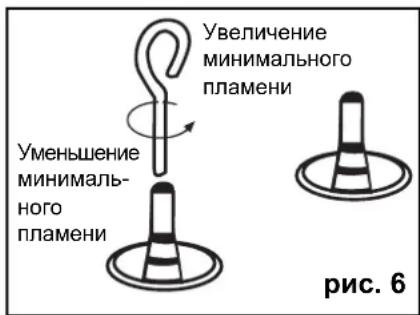
Minimum flame adjustment
- Remove the knobs (push-on type).
- Light the burners and adjust the minimum flame by turning the adjustment screw clockwise to decrease the flame and anticlockwise to increase it (fig. 6). The screwdriver for adjustment is supplied with the accessories.

Appliance cat. II 2H3+
| Type of gas Burner | Injector marking | Total rated heat capacity in kW | Heat capacity reduced in kW |
| NATURAL GAS (methane) | auxiliary | 72 | 1.0 |
| semi-rapid | 97 | 1.7 | |
| G20 20 mbar | rapid | 115 | 3.0 |
| triple crown | 140 | 3.3 | |
| Liquid petroleum gas (LPG) | auxiliary | 50 | 1.0 |
| semi-rapid | 65 | 1.7 | |
| G30 29 mbar | rapid | 85 | 3.0 |
| G31 37 mbar | triple crown | 91 | 3.3 |
| Table of recommended pans | |||
| Burner Ø Pan in cm | |||
| Auxiliary | from Ø 8 to Ø 14 | ||
| Semi-rapid | from Ø 14 to Ø 20 | ||
| Rapid | from Ø 22 to Ø 24 | ||
| Triple crown | from Ø 24 to Ø 28 | ||
The use of larger pots than those specified can cause excessive overheating of the knobs and top and, in case of prolonged use, yellowing of the cover (if in stainless steel).
Franke declines any liability for damage due to such use.
Total heat capacity: see dataplate on the bottom of the hob.
Air necessary for combustion: 2m^3 /h per kW of installed power - see dataplate.
Power supply voltage 220/240 V 50-60 Hz.

The appliance complies with the following EC Directives:
-90/396/EEC (Gas);
- 73/23/EEC dated 19/02/73 (Low Voltage);
- 89/336/EEC dated 03/05/89 (Electromagnetic Compatibility);
93/68/EEC dated 22/07/93 as amended.
Sommaire
Introduction 15
Utilisation 15
He no3B0JrTe DeTm npKacatbca K:
- opraham ynpablenn n npbopby B cenom;
- ynaKOBouHbIM MaTePnAJIaM (MeIKN, noJIncTnPoN, rBO3dN t.D.);
- BapouHoi nAHeHH BO BpeM pa60TbI n Cpa3y nOcIe ee BBKIOUeHn, n3-3a BBICOKo TEMnepaTpybI;
- BBBeHOMy 33KcNpyataunn np60py (B 3TOM cnyae DeTaUN, KOtOpbIe MOrY T ppeCTabJIaTb OnaCHocTB, DOJXHbI 6bITb npuBeHeB I H NeonacHOe COCTOHNHe).
Kateropnueckn 3anpeaetc:
- npnkaatbca K npnbopy BnaXhbIM NaCTaMn TeNa;
- nCnoJb30BaTb npu6Op, cToA Ha noJy 6ocbIMn HORAMN;
- Taryt b 3a uHyp dIy OTKIoueHnI np6opa ot cTeBOi po3eTkn;
- BbINOJHrTb HenpeDyCMOTpeHHbIe I onaChbIe Oepaun;
- octabnTb hnp nHTAHy dpynx 3neKtpo6bIb0bIX npnbopOB Ha ropaux qactx npnbopa;
- NOBBePraTb npi6op Bo3eNCTBnIO aTMocΦepHbIX areHTOB;
- nCnoJb3ObaT npnbop B kaueCTbe onOpHoi nloockoctn;
-нспьбовыт огонаные кдкости Вблзnp6opa;
-NCIOJIb3OBAbTnepeXoHNKn,TpoHKNn(iIN)yDInHHTeIN;
IOBepaYb yCTaHOBky n pemOnT npu6opa HeKBaHnΦnUPOBaHHOMy nepcoHaJy.
BhimaHne
He ctabte Ha ropeKn Heuyo Hn DeopmpoBaHHyO nocydy Bo n36eKaHne ee onpOKnDbBaHn Hn npOnBaHn ee coepxMOrO Ha nobepxHOCTb NaHEnI.
- Ecn n anenb obopydoBaHa KpbIkwOn, nepe TEm, KaK 3akpbIbTaB ee, y6eDntecb B Tom, YTO ropeKNIOCTbln.
- 3aKpbBaIe KpaH noJaunra3a, KoIa naHe He nCNoB3yETcR.
-песд Tem Ккпстунаь KMOTажу, уdocToBepbTecb,чTO xapakTepeNTKc cTeN ra3Ocha6keHn COOTBETCTBYIOT TpeBOAHmДЯ HAcTOnaero N3deJIIN. Yka3AHn NO nepeBOy BapOCHNo PAHeHn Ha dpyroB Vd Ra3a npBveDeHbHa Ta6nUepe, paCnoJoxEHHo Ha Dne PAnEHn. Pnp6Op He Chab6KeH yCTPOICTBOMДЯ UdaJIeHn IpoDyKTOB CROPANH; erO yCTaHOBKa IN ONDKNUeHne DOJXbI INPON3BOIDITbCBA COOTBeTCTBnC DeIcTByIOUIMn HopMaMn. OcoBoe BnHMaHne CNeDuYt yEnrTa TpeBOAHmNo IpoBETpNBAnIO NOMEuHn. NcONb3OBaHne ra3OBoB BApOCHNo PAHeHn pInBODIT K o6pa3OBaHIO TeIIA n BlaxHQCTN B NOMEuHn, B KOTOpOM OHa yCTaHOBHeA. B 3Tom NOMeUeHN He06xOIMo ObecneHTb XopoWyU BeHTNJLauH, npUcHem: DEPKITE OTKpbTbIMN OTBepCTNa, obEcneuBaIOUme cTeCTBEHNyU BEHTNJLauH, N6O uCTaHOBte UcTPOIcTBOДЯ MEXaHueCKo BEHTNJLauH (BbITXkKY C BblNyCKHBIM BO3dyXOBODM). IVTHcHbHOe IN PpOOnJNKtENbHOe NCpONb3OBaHne pnp6Op moKet NOTpe6OBaTb DOONHITeNbHO rpoBETpNBAnHn NOMEuHn (HaPImep, OTKpbTmE OKHa), Nl6o yBeNueHn MOUHOCTN yCTPOIcTBa MEXaHueCKo BBtJXHOB BEHTNJLauH, ECJN TAKOBoe IMMeTCR.
I3ROBNTeJIb CHImaET C Ce6yBCaKyIO OTBeTCTBeHHocTb 3a yUep6, KOToPbIM MOKeT IMeTb MeCTO BCNEcTBHe: HnPaBnJIbHOY yCTaHOBKn; HeNoDxOJaXnx, OUn6OuHbIX n Hecoo6pa3HbIX cNooc6OB NcNoJIb3OBaHnI.
yctahOBka
B 3TOM npaparpafe npnbedeHOn oNncaHne Onerpaun, KOtOpbIe Heo6xOJMo BblIOJIHTb npu yCTaHOBKe np6bopa n POKJIIOUeHN erO K ra3OBOM MaNCTpaUN n CetN 3JIeKTPONITAHN. TaKne pa60tb dOnXHBc OcyueCTBnTBCRAJIINΦUncPOBaHHbIM NepcoHApOM B COOTBeTCTBnC DeJeCTByUOUMN HOpMaM; BblIOJIHeHne DaHHbIX pa60fJIuCaMn, He IMeUOUMN Heo6xOJMOrO ONbTa, MOKET COzDaTb OnaCHyIO CTyauHIO.
N3ROTOBNTJIb CHIMaeT Cce6yBCaKyO OTBcETCBeHHocTb 3a yuep6, npnHHeHHI JIOJAM NIN MMyueCTBy BCNEdCTBnE Heco6nOJeHnnpBeDeHHbIX Bblwe yka3aHn. Pp nnoKluOeHN K cetra3oCha6KeHn Heo6xOAnMo pykoBOcTBOBaTbcr deiCTByUoHmN B MOMENT yctaHOBKn npu6opa HopMaMn.
IodroTbKa Me6eJn
HactoIeE pyKOBODCTBO OTHOCITcK BCtpanBaemBapOHyn NaHeN KJIacca 3.
BbInonHnTe B cToJeuHnue Bbipe3 C co6IIOdeHnem pa3MePoB, npUBeDeHHbIX Ha pnc. 1.
Heo6xOIMO, B IIO6OM Cnyuae, BbIIOJHnTb OTBepCTne B HAn6OJe e yO6Hom MeCTe, C yUeTOM TOrO, YTO Tpy6a NODaun Ra3a He DoJnxHa KacaTbcra CTeHOK dYxOBKn, KOtOpA MoKet 6bITb yCTaHOBNeHa NOB, BapOCHN NaHeJIbIO.
BcTpaBaHne B kxyoHHyU Me6eJIb
BbnoJIHB noKnHcHn, npOxNte yIIOHTHeIb NO KpaM OTBepCTra N BCTaBbTe BapOHyIO naHeIb.
Octopoxho 3akpyuHbA, 3aTaNITE KpeIeHnna (pnc. 2). YdaNITE n3JIuKn yNJIOHTHeIa.
Ppimechne
B cnlyae ecnn bapouhna nahe he 6ydt yctahOBHeHa nAd dyxOBko, Heo6xoJMo npedymOTpeTb pa3dennTeIbHyIO neperopokky (pnc. 3).

IopKnHueHne Kra3OBoMmucTpaJN
IopKnHueHne np60paK ra3oBOM MaHCTpAln CNeyET OCUyEeCTBnTb B COOTBeTCTBmC DeNCTBYUOMH HOpMaMn I TOJbKO Nocne npOBepKn PpaBnHOCn HaCTpoiKn np60baHa TnN nCnONb3yeMoTOra3a.
B npotnbom cnyae Heo6xOIMBO bInOnHnTb DeIcTBn, onncAHhble B pa3dene «3aMeHa nHexeKTopOB» (ctp. 57). Ppi nCnoNtB3OBAHm CxJxKeHHoro ra3a Heo6xOIMOpimHeHrpeyIaTOpbI daBneHnA, COOTBeTCTByUOuNe DeiCTByIOUHm HopMaM.
IopKnHueHne Kra3OBoMamcTpaNMOKeT OcyuEcTBJIaTbCnOco6amn:
A PoiCoeHInTe BapOHyIO NaHeIb K Ra3OBoM MaHCTpaN C NOMOuBo JxecTKo MeHOn Tpy6bl DnAmEtPOM 12 MM, KaK 3TO NOKa3aHO Ha pnc.5.DIy ObScneHEnr Heo6XoDmOreRpeMeTuHOCTH CoEINHeHN IcNoJIb3yIte NoCTabIReMoE B KOMPiKeTc C NaHeIbU yNlOTHeHne N3 3JNaCTOMepHOrO MaTePnAJa.
B POnKJIIOHTe BApOHyIO nAHeIb c NOMoIbHO rI6KOJ 6ecSIOBHO CTaIbHOI Tpy6bl. IaI oEbcneueHnra Heo6xOIMoI repMeTNUHOCTN yCTaHOBTe npOKnAky, BXOJaUyIO B KOMPiKeT NOCTABKN.
PekomehdyetcTaKke co6JIHOdaTb DeIeCTByOuJe HOpMbI NO rA3OBbIM yCTaHOBkAM.
BbINOJIHINb NOIKNIOUeHHe, npOBepbTe MeCTO CoeUNHeHn Tpy6bl Ha OTCyTCTBnE yTeueK C NOMOIbIOMbIbHOrO pactBopa.
Bentnlae nomeeHn
Y6eIITecb, YTO B NOMEUeHNN, B KOTOPOM yCTaHOBJIeH npi6Op, IMeIOCTcnoCTOHH OTKpbItbIe, COo6uaIOuIeC a ATMOCdpeoi ChapyKNI OTBepCTNIG INI BHTINJauONHbIe KaHaJIbI, oBeCeNeHBAIOUne Heo6xOIMMbII npitOK BO3dyxa, cornacHO ppeINCAHNm DeIcTBYIOUX HopM. Bce yka3aHbIe OTBepCTN IOnKhbI:
- ImMeTb npoxoHoe ceueHne He MeHee 100 cm²;
- 6bITb BbINOJIHeHb TaKIM O6pa3OM, YTO6bl NCKJIIOHaTb INx 3acopeHne KaK ChapyKn, TAK INN3HyTpN NOMeUeHn;
- mMetb 3aunthbte yctpoinCTBa, npenTCTbyUOne yMeHbSeHHIO npoxoHoro ceehnra;
- HaxoDntbCra Ha BbICote OT nOla, He MeuHaOuSey ydaJeHnIO npOdyKTOB cropaHna.
EcnBENTUNIOHNBIEOTBepCTNBBINONHEBIBCTHeNBEDyBnPnIeAIOOe NOMEUHeNE,NOeDHeEOHNMeTbCNCTEmYnpaMOBENTUNIAu. TaKIM NOMeUeHEm HeMoryT 6bITb:
- cπaJIbHЯ;
- 06üee nomeüeHne 3aHnir;
- noxapoonachoe nomeeHne.
Ipeed nCnblTahmep np6bopa y6eHtceb, yTO B NOMeUeHm, B KOToPoE BeTeBENT BHTINJauOHO OTBepCTne, He ImeetcraOpntaTeNbHoro daBHeHna 3-3a pa60tbI dpYrOro annapata. MeKdy DByMra NOMeUeHmN DOxHa 6blb oecnehe CBO6OHN aNpKpyLAnu BO3Dyxa, HApPImep, YBeJIueHem pacCToHn MExdy NOlOM HIXHM Kpaem DBepn. YdaJeHne PPOyKTOB CropaHn DOxKHO OCyUeCTBnTbc R NOMoCbH BbITXKN, NODKnIOUeHHo K DblMOxOHy INN HenOCpeiCTBeHHO COo6UaIoSeIc r HapyKhbIM BO3DyXOM.
DocTyK BapouHoi naHeJI
Дяdoctyna KBHytpenHeичacn NaHEn DeiCTByIte cneDyUOUM 6pa30m:
CHIMMTEpeWETKn,HaKnJaDKNcAmPiJaMePacCeKaTeJIropeJIOK;
CHIMMTEpyKNC COOTBeTCTBYIOUX CTepxxHei;
CHIMMTE BINTbI KpenneHnropeIOK K naHeJI;
- NOДнИМЛТЕ панель.
IopKJIIOUeHHe K 3JIeKTPnueckoI cTeN
BapouhnaHn FRANKE noctabnraTcB KOMnneKTe C TpexnoHocbIM Ka6enem NHTaHn, KInbI KOToPoro IMeHOT CBO6OHDhIE KOHcbl.
B cnlyuae ctaunohap Horo coeHHeHn B apOHH n aeHn C 3neKtpueecko CeTbIO Heo6xOIMO npedymotpeTB yctpoiCTBO OT KJIouHn O T CETn C paCCToHnEM MeJy pa3OMKHyTBIM KOHTaKTAM, oBeceNeBaIooM nolHoe OTKIOUeHne np6opa ot CETn B ycIOBnx nepeHaPjKeHn KaTeOpnn III. PpOBeprTe cJeDyUoee:
a) BnJIka n po3EtKa dOJIKHbI 6bITb paccHTaHbI Ha TOK 16 A;
b) KAK BUNIka, TAK I PO3eTKa DOJIXHbI 6bITb JERKIO DoCTynHbI U yCTaHOBneHbI TAK, YTO6bl NCKNCHUHTB BO3MOXHOCTb PnIKOCHOBEHnK HaxOJaUcMc PoI HaPRAKeHnEM YAcTm PpN BBedeHNn NNIOTCOEINHEHN WTeNCeNbHOB BUNK;
c) BUNIka DOJNKA HBCTABNATCB 6e3 npNJIOXeHn yCNI, nocne yCTaHOBKn np6Opa K Hei DOJIKeH NMeTbcB 6ecnpenrTCTBeHHbI DoCTyn;
d) nocJIe yCTaHOBKn BUNKn Bpo3ETky BapOuHa naHeJIb He DoJxHa OnpaTbcra Ha Hee npN BCTpaunBaHn B Me6enb;
e) K OJHOH po3EKe He DoJIKHbI 6bITb NODKJIIOHeHbI Ka6eN IHTaHnA DByX np6OpOB;
f) B cnyuae 3aemeHb Ka6eJnNTaHn Heo6xOuMo UcnoNb30BaTb Ka6eJb 3× 0 ,5MmTuNa H05VV-F;
g)npnnoKIOHcHNN CBO6OHBIX KOHcOB KIN IOJXHa 6bITb O63aTeNbHO co6IIOHeHa npabUNbHna NOIpaHocTb (kopuHcBbI=Φa3a-CHHN=HeITpAnb-KeJITo-3eNEHbI=3EmJI).
ПРИМЕЧАНЕ: yбeДиТecь, чTO xapakTepnCTnKДомaшн ДэлкTpueckо сETN (HanpЯжHe, MaKcmaJIbHЯ MОuHOCt b И сиJa TOKa) COOTBETCTByHT HOMHaJIbHbIM xapakTepnCTnKam npno6peTeHHoI Bamn BapouHoi nAnei FRANKE.
3aMeHa HJKeKTopoB
Приимеauthи. BCE BbInyckaemblc 3aBoIOM-N3rOToBnteHm N3dJIINHa HAcTpoEhbl Ha pa60Ty c ra3OM Metahom (G20).
B cnyuae nCnoIb3OBAHnI pyroro ra3a BblOnHInTe 3aMeHy INHXeKTopOB CneDyUoM O6pa30m:
- CHIMNTE peWeTKn, HAKNaDKn I camn PnaMepacceKaTeJin;
- pa3BHTte n CHMnTE INHKeKTopb; 3aMeHnTe INX INHKeKTopAMN, COOTBeTCTBYOUMN BVny NCIOJIb3yEMOrO ra3a, pOBepNB COOTBeTCTBne INx MapKnipOBKn C MapKnipOBkO, yKa3aHHoB B Ta6nIe (cTp.58);
3.yCTaHOBHTe Ha MecTo IJaMepacCeKaTeJIN,HaKJIaIKn HpeWSeTK; - 3Tn ropEnKn He Tpe6yIOT perynipOBKn noaun Bo3dyxa.
PpeDynpexKeHne
B cnyuae nepeboa nane Hn pyro Bn ra3a, H np6op, B npdeymoHOM dna 3toN MeCe, Heo6xOIMO HaKneNB CoOTBeTCTByU OyIO KneKyIO 3TuKeTky, NOCTABNReMyo B KaueCTBe akceccyapa. Pnp pa6ote Ha CxnxKeHHom HeoTahHom rase. (G30 nn G31) BuHT peryInpOBKn MmHmAbHoro nnameHn DoJxhen 6bIb 3akpyuen do ynpa. DaHhble np6opbl COOTBeTCTByOT KaTeOpnn II 2H3+.
PerynpoBka MmHmMaJIbHOro IJaMaEH
- CHIMnTe pyuKn (HaxmHoro Tnpa).
3aXnTe ropeKn, 3aTeM oTpeYnpyIe MInHMaJIbHoE pIaMnyoBOpOTom perynipOBOuHO BnHTa NO yacOBO CTpeKe dnyUMeHbSeHHraPiameHH, IIOBo npOTNB YacOBO CTpeKN dIraeroYBeNueHHe (pnc.6).OTBepTKdIy BblONHeHHRA ToI peYnpOBKnBXODNT B KOMPJIeKT NocTabnEMyBc BapOCHNo NaHeJIbIO npHaADJeXHOCTei.
Прибор кaterори II 2H3+