USER MANUAL FCB 3401 NS XS FRANKE

3. EQUIPMENT CHARACTERISTICS

4. SAFETY

6. USE

7. ROUTINE MAINTENANCE

8. EXTRAORDINARY MAINTENANCE
![graph TD A["1A"] --> B["1B"] B --> C["1C"] C --> D["2A"] D --> E["2B"] E --> F["3A"] F --> G["3B"] G --> H["4A"] H --> I["4B"] I --> J["5A"] J --> K["5B"] K --> L["5C"] L --> M["1C"] M --> N["1A"] style A fill:#f9f,stroke:#333 style N fill:#f9f,stroke:#333](/content/2026/02/359211/images/4a0ea5622eb2a5e62481cb7345577bf553174813b511595208115d2fd35ef8d5.jpg)
Guarantee conditions 2
Identification and serial No. Plate 2

- SPECIFICATIONS OF THE APPLIANCE ....3
Table 1 - Technical data.... 3
Operative conditions.... 4
Description of the appliance ....4

- SAFETY....5
Safety precautions 5
Safety data sheet for R600 a gas 7
Disposal and interruption....7

- INSTALLATION 8
Transport and unpacking 8
Positioning 8
Cleaning before use 9
Electrical connection 9

- USE....10
Description of the functions of the refrigerator and freezer - CFE MODEL ...... 10
Description of the functions of the refrigerator and freezer - CFL MODEL ...... 11
Advice on the preservation of foods: refrigerator/freezer....12

- ROUTINE MAINTENANCE....16
Cleaning the appliance 16

- EXTRAORDINARY MAINTENANCE 17
Door reversibility 17

- TROUBLESHOOTING....19

1. PRESENTATION
Congratulations!
You have purchased a high quality appliance, which will meet your expectations reliably and safely and will provide you top level performance for a long time.
It is simple and immediate to use, but we advise you to read this handbook carefully and keep it in a place accessible for future consultation.
The Manufacturer also ensures you an efficient and speedy after-sales technical assistance service.

2. AFTER-SALES SERVICE
Guarantee conditions
The appliances have a 24 months guarantee from the date of purchase, confirmed by a tax receipt or other tax-wise compulsory document.
After the end of the guarantee period, assistance will be provided by the Manufacturer's Authorised Assistance Centres, debiting you the repaired or replaced parts, labour and transport costs.
The guarantee specifies free-of-charge replacement or repair of all faulty parts.
Damage caused by the following is not covered by the guarantee:
• user's negligence or carelessness during use or transport; • damage to things, persons and animals due to improper use or incorrect installation of the appliance; • installation on systems not complying with current legal regulations; • replacements and/or repairs carried out by the user but not specified and authorised by this handbook; • use of non original spare parts not authorised by the Manufacturer.
Identification and serial No. Plate
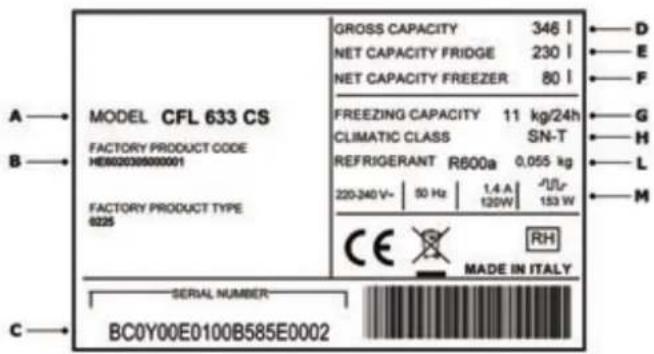
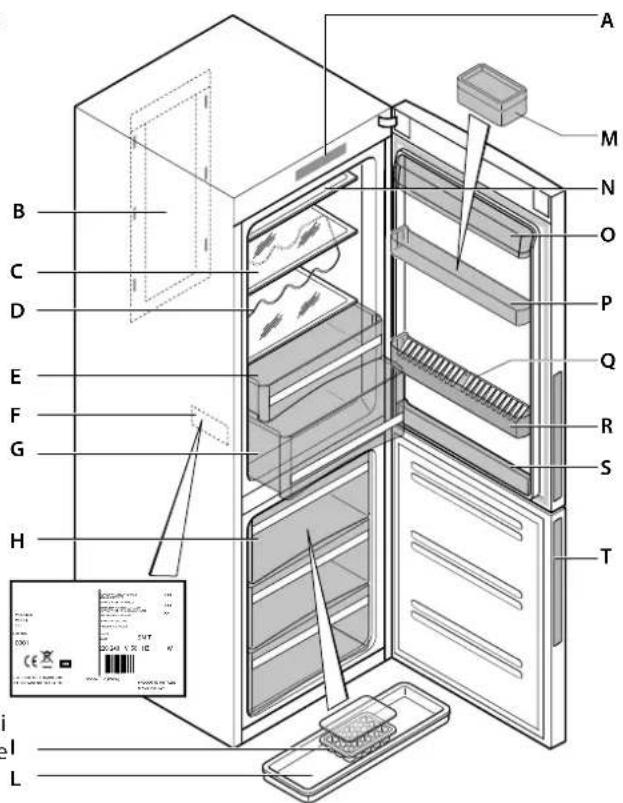
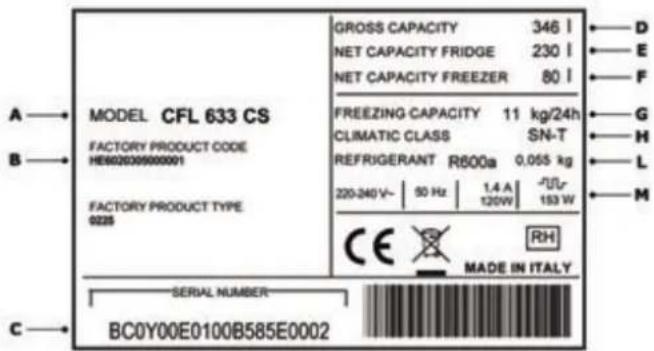
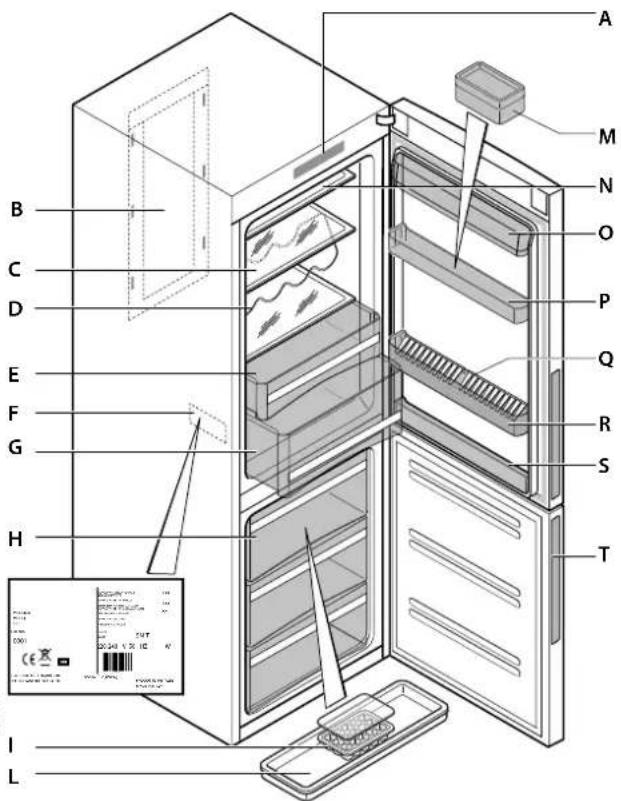
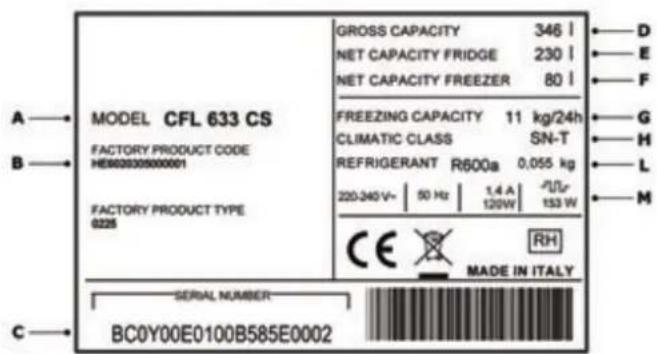
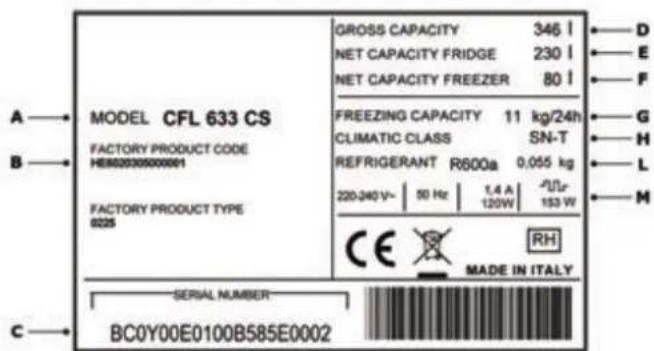
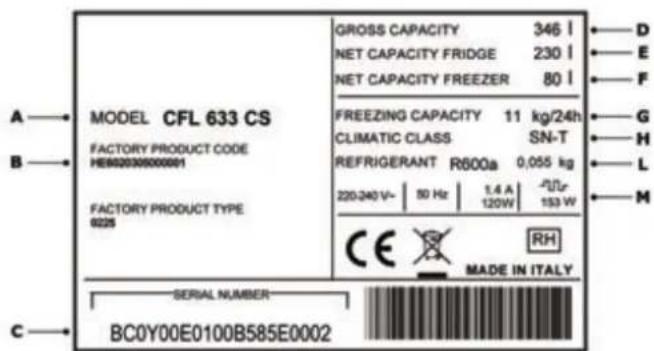
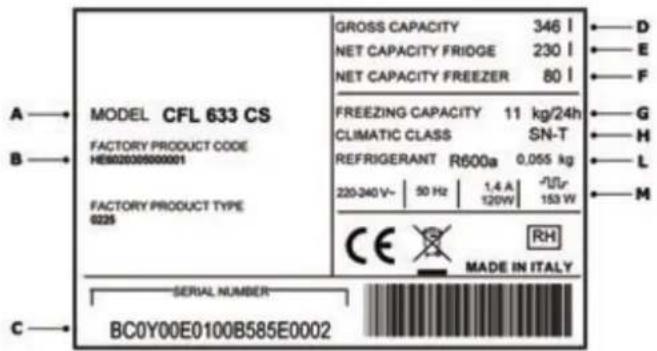
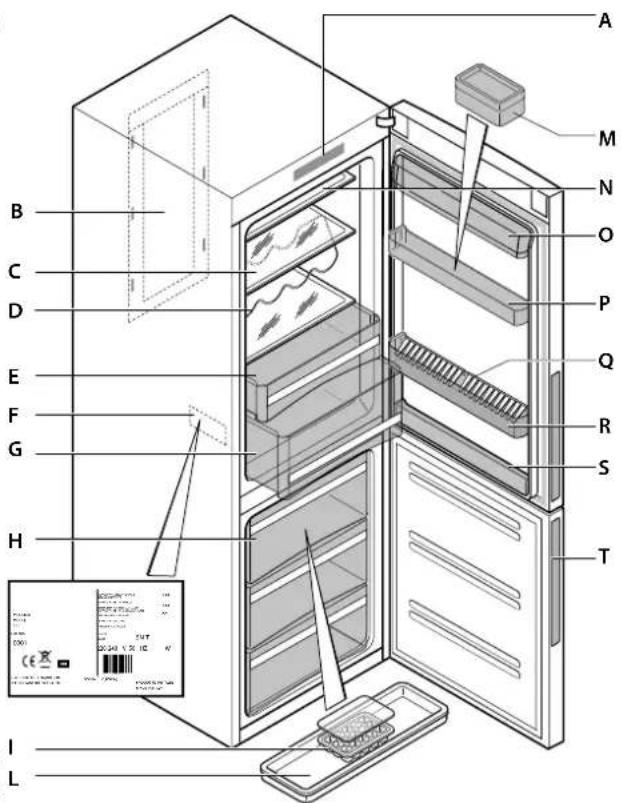
If the appliance is faulty or does not operate, consult the "Troubleshooting" chap. at the back of this handbook. If the problem is not resolved, call the Assistance Centre, specifying the data on the Identification and serial No. plate: it is located inside the refrigeration compartment glued low down on the left side (see paragraph "Description of the appliance").

The identification and Serial No. Plate provides important information about the appliance and must not be tampered
with or removed.
Reading examples:
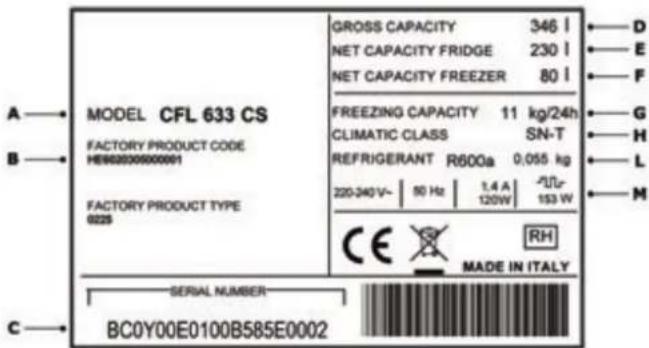
A: Model B: Product code C: Serial number D: Gross capacity E: Net capacity of refrigerator compartment F: Net capacity of freezer G: Freezing capacity (in kilograms of foods frozen in 24 hours) H: Climate class L: Type and quantity of refrigerant M: Electrical characteristics

3. SPECIFICATIONS OF THE APPLIANCE
Table 1 – Technical data
| Model | CFL 533 CFL 633 CFE 533 CFE 633 | |
| 1 | |
| Energy class A A+ A A+ | | | | | |
| Climatic class SN /T SN /T SN/T SN/T | | | | | |
| Volts/frequency V/Hz | | 220-240~/50 220-240~/50 220-240~/50 220-240~/50 |
| Type of refrigerant (R134a / R600a) | | R600a | R600a | R600a | R600a |
| Temperature maintenance time in case of blackout | h | 18 | 18 | 18 | 18 |
| 2 | Essential specifications |
| Number of compressors | n° | 1 | 1 | 1 | 1 |
| Defrosting of refrigerator/freezer (M = Manual / A = Automatic) | | A / A A / A | A / A A / A | | |
| Control system (E = Elettronic / M = Mechanical) | | E | E | E | E |
| NO FROST (Refrigerator/Freezer) | | yes/yes | yes/yes | yes/yes | yes/yes |
| Ventilated (Refrigerator only) | | yes | yes | yes | yes |
| 3 | Temperature and refrigeration capacity |
| Refrigerator temperature setting interval | °C | 2÷8 | 2÷8 | 2÷8 | 2÷8 |
| Meat box temperature | °C | -2÷3 | -2÷3 | -2÷3 | -2÷3 |
| Vegetables box temperature | °C | 0÷10 | 0÷10 | 0÷10 | 0÷10 |
| Freezer temperature setting interval | °C | -16÷-24 | -16÷-24 | -16÷-24 | -16÷-24 |
| Refrigerator net volume | l | 230 | 230 | 230 | 230 |
| Freezer net volume | l | 101 | 101 | 101 | 101 |
| 4 | Control panel |
| Commands and temperature indications | | internal | internal | internal | internal |
| Type of display | | LED | LED | - | - |
| Super cooling (Refrigerator) | | yes | yes | yes | yes |
| Super freezing (Freezer) | | yes | yes | yes | yes |
| Over-temperature alarm | | yes | yes | yes | yes |
| Adjustable thermostat | | yes | yes | yes | yes |
| Indicator lights | | yellow/green | yellow/green | green | green |
| 5 | Dimensions of appliance |
| Dimensions (height x width x depth) | cm | 186,5 x 59,5 x 64 | 186,5 x 59,5 x 64 | 186,5 x 59,5 x 64 | 186,5 x 59,5 x 64 |
| Depth with door open | cm | 120 | 120 | 120 | 120 |
| 6 | Accessories |
| Ice maker (M = Manual / A = Automatic) | | M | M | M | M |
| Internal light | | yes | yes | yes | yes |
| Power cable length | cm | 200 | 200 | 200 | 200 |
| Type of plug | | Schuko | Schuko | Schuko | Schuko |
| 7 | Dimensions, packing and weight |
| Packing dimensions (height x width x depth) | cm | 193,3 x 64 x 73 | 193,3 x 64 x 73 | 193,3 x 64 x 73 | 193,3 x 64 x 73 |
| Net weight | kg | 76 | 76 | 76 | 76 |
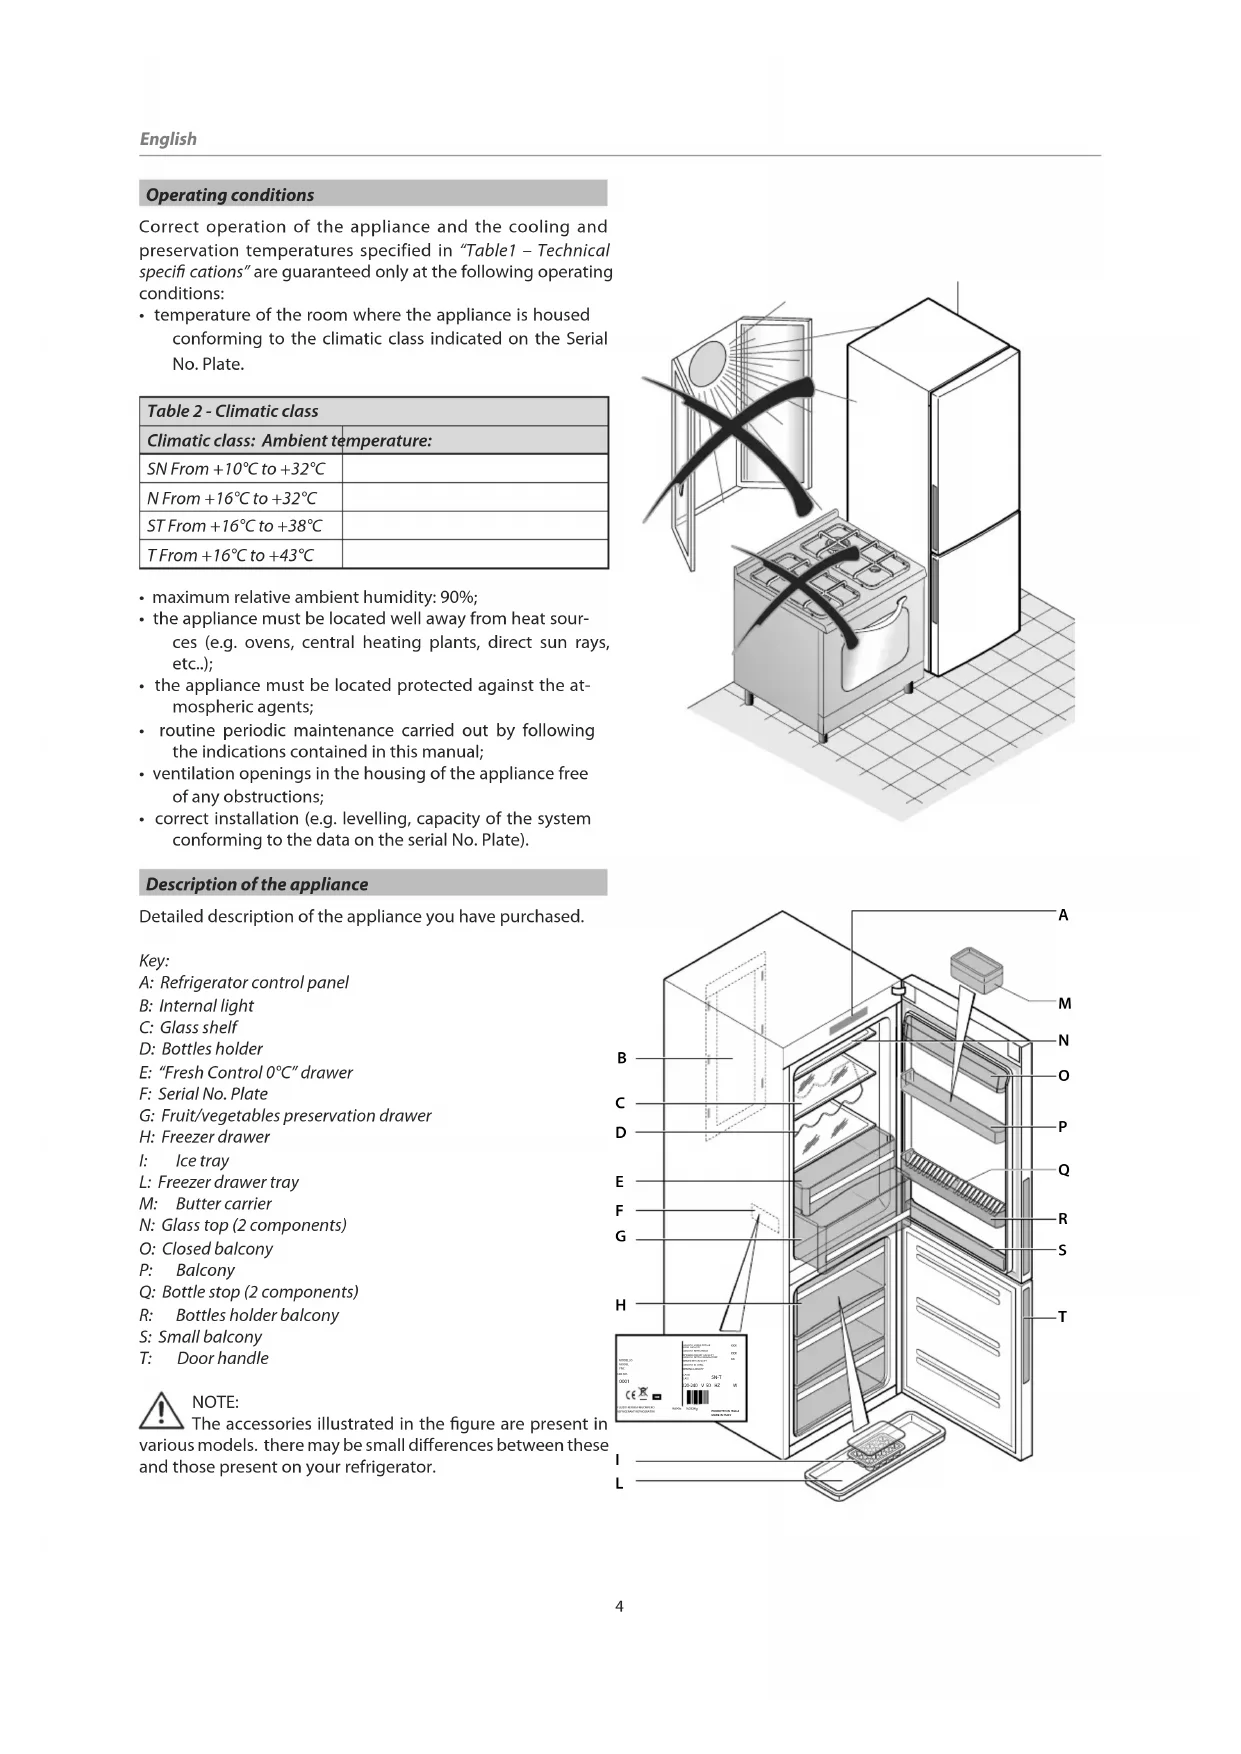
Operating conditions
Correct operation of the appliance and the cooling and preservation temperatures specified in "Table1 - Technical specifications" are guaranteed only at the following operating conditions:
- temperature of the room where the appliance is housed conforming to the climatic class indicated on the Serial No. Plate.
| Table 2 - Climatic class |
| Climatic class: Ambient temperature: |
| SN From +10°C to +32°C | |
| N From +16°C to +32°C | |
| ST From +16°C to +38°C | |
| T From +16°C to +43°C | |
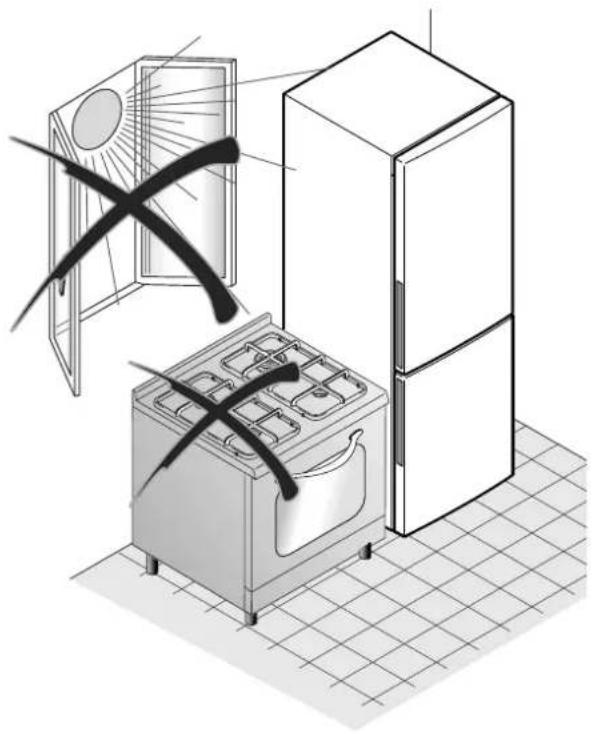
• maximum relative ambient humidity: 90%; - the appliance must be located well away from heat sources (e.g. ovens, central heating plants, direct sun rays, etc..); - the appliance must be located protected against the atmospheric agents; • routine periodic maintenance carried out by following the indications contained in this manual; - ventilation openings in the housing of the appliance free of any obstructions; - correct installation (e.g. levelling, capacity of the system conforming to the data on the serial No. Plate).
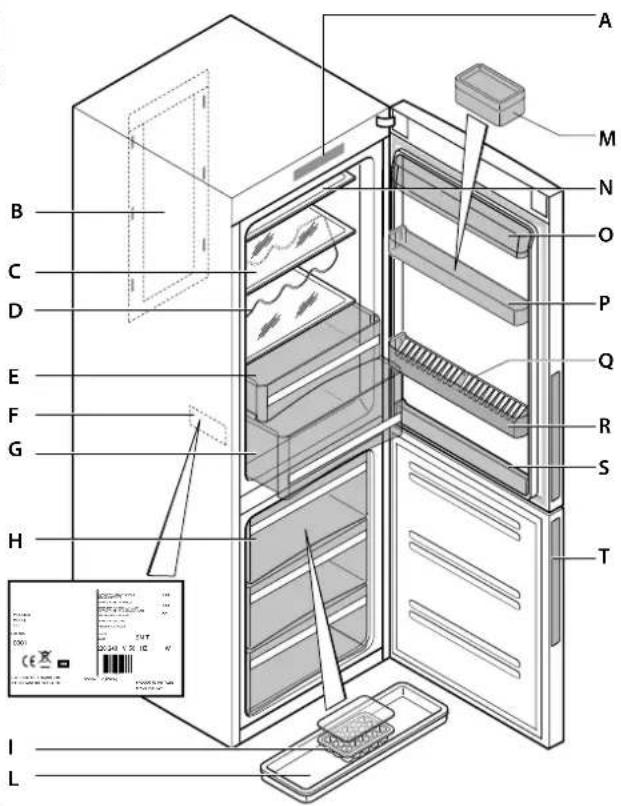
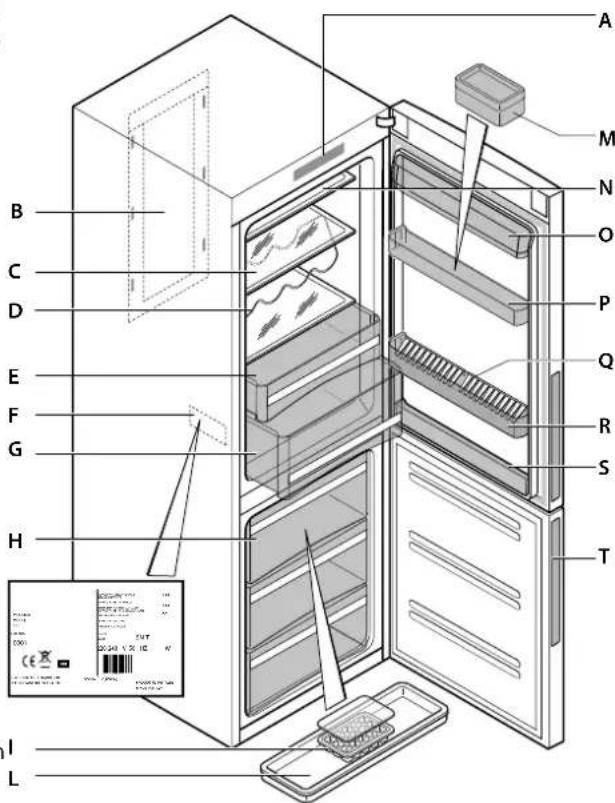
Description of the appliance
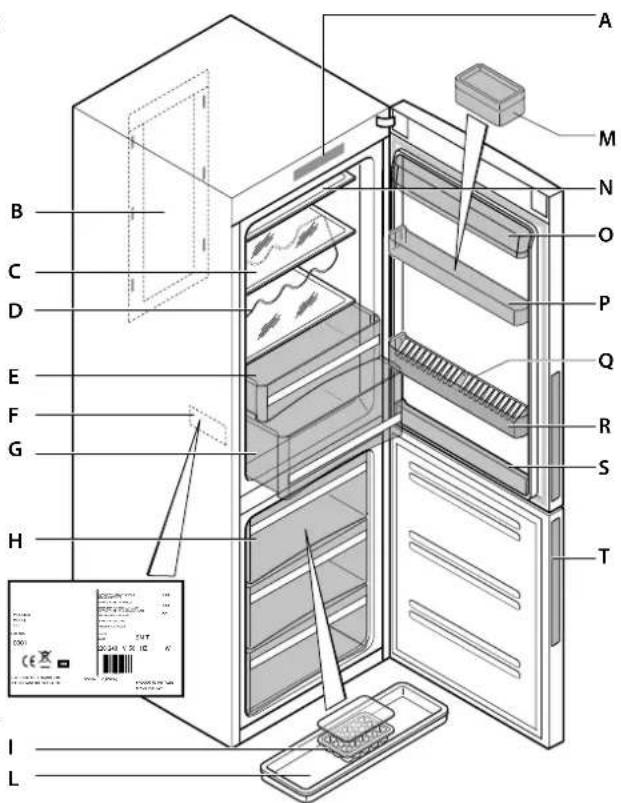
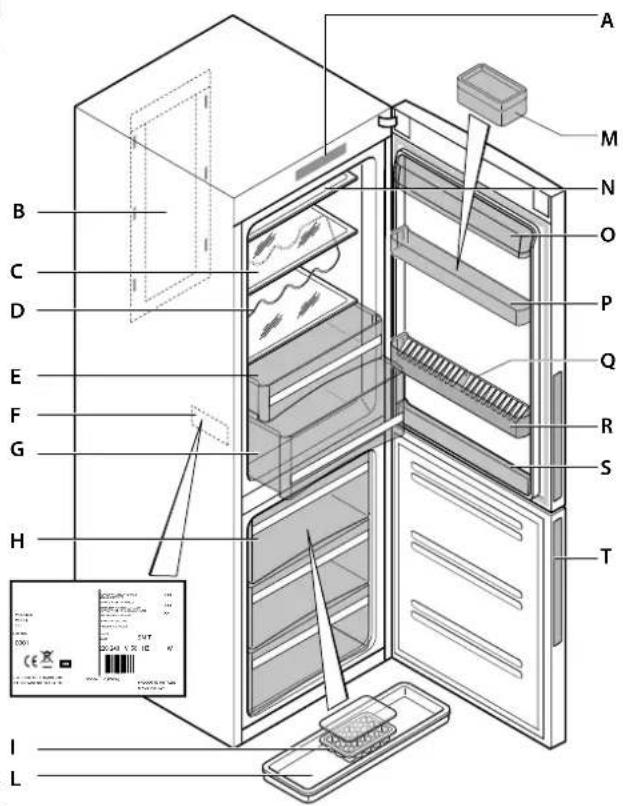
Detailed description of the appliance you have purchased.
Key:
A: Refrigerator control panel
B: Internal light
C: Glass shelf
D: Bottles holder
E: "Fresh Control 0°C" drawer
F: Serial No. Plate
G: Fruit/vegetables preservation drawer
H: Freezer drawer
I: Ice tray
L: Freezer drawer tray
M: Butter carrier
N: Glass top (2 components)
O: Closed balcony
P: Balcony
Q: Bottle stop (2 components)
R: Bottles holder balcony
S: Small balcony
T: Door handle

NOTE:
The accessories illustrated in the figure are present in various models. There may be small differences between these and those present on your refrigerator.

4. SAFETY
Safety precautions
Symbols:

General advice to optimise operation of the appliance

General danger

Hot surfaces
- This handbook must be stored together with the appliance for any future consultation. In the event of sale or transfer to another person, make sure that the handbook is provided together with the appliance, thus enabling the new user to know its operation and the relevant warnings.
• These warnings have been drafted for your safety: therefore, please read them carefully before installing and using the appliance.
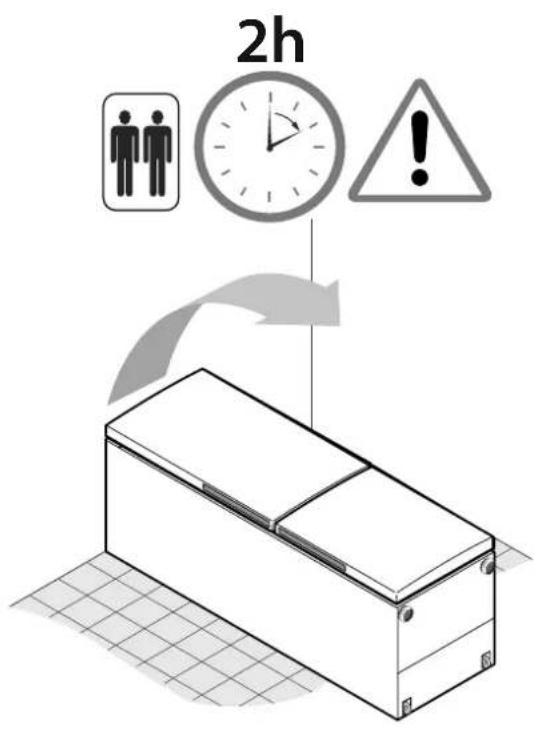
- If the appliance is in a horizontal position during transport. The oil in the compressor may flow out into the refrigerating circuit. We therefore advise you to leave the appliance in a vertical position for 2 hours before start-up, to enable oil to flow into the compressor.
• After unpacking the appliance, check it carefully and install it following the instructions in the relevant chapter: if you notice any faults, turn OFF the appliance and follow the procedure indicated in chap. "After-sales assistance".
- Before you attempt any routine or extraordinary maintenance operation, disconnect electrical power to the appliance – when you do this, do not on any account pull the plug by its cable. Also check if the cable is damaged. If it is, contact a Service Centre. If the appliance has been moved, when re-positioned, make sure that the power cable is not crushed or is not obstructing.
IMPORTANT: the appliances are provided with refrigerant gas, ISOBUTHANE (R600a). The appliance must be transported and moved, taking maximum care to ensure that it is not excessively struck or shaken. Failure to observe the above rule, could put the appliance out of service. Damage to the refrigerating circuit, with possible outflow of refrigerating gas, could create risks of explosion caused by external sparks or flames. Do not, on any account, run your appliance if it appears to be damaged. In case of damage, contact the Service Centre, ventilate the room where the appliance is located, and avoid flames or jobs on the appliance.
- Before you connect the appliance to the electrical mains, make sure that the capacity of the system is adequate with respect to the data on the serial number plate. Any modification which may be necessary to the domestic electrical system, in order to install the appliance, must be carried out by qualified personnel.
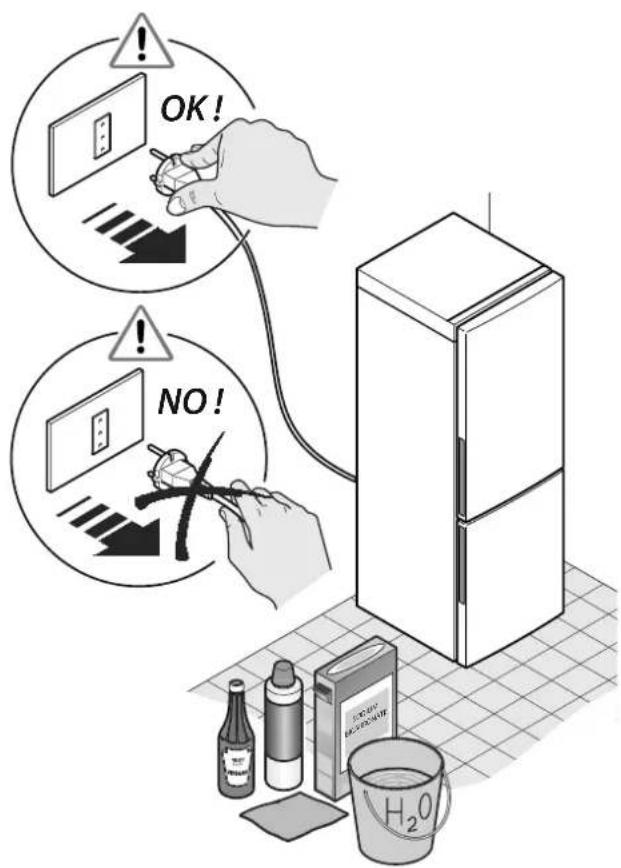
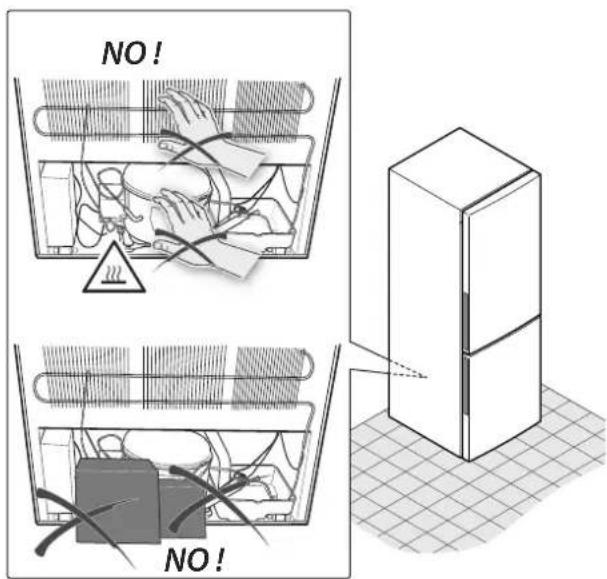
- If the appliance is moved from its usual position, take into account that even after you have unplugged, the components on the rear of the appliance may remain very hot for some time.
- The appliance is not built for insertion in an embedding structure. Insufficient ventilation will certainly lead to poor operation and will damage the appliance. IMPORTANT: during normal operation and routine maintenance, do not on any account:
- use electric appliances inside the compartments for preserving food frozen by the appliance;
- use mechanical or other devices to accelerate the defrosting process, other than those recommended by the Manufacturer;
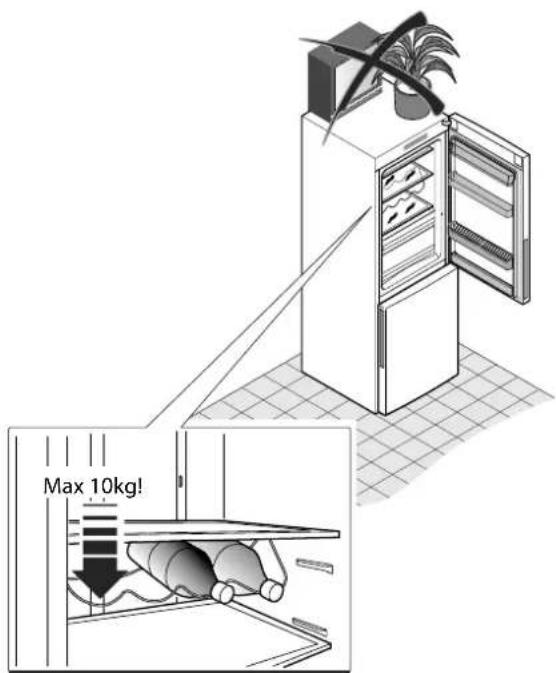
- lay fragile, heavy or unstable objects on the appliance.
• Temperature inside the refrigerator and freezer could rise or fall slightly; these appliances are therefore unsuitable for preserving products (e.g. medicines) for which a stable temperature must be guaranteed.
- IMPORTANT: this appliance was designed solely for domestic use, for preserving and/or freezing foods. Therefore, make sure that children do not approach the refrigerator with the intention of playing there, do not sit on the drawers and do not hang on the doors its appliance. IMPORTANT: Do not put substances with an explosion risk, contaminants or volatile substances in the appliance. IMPORTANT: Never put carbonated beverages or bottles of water in the low temperature compartment (freezer) – they may explode. Furthermore, we strongly advise you not to put hot liquids or foods inside the appliance and not to fill receptacles up to their brim. For all other preservation advice, consult chap. "Use". IMPORTANT: Bottles holder maximum load: 10Kg.
Safety data sheet for R600a gas
Measures in the event of accidental leakage
Allow the material to evaporate providing that adequate ventilation is provided.
Behaviour of gas
The gas is highly inflammable; therefore, absolutely avoid contact with naked flames and hot surfaces. Gas R600a is heavier than air, and therefore, high concentrations could form close to the floor where general ventilation is poor.
First aid
Inhalation
Take the exposed person from the polluted area and carry him to a warm, well ventilated place.
Long exposure can cause the onset of asphyxia and possible loss of consciousness. If necessary, practice artificial respiration, and, in the most serious cases, administer oxygen, under close medical supervision.
It is unlikely that occasional contact with the skin is dangerous by cutaneous absorption. If this happens: thoroughly wash the affected zone.
Liquid splashes and atomised liquid can cause freezing burns: Wash the affected part with plenty of water and call in a doctor to treat any burns.
Wash with plenty of water, with eye lids well open, and call in a specialised doctor as soon as possible.

In any event, we advise you to consult your own doctor following contact with or inhalation of R600a gas.
Disposal and interruption
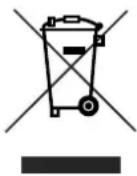
Under the provisions of art.13 of Law Decree of 25 July 2005, No.151 "Implementation of Directives 2002/95 CE, 2002/96/CE and 2003/108/CE, concerning the reduction in the use of dangerous substances in electric and electronic appliances, and the disposal of waste":
The symbol of the crossed rubbish bin affixed to the appliance or to its package indicates that, at the end of its useful life, the product must collected separately from other waste. Therefore, the user shall transfer the appliance, when it has reached the end of its life, to centres for differentiated collection of electronic and electro-technical waste, or redelivery it to the seller when the user buys a new appliance of equivalent type, one for one.
Make sure that the old appliance is transported to the collection point for its disposal without any damage to the cooling circuit. You will therefore be sure of preventing uncontrolled outflow of refrigerant. The refrigerant data are shown on the appliance's data plate.
The cycloisopenthane, a substance not harmful to ozone, is used as an expander for the insulating foam.
Adequate differentiated collection, prior to sending the out-of-service appliance for environmentally compatible recycling, treatment and disposal, contributes to avoiding possible negative effects on the environment and health, and favours the use and/or recycling of the materials the appliance is composed of.
Abusive disposal of the product by the user, entails the application of the sanctions under current legal regulations.
For more detailed information about the available collection systems, contact your local waste disposal service. We thank you for your contribution to the protection of the environment.

We advise you to cut the power cable before taking the appliance to the collection centres.

Make the closing of the door unfit for use (by removing the seals), or better still, remove the door in order, for example, to prevent a child risking to stay shut inside while playing.

5. INSTALLATION
Transport and unpacking
If the appliance is in a horizontal position during transport. The oil in the compressor may flow out into the refrigerating circuit. We therefore advise you to leave the appliance in a vertical position for 2 hours before start-up, to enable oil to flow into the compressor.
Remove the external packing, remove the protective film, where present, from the surfaces of the appliance, clean the outside of the appliance with specific products. Do not use scrapers or abrasive fabrics which could damage the surfaces beyond repair.
Carefully remove all sheets and adhesive tape from the appliance and door and any parts in polystyrene.
Take out the documents and existing accessories from inside the appliance.

The packing material is recyclable and is marked with the recycling symbol.

For disposal, follow the local regulations. Packing material (plastic bags, parts in polystyrene, etc...) must kept out of reach of children as it is a potential source of danger.
Control the appliance carefully: if you notice any faults, do not install the appliance and follow the procedure indicated in chap. "After-sales assistance".
Positioning
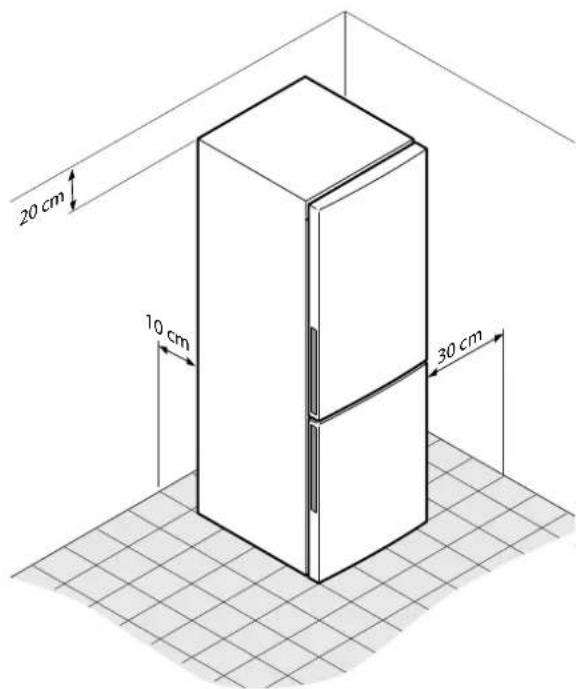
The place chosen for positioning must satisfy the indications supplied in parag. "Operating conditions", and must have a stable floor of sufficient capacity for the appliance's weight.
Furthermore, you must take into account the distances to be respected for correct operation of the appliance and for its dimensions:
1) top part (at least 20 cm) 2) back part (at least 10 cm) 3) wall on door opening side (at least 30 cm).
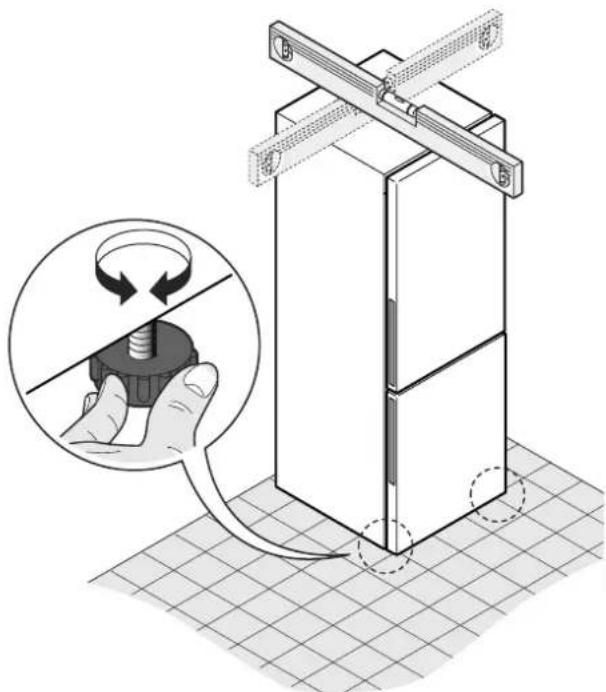
Level the appliance with its feet: keep the appliance slightly above the floor to encourage good air circulation on the condenser. In these conditions, you will obtain excellent operation of the refrigerant circuit.
Cleaning before use
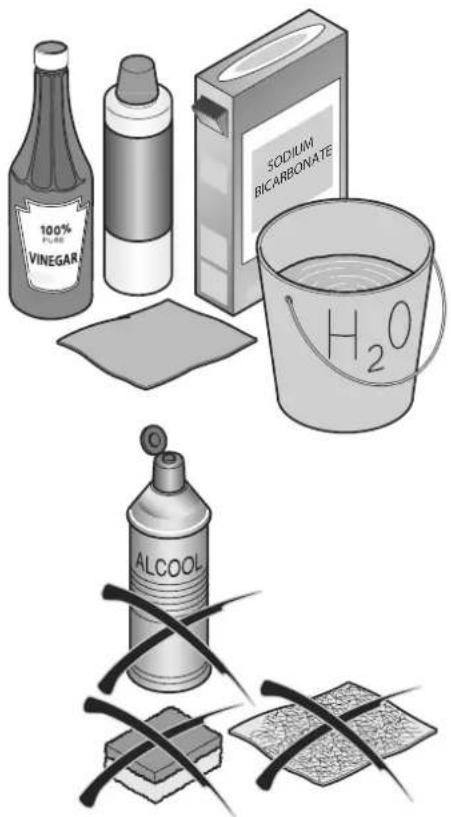
Make sure that you have removed, from the appliance, all the adhesive strips which restrain the accessories, clean all internal parts with lukewarm water and neutral soap, vinegar or sodium bicarbonate, in order to remove the characteristic odour of new parts, then dry carefully.
Do not use detergents and/or abrasives containing soda, or solvents which could damage the finishes.
Electrical connection
Before you insert the plug in the power socket, make sure that:
- your hands are not wet or humid;
- voltage and frequency on the serial number plate match those of the domestic power supply (a swing of -6% to +6% is permitted for nominal voltage; for operation at different voltages, use a transformer of adequate power);
- the cable and plug are not damaged or crushed by heavy objects;
- the power cable is not too tight: extensions to reach the socket are not permitted.

IMPORTANT: do not connect the appliance to rectifiers (e.g. sun plants) or by an extension lead.

IMPORTANT: the appliance must be connected to an efficient earth plate.
To this end, if the power socket of the domestic system is not connected to earth, connect the appliance to a separate efficient earth system, in compliance with current legal regulations, consulting a specialised technician.
The Manufacturer declines all and any responsibility if this accident prevention regulation is not respected.
This appliance conforms to the following EU directives:
B.T. 73/23/EEC
93/68/EEC

6. USE
Description of the functions of the refrigerator and freezer - CFE MODEL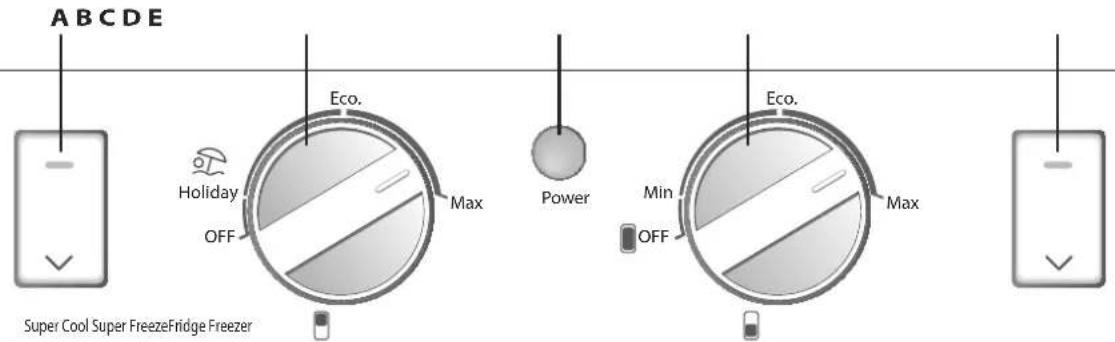
Key:
A: Super cool push button B: Knob for setting temperature of the refrigerator compartment C: Power indicator
D: Knob for setting temperature of the freezer compartment E: Super Freeze push button
Initial power supply
At power-up, the Power indicator (C) lights. The over-temperature alarm will be generated due to high temperature inside the compartments. To disable the buzzer, press any key.
Setting temperature in the refrigerator compartment
To set the temperature inside the refrigerator compartment, turn the knob (B). The settable temperature range is between Holiday, Eco, and Max.
Setting temperature in the freezer compartment
To set the temperature inside the freezer compartment, turn the knob (D). The settable temperature range is between Min, Eco, and Max.
Super Cool
To activate this function, press the Super Cool push button (A) – the relevant indicator lights up. This function will be automatically disabled when the temperature drops to minimum level. This function can be disabled by pressing the (A) push button again.
Super Freeze
To activate this function, press the Super Freeze push button (E) – the relevant indicator lights up. This function will be automatically disabled after 24 hours. This function can be disabled by pressing the (E) push button again.
Holiday Function
To activate this function, turn the knob (B) to the Holiday position. In the Holiday mode, the refrigerator works at a temperature of over +10°C (after you have activated this function, we advise you to remove perishable foods from the refrigerator compartment and close its door).
Open door alarm
When the refrigerator door stays open for more than 3 min., the indicator light of push button (A) flashes and a buzzer is sounded: 3 beeps every 30 seconds. The buzzer can be disabled by closing the door, or pressing any key. Indicator (A) stays lighted until the door is closed.
Excessive temperature alarm
When the temperature in the freezer compartment rises over a given level, the indicator light of push button (E) flashes and a buzzer is sounded: 1 beep per 30 seconds. The buzzer stops when the temperature in the freezer compartment reaches the defined level, or by pressing any key. The indicator (E) stays lighted until the required temperature is reached inside the compartments.
Turning OFF the refrigerator compartment
Turn knob (B) to its OFF position. The refrigerator compartment will be disabled whereas the freezer compartment continues to work normally.
Turning OFF the appliance
Turn the knob (D) to its OFF position. The refrigerator goes OFF, but continues to be fed by the electrical mains.
Description of the functions of refrigerator and freezer - MODEL CFL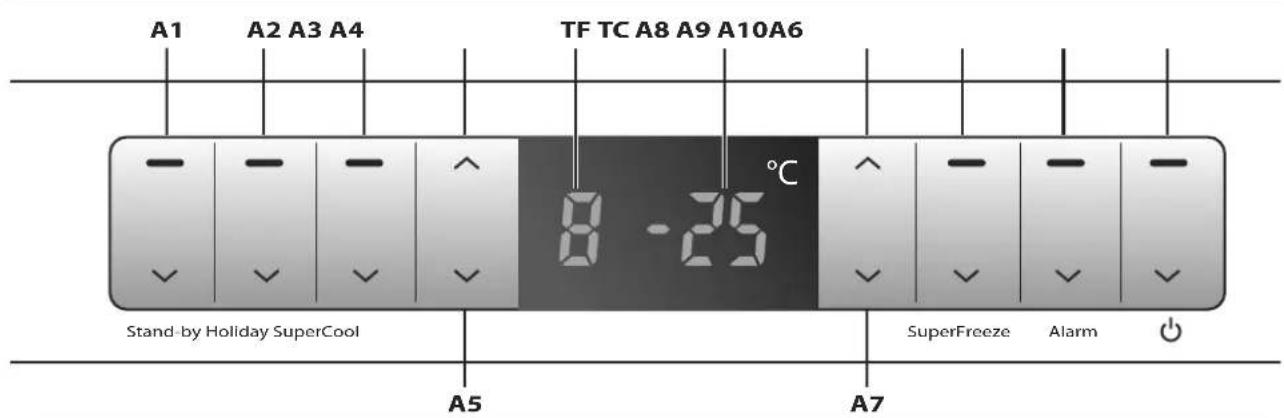
Key:
A1: Stand-by A2: Holiday function push button A3: Super Cool push button A4: Refrigerator temperature increase push button A5: Refrigerator temperature reduction push button A6: Freezer temperature increase push button
A7: Freezer temperature reduction push button A8: Super Freeze push button A9: Alarm silencer push button A10: Power up push button TF: Refrigerator temperature TC: Freezer temperature
Initial power supply
When the refrigerator is powered up, indicator (A10) lights up. The temperature of the compartments is shown on the display as “-” due to the high temperatures inside. An alarm buzzer is sounded. Press key (A9) and the buzzer stops, whereas indicator (A9) stays lighted. The display shows. When the temperature has dropped to a given level, the temperatures of the refrigerator and freezer on the display respectively indicate “5” and “-18” according to the settings predefined in the factory.
Setting temperature in the refrigerator compartment
Press key (A4) or (A5) to set the refrigerator temperature: the relevant indicator light flashes, enabling you to set the temperature from 2°C to 8°C. The setting will be confirmed automatically 5 seconds after the operation has ended, or by pressing any key.
Setting the temperature of the Cooler compartment
Press key (A6) or (A7) to set the cooler temperature: the relevant indicator light flashes, enabling you to set the temperature from -16°C to -24°C. The setting will be confirmed automatically 5 seconds after the operation has ended, or by pressing any key.
Super Cool
To activate this function, press Super Cool key (A3): In this way the relevant indicator light also lights up. This function will be automatically disabled when the temperature drops to minimum level. This function can be disabled by pressing key (A3) again.
In this mode, the temperature in the refrigerator compartment and the Holiday function cannot be set.
Super freeze
To activate this function, press Super Freeze key (A8): In this way the relevant indicator light also lights up. This function will be automatically disabled after 24 hours. This function can be disabled by pressing key (A8) again.
In this mode, the temperature in the Cooler compartment cannot be set.
Holiday Function
To activate this function, press key (A2). In Holiday mode, the refrigerator operates at a temperature above +10°C (after activating this function, we advise you to remove perishable foods from the refrigerator compartment and close its door). The temperature of the refrigerator compartment is indicated by "-". Press key (A2) again – the relevant indicator goes off and the refrigerator returns to normal control status.
In this mode, you can set both the Super Freeze and Super Cool functions. In the latter case, the Holiday function is automatically disabled.
Display control
The display screen automatically turns off 1 minute after the end of the operation. It can be turned on again by opening the door or pressing any key (an alarm does not turn on the screen).
Open door alarm
When the refrigerator door remains open for more than 3 minutes, a buzzer sounds: 3 beeps every 30 seconds. The buzzer can be silenced by closing the door or pressing any key. If the door remains open, the display is re-lit and the alarm indicator (A9) is shown.
Excessive temperature alarm
When the temperature in the freezer compartment rises above a certain level, the indicator light of push button (A9) flashes and a buzzer sounds: 1 beep per second. The buzzer stops when the temperature in the freezer compartment reaches the defined level, or by pressing any key. The indicator (A9)
stays lit until the set temperature is reached inside the compartments.
Turning off the refrigerator compartment
If you press key (A1) for 3 seconds, indicators (TF) and (A1) go off, and the refrigerator compartment is disabled, while the freezer compartment operates normally. To re-enable the refrigerator compartment, press key (A1) again for 3 seconds: the relevant indicator lights up, and the icon indicating the temperature of the refrigerator compartment is reset.
Turning off the appliance
If you press key (A10) for 3 seconds, the relevant indicator goes
off, the display screen also goes off, and the refrigerator stops operating but remains powered by the electrical system. To re-enable the appliance, press key (A10) again for 3 seconds. The relevant indicator lights up, the display screen lights up, and the refrigerator resumes normal operation. Note: if the Holiday or Super Cool functions, and the Super Freeze function were active before the appliance was turned off, they are re-activated at power-up.
Error indication
When "E" or "F" is displayed due to a malfunction, the refrigerator can still guarantee preservation of foods.
Please contact the Service Centre as soon as possible.
Advice on the preservation of foods: REFRIGERATOR
Description of functions
Super Freeze: we advise you to use this function when you put the fresh foods you have bought during shopping, in the refrigerator compartment.
This method favours faster cooling of foods.
Holiday function: this function is recommended when, for short periods (e.g. a holiday), you do not wish to disable the refrigerator but make it work at reduced consumption. With this mode, the freezer compartment operates normally and the refrigerator compartment operates at temperatures of over +10°C. In view of the temperature, remove from the refrigerator all perishable foods which require lower temperatures for excellent preservation, and keep the refrigerator door closed.
Advice on cooling foods
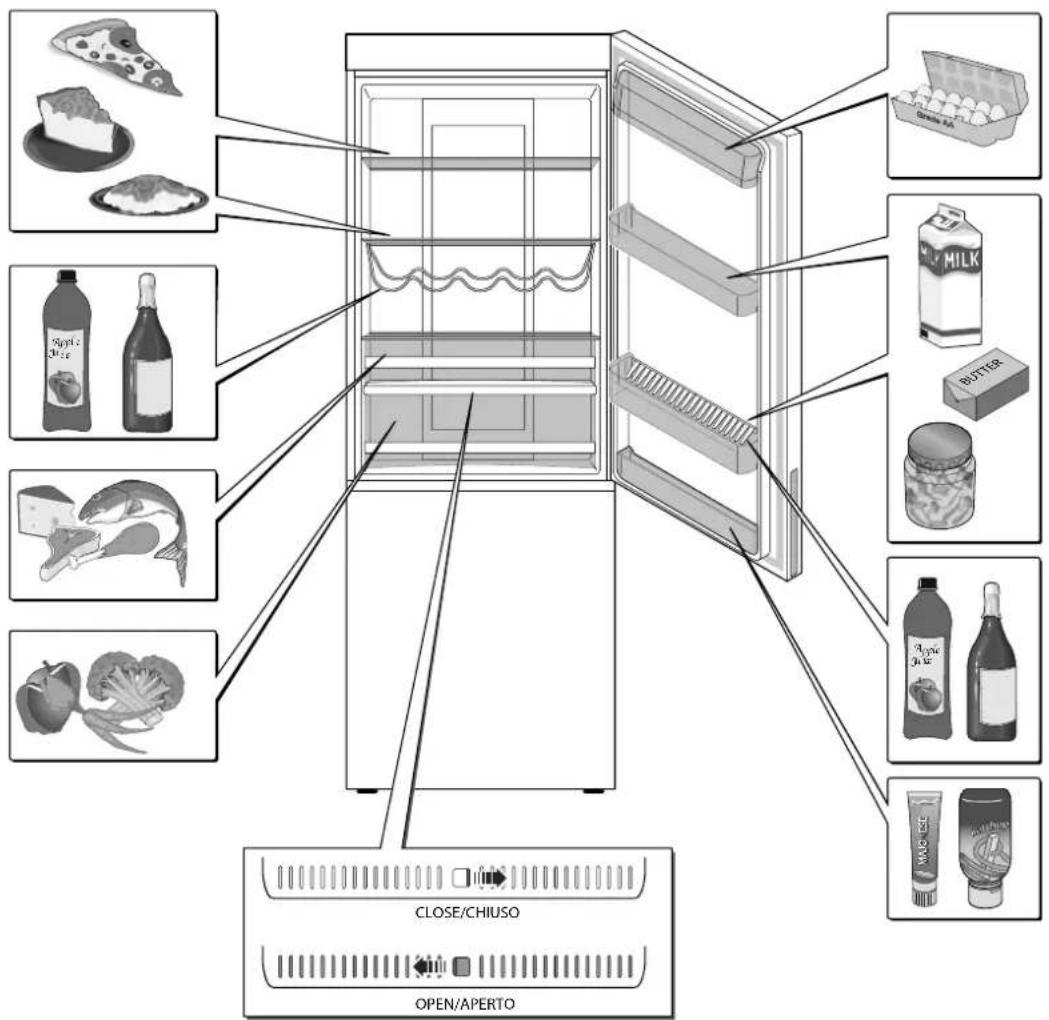
Ambients with different temperatures can be created by circulating air in the cooling compartment. These ambients are particularly suitable for preserving various foods. It is therefore important to position the foods to allow air to freely circulate around them.
The coldest zones (e.g. suitable for preserving dressed and other meats) are just above the vegetables drawer. Instead the less cool zones are situated at the top, toward the outside and in the doors (ideal for preserving butter and cheeses to spread).
Ventilation inside the vegetables drawer is provided by a series of slits which can be closed at the user's discretion.
Advice on how to best use the refrigerator compartment:
- do not put in hot foods or evaporating hot liquids;
- always replace in closed containers, or in appropriate packages, liquids and all foods which issue or which can easily absorb odours and flavours;
- do not put food oil in flexible containers in the refrigerator door: cracks could form in the plastic;
- Never obstruct the ventilation holes or grids on the bottom wall of the refrigerator and freezer compartment.
- Do not put explosive materials or spray cylinders containing inflammable propellants such as butane, propane, pentane, etc. in the appliance. Put back high proof alcohol only in upright position and in properly shut containers.
Gases or liquids that accidentally issue from cylinders can be recognized by reading the indications of their content, and are sometimes marked with a flame symbol.
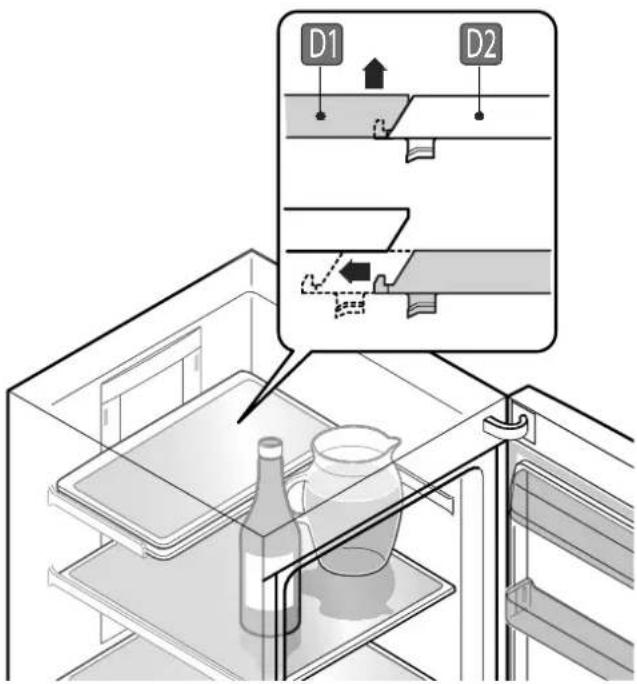
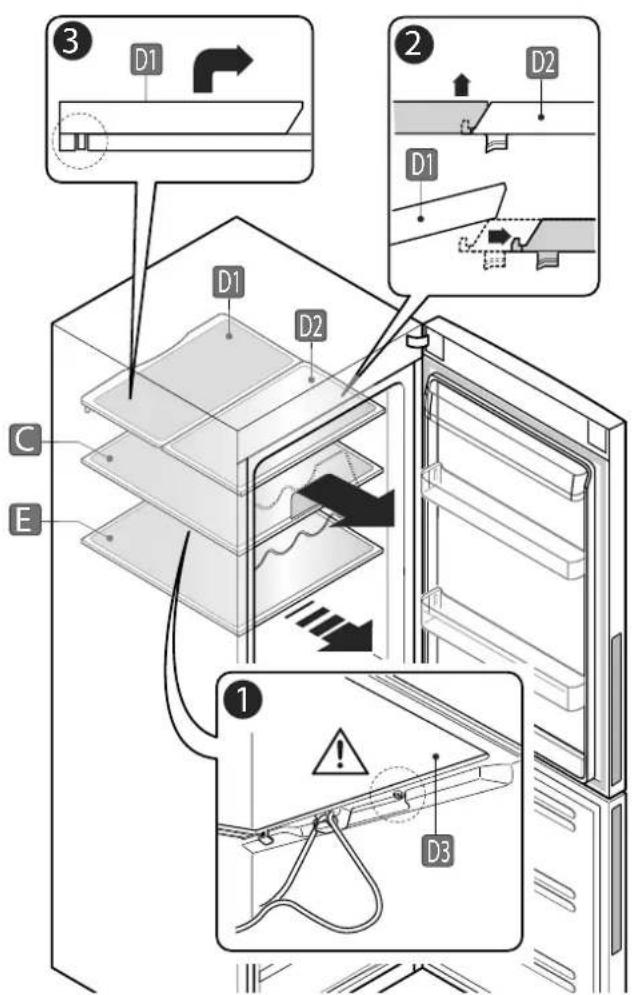
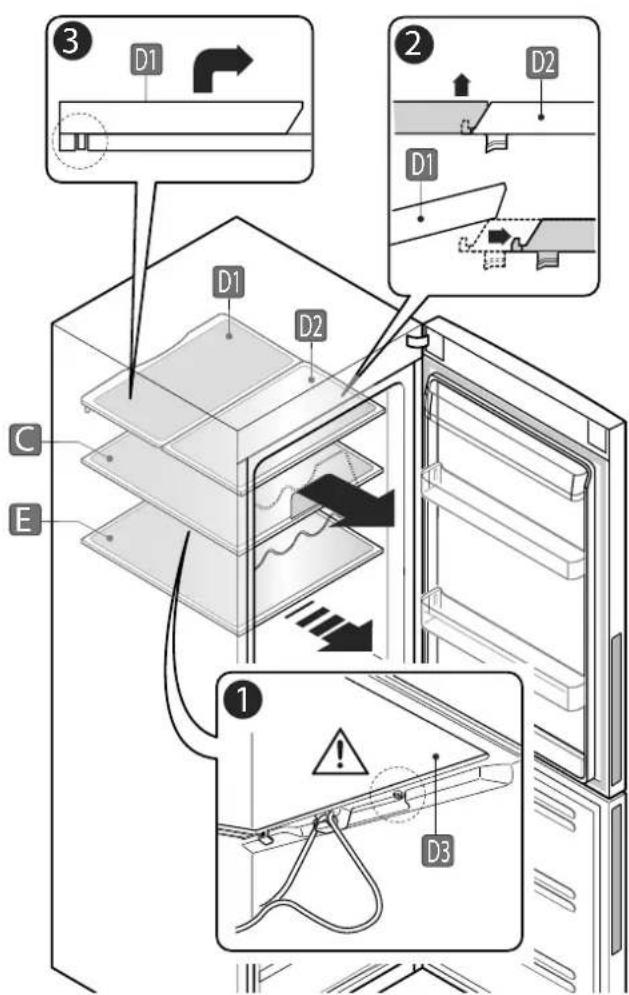
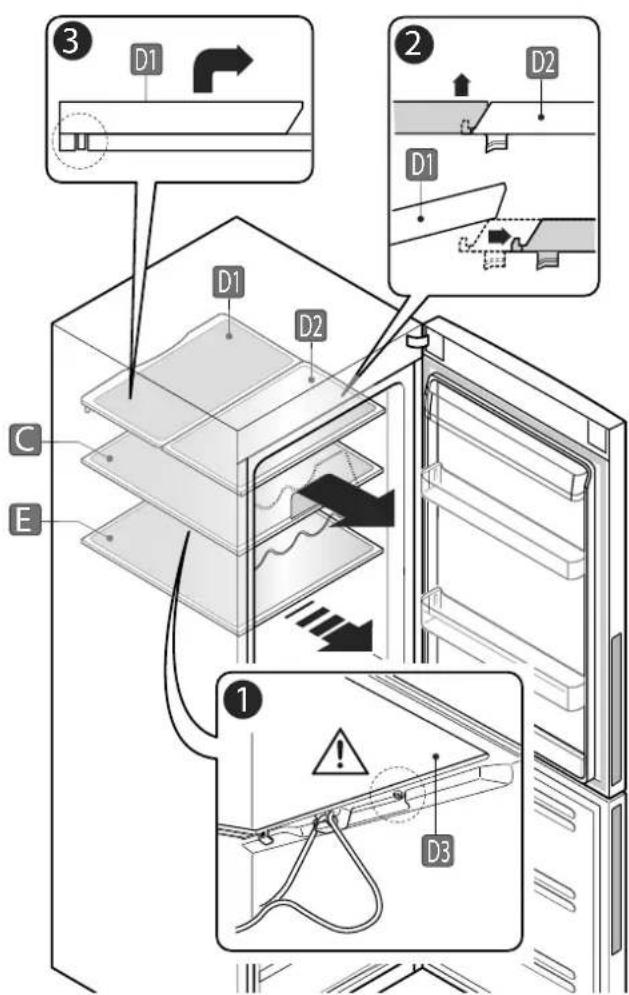
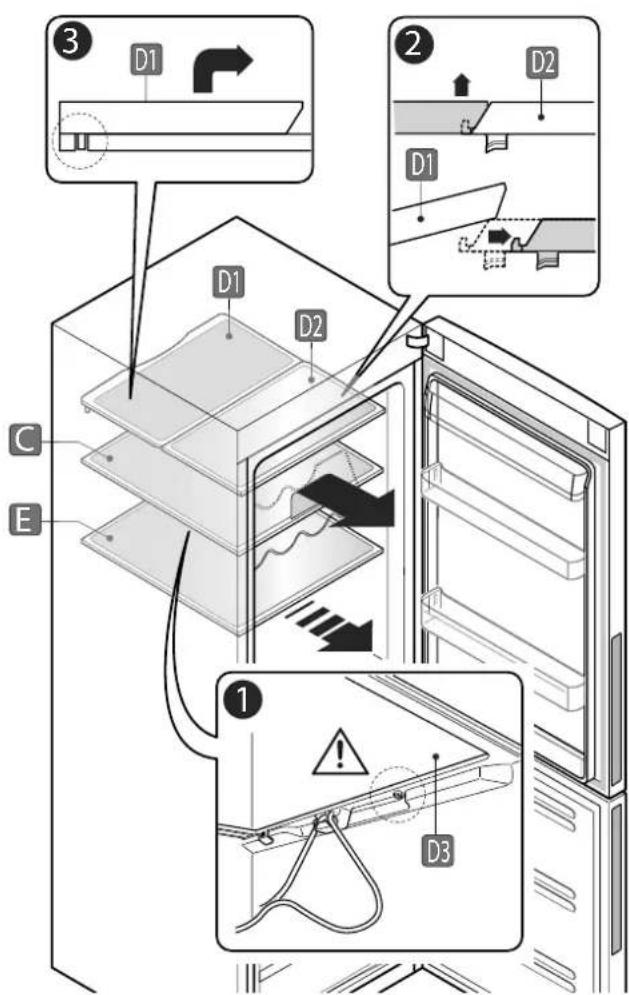
Glass top in two pieces
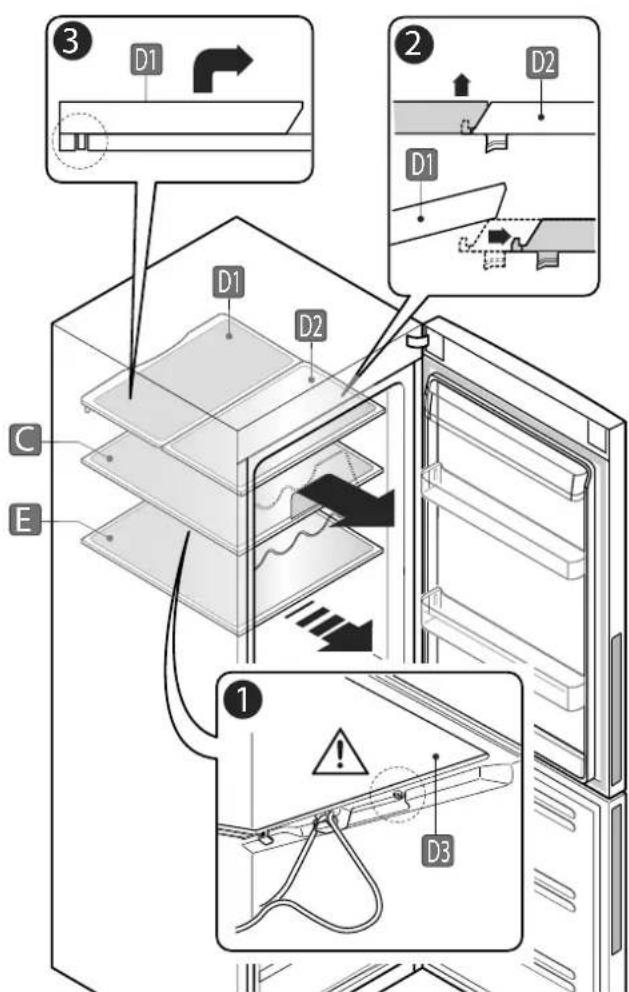
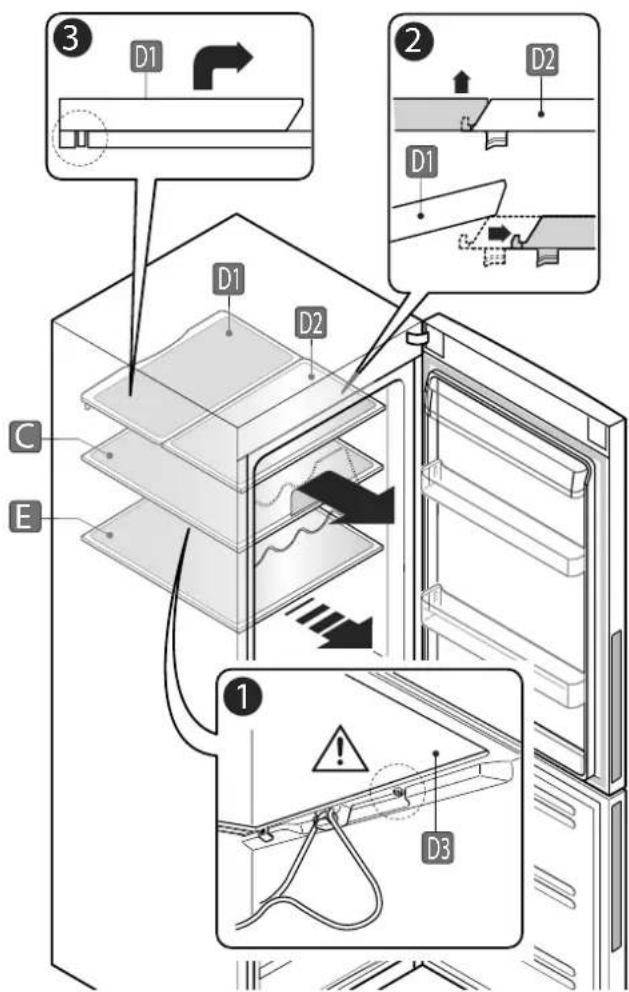
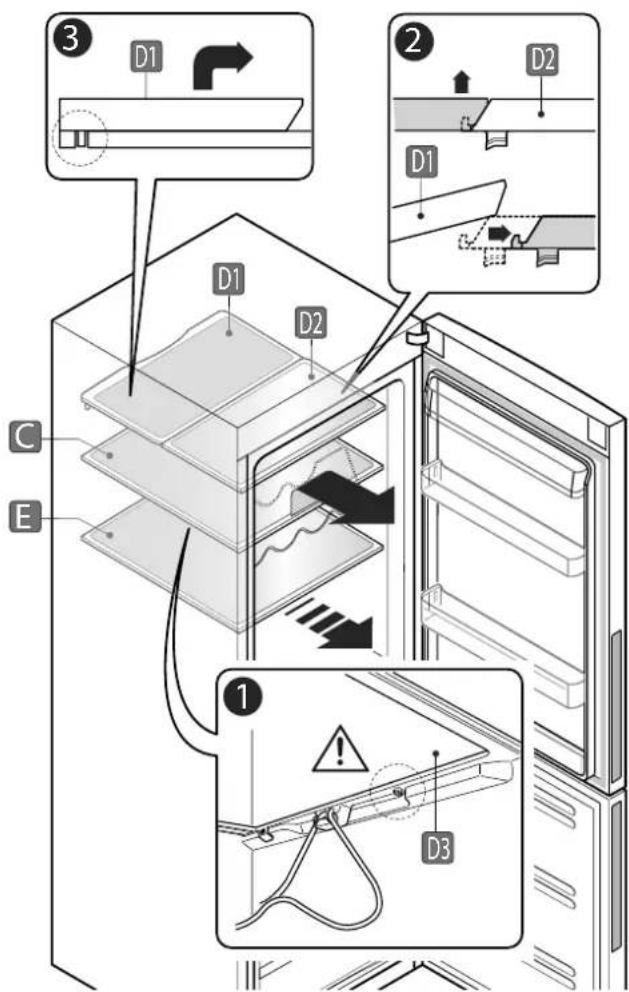
By a simple operation, shown in the figure below, the front glass top (D2) can be positioned under the rear one (D1).
In this way you can create space for cooling bottles (or other very high containers) in a vertical position.
| Table 3 - Preserving foods in the refrigerator |
| Food Preservation containers | Preservation zone Duration | | |
| Meat and fish (of any type)Hard cheeses | Protective fi lm, aluminium sheets, closed glass containers, plastic for foods or steel | Drawer“Fresh Control °0C” | 1-2 days |
| Cooked foods, cold dishes, sweets | Closed containers in glass, plastic for foods or steel | Any drawer 1-2 days | |
| Fruit and vegetables Sale | package or bulk Fruit/vegetable drawers 3-4 days | | |
| Bananas, potatoes, onions and garlic | Do not preserve in the refrigerator -- | | |
| Water, wine, beer, milk, fruit juices, fi zzy beverages | Food containers in glass or plastic | Balconies on the door | Refer to the best before date |
| Pickled or in oil foods, sauces, butter, spreadable cheeses, eggs | Original package | Balconies on the door | Refer to the best before date |
| Yoghurt | Original package | Any drawer | Refer to the best before date |
Advice on preserving foods: FREEZER
Description of functions
Freezing: The rapid freezing function is designed to best preserve the nutritional value of foods placed in the freezer compartment, guaranteeing complete and quicker freezing.
Advice on freezing foods
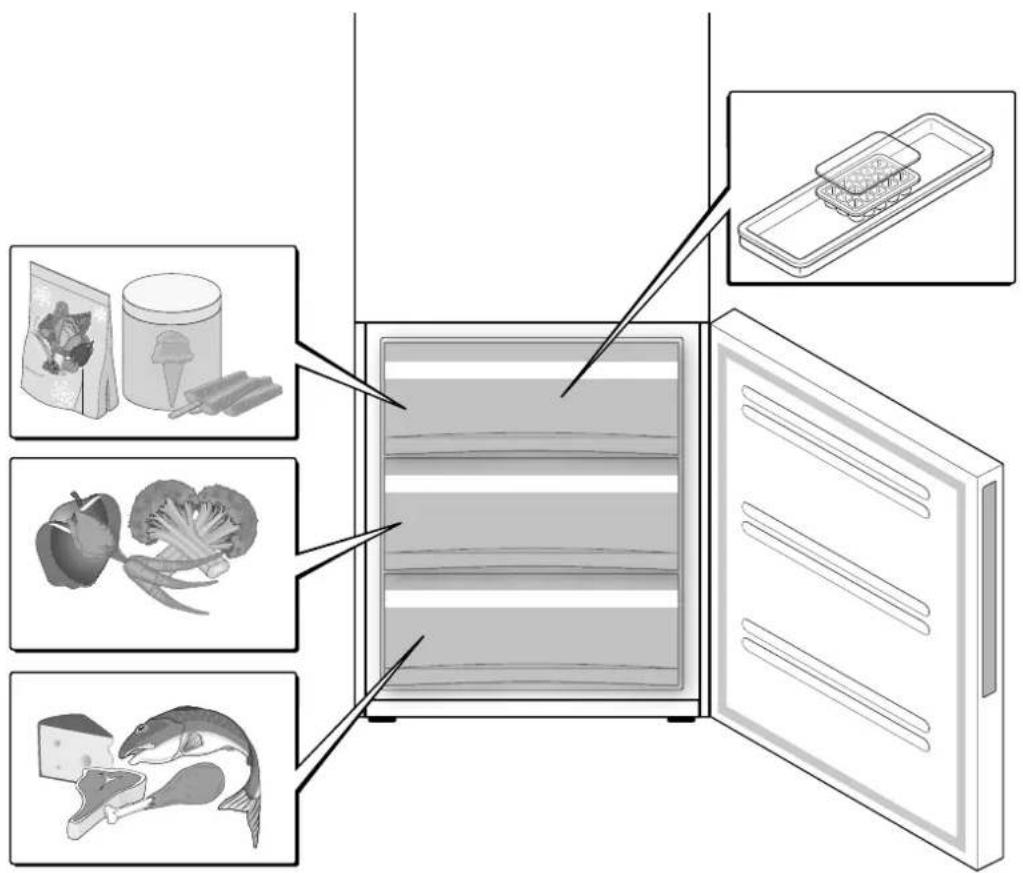
The freezer compartment is recommended for preserving already frozen foods, for freezing small quantities of foods, and for preparing ice cubes and ice cream.
IMPORTANT: a temperature of -18°C is necessary for freezing and preserving foods for a long time. This temperature considerably stops the action of microorganisms. As soon as the temperature exceeds -10°C, the decomposition process activated by the microorganisms is resumed, shortening the life of foods. For this reason, when foods have been defrosted, they can be re-frozen only after cooking in order to eliminate most of the microorganisms.
Some advice:
• To preserve frozen foods, make sure they are well preserved by the seller; - we advise you to limit opening the compartment containing deep-frozen and frozen foods and keep it open for as little time as possible; - we advise you to freeze only fresh, high-quality foods, after washing and drying them carefully; - place the foods to be frozen in the lower drawer – this is the coldest point of the freezer compartment; - preservation temperature must always be lower than or equal to -18°C; - the serial number plate indicates the maximum quantity of fresh foods which can be frozen in 24 hours ("freezing capacity"). A larger quantity worsens freezing quality and considerably reduces the quality of already frozen foods; - we advise you to activate the Super-Freeze function 24 hours before freezing, when food quantities exceed 8 kg; - freeze foods in small portions, carefully wrapped in suitable protective material (aluminium sheets or specific freezer packets), adhering well and closed, marking the packing and best-before dates; - ice cream and ice lollies should be eaten only a few minutes after they have been removed from the freezer, to avoid cutaneous lacerations to lips and tongue. For the same reason, do not touch internal parts of the freezer with wet hands; - packets must be dry to prevent them freezing together or attaching to each other; - the packaging must ensure that air and humidity do not come out, to prevent drying of foods and loss of the vitamins they contain; - the bags and/or sheets must be soft to adhere well to the contents; - arrange the foods to be frozen so that they do not come into contact with already frozen foods, to avoid defrosting; - to defrost small quantities of fresh foods (1-2 kg), there is no need to adjust the thermostat knob. To defrost larger quantities, enable the "Super-Freeze" function (see paragraph "description of refrigerator and freezer functions").
IMPORTANT: do not preserve bottled drinks, especially if fizzy, in the freezer compartment or in the low-temperature cells; if the beverages freeze, the contents expand and the bottles can burst.
IMPORTANT: increasing the temperature of frozen foods reduces their preservation time.
- If, for accidental reasons, i.e. a power cut in the domestic system, the foods in the freezer compartment have defrosted (even if only partially), they must be consumed very quickly; they can also be re-frozen after being cooked.
- With brief interruptions (up to 6-8 hours), the foods will not alter.
Making ice cubes
The appliance is supplied with one or more trays for the production of ice cubes; fill up to 3/4 with drinking water and put them back in the appropriate compartment. Do not use metallic and specially sharpened objects to detach the trays. To easily detach ice cubes from the tray, pour some running water on the tray.
Advice on defrosting foods
To cook frozen foods excellently, we advise you to defrost them in the refrigerator or at room temperature, shortening defrosting time in the latter case.
If you want to cook the foods quickly, providing they are small they can be cooked directly, lengthening cooking times.
If they are of normal dimensions, they can be defrosted in a microwave oven.
When foods are defrosted, they deteriorate quickly. Therefore, they should be consumed by the next 12-24 hours and can be refrozen only after they are cooked (boiled or roasted).
| Table 4 - Preserving foods in the freezer |
| Food Preservation containers | Preservation zone Duration | | |
| Preservation of frozen foods, ice cubes, ice creams | Original package, well closed | top of freezer compartment | Refer to best before date |
| Freezing foods: meat and fish | Original package, well closed.Food containers resisting to cold temperatures, hermetically closed.Maximum quantity per container: 2.5 Kg | preferably at the bottom of the freezer compartment | Beef: 12 monthsPork: 12 monthsMinced pork: 6 monthsRabbit: 6 monthsVeal: 9 monthsMutton: 9 monthsPoultry: 6 monthsFish: 6 months |
| Freezing foods: 1st courses/ pasta dishes, fruit, vegetables, sweets | Food containers resisting to cold temperatures, hermetically closed.Maximum quantity per container: 1 Kg | central part freezer compartment | 6-12 months |

7. ROUTINE MAINTENANCE
Cleaning the appliance

Disconnect the electrical power supply before starting the job.
Internal cleaning
Clean all internal parts with tepid water and neutral soap, vinegar or sodium bicarbonate, then dry accurately. Alternatively use detergents made specifically for the refrigerator, on sale in any supermarket.
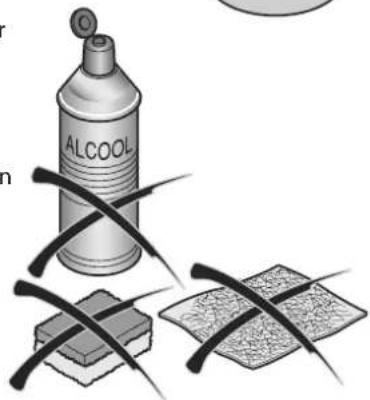
Do not use abrasive detergents and/or powders, soda based detergents, or solvents which could damage the finish.
To facilitate cleaning, the internal accessories can be removed (consult parag. "Dismantling components").
External cleaning
Clean all external parts with specific detergents. Do not use abrasive detergents and/or powders, soda based detergents, or solvents which could damage the finish.
Dismantling components
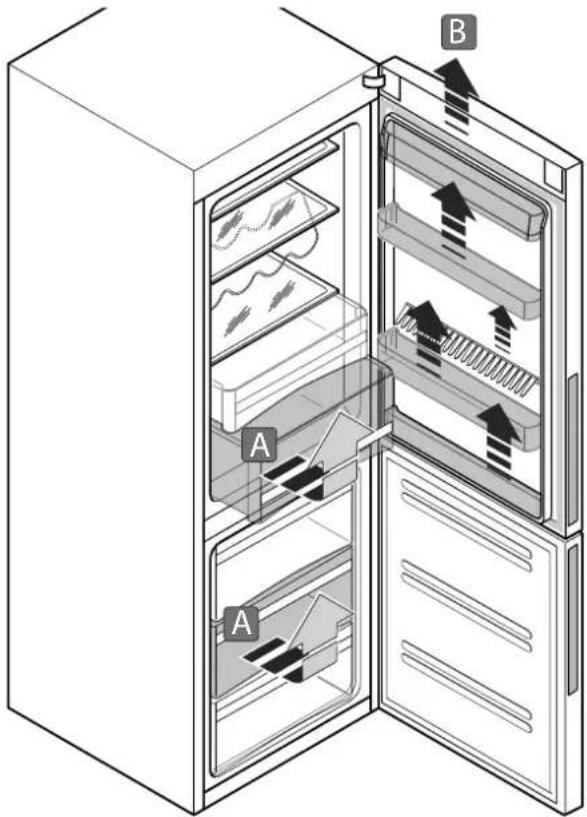
To facilitate cleaning operations, all the internal components of the appliance can be dismantled. Follow the instructions in the relevant figure.
A: Freezer drawers, fruit/vegetable drawer and "Fresh Control 0°C drawer"; these drawers slide on special guides with stops, which prevent the drawers from coming out entirely when opened, and risk falling on the floor. If you wish to take them out of the appliance for cleaning operations, extract them to up to 3/4 of their depth, lift them up slightly and continue extracting, keeping them inclined upwards.
B: Door balconies: they are simply fitted on the guides integrated on the door. To remove them, lift them upward, firmly pushing them up.
C: Top in glass with bottle holder; the top slides on guides, and has two pins preventing the guides from coming out accidentally (see detail ①); if you wish to remove it from the appliance for cleaning operations, lift it up slightly and extract it, keeping it inclined upwards.
D: Glass top in two pieces: the front top (D2) is connected to the rear top to prevent the latter coming out accidentally (see detail ②); to remove it, slightly lift the rear top (D1) and withdraw the front top (D2).
The rear top (D1) is restrained at its ends by two pins which prevent it coming out accidentally (see detail ③). To extract it, lift it upward and pull it toward yourself until you withdraw it. When you re-position the two tops (D1 and D2) make sure you connect them once again to each other.
E: Glass top: the top slides on guides. If you wish to remove it from the appliance for cleaning operations, take away the "Fresh Control 0°C" drawer, slightly lift up the top and extract it, continuing to hold it inclined upwards.

8. EXTRAORDINARY MAINTENANCE
![graph TD A["1A"] --> B["1B"] B --> C["1C"] C --> D["2A"] D --> E["2B"] E --> F["3C"] F --> G["3B"] G --> H["4A"] H --> I["4B"] I --> J["5A"] J --> K["5B"] K --> L["5C"] style A fill:#f9f,stroke:#333 style B fill:#ccf,stroke:#333 style C fill:#cfc,stroke:#333 style D fill:#fcc,stroke:#333 style E fil…](/content/2026/02/359211/images/73112c0e3923fa8cc65fac247a8203d935361d2d33a15e9c7ed43a2262e072b0.jpg)
Door reversibility: dismantling door from the right
!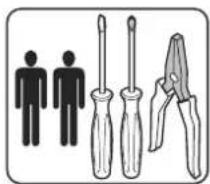
Disconnect power and empty the appliance before you start the operation.
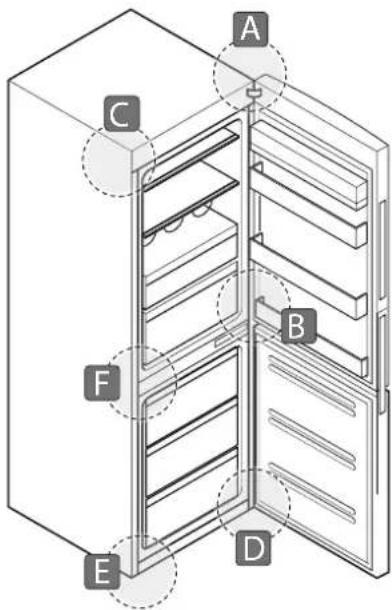
1 A) Open the refrigerator door;
B) using a normal screwdriver, work on the two clips to remove the head from the top end of the door and withdraw it upward;
C) using a normal screwdriver, withdraw downward the clips from the right and left side – the clips are under the upper hinge, take care not to damage them.
2 A) Unscrew the two screws which secure the front panel, located at the top;
B) To remove it, obtain leverage in several points with a normal screwdriver, taking care not to damage the panel
3 A) While firmly holding the refrigerator door, unscrew the two screws which restrain the upper hinge on the left and loosen the third screw located on the right.
B) Remove the upper hinge, first turning it anti-clockwise and then withdrawing it upwards.
C) Next, remove the door from the refrigerator, withdrawing it upward and re-position it carefully, paying attention not to damage it.
4 A) Open the freezer door;
B) while firmly holding the door, unscrew the three screws which restrain the central hinge to remove it.
C) Remove the door from the freezer, withdrawing it upwards and re-position it carefully, paying attention not to damage it.
5 A) Incline the appliance toward the rear side;
B) while keeping the appliance in this position, unfasten the two screws, located under it, which restrain the lower hinge in order to remove the hinge.
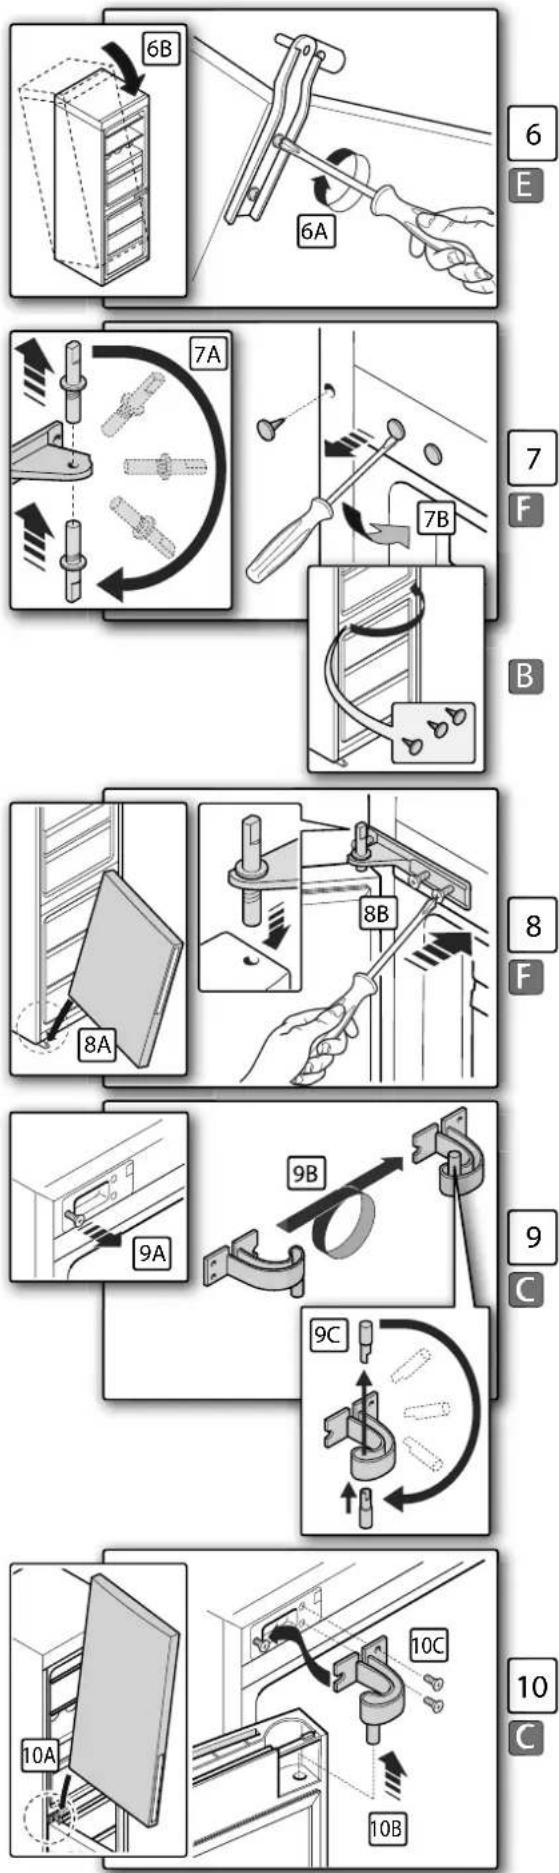
Door reversibility: mounting door from the left
6 A) Re-install the lower hinge on the left side, re-fastening the screws.
B) Re-locate the appliance in vertical position.
7 A) Take the central hinge and, with the help of pliers, unscrew the pin, turn it upside down by 180° and re-screw it back on the hinge.
B) Using a normal screwdriver, withdraw the three hole-covers of the central cross-piece from the left side and re-install them on the right side.
8 A) Fit the freezer door on the pin of the lower hinge.
B) Take the central hinge, turn it through 180°, insert it on the freezer door, and fasten it with the screws on the left side of the central cross-piece.
9 A) Slightly loosen the screw (present) on the top left side of the appliance.
B) Take the upper hinge and turn it upside down.
C) Remove the pin (now facing up) from the hinge and install it in its lower part.
10 A) Take the freezer door and install it on the pin of the central hinge.
B) Fit the upper hinge on the door and bring it close to the locating position of the appliance.
C) Fit the hinge slot on the screw on the left side (loosened in step 9A); secure the hinge on the appliance, fastening two screws on it.
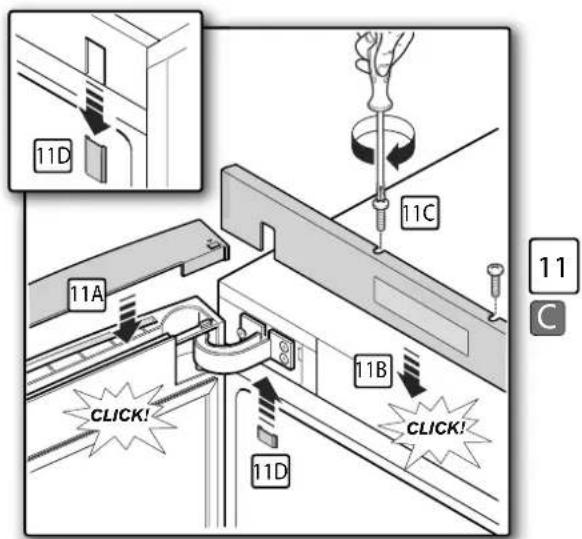
11 A) Click-fit the head (previously removed) on the top side of the refrigerator door.
B) Click-fit the front panel, applying pressure on several points;
C) Secure it with two screws;
D) Fit the clips on the right and left sides (previously removed).

9. TROUBLESHOOTING
- POWER SUPPLY
| PROBLEM CHECKS SOLUTIONS | | |
| APPLIANCE NOT OPERATING CHECK THE ELECTRICAL SYSTEMVISUALLY CHECK IF THE PLUG OF THE POWER CABLE IS CORRECTLY INSERTED IN THE POWER SOCKET;VISUALLY CHECK IF THE POWER CABLE AND PLUG HAVE BEEN DAMAGED. | CONTACT AN ELECTRICIAN;RECONNECT THE PLUG TO THE POWER SOCKET;CALL THE TECHNICAL SERVICE |
- LIGHTING
| PROBLEM CHECKS SOLUTIONS | |
| INTERNAL LIGHT OFF WHEN DOOOR OPENED | SEE POINT 1;INTERNAL LIGHT OFF WHEN DOOOR OPENED FAULTY LED BOARD: CALL THE TECHNICAL SERVICE.NB: THE REPLACEMENT OPERATION MUST BE CARRIED OUT BY THE AUTHORISED ASSISTANCE SERVICE | |
- TEMPERATURES TOO HIGH
| PROBLEM CHECKS SOLUTIONS | |
| INSUFFICIENT REFRIGERATOR COOLING CAPACITY | MAKE SURE THAT FOOD IS NOT PLACED TOO NEAR THE REFRIGERATOR WALLS AGAINST THE VENTILATION OPENINGS;CORRECT CLOSURE OF THE DOORS AND ADHESION OF SEALS;VALUE OF SET TEMPERATURE INCORRECTMAKE SURE THAT THE APPLIANCE IS NOT INSTALLED NEAR A HEAT SOURCE. | RE-POSITION THE LOAD ADEQUATELY.CLOSE THE DOORS CORRECTLY AND CLEAN THE SEALS;SET THE TEMPERATURES (REFRIGERATOR/FREEZER) ACCORDING TO THE INSTRUCTIONS IN THIS MANUAL;RE-POSITION THE APPLIANCE |
- NOISES AND VIBRATIONS
| PROBLEM CHECKS SOLUTIONS | |
| APPLIANCE VIBRATING | MAKE SURE THAT THE APPLIANCE IS STABLE, WITH THE FEET CORRECTLY ADJUSTED; | ADJUST THE HEIGHT OF THE FEET WITH AN APPROPRIATE TOOL |
| COMPRESSOR NOISE | MAKE SURE THAT THE REAR OF THE APPLIANCE IS NOT TOO CLOSE TO THE WALL; | MOVE THE APPLIANCE; |
| NOISE INSIDE THE COMPRESSOR | CALL THE TECHNICAL SERVICE |
| PROBLEM CHECKS SOLUTIONS | | |
| BAD SMELLS ISSUING CHECK CORRECT PRESERVATION OF FOODS;CHECK IF THERE IS ANY LEAKAGE OF LIQUIDS INSIDE THE APPLIANCE;CHECK IF THERE ARE ANY BAD SMELLS ON THE SEALS;APPLIANCE OUT OF SERVICE FOR TOO LONG, WITH THE DOORS CLOSED. | COVER THE FOODS AND/OR USE PLASTIC CONTAINERS FOR PRESERVATION;CLEAN THE CELLS AND GLASS TOPS WITH A SPECIFIC REFRI-GERATOR DETERGENT;CLEAN THE SEALS WITH WATER AND VINEGAR;ASSESS THE CAUSE OF THE APPLIANCE 'S STOPPING . |

- PRESENTATION 2

- AFTER-SALES SERVICE....2
Warranty conditions....2
Identification plate....2

- APPLIANCE FEATURES.... 3

3. APPLIANCE FEATURES

4. SAFETY

6. USE
Super freeze (Super Freeze)
Super freeze (Super freeze)



3. APPLIANCE FEATURES

4. SAFETY

6. USE

7. NORMAL MAINTENANCE

3. DEVICE FEATURES

4. SAFETY

6. USE



3. DEVICE FEATURES

4. SAFETY

6. USE



3. DEVICE FEATURES

4. SAFETY

6. USE

7. NORMAL MAINTENANCE

8. SPECIAL MAINTENANCE
![graph TD A["1A"] --> B["1B"] B --> C["1C"] C --> D["2A"] D --> E["2B"] E --> F["3C"] F --> G["3B"] G --> H["4A"] H --> I["4B"] I --> J["5A"] J --> K["5B"] K --> L["5C"] style A fill:#f9f,stroke:#333 style B fill:#ccf,stroke:#333 style C fill:#cfc,stroke:#333 style D fill:#fcc,stroke:#333 style E fil…](/content/2026/02/359211/images/76b4dc89866ca19d7ef673cd3243c1293d1f358b9dd1b95265f88d095d76538b.jpg)
- EXCESSIVELY HIGH TEMPERATURES
| PROBLEEM CONTROLES OPLOSSINGEN | |
| ONTOEREIKENDKOELVERMOGENKOELRUIMTE | CONTROLEER OF DE ETENWAREN NIET TE VEEL AANLEU-NEN TEGEN DE WANDEN VAN DE KOELRUIMTE, TEGEN DE VENTILATIEOPENINGEN;DE CORRECTE SLUITING VAN DE DEUREN EN DE EFFICIËNTIE VAN DE AFDICHTINGEN;INGESTELDE TEMPERATUURWAARDE NIET CORRECT;CONTROLEER OF HET APPARAAT NIET GEÏNSTALLEERD IS DICHTBIJ EEN WARMTEBRON. | HERSCHIK DE LADING.SLUIT DE DEUREN CORRECT EN REINIG DE AFDICHTINGEN;STEL DE TEMPERATUREN IN (KOELRUIMTE/FREEZER) OP BASIS VAN DE AANWIJZINGEN IN DEZE HANDLEIDING;HERPLAATS HET APPARAAT. |
- NOISES AND VIBRATIONS
| PROBLEEM CONTROLES OPLOSSINGEN | |
| TRILLINGEN VAN DE APPARATUURGELUID VAN DE COMPRESSOR | CONTROLEER OF HET APPARAAT STABIEL IS EN OF DE VOETJES GOED GEREGLD ZIJN;CONTROLEER OF DE ACHTERZIJDE VAN DE APPARATUUR NIET TE DICHT BIJ DE MUUR IS;INTERN GELUID COMPRESSOR. | REGEL DE HOOGTE VAN DE VOETJES MET HET GEPASTE GEREEDSCHAP;VERPLAATS HET APPARAAT;BEL DE TECHNISCHE ASSISTENTIE. |
- ODORS
| PROBLEEM CONTROLES OPLOSSINGEN | |
| VRIJGAVE VAN VIEZE GEUR-TJES | CONTROLEER DE CORRECTE BEREIDING VAN DE ETEN-SWAREN;CONTROLEER OF ER VLOEISTOFFEN GEDRUPPELD HEBBEN IN DE APPARATUUR;CONTROLEER DE AANWEZIGHEID VAN VIEZE GEURTJES OP DE AFDICHTINGEN;DE APPARATUUR HEEFT TE LANG DICHT AF GESTAAN MET DE DEUREN DICHT. |
| DEK DE ETENSWAREN AF EN/OF GEBRUIK DEVERPAKKINGEN VAN PLASTIC VOOR DE BEWARING;REINIG DE CELLEN EN GLAZEN LEGPLATEN MET EEN SPE-CIAAL REINIGINGSPRODUCT VOOR KOELKASTEN;REINIG DE AFDICHTINGEN MET WATER EN AZIJN;PEIL NAAR DE OORZAAK VAN DE STILSTAND VAN DE AP-PARATUUR. |