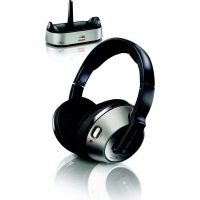
SBCHC8540 - Headphones PHILIPS - Free user manual and instructions
Find the device manual for free SBCHC8540 PHILIPS in PDF.



| Brand | Philips |
| Model | SBCHC8540 |
| Product type | FM wireless headphone |
| Technology | Radio frequency (RF), FM modulation |
| Carrier frequency | Channel 1: 863.5 MHz; Channel 2: 864 MHz; Channel 3: 864.5 MHz |
| Transmission range | Up to 100 meters, omnidirectional (360°) |
| Radiated output power | <10 mW |
| Input level | 500 mV |
| Transmitter power supply | 12 V / 200 mA DC, adapter SBC CS030/00 |
| Headphone power supply | 2 rechargeable NiMH R03/AAA batteries (type SBC HB550S) |
| Battery life | Approximately 15 hours |
| Charging time | Approximately 16 hours |
| Audio frequency response | 20 - 20,000 Hz |
| Signal-to-noise ratio | ~70 dB (A-weighted) |
| Total harmonic distortion | ≤ 2% |
| Channel separation | ≥ 30 dB |
| Compatibility | Other Philips 864 MHz band FM wireless headphones/speakers, FM modulation, 19 kHz pilot tone |
| Cleaning | Slightly damp chamois leather; avoid alcohol, ammonia or abrasives |
| Listening safety | Continuous use at high volume may damage hearing |
| Spare parts | Rechargeable batteries SBC HB550S, adapter SBC CS030/00 |
| Warranty | Do not open yourself; consult an authorized dealer |
Frequently Asked Questions - SBCHC8540 PHILIPS
User questions about SBCHC8540 PHILIPS
0 question about this device. Answer the ones you know or ask your own.
Ask a new question about this device
Download the instructions for your Headphones in PDF format for free! Find your manual SBCHC8540 - PHILIPS and take your electronic device back in hand. On this page are published all the documents necessary for the use of your device. SBCHC8540 by PHILIPS.
USER MANUAL SBCHC8540 PHILIPS
Instructions for use
English 4
Mode d'emploi
Français 12
natural_image
Black and silver HP headsets with a Philips brand logo on top (no visible text or symbols on the headphones or background)PHILIPS
A
B
natural_image
Abstract curved arrow graphic pointing right, no text or symbols present4 ENGLISH
Index
Functional overview 4
Safety precautions ....5
System compatibility ....5
Using your FM wireless headphone system 6-8
Problem Solving 8-10
Technical Specification 10
European Regulations 11
FM Wireless Headphone System
SBC HC8540
Congratulations! You have just bought one of the most sophisticated FM wireless headphone system.
This system implements the latest FM wireless technology, which offers you complete freedom of movement while enjoying your favourite movie or music. With energizing docking station, your headphone can be recharged in ease while it is not in use. This allows your headphone to be fully charged and always be ready for use whenever you need to enjoy a movie.
To ensure you achieve the best performance from your FM wireless headphone system, please read this manual carefully and keep it for future reference.
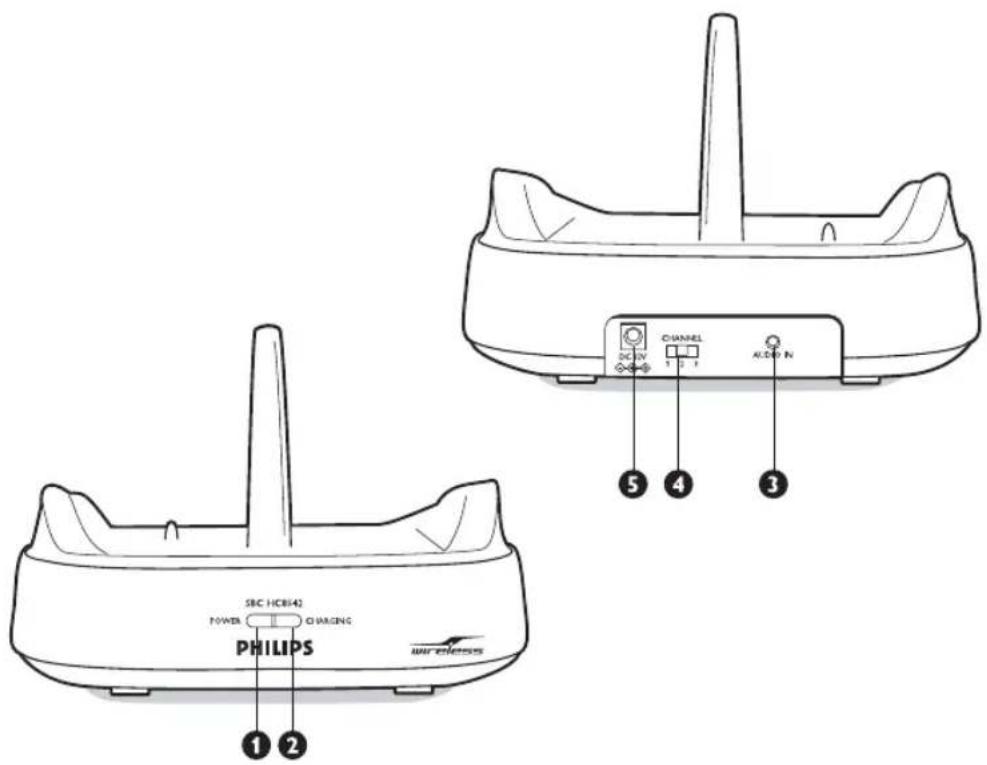
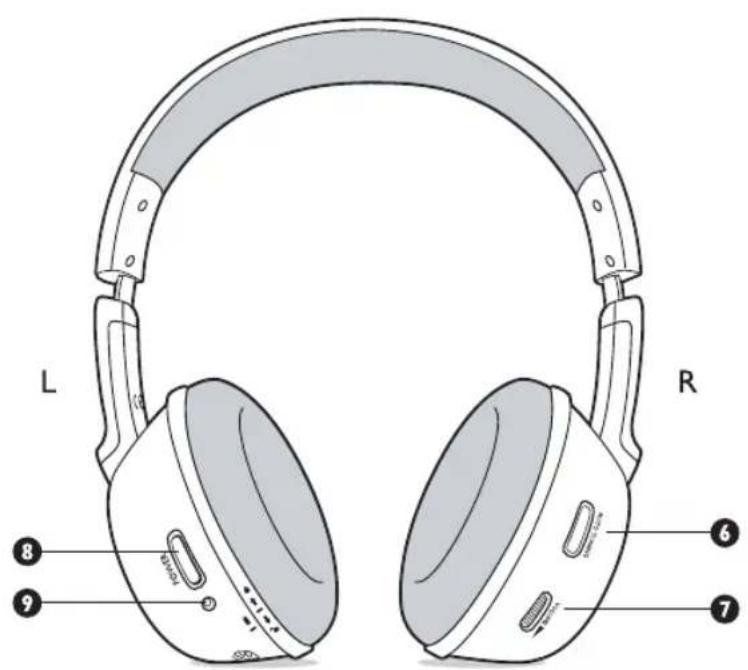
Functional overview - Product illustrations on inside flap
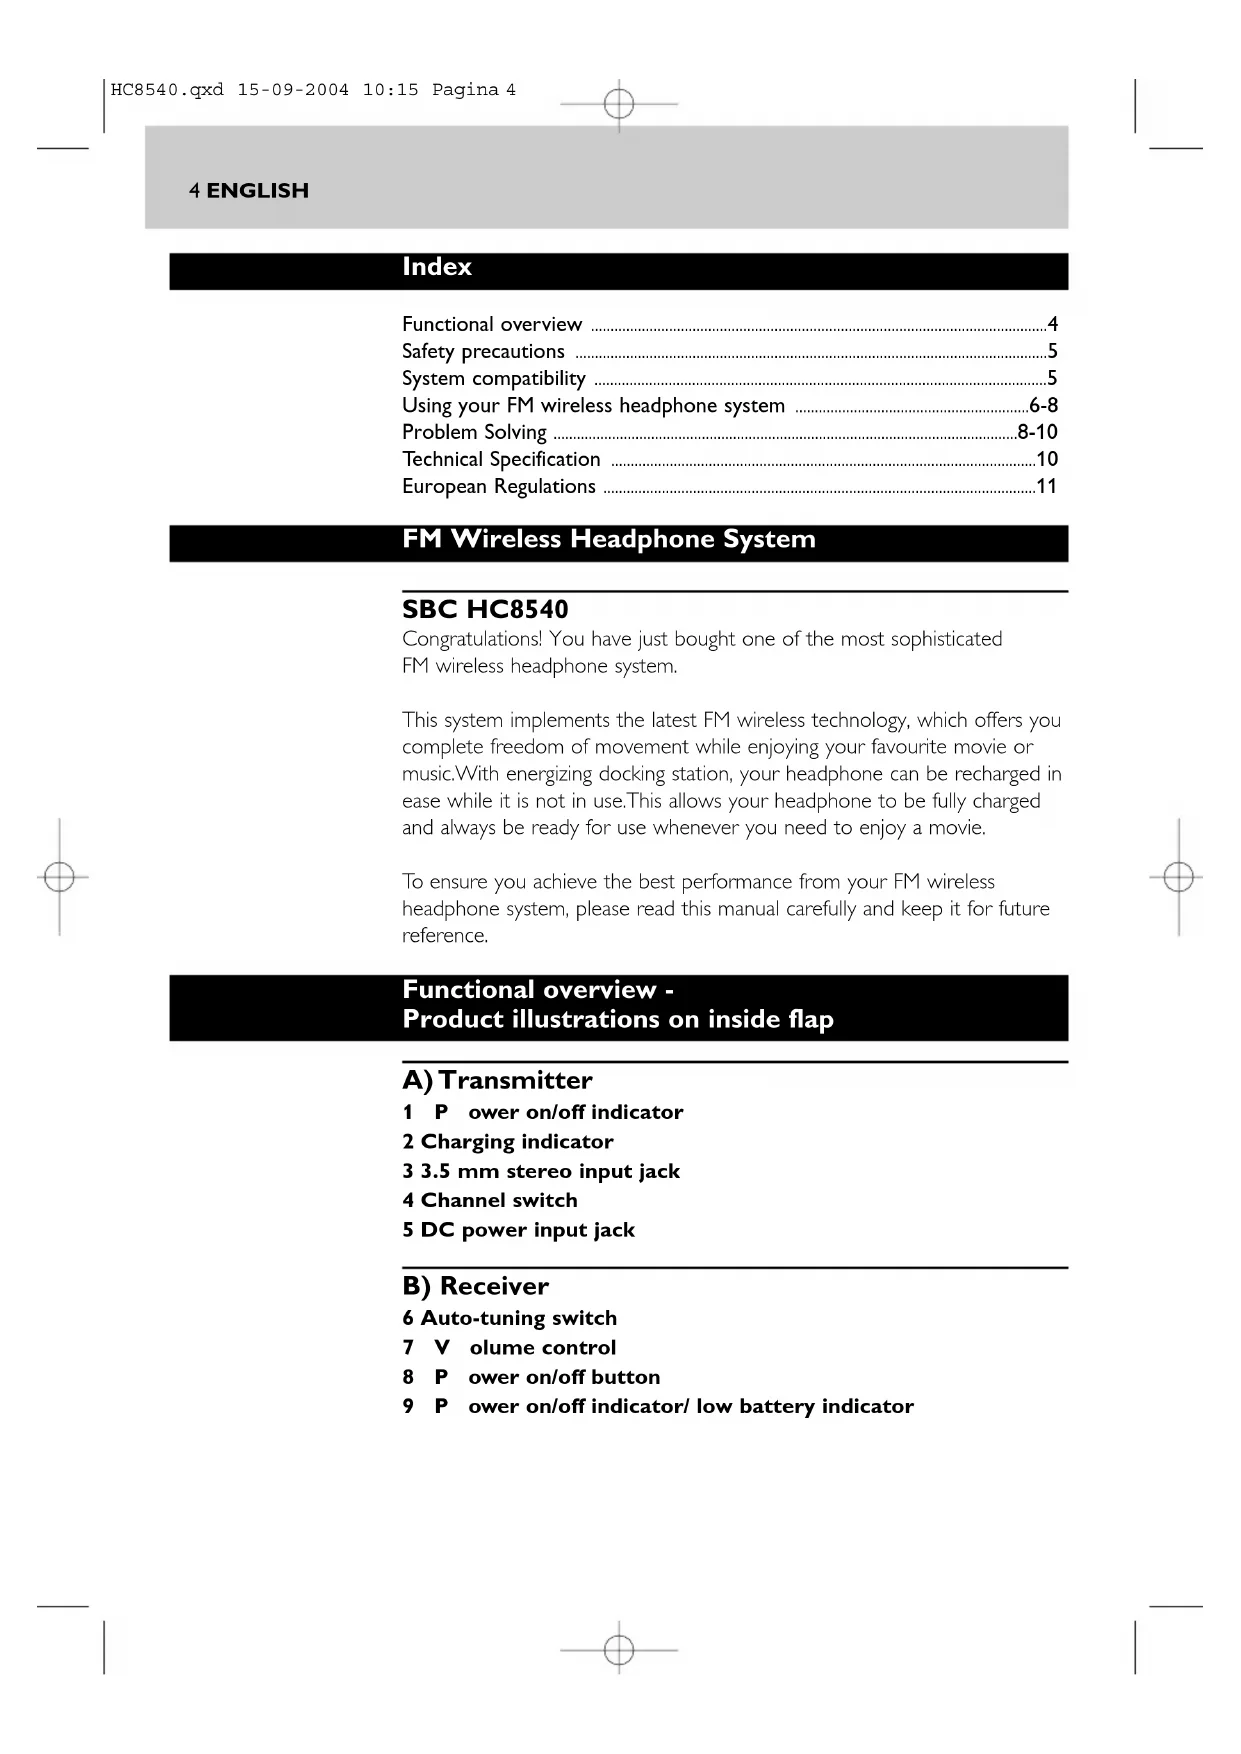
A) Transmitter
1 P ower on/off indicator
2 Charging indicator
3 3.5 mm stereo input jack
4 Channel switch
5 DC power input jack
B) Receiver
6 Auto-tuning switch
7 V olume control
8 P ower on/off button
9 P ower on/off indicator/ low battery indicator
Important information
Please read the following instructions carefully, and retain this booklet for future reference. All the safety and operating instructions should be read before using the FM wireless headphone system.
Safety precautions
- Prevent fire or shock hazard: do not expose this equipment to humidity, rain, sand or excessive heat caused by heating equipment or direct sunlight.
- Radio equipment for wireless audio applications is not protected against disturbance from other radio services.
- Do not use cleansing agents containing alcohol, spirits, ammonia or abrasives as they may harm the housing. Use a slightly dampened chamois cloth to clean the housing.
- If fluid spills into the headphone system, remove the batteries immediately and consult an authorized dealer.
- Do not use this product in damp places or close to water.
- Do not expose this product to extreme heat or direct sunlight.
- Do not disassemble the product. In the event of technical difficulties, take it to your Philips retailer.
- Do not cover this product
- Inadequately protected or sensitive electronic equipment may be affected by the use of this product. This interference may lead to damage to either equipment. Please check whether or not surrounding equipment may be affected by this product before you start using it.
- Hearing Safety! Continuous use at high volume may permanently damage your hearing.
System compatibility
It is technically possible to use an additional number of FM wireless headphones or Philips FM wireless speakers with a single transmitter if they all*:
- operate in the 864 MHz band
- work according to the same modulation scheme
– can detect a 19kHz pilot tone
Please consult the appliance's electrical specification sheets for confirmation on compatibility.
This statement is to be interpreted from a technical point of view only and does therefore not constitute any guarantee nor obligation whatsoever regarding the commercial availability of single FM wireless headphones /speakers compatible with SBC HC8542.
6 ENGLISH
Using your FM wireless headphone system
IMPORTANT!
- Use only Philips SBC CS030/00 (/05 for UK, Ireland) 12V/200mA AC/DC adapter.
- Use only Philips' shortened sleeve rechargeable batteries NiMH (R03/AAA, type number: SBC HB550S, partnumber 996500015757).
- Do not use NiCd batteries or alkaline batteries as they may damage your FM wireless headphone system.
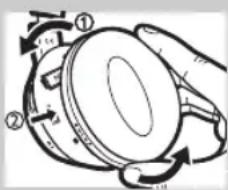
Installing/replacing batteries
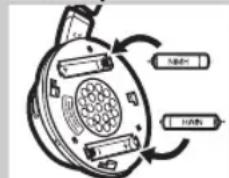
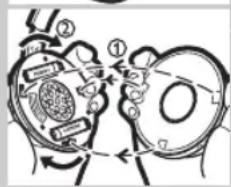
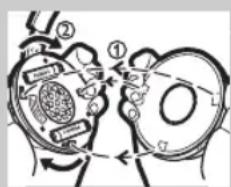
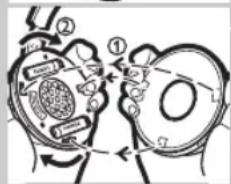
1 Unscrew and remove the left ear cushion of the headphone.
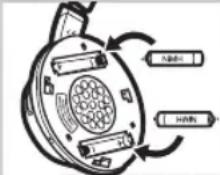
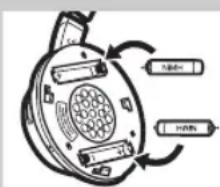
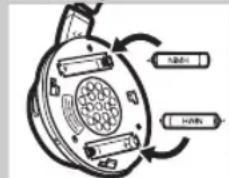
2 Insert the rechargeable batteries into the battery compartment.
Use only Philips' shortened sleeve rechargeable batteries NiMH (R03/AAA, type number: SBC HB550S, partnumber 996500015757).
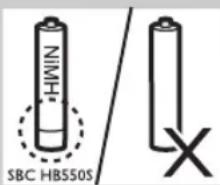
3 Make sure the batteries are correctly inserted as indicated by the engraved polarity symbol in the battery compartment.
Always remove the batteries from the headphone if the system will not be used for a long period of time.
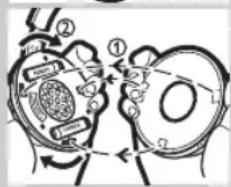
4 Put the left ear cushion back into place.
Setting up the transmitter
5 Make sure the adapter's rated voltage indicated on the type plate corresponds to the mains voltage supply.
6 Connect the DC power output connector of the 12 Volt/ 200mA AC/DC adapter to the DC POWER INPUT JACK at the back of the transmitter.
7 Connect the 12 Volt/200mA AC/DC adapter to the mains socket.
Always remove the adapter from the mains socket if the transmitter will not be used for a period of time.
Charging the headphone
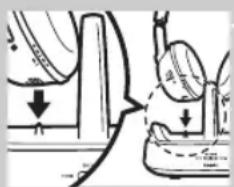
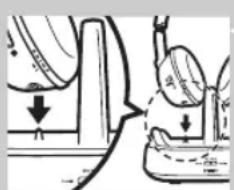
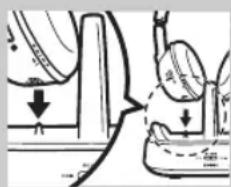
8 Place the headphone onto the energizing docking station, and make sure the charging pins of the transmitter and the charging contact of the headphone are well aligned.
The CHARGING INDICATOR light will be on automatically indicating charging is taking place. At the same time, the headphone will power off automatically (i.e. POWER ON/OFF INDICATOR lights off).
When charging is finished (which takes approximately 16 hours), the green CHARGING INDICATOR light will also be off automatically.
ENGLISH 7
IMPORTANT!
- The energizing docking station does not transmit audio signal when charging is activated.
WARNING!
- Before using the FM headphone for the first time, please ensure that the batteries are fully charged for at least 16 hours. This will guarantee a longer operating lifetime of batteries. - This product complies with the latest safety regulations. Please only charge the batteries with the docking station provided (SBC HC8542) or with fully compatible charger.
Audio Connection
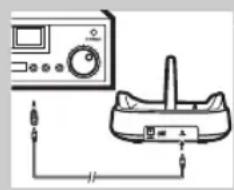
9 Connect one end of the audio cable (3.5 mm stereo plug) to the transmitter's 3.5 mm STEREO INPUT JACK.
natural_image
Simple line drawing of a device connected to a speaker (no text or symbols)10 Connect the other end of the 3.5 mm stereo cable to either:
a) The headphone output of an audio source, such as TV, HiFi or PC. Adjust the volume level of the audio source to a fixed reasonably high level; for example 25% of the maximum level.
- In case your audio source has a 6.3mm headphone output, use the supplied 3.5mm to 6.3mm stereo adapter plug.
IMPORTANT!
- In case of certain TVs, the headphone jack output level can only be adjusted after accessing the TV on-screen menu.
natural_image
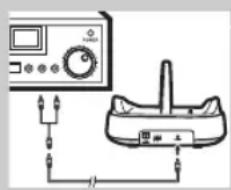
Pure electrical circuit lines without any symbolsb) The line output of an audio source, such as REC OUT or LINE OUT (with the Y-cable supplied).
- Check if the red RCA plug (right channel) is connected to the right channel (red) of the audio source.
- Check if the white RCA plug (left channel) is connected to the left channel (white) of the audio source.
- In case the audio source has an adjustable RCA output level, adjust the output level to the highest acceptable undistorted level.
11 Switch on your audio source and carefully increase the volume of the audio source.
The POWER ON/OFF INDICATOR of the transmitter lights up when signals are received.
natural_image
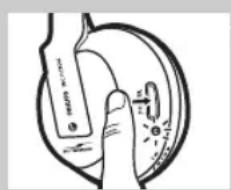
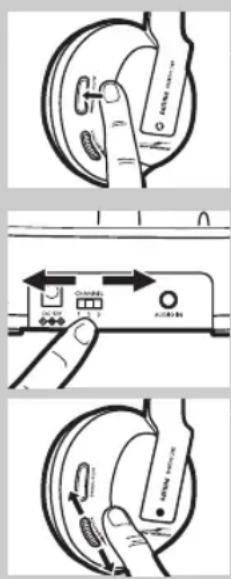
Simple line drawing of a hand pressing down on a circular object with a handle (no text or symbols)12 Switch on the POWER ON/OFF button of the headphone.
The POWER ON/OFF INDICATOR will be switched on automatically.
8 ENGLISH
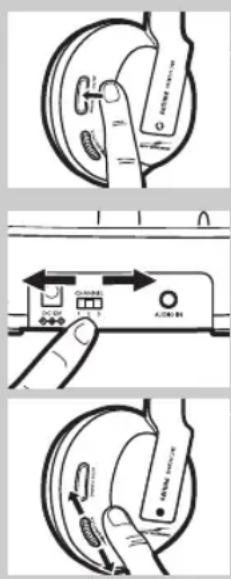
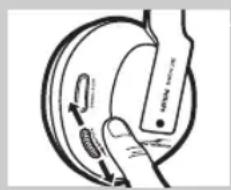
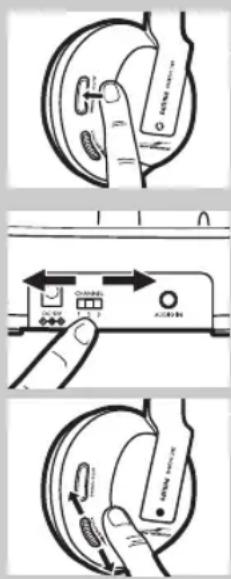
13 Press and hold the AUTO-TUNING BUTTON on the headphone for about 1 second to tune to the correct transmission channel. The headphone will automatically tune to the transmitter.
14 In case interference from neighbouring transmitters has occurred, adjust the transmission channel of the transmitter, then repeat step 13 to tune the headphone to the transmitter.
15 Adjust the volume of the headphone to the desired listening level.
IMPORTANT!
- Avoid adjusting the listening volume level at the audio source as this may compromise the audio quality on too low input levels.
Problem solving
If a fault occurs, first check the points listed below. If you are unable to remedy a problem by following these hints, contact the helpline (see 'Need help?') or consult your dealer. Never try to open the set yourself as this will void the guarantee. First, check all cables to ensure that they are connected correctly.
Problem Possible Cause Solution
| Headphone fails No battery installed Follow step 1 to 4 of to charge ‘Installing/replacing the batteries’ | ||
| Wrong battery orientation Reposition the batteries according to the engraved polarity symbol. | ||
| No power supply Make sure the docking station is connected to the local mains power supply through an adapter and follow steps 5 to 7. | ||
| Charging pin of the docking station not in contact with the metal make plate of the headphone | Lock the headphone in place, and sure the CHARGE INDICATOR light is on. | |
| Wrong headphone orientation when placed onto the charging dock | Reposition the headphone with correct orientation. | |
| No sound/distorted sound | Headphone power off | Push the POWER ON/OFF BUTTON. The POWER ON/OFF INDICATOR light turns on automatically indicating the headphone is on. |
| No battery installed Follow step 1 to 4 of ‘Installing/replacing the batteries’ | ||
ENGLISH 9
| Wrong battery orientation Reposition the batteries according to the engraved polarity symbol. | |
| No power supply to transmitter Make sure the docking station is connected to the local mains power supply through an adapter and follow step 5 to 7. | |
| Battery power running low Follow steps 5 to 7 to recharge the system. | |
| Audio source not connected Make sure the audio output of your audio source is connected to the 3.5 mm STEREO INPUT JACK of your transmitter. Follow step 9 to 12. | |
| Audio source is off Turn on your audio source. | |
| Volume level set too low Adjust the volume level of your audio source or the headphone.Hearing Safety: Continuous use at a high volume may permanently damage your hearing. | |
| Audio output level low In case of audio sources with adjustable output level, adjust the output level to a higher and non-distorted level.IMPORTANT: In case of certain TVs, the headphone jack output level can only be adjusted after accessing the TV on-screen menu. | |
| Headphone not tuned to Push and hold the AUTO-TUNING the transmitter BUTTON for about 1 sec, then the headphone will automatically search for the best possible reception. | |
| Interference from other radio sources 1) Alter the transmitter's frequency channel. Select 1 of the 3 options for best reception.We advise you to select channel 1 as the first option. Next adjust the headphone's tuning channel as described above.2) Move transmitter or headphone elsewhere | |
| Receiver too far away from transmitter | Move closer for reception |
| Transmitter other than SBC HC8542 is used | Make use of the SBC HC8542 transmitter provided. Some transmitters already built into other equipment may not be compatible with the SBC HC8545 headphone because of the advanced technologies used. |
10 ENGLISH
No sound The energizing docking station If you want to enjoy music with (multiple does not transmit audio signal other Philips wireless headphones or headphones or when charging is taking place. speakers which is compatible with Philips wireless Therefore other Philips the SBC HC8542 docking station, speaker) headphones or wireless speaker be sure to remove the SBC HC8545 cannot receive any signal, headphone from the docking station. even if they are compatible with the SBC HC8542 docking station.
Technical specifications*
| Transmitter System: Radio Frequency (RF) | ||
| Modulation: | Frequency Modulation (FM) | |
| Pilot Tone: | 19kHz | |
| Carrier Frequency: (/00 & /05) | Channel 1: 863.5MHzChannel 2: 864MHzChannel 3: 864.5MHz | |
| Radiated Output Power | <10mW | |
| Effective Transmission Range | Up to 100m **, omni directional (360°) | |
| Input Level: | 500 mV | |
| Power supply: | 12 Volts/ 200mA DC, center positive; type number: SBC CS030/00 (/05 for UK, Ireland) | |
| Headphone | Reception Frequency: (/00 & /05) | 863MHz – 865MHz |
| S/N ratio: | ~ 70 dB (1kHz sine wave, A-weighted) | |
| Distortion: | ≤ 2% THD | |
| Channel Separation: | ≥ 30 dB | |
| Audio frequency range: | 20-20,000 Hz | |
| Power Supply: | 2 x R03/AAA rechargeable batteries (Philips, NiMH, type number: SBC HB550S, partnumber 996500015757) | |
| Battery Life Time: | ~ 15 hours | |
*) All specifications are subject to change
**) Depending on ambient conditions
European Regulations
Hereby, Philips Consumer Electronics, B.U. Peripherals & Accessories, declares that this FM wireless headphone system SBC HC8540 is in compliance with the essential requirements and other relevant provisions of Directive 1999/5/EC.
This product has been designed, tested an manufactured according to the European R&TTE Directive 1999/5/EC.
Following this Directive, this product can be brought into service in the following states:
SBC HC 8540/00
R&TTE Directive 1999/5/EC
| B √ | DK √ | E √ | GR √ | F √ |
| IRL ✘ | I √ | L √ | NL √ | A √ |
| P √ | SU √ | S √ | UK ✘ | N √ |
| D √ CH √ |
SBC HC 8540/05
R&TTE Directive 1999/5/EC
| B × | DK × | E × | GR × | F × |
| IRL √ | I × | L × | NL × | A × |
| P × | SU × | S × | UK √ | N × |
| D × CH × |
This product complies with class 3 requirements as set down in EN 301 489-1 and EN 301 489-9.
12 FRANÇAIS
Index
natural_image
Simple line drawing of a device connected to a speaker (no text or symbols present)natural_image
Diagram of a simple electrical testing setup with a digital instrument and a device connected to a power outlet (no text or labels visible)natural_image
Illustration of a hand pressing down on a circular object with a tool, no text or symbols presentR&TTE Directive 1999/5/EC
| B √ | DK √ | E √ | GR √ | F √ |
| IRL ✘ | I √ | L √ | NL √ | A √ |
| P √ | SU √ | S √ | UK ✘ | N √ |
| D √ CH √ |
SBC HC 8540/05
R&TTE Directive 1999/5/EC
| B × | DK × | E × | GR × | F × |
| IRL √ | I × | L × | NL × | A × |
| P × | SU × | S × | UK √ | N × |
| D × CH × |
natural_image
Diagram showing a mechanical or architectural component with downward arrows indicating motion or force, no visible text or symbols.natural_image
Simple line drawing of a device connected to a speaker (no text or symbols present)natural_image
Diagram of a device connected to a speaker with signal lines (no text or symbols)natural_image
Simple line drawing of a hand pressing down on a curved object with a handle and circular base (no text or symbols)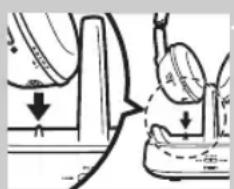
natural_image
Diagram showing mechanical components with arrows indicating motion or force direction (no text or symbols)WICHTIGER HINWEIS!
natural_image
Simple line drawing of a device connected to a screen and a speaker (no text or symbols)natural_image
Diagram showing a device connected to a device with labeled ports and connections (no readable text or symbols)natural_image
Simple line drawing of a hand holding a curved object with a circular base and a small inset showing a hand pointing at it (no text or symbols)
natural_image
Technical line drawing showing mechanical assembly with downward arrows indicating motion (no text or symbols)natural_image
Simple line drawing of a device connected to a speaker (no text or symbols present)natural_image
Diagram showing a device connected to a device with labeled ports and connections (no readable text or symbols)natural_image
Simple line drawing of a hand pointing at a curved object with a label (no text or symbols present)natural_image
Diagram showing a mechanical or architectural component with arrows indicating direction (no text or symbols present)ITALIANO 47
IMPORTANTE!
natural_image
Simple line drawing of a device connected to a speaker (no text or symbols)natural_image
Diagram of a device connected to a speaker with labeled ports (no text or symbols present)natural_image
Illustration of a hand pressing down on a curved object with a label (no text or symbols present)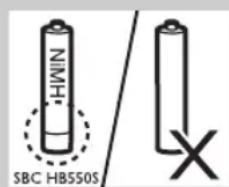
Colocar/substituir as pilhas
natural_image
Diagram showing mechanical components with arrows indicating motion or force direction (no text or symbols)PORTUGUÊS 55
IMPORTANTE!
natural_image
Diagram of a device connected to a speaker with a power outlet (no text or symbols present)natural_image
Simple line drawing of a device connected to a speaker (no text or symbols present)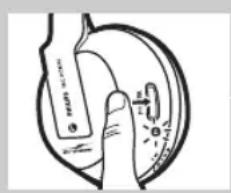
Installera/byta batterier
Ställa in sändaren
natural_image
Diagram showing a mechanical or fluidic process with arrows indicating direction of movement (no text or symbols present)Ladda headsetet
natural_image
Pure electrical circuit lines without any symbolsnatural_image
Diagram of a device connected to a device with cables and a speaker (no text or symbols visible)natural_image
Simple line drawing of a hand pressing down on a curved object with a label (no text or symbols present)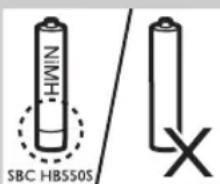
natural_image
Diagram showing a mechanical or fluidic process with downward arrows indicating flow or movement (no text or symbols present)natural_image
Simple line drawing of a device connected to a speaker (no text or symbols present)natural_image
Hand holding a device with a circular component and a small inset showing a hand holding a device (no text or symbols visible)natural_image
Simple line drawing of a mechanical device with no visible text or symbols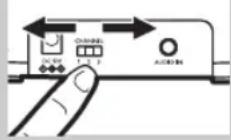
natural_image
Hand holding a circular device with a scroll wheel and directional arrows (no text or symbols)Pil takma/yenileme
İleticiyi kurmak
natural_image
Diagram showing mechanical components with arrows indicating motion or force direction (no text or symbols)Kulaklığı şarj etme
natural_image
Simple line drawing of a device connected to a speaker (no text or symbols present)Turk Philips Tic. A.S.
Y. Dudullu Org. San Bolg.2.Cad.No:22
Umraniye-IST-Turkiye
84 POLSKI
Spis treści
Opis możliwości 84
natural_image
Diagram showing mechanical components with downward arrows indicating motion or force (no text or symbols)POLSKI 87
WAŻNE!
natural_image
Simple line drawing of a device connected to a speaker (no text or symbols)natural_image
Pure electrical circuit lines without any symbolsnatural_image
Simple line drawing of a hand pressing down on a curved object with a handle (no text or symbols)R&TTE Directive 1999/5/EC
| B √ | DK √ | E √ | GR √ | F √ |
| IRL ✘ | I √ | L √ | NL √ | A √ |
| P √ | SU √ | S √ | UK ✘ | N √ |
| D √ CH √ |
SBC HC 8540/05
R&TTE Directive 1999/5/EC
| B × | DK × | E × | GR × | F × |
| IRL √ | I × | L × | NL × | A × |
| P × | SU × | S × | UK √ | N × |
| D × CH × |
natural_image
Diagram showing a mechanical assembly with downward force arrows and a circular component (no text or symbols)DŮLEŽITÉ!
natural_image
Simple line drawing of a hand pointing at a curved object with no text or symbolsnatural_image
Diagram showing mechanical components with downward arrows, no readable text or symbols presentnatural_image
Simple line drawing of a device connected to a speaker (no text or symbols present)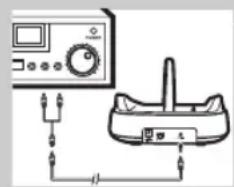
natural_image
Simple line drawing of a device connected to a speaker (no text or symbols present)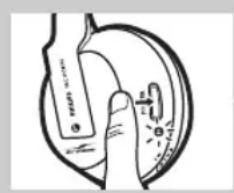
natural_image
Simple line drawing of a hand pointing at a curved object with a label (no text or symbols present)104 MAGYAR
natural_image
Diagram showing a mechanical or fluidic process with downward arrows indicating flow or movement (no text or symbols present)Зарядка наушников
natural_image
Diagram showing a device connected to a device with a power outlet (no text or symbols present)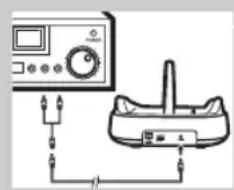
natural_image
Simple line drawing of a device connected to a speaker (no text or symbols present)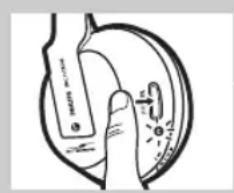
natural_image
Simple line drawing of a hand holding a curved object with a label, no text or symbols present.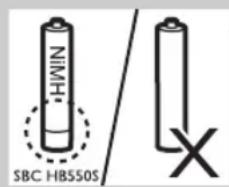
natural_image
Pure electrical circuit lines without any symbolsnatural_image
Diagram showing a device connected to a device with ports and cables (no text or symbols visible)natural_image
Hand holding a circular object with a label and abstract markings (no readable text or symbols)12 Vajutage kõrvaklappide TOIDE SISSE/VÄLJA LÜLITIT. TOIDE SEES/VÄLJAS INDIKAATOR süttib automaatselt.
120 EESTI KEEL
natural_image
Diagram showing a mechanical or architectural component with downward arrows indicating motion or force, no text or symbols present.SVARĪGI!
natural_image
Diagram of a device connected to a speaker with power lines (no text or symbols)10 Pievienojiet otru 3.5 mm audio stereokabela galu:
natural_image
Diagram showing mechanical components with downward arrows indicating motion (no text or symbols)natural_image
Pure electrical circuit lines without any symbolsnatural_image
Simple line drawing of a hand holding a device with a circular component (no text or symbols)- ENGLISH
- Index
- FM Wireless Headphone System
- SBC HC8540
- Functional overview - Product illustrations on inside flap
- A) Transmitter
- B) Receiver
- Important information
- Safety precautions
- System compatibility
- ENGLISH
- Using your FM wireless headphone system
- IMPORTANT!
- Installing/replacing batteries
- Setting up the transmitter
- Charging the headphone
- ENGLISH 7
- WARNING!
- Audio Connection
- ENGLISH
- Problem solving
- ENGLISH
- European Regulations
- SBC HC 8540/00
- SBC HC 8540/05
- FRANÇAIS
- WICHTIGER HINWEIS!
- ITALIANO 47
- IMPORTANTE!
- Colocar/substituir as pilhas
- PORTUGUÊS 55
- Installera/byta batterier
- Ställa in sändaren
- Ladda headsetet
- Pil takma/yenileme
- İleticiyi kurmak
- Kulaklığı şarj etme
- POLSKI
- Spis treści
- POLSKI 87
- WAŻNE!
- DŮLEŽITÉ!
- MAGYAR
- Зарядка наушников
- EESTI KEEL
- SVARĪGI!
Brand : PHILIPS
Model : SBCHC8540
Category : Headphones