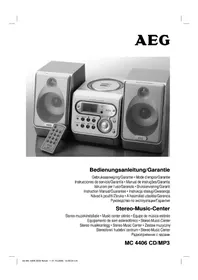
SLS 4712 - Hi-fi system AEG - Free user manual and instructions
Find the device manual for free SLS 4712 AEG in PDF.
| Product type | Home cinema system (hi-fi) |
| Brand | AEG |
| Model | SLS 4712 |
| Power supply | 230 V, 50 Hz |
| Power consumption (operation) | 75 W max |
| Power consumption (standby) | < 1 W |
| Net weight | 5.8 kg |
| FM range | 87.5 – 108 MHz |
| Supported audio formats | MP3, WMA |
| Audio inputs | USB, SD, AUX (2.1), DVD 5.1 (analog) |
| Surround function | PRO-LOGIC (2.1/5.1) |
| Remote control | Yes (AAA batteries not included) |
| Radio presets | Yes |
| Display | LED screen |
| Cleaning | Soft, dry cloth |
| Safety | Automatic standby shut-off (standby < 1 W) |
Frequently Asked Questions - SLS 4712 AEG
User questions about SLS 4712 AEG
0 question about this device. Answer the ones you know or ask your own.
Ask a new question about this device
Download the instructions for your Hi-fi system in PDF format for free! Find your manual SLS 4712 - AEG and take your electronic device back in hand. On this page are published all the documents necessary for the use of your device. SLS 4712 by AEG.
USER MANUAL SLS 4712 AEG
D 5.1 Surround Laufsprecher System
NL 5.1 Surround liquidsprekersysteme
F 5.1 Système haut-parleur surround
E Sistema De Altavoces Envolvente 5.1
I 5.1 Sistema di casse Surround
GB 5.1 Surround Loudspeaker System
PL 5.1 Zestaw naglasniajocy Surround
H 5.1 Surround-hangszórendszer
UA 5.1 CnCTema 06'EMHOro 3ByaHHA
RUS 5.1 Akkyctnneckar cmtema Tna "Surround"
Overview of the Components.. 3/35
Instruction Manual.. 36
Technical Data Page 40
Disposal Page 40
Język polski
Spistresci
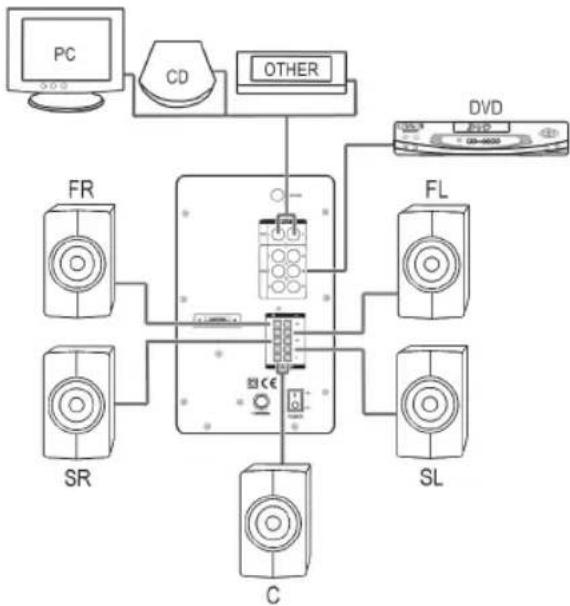
3 DVD INPUT (branchements 5.1)
Mode supports de stockage
Remote control (Fig. 2)
1 FM:
Switches the unit to radio mode.
2 PRESET:
Selects the preset radio station.
3 MUTE: Switches to mute.
4 RESET:
Restores the factory defaults.
5 PRO-LOGIC:
Toggles the unit between PL ON (5.1) and PLOFF (2.1) mode.
6 USB/SD:
Selects USB or card slot.
7 CEN:
Adjusts the volume of the center speaker in combination with the VOL +/- buttons.
8 :
Start/pause music playback from USB or memory cards.
9 SUB:
Adjusts the volume of the subwoofer with the VOL +/- buttons.
5 VOL+/VOL- buttons
6 ST-BY/ button (keep the button pressed to switch between standby and operating mode.)
7 SOURCE button
10 TUNING+/TUNING:
Scans radio stations.
11 Numeric buttons
12 SURR:
Adjusts the volume of the surround speakers in combination with the VOL +/- buttons.
13 VOL+/VOL:
Increase/reduce overall volume.
Select next/previous track.
14 FRONT:
Adjusts the volume of the front speakers in combination with the VOL +/- buttons.
15 AUX:
Switches the unit to AUX mode (2.1).
16 DVD:
Switches the unit to DVD mode (5.1).
17 ST-BY:
Switches the unit to standby/operating mode.
18 MEMORY:
Stores radio stations.
Thank you for choosing our product. We hope you enjoy using the device.
General Safety Instructions
Read the operating instructions carefully before putting the appliance into operation and keep the instructions including the warranty, the receipt and, if possible, the box with the internal packing. If you give this device to other people, please also pass on the operating instructions.
- To avoid the risk of fire or an electric shock, you should not expose the device to rain or moisture. Consequently, do not use the device in the immediate vicinity of water - for example near a bath tub, a swimming pool or in a damp cellar.
- Use the device only for the intended purpose.
- Only connect the device at a properly installed plug socket. Pay attention that the specified voltage corresponds to the voltage of the plug socket.
- When using external mains supply, pay attention to the correct polarity and voltage. Always place the batteries in the correct direction.
- Assemble the device in such a way that the available ventilation openings are not covered.
- Do not insert any objects into the bass reflex opening.
- Never open the housing of the device. Incorrect repairs can constitute a considerable risk for the user. Should the device become damaged, in particular the mains supply cable, do not operate the device any longer, but rather have it repaired by an expert. Check the mains supply cable regularly for damage.
- For safety reasons a broken or damaged mains lead may only be replaced by an equivalent lead from the manufacturer, our customer service department or a similarly qualified person.
- If the device is not used for a longer period, remove the plug connector from the plug socket or take out the batteries.
These symbols may be found on the machine and are intended to indicate the following:
The lightning symbol should advise the user of parts in the inside of the device which carry dangerously high voltage levels.

The symbol with an exclamation mark should advise the user of important operation or maintenance instructions in the accompanying documentation.
Symbols in these Instructions for Use
Important information for your safety is specially marked. It is essential to comply with these instructions in order to avoid accidents and prevent damage to the machine:

WARNING:
This warns you of dangers to your health and indicates possible injury risks.

CAUTION:
This refers to possible hazards to the machine or other objects.

NOTE:
This highlights tips and information.
Children and Frail Individuals
- In order to ensure your children's safety, please keep all packaging (plastic bags, boxes, polystyrene etc.) out of their reach.

WARNING!
Caution! Do not allow small children to play with the foil as there is a danger of suffocation!
- This device is not intended to be used by individuals (including children) who have restricted physical, sensory or mental abilities and/or insufficient knowledge and/or experience, unless they are supervised by an individual who is responsible for their safety or have received instructions on how to use the device.
Children should be supervised at all times in order to ensure that they do not play with the device.
Installation
- Remove all devices from the packing and replace the internal packaging material back in the box.
- Retain the packaging if possible during the entire guarantee period!
- Do not insert the plug of the subwoofer into the socket until all loudspeakers and connections have been correctly made!
- If applicable, remove the protective plastic from the display and the front panel.
For optimum installation of the loudspeakers, please follow the instructions below:

Connection
CAUTION:
- Switch off the subwoofer before connecting the speakers or modifying the connection.
- Make sure that the uninsulated speaker wires do not touch/cross. Risk of short circuiting!
- Do not operate the unit at maximum volume. This may lead to damage.
- Never connect the speakers to the mains!
- Never touch the speaker membranes with your hands or with objects. Doing so may damage the membranes.
- Do not overload the speaker boxes.
NOTE:
Please ensure
- that the plug-in connectors are firmly in place. Poor connections can result in interference.
- that exposed wires do not touch or cross each other. Danger of short-circuiting!
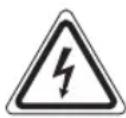
1 Antenna connection
Plug the supplied FM wire antenna onto the connection.
2 AUX R/L INPUT (2.1 connections)
For connection of an external sound source with normal stereo recording (e.g. hi-fi video recorder).
NOTE:
Alternatively, you can switch to PRO-LOGIC, which modifies the stereo signal to simulate a surround sound. All loudspeakers are then activated.
3 DVD INPUT (5.1 connections)
Used for connecting an external sound source to a
5.1 output (e.g. DVD player).
NOTE:
The device has an analogue 5.1 connection for an AC3 or DTS decoder.
4 OUTPUT
- Outputs on the right and left for connection of the front loudspeakers (FR/FL).
-
Outputs for connection of the surround speaker boxes right and left (SR/SL).
Output for connection of the centre loudspeaker (C). -
Remove around 1.5cm of the cable insulation.
- Twist the end of the cable.
- Open the cable terminal by pressing on the latch.
- Now connect the speaker cable of the respective box to the corresponding connection on the subwoofer. Check that the polarity is correct. The wire marked with a white stripe is +
5 POWER ON/OFF switch
With this switch the system can be switched on and off.
NOTE:
- Every time it is switched on the device starts in 5.1 (AC3) operation.
After the device has been separated from the power supply the values set by you are reset to the default values set at the factory.
6 Mains lead
Power supply
When you have connected all loudspeakers and devices as described you can insert the mains plug of the subwoofer into a correctly installed 230 volt, 50 hertz power socket.
38 English
The correct wiring should be as follows:

Remote Control
Inserting the battery/batteries
(battery/batteries not supplied)
- Open the lid of the battery compartment on the back of the remote control.
- Insert 2 batteries of type R03 "AAA" 1.5 V. Ensure that the polarity is correct (see the floor of the battery compartment)! If the remote control is not used for a prolonged period, remove the batteries in order to prevent battery acid leaking.
- Now close the battery compartment.
CAUTION:
- Different battery types or new and used batteries must not be used together.
- Batteries are not to be disposed of together with domestic wastes. Dispose of the used batteries at the relevant collection bin or at your dealer's.
WARNING:
Do not expose the batteries to high temperatures or direct sunlight. Never throw batteries into the fire. There is a danger of explosion!
When the remote control is used, care should be taken that there are no objects between the remote control and the central loudspeaker. (e.g. table, chair, etc.). These objects prevent the infrared beam of the remote control from reaching the receiver of the central loudspeaker. It is then not possible to control the television with the remote control.
Initial Operation
iNOTE:
Some buttons are located both on the front panel of the device and on the remote control. The buttons with the same designation have the same function.
Insert the plug in a duly installed 230V / 50Hz socket.
- Switch on your sound source (e.g. DVD player) and start it.
- Turn on the subwoofer with the on/off switch on the rear of the device.
- Select the desired input source. To do so, press the corresponding button on the remote control (DVD (16), AUX (15), USB/SD (6), or FM (1)).
NOTE:
- You can also select the input source by repeatedly pressing the SOURCE button (7 on the unit).
After changing the input source and after disconnecting from the mains, the values you have preset are reset to the factory defaults. -
Every time it is switched on the device starts in 5.1 (AC3) operation. "dU" appears on the display.
-
Use the PRO-LOGIC button to switch between 2.1 and 5.1 mode.
- With the VOL +/- button you can set the overall volume.
MUTE (3)
This button is used to quickly turn off the volume. The indicator flashes on the display. Press the button again to cancel the function.
Adjust the volume of the individual speakers
- Firstly, on the remote control, press the button of the speaker whose volume you want to adjust (CEN (7), SUB (9), SURR (12), FRONT (14)).
- Then press the VOL +/- buttons to adjust the volume of the center, subwoofer, surround, or front speaker.
NOTE:
Please note! The surround and centre loudspeakers can only be controlled during 5.1 operation.
Turning off
To turn off, switch the POWER button on the back of the unit to the OFF position.
Radio mode
Scan stations
- Press the FM button (1) to switch the unit to radio mode.
- Tune the desired station with the TUNING+/TUNING-buttons. If you keep one of the buttons pressed, the unit will scan to the next radio station. The tuned frequency is shown on the display.
Preset stations
- Search for a station as described under "Scan stations".
- Press the MEMORY button (18). "00" flashes on the display.
- Use the and buttons (13) to select the preset location at which you want to store the station.
- Press the MEMORY button again. The preset location flashes briefly and the station is preset.
Select preset stations
You have two options to select the preset radio station:
- Use the numeric buttons (11).
- Press the PRESET button (2). Then select the preset location with the and buttons (13). Press the button (8) to play the radio station.
Storage media mode
Storage media compatibility
There is a wide range of compression methods as well as variations in quality between storage media. These unfortunately do not allow us to guarantee full compatibility. For these reasons, there may be problems in rare cases in playing back music from memory cards and USB sticks. This is not a malfunction of the device.
USB Port (1)
- Press the USB/SD button (6). "Ud" appears on the display.
- Connect a USB stick. USB appears on the display. Playback then begins. The elapsed playing time of the current title is shown on the display.
For operation, please refer to the "Explanation of controls" section.
NOTE:
If you have also inserted a memory card at the same time, this will be accessed first. Remove the memory card to play back files from the USB.
CAUTION:
Before removing the USB stick, switch to another input source.
Card slot (2)
- Press the USB/SD button (6). "Ud" appears on the display.
- Insert a memory card into the card slot. SD appears on the display. Playback then begins. The elapsed playing time of the current title is shown on the display.
For operation, please refer to the "Explanation of controls" section.
CAUTION:
Before removing the memory card, switch to another input source.
Explanation of controls
II(8)
You can briefly pause and restart playback. The elapsed playing time flashes on the display. Press the button again to continue playback at the same point.
(13)
- Use the button to skip to the next or to the subsequent title etc.
- Use the button to skip to the previous title.
Numeric buttons
Directly select the music track. After entering the title number, press the button to start playback.
Troubleshooting
| Problem Possible Cause Remedy | ||
| No sound from the front loudspeakers. | No power supply. Check the mains con- nection and the posi- tion of the on/off switch on the subwoofer. | |
| The volume is turned off. | Check the volume set- ting. | |
| The loudspeaker leads are wrongly connected. | Check the loudspeaker connections. | |
| No signal at the RCA input of the cinch sockets. | Check your external sound source (e.g. DVD player) and the RCA connections. | |
| The loudspeaker connection is the wrong way round or not correct. | Check the loudspeaker connection. | |
| No sound from the center or surround loudspeakers (5.1). | The loudspeaker connection is the wrong way round or not correct. | Check the loudspeaker connection. |
| The sound source does not emit any 5.1 signal. | Switch on the 5.1 output of the sound source. | |
| The subwoofer is not set to PL ON. | Set the subwoofer to PL ON. | |
| Device cannot be operated. | Device crashes and "hangs". | Disconnect the power supply for 5 sec. Then switch the device on again. |
Technical Data
Model: SLS 4712
Power supply: 230 V, 50 Hz
Power consumption
Standby: <1 W
Operating mode: max. 75 W
Playable file formats: MP3/WMA
Net weight: 5.8 kg
Radio element
Frequency range: FM 87.5 ~ 108 MHz
Subject to technical changes without prior notice!
This device has been tested according to all relevant current
CE guidelines, such as electromagnetic compatibility and low voltage directives, and has been constructed in accordance with the latest safety regulations.

Disposal
Meaning of the "Dustbin" Symbol
Protect our environment: do not dispose of electrical equipment in the domestic waste.
Please return any electrical equipment that you will no longer use to the collection points provided for their disposal.
This helps avoid the potential effects of incorrect disposal on the environment and human health.
This will contribute to the recycling and other forms of reutilization of electrical and electronic equipment.
Information concerning where the equipment can be disposed of can be obtained from your local authority.
Czeci (rys. 1)
TnybT duCTaHuiHoro KepyBaHHa (MaI.2)
1 FM:
Ipeemikahn npncptpo y pekm paio.
2 PRESET:
Bn6ip nonepedhbo BcTaHOBlenx paiaocTahui.
3 MUTE: BIMKHEHH 3BYKY.
4 RESET:
BjIDHOJIeHHaBOcBkXHaIaUyBaHb.
5 PRO-LOGIC:
Ipepexid mix pekumamPL ON (5.1) iPL OFF (2.1).
6 USB/SD:
Bn6ip po3'emy USB a6o rhi3da dny kaptni nam'rti.
7 CEN:
PeryIIOBaHHr rYHOCtI CEHTpaJIbHOrO rYHOMOBUBA B noEHaHHi 3 KhoNkAmn VOL + / -
8 :>11
3anyck/nay3a BiTbopeHnMy3nKn 3 USB a6o KapT nam'ATi.
9 SUB:
PeryIIOBaHnIryHocTi ca6BypepaB noeHaHHi 3 KhoNkami VOL + / -
5 KhoNKn VOL+/VOL-
6 KhoNka ST-BY/II (HaTnckaIte KhoNky IJI na nepexoJy mix peKIMOM OchikyBaHHI pekimom po60Tu)
7 Khoinka SOURCE
10 TUNING+/TUNING:
Pouyk paoictaui.
11 KhoIkn 3 uΦpaM
12 SURR:
PeryIIOBaHHr rYHOCTI rHOMOBUIB 6'MHOrO 3ByaH H B NoeHaHHi 3 KOnKamn VOL +/-
13 VOL+/VOL:
36iNbWeHHa/3MeHWeHHa 3araIbHoro pIBHa ryHocTi.
Bn6ip hactynho/nonepehboi dopixkN.
14 FRONT:
PernyIOBaHHr rHyHocTi nepeDHHr rHyHomOBuB y noEHaHHi 3 KhoNkAMn VOL +/-
15 AUX:
Ipepeixid y pekim AUX (2.1).
16 DVD:
Ipepeixid y pekim DVD (5.1).
17 ST-BY:
3MiHa pexkIMiB oYiKyBaHHa/po60Tu.
18 MEMORY:
36epekeHHpaJIOCTaHcij.
IInctpykui 3 ekcnnyatauii
JaKyEmo,IO npnIbAan HaN npOyKr. CnoJIBaEMocB 6yTe 3aobolneH i pOToIO boro npnna.
3araIbHi Bka3iBKn 0do 6e3neKn
Ipeep npnHHTAM B EKCNlyatauio zuo rnpnaLydyxye ybaXHO uTaTe IHCTpyKUIO 3 ekcnnytau ta 36epiraTe ii pa3OM 3 rapaHTINHM TaIOHOM, KACOBIM YekOM Ta, NO Mpi MOxJIbOcTI, 3 KapToHHOIO KOpObKOIO I BHyTpiUHbIOY naKOBKOIO. Y pa3i, io npinaad 6yde nepeDaHO TpeTimOCobam, cnid nepeDaBAtNo paoM 3 UIeIO IHCTpyKUIO 3 ekcnnyatau.
-ДязANO6irAHnpyn3Nkynoxekxiabo ydapy cTpyMOM, He donyckaiTe 3B0NoXeHNr npinay. He KopnCTyTEcH npinadm no6n3y BOn (HaPnKlaB BaHHi KIMHaTN, 6aceHH,BOIOriPiBaH).
BukopncObyTe pnpctpi BnKIOHNo 3a npn3HaueHHAM.
PiikJIOaHte npnnaBnKIOHO DO HanexHM YINHOM BCTAHOBHeHOrO JKepeHa XnBneHHra.3BepHtB yBary Ha Te,io6 Bka3aHa Hanpyra BiNobiIana Hanpy3i WTeNcEhBoHoi Po3eTKn.
- Ppi 3actocybaHHI 30BHIuHIX 6bIOKIB XINBHeHn 3BepHiYbary Ha BIPHI NOJIaRPHICr Ta HAnpyr, 3aBXdN CTaTe 6atapeKn B Heo6xIDHomy NopAky.
BcTaHObitb npnlaTak, 106 He 3aKpBaTn icHyOHi BEHTINJIaI Hi OTBOpN.
He BCTaBnIte 6yIb-RAKnx npEIMETIB OTBip pa3oiHBepTopa.
B JKOHOMy pa3i He BiKpnbATn KOpNc npuIady. HeaJIexHi peMOHTn MOxuyb CnpuHHTn cyTTeBi 3arpo3n IaI KOpNCtByaHa. Ppi noXkoJKeHHi npuIady, 3OKpeMa Ka6eJI XuBHeHH, npuIad He cIid NcKaTn B EKcNpy-ataJIO. Ka6eJI XuBHeHH peryIapHO nepeBiprTa Ha noXkoJKeHHa.
-Дязанобiraнэ Zarpo3i noшкджени КавьхИнгслд зamIHNTHa ekBIBaJIeHTHm BKNJIIOUHO BInpO6HnKOM, HauJOO cepBICHO CnyXbO AO iHJOHO KBaIipikoBaHOIOOCO6OIO.
KoJIN Bu DOBRO He KopnctyTeCb npnlaOM, BNTaHITb 1tTeNcEhBy BNkY 3 po3eTkn abo ndaTbte 6aTapeiKn.
Ha npnaiDi moxytb 6ytn po3taoBoaHi Taki CmBOni, uO6 BkA3Tn Bam Ha HacTyunHe.
CIMBOI 36NCKABKO BKA3YE KOPNCYBaHY Na BHyTPIUHl DeTANI npnAyni NHe6e3neHNO BUCOKOHO HanpyrO.

CmB0n i3 3NaKOM OKIky Bka3ye KOpNCTyBaHu Ha BaKJIbBi Bka3iBKn IIOdo EKcIIyatauIa6o pemOHTy B cynpOBiDnHX DOKymeHTax.
CnmboN B ciin HcTpykci 3 ekniyaTaui
Baxnbi Bka3iBKn Ila Ba0oi 6e3neKn CneuaJIbHO BiIMHeI. Ia 3anobirHn HeuacnX BNnAkn TB noKoJKeHb npnaNy oOb'r3KOBO pnpTpMmYTeCb IXN Bka3IBOK.

NONEPEDKEHHA.
PonepeJxye npo 3aRpo3nI BaUoro 3doPo8 Ta Bka3ye Ha MoXJIbI pu3NkTpaBM.

YBAGA.
Bka3ye Ha MoKJIbI 3aIrpO3n dIa npIaNy a6o IHux npeiMetIb.

IPMIMITKA.
Buiinie nikka3kn Ta infopmaioInBa.
DITU Ta HEMiHi Oco6u
-Дябзпсвсдг He 3aJIMaTe IOCTyHIMn NaKy-BaJIbHi MaTepiAn (PnaCTNKOBi NaKeTn, KapTOHHI Kopo6Kn, NeHONJIaCT TOnO).

NONEPEDKEHHI
He do3B0JIaTe MaIIM DIITM rpaTncb i3 nIIBKOIO. IcHyE 3arpO3a3adyxN!
Ley npnad He npn3haeHm dIy BkOpncTahnn IIObMn (BKNIOaOHy dTei) 3 O6MeXeHmN f3MHmN, YTTcBIMn a6o po3ymOBIMn 3dIOHOCTAMN, HeIOCTaTHIM DOCBIDOM Ta/a6o 3HaHHMM - KpIM BUNaKIB, KOIN 3a HMM DoIgIaE BiNDObIaNbHa 3a ix 6e3neky oc6a abo BOHN OTPIMaII BkazIBKn UDO BkOpncTaHH npnlaNy.
IITAM He IO3BOJIeHO rpaTncb 3 cIM npnlaom. NToTpi6EH DOrJIa3a HMM.
BctaHOBJEHH
BnmiTb yci YactHnnpctpo 3ynakOBki i noklaiBtBHyTpIHHn NaKyBaJIbHm MaTePian Ha3aY Kopo6ky.
36epiraTe nakyBaHm MaTepiAn, kUcO ce MOKlnBO, npOTaROM BCbOro rapaHTiHoro nepioNy!
He BCTabJIrTe 1eTKepeCabByepaBpo3eKy,doIOKn He 6yJe nIe'edHaBO Cci rYHOMOBi i npabINbHO BVKOHaHO Bci 3'edHaHH!
3a Heo6xIiHOCTI 3HIMITb 3axnCHy PnIBKy 3 nncnpei nepeHboi naHeJI.
IOnTMMaJIbHOBOBcHnHrYHOMOBuB JOTpMMyTEcb HabeEHnx HxKye IHCTpykui.
Pi'd'eHaHHa

YBAGA.
Ipeew HIX nID'EnHyBaTn rYHOMOBU a6o 3MIHOBATn npAdoK 3'eDHaHHB, BmKHiB ca6bBypep.
IpeBipTe,Hei30JIbOBAHIdpoTnIyHOMOBua He TopKaIOTBcA OINH OJHOro I He nepexpeuYIObCra. lChye He6e3neKa KOpOTKOro 3aMUKaHH!
He BUKOPNCOTobyTe IpnCTpiHa MaKcImaJIbHI rYHocTi. Lc MoKe np3BecTn Do noWkoJKeHHA potIB.
HikonHe nDeynte rHyOMoI Do MepeXkNbneH
HikoJI He TopkaITeCb Mem6paH rYHOMOBu pyKaMn abo 6yIb-AMMn IpeDMeTaMn. IHaKUe MOXHa NOJko-DHTN Mem6paHn.
He nepehaBaTaXyIte rYHOMOBU.


IPMMITKA.
IpebpTe take:
- Hn haHnHO 3akpInIeHi po3'emn Ha Micu. HeHaJIHe 3'eHaHHa MoKe cPnHHTn nepeUkoJn.
- HN OROJIH IIOPTI HE KOHTAKTYIOb aOo He NpepeuIOTbCA OINH 3 OINM. lChyE He6e3neKa KOpOTKOro 3aMnKaHH!
1Pi'dcHaHHaHTeH
IiD'ehaHte dpit FM-ANTHeH, uo doaaeTbcn, do po3'emy.
2 AUX R/L INPUT (po3'em 2.1)
BnKopncTObYeTBcA Dnla 3'edHaHHa 30BHIHbOrO dKepeIa 3BykoBOrO cHrHaI y 3BnauHoro cTepeo 3anCyIOro npicTroO (HapnKlnd BideomarHITocfoha hi-fi).

IIPMMITKA.
KpIM TORO, moXHa YbIMKHyTN peXm PRO-LOGIC, kKm MoDnphiKyE CTpeoocrHAn dIaIMtaii06'EMHOrO 3BykY. ToDi Byde AKTINBOAHO BcI rHOMOBU.
3 DVD INPUT (po3'EM 5.1)
BnKopncTObyEbCnIa nIeEHaHH3 3OBHIIuHbOrO DkepeNa CnHany Do BxOy5.1 (Hanpknad, DVDnporpaaba).

IPMMITKA.
Bn6ip BcTaHOBJeHoI cTaHci
IChye DbA CnOc6Bn BbOpBy BCTaHOBHeHoi paIOctaHJIi:
3a donomororo kHONOK iuzdpamn (11).
- Hatncihb KhoNkpy PRESET (2). 3a donomoroKhoNok i(13) Bn6epitb Micue BcTaHOBneHHa. DnBtBOpEHra paioctahuHaTNCihtb KhoNky (8).
PexkIM Hocia daHnx
CymichcHb Hocir daHnx
IChye IInpOKn CnEeKTp MeToiB CTnCHehHa, a TaKoX pi3HnCBy RaocTi HociiB DaHnx. Lc, HaxaIb, He Do3BoJIe HAM rapaHTyBaTI NOBHy CmICHCTb. 3 LxN pINHH, B OKPemNX BnIaKkAX MOxyTB 6Ty IN pO6IeMn 3 BiITBOpEHnM My3NK 3 KapT nAm'rTI i nam'rTI USB. Lc He e HecnpabHicTIO npICtpoio.
Po3'em USB (1)
- HaTnCHiB KhoNky USB/SD (6). Ha DnCnJIeI 3'ABNTbcn iHnkaJia "Ud".
2.Пд'Енайтам'ЯТБ.ИДСПЛ'3'АВТБСIИДИКAZI"USB".TODIpo3noHETbCByiTbOpeHHa.IDcPJIeBIIDobpaKaTImeTbC YAc BiITbOpeHHa notOHoro 3aROnOBka,цoMnHae.
Po3'ACHeHHIoo pOoTo nDnBItbcy y po3di "POnCHeHHeIeMeHTIB ynpabJIHH".
I PIMITKA.
KUO OJHOaCHO BCTAHOBHeHO KAPTy NaM'ATI, CnepuY iHOpMaJIg 6yJe 3HTyBaTncb i3 Hei. IINB BiITbOpEHn H paINIB 3 USB-npncpoTO BmIMtB KapTy naM'ATI.

YBARA.
Pepw hix BnIMaTn Nam'ATb USB, npeyntb do iHoro dKepeJcunHaJy.
Hh3do dIa KapTu nAm'Ati (2)
- HaTnCHiB KNONky USB/SD (6). HaДиСплeɪ 3'ЯВИТьСИнДИКALIJ "Ud".
- BCTABTe KapTy Nam'ATI B rH3do dNn KapTu Nam'ATi. Ha DnCnJIe 3'ABNTbCra iDnKauJ "SD". ToDi po3NoHTbcB C BiTbOpeHHa. Ha DnCnJIe BiD6paXaTmEbCra Yac BiD TBOpeHHa ITOUHO 3aRrOBoK, Uo MHaae.
Pos'acHenHJIOpObotnDinBtbcypo3jJI"PochenHeJelemEHITynpablinHH".

YBAGA.
Pepw HIX BIMMaTn KapTy NaM'ATI, nepeiDiTb Do IHUoro Dkepeia CunHany.
POncHeHHH eIemEnTIB yIpaBnIHnH
II (8)
O3BONIE KOPOTKO 3yINHNTI BIDHOBTN BiTBOPEHHa. Ha DCNJIe6yJe 6JIMATn Yac, UO MNHae. NOBTOPHe HATNCHEHHKONKNIO3BONITb PpOJBXHTN BiTBOPEHHa 3 TOROCAMORO MICU.
(13)
3a donomoroIO KhoNKnI nepeiDITb Ido HAcTyHOrO 3a- roJIOBka TOUIO.
3a donomoroKhoNknI nepeuiTb do nonepeHboro 3arolOBka.
Khoikn3uqpaam
PpAMn BnBip 3BykoOoi DopiXKn. Nicna BBeDeHHN HOpema 3aRrOBka HaTNCHTb KOnKy II.
YcyHeHH HeCnpaBHOCTeI
POnaHHJXnBJIeHHJ: 230B,50Tc
CnokuBaHHeJekTpoeHeprii
PexkM ouikyBaHHr: <1BT
Pobohn po60tn: .. 75BT
BjTbOpOBaHi fopMaTH paJnib: MP3WMA
Bara HETTO: 5,8 Kr
Papioenement
Tnylt dncTaHnHOHHo ynpabJIeHn (Ndy) (pnc.2)
1 FM:
BkIIOueHHe yCTpoiCTBa B pexim paIIO.
2 PRESET:
Bb6op npedBaPnteHbO coxpaHeHHbIX paNIOCTaHcI.
3 MUTE: BbiknIOHeHne 3Byka.
4 RESET:
BocCTaHOBJIeHHe 3aBOIDCKIN HAcTpoEK.
5 PRO-LOGIC:
IpeekJIOueHne peKIMOB yCTpOyCTBa PL ON (5.1) n PL OFF (2.1).
6 USB/SD:
Bb6op BxOda USB nIIN rHe3da KapTbI naMTN.
7 CEN:
PerynpOBKa rpoMkOCTn LcHTpaNBHO KOJIOHKN B KOMBHaCn C KHONKAMN VOL +/-
8:11
Tysck/OctaHOBka Bocnpo3BeHeHcBXOda USB nIINrHe3da KapTbI naMRTN.
9 SUB:
Perynipobka rpoMkoCTn ca6Bypepa KhoNkamVOL+/-.
5 KhoKnVOL+VOL
6 KhoNka ST-BY/II (Дяп поеведma Мжду JdUIM npaobu'm pekimamm derpknite Khonky haxaToi)
7 Khoinka SOURCE
10 TUNING+/TUNING:
Ponckpaiooctaunm.
11Lcnpobbie KhONIK
12 SURR:
Perynipobka rpoMkOCTN OKpykaIOLux KIOHOK B KOMBnHaCn CKnHnKaMn VOL +/-
13 VOL+/VOL:
YBeHHe/HMeHbWeHHeO6ueI rPOMKocTN. Bb6op CneDyUoSe/NpeBduUye 3aNNCn
14 FRONT:
Perynipobka rpmkoctn npe,ndnx kONOHOK B KOMnHaun c KhoKamn VOL +/-
15 AUX:
BkIIOUeHHe yCTpOiCtBa BpeKIM BxoJa AUX (2.1).
16 DVD:
BkIIOueHHe yCTpOyCTBa B pexHM BocIpOn3BeJeHnA ncka DVD (5.1).
17 ST-BY:
BkIIOUHeHne yCTPOIcTBA W KdUzni/paObouN peKIM.
18 MEMORY:
CoxpaheHne paDIOCTaHcM.
PykoBoDcTBO no 3KcnIyatauIN
Cnacnbo 3a BbIbOp HaWero npOyKta. Haneemcra, OH Bam noHpabNTca.
06uye yka3aHnno TeXnke 6e3onacHOCTN
Ipeed Hauanom 3KcNlyatauun npubopa BHMaTeIbHo npouHTaIe npinraeMyIO INCTpyKUIO NO 3KcNlyatauIM COxpaHNTe ee B HAdexHom MecTe, BMeCTe C rapaHTnHBIM TaHOOM, KaccOBbIM YekOM N, NO BO3MOXHOCTN, KAPTOHHO KoOp6koC yNaKoBOyHbIM MaTePnAnOM. EcnI daTe KOMyJIbO pONBo3ObaTbCRA npubopOM, O83aTeNbHO daITe BpNiDaHy dAHHyIO INCTpyKUIO NO 3KcNlyatauIN.
- TTo6bI npedOTBpaTb pNCK Bo3HKnHOBeHn NOXapa NnnpaKeHn 3JNeKTPOTOKOM, 3aPpeuaeTcA KcNlpyATnpoBaTb 3JNeKTpOpi6Opbl NOI DOxJem Nn BO BnaxhbxMecTax. 3aPpeuaeTcB KJIIOuTaB 3JNeKTpOpi6Opbl B HEnocpeiCTBeHHoB 6JIIN3OCTN K BOe (HaNPIM.: B BaHHoKOMHaTe, 6acceHne, BlaXHOM IOBaJe).
- IcnoJb3yIte 3JeKtponp6Opby ToJIbKO nHa3HaHeHIO.
BkHouaTe 3JekTpnpn6OpbI TOnbKO Bpo3eTKU, yCTAHOBJIeHHBe B COOTBETCTBm CO BCEMI pEiINCAHNAMCNeIte 3a TEM, YTo6bl HapRjKeHne cEtN CoBnAaIO C HapRjKeHnEM NITaHn 3JekTpnpn6Opa.
EcINNCN0b3yETCBAHEHNI6IOKNTAHNAOBpaTNTe BHIMaHHeHaeroBbIXOHOEHaNPJXKeHneNIOJIAPHOCTb, npabINbHO BCTaBnAteBaTapeKn. - YctaHaBnBaIte 3JKeTpOnpu6OpbI TaK, YTO6bI He 3aKpbI BANCb IMeIOUHe BEHTNUAUOHHbE OTBepCTNIA.
- Hn B KOem Cnyuae He cyuTe KaKne-Jin6o npEaMeTbI B OTBepCTne 6acc-pefNeKToppa.
- Hn B KOem Cnyae He BCKpbBaIte 3JNEKTPoPn6Op. HenpoceccnoHaBbH peMOHT ppeCTabJIeT 60JIbUO onaCHOCTb IINOTpe6ntEJI. EcIn 3JNEKTPoPn6Op BblIeN 13 CTPOR, B OCO6eHHocNT N3 3a DeFekTA cTeBOrO 5Hypa, 60JIbUe eHO HE BKIOHAtb, a 3dA Tb Ha PEMOH KBAIIINΦuIPOBaHHOMy CneuaJIACtY. PeryIpaH NOpBePAITe CeTEBOI UHyp Ha OTCyTCTBHe NOBpeXJeHIM.
- 3aMeHbT DeΦeKTHbI CeTeBOI ΜHyp TOJbKO Ha paBHO3HaHb H a 3aBoDE-N3rOToBtEne, HAlJE CepBnCHOM CEHTpe INI O6paTINBUNCB K KBaJIuΦnUpOBaHHOMy CNeUaJIInCTy.
- Ecnn 3neKtpnpnbop DOnIroe Bpemr He nCnOJb3yETcA, OTKIOUHTe erO tCEN N BbIHbTe 6aTapeKNI.
Tn HakienMOnyHaxoNTbcHaKopnyceNobpaaIOT Baue BHMaHHe Ha CJeNyUOJIe:
CIMBOJ "MOJHNA" YKAZbIBaET HaTo, YTO BHyTpN 3JIeKTPoPnIbOpa IMeIoTcJeTaII HAXODAJImeCA NOI ONaCHbIM, BBICOKIM HApraJKeHMe.

CmBON "BOCKJIuaTeJIbHbI 3HaK" o6paUaET BaIe BHNMaHHe Ha BaXHbIe pImMeaHnB BCOpOBoNDTeJIbHbIX DOkUMeHTax NO nOJb30BaHIO n TexOCMOtpy 3JeKTPoPnpbopa.
CnMBOJI npIMeHReMbIe B DaHHOM pyKOBoDCTBe NOJIb-3OBaTeJIa
BaxhIbe peKOMeHdaaun IJnOBecneueHnBaUe 6e3oNaHocTn 0bO3HaYeHbI NOOCoBeHHOMy.ObraTeJIbHO CNeIyTe 3TNIM peKOMeHdaaum, YTObI ppeOTBpaNTb HeChactHbI cnUayai nnIOLOMKy n3dEJIY:

IPEUIPEJKEHNE:
IpeDynpexKaetobnOaChocTINJIN3OpOBbNBO3MOK-HOMPNCeNOyHeHrTpaBMBI.

BHIMAHINE:
Yka3bIbaeT Ha BO3MOxHHyO ONaCHOCTb IIN3JeINN INpyNX OKpyXaIOUnx PpeMeTOB.

ПРИМЕЧАЙ:
JaetcoBebtiNnHOpMaIIO.
Teu nIua HykaioueeB npncMOTpe
V3 coo6paKeHn 6e3oNaChocTn dIa DeTeH He octab NaIte JexaTb ynaKOBky (PiactIKOBbie MeUKN, KapTOH, NeHOrnlaCT n.T.D.) 6e3 npCmOTpa.

PNEyIPEKJEHNEI
He no3B0JIaTe DeTAM UrpaTB C NOIN3TNHeHOBOI nJIeHko. Onachoc7ydyuBa!
3TOT npi6op He npeHa3NaehnIINoJIb3ObaHnIINaMn (BkIOUaJeTei) C OrpaHHeHHbIMn Fm3uHeCKNIM,CEHCOPHbIMN IINY UMCTBeHHbIMn CNOOCBOCTAMN ININIIaAMn, He IMeHOUcIMN ONbITa N/INN HeO6XoDMbIX3HaHn. NckIOUeHne COCTABJIoT CJIyau, KOrDa OHNHaxoDArTa NOI pncmOTpOM IINu, OTBETCTBEHHORo 3aNX 6e3OanchoCTb, INI KOrDa OT 3TOFO IINu NaONyueHbI yka3AHnI IO NIOb3OBAHnIO npi6opom.
HeoXoDIMO npMCMatpmbTa 3a DeTbMM, YTo6bl y6e-NTbCB TOM, YTO OH He INrpaIOT C np6Opom.
MOHTAX
- PacnakyuTe BCE Detaun n CNOxNte BeCb ynaKOBouHbIMATEpnaJ o6paTHO B KAPTOHHyO Kopo6ky.
XpaHHTe ynaKOBOHbIM MaTePnA B TeueHm Bcero cpoKa rapaHTn! - Pocne nonHoro noKJIOUeHnBCEx rPOMKOROBOpuTeNei K COOTBETCTBYIOUzIM THe3Jam, BCTaBbTe BUNKy rPOMKOROBOpuTeNa Subwoofer b po3ETky!
CHIMITE 3aUHTHyIO pAACTKOByIO PHeHky C DInCnpeI nepeDne I naHEn, eCIN OHa eCTb.
62 Pycckn
OnTMaIbHa paCtAHOBka rPOMKOrOBOpTeNe BblrJnT CLeDyIOUIM O6pa30M:
IopKIOUoyeHne
BHIMAHNE:
BbiknoyaIte ca6bypep nepeid noKIOHcHEm KOHOK uIN N3MeHHeM COeHNHeHm.
CneIte 3a Tem, TTObH HeN3OJIPOBaHHbIe IpoBOJa KOHOHOK He Kacalncb/HepeceKaJIncb. Pnck KopoTkoRo 3ambKaHnI
He nCnoB3yIte yCTpoNCTBO npu MaKcMaIbHoI rpoMkoCTn. 3To moKeT npuBecTn K NOBpeXDeHIO.
Hukorda He Bknoaute KoJIOHKn B 3neKtpocetb!
Hukorda He npkacaiTecb K Mem6paHam dHaAMKOB pyKaMn nn DpyrMaN npedMetAm. MoXHO NOBpeDntb Mem6paHbl.
He neperpymaKeKpnyca KIOHOK.
I P N I M E Y A H N I:
06paTHTBEBHIMMaHHeHaTo,
TO6blIeepHbI pa3bEml6bINxopoIO coeHNHebl.IIOXNE COEINHEHMOYT 6bITb PnHHoIyMOBbIX NOMEX.
Yro6blrIbe npoOda He Kacalncbpyr pyra/He nepekeuBaJIncb. Onachoctb KopotKoro 3amblaKaHnI!
1 PoiKJIIOUeHHe aHTEHbI
Bctabte npinaraemy npoBOOnyHyO YKB-aHTeHHy (FM) B COeINHtEJIb.
2 AUX R/L INPUT (coeMHHeHn 2.1)
CnykntIraNoKIOHHeBHEUHrO MTOCHNka 3Byka C HopMaJIbHOI CTpeo3aNNcBIO (K npIMepy Hifi-BuJeomarHHTOFOH).
I INPIMEYAHNA:
Ib60y BMOxTe nepeKIOHTb Ha PRO-LOGIC, np3OM n3 cTepeocnHaJa 6yDet MoJeINPOBaTbcr Suround Sound (CnHAn KpyroBOrO 3Byka).Pp3OM 6yDyT 3aDeNCTBOBaHb BCE HnHaMKN.
3 DVD INPUT (coedneHenn 5.1)
Cnyknt nna noKIOHHeBn BHeIHeO nCToHHka 3Byka C BbIXoDM BΦopMaTe 5.1 (KnpImepy: DVD nleepa).
INPIMMEYAHNA:
Pnp6op nMeet aHaIorOBbBxOa5.1 nA AC3 nnn dna dekoepa DTS.
4 OUTPUT
BbIXoIbI nIOKIIuOHeH IeBOrO npABOrO pOHTaIbHO rPOMKOrOBOpNTra (FR/FL).
BbIXOJIyIINIOKNIUHEnI npABOn IeBOI OKpy- XaHOUIX KOLOHOK (SR/SL).
BbIXoI nIIOKIIIOeHnIeHTpaIbHorO rPOMKOBOpTeJI (C).
- CHIMMITE npimepho 1,5 cm n30Jauin C ka6eJIa.
- CkpyTInTe KOHeu KaBeJa.
- OtkpoTe rHe3do IaI noKJIoueHnKa6eHa, HaxaB Ha 3aUeKNy.
4.Tenepb noCDoeDHHTE ayDNIOKabb COOTBETCTBYIOUeN KOJIOHN K COOTBETCTBYIOUeMY COeINHNTIHOHa cABypepe. IpoBepbTe nOJIaPnOCTb. IpoBoDc6eONIPOONCKOBHETCA+
5 POWER ON/OFF BBIKIOyateIb
3TINMBbIKIOyATEIeMMOXHO BKIOyATb INBbIKIOyATb annapaTy.
I INPIMEYAHNA:
- Nocle KaKdoRo BKJIOueHn npN6Op HauHaet pa60Ty B pexIme 5.1 (AC3).
IocneOTKIOUeHnOTcTeINpEaBapnteHbO yCTaHOBJIeHHBe BamN poka3aTeIN BO3BpaTATCA K 3aBOckIM YCTaHOBkAM.
6 CeTeBOUHyp
IopKJIoucheHne 3JIeKTPoNtHaHn
IocneToR, KaB CBe rPOMKOrOBOpNTeIN 6ydyT POnkLIOHeHb, BCTaBbTe BnIKy rPOMKOrOBOpNTeIN Subwoofer B po3ETky c HanpJxehnem CetN 230 B, 50 Tc, yctahOBJIeHHyU B COOT-BETCBN C ppeDnicaHnAM!
IpaBnIbHoe coeINHeHme cneDyUoUee:
(6aTapeKa/6aTaepKNe He KOMnIeKTyOToC)
- OtkpoIte KpbIuKy OTecka 6aTaapeek Ha o6paTHoN CTopoHe Iy.
BCTaBbTe cOTcEK 26aTapeKn no1,5BTuna R03 "AAA". CNeIITe 3a npabInbHoi nOJIaRHOCTbIO (CMOTpN dHO OTcKa)! EcnI INy DOINrE BpEM He IcNOJb3yeTcB, BbHbTe 6BaTapeKn n3 OTcKa, YTObblpeDOrTbpATNTb "BbTEKaHHe" UeIoHn n3 HIX.
3akpoiteOTCEK6paTHO.
BHIMAHNE:
HnB Koem cnyuae He MeuaiTe HoBbIe 6aTapeKn co cTapbIMn, a TaXke C 6aTapeKamn npyrrx TINOB.
He BbIbpaBbIaTe 6BaTapeKn B DOMaUHm MycOp. PoxKaIyIcTa CdaIte OTpAboTaHHbe 6BaTapeKn Ha CneLNaJIbHbI PyHKT PpHema MIn BTOPOBHy TOUY.
IPEyIeXKeHHeN:
He noDBepraIte 6aTapeiKn CINbHOMy HarpReBy nIN BO3-DeiCTBIO npMbIX COInHeYbIX JLyueH. HmKOrJa He 6pocaiTe 6aTapeiKn BOrOHB.CuIeCTByET OnaHocTb B3pbiba!
Bo BpemnoB3OBaHHnIyIbTOMDnCTaHUNHOYnpabNHe HnCneInTe 3a Tem, YTObI MEXdy Hm N rPOMKOrOBopNTe IeM Subwoofer Hebilo npnATCTBn (K npimepy: cTOnob, CTyIbeB n T).3Tu npnRTCTBn NorNoaOT INHpaKpaChhie LyuH NyIbTa DnCTaHUNHOrO ynpabNeHn. B 3tOM cnUyae DnCTaHUNHOe ynpabLeHne CTAHOBNTc HEB03MOXhBM.
PnoTobka K pa6oTe
I PIMMEYAHNIA:
HekotopbIe KhoNkna HaxoJATcKa KaHa Iy,Tak Ha nepeDHei NaHeen. OHn IMeIOT OINHaKOBbIe yHKUm.
BCTaBtBe BnIKy B po3ETky C HAnpAKeHnEM ceTn 230 B, 50 T, yCTaHOBNEHHyIO B COOTBETCTBN C ppeDnncAHNMI.
- BkJIOHTe NCTOCHIK 3Byka (K npIMepy: DVD nleep) n CTAPTyIte BOCPpon3BeJeHne.
- BkJIOHTe rpoMkoROBOpTeJIb Subwoofer npn nomouu BkIOHateJIHa erO oBaTHoCTopoHe.
- BbIbepnTe HxKbHb BXoJHO NCTOCHNK.ДЯ 3TORO HaKMITE COOTBeTCTBMyIO KhoNky Ha Iy (DVD (16), AUX (15), USB/SD (6) nJ FM (1)).
I INPIMEYAHNIA:
BxOHNIOCTOCHNK TaKKe MoXHO BbIpaTb HaxaTNAMN KONKI SOURCE (7 Ha yCTpoiCTBe).
- Nocne nepeKIOUeHnBxOJHOrO IcTOHnKaIJIOTKIOUeHnOIT3JEKTPOCeTn 3aDaHHbIe BaMNI3HaueHnC6paCbIAoTcRHa 3aBOJCKNe YCTaHOBKn.
- PocJIe kaxdoB O BkIouHeHn npIbOp HauHnaeT pa60Ty B pexKmE 5.1 (AC3). Ha dncnlee noRbnaetcaHnDnKaun "dU".
- KhoIIka PRO-LOGIC nepeKIOHaeT peXIM MeJxIy 2.1 n5.1.
5.ПиnomошнКногOKVOL+/-perynypetyeTcO6uaIpyOMKOCTbCNUCTEmbl.
MUTE (3)
3Ta KHONKa HcNOLb3yETcra dIa 6bICTpOro BbIKIOueHn rPOMKoCTn. Ha IucnIee 3amIrAeT INdIkaTOp. ChOBa HaxMITE KHOKNy dIra OTMeHbI cyHKUIN.
PerynpoBkA rpoMkoCTn OTeJIbHbIX KOHOK
- Chaana Ha ΠДу HαхмITE KнОнky KОLOHк, rρOMKOCt b KOToPoI HyxHo OTpeRyInpoBaTb (CEN (7), SUB (9), SURR (12), FRONT (14)).
- 3aTeM KHOKNKAMN VOL +/- OTpeRyIpyrTe rPOMKocTb CEHTpaJIbHON KOLOHKn, caBBydepa, OKpyKaIOxuN INI nepeDNHX KOJHOHK.
I INPIMEYAHNIA:
06patnte BnmaHme, noxayncta! NHaMnKn kpyroBoro (Surround) nIeHTpOBOr (Center) 3ByaHnpeynpuyTOc TOnbKO B pexmE 5.1.
BbIKIOUeHnE
IINBbIKJIOHHeHHyCTPOIcTBA nepeKJIIOHTe KHOKNy POwER c3aNDyUCTOIcTBA BNOLOKeHne OFF.
64 Pycckn
Pexim paio
Ponck CtaHcM
- HaxmTe KhoNky FM (1) DnB BKJIOueHn yCTpoiCTBa B peXIM paIIO.
- HactpoTecb Ha HyKHyIO CTaHcIIO C NOMOuBIO KHOJOK TUNING+/TUNING- EcnI IepXaTb OdHy n3 3TuX KHOJOK HaxaToI, To yCTpoCTBO nepeIeT Ha cJeNyUOyO paNIOCTAHcIIO. COOTBeTCTByIOua JAcTota Noka3bIbaETcHa dnCnJIee.
CoxpaHne cTaHn
- HauTe CTaHcIIO, KaK OINcaHO B NyHKTe "POnck CTAH
- Haxmte KhoNky MEMORY (18). Ha dincnilee 3amiraet uHdkaun "00".
3.KHonkamn H113BbI6epnte 3aHaHHyIO nO3nIO dNtcoxpaHeHNA cTAHm. - ChoBa HaxMMTe KhoNkY MEMORY. 3aDaHnHa No3uHn KaTkoBpeMeHHo 3aMnraet, n CTaHnIy 6yJeT COxpaHeHa.
Bb6op npedBaPnteBHO coXpaHeHHbIX CTaHcM
YnpabnHeH BocpOn3BeHeHem OncaHO B pa3Je "OncaHHe 3neMHTOB YnpabHeHn".
I PIMMEUAHNIA:
EcIn OJHOBpeMeHNO BCTaBHeHa KapTa nAMrTn,TO nepBOI 6yET BOCPOn3BOIDtBCrOHa.ДЯ BOCPOn3BeDcEHnФaiNoB C BXoJa USB BbIHbTe KapTy nAMrTn.
BHIMMAHNE:
Ipeepn3BLeueHHeMΦJIaH-NaMATu USB npeeknOHTecb Ha npyroB BXoHOH NCTOHHK.
THe3doKapTbI NaMAtu (2)
- Haxmte KhoNky USB/SD (6). Ha nCnIe e noBntcHnDnKaun "Ud".
- BCTaBbTe KapTy NamATn B rHe3do. Ha DnCIIe neonBntc HnDnKaunSD. 3aTeM hauHETcB OcnpOn3BeDeHne. Ha DnCIIe noka3bBAeTcN dInTEJIbHOCTb BOCpOn3BeDeHn TekUJero 3aROnOBka.
YnpaBHeHne BocpOn3BeDenHnEM OncaHo B pa3Je "OncaHne 3IeMeHTOB YnpaBHeHnA".
BHIMAHNE:
Ipeepn3BLeueHHeM KapTbI nAmATn nepeKIOHTecbHa npyroB BXOHOH NCTOHNK.
Onncnne 3JeMeHToB yIpaBHeHn
II (8)
Bocpon3BeHne MoXHO BpemEHNO npnoCTaHOBTb H CHOBa BO3o6HOBTb. INITEJIbHOCTb BOCpon3BeHnHa H DnCnIe HaHHeT MmraTb. ChOBa HaxMITE KONKY IINBa BO3- 06HOBNEHnBOcpon3BeHnCA TOrO Xe MeCTa.
(13)
Khonka Hno3BolaretnepeTnHaCJeDyUOuYIO 3aINCb, 3aROJOBOKN.T.D.
KhoKa no3BOJrT nepeHTn Ha npEbyuyn 3aronoBOK.
Unpobbke Khoikn
3aINcB MoXHO BbIpaTb HEnOpeDCTBeHNO No HOMepy. IocJIe BBOda HOMepa 3aROnOBKa HaxMITE KONKy II, YTO6bl HaHaTb BOCnpoUNBEdHeNe.
YcTpaHHeNoBpeKdEHH
3JIeKtpoNTaHHe: 230B,50Tc
Iotppe6nemamMOUHocTb
Xduyu npexm: <1Bt
Pabochy pexk: ..Makc.75BT
Bocnpou3BovDmblc foopMaTbI faHIOB: MP3WMA
Bec HETTO: 5,8 K
PapnoepMHNK
ДианэзнчстOT: YKB(FM)87,5~108МФ
Mbl octablanem 3a co6o npaBO Ha TexHnueckne n3MeHeHHI!
3To n3deneHne npoNo BCE Heo6xoDmblte N akTyalb HbI npOBepKn, npedncahHbIe dnpekTtboE CE, K npIM.
Ha 3JIeKTPOMaHHTHYIO COBMECTUMOCTb I COOTBeTCTBME
Tpe6oBaHnM K Hn3KOBJbTHoI TexHKe, OHO 6blIO TaKKe
CKOHCTpyINPOBaHO INOCTPPOEHO C YHTOM NIOCLIeHNIX TpeBOBAHNI NO TEXHnke 6e3oNacHOCTN.