Pkp3.6 - Glue gun BOSCH - Free user manual and instructions
Find the device manual for free Pkp3.6 BOSCH in PDF.
| Product type | Cordless glue gun |
| Brand | Bosch |
| Model | PKP 3,6 LI |
| Article number | 3 603 B64 6.. |
| Preheating time | Approx. 15 seconds |
| Glue temperature | Approx. 170 °C |
| Glue stick diameter | 7 mm |
| Glue stick length | 150 mm |
| Weight (according to EPTA 01/2003) | 0.3 kg |
| Battery type | Lithium-ion |
| Rated voltage | 3.6 V |
| Battery capacity | 1.5 Ah |
| Runtime per charge | Approx. 30 minutes (6 sticks) |
| Charging time | 3 to 4 hours |
| Charging voltage | 5 V |
| Charging current | 500 mA |
| Charging temperature range | +5 °C to +40 °C |
| Charger weight | 0.1 kg |
| Protection class | II |
| Automatic shut-off | After 5 minutes of inactivity |
| Adherable materials | Paper, cardboard, wood, leather, textile, ceramic, metal, glass, stone, etc. |
| Safety | Do not touch the hot nozzle; short-circuit protection; Electronic Cell Protection |
| Maintenance | Clean with a blunt object after cooling; do not use solvents |
| Spare parts | Use only original Bosch parts |
Frequently Asked Questions - Pkp3.6 BOSCH
User questions about Pkp3.6 BOSCH
0 question about this device. Answer the ones you know or ask your own.
Ask a new question about this device
Download the instructions for your Glue gun in PDF format for free! Find your manual Pkp3.6 - BOSCH and take your electronic device back in hand. On this page are published all the documents necessary for the use of your device. Pkp3.6 by BOSCH.
USER MANUAL Pkp3.6 BOSCH
Power Tools Division
70745 Leinfelden-Echterdingen
Germany
www.bosch-pt.com
1619929K84(2012.11)PS/69WEU

WEU
PKP 3,6 LI

BOSCH
de Originalbetriebsanleitung
en Original instructions
fr Notice originale
es Manual original
pt Manual original
it Istruzioni originali
nl Oorspronkelijke gebruiksaanwij-zing
da Original brugsanvisning
sv Bruksanvisning i original
no Original driftsinstruks
fi Alkuperäiset ohejet
el Ptpotuno oyniyw xprnnc
tr Original isletmet talimat
ar aulululululululul


2
Deutsch . 4
English 8
Français. Page 13
Espanol . Pagina 18
Read all safety warnings and all instructions. Failure to follow the warnings and instructions may result in electric shock, fire and/or serious injury.
Do not allow persons unfamiliar with the glue gun or these instructions to operate the device.
This glue gun and this charger can be used by children aged from 8 years and above and persons with reduced physical, sensory or mental capabilities or lack of experience and knowledge if they have been given supervision or instruction concerning use of the glue gun in a safe way and understand the hazards involved. Otherwise, there is danger of operating errors and injuries.
Supervise children. This will ensure that children do not play with the glue gun or the battery charger.
Cleaning and user maintenance of the glue gun or the battery charger shall not be made by children without supervision.
Before each use, check the glue gun, charger, cable and plug. If damage is detected, do not use the glue gun and the charger. Never open the glue gun or the charger yourself, and have repairs carried out only by a qualified repair person using only identical replacement parts. Damaged glue guns, chargers, cables and plugs increase the risk of an electric shock.
Do not leave the switched on glue gun unattended.

Protect the glue gun against heat, e.g., against continuous intense sunlight, fire, water, and moisture. Danger of explosion.
Do not touch the hot nozzle and the silicone cap. Danger of burns.
Charge the glue gun only with chargers recommended by the manufacturer. Otherwise there is danger of fire.
- Keep the charge socket of the glue gun and the charge connector away from paper clips, coins, keys, nails, screws or other small metal objects, that can make a connection from one terminal to another. Shorting the terminals together may cause burns or a fire.
Have your glue gun and charger serviced only by a qualified repair person using only identical replacement

English | 9
parts. This will ensure that the safety of the product is maintained.
After use, place down the glue gun in a safe manner and allow it to cool down completely before packing it away. The hot nozzle can cause damage and/or burns.
Under abusive conditions, liquid may be ejected from the battery; avoid contact. If contact accidentally occurs, flush with water. If liquid contacts eyes, additionally seek medical help. Liquid ejected from the battery may cause irritations or burns.
SafetyWarnings for Battery Chargers

Keep the battery charger away from rain or moisture. Penetration of water in the battery charger increases the risk of an electric shock.
Only charge Bosch lithium ion batteries or lithium ion batteries installed in Bosch products. The battery voltage must match the battery charging voltage of the charger. Otherwise there is danger of fire and explosion.
- Keep the battery charger clean. Contamination can lead to danger of an electric shock.
In case of damage and improper use of the battery, vapours may be emitted. Ventilate the area and seek medical help in case of complaints. The vapours can irritate the respiratory system.
Products sold in GB only: Your product is fitted with a BS 1363/A approved electric plug with internal fuse (ASTA approved to BS 1362).
If the plug is not suitable for your socket outlets, it should be cut off and an appropriate plug fitted in its place by an authorised customer service agent. The replacement plug should have the same fuse rating as the original plug.
The severed plug must be disposed of to avoid a possible shock hazard and should never be inserted into a mains socket elsewhere.
Product Description and Specifications
Intended Use
The glue gun is intended for solvent-free bonding of e. g., paper, cardboard, cork, wood, leather, textiles, foam, plastics, (except PE, PP, PTFE, Styropor® and soft PVC), ceramics, porcelain, metal, glass and stone.
Product Features
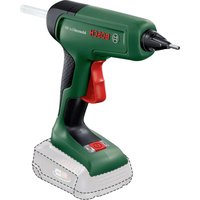
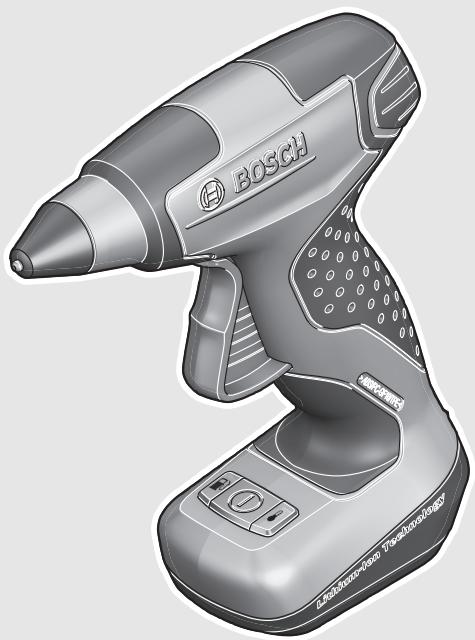
The numbering of the product features refers to the illustration of the glue gun on the graphics pages.
1 Nozzle
2 Silicone cap
3 Feed trigger
4 Glue stick*
5 Glue stick opening
6 Heating indicator
7 On/Off button
8 Battery charge-control indicator
9 Plug connector for charger
10 Socket for charge connector
*Accessories shown or described are not part of the standard delivery scope of the product. A complete overview of accessories can be found in our accessories program.
Technical Data
| Cordless Glue Gun | PKP 3,6 LI | |
| Article number | 3 603 B64 6.. | |
| Heating time | s | approx. 15 |
| Gluing temperature | °C | approx. 170 |
| Glue stick, diameter | mm | Ø 7 |
| Glue stick, length | mm | 150 |
| Weight according to EPTA-Procedure 01/2003 | kg | 0.3 |
| Battery | Li-Ion | |
| Rated voltage | V= | 3.6 |
| Capacity | Ah | 1.5 |
| Number of battery cells | 1 | |
| Operating duration per battery charge (according to Bosch testing procedures) | min | approx. 30 (corresponds with approx. 6 glue sticks) |
Battery Charger
| Article number | 2609 120 4.. | |
| Charging time | h | 3.0 – 4.0 |
| Output voltage | V= | 5 |
| Charging current | mA | 500 |
| Allowable charging temperature range | °C | +5 ... +40 |
| Weight according to EPTA-Procedure 01/2003 | kg | 0.1 |
| Protection class | ☐/II |
Assembly
Battery Charging (see figure A)
Observe the mains voltage! The voltage of the power supply must correspond with the data given on the nameplate of the battery charger. Battery chargers marked with 230V can also be operated with 220V .
The battery is supplied partially charged.
To ensure full battery capacity, completely charge the battery (at least 2 - 3 hours) before using for the first time.
The glue gun cannot be used during the charging procedure; it is not defective, when it does not function during the charging procedure.
The Lithium-lon battery can be charged at any time without reducing its service life. Interrupting the charging procedure does not damage the battery.
The "Electronic Cell Protection (ECP)" protects the lithium ion battery against deep discharging. When the battery is dis
10|English
charged, the glue gun is switched off by a protective circuit: The glue is no longer heated.
Battery Charge Indicator
| red | green | Meaning |
| - | - | The battery is being charged |
| - | ○ | The battery is fully charged |
| - | - | The battery has less than 30% of its capacity and should be charged |
| ○ | - | The battery is completely dis-charged |
Flashing Continuous light
- Plug the mains plug of the battery charger into the socket outlet and the charger plug 9 into socket 10.
Disconnect the battery charger from the mains supply when not using it for longer periods.
Protect the battery charger against moisture!
Observe the notes for disposal.
Operation
Starting Operation
Switching On
- To start the operation, press the On/Off button 7 until the heating indicator 6 lights up green.
Heating indicator

green
Meaning
for approx. 15 s
The glue is being heated

The glue gun is ready for operation
- Flashing - Continuous light
Switching Off
- To switch off, press the On/Off button 7 until the heating indicator 6 goes out.
Automatic shut-off:
Note: When the glue gun is not used for more than 5 minutes, it automatically shuts off.
- Switch the glue gun on again and check the battery charge-control indicator 8.
When the battery charge-control indicator briefly lights up red, the battery must be recharged.
After use, place down the glue gun in a safe manner and allow it to cool down completely before packing it away. The hot nozzle can cause damage and/or burns.
Working Advice
Do not allow the hot glue or the nozzle tip to come into contact with persons or animals. Glue and nozzle tip reach a temperature of approx. 170^ ; danger of burning. If hot glue comes into contact with the skin, hold the affected area immediately under a stream of cold water for several minutes. Do not try to remove the glue from the skin.
Use only glues recommended by the manufacturer of the glue gun (see page 3).
Bonded connections can loosen under the effect of moisture.
Preparations for Gluing
The surfaces to be glued must be clean, dry and free of grease.
The materials to be glued as well as the surface on which you are working may not be easily ignitable or inflammable. Check the suitability of heat-sensitive materials first on a test workpiece.
The ambient temperature and the workpieces to be glued may not be colder than +5^ and warmer than +50^ .
Materials, such as metal, which cool off the glue quickly, should be preheated with a hot air gun.
Gluing
- Insert the appropriate glue stick 4 for the material being glued via the opening at the rear of the glue gun.
- Switch the glue gun on and allow it to heat up (see "Switching On", page 10).
The glue gun is ready for operation after approx. 15 seconds.
- Press the feed trigger 3 applying moderate pressure.
- Apply the glue only on one side (also see "Practical Advice", page 10).
After applying the glue, immediately press the surfaces to be glued together. Correcting the gluing location is still possible at this point.
The glued spot can be subjected to load after a cool-down period of approx. 2 minutes.
Practical Advice
| Material/Workpiece | Recommendation |
| Large-surfaces, long workpieces | Apply the glue in the form of points |
| Flexible materials (e.g. textiles) | Apply the glue in lines |
Remove glue residue after cooling with a blunt object. If required, glued spots can be separated again by applying heat.
Do not use inflammable solvents for cleaning the surfaces to be glued. Solvent remainders can ignite from the hot glue, or hazardous vapours can develop.
Glue remainders on clothing cannot be removed.
Glued spots can be painted.


English | 11
Troubleshooting - Causes and Corrective Measures
| Problem | Cause | Corrective Measure |
| The glue stick is not transported. | Glue stick used up. | Insert a new glue stick. |
| Glue stick diameter too large or small. | Use recommended original glue sticks. | |
| Glue stick too short. | Use recommended original glue sticks. | |
| Insert a new glue stick. | ||
| Glue stick falls out of glue gun. | Glue stick diameter too small. | Use recommended original glue sticks. |
| Long after-run or dripping period after relieving the feed. | Melting temperature of glue stick too low. | Use recommended original glue sticks. |
| Glue gun dripping continuously without feed actuated. | Melting temperature of glue stick too low. | Use recommended original glue sticks. |
| Feed blocked through glue escaping toward the rear. | Glue stick diameter too small. and/or Melting temperature of glue stick too low. | Use recommended original glue sticks. |
| Glue does not flow uniformly. | Melting temperature of glue stick too low. | Wait for heating time of glue gun to elapse. |
| Feed not uniform. | Actuate feed trigger slowly and uniformly. | |
| Adhesive surface only bonds on one side. | Adhesive already partially cooled off before components have been joined. | Join workpieces quicker. |
| Set gluing points or beads instead of applying glue over surface. | ||
| Pre-heat adhesive surface with hot air blower. | ||
| Adhesive bond comes undone after cooling. | Adhesive surface greasy or too smooth. | Degrease adhesive surface or roughen slightly. |
| Adhesive surface dusty. | Clean adhesive surface. | |
| Material of workpiece not suitable. | Adhesive not suitable. Use specialty adhesive. | |
| Glued tiles in damp locations come undone. | Moisture creeps under bonding location. | Adhesive not suitable. Use specialty adhesive on cement basis. |
| Glued shoe soles come undone. | Moisture causes leather to swell and creeps under bonding location. | Adhesive not suitable. Use specialty adhesive. |
| Strands/strings of glue are pulled at the end of the gluing when removing the glue gun. | Feed still actuated when done applying the adhesive. | Discontinue feed slightly prior to ending the adhesive application. |
| Nozzle not been wiped off. | At the end of the gluing before removing the glue gun/pen from the bonding location, wipe off nozzle against workpiece. | |
| Workpiece melts. | Workpiece consists of material that melts at low temperature, e.g. foamed polystyrene. | Adhesive not suitable. Use specialty adhesive. |
| Burns on fingers from applying adhesive. | Adhesive penetrates through paper when applying. | Do not hold workpiece in hand. |
| Apply adhesive with workpiece placed on heat-resistant silicone pad or base. | ||
| Adhesive penetrates through fabric/tissue when applying. | Do not hold workpiece in hand. | |
| Apply adhesive with workpiece placed on heat-resistant silicone pad or base. | ||
| Metal workpiece has heated up. | Do not hold workpiece in hand. | |
| Apply adhesive with workpiece placed on heat-resistant silicone pad or base. | ||
| Clamp workpiece. |
12|English
Maintenance and Service
Maintenance and Cleaning
Warning! Before any maintenance or cleaning, switch the glue gun off.
For safe and proper working, always keep the glue gun clean.
An inserted glue stick 4 cannot be removed out of the rear opening of the glue gun.
If the glue gun and the charger should fail despite the care taken in manufacture and testing, repair should be carried out by an authorised customer services agent for Bosch power tools.
After excess glue has hardened, it can be removed with a blunt object. Do not use solvent for cleaning.
In all correspondence and spare parts orders, please always include the 10-digit article number given on the type plate of the glue gun or the charger.
After-sales Service and Application Service
Our after-sales service responds to your questions concerning maintenance and repair of your product as well as spare parts. Exploded views and information on spare parts can also be found under:
www.bosch-pt.com
Bosch's application service team will gladly answer questions concerning our products and their accessories.
Great Britain
Robert Bosch Ltd. (B.S.C.)
P.O.Box 98
Broadwater Park
North Orbital Road
Denham
Uxbridge
UB95HJ
Tel. Service: (0844) 7360109
Fax: (0844) 7360146
E-Mail: boschservicecentre@bosch.com
Ireland
Origo Ltd.
Unit 23 Magna Drive
Magna Business Park
City West
Dublin 24
Tel. Service: (01) 4666700
Fax: (01) 4666888
Australia, New Zealand and Pacific Islands
Robert Bosch Australia Pty. Ltd.
Power Tools
Locked Bag 66
Clayton South VIC 3169
Customer Contact Center
Inside Australia:
Phone: (01300) 307044
Fax: (01300) 307045
Inside New Zealand:
Phone: (0800) 543353
Fax: (0800) 428570
Outside AU and NZ:
Phone: +61 3 95415555
www.bosch.com.au
Republic of South Africa
Customer service
Hotline: (011) 6519600
Gauteng - BSC Service Centre
35 Roper Street, New Centre
Johannesburg
Tel.: (011) 4939375
Fax: (011) 4930126
E-Mail: bsctools@icon.co.za
KZN - BSC Service Centre
Unit E, Almar Centre
143 Crompton Street
Pinetown
Tel.: (031) 7012120
Fax: (031) 7012446
E-Mail: bsc.dur@za.bosch.com
Western Cape - BSC Service Centre
Democracy Way, Prosperity Park
Milnerton
Tel.: (021) 5512577
Fax: (021) 5513223
E-Mail: bsc@zsd.co.za
Bosch Headquarters
Midrand, Gauteng
Tel.: (011) 6519600
Fax: (011) 6519880
E-Mail: rbsa-hq.pts@za.bosch.com
Transport
The contained lithium-ion batteries are subject to the Dangerous Goods Legislation requirements. The user can transport the batteries by road without further requirements.
When being transported by third parties (e.g.: air transport or forwarding agency), special requirements on packaging and labelling must be observed. For preparation of the item being shipped, consulting an expert for hazardous material is required.
Dispatch batteries only when the housing is undamaged. Tape or mask off open contacts and pack up the battery in such a manner that it cannot move around in the packaging. Please also observe possibly more detailed national regulations.
Disposal

The glue gun, charger, accessories and packaging should be sorted for environmental-friendly recycling.
Do not dispose of the glue gun, battery charger and batteries into household waste!


Français | 13
Only for EC countries:
According to the European Guideline 2002/96/EC, power tools that are no longer usable, and according to the European Guideline 2006/66/EC, defective or used battery packs/batteries, must be collected separately and disposed of in an environmentally correct manner.
Batteries no longer suitable for use can be directly returned at:
Great Britain
Robert Bosch Ltd. (B.S.C.)
P.O.Box 98
Broadwater Park
North Orbital Road
Denham
Uxbridge
UB95HJ
Tel. Service: (0844) 7360109
Fax: (0844) 7360146
E-Mail: boschservicecentre@bosch.com
Battery packs/batteries:
Integrated batteries may only be removed for disposal.
Opening the housing shell can damage or destroy the glue gun.
Discharge the battery until the battery charge-control indicator 8 lights up red. Unscrew all screws from the housing and open the housing shell. Disconnect the battery connections and remove the battery.

Li-ion:
Please observe the instructions in section "Transport", page 12.
Subject to change without notice.
Français
Robert Bosch (France) S.A.S.
Bosch Service Center
Telegrafvej 3
2750 Ballerup
Tlf. Service Center: 44898855
Fax: 44898755
E-Mail: vaerktoej@dk.bosch.com
Transport
Bosch Service Center
Telegrafvej 3
2750 Ballerup
Danmark
Tel.: (020) 414455 (inom Sverige)
Fax: (011) 187691
Transport
De litiumjonbatterier som ingar ar underkastade kraven for farligt gods. Anvandaren kan utan ytterligare forpliktelser transportera batterierna pa allman vag.
Endast for EU-lander:
Blinking Kontinuerlig lysing
Utkobling
-Til utkoping trykker du pa/pavasten 7 til oppvarmingsindikatoren 6 slokner.
Automatisk utkoping:
Klargjoring for liming
Euvrponon kal Service
Uvtnponn kalkaogapiaooc
Ppooox! Na 0eTeTcTo oukyoAantko nioToAeKTOc Aetoupyiac npiv ano onoiabijnote epyaia ouvtipnoic naKaapiaou.
Na diatnpieTo oukyoalntiko niotolka aqapoy va va umopeiteva epyaocte kalakai aoppaawc.
'Eva tonotheetaevo thepooukykooantiko quaiyyio 4 dev nopoei va aapaieo i ano to niaw epcoc tou thepouuykoanikou otolou.
Se nepiTwnn toeepouaykoanntiktoTolaki o poptoTNC,nap'olec tic emieaeneves diaokaicke kataokuehckai
éleyxou,otaatmahouov kantoe va leitoupyouv,tote n etiokueun Touncipeneva atateo e evaEouaiobotnevo katotnma Service yia nalektpika epyaiaea tnc Bosch.
'Otav n kOaIa otpeooinθei μnpoe tva TnV aopaieote μe eva uβλu avtikeiuevo. Na vXpnoioioeite δiauteγia tov kaθapiaμo.
'Otavzntate diaaaopnke,naopoopoeic kaohc kai otavnapayyAvete avtalakktknpenei va avaepepete onoobhnoto 10nphi apioeupetniou nauaypapetal otnv mivakida kataokueaout toeepoooykoanlkiou mtoloiou n,avtoia xu,voptotn.
Türkce|57
Service kal npoxn oupouawxphonc
To Service anavrta otic eopwthoeic oac oxetikae tyn emokuei kai tn ouvtihonan tou npoiovoc aac kaohc yia ta katalnaa avtalaaktka:
www.bosch-pt.com
H oába napoxhç ouβouawv tnc Bosch anavta euxapiatoc otic epwtnoic aac oxetikäe ta npoiovta ja cai ta avtaa- ktiKa Touc.
Eλλδα
Robert Bosch A.E.
Epyeiac 37
19400Kopwi-Aθriva
Tel.: 210 5701270
Fax: 2105701283
www.bosch.com
www.bosch-pt.gr
ABZ Service A.E.
Tel.: 210 5701380
Fax: 2105701607
Mεταφορὰ
Opiexoee matapie tovtwv tiou unokvat ot anatneic twv emikivuvw ayaw. Omuatpie mnpovva eTapeoov obikoc anto xpnntxupic aalouc opouc.
Yanipsonme Surekliyanma
Kapama
Bosch San. ve Tic. A.S.
Ahi Evran Cad. No:1 Kat:22
Polaris Plaza
80670 Maslak/Istanbul
Bosch Uzman Ekibi +90 (0212) 367 18 88
Isiklar LTD.STI.
Kizilay Cad. No: 16/C Seyhan
Adana
Tel.: 0322 3599710
Tel.: 0322 3591379
1 = 2
pui j! uJ ksw gjUd Jb:alal .5ucuji ool dol aai
jaw aIla w gao 0aagg jll s jw - .8pJAL
jgo lo sic pall uu uy uuy .a aal y
aJgdoI aI JIOJI 0jU jS
aLgI aI aI gogai I Jgai I gai I gai I gai I gai I gai I gai I gai I gai I gai I gai I gai I gai I gai I gai I gai I gai I gai I gai I gai I gai I gai I gai I gai I gai I gai I gai I gai I gai I gai I gai I gai I gai I gai I gau
J
aaii iJ 10u uulgI g wai pai .aiiJI wJ jog aiLl
JlIaJIaJIaJIaJIg aauuUoJauUoJauu J
CuuuJ.(auiuJbuaJkuu,170C aJ
JauuJ uJ uJ uJ uJ uJ uJ uJ uJ uJ uJ uJ uJ uJ uJ uJ uJ uJ uJ uJ uJ uJ uJ uJ uJ uJ uJ uJ uJ uJ uJ uJ uJ uJ uJ uJ uJ uJ uJ uJ uJ uJ uJ uJ uJ uJ uJ uJ uJ uJ uJ uu J.
aai lla aal algllpaa (3 aal g) gll jol aul y. agbll cgll oag
gjjll aalooj
aIg aIg aIb jUJ sLoI ngS J U .gawu
U
(Agglj)0Jl
Uy!aJyJLJ aSwJUJdui
0gKdJlIogloIgOgJIgIgIgIgIg
aij.0sJol EoL sic aJg aiJg
a aal oal jn
pJalI
a dla jwgo
jiaol jiai

jai
| psjall ∏ω ω pā | ● | - |
| lols ∏ω ω psjall ∏ω ω pā | ○ | - |
| 30% ∏ω ω pjpsjall àsw diaw ω pā ∪ l ω g | - | ● |
| lolaj éjla psjall | - | ○ |
oJaiua oJou!O Jlaa
jLg:UaJlAuljSLLaSllu
9 11111111111111
.8
sijjyssjjssjwll jgss
.ajgobjiaJUlaeWp
!aegbll no nssll jqpa
J 10 J aaiil 10 10aalal 10clj
oJgaoJI JzI
gjll jgws jj gssal jj j j j j j j j j j j j j j j j j j j j j j j j j j j j j j j j j j j j j j j j j j j j j j j j j j j j j j j j j
1
UgSluu 2
a. 3
*gull lac 4
aal 5
junwuljugo 6
laBxlg Juswul 20
aJoljw aJU Jugo 8
Jlglj 9
uul uug 10
g oJgall gll (sLacK Jgill Jb| jaoa2x
-1gll liolj y alolJI gill Jc agogall