EC 9155.MB PREMIUM - Espresso Coffee Maker DELONGHI - Free user manual and instructions
Find the device manual for free EC 9155.MB PREMIUM DELONGHI in PDF.
| Product type | Espresso machine with integrated bean grinder |
| Brand | De'Longhi |
| Model | EC 9155.MB PREMIUM |
| Pump pressure | 15 bar |
| Water tank capacity | 1.2 L |
| Bean hopper capacity | 250 g |
| Power | 1350 W |
| Weight | 11 kg |
| Dimensions (W x D x H) | 33 x 36 x 40 cm |
| Grind settings | 8 |
| Brewing temperatures | 3 levels (92°C to 96°C) |
| Functions | Espresso, Americano, Ground coffee, Hot water, Steam |
| Steam wand | Pivoting professional steam wand |
| Included filters | 1 cup and 2 cups |
| Adjustable water hardness | Yes, with test strip |
| Automatic descaling | Yes, with indicator light |
| Dishwasher safe parts | Portafilter, filters, milk jug, drip tray |
| Included accessories | Milk jug, descaler, test strip, Softballs (according to model), coffee scoop, brush |
| Warranty | 2 years |
Frequently Asked Questions - EC 9155.MB PREMIUM DELONGHI
User questions about EC 9155.MB PREMIUM DELONGHI
0 question about this device. Answer the ones you know or ask your own.
Ask a new question about this device
Download the instructions for your Espresso Coffee Maker in PDF format for free! Find your manual EC 9155.MB PREMIUM - DELONGHI and take your electronic device back in hand. On this page are published all the documents necessary for the use of your device. EC 9155.MB PREMIUM by DELONGHI.
USER MANUAL EC 9155.MB PREMIUM DELONGHI
a_i = 12


| DISHWASHER SAFE | QIEco MultiClean | ||||
| √ | × | × | √ | √ | |
| × | × | × | √ | √ | |
| × | × | √ | × | × | |
| × | × | × | √ | √ |
9. PULIZIA DEL MACINACAFFE
Before using the appliance, always read the safety warnings.
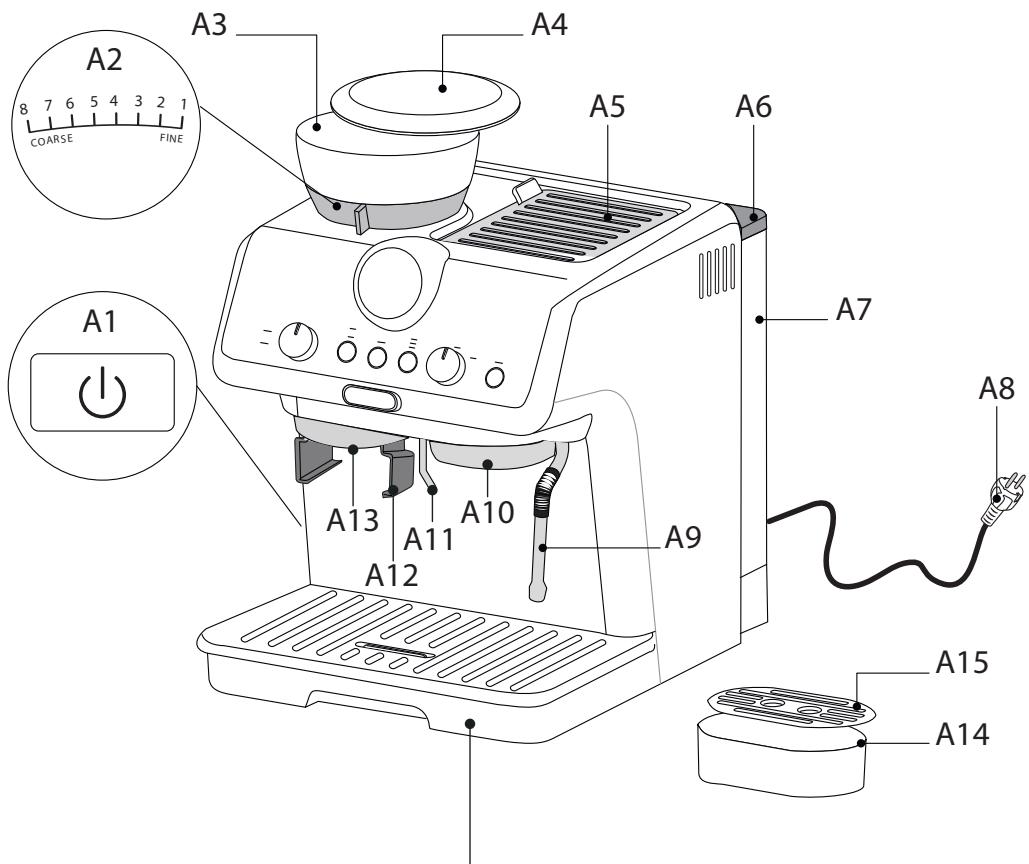
1. DESCRIPTION
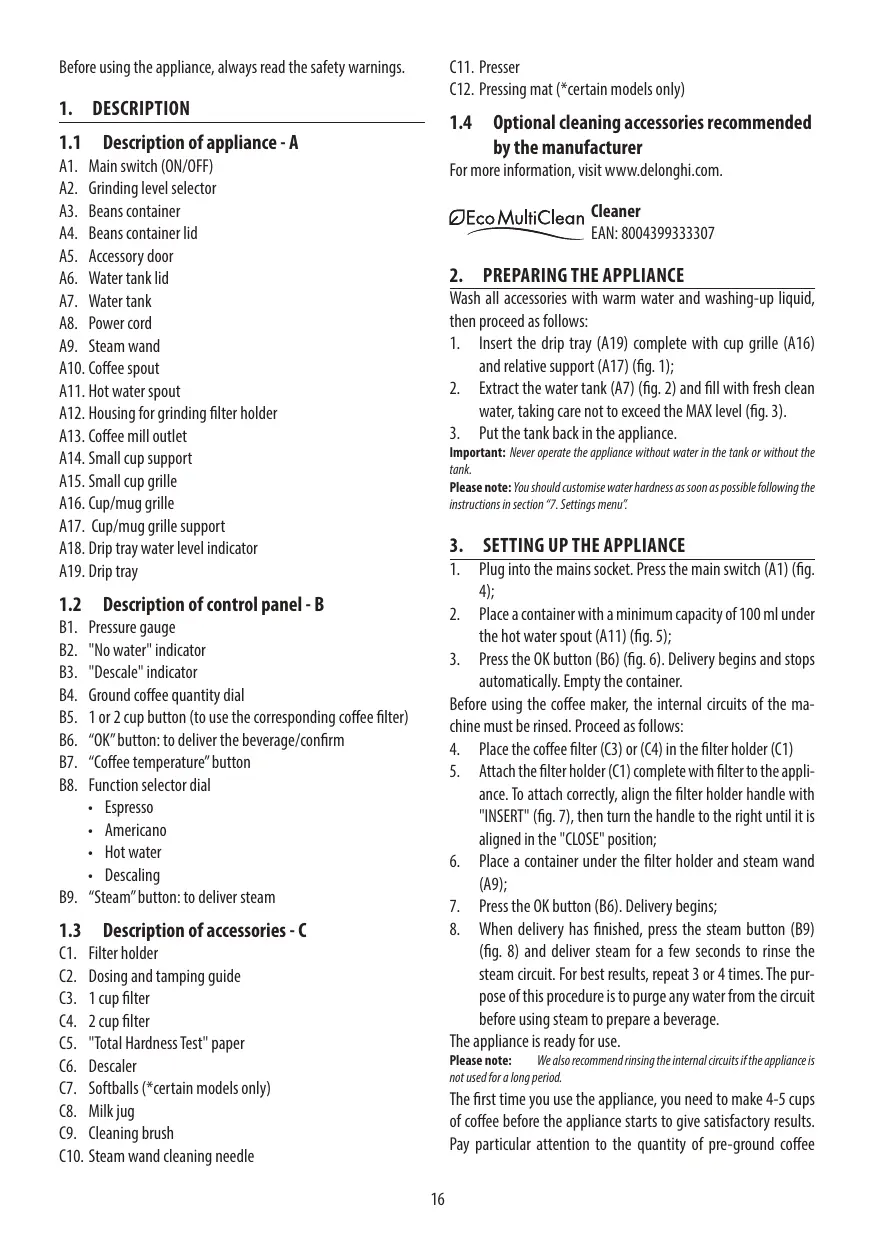
1.1 Description of appliance - A
A1. Main switch (ON/OFF)
A2. Grinding level selector
A3. Beans container
A4. Beans container lid
A5. Accessory door
A6. Water tank lid
A7. Water tank
A8. Power cord
A9. Steam wand
A10. Coffee spout
A11. Hot water spout
A12. Housing for grinding filter holder
A13. Coffee mill outlet
A14. Small cup support
A15. Small cup grille
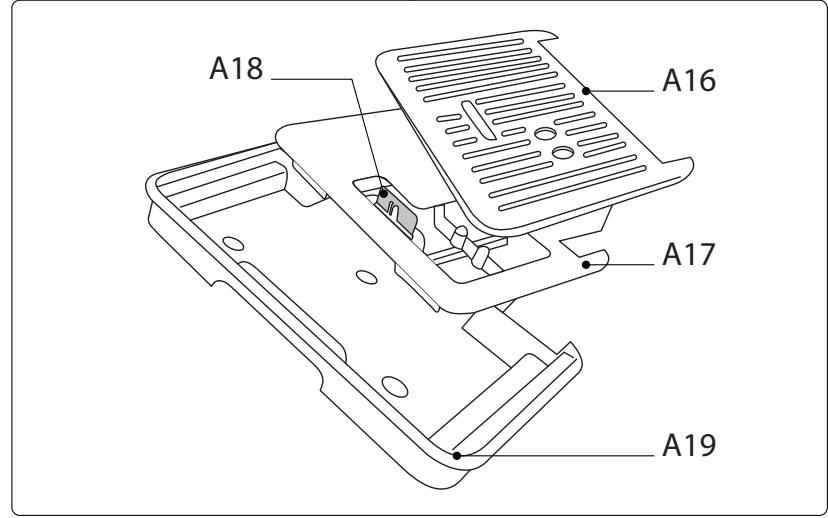
A16. Cup/mug grille
A17. Cup/mug grille support
A18. Drip tray water level indicator
A19. Drip tray
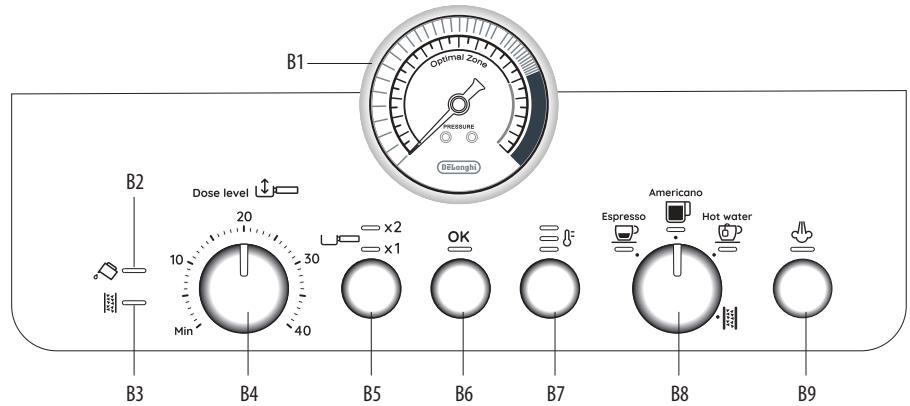
1.2 Description of control panel - B
B1. Pressure gauge
B2. "No water" indicator
B3. "Descale" indicator
B4. Ground coffee quantity dial
B5. 1 or 2 cup button (to use the corresponding coffee filter)
B6. "OK" button: to deliver the beverage/confirm
B7. "Coffee temperature" button
B8. Function selector dial
- Espresso
Americano
Hot water - Descaling
B9. "Steam" button: to deliver steam
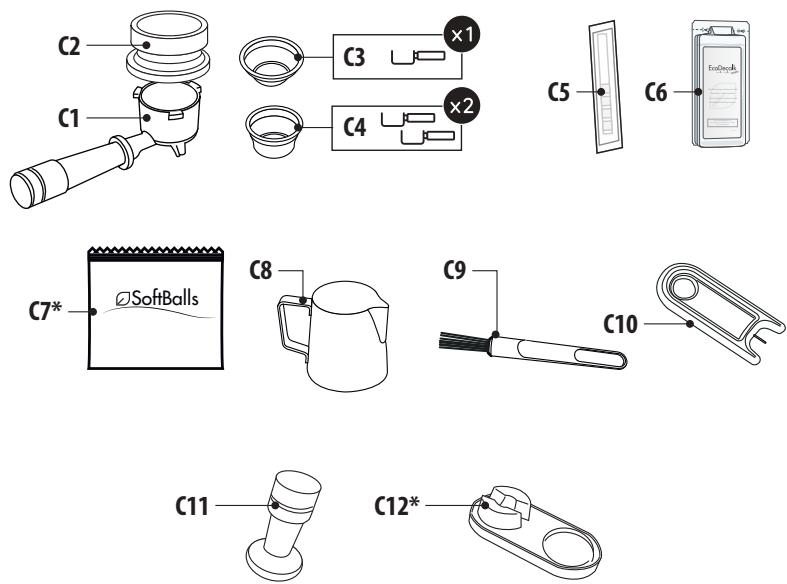
1.3 Description of accessories - C
C1. Filter holder
C2. Dosing and tamping guide
C3. 1 cup filter
C4. 2 cup filter
C5. "Total Hardness Test" paper
C6. Descalerr
C7. Softballs (*certain models only)
C8. Milk jug
C9. Cleaning brush
C10. Steam wand cleaning needle
C11. Presser
C12. Pressing mat (*certain models only)
1.4 Optional cleaning accessories recommended by the manufacturer
For more information, visit www.delonghi.com.
EcoMultiClean
Cleaner
EAN:8004399333307
2. PREPARING THE APPLIANCE
Wash all accessories with warm water and washing-up liquid, then proceed as follows:
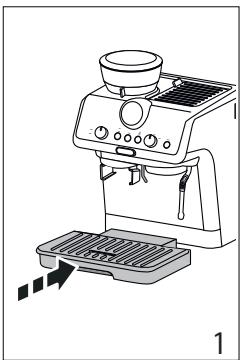
- Insert the drip tray (A19) complete with cup grille (A16) and relative support (A17) (fig. 1);
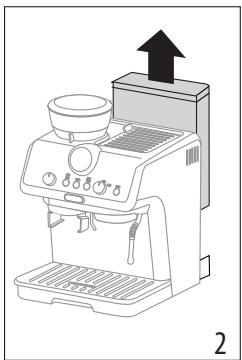
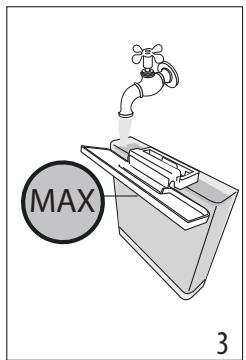
- Extract the water tank (A7) (fig. 2) and fill with fresh clean water, taking care not to exceed the MAX level (fig. 3).
- Put the tank back in the appliance.
Important: Never operate the appliance without water in the tank or without the tank.
Please note: You should customise water hardness as soon as possible following the instructions in section "7. Settings menu".
3. SETTING UP THE APPLIANCE
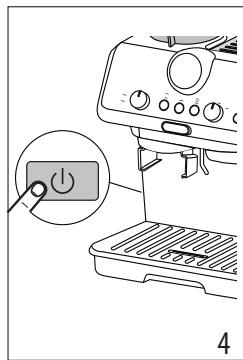
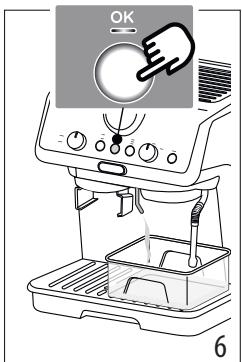
- Plug into the mains socket. Press the main switch (A1) (fig. 4);
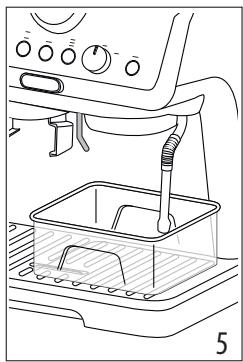
- Place a container with a minimum capacity of 100ml under the hot water spout (A11) (fig. 5);
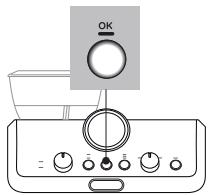
- Press the OK button (B6) (fig. 6). Delivery begins and stops automatically. Empty the container.
Before using the coffee maker, the internal circuits of the machine must be rinsed. Proceed as follows:
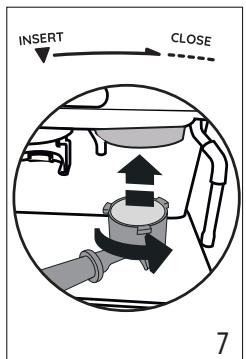
- Place the coffee filter (C3) or (C4) in the filter holder (C1)
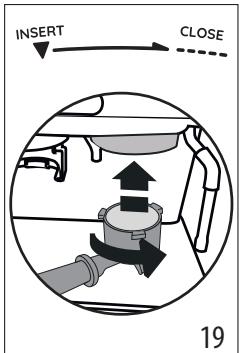
- Attach the filter holder (C1) complete with filter to the appliance. To attach correctly, align the filter holder handle with "INSERT" (fig. 7), then turn the handle to the right until it is aligned in the "CLOSE" position;
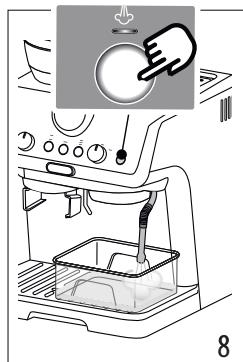
- Place a container under the filter holder and steam wand (A9);
- Press the OK button (B6). Delivery begins;
- When delivery has finished, press the steam button (B9) (fig. 8) and deliver steam for a few seconds to rinse the steam circuit. For best results, repeat 3 or 4 times. The purpose of this procedure is to purge any water from the circuit before using steam to prepare a beverage.
The appliance is ready for use.
Please note: We also recommend rinsing the internal circuits if the appliance is not used for a long period.
The first time you use the appliance, you need to make 4-5 cups of coffee before the appliance starts to give satisfactory results.
Pay particular attention to the quantity of pre-ground coffee
in the filter ((C3) or (C4)) (see instructions in section "4.1 Step 1 - Grinding").
Proceed as described in section "The "perfect dose""
4. MAKING COFFEE
4.1 Step 1 - Grinding
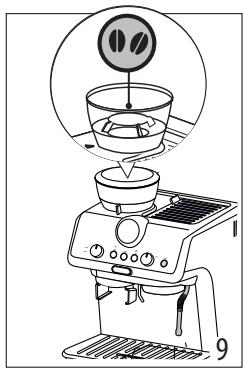
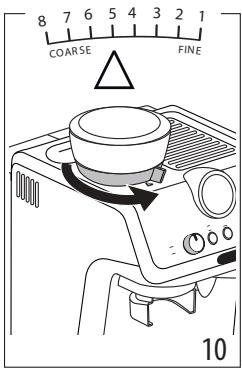
- Put coffee beans in the container (A3) (fig. 9). It is best to grind only a quantity of beans sufficient for immediate use, so that the coffee will always be fresh.
- The default grinding setting is 5 (medium ground). If this is too fine or too coarse, adjust the level according to personal taste and the type of coffee used (adjust only when the coffee mill is in operation (fig. 10).
Please note: A grinding level between 3 and 6 is recommended for most coffees. Grinding with 1 or 2 selected produces a very fine result. Use only with very special coffee (light roast) or when you notice non-optimal coffee quality due to wear of the burrs (grinding too coarse).
- Place one of the coffee filters (C3) or (C4) in the filter holder (C1). Press (B5) to select preparation of 1 or 2 cups. This also doubles the quantity of espresso delivered.
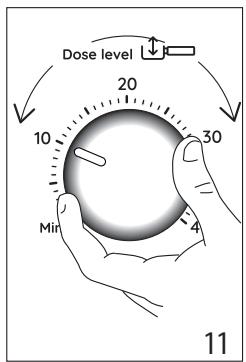
- Set the quantity by adjusting the dial (B4), starting from the minimum position (fig. 11).
The first time you use it, leave the dial in the Min. position. In the beginning, it is normal to make a few attempts before finding the optimal setting. We suggest you start with the default values, then modify them if necessary following the suggestions in section "Adjusting the quantity of ground coffee in the filter".
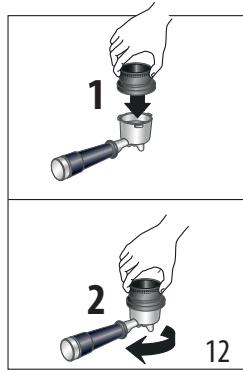
- Attach the dosing and tamping guide (C2) to the filter holder: 1 press; 2 rotate to lock (fig. 12).
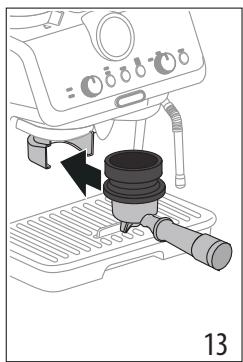
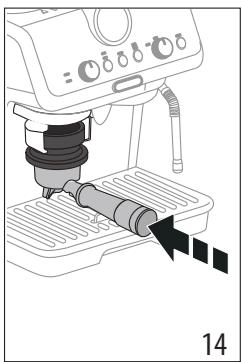
- Insert the filter holder in the coffee mill outlet (A13) (fig. 13).
- Press the filter holder until you hear a "click" (fig. 14), then release. Grinding starts and stops automatically.
Please note: To manually stop grinding, just press the filter holder again (until you hear a click).
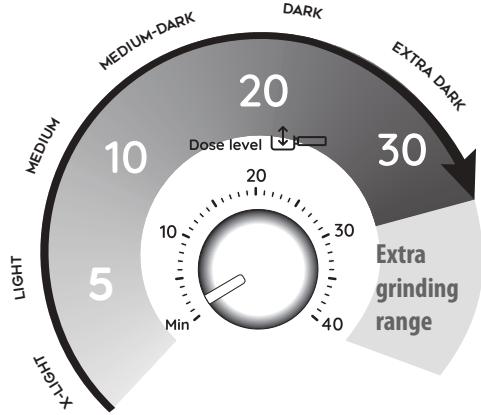
Adjusting the quantity of ground coffee in the filter
Different varieties of coffee bean give different results when ground: consequently, the initial adjustment of the dosage requires special care.
This illustration shows how to regulate the dosage, based on the roast colour: this should be taken as a general guide, given that in practice, the final adjustment can vary according to the composition of the beans.
- Set the quantity (to the raised mark inside the coffee filter), starting from the minimum position. The numbers on the dial are a handy reference to note down once the quantity in the filter is ideal. The numbers do not correspond to the coffee mill settings, measurement units (g/oz) or grinding time.
- Looking at the roast colour of your particular beans, turn the dial slowly to find the right adjustment.
4.2 Step 2 - Tamping
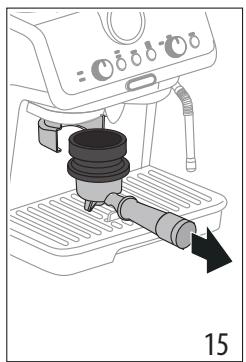
- After grinding, remove the filter holder (fig. 15).
- Tap the dosing and tamping guide (C2) to level the ground coffee.
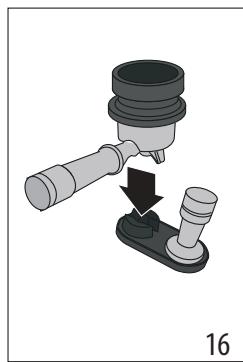
- (Certain models only): rest the filter holder in the housing on the pressing mat (C12) (fig. 16).
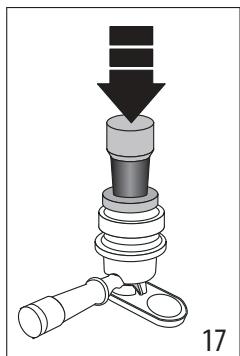
- Press the coffee using the presser (C11) (fig. 17).
- Remove the dosing and tamping guide by turning it anticlockwise and pulling upwards (fig. 18) and check that the quantity is correct (see "The "perfect dose").
- Attach the filter holder to the coffee outlet (A10) (fig. 19).
Please note: Coffee left on the edges of the filter after pressing does not in any way compromise the quality of the brewing and therefore the end result.
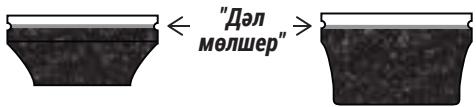
The "perfect dose"
The perfect quantity corresponds to the raised line inside the coffee filters;
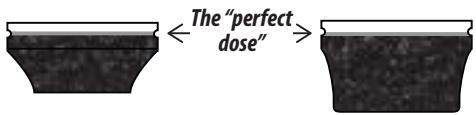
Make sure the coffee is at the right level after tamping. It might be necessary to adjust the level a few times using the dial (B4) before the ideal dosage is achieved.
- If the coffee is extracted too strongly or too weakly even at the ideal dosage, this can be corrected by grinding the beans more finely or more coarsely (see "4.1 Step 1 - Grinding"). To correct over-extraction (coffee released too slowly), select a coarser setting. To correct under-extraction (coffee released too quickly), select a finer setting.
4.3 Step 3 - Brewing
- Select the temperature (fig. 20) (see "Coffee preparation temperature").
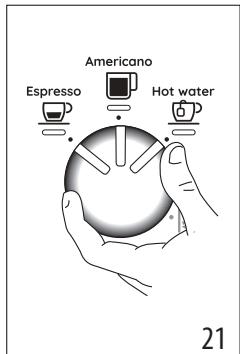
- Select the desired beverage (fig. 21). If the beverage has been programmed (see section "6. Programming beverage quantities"), the beverage light flashes briefly.
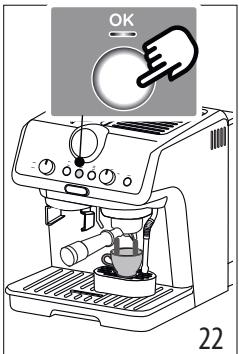
- Press OK (B6) to start brewing (fig. 22) (pre-infusion and infusion). Delivery of the coffee will stop automatically.
Coffee preparation temperature
The water temperature is controlled during the entire preparation process to ensure its stability during the extraction step. The Specialista Arte has 3 infusion temperatures* in a range between 92 and 96^ .
The temperature effectively utilized will depend typically on the variety of been and the roast: Robusta beans require a lower temperature, and Arabica beans a higher temperature. The same applies for dark roasted beans or for light roasted beans, respectively.
| Temperature level | Corresponding indicator light | Roast colour |
| MIN | Dark | |
| MED | Medium-dark | |
| MAX | Light - medium |
- This is the temperature of the water in the thermoblock. It is therefore not the temperature of the beverage in the
cup or the temperature of the beverage at the moment of release from the outlets of the filter holder.
5. MAKING MILK BEVERAGES
5.1 Frothing the milk
- Fill the jug (C8) with the amount of milk to be warmed/ frothed, bearing in mind that the milk doubles or triples in volume (fig. 23). For a denser and more evenly distributed froth, best results will be achieved using whole cow's milk at refrigerator temperature (about 5^ ).

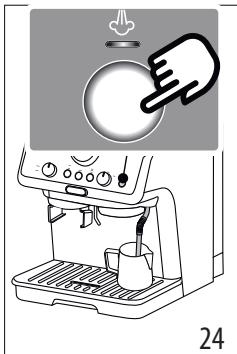
- Place the jug under the steam wand and press the steam button (B9) (fig. 24).
- To froth the milk, rest the steam wand (A9) on the surface of the liquid. This mixes air with the milk and steam.
- Keep the steam wand in contact with the surface, taking care not to let in too much air and create excessively large bubbles.
- Immerse the steam wand below the surface of the milk, this creates a vortex in the liquid. Once the milk is heated to the desired temperature, press the steam button again and wait for the flow of steam to stop completely before removing the milk jug from the machine.
Barista tips:
- Fresh milk is best. Always use fresh milk straight from the fridge.
- For best results, always replace the milk jug in the fridge when not in use.
Whole milk ensures optimum results. The appearance and texture of froth depending on the nature of the dairy milk or vegetable beverages utilized.
After frothing the milk, eliminate unwanted bubbles by swirling the jug gently.
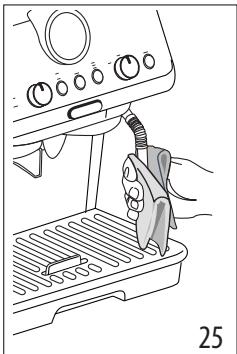
Cleaning the steam wand
- Following use, always wipe the steam wand (fig. 25) with a cloth to remove residual deposits of milk. The recommended procedure for in-depth cleaning is to use Eco MultiClean: this product ensures maximum hygiene by removing milk proteins and fats, and can be used for cleaning the entire machine.
-
Release steam for a few seconds to clean the wand (fig. 8).
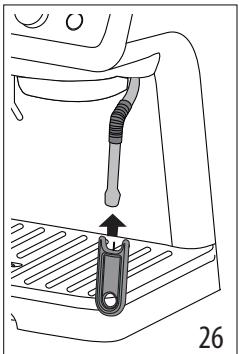
-
Wait until the steam wand has cooled down. To ensure the wand works efficiently over time, use the special cleaning tool (C10) to free the holes (fig. 26) of any obstruction.
6. PROGRAMMING BEVERAGE QUANTITIES
- Prepare the appliance to deliver 1 or 2 cups of the beverage you want to make, as far as attaching the filter holder (C1) complete with the (C3) or (C4) filter and ground coffee.
- Turn the dial (B8) to select the beverage being programmed.
- Press and hold the OK button (B6) until the machine delivers the desired quantity. The OK button light flashes orange to confirm you are in programming mode.
- When the desired quantity has been reached, release the OK button. The quantity is programmed.
Please note:
- You can programme beverages, but not steam delivery.
- Programming changes the quantity of beverage delivered, but not the quantity of ground coffee
- When a programmed beverage is selected, the corresponding light flashes briefly.
- 2x beverages can be programmed separately.
| Coffee recipe | Default quantity | Programmable quantity |
| Espresso | ≈ 35 ml | from ≈15 to ≈90 ml |
| Espresso 2x | ≈ 70 ml | from ≈30 to ≈180 ml |
| Americano | ≈ 120 ml | · espresso: from ≈15 to ≈90 ml · water: from ≈25 to ≈150 ml |
| Americano X2 | ≈ 240 ml | · espresso: from ≈30 to ≈180 ml · water: from ≈50 to ≈240 ml |
| Hot water | ≈ 250 ml | from ≈65 to ≈300ml |
7. SETTINGS MENU
| 1. Access the menu: | |||
| Press together and hold for 3 seconds | ×2 + | ||
| 2. Select the setting to be adjusted | |||
| Americano Espresso Hot water Hot water Hot water Hot water Hot water Hot water Hot water Hot water Hot water Hot water Hot water Hot water Hot water Hot water Hot water Hot water Hot water Hot water Hot water Hot water Hot water Hot water Hot water Hot water Hot water Hot water Hot water Hot water Hot water Hot water Hot water Hot water Hot water Hot water | Turn to | Press No | Press No again to change the setting |
| Pre-infusion pause | Espresso | The indicator light corresponding to the setting currently selected comes on | No → No |
| No → 1 sec | |||
| No → 2 sec | |||
| Extra grinding adjustment | Americano | The indicator light corresponding to the setting currently selected comes on | No → 1st range |
| No → 2nd range | |||
| Auto-off | Hot water | The indicator light corresponding to the setting currently selected comes on | 9 minutes |
| 1.5 hours | |||
| 3 hours | |||
| Water hardness | The indicator light corresponding to the setting currently selected comes on | soft medium | |
| hard /very hard | |||
| → | |||
3. Save the new settings by pressing OK (B6)
Please note: The appliance exits the settings menu automatically if there is no activity for 30 seconds.
7.1 Reset default settings
The OK light (B6) flashes briefly to confirm the reset.
| 1. Access the menu: | |
| Press together and hold for 3 seconds | x3set |
| 2. Reset default settings | |
| Press and hold the steam button (B9) for 3 seconds. | |
The OK light (B6) flashes briefly to confirm the reset.
8. CLEANING THE APPLIANCE
Important!
- Do not use solvents, abrasive detergents or alcohol to clean the coffee machine.
- Do not use metal objects to remove encrustations or coffee deposits as they could scratch metal or plastic surfaces.
- Should the machine remain idle for more than a week, it is advisable to carry out a rinse cycle before preparing any beverages.
Danger!
- Never immerse the coffee maker in water when cleaning: it is an electrical appliance.
Before commencing any cleaning operation on the outside of the machine, turn it off, unplug it from the mains socket and wait for it to cool down.
| DISHWASHER SAFE | O Eco MultiClean | |||
| × | √ | √ | × | × |
| √ | × | × | √ | √ |
| → | ||||
| DISHWASHER SAFE MultiClean | Eco MultiClean | |||
| × | × | × | √ | √ |
| × | × | √ | × | × |
| × | × | × | √ | √ |
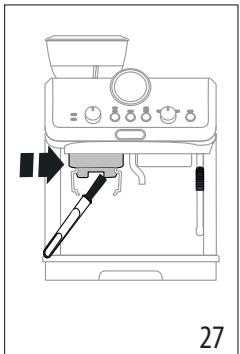
9. CLEANING THE COFFEE MILL
- Clean the attachment area with the brush (C9) (fig. 27).
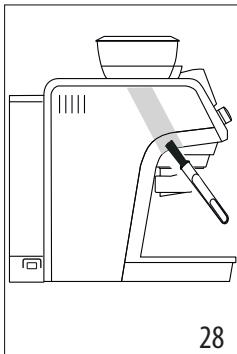
- Use the brush to clean the coffee guide (fig. 28).
Efficient grinding
The burrs are subject to wear over time. As time goes by, to achieve the perfect quantity, you need to turn the dial (B4) towards the highest numbers. When you reach a setting of between 30 and 40, you need to set the extra grinding range (see section "7. Settings menu" - "Extra grinding range").
When the quantity of ground coffee becomes less than expected, contact a service centre to have the burrs replaced. With the new burrs fitted, adjust the coffee mill by accessing the settings menu and selecting the first range of the "extra grinding adjustment" setting. Next, turn the ground coffee quantity dial (B4) to the Min position and set the quantity as for first-time use (see "La "dose perfetta").
10. WATER HARDNESS
The descale light [B3) comes on following a predetermined period of operation that depends on a water hardness setting. The machine can also be programmed according to the actual hardness of the local water supply, in which case descaling may be required less frequently (see section "7. Settings menu").
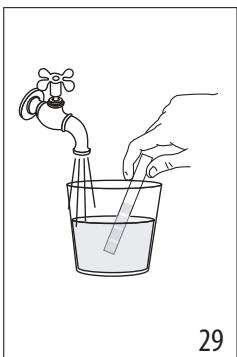
- Remove the "TOTAL HARDNESS TEST" indicator paper (C5) from its pack.
- Immerse the paper completely in a glass of water for about one second (fig. 29).
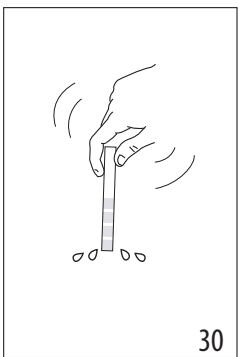
- Remove the strip from the water and shake lightly (fig. 30).
| Water Hardness Test Result | (B7) button | Level |
| 1 soft water | ||
| 2 medium water | ||
| 3 hard or very hard water |
- Set the machine accordingly, as indicated in the section "7. Settings menu".
11. HOW TO USE SOFTBALLS (CERTAIN MODELS ONLY)
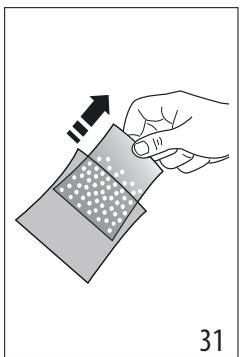
Softballs (C7) are an innovative treatment system that prolongs the life of the machine, without altering the properties of the water, while ensuring consistently creamy and aromatic coffee. To optimize the effectiveness of the treatment, leave Softballs in the water overnight before use.
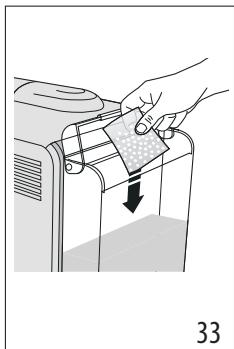
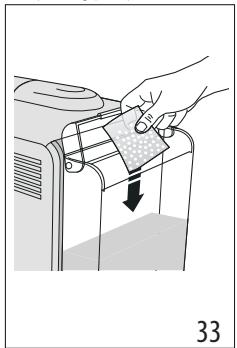
- Take the sachet of Softballs from the wrapper (fig. 31).
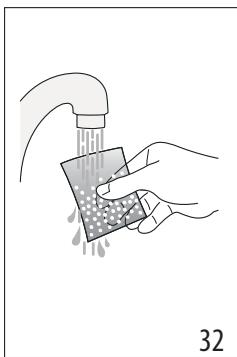
- Rinse the sachet of Softballs under running water (fig. 32).
- Immerse the sachet in the water tank (A7) (fig. 33).
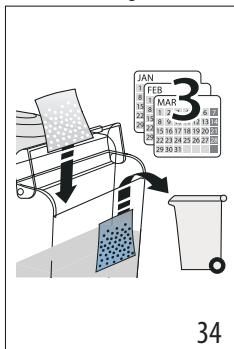
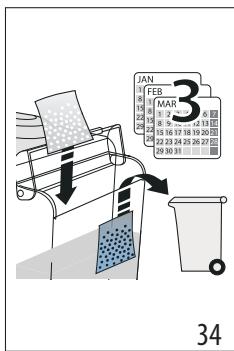
- Change the sachet of Softballs every 3 months (fig. 34).
12. DESCALING
Important!
Before using the descaler, (C6)read the instructions and the labelling on the pack.
Use De'Longhi descaler only. Using unsuitable descaler and/or performing descaling incorrectly may result in faults not covered by the manufacturer's guarantee.
- Descaler can cause damage to delicate surfaces. If the product is accidentally spilt, dry immediately.
| To descale | |
| Descaler | De'Longhi descaler |
| Container | Capacity 2 litres |
| Time | ~40min |
- When the indicator light [B3) comes on, you need to descale the appliance. You can start descending at any time.
- Remove and empty the drip tray (A19), then reposition it in the machine.
- Empty the water tank (A7). (If present, remove the softballs and place in a glass of water until they can be re-inserted at the end of the descaling process.)
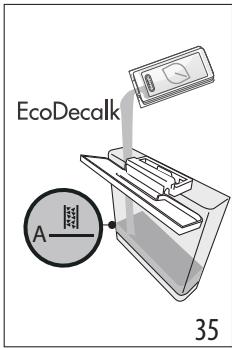
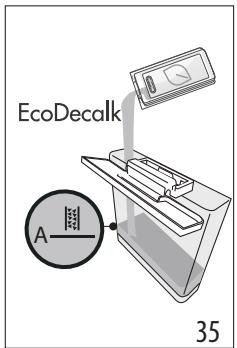
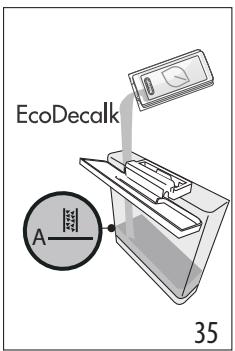
- Pour the descaler into the water tank (C6) up to the level A marked on the inside of the tank (corresponding to the contents of one 100ml pack) (fig. 35).
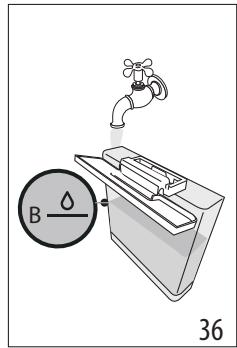
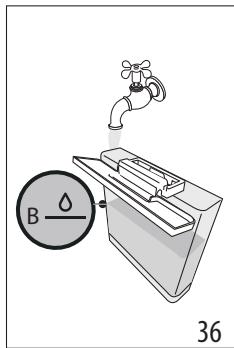
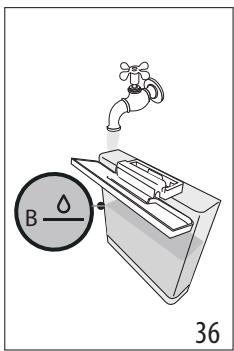
- Add water (1 litre) up to level B (fig. 36). Now reposition the water tank in the machine.
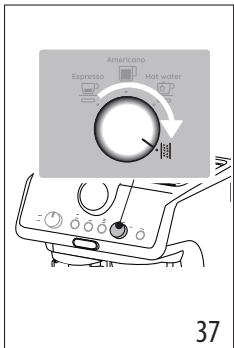
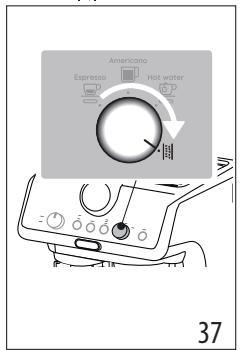
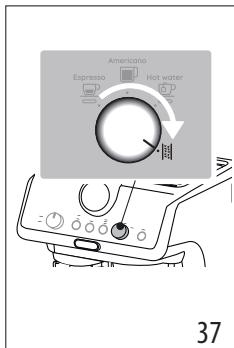
- Turn the dial (B8) to [5] (fig. 37): The OK light turns orange and the [5] light flashes.

-
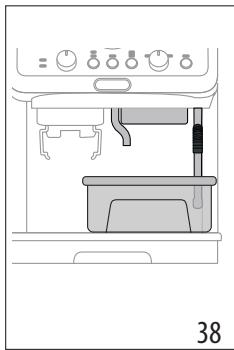
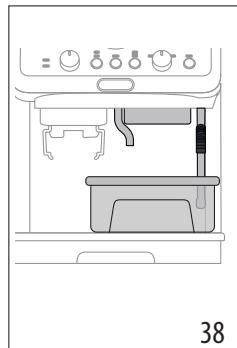
Make sure the filter holder (C1) is not attached. Position a container under the coffee spouts (A10) and hot water spout (A11) and another under the steam wand (A9) (fig. 38).
-
Press the hold the OK button (B6) for at least 3 seconds. The OK light flashes.
- The descending programme starts and the descaler liquid comes out of the spouts. The descale programme removes limescale deposits from inside the appliance by automatically performing a series of rinses and pauses until the tank is empty.
Descending ceases and the OK light turns white. This means that a rinse cycle must be carried out:
- Empty the containers used to collect the descaler solution and reposition them under the spouts.
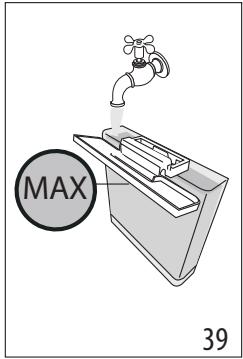
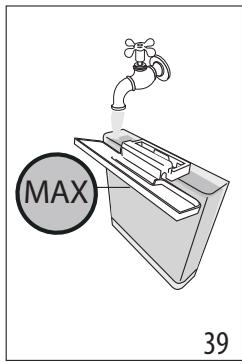
- Remove the water tank, empty out any residual descaler solution, rinse under running water and fill with fresh water up to the MAX level (fig. 39). Put the tank back in its housing.
- Press the OK button. The rinse cycle starts.
- When rinsing is complete, delivery stops. The light flashes red and the OK light goes out.
- Empty the recipient used to collect the rinse water.
- Remove and empty the drip tray (A19), then reposition it in the machine.
- Remove the tank, fill with fresh water and reposition in the machine. (If present, rinse the softballs with running water and put back in the tank).
- Turn the function selection dial (B8) to one of the beverages. The machine is now ready for use.
Please note:
- The descending cycle can be started up at any time (even if the relative light has not yet come on).
-
Should descending be started up by mistake, it can be stopped by pressing the OK button and holding for 10 seconds; the rinse cycle cannot be stopped.
-
EXPLANATION OF INDICATOR LIGHTS
| LIGHTS | EXPLANATION OF INDICATOR LIGHTS | OPERATION |
| All lights blink briefly | Turning the machine on | Self-diagnosis |
| OK on | The machine has been turned on for the first time and the water circuit must be filled | Proceed as indicated in section "3. Setting up the appliance" |
| OK + Americano + Hot water On (The indicators L and show the respective selections) | The machine is ready to deliver fluids | Set up the machine and proceed with preparation of the beverage |
| OK Flashing | The machine is warming up | Wait until the ideal delivery temperature has been reached |
| On | There is not enough water in the tank (A7) or the tank is not correctly in place | Fill the tank with water, or remove the tank and reposition it correctly |
| → | ||
| Flashing | An attempt is being made to prepare a beverage, but with water tank (A7) empty | Fill the tank with water |
| Because the beans are too finely ground, the coffee is delivered too slowly or not at all | Remove the filter holder (C1) and repeat the coffee-making steps, bearing in mind the indications given in sections "4.1 Step 1 - Grinding" and "4.2 Step 2 - Tamping" | |
| The coffee filter (C3) or (C4) is obstructed | Rinse the filters under running water | |
| The tank (A7) is not properly in place and the relative valves are not open | Press down lightly on the tank to open the valves | |
| Limescale in the water circuit | Descale as described in section "12. Descaling" | |
| ×2×1on | 1 cup preparation is selected | The entire preparation procedure (from grinding to delivery) is set to make 1 cup |
| ×2on×1 | 2 cup preparation is selected | The entire preparation procedure (from grinding to delivery) is set to make 2 cups |
| MIN MAX On | Select one of the available temperatures | See "Coffee preparation temperature" |
| Flashing | General alarm | Turn the machine off and wait 10 minutes before turning on again. If the problem continues, contact customer services. |
| Flashing | The steam function is selected and underway | After a few seconds, the machine starts deliv-ering steam |
| On-red | Dscaling is required | Carry out descaling as described in section "12. Descaling" |
| Red OK Orange Flashing-On | Dscaling is selected | Press OK to start descaling or turn the dial to a beverage |
| Red OK Orange Flashing | Dscaling proceeds. The machine deliver-ers descaling solution | Proceed by completing the descaling cycle (see "12. Descaling") |
| → | ||
| Red OK White Flashing - On | The first phase of the descending cycle is complete. You now need to proceed with rinsing. | Press OK to start rinsing. |
| Red OK White Flashing | The machine proceeds with the rinsing phase to complete the descending cycle. | Proceed by completing the descending cycle (see “12. Descaling”) |
- TROUBLESHOOTING
| PROBLEM | CAUSE | SOLUTION |
| There is water in the drip tray (A19) | This water comes from the internal cir-cuits of the machine and is a normal con- sequence of their operation | Empty and clean the drip tray on a reg- ular basis |
| The machine fails to produce espresso coffee | No water in the tank (A7) | Fill the tank |
| The OK light (B6) is on, meaning that the coffee circuit or the steam circuit is empty | Press the button associated with the OK light to fill the circuit | |
| Blockage in the coffee filter (C3) or (C4) | Rinse the filters under running water | |
| Coffee ground too finely | Adjust the quantity and grinding level | |
| The tank (A7)is not properly in place and the valves at the bottom are not open | Press down lightly on the tank to open the valves at the bottom | |
| Limescale in the water circuit | Descale as described in section “12. Descaling” | |
| The filter holder (C1) cannot be attached to the appliance | The ground coffee has not been tamped or the quantity is excessive | Repeat phase 1 (section “4. Making cof- fee”) using less coffee. If you are using the 1 cup filter, make sure the 1X light (B5) is on. |
| The espresso coffee drips from the edges of the filter holder (C1) instead of from the holes | The filter holder is not correctly in place | Attach the filter holder correctly (fig. 19) |
| The coffee spout gasket has lost flexibility or is dirty | Contact a customer services centre to have it replaced | |
| Blockage in the coffee filter (C3) or (C4) | • Rinse the filters under running water • Adjust the grinding settings | |
| The espresso cream is too light (delivered from the spout too fast) | The machine settings need to be reappraised | See instructions in section “The “perfect dose”” |
| The espresso cream is too dark (delivered from the spout too slowly) | The machine settings need to be reappraised | See instructions in section “The “perfect dose”” |
| On completion of the descale cycle, the machine calls for a further rinse | During the rinse cycle, the water tank (A7) has not been filled to the MAX level | Repeat the rinse cycle (see section “12. Descaling”) |
| The machine does not grind the coffee | Foreign matter has found its way into the coffee mill | Turn the selector (A2) to 8 and remove all beans with a vacuum cleaner until the beans container (A3) is empty and clean. If the problem continues, contact customer services |
| Changing to a different type of coffee | You are recommended to pour only the amount of beans to be used into the beans container (A3) To empty the container, vacuum out the contents with a vacuum cleaner or grind all the beans in the container until completely empty. Add new type of coffee beans If the amount of ground coffee does not give the perfect dose, proceed to set up the machine as for first-time use | |
| After grinding, the coffee filter (C3) or (C4) is empty | The funnel of the coffee mill is clogged | Clean as described in section “9. Cleaning the coffee mill”. |
| After grinding, the amount of coffee in the filter (C3) or (C4) does not give the “perfect dose” | The quantity of ground coffee needs adjusting | Adjust the quantity of coffee with the dial (B4), following the instructions in section “The ‘perfect dose’”. If the dial is already in the max. position, proceed as described in section “7. Settings menu” – “Extra grinding adjustment” |
| You are using the 2 cup filter (C4) | Make sure the 2X light is on | |
| Over time the burrs wear down | Contact Customer Services |
4.3 Phase 3 - Distribution (brewing)
- Espresso
Americano
Hot water (Heet water) - Ontkalken
| DISHWASHER SAFE | Ceco MultiClean | ||||
| √ | × | × | √ | √ | |
| × | × | × | √ | √ | |
| × | × | √ | × | × | |
| × | × | × | √ | √ |
9. LIMPIEZA DEL MOLINILLO
| DISHWASHER SAFE | QIEco MultiClean | ||||
| √ | × | × | √ | √ | |
| × | × | × | √ | √ | |
| × | × | √ | × | × | |
| × | × | × | √ | √ |
9. LIMPEZA DO MOINHO DE CAFÉ
- Limpe a zona de engate com o pincel (C9) (fig. 27).
- Utilizing o pince, limpe a rampa de cafe (fig. 28).
Moagem eficiente
4.1 Fase 1 - Maling (grinding)
4.3 Fase 3 - Brygging (brewing)
- Velg temperatur (fig. 20) (se "Temperatur for tilberedelse av kaffe").
- Velg onsket drikk (fig. 21). Hvis drikken er blitt programmert (se kapittel "6. Programmering av kaffestyrke") vil lampen til den aktuelle drikken blinke kort.
- Trykk pa OK (B6) for a starte tilberedelsen (fig. 22) (for händsbryggy og bryggy). Tilberedelsen starter opp og avbrytes automatisk.
4.3 Fas 3 - Dispensing (brewing)
| DISHWASHER SAFE | Eco MultiClean | |||
| × | √ | √ | × | × |
| → | ||||
| DISHWASHER SAFE | QIEco MultiClean | ||||
| √ | × | × | √ | √ | |
| × | × | × | √ | √ | |
| × | × | √ | × | × | |
| × | × | × | √ | √ |
9. RENGÖRING AV KAFFEKVARNEN
| DISHWASHER SAFE | Olive MultiClean | |||
| × | √ | √ | × | × |
| √ | × | × | √ | √ |
| → | ||||
| DISHWASHER SAFE MultiClean | Eco MultiClean | |||
| × | × | × | √ | √ |
| × | × | √ | × | × |
| × | × | × | √ | √ |
9. RENGØRING AF KAFFEKVERN
| DISHWASHER SAFE | O Eco MultiClean | |||
| × | √ | √ | × | × |
| √ | × | × | √ | √ |
| → | ||||
| DISHWASHER SAFE MultiClean | OECo MultiClean | |||
| × | × | × | √ | √ |
| × | × | √ | × | × |
| × | × | × | √ | √ |
9. KAHVIMYLLYN PUHDISTUS
- Espresso
Americano
Hot water (Topyaa Boda) - YdaJIeHHe NaKUnn
B9. KhoNka «nap»: Дя подауни napa
1.3 OnncanHe npHaadJeKHOCTe -C
1.4 He BkIIOUeHHbIe npICnOc6JIeHnIa OUYCTKn, peKOMeHDoBaHHbIe npOn3BOoNTeIeM
TempepatyaДЯпruToBLeHnKoΦe
KoTHpOB 3a TempepaTpyo BObl OcyuIeCTBnIeTcH Na npOtaJXeHN Bcero npOcecca npriOtOBnEHH, YTObI oBeCneUH bero CTabNlBHOCTb Ha 3Tane 3KCTpaKUn. La Specialista Arte npednaet 3 yPOBHa TEMepaTpyb 3abapKn, KOtOble COOTBetCTByIOT dHaana3OHy OT 92^ Do 96^
B 3aBcIMocTOn OT TnA n CTeneHn 06kapKn 3epeh peKoMeHnyetcN cNoIb3OBAHne pa3nUHbIX yOpBHeN TeMnpaTypb: 3epHa pO6Cybl Tpe6yEt 60nee Hm3Ko TempepaTypb, a 3epHa apa6uKn - 60nee BbICOKo. Te Jxpe Tpe6OBaHna DeiCTBntBhl n dIg 3epeh TMHO n6kapKn IIN TOLbKO YTO 06kapHbIX 3epeH.
4.2 2-KaJaM-TbIfbI3day
- TapTyuaH coH cy3ri yCTaFbIUtbI aNbIHbI3 (15-cypeT).
- TapTbIINFaH KoΦeHI TeriCteY yuiH MOnIeepNey KHe TbIFbI3day KypaJIbIH (C2) KaFbI-NKaFbIN KaJIbIHbI3.
- (Tek Kei6ip yIrIepde): cy3ri ycTaFbIuTbI TbIFb3day ToCeMIHe KopNycbIMeH KoJIbIHb3 (C12) (16-cyper).
- KoΦeHi 6acKbIuHneH (C11) (17-cyper) 6acblHbI3.
- MJIWepeIey JxHe TbIFb3day KypaJIbIH caFAT TiJIHe Kapcbl 6pyay XHe KOFapbl TapTy (18CypeT) apKbJIbI bIbIFapbl anbl, MJIWepeDIn DyPbICbIFbIH TEkcepH3 ("DAn MJIWeep"60JIIMH KapaHbI3).
- Cy3ri yCTaFbIuTbI Kofoe wyMerie (A10) 6ekitih3 (19-cypet).
EciH3e 6oNcBn: BacydAn KeiH cy3riHiKneKeTpInDe KaIraH Koe eIbip KaFdaNAdaKaHaTy caNaCbHa HkCaH KeTIpMeNdi, rFnH, COHfBI HAtNXere de acep etNei.
"Дэл менир"
Дал молшер коф ecy3rilepiH iuiHderi 1bIfbIKbl cbI3bIKKa TeH;
TbIbI3dayaH coH, KOfeHH dyPbIC deHeReJe eKeHHe K03 JeTKi3iH3.Дан МоЛшрre КОJ KeTKi3y yuH DeHReDi peTey DoHreIerIMeH (B4) 6ipHeWe pet petTeY KaKet 6onybl MymkIH.
ErepKofoTintiMihci3do3adaTbIM KOHO HEmece TbIM aWbIK 60bnI WbIKca, OHbI dHnepdi MaDanaHy Hemece ipiney etin TaPty apKbIbI peTteyre 60aIbI ("4.1 1-Kaam -YHTaKTay" 60JIIMn KapaHbI3). ApTbIN WbIFybl TY3ETy ysiH (Kofo TeBIM 6aary WbIKca),ipineynapaMeTpdi TaHaDaHbI3.Kemin WbIFybl TY3ETy ysiH (Kofo TeBIM Te3 WbIKca), MaDanaay npaMeTpdi TaHaDaHbI3.
4.3 3-KaДam-KaHаТу
- TemnepaTypaHbI TaHaHaB13 (20-cypeT) ("Kofo DaHbIHday TemnepaTypacbl" 6eimH KapaHb13).
- KaIaFaH cycbIHbI TaHdaHbI3 (21-cypet). CycbIH 6aFapnAmalaHaFan 60anca ("6.CycbIH MOnIeepIepiH 6aFapnAmaiay" 6oImiH KapaHbI3),cycbIH WAMblKbICKaWJxHaHdbI.
- KaHaTyDbI 6acTay yuH IN OK (B6) TYMecIH 6acbIbI3 (22-cypeT) (dEmDey KHe aNDbH aHa dEmDey). KoFe KybIybl ABTomaTTbl TypDe TOKtaNbI.
Kofo daibihay tempepatacbi
KofoHi aFbI3y 6apbcihda 6yKi n daBbIHday npocecHH typaTbIbIFbH KAMTaMaCbI3 ety yuH cydbH TemnepaTypacbI 6akblHaDbI. Specialista Arte KypblfbcIHda 3 demey TemnepaTypacbI* 6ap, onap 92 xhe 96^ apacbIHda peTTeJI. TemnepaTypahbIH TmIMi DeHreI dH cypbl6bi MeH KybpblNy DeHreiHe 6aIIaHbICTb peTTeJI: Po6ycTa dHepi yuH IN ToMeHipeK, an ap6nka dHepi yuH XofapbIpaK TemnepaTypa KaXeT. A3 KybpblfAH kHe KaTbI KybpblFaH dHdep yuH de TemnepaTypa OcbIaN peTTeJI.
| DISHWASHER SAFE | Oleco MultiClean | ||||
| X | X | √ | X | X | |
| X | X | X | √ | √ |
9. KOΦE TAPTKblITb1 TA3AJIAY
- Bekeitya aHaMaFbIn ΜeTkaMeH (C9) Ta3aJaHaI3 (27-cpeT).
- Kofo 6afttaftbIHTbTa3aJAY yuH uTeKaHbI naJaHaNbHbI3 (28-cypet).
Tmimi TapTy
Kaayticep yakblt 0te KeNE To3aBl. YaKbl 0te Ke ne dAn MOnIeepi any ywiH dOnHreKeTl (B4) en XorapfbCaHdapfa 6ypay KaKet 6oNaBb. 30 Xane 40 apaIbIbHdaft npamaTpRe KOn JxetKeH Ke3de, KocbIMwa TapTy npamaTpIn OpaHTy KaKet 6oNaBb ("7. PanaMeTpnep M3ipi" - "KocbIMwa TapTy ayKbIMb" 6eImIH KapaHbI3).
TaptbInFaH KoFe MOnIepi KytKeHderiEdn a3 WbIKKaH Ke3De, KaWayTicTePdi AybICTbIpTy yuH IN KbIMET opTaIbIFbIMEn Xa6apJaacblbI3. KaWayTicTeP caIbIHFaH Ke3De, napaMetpIep M3aipIHe Kpy XaHe "KocBIMwa TaTpYdBi peTtey" napaMetpiH, 6ipHni aykbIMbIH TaHday apkblb I KoFe TApTkblTbi petTeH3. OdaH KeiH, TaptbInFaH KoFe MOnIepi HOnHreNeKTi (B4) Min KyIHe opHaTbIN, 6ipHni pet KonDaHaHaDa caIbHybl Tnic MOnIepi caIbHB13 ("DAn MOnIeep"" 6oJIIMn KapaHbI3).
10.CY KATTbIJIbIFbl
Ka Ka Ta3anay 7aMbI (B3) cy KaTbIbIfblnapaMeTpIe 6aHaNbICTbI aDbIH anaahbIKtaIraH Kymbc Ke3eHHeh KeiH XaHaDbI. ByKypbJIbHbI ci3 TypaTbIH Jepderi HaKtbl Cy KaTbIbHbIHa ca6afapJaMaNayFa da 6oJala, coHda Xn Ka Ka Ta3anay KaKet 6oImaJbI ("7. NapaMeTpIep M3pi" 6oImin KapaHbI3).
- TOTAL HARDNESS TEST KερceτκιώΚαfa3bIH (C5) opambyHaH υβfapbIbI3.
-
KaFa3DbI cTaKaHdAfbI cyFa 6ip ceKyuHdTaI ToBbIK 6aTbIPbIN aBbIHbI3 (29-cypet).
-
XokaHaHb cydah 乌fapbl, kailan cijkiniz (30-cypet).
| Су KaTTbIbIbIbIc | (B7)ТуМсeI | Дени |
| 1ЖУМсaК,су | ||
| 2орташacу | ||
| 3KaTTblHemeceTeKaTTbl cy |
- KypbIfblHbl "7. Iapametprlep M3iPI 60JIIMIHde KepcetilreHnei Tnicihue opHaTbIHb13.
11. JYMCAK TYIIPUIKTEPDI KOIДAHY ФДICI (TEK KEIBIP YJΓIJIEPDE)
KymcaTnyipwikTep (C7) DeereHim3 cydbIH KacneTTepi H3repTnei, KypblfBiHbH JapaMdbIbIK, Mep3iMH Y3apTaTbIH XaHe KofoHi 6ipKaIbITbI KOIO XoH NiCTi eTeiH INHOBaunJIbIK Kyue. OHeyDi TImdInirH KaCapTy ysiH JyMCAk TyipwiKTEpDI KOJaHaBac 6ypbi6ip TYHRe cyfa caJIbIN KoBlHbI3.
- KymcaK TyiipwikTep KaTaNbIFbIH opamHaH WbIFapbIH3 (31-cypet).
- KymcaK TynipikTep KaItaBbIFbIH aFbIH cy (32-cypeT) actbIHda WaaBbHbI3.
- KaTaNbIKbI cy bIDbcIHbHa 6aTbIPbIHbI3 (A7) (33-cyper).
- KymcaK, TyipwikTepe KaItaWbIFbIH 3 aI caIbIH aybICTbIPbHbI3 (34-cyper).
12. KAK TA3AJAY
MaHbI3dbl!
Ka Ka Ta3aJaFbIUtB1 (C6) KonDaH6ac 6ypblH, HycKaynapdbI XaHe KaNTaMa JxanCbIpMacblHaDafbl HycKaynapdbI Okbln 1blfblbl3.
Tek De'Longhi KaKa Ta3anaFbIbHn naJaHaNbIbIbI. Baca KaKa Ta3anaFbIbTbI naJaHaHy JkHe/Hemce KaKa Ta3aJaiDbI dypbicOpbIHdAmay OHIM KacayUbICbHbIH KeniDirInDe KapaImaHa akaylbITapFa ce6en 60nybIMyMKIN.
KaKaTa3aIaNbHn3ik6eTepi3aKbIMdaybl MyMKIn.Erep6yIeHIM6aIKaycb13daTeirinKeTce,OhIdepeyKypFaTbIHbI3.
| Каç таzaлay | |
| Каç, Тазарткыìш | De'Longhi каç тазарткыìшì |
| bɪdɪc | СbɪbɪMдьɪlɪbɪfbl - 2 ЛNTp |
| Yaксытbl | ~40 MнH |
- INHINKaTOp WAmbl (B3) XaHaH Ke3De, Kypblfbl KaBbIH Ta3aJAY KaKet 6oJaBl. KaK Ta3aJAYbl Ke3 KeJIReH yaKbITTa 6actayFa 6oJaBl.
- Tambl HayacbH (A19) bIrapbn anbIn, 60caTbHb3 Da, KypblfBfKaaTc aBbHb3.
- Cy bɪdɪbɪcɪh 60caTbɪHbɪs (A7). (Erep 60nca, JyMcaK TɪyɪpɪwɪkTePdi anbɪn, KaK Ta3aJAY npoʊci 6ɪtkeHwɪe cTaKaHdʌfbl cyfa calbɪn Koɪbɪhɒl3.)
- KaKa Ta3aJaBbIbTb cy bIbIcBiHa (C6) iWInDeri 6ipHni DeHReir A DneIH TonTbIpBn KyNbIHbI3 (6yN 6ip 100 Mn KaIWBikKa TeH) (35-cypTe).
- CydbI (1) B deHreinHe DeiH KybIHbI3 (36-cypeT). CocbiH cy bIDbcIH KypblfBa caIbIHbI3.
- DeHreKeTI (B8) KYiHe 6ypaHbI3 (37-cypET): OK IaMbI capfbIANT 60bnJ XHaHaDbI Da, IaMbI XblPiJIbIKTaIbI.
- BykKe3e cy3ri yctaftbIbI (C1) 6ekitImereh 60nybI KepeK. KoFe wymekTepiH (A10) xane bICTbIK cy wymerIH (A11) acTbHa 6oc bIDbc KOnbIn, by tyTirih (A9) (38-cypeT) actbHa da 6oJIeK 6ip bIDbc KObIHbI3.
- OK tyMecih (B6) keMihde 3 cekyHd 6acbin TypbHbI3. OK wambl kblnbikTaIbI.
- KaKa Ta3aay 6aFapnMaCbI 6acTaanAbj KHe WymKeTEN KaKa Ta3aNaFbIi CyBbIK 3aT bHaBJI. KaKa Ta3aay 6aFapnMaCbI KpybInFbHbIH iHiDeri KaKTbI Ta3aay yuH 6ipHeWe WaO XaHe KiDipy apeKetTePi bIbIC 6ocFaHwa opIHdaibl.
KaKa Ta3anay ToKtan, OK WaMbI aK, 60nbIn KaHaNbI. Byn waio uKkni opbHdaNybl KaKet DeReHdi 6inipedi:
- KaKa Ta3anaFbIi EpitIHdiH JxHay yuHn HuaHaHbIFaH bIDbcTb6OcTaBn, onapDbI WymekTeP acTbHa KaTa KoBbHbI3.
- Cy bIbIcBn IbIFapBn anBn, KaK Ta3aIaNfBII epiTINHIn H Ke3 KeJrEe KaIbIbFbIHAn 6ocatbIbIb3 Da, aFbIH cy actbHda WaiBn, MAX
JeHreinHe DeiH Ta3a CyMeH ToTbipbHbI3 (39-cypet).Cy bIDbcIH Kopnycka KaITa caNbIHbI3.
- OK TyMeciH 6acbIbI3. ⅢaIO uNKJI 6aCTaJIaDbI.
- Wao aKaTaNFaH Ke3e, cy ary ToKtaNbI.
[...] WaMbI XbInbIbIKTaNdbI XaHe OK WaMbI cHei. - ⅢaTbIH cydbI xHHay yuH KOIJaHbIaTbIH bIDcTBi 6OcaTBHbI3.
- Tambl Haya cbH (A19) mbfapbn anbIn, 60caTbIHbI3 Da, KypblFbIfa KaTtCaNbIHbI3.
- bɪdɪcɪtɪ wɪfapbɪn, Ta3a cymeH ToTlɪbɪpɪn, opHbɪHa Kaɪta caɪbɪhɪz. (Erep 6ɔːnca, kʌymcaK TɪyɪpɪwɪkTePdi aFbɪH cy actbɪnda wəɪbɪn, bɪdɪcɪka Kaɪta caɪbɪhɪz3).
17.Функця тандay dHreineriCycbIHdapdbIH 6ipiHe 6paHbI3.
OcbIaH KeIN Kypblfbl naJaIaNahyra daIbIH.
Ecihi3e60ncbH:
Ka Ka Ta3aJaay uKJIiH Ke3 KeJIreH yaKbITTa 6actayfa 6oJaBbl (TnicTi wam aJIi XaHa6aca da).
Kak Ta3aay fHKcncbKaTeiikneH icKe KocblbI KeTce, OHbl OK tyMecin 10 ckyHd 6acbl Tpy apKbIbI TOkTaTyfa 6oJaIb; an IwAo zukIn TKTaTY MymkiH emc.
- INHINKATOP IAMdAPbIHt TYCIHIPMECI
| шAMДAP | ИнДИКATOP ШAMДAPынIH TYСИДIPMECI | ЖУМБIC TYPI |
| Барлык, Шamдap a3 fana уакытжылбытайды | Курьлфы icke косылuda | θзин-эзiTekсеруde |
| OK Kocylы | Курьлфы 6ipinshi pet icke Кocылfasан JэHe cy aiHaJy Жолары толырылы Kepek | Келесi 6eIIMde KepcetilreH Hyckaylappы OpbIHdaHbI3: "3. Курьлфы napametprpeH opHATy" |
| OK + Hot water Kocylы ENdikatoplары ТиICTi Тандaynapылы КерсеTi | Курьлфы cybIKtBtKtarpы Куюfa дaibH | Курьлфы пapametprpeH opHATbI, CysbH daibIHdAydbl 6actaHbI3 |
| OK Kobinbiklay | Маша НхыltынluDA | Mincis 6kyu TemnepaTPacbHnA DeiH Kbl3FaHsA KytTic3 |
| Kocylы | Быдіста жеткілікі Magic opbH Жok (A7) Hemece bldlc opbHna Дурс салынбаган | Быдісты СуMuH TOЛТырБИнbI3 Hemece bldlcSTbl aIbI, OHbI ДурстпсалынbI3 |
| Жынлы | Сусын дaibHdav Āpeketi opbIHdanyda, bipak cy bldlcbl (A7) 6oc | Быдісты СуMuH TOЛТырБИнbI3 |
| Дэндер Тым Мада 6oLbIn ТарылганыктAN, Kofoe эTe Jäm KúbIlyda Hemece Mул dem KúbIлмayda | Суэрі устыtsы (C1) StbIFapbln aIbI, Kofoe Jaskay KaDAMapbln КаITanlan opbIHdaHbI3, bipak "4.1 1-Kadam - YHTaKtay" JxHe "4.2 2-Kadam - TblbI3dAy" 6eIIMderiHde KepcetilreH HvCKaynapылы ecenke aIbIbI3 | |
| (C3) Hemece (C4) Kofoe cy3rici 6iteLren | Суэрір徂Да afbH cy acTbIHda шaibHbI3 | |
| bldlc (A7) opbHnHa duypbc салынбafan JxHe TnICTi Клаландap aSbIIMaFah | Клаландapы aShy yuHn bldlcTbI yctihen JxaiJIan 6acblbI3 | |
| Су aiHaJIbIMbIhda KaK Калыntackан | "12. KaK Tazalay" 6eIIMde сипатлгандai etin KaKTan Тазаланы3 | |
| → | ||
| шAMДAP | ИнданКATOP ШAMДAPыHBиН TYСИДIPМECI | ЖУМьIC TYPI |
| x2 x1 Kocyls | 1 kece дайындay napametpi Тандалды | Букій дайындay поочурасы (Tартудан Ксюfa DeiiHri) 1 kece жасay napametpihe opнатылды |
| x2 Kocyls | 2 kece дайындay napametpi Тандалды | Букій дайындay поочурасы (Tартудан Ксюfa DeiiHri) 2 kece жасay napametpihe opнатылды |
| MIN MED MAX Kocyls | К олж e trimdi temператypалардын,бipін Тандалдз | "Кофе дайындay Temператypалсы"6өлімн караныз |
| Жынblытay | Жалны дабы | Курсынгыны ошірін,10 мінітіан сон, Кайта Ксюыныз.Еream п探测ема Кайталая 6ерс, Тусынчынралды Колд Кызmetтетіменхаşраласыныз. |
| Жынblытay | Бу Фунцяясы тандалfacан Жэн ecурін жатур | Биршеce сенидан coн, Курсынfy 6у 6epe 6actaydBi |
| Kocyls - Kbl3bll | Кak taizanay kajket etiledi | Кak taizanaydukkeleci 6eiliMe Керсетілгendey opbɪндалыз: "12. Кak taizanay" |
| ЖынblытayOK capbint | Кak taizanay taizanfah | Кak taizanaydukбactay ушін OK Туймecin 6acbyныз hemecce Дэнгелекti 6iP cycbɪnfa 6ураиыз |
| ЖынblытayOK | Кak taizanay opbɪндалäы. Курсынfu KaK Taizanay epitɪngicɪn afbɪzədBi | Кak taizanaydukobpɪnɪdaɪs ("12. Кak taizanay"6eiliMine cai) |
| ЖынblытayOK | Кak taizanay ушінivсiklinig 6ipɪnü Kezeeni Āякtaлды.Енdi шаюды opbɪндау кajket. | Шаюды 6actay ушін OK туймecin 6acbyныз. |
| ЖынblытayOK | Машина кak taizanay ушін ушін Kezeин opbɪндау ушін ушін Kezeин opbɪндау. | Кak taizanaydukobpɪnɪdaɪs ("12. Кak taizanay"6eiliMine cai) |
- AKAYJIbIKTAPJIbI JKOIO
| ПЮБЛЕМА | CE6E6I | ШЕЛIMI |
| Тамший hayасьида (A19) cy 6ap | Бул су Кчрьлгын bIn iшki аиhalыm JОлдарынан шыfasы jжэne 6ул оларын ЖуMbICынан кein 6олатын Калыntын hapce | Тамший hayасьин Туракты Турde 6ocatbIHb3 Jжэne Тазаланы3 |
| Кчрьлгы үспесco кофeciin Жасай олмayda | ыдбICTa cyжOK (A7) | Су bIDbcBn TOITbIPbHb3 |
| OKшамы (B6) кофe hemece 6y аиhalымы 6oc ekeniH korpctу Ушin жанды | Жунeni TOTMbIPy JwIn OK шамын Тиесіл Tумсени басын3 | |
| (C3) hemece (C4) кофe cy3rici бITEлген | Сузгileрdi aByIN cy actbHda шайын3 | |
| Кофe ТыIM мада etilin Тарылган | Мөлserрmen уNTakTay (тарту) Дechг佩н реттп3 | |
| ыдьic (A7) opнын дурьс салынбafan Jжэne Oнын ТубИ徴i Клаландap aшык emec | ТубИ徴i Клаландapы aшу УшIN bIDcICTbY UCTiHEN Jжийл басын3 | |
| Су aiHalbIMbIHDA КAK Калыntackан | "12. Кak тazanay" БOLIMde синоталлгандai etin Кakтан Тазаланы3 | |
| Сузгі усткыш (C1) Кчрьлгыfa бекитимедi | Тарылган Кофe ТыfblДалмafan hemece Кофe Молшері ТыIM кeIN | Альраз, Кофeti пайдану арылы 1-kezeнд("4. Кофe хасay" БOLIMi) осы Кеzeнд Кайталаны3.Ер 1 Keceліk сузгіпайданын жATcaHb3, 1X ShambyHbN (B5)жанын Турfaнын Ke3 JжETKizhi3. |
| Зспесco кофeci tecikterpenen емec, сузгі устышын (C1) Жиекерін tamшылайы | Сузri устыш opнын дурьс салынбafan | Сузri устышын dурьістан бекітін3 (19-cypet) |
| Кофe Shymerini ТыfblДалмblshblHbH Соьылмыbl KacneTi Jxofalfah hemece onl kipleren | Оны aybICTbIpy YwIn ТуТыншылары TКОдay ОрТалыrtbIMeH xa6apLacbHb3 | |
| (C3) hemece (C4) кофe cy3rici бITEлген | •Сузгileрdi afbIn cy actbHda шайын3 •Кофe tarpy napametpreleni pettehi3 | |
| Зспесco кілereşі тым суьык (шумков тым тezаfedы) | Кчрьлгыnapametprelpi ka'ta орнаылуbl кepek | ""Дэл мэлэр"" 6элimінderi нуSCayapLapы Караны3 |
| ПИОБЛЕМА | CE6E6I | ШЕШIMI |
| Знице кинreich Тым Кара (шумкень Тым бая удаbl) | Курьлгыnapаметрелій салу opнатылbykepek | ""Дэл менир"" 6өлimiinderи hyckayларды караныз |
| Каç тазалay сүліяякталган сон, Курьлгы shaio сүлін opындануды сура'dы | Шаю сүлій барысында су bдысы (A7) MAX дөгөiner Deийн толttырлmafasan | Шаю сүлій сүләлалыз ("12. Каç тазалay" 6өлimiinderи караныз) |
| Курьлгы кOFеhi tarTpnaïды | Кофе tarTpкышta 6өгдze 3at 6ap | Тандаftышы (A2) 8 пarametr pine 6уран, 6арнык, дэндердішансорышpen 德н bдысы (A3) 6ocaraнша жэne тазаллоганда anlgin таспаныз.Егр поблесma Кайталагды калдay Кызmetтepimehхаарласыныз |
| Баска кOFe турин aybістыр | • Дэн bдысынale NaTek KОлданыларын Iэндер mөлserрін fana calfaн жэн (A3) • bдысы 6ocatу ушin онын iшиderiineрdi shanccorfbышpen Tazalaныз Hemece bдысы TANFAH 6арнык dэнderdi bдыс толык 6ocaraнша tarTpын таспаныз.• Ханca koфe дэнiz Турін салыныз •Егр tarTpылганkoфe мөлserрі kUTken dəл мөлserр 6oilmai shыкca, курьлгыnapametrрелін Курьлгыны alfaшкы падалануfa дайынданган ке徴дій peTTeɪз | |
| Кофeni tarTkан coh, (C3) hemecе (C4) koфe cyzrici 6ocãды | Кофe tarTkышын, Куньсыбы 6iteлген | "9. Koфe tarTkышыт TaZalaay" 6өлimiDE cinnataлгандai etin TaZalaanbly3. |
| → | ||
| ПЮБЛЕМА | CEБEBI | ШЕШИМ |
| Кофени Тартукан сон, (C3) немесе (C4) сизERICIN, ilшinderei koфе молшер ("дал молшерг") жетnéйdi | Тартылган кофе молшер piTTeуni кадут | Кофе молшерин дэнгелекпен (B4) petten, ""Дал молшер" бүлімінderi hyckaynapы opbIHdaныз.Егр дэнгелек макс. КүйнDE 6уган Deин туган 6oJSCa, onJa "7. Пaramетрир'mәз行政处罚 - "Кофe tarтуды КосыIMSHA petTey" бүлімінde TyciHdipɪŋreн аpeketti opbIHdaныз |
| СiЗ 2 КecSELIC cy3rini пайдалиын жатырсыз (C4) | 2X Шамы Кангafынha көз жеткизii3i3 | |
| Уakыт от eе ке пашayтICTep TO3aDbl | Тулынчыларды колдay КызmetTepimEn XaбapnaCSbIHbI3 | |
| DISHWASHER SAFE | Olive MultiClean | |||
| × | √ | √ | × | × |
| → | ||||
| DISHWASHER SAFE | QIEco MultiClean | ||||
| √ | × | × | √ | √ | |
| × | × | × | √ | √ | |
| × | × | √ | × | × | |
| × | × | × | √ | √ |
9. A KÁVEDARALO TISZITÍSÁ
| DISHWASHER SAFE | Olive MultiClean | |||
| X | √ | √ | X | X |
| → | ||||
| DISHWASHER SAFE | QIEco MultiClean | ||||
| √ | × | × | √ | √ | |
| × | × | × | √ | √ | |
| × | × | √ | × | × | |
| × | × | × | √ | √ |
9. CISTENIE KÁVOVEDO MLYNCÉKA
- Pripevnovaciu zonu yvistite stetcom (C9) (obr.27).
- Pomocu šetca vycistite Žab kávy (obr. 28).
Ucinne mletie
Mlynéky Časom podliehajó opotrebovaniu. Preto v priebehu Času, aby ste dosiahl perfektnú davku, je potrebné otočit gombik (B4) smerom k vyssim cislam. Ked budete na nastaveni medzi 30 a 40, prišla chvīfa na nastavenie extra rozsahu mletia (pozri kapitolu,7. Menu nastaveni"-"Rozsa h extra mletia").
| DISHWASHER SAFE | Q5co MultiClean | |||
| × | √ | √ | × | × |
| √ | × | × | √ | √ |
| × | × | × | √ | √ |
| × | × | √ | × | × |
| × | × | × | √ | √ |
9. CZYSZCENIE MLYNKA DO KAWY
| DISHWASHER SAFE | Q5co MultiClean | |||
| × | √ | √ | × | × |
| √ | × | × | √ | √ |
| × | × | × | √ | √ |
| × | × | √ | × | × |
| × | × | × | √ | √ |
9. CURATAREA RASNITEI
[19] (A19) [a] [a] [a] [a] [a] [a] .15
alal (c)g [1] .dla d a jy lal yjol slg jw .16 .(jzjlll lalag yjlll yjlll
.17
JuswWjBcAslclow
1u a
(g)aJ!(g)abol a 3 aWlll lIj oBn jSk .(Lgglzaiall
b#ol b#ol ybjc jc a##jll a#jll a#ac 10dOK ciaall J
gcoe gog gog (C1)jall joln o 0.7
(A9)jolll gog (A11)jolll clll egog .(A10)ogall
.(38Jkl)
jog: (B6)jJl Jc jlg3 0dJ OK jj Jc bawal .8 .OK
aIgll aIgll 1
| مُّلْكَسِيرِهُ لَبَعَدَةِ الحَزَلَةِ مَّلْكَسِيرِهُ لَبَعَدَةِ الحَزَلَةِ مَّلْكَسِيرِهُ لَبَعَدَةِ مَّلْكَسِيرِهُ لَبَعَدَةِ مَّلْكَسِيرِهُ لَبَعَدَةِ مَّلْكَسِيرِهُ لَبَعَدَةِ مَ�َنَتَبَعَدِهُ |
| مُّلْكَسِيرِهُ بَعَدَةِ الحَزَلَةِ مَ�َ�َرْبَعَدِهُ بَعَدَةِ مَ�َ�َرْبَعَدِهُ bَعَدَةِ مَ�َ�َرْبَعَدِهُ bَعَدَةِ mَ�َنَتَبَعَدِهُ bَعَدَةِ mَ�َ�رْبَعَdِهُ bَعَدَةِ bَعَدَةِ bَعَدَةِ bَعَدَةِ bَعَدَةِ bَعَدَةِ bَعَدَةِ bَعَدَةِ bَعَدَةِ bَعَدَةِ bَعَدَةِ bَعَدَةِ bَعَدَةِ bَعْدَةِ bَعَدَةِ bَعَدَةِ bَعَدَةِ bَعَدَةِ bَعَدَةِ bَعَدَةِ bَعَدَةِ bَعَدَةِ bَعَدَةِ bَعَدَةِ bَعَدَةِ bَعَدَةَ bَعَدَةِ bَعَدَةِ bَعَدَةِ bَعَدَةِ bَعَدَةِ bَعَدَةِ bَعَدَةِ bَعَدَةِ bَعَدَةِ bَعَدَةِ bَعَدَةِ bَعَدَةِ bَعِدَةِ bَعَدَةِ bَعَدَةِ bَعَدَةِ bَعَدَةِ bَعَدَةِ bَعَدَةِ bَعَدَةِ bَعَدَةِ bَعَدَةِ bَعَدَةِ bَعَدَةِ bَعَدَةْ bَعَدَةِ bَعَدَةِ bَعَدَةِ bَعَدَةِ bَعَدَةِ bَعَدَةِ bَعَدَةِ bَعَدَةِ bَعَدَةِ bَعَدَةِ bَعَدَةِ bَعَدَةِ bَع—" |
jS.(B3){gall Llaic aill lll j 1 .1
A.(A19)a(A19)a(a)a(a)a(a)a
aag aill lglll ally . (A7) all jzg 3
all! Jlalss.
(
gssll (C6) a yjzssjll jz jz jz jksw 4
J11 J11 J11 J100 a zw a Ljla lo A .35 Jkwl)
.36JkJ1)B sssall Jj j (j1 1)Jall .5
J OK jgall g: (37 JkJl) (B8)aaal 6 .6
| sgssss | (B7) jll | salll jwccjll |
| 2 a#b##goo ollo jwssll | ∅ | |
| 3 gljwcccldo l#jwcc | ∅ | |
1a 7Jauill goo gao la jauill cIisla Jbou 4 .
| DISHWASHER SAFE MultiClean | ||||
| × | × | √ | × | × |
| √ | √ | × | × | × |
ogalliaaba.9
.(27Jswi) (C9)olawjolawjll aebzio 1
.28Jk) 0gagall yjoo aaiy j,olajoll oiai
jbs
dclc llll i. jilj 1 jalbll jai jai jai jai jai jai jai jai jai jai jai jai jai jai jai jai jai jai jai jai jai jai jai jai jai jai jai jai jai jai jai jai jai jai jai jai jai jai jai jai jai jai jai jai jai jai jai jai jai jai jali jali jali jali jali jali jali jali jali jali jali jali jali jali jali jali jali jali jali jali jali jali jali jali jali jali
.(《glo!jobgbi:«-《bawalUusLJ 7》>Jall
aalg aillw alj ydo jgi aggball oggall aasolal ic
aiaa bja jno bawl a: jnbll cajawll dyaedall gall
bawll gllbld wagbawll calsel aqll jgwl noggall
aeg (B4) aaii bwa aao aay dl uas a. jnall "glzyl"
aaii(11) jnil) lglil palaasll ayas aaii bawl a MIN jdlld
.(<<dJ
olollsw .10
joo 000000000000000000000000000000000000000000000000000000000000000000000000000000000
jlaJ 4a aolal oagall jglgll gglgll lglal bglj .1
.(TOTAL HARDNESS TEST (C5 "cll)
Jkaa oolg aol clall no g k Jokly jai .2
.(29)
.30Jsw) 0j8o8gclll o bawl j
| مإستعمال | (B7)zzjj | الله��اللهالله |
| 1 الله��الله |
| :aaaalaaaalaaalaaalaaalaaalaaalaaalaaalaaalaaalaaalaaalaaalaaalaaalaaalaaalaaalaaalaaalaaalaaalaaalaaalaaalaaalaaalaaalaaalaaalaaalaaalaaalaaalaaalaaalaaalaaalaaalaaalaaalaaalaaalaaalaaalaaalaaalaaalaaalaaalaaalaaa | .1 |
| 3 3 3 3 3 3 3 3 3 3 3 3 3 3 3 3 3 3 3 3 3 3 3 3 3 3 3 3 3 3 3 3 3 3 3 3 3 3 3 3 3 3 3 3 3 3 3 3 3 3 33 | .2 |
.000000000000000000000000000000000000000000
jai.8
a
gJtll aouo cIabio gI cUio Jaxu y Auol all uobii
Jgssu
wglg jg aagjll gai jbj 4aasall eal y
a a a a a a a a a a a a a a a a a a a a a a a a a a a
.
JgEgawjdujjolldwllcuijduaill
cabbadolssollldssolld
y = - 12x + 3 BC//l
jglg:cllal 1sll jssaiy
j 1
ailll jil jil jil jil jil jil jil jil jil jil jil
S BCD = S COD + S BDO - S BOC
| MultiClean | DISHWASHER SAFE | |||
| × | × | √ | √ | × |
| √ | √ | × | × | √ |
| √ | √ | × | × | × |
| ← | ||||
aill jll 0g>OK (B6 jj lj jaiwll go bdoi .3
.aaJg g 1 JU JU UO KJ JJ
aai:OKjjjggdglalldgollldoic .4
.
:la a
i. ( x,y) = a + b
Lg 1s
diGxalldogdall
.
Jauai juii xi xi xi xi xi xi xi xi xi xi xi xi
:JdA (A9)JdA JdA JdA gddgddgddgddgddg
jIyIgIyIyIyIyIyIyIyIyIyIyIyIyIyIyIy
blaiol oc oc oocn go cbiow lc bawu biai .4
1.13> 80s CcIeae 96g U 5g2g loa ege all no
aIgOgUgGgUgUgUgUgUgUgUgUgUgUgUgUgUgUgUgUgUgUgUgUgUgUgUgUgUgUgUgUgUgUgUgUgUgUgUgUgUgUgUgUgUgUgUgUgUgUgUgUgUgUg
jlljjbcbsaaiagbllal jlll lglgogol y
g 1 1 1 1 1 1 1 1 1 1 1 1 1 1 1 1 1 1 1 1 1
:Jy Juy Juy Juy Sogj
.(17JcJ) (C11)olal dall alawy jI Jb
acllll lacolj scc ygdu jc ccljgl g aill .5
aai j 100000000000000000000000000000000000000000000
A. JUJUdQJU(《JUJUdUdUdUdUdU
.(19KJ)A(10)8galljgojulalJolog.6
10 100
a. a. a. a. a. a. a. a. a. a. a. a. a. a. a. a. a. a. a. a. a. a. a. a. a. a. a. a. a. a. a. a. a. a. a. a. a. a. a. a. a. a. a. a. a.
"aaa
aIall aIgai:JlIJI JJJbJcJcJgai j
:jjllbollieoo
(grinding) jabll - 1 a
baa Ssw aai .9 (Jkll) (A3) cglg jn lal gsw 1
jaxw ayjbal oag :slayy alal aggrall oggal uog
: jlb ogg jlc la
jol 13. (bawgio jbo) 5 yjnbll a jyj gauall ldua .2
lqng jnbll sgwua bawy a eil willy aayo n jnbll aai
aiaabo Joc elj bawll alac elj! yj) oogall egig igd .(10 k) (jJ
aaii jll ggi abed 6g3 uj jab aay y sog :d aai jol o ga bai lalusii d aact 2 gl 1 jc jaiyall gao jali jali aillto n c oggs agg bdo liuic g (yaasll i) J .(joojoo)
jll bcl . (C1) jlll Jolc (C4)g(C3)oggliljla 1j lal . 3
jlll l i ccln : jnljcn g jnljcn nnnn B5) L
. qgrs y gill gswyssyll aasL
Jklll) jdl ldl aagog no IeB (B4) aasll dcdu ma bcl . 4
.(11
J 1 J 1 J 1 J 1 J 1 J 1 J 1 J 1 J 1 J 1 J 1 J 1 J 1 J 1 J 1 J 1 J 1 J 1 J 1 J 1 J 1 J 1 J 1 J 1 J 1 J 1 J 1 J 1 J 1 J 1 J 1 J 1 J 1 J 1 J
:1 (J) (A17) aolc no 1
olllgcoaagbgyclalaoaog(2JkA1)A7)ollljzJ.2
(A1) yogall jll glbl lc baoi .swalld 1j
(4JcJ1)
100 j Jaa Aa aagb (A11)jLall sll ggo 2
(5 ( )
.1aai aagg g@JdI J:6 (Kb) (OK (B6 jj bc b#).3
.
ailll aillll gllll cbls yll aall lalwol
:dllglal
(C1) Cωjoll ωg (C4)g (C3)δgall jld
Joloo:aaSLlly (C1) 50000000000000000000000000000000
Jolg 05d 015b 4, cwwll Jgall
g (7 k) "INSERT"
:"CLOSE" gogll oIiIoo
:(A9)jLJUgJgJdJIbCoo
:all (OK (B6 jj Jc bdo) .7
8g (8 Jkll) (B9) jll jao jol jol jol jol jol .8
JgJgJgJgJgJgJgJgJgJgJg
.1y4g3dall0jLjSuayualluyjgu
JLJLLJ 10
aillbll 1 aal 1 aal 1 aal 1 aal 1 aal 1 aal 1 aal
jlll
j 5-54 54
ogall aolol oalol ccll co: ado yol lbcI g jlll
4.1 0aBgl (C4)g(C3))jdlg
.(grinding)-1