
EZ901N - Deep fryer MOULINEX - Free user manual and instructions
Find the device manual for free EZ901N MOULINEX in PDF.
| Product type | Dual-basket air fryer |
| Brand | Moulinex |
| Model | EZ901N |
| Number of baskets | 2 (left and right) |
| Basket 1 capacity (large) | Up to 1400 g of fries |
| Basket 2 capacity (standard) | Up to 800 g of fries |
| Temperature range | 40 °C to 200 °C |
| Timer | 0 to 60 minutes |
| Automatic cooking modes | Fries, Chicken, Vegetables, Fish, Dessert, Dehydration |
| Manual program | Yes (free time and temperature setting) |
| Grill program | Yes (depending on model, basket 1 only) |
| Sync function | Allows finishing two dishes at the same time |
| Screen | Digital touch screen |
| Removable grates | With silicone feet, for each basket |
| Grill plate | Included depending on model (usable in basket 1) |
| Material of baskets and grates | Non-stick coating |
| Cleaning | Baskets and grates dishwasher safe |
| Safety - Automatic shut-off | If basket removed for more than 5 minutes, or inactivity for 10 minutes |
| Basket handles | Yes, for safe removal |
| Power supply | Mains (standard plug) |
Frequently Asked Questions - EZ901N MOULINEX
User questions about EZ901N MOULINEX
0 question about this device. Answer the ones you know or ask your own.
Ask a new question about this device
Download the instructions for your Deep fryer in PDF format for free! Find your manual EZ901N - MOULINEX and take your electronic device back in hand. On this page are published all the documents necessary for the use of your device. EZ901N by MOULINEX.
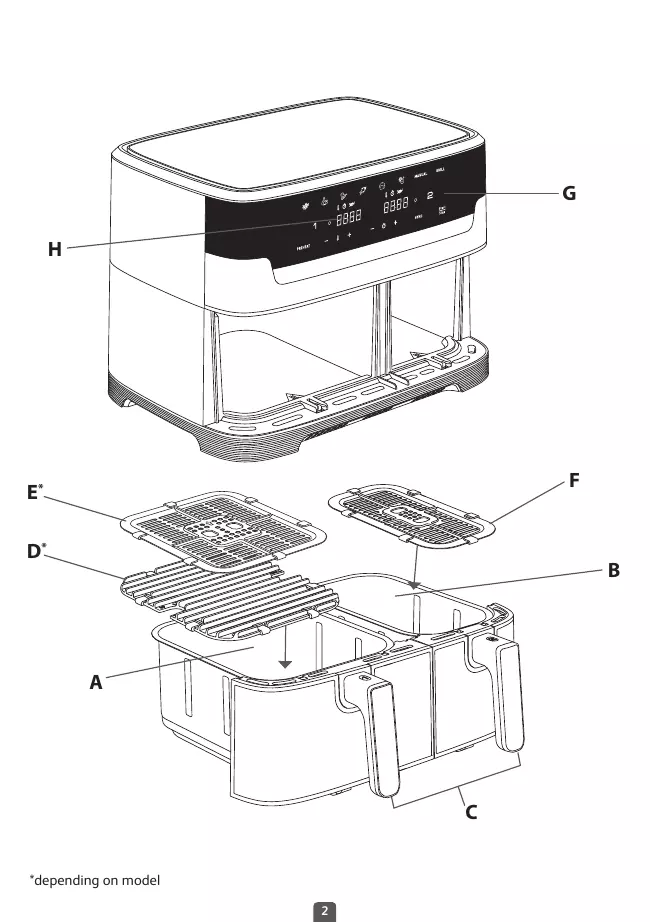
USER MANUAL EZ901N MOULINEX
A.Drawer 1 (large bowl)
B.Drawer 2(regular bowl)
C. Drawer handles
D. Large removable die-cast grill grid with silicon pads (depending on model)
E. Large removable grid with silicon pads (depending on model)
F. Removable grid with silicon pads
G. Digital touchscreen panel
H. Time/temperature display
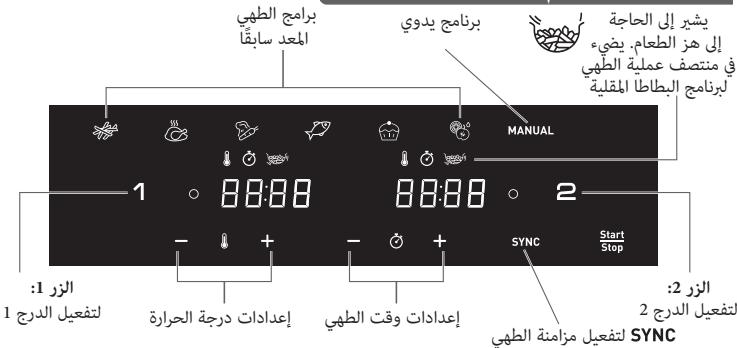
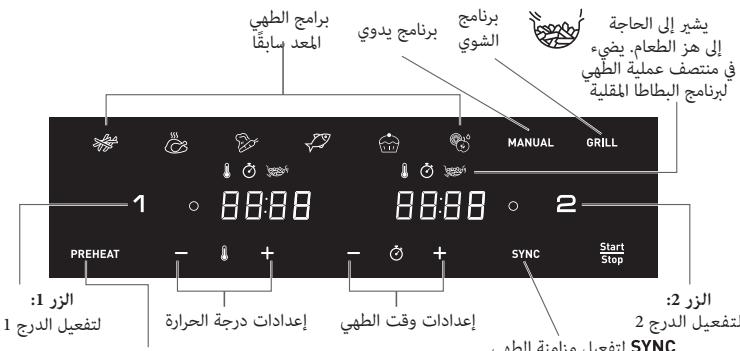
DUAL EASY FRY user interface
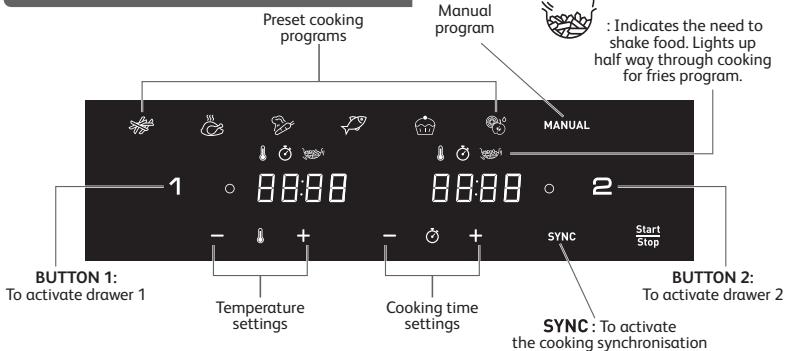
OFF : indicates the drawer is off. To activate, click on 1 or 2 buttons.
DUAL EASY FRY & GRILL user interface*
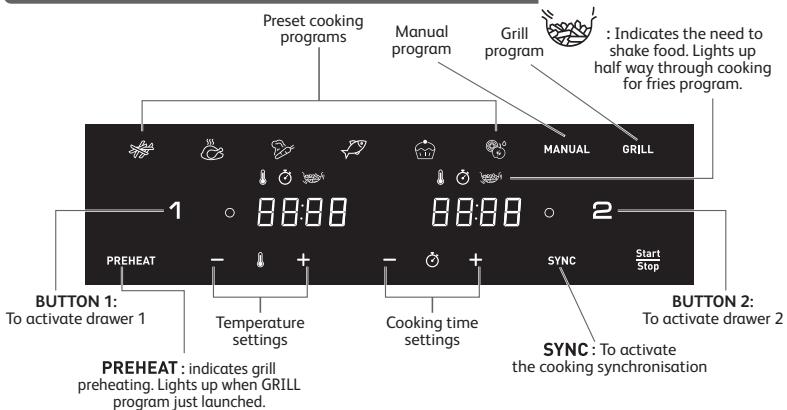
OFF: indicates the drawer is off. To activate, click on 1 or 2 buttons.
*depending on model

Fries

Chicken

Vegetables
Fish

MANUAL
GRILL
Dessert
Dehydrate
Manual mode
Grill program (depending on model)
EN
BEFORE FIRST USE
- Remove all packaging material.
- Remove any stickers from the appliance (sticker on the drawer for example), except QR code sticker.
- Thoroughly clean the drawer and removable grids with hot water, some washing-up liquid and a non-abrasive sponge.
The drawers and the grids are dishwasher safe.
- Wipe the inside and outside of the appliance with a damp cloth. The appliance works by producing hot air. Do not fill the drawer with oil or frying fat.
PREPARING FOR USE
- Place the appliance on a flat, stable, heat-resistant work surface away from water splashes.
- Do not fill the drawer with oil or any other liquid.
Do not put anything on top of the appliance. This disrupts the airflow and affects the hot air frying result.
IMPORTANT: To prevent the appliance from overheating, do not place it in a corner or below a wall cupboard. A gap of at least 15cm should be left around the appliance to allow air to circulate.
- Press to switch on the appliance.
- Fries mode is displayed as default for drawer 1 while OFF is displayed on the screen for drawer 2.
- Any drawer can be activated for selection by pressing '1' or '2' button. (To cancel the selection, press again '1' or '2' button, the drawer will be OFF and cancelled).
Note: Never exceed the maximum amount indicated in the table (see section 'Cooking Guide'), as this could affect the quality of the end result.
- Always place the suitable grids in the drawers before cooking for optimal cooking results.
USING BOTH DRAWERS ON SYNCHRONISATION MODE (DUAL COOKING)
Cook 2 different types of food at the same time thanks to both drawers and SYNC Mode.
- Press Start to switch on the appliance. Fries mode is displayed as default for drawer 1 while OFF is displayed on the screen for drawer 2.
- Press the desired cooking mode and adjust timing and temperature if different to the pre-set settings (by pressing + and -) The settings are saved.
- Place your first food in the drawer 1 (left drawer). Slide the drawer back into the appliance.
Note : When the screen displays “Add” and if there is no action for 10 minutes, the program stops and the screen returns to display “START/STOP”. You will need to re-select to restart cooking.
- To activate drawer 2, press '2'.
- Press the second desired cooking mode and adjust timing and temperature if different to the pre-set settings (by pressing + and -).
- Place your second food in the drawer 2 (right drawer). Slide the drawer back into the appliance.
- Press SYNC in order to get the two foods ready at the same time. If the two cooking modes selected have different cooking times, 'HOLD' appears on the screen for the shortest cooking mode (for the food which needs less time to cook). It means the appliance delays the cooking launch in order to have the two types of food ready at the same time.
- Press Start Stop to begin cooking.
- The appliance beeps when the food is ready, at the same time.
- When the food is cooked, take out the drawer. To remove food, use a pair of tongs to lift the food out of the drawer.
Caution: After hot frying, the grids and the food are very hot.
Note: During cooking, if you remove one of the drawers and you do not slide it back within 5 minutes, this drawer panel will display 'OFF'. The other drawer keeps running, but it ends 'SYNC' program.
USING ONLY ONE DRAWER OF THE APPLIANCE
- Press Start to switch on the appliance.
- Fries mode is displayed as default for drawer 1 while OFF is displayed on the screen for drawer 2.
- Any drawer can be activated by pressing '1' or '2' button. The other drawer remains OFF (To cancel the selection, press again '1' or '2' button).
-
To begin cooking, you can select between the preset cooking mode or the manual settings. a. If choosing preset cooking mode:
-
Select the desired cooking mode by pressing the icon corresponding on the touchscreen panel (these modes are described in detail in the "Cooking guide" section).
- Confirm the cooking mode by pressing the Start Stop button. This will launch the cooking process.
- Cooking starts. The remaining cooking time is displayed on the screen.
b. If choosing manual settings:
- Press MANUAL mode.
- Adjust the temperature 与 with the + and - buttons on the digital screen. The thermostat varies from 40 - 200^ .
- Then set the desired cooking time by pressing the + and - buttons. The timer can be set for between 0 and 60 minutes.
-
Press the button to begin cooking with the selected temperature and time settings. Cooking starts. The remaining cooking time is displayed on the screen.
-
Excess oil from the food is collected in the bottom of the drawer.
- Some food will require shaking halfway through the cooking time for optimal cooking results. (see section 'Cooking Guide'). To shake the food, pull the drawer out of the appliance by the handle and shake it. Then slide the drawer back into the appliance and the cooking restarts automatically.

During Fries cooking mode, this pictogram flashes half way through cooking. It indicates the need to shake the fries for even cooking and browning.
*depending on model
- When you hear the timer sound, the cooking time set has finished. Pull the drawer out of the appliance and place it on a heat-resistant surface.
- Check if the food is ready.
If the food is not ready yet, simply slide the drawer back into the appliance and set the timer for a few extra minutes.
- When the food is cooked, take out the drawer. To remove food, use a pair of tongs to lift the food out of the drawer.
Caution: The drawer should never be turn up side down with the grid.
After cooking, the drawer, the grid and the food are very hot.
- When a batch of food is ready, the appliance is instantly ready for preparing another batch of food.
USING BOTH DRAWERS ON SYNC MODE WITH THE GRILL PLATE*
Grill function is only suitable for the drawer 1.
- Always place the grill plate in the drawer 1 of the appliance.
- Press Start Stop. Fries mode is displayed as default for drawer 1 while OFF is displayed on the screen for drawer 2.
- Press GRILL on the screen to select the Grill mode and adjust cooking time if needed. The temperature is automatically set at 200^ . Do not place the food in the drawer 1, a grill preheating phase will be launched automatically.
- Press '2' to activate drawer 2 and select the desired cooking mode (Example Fries) and adjust time and temperature if needed.
- Add your food in the drawer 2. Slide the drawer back into the appliance.
- Press SYNC.
- Start the cooking by pressing . This will launch the preheating phase for the grill (drawing 1). PREHEAT lights up and screen displays «Pre Heat». The grilling temperature is automatically set at 200^ .
- When you hear the timer sound, the preheating phase has finished. The screen displays 'Add'.
- Take the drawer 1 out the appliance and place it on a heat-resistant surface.
Caution : the drawer and the grill grid are very hot. Use a pair of tongs to place the food on the grill plate.
Note : When the screen displays “Add” and if there is no action for 10 minutes, the program stops and the screen returns to display “START/STOP”. You will need to re-select to restart cooking.
- Place the food on the grill plate and put back the drawer into the appliance.
- The cooking starts automatically. The remaining cooking time is displayed on the screen.
Note : the pieces of meat can be turned at halfway through cooking cooking.
Excess oil from the food is collected in the bottom of the drawer.
- When you hear the timer sound, the cooking has finished. Take the drawers out of the appliance and place them on a heat-resistant surface.
- To remove food, use a pair of tongs to lift the food out the drawer.
Caution: After cooking, the drawers, the grids and the food are very hot.
Note : During cooking, if you remove one of the drawers and you do not slide it back in within 5 minutes, this drawer panel will display 'OFF'. The other drawer keeps running, but it ends 'SYNC' program.
The table below helps you to select the basic settings for the food you want to prepare.
Note: The cooking times below are only a guide and may vary according to the variety and batch of potatoes used. For other food the size, shape and brand may affect results. Therefore, you may need to adjust the cooking time slightly.
| Quantity | Approx. Time(min) | Temperature | Cooking mode | Shake | Extra information | ||
| Potatoes & fries | |||||||
| Frozen fries(10 mm x 10 mm standard thickness) | Drawer 1 | 600 - 1400 g | 25 - 40 min | 180°C | x2 | ||
| Drawer 2 | 300 - 800 g | 25 - 35 min | x2 | ||||
| Homemade fries(8 mm x 8 mm) | Drawer 1 | 500 g | 40 min | 180°C | x4 | Dry it by towel before cooking | |
| Drawer 2 | 200 g | 35 min | x4 | ||||
| Frozen potato wedges | Drawer 1 | 600 - 1400 g | 25 - 40 min | 180°C | x2 | ||
| Drawer 2 | 300 - 800 g | 25 - 40 min | x2 | ||||
| Meat & Poultry | |||||||
| Frozen beef burgers | Drawer 1 | up to 4 pieces | 10-18 min | 200°C | MANUAL | x1 flip | |
| Drawer 2 | up to 2 pieces | 10-15 min | |||||
| Chicken breast fillets (boneless) | Drawer 1 | up to 4 pieces | 10 min | 200°C | x1 flip | ||
| Drawer 2 | up to 2 pieces | 10 min | 200°C | ||||
| Chicken whole | Drawer 1 | up to 1300 g | 50 min | 160°C | Drawer 1 only | ||
| Snacks | |||||||
| Chicken nuggets | Drawer 1 | up to 1 kg | 12 min | 200°C | x1 | ||
| Drawer 2 | up to 400 g | 12 min | 200°C | ||||
| Chicken wings | Drawer 1 | up to 1 kg or 8/9 pieces | 22 min | 200°C | x1 | ||
| Drawer 2 | up to 400 g or 4/5 pieces | 22 min | 200°C | ||||
| Snacks | |||||||
| Pizza | Drawer 1 | up to 3 slices | 5 min | 170°C | MANUAL | ||
| Drawer 2 | up to 2 slices | 5 min | 170°C | MANUAL | |||
| Vegetables | Drawer 1 | up to 1 kg | 22 min | 200°C | ◇ | x4 | |
| Drawer 2 | 400 - 600 g | 22 min | 200°C | x4 | |||
| Fish | |||||||
| Salmon fillet | Drawer 1 | up to 4 pieces | 8-10 min | 200°C | ◇ | ||
| Drawer 2 | up to 2 pieces | 8-10 min | 200°C | ||||
| Prawns | Drawer 1 | up to 500 g to 1 kg | 8-10 min | 200°C | x1 | ||
| Drawer 2 | up to 400 g | 8-10 min | 200°C | x1 | |||
| Baking | |||||||
| Muffins | Drawer 1 | up to 6/8 pieces | 16 min | 160°C | ◇ | ||
| Drawer 2 | up to 4 pieces | 16 min | 160°C | ||||
| Chocolate cakes | Drawer 1 | 1 round cake pan | 30-35 min | 160°C | |||
| Dehydrate | |||||||
| Sliced Apple | Drawer 1 | 8 slices | 8h | 40°C | ◇ | ||
| Drawer 2 | 4 slices | 8h | 40°C | ||||
| Type of cooking | Quantity | Approx. Time | Temperature | Shake | Extra information | ||
| GRILL PROGRAM* | |||||||
| Beef | Drawer 1 | rare | up to 4 pieces | 4 min | 200°C | x1 flip | Drawer 1 only You can add oil, aromatic herbs and salt for better taste. At mid-cooking, you can return the food. |
| medium | up to 4 pieces | 6 min | 200°C | ||||
| well-done | up to 4 pieces | 8 min | 200°C | ||||
| Pork chops | Drawer 1 | done | up to 3 pieces | 12-16 min | 200°C | x1 flip | |
| Lamb loin chops | Drawer 1 | done | up to 4-6 pieces | 12-14 min | 200°C | ||
| Chicken fillets | Drawer 1 | done | up to 4-6 pieces | 10 min | 200°C | x1 flip | |
| Sausages | Drawer 1 | done | up to 8-10 pieces | 16-20 min | 200°C | x3 flip | |
| Fish fillets | Drawer 1 | done | up to 4-6 pieces | 8 min | 200°C | ||
*depending on model
TIPS
- Smaller foods usually require a slightly shorter cooking time than larger size foods.
- Shaking smaller size foods halfway through the cooking time improves the end result and can help prevent uneven cooking.
- To make your potatoes extra crispy, try adding a small amount of oil before cooking and shake to evenly cover. We recommend 14ml of oil (1 tablespoon).
Snacks that can be cooked in an oven can also be cooked in the appliance. - The optimal recommended quantity for cooking fries is 1200 grams (800g in drawer 1 and 400g in drawer 2).
- Use ready made puff and shortcrust pastry to make filled snacks quickly and easily.
- Place an oven dish in the appliance's bowl if you want to bake a cake or quiche or if you want to fry delicate ingredients or filled ingredients. You can use an oven dish in silicon, stainless steel, aluminium, terracotta.
- You can also use the appliance to reheat food. To reheat food, set the temperature to 160^ for up to 10 minutes. Cooking time could be adjusted depending on food quantity in order to fully reheat the food.
CLEANING
Clean the appliance after every use.
The bowl and the grid have a non-stick coating. Do not use metal kitchen utensils or abrasive cleaning materials to clean them, as this may damage the nonstick coating.
- Remove the mains plug from the wall socket and let the appliance cool down. Note: Remove the bowl to let the appliance cool down more quickly.
- Wipe the outside of the appliance with a damp cloth.
- Clean the bowl and grid with hot water, some washing-up liquid andnda non-abrasive sponge. You can use a degreasing liquid to remove any remaining dirt.
Note : the bowl and the grid are dishwasher safe.
Tip: If food debris/residue is stuck at the bottom of the bowl and the grid, fill them with hot water and some washing-up liquid. Let the bowl and the grid soak for approximately 10 minutes. Then rinse clean and dry.
- Wipe inside of the appliance with hot water and a damp cloth.
- Clean the heating element with a dry, cleaning brush to remove any food residues.
- Do not immerse the appliance in water or any other liquid.
STORAGE
- Unplug the appliance and let it cool down.
- Make sure all parts are clean and dry.
GUARANTEE AND SERVICE
If you need service or information or if you have a problem, please visit the brand website or contact the brand Consumer Care Centre in your country. You can find the phone number in the worldwide guarantee leaflet. If there is no Consumer Care Centre in your country, go to your local brand dealer.
TROUBLESHOOTING
If you encounter problems with the appliance, visit the brand website (see cover page on this manual) for a list of frequently asked questions or contact the Consumer Care Centre in your country.
DESCRIPTION
IPIN ANO THN INPQTH XPHSH
PPEDN PbPBA YNOTPEBA
- OtctpaHete BCnUKN ONAKOOBuHN MaTePnaJI.
- Otctpahete BCnKn CTkepn OT ypea (HaNPmep CTkepa Bbpxy OTdeneHneTo), c n3KJIIOUeHne Ha CTkepa C QR KOD.
3.Почирете Добpe OTделениTo ИpoДвнжнite peшETК C ropeца BOda, MaNKо npenapat 3a MNEHe Ha CBdoBe И Hea6pa3nBHa rb6a.
OtdeneHnraI npweetKnte MOraT da ce MnT B cbdomnHa MaunHa.
4.ИЗБьшeteуpedaOTBТрп OTBнСВлЖнKaКьрna.YpeДТpa6OTn,KATO npOu3BexJa ropeu Bb3dYx.He NpIhETeOTdJIeHHeTcO cIINaMa3HnHa 3aПьрxe He.
IIOIΓOTOBKA 3A YIITPENEBA
- Поставете урEDA Вьрху равна,стина и толустонива работа NOВьхноct далец OT BOДн И рбсн.
- He nbIhHeTe OTdJIeHHeTe O ONIO nIIc HЯKaKbA dpyra TeuHOCT.
He noctabraye Hnio otrope Ha ypea. Toba Bb3npenrTcBa Bb3duhnnno nnotok m OKa3Ba BlnHne Ha pe3yIyTaOT nbpKeHeto C ropeu Bb3dyx.
- HatncheTe St (Ctapt/CTon), 3a da BkIoune Typea.
- PeximbT Fries (Ibpxhen KarpToH) ce nok3Ba no npopa3bpahe 3a otJeHne 1,doKaTO 3a otJeHne 2 Ha ekpHa ce nok3Ba OFF (IV3KJI.).
- BcKaO OTdEnHHe MOKeJa Ce AcKTHBnPa 3a H36Op C HATINCKAHe Ha bTyOn,1"uIn,,2"(3a Da OTMeHnTe N36Opa, HATINCHete OTHOBo 6yToH,1"uIn,,2",OTdEnHHeTo Ie 6bJe N3KnIOUeHO n OTMeHNe).
3a6benekkha: HnKora He hadBniuwaabaTne MaKcIMaJIHOTo KOInueCTBO, NOCOeHO B Ta6bniata (BnXte pa3dien, PbKOBoDcTBO 3a rotBeHe), TbN KaTO TOBa MoKe da NOBInJe ha KaHeCTBO t Ha KpaHNIpe3yJITat.
- BnHarn nIpeDn rotBHe noCTabYte noXoJaUeTe peWetKn B OTJeHnraTa, 3a da NoCTnHete ONTImaJIHN peZyITaTn OT rotBeHeto.
N3PON3BAHE N HA DBETE OTDEJEHNA B PEXKIM HA CNHXPOHN3UPAHE (DBOIHO TOTBEHE)
TOrBete 2 pa3nHxpaHIn, KOINTO 1e cTaHAT roTOBn eJHOBPemHe, 6naOpaHne Ha dBeTe OTdeneHnI pexkMa SYNC (CINHXPOHNIUPAHE).
-
Hatachete (Stap/CTon), 3a da BKJIOUHTe ypeda. PekxIMbT Fries (IbPKeHN kaTOΦn) ce noka3Ba no npda36bnape 3a otJeHne 1, dokaTo a otJeHne 2 ha ekpaHa ce noka3Ba OFF (N3KJI).
-
Hatnche JekanHn peKMM Ha roTBeHe n peryIinpaJte BpemTo n temnepatyPata, aKO ce pa3JIuHabAT ot yCTaHOBEnITE hAcTpoKn (Upe3 HATNcKaHe Na + n -). HAcTpoKnite ce 3aIamETABat.
- Ποctabete Πβρατa xραha B Οθεηηνε 1 (λήσον Θόεηνε). Πήβεθε Θεθεηνε ΕΟβαρθου Βγρεδα. 3aδεπεχκα: KORATO HA εκραha CE ποκαχε, "Add" (Дόδαυχε) ΑκΟ B προδιλχενηνε Α 10 Mινγι η δύς Πρεπρηετην ἀνικακυν έδειcbνη, προρματa Σπιρα Α ὁκερατα ΘΟθΟ ΚE NOKA START/STOP" (CTAPT/CTOΠ). Με τργδα Α ηιδερε ΕΟθΟ, 3a Α pεctαπιρατe τοῦνητης.
- 3a da akTnBupate otJeHne 2,HaTncHeTe,2".
- Hatnche Tbopna Jekan pexim Ha rotbeH n peyunpaTte BpeMeTo n TemnpaTpata, aKo ce pa3nuaBt OT yctahOBeHnTe HactpoKn (Upe3 HatncKaHe Ha + n -).
- Поставete Вторахаь OTденинe 2 (Дясно OTденинe).Пльзные OTденинeToобразно Вурда.
- Hatnche SYNC (CINHXPOHNI3NPAHE), 3a Да завршт erotbeheTo Na DBeTe xpaHn no eHNoи cBIo BPeme.Ako DBata n3bpaHn pexkIMa Ha rotBeHe IMat pa3nIHy BOpeMe 3a rotBeHe,Ha ekpHa ce noJABBa "HOLD" (3AДБРKAHe) 3a NaH-KpaTkn BepKm Ha rotBeHe (3a xpaHATA, KoTOte Ho NHydAe NO mAnKO BPeme 3a rotBeHe). Toba O3NaUaba, YeypeDbT 3a6abY CTapTnpaHTo Ha rotBeHe, 3a Дa 6bDat DBeTe xpaHn rOToBOn No eHNo and CbIo BPeme.
- HatncheTe Start (CTAPT/CTO), 3a da 3anouHeTe roTBeHeTo.
- YpeBt n3daba 3bYKOB cHnA, KOraTo XpaHIne ca rOToBn, IOn eHNo n CbIoo BpeMe.
- Korato xpaHnte ce croTBaT, n3BaTeTe OTdeneHneTe. 3a da OTcTaPHTe xpaHnte, n3no3BaTte UINPKN, 3a da NOBmHHeTe xpaHnte N3BbH OTdeneHneTe.
BhImaHHe: cIe IbpxHe c ropeu Bb3dUx peWetKnte n xpaHaTa ca MHoro ropeu.
3a6eJekka: no BpeMe HA rotBeHe, aKo OTcTpaHHTe eHNo OT OTdJeHnraT ha He ro nll3HeTe 6o4tho B pAMKIne Ha 5 MNHyTn, Hn NaHena Ha TOBa OTdJeHnne Ie ce cnoKaKe,OFF" (N3KJI). DpyroTo OTdJeHnne npOdbInxaba da pa6Otn, Ho npOrpamata,SYNC" (CNUHXPOHN3UPAHE) npKnIOvBa.
ИЗПОЛЗВАЕ CAMO HA EДHOTO OTДЕЛЕнUE HA YPEДA
- HatncheTe Start (Ctapt/CTon), 3a da Bklnoute ypeda.
- PeximbT Fries (IbpxeHn KAPToΦn) ce nok3Ba IIO npda36npaHe 3a oTdeHne 1,doKaTO 3a otDeHne 2 Ha ekpaHa ce nok3Ba OFF (IV3KJI.).
- BCaKo OtIeHHe MoKe Da Ce AkTbUpa CHaTnCKaHe Ha 6yToH,1"uNIn,2".IpyrToO tDJIeHHe OCTaBa N3KnIOeHO (3a Da OTMeHNte I36Opa, HAtNCHE ToTHOBo 6yToH,1""uNIn,2").
- 3a da 3anoyheTe roTBeHeTo, MoKTe Da n36epeTe MeJy npedBaPntEnHO 3aadeneHn peXIM Ha roTBeHe NIN pBUnHe NaCTPOKn.
a.Пии36ор На ппeдварпелно 3аада徳н ржим Ha rotbeHe:
- I36pepe Te jenHnI pexIM Ha rotBeHe, KaTo HauNCHe TcBtBETha NkOHa H cEH3OpHnnaHEn (Te3n peXmM ca onncAHn noPp6HO B pa3dEn PbKOBOCTBO 3a rotBeHe").
- ПOTьрдete nporpaMaTa 3a rotBeHe, KaTo haTnCHete 6yToHa. Toba UIe cTapTnpa npoceca Ha rotBeHe.
- GOTBeHTo CTapTnpa. OctabaIooTO BpeMe 3a GOTBeHe ce NOKa3Ba Ha ekpaHa.
Ako xpaHata Bce OSe He e roToBA, pnoCTO PnIb3HeTe Kynata O6paTHo BVpeJa N 3aadTetaiMepa 3a OSe HRAKOLKO MNHYTN.
- Korato xpaHata ce croTBn, n3BaTeKe KyNaTa. 3a da OCTpaHnte xpaHata, n3noJ3BaNte UINKm, 3a da NOBUNHHeTe xpaHata n3BbN KyNata.
BhImaHHe: otDeneHneTo HnKOra He Tp86Ba da ce o6pbua c peWetKaTa Harope.
Cnei rotbehe otdehenra, peweTKte n xpaHaTa ca MHoro ropeu. - Korato eHa napTnDa oT xpaHata e roTOBa, ypeBt BeHara e roTOB 3a nprirotBHe Ha dpyra napTnDa oT xpaHata.
M3ПОЛЗВАЕ НАДБETE OTДЕЛЕнь ВPEЖИМ SYNC (СИХPOНЗИРАЕ)СПLOЧATA 3A ГИЛ*
Функцята згрип похожа само за отdenенье 1.
- Bnharno noctabraTe npouata 3a rpnB oTdeJeHne 1 Ha ypea.
- HataChete Start (CTAPT/CTOPI). Pekmbl Fries (PbpxKeHn KapToΦn) ce nokazba no noopa3bupane 3a otJeIeHne 1, oKato 3a otJeIeHne 2 Ha ekpaha ce nokazba OFF (N3KJI.).
- Hatnchete GRILL (TPJL) Ha ekpahta, 3a Ja n36bepete pexkIM Grill (fPnn) Na da perynilpate bpeMetO arotBeHe, ako e Heo6xmoIO. TemnpaTypaTa ce 3aaba BVAMTAtuHNO ha 200°C.He noctabTe XpaHata B otDeneJe 1- BVOMATnuHIO ue ce STapriya 0haa H na pndBaprntnoH ngarbaeHa ra npria.
- Hattichete 2^ , 3a da aktiBnpatte Kynla 2, da n36epete keJahnra pekim Ha rotBeHe (hannpem Fries (PbpxeHn KapToΦn) u da perylnpatte BpeMeTo n TempepaTpyata, ako e Heo6xOdimo.
- 06abete xpaHATA B OTdelenHe 2. PInb3HeTe OTdelenHeIeTo 06paTHo BypeHa.
- HatncheSyNC (CNHXPOHIN3NPAHE).
- CtaptnpaIte roTbeHeTo, KaTo HAtnChTe St (CTAPT/CTO). Toba ue cTaptnpa 4a3ata Ha npEbaPmTEHo HarpBaHa He rpnna (oTeJeHne I). PREHEAT (IPeDBApITEnHO HAPRBAHE) CBETBa H e KpaHa ce nok2a3e Pre Heat (PiEbpNTenHO HarpBaHe). Temepatypata Ha rpInoBAhe ce 3aDaba ABOTMAnH O ha 200^
- Korato yyeTe 3Byk OT TaMepa, fo3aTn Ha npEbnBapntEnHo HarpBaHe e npNKJIouHnla. Ha ekpaHa ce noka3BaAdd" (D6abAne).
*cnpoeMDoEna
- ɪЗbaɪdTe OTdɛnɛhɪe 1 OT ypeə n FO noctaBeTe Bbpxy TOnIloyctOuHbBa NOBbpxHOCT.
BHMAMHHe: Kynata n rpn pewetkata ca mHoro ropeu. N3non3BaTe uINKn, 3a da noCTaBITE xpaHATA Bbpxy nloUaT a 3rpnI.
3a6eIexka: Korato ha ekpaHa ce nokKaxe, Add" (JIo6abHne) n Ako B npOdbLnKHe Ha 10 MInHTy He 6bDat npEepnEt HnKakBn DeiCTBn, npOrpamata Cnpa nHa ekpaHa oTHoBO ce noka3Ba, START/STOP" (CTAPT/CTO). Ie Tpr6Ba da n36pepe otHOBO, 3a da pectaptnate roTBeHTo.
- NocTaBeTe XpaHata BbPxy nIooYata 3a rprn I nOcTaBeTe OTeJeHeNeTo O6paTHo B ypeHa.
- 70tBHeTeO CTAPTIpA ABOMATNUHO.OCTaUOTo BpMe 3o rotBeH e c nOKa3Ba HkepaHa. 3a6enEka : napetata Meco Tp8bHa da ce o6bHpHa no CpeDaHa roTBeHTo. 13nIuHOTo OJNO OT xPahata c SeBpaHa aDhBtOHa Kynata.
- Korato yyeTe 3Byk ot TaMepa, roTBeHTo e npKnIouNIO. IVBaJeTe OTdeneHHeTo OT ypeA n Iro NoCTabete BbPxy TOnlOyCTOnuBA NOBbPxHOCT.
- 3a da oTcTaHnTe xpaHATA, n3nOJ3BaIte uINPKI, 3a da NOBdIgHeTe xpaHATA n3BbH KypATA. BHMAnHne: cIeN pIbPxKeH c ropeu Bb3dUx OTdelenHnTo, peWetKaT a I xpaHATA ca Mhoro ropeu.
3a6eIeKKa: NO BpeMe HA rotBHe, Ako OTcPAnHte eHDo OTdJeHnHTa Hr O
nIb3Hete 6oBaTHo B pAMKIne Ha 5 MHyTn, Ha naHena Ha TOBa OTdJeHne Ie ce
noKaJke, "OFF" (I3KJI). Dpyrata Kya npOdbIxKaBa da paoTn, Ho npOrpaMaTa, SYNC"
(CNHXPOHn3INPAHE) npKnIOuBa.
PbKOBOdCTBO 3A FOTBEHE
Tabnieta Tno-dony Bn Nomara npn n36oopa Ha ochOBHn hactpoKn 3a xpaHata, KOrTO NCKTe da npnrTOBNTe. 3a6eneJkka: BpeMeHata 3a rotBEHe No-dony ca cama opneHTnpOBuHN M OMOE da BapnP aT 3aBNCIMOCT OT cOpTa N KOnJIeCTBOTo Ha n3non3BaHnte KapToΦn. Pnp dpyr XpaHn pa3MepbT, φoMpMaI Mapkata MoDe JA nobNIAHt H pezyntaTInte. CneobatEnHO moKeJa ce HAOKn Da perylnpate ManKO BpeMeTo 3a rotBeHe.
| Колочево | Прибл.Вreme | Темпатура | Реким на涩вени | разьлесашиe | Довленьегнишформачия | ||
| Картофи и пържени karтофи | |||||||
| Замраозени пържени karтофи (10mm x 10 mm) | Оддени 1 | 600 - 1400 g | 25 - 40 min | 180°C | x2 | ||
| Оддени 2 | 300 - 800 g | 25 - 35 min | x2 | ||||
| Домашно пъогтваени karтофи (8 mm x 8 mm) | Оддени 1 | 500 g | 40 min | 180°C | x4 | Пробсчete ти с Кърна р徳и涩вени | |
| Оддени 2 | 200 g | 35 min | x4 | ||||
| Замраозени karтофи уедима | Оддени 1 | 600 - 1400 g | 25 - 40 min | 180°C | x2 | ||
| Оддени 2 | 300 - 800 g | 25 - 40 min | x2 | ||||
| Мени пъцни поюкten | |||||||
| Замраозени пържILA | Оддени 1 | do 4 6p | 10-18 min | 200°C | MANUAL | x1 | |
| Оддени 2 | do 2 6p | 10-15 min | |||||
| Фильета о тпileшkin гърди (бez кост) | Оддени 1 | do 4 6p | 10 min | 200°C | w | x1 | |
| Оддени 2 | do 2 6p | 10 min | 200°C | w | |||
| Цало плел | Оддени 1 | do 1300 g | 50 min | 160°C | w | Само за кура 1 | |
| Зakувени | |||||||
| Плешкихашик | Оддени 1 | do 1 kg | 12 min | 200°C | w | x1 | |
| Оддени 2 | do 400 g | 12 min | 200°C | ||||
| Плешкиха крелда | Оддени 1 | do 1 kg - 8/9 6p | 22 min | 200°C | w | x1 | |
| Оддени 2 | do 400 g - 4/5 6p | 22 min | 200°C | ||||
| Колчес硐 | Прибл.Вreme | Темперараза | Реким наrotве | Разклоанe | Довлелендаионформачия | ||
| Зakувени | |||||||
| Пица | Оддение 1 | do 3 pezeна | 5 min | 170°C | MANUAL | ||
| Оддение 2 | do 2 pezeна | 5 min | 170°C | MANUAL | |||
| Зеленчци | Оддение 1 | do 1 kg | 22 min | 200°C | # | x4 | |
| Оддение 2 | 400 - 600 g | 22 min | 200°C | x4 | |||
| Риба | |||||||
| Фице otсьомгa | Оддение 1 | do 4 sp | 8-10 min | 200°C | # | ||
| Оддение 2 | do 2 sp | 8-10 min | 200°C | ||||
| Сkapади | Оддение 1 | 500 g - 1 kg | 8-10 min | 200°C | x1 | ||
| Оддение 2 | do 400 g | 8-10 min | 200°C | x1 | |||
| Пechene на тecteni издени | |||||||
| Мыфiniи | Оддение 1 | do 6/8 sp | 16 min | 160°C | # | ||
| Оддение 2 | do 4 sp | 16 min | 160°C | ||||
| Шокаладов Торту | Оддение 1 | 1 крълonaфорma заторта | 30-35 min | 160°C | |||
| Dehydration (Сушие) | |||||||
| Ясыkin hapezieни | Оддение 1 | 8 Фллики | 8h | 40°C | # | ||
| Оддение 2 | 4 Фллики | 8h | 40°C | ||||
| Тил Говене | Колочево | Пробл. врeme | Tempepatура | Разкалачао | Дожьнелегни информаян | ||
| ПОГРАМА GRILL (ГИЛ) * | |||||||
| Товекdo | Оденице 1 | адангile | do 4 6p | 4 min | 200°C | x1 | Само за кура 1 «Можete за дожавпе олно, apomатни бизни сол за по-dожь рвку. Пос perdата на Говенeto мен�а за въренье хсанта.» |
| среadingо осячedo | do 4 6p | 6 min | 200°C | ||||
| добраз осячedo | do 4 6p | 8 min | 200°C | ||||
| Свинско | Оденице 1 | осячedo | do 3 6p | 12-16 min | 200°C | x1 | |
| Агенто | Оденице 1 | осячedo | do 4/6 6p | 12-14 min | 200°C | ||
| Пильшки Фильета | Оденице 1 | осячedo | do 4/6 6p | 10 min | 200°C | x1 | |
| Наденици | Оденице 1 | осячedo | do 8/10 6p | 16-20 min | 200°C | x3 | |
| Рибно Фиде | Оденице 1 | осячedo | do 4/6 6p | 8 min | 200°C | ||
*cnpoeMmDena
CbBETN
XpaHNTe C NO-MaJIKN Pa3Mepn O6NIKHOBeHO M3NCKBAT MaJIKO NO-KpATKO BpeMe 3a FOrTBHe OEI NO-TOJEMITE.
Pa36bPKBAHETO HAMANKI KOJUNCTECTA XHPNA NO cPeDATA HO rTBEHTNO IOdO6PBA KPAHINRA EpyETATN MOJE DA NOMORHE 3a PnEDOTBPATBAHE HA HePABHOMEPHOT COTBHE.
Ib6abete ManIO NOI KMBNEPCHNTe KAPTOH,3a da cTahx PnyKnB. CneJ kATO Do6abABte IbXmuO IOIO, bPbXete KAPToHDe 3a HKnOIO MNUHTy.
- JeKnte 3aKcKn MoKe Da ce nprirotBt BbB CyphNa, HO MoKe CbIoo Da ce nprirotBt N BypeDa.
- OINTMAMHO TnpenOpBHTeHNO KOnJIeCTBO KapToΦK3 a PtbpXeHe e 1200 rpama (OTdeneHnE 1:800g + OTdeneHne 2:400g)
- I3noI3BaIte roTOBO 6yTe npMn MacneHO TectO, 3a Da HappaBIne TbJIHeHn 3aKycKn 6bp30 nIecHO.
Iocabete B ypeda taba 3a neehe, ako nckate da nnechete KEc KIIIN KIIIN NIN AKO nckate da npknte denikaTHn IN pblHne HnRpeDneHTN. MokeTe da n3noJIbTaBe cbdobe 3a neehe OT CNlIKOH, HepbJxdaem CTOMAHa, anyMNHH nn IINHa.
- Moxtete cbu do a nioo3bate ypeda 3a pnetonpHne Ha xpaHa. 3a da npetonpIte xpaHa, 3aadaite temnepatypata ha 160^ 3a do 10 mHynta.
ПОУЦТBAHE
IounCTBaIte ypea cIeBcKa ynoTpe6a.
Kynata n pseietkata mmat Heaenbauo NOKPNTNE. He 3nOJ3BaiTe MetaJHn KUxHEKN knp60n nn a6p3aBHN nouchCTbaN MaTePnAa 3a nouCtBaHTo My, Tb KaTO HeaENbauoTO NOKPNTNE MOKe da ce NobpeDn.
1.ИЗbaTe Μεncena OT KOHTaKtNa N OCTaBeTe ypeDa Na ce OxlaДи.
3a6eJekka: ɪzBaTe Te Kynata n octaBeTe ypeDa n 3CTnHe no-6b30.
2. 3a6bpuete C BnaxHa Kbpna BbHHaTa YacT Ha ypea.
3.Почирете Кунаи решштaka с ropeца ВODa, Teueн пренират за минене на сбдове и Hea6pa3nVBha r6a.
Moxete Da n3nON3BaTe TeuHcT 3a NOUcNtBaHe Ha Ma3HNHH, 3a Da OTCTpaHNTe OCTaHaJIOTo 3aMbpcraBaHe.
BhImaHHe: Kynata N peWetKata MoT Da ce MnT B MnJIHa MaIHa.
Cbbet: Akno ha bHoto Hau Kynata u peshetka t e aanenHana MPbcoTn, hantbHete r c ropeza BODa n MAnko Teueh npenapat 3a Mmne. Octabe Tynata u peshetkata da ce HAKCHAT 3a OKONO 10MHNYt. Tocne i3nnakhethe do6pe n ondcywete.
4.ИЗБьшeteВьтpeшнataчacntHaуретаC ropetsaBoDAиHANOeHaKbpna.
5. Nouchte HargRAPaunie enemeHT CbC cyua nouchCTBaua qetka, 3a da OCTpaHITE BCAKBn xpaHITENH OCTabu.
6. He notanayte ypea BvB BOa nI npyra TeuHOCT.
ПИБИРАСЕ
1.ИЗкlioуeteцencenaHaуретаOTKoHTaTaNroOCTaBeTe da ce OxlaДи.
2. Ybepete Ce, Ye BCnUKN uactn ca uctn n cyxn.
TAPAHUNI CEPBNU3HO OBCJUYXBAHE
Ako ce Hynkaete OTE cEBN3 mnnnHhOpMaZn, KaKTo n Ako Imate npo6nem, Monr, nocetete.
PhiMEnHa Ye6caTm Nn Ce CbPKeTe C zHeTbpa 3a o6CnyXBaHe Ha KIneHTn BvB BawaTa
DbPxaba. MoKTe Da Hamepnte TeneOHHnHomep B nIcTobKaTa 3a MeKdyHapOnHaTa
raHApuZn. Ako BvB BawaTa Dpbxaba Hama ZHeTb 3a o6CnyXBaHe Ha Notpe6nentnTe, ce
06bPhETe KbM MecTHNa TbProBeu Ha fipMaTa.
OTCTPAHBAHE HA HEM3IIPABHOCTN
Ako cpeunhe Tpo6nemc ypea, nocetete fHpMEnHa ye6caTt (BnKte Kopuata Ha pKOBODCTBO) 3a cnCbKa C ceTo 3aDaBaHN bBpOnc nIe Ce CBpKeTe C eHTbpa 3a o6CbYbHe A noTpe6nten BbB BaWata dPbKbAa.
OPIS
POKNYNA PRIPRAVU POKRMOV
Tabulka nizsie vam pomoze vybrat zakladne nestavenia pre Jedlo, ktorc chete pripravit. Poznamka: Casy varenia nizsie sul len orientacne a mozu sa listv zavisiosti od druhu a mnozstva pouzitych zemiakov. Pri inych jedlacke moze yvesledky ovplyvnit veilkost, tvar a zncka. Preto mozo bude potrebne mierne upravit cas varenia.
| Množstvo | Přilžný Čas | Teplota | Režim varenia | Pretriast' | Đalsie informácie | ||
| Zemiaky a hranolky | |||||||
| M razené hranolčeky (10 mm x 10 mm) | Zásuvka 1 | 600 - 1400 g | 25 - 40 min | 180°C | ♂ | x2 | |
| Zásuvka 2 | 300 - 800 g | 25 - 35 min | x2 | ||||
| Domáce hranolčeky (8 mm x 8 mm) | Zásuvka 1 | 500 g | 40 min | 180°C | ♂ | x4 | Pred varením osušte utierkou |
| Zásuvka 2 | 200 g | 35 min | x4 | ||||
| Mrazené americké zemiaky | Zásuvka 1 | 600 - 1400 g | 25 - 40 min | 180°C | ♂ | x2 | |
| Zásuvka 2 | 300 - 800 g | 25 - 40 min | x2 | ||||
| Mäso a hydina | |||||||
| Mrazený steak | Zásuvka 1 | do 4 kusov | 10-18 min | 200°C | MANUAL | x1 | |
| Zásuvka 2 | do 2 kusov | 10-15 min | |||||
| Filey z kuracích prí (bez kosti) | Zásuvka 1 | do 4 kusov | 10 min | 200°C | ♂ | x1 | |
| Zásuvka 2 | do 2 kusov | 10 min | 200°C | ♂ | |||
| Celé kura | Zásuvka 1 | do 1300 g | 50 min | 160°C | ♂ | Len miska 1 | |
| Chutovky | |||||||
| Kuracie nugetky | Zásuvka 1 | do 1 kg | 12 min | 200°C | ♂ | x1 | |
| Zásuvka 2 | do 400 g | 12 min | 200°C | ||||
| Kuracie kridelká | Zásuvka 1 | do 1 kg - 8/9 kusov | 22 min | 200°C | ♂ | x1 | |
| Zásuvka 2 | do 400 g - 4/5 kusov | 22 min | 200°C | ||||
| Množstvo | Priblžný ćas | Teplota | Režim varenia | Pretriast' | Dalšie informácie | ||
| Chutovky | |||||||
| Pizza | Drawer 1 | do 3 plátky | 5 min | 170°C | MANUAL | ||
| Zăsuvka 2 | do 2 plátky | 5 min | 170°C | MANUAL | |||
| Zelenina | Zăsuvka 1 | do 1 kg | 22 min | 200°C | ◇ | x4 | |
| Zăsuvka 2 | 400 - 600 g | 22 min | 200°C | x4 | |||
| Ryba | |||||||
| Filez uzlososa | Zăsuvka 1 | do 4 kusov | 8-10 min | 200°C | ◇ | ||
| Zăsuvka 2 | do 2 kusov | 8-10 min | 200°C | ||||
| Krevety | Zăsuvka 1 | 500 g - 1 kg | 8-10 min | 200°C | x1 | ||
| Zăsuvka 2 | do 400 g | 8-10 min | 200°C | x1 | |||
| Pečenie (koláće) | |||||||
| Muffiny | Zăsuvka 1 | do 6/8 kusov | 16 min | 160°C | ◇ | ||
| Zăsuvka 2 | do 4 kusov | 16 min | 160°C | ||||
| Čokolálové koláće | Zăsuvka 1 | 1 okruhla tortová forma | 30-35 min | 160°C | |||
| Dehydratácia | |||||||
| Jablíká na platyk | Zăsuvka 1 | 8 plátky | 8h | 40°C | ◇ | ||
| Zăsuvka 2 | 4 plátky | 8h | 40°C | ||||
| Typ varenia | Množstvo | Približný Čas | Teplota | Pretriast' | Čalšie informação | ||
| PROGRAM NA GRILOVANIE* | |||||||
| Hováždžina | Zásvukla 1 | krjavý | do 4 kusov | 4 min | 200°C | x1 | Len miska 1 Na vylepšenie chuti možete pridat' olej, aromatické bylinky a sol. V polovici varenia možete Jedlo vrátit. |
| stredne prepečěnéý | do 4 kusov | 6 min | 200°C | ||||
| dobre prepečěnéý | do 4 kusov | 8 min | 200°C | ||||
| Bravčovina | Zásvukla 1 | prepečěnéý | do 3 kusov | 12-16 min | 200°C | x1 | |
| Jahťacina | Zásvukla 1 | prepečěnéý | do 4-6 kusov | 12-14 min | 200°C | ||
| Kuracie filety | Zásvukla 1 | prepečěnéý | do 4-6 kusov | 10 min | 200°C | x1 | |
| Klobásky | Zásvukla 1 | prepečěnéý | do 8-10 kusov | 16-20 min | 200°C | x3 | |
| Rybia fileta | Zásvukla 1 | prepečěnéý | do 4-6 kusov | 8 min | 200°C | ||
*podla modelu
RADY
Tpnlb (B 3aBnCmOCTN OT MOeJI)
RU
PENEI PEPBbIM INCIOJIb3OBAHHEM
- ydaInte BCE ynaKOBOUHbI MaTePnAJIbI.
- YdaJInte c npIbopa Bce hakLeiKu (HaNPIMep, hakLeiKy Ha YaSe), KpOME hakLeiKn c QRKOdom.
- TuaTeIbHo OoHCTnTe HaSyu N CbeMhble peWetKn B rOpye BoDe c N oMoUbI Ho He6OJIbIoo KOnIueCTBa MoIOJero CpeDCTBa I rY6Kn 6e3 a6pa3N8HOrO nOKpbTnIa.
Haun npweetkn MOXHO MbITb NocydomoeHOn MaunHe.
- Пуотрип Вьтreneиюи BVEshniOIO NOBepxHocTb пибopa BlaxKHO TkaHbI. Пибор roTOBNT eY c nomoцью ropayero BO3duYa. He 3aJIINBaIte B uayu MaCNo nIи JnP dIЯжkn.
ПОДГOTOBКИСПОЛБ3OBAHNIO
1.Помecntte npn6op ha nlocko,yctouHBOI xkaponpoHOn pa6oey noBepxHocTN BdaJIOn 0f6pb3r BObl.
2. He HanNBaIe B uawy MaCNo nnn dpyrne KnDkoCTn.
HnUero He cTabbTe Ha npB6Op.3To npuBOnIT K hapyuWeHIO nOTOKa BO3dyXa N BInJeT Ha pe3yIbTat JapKn rOpaHm BO3dyXom.
- Haxmte KhoNky (Start (Ctapt/CTon), yTO6bI BKNIOUHTb npu6Op.
- Pexim npriroTOBHeHnA KapToΦeIaФpI OTo6paKaTeCn PO yMOnuHaHnIO dIra ChaSi 1,aHa 3KpaHc YaSiN 2 OTo6paKaTeC «OFF» (BblKI.).
- JIO6yIO uAlyu MoKHO BbIbpaTb HauKaTIeM KHNKn «1» IuN «2». (UTo6bI OTMeHITb BbIbOp, CHOBA HauKMITE KHNkY «1» IuN «2», UaSA 6yIeT BbIKIouHe N OTMeHeHa).
PpimmeaHne. HnKOrda He npebbwaIte MaKcImaIbHbI yOboHb, yKa3aHHbI B Ta6nIe (cm. B pa3dene «Ta6nIa pnproTOBHeN6 6IOJ), TAK KAc 3To MoKet NOBnIaTb Ha KaueCTBO KOeHOrO pe3yIbTata pnproTOBHeNHa.
.3y jlaal yjgl blll l 1
aie jglgll gai jSaoe gglgjj: afo
.2
jglalilj lslw pluulwl dks. alw n aociaig g bbl jll jilw no jaoaog jolll stbly aokg sglg 3
aLgJgJy
. jzssall allw s 1jwul jioI aJswll gseI y
a aae aee bga jolll lgljg jol jol jol jol jol
pLb lyai yj alljy ai bia oia aia 5
j^2 15w( y y) ( z) ( z) y
jz
.3ydsjgljglll J1
- . . . . . . 2
aIalgl Jlal
a 155 155 155 155 155 155 155 155 155 155 155 155 155 155 155 155 155 155 155 155 155 155 155 155 155 15
JyJyJyJyJyJyJy
1
ally 15d Jgol (Jlll lio d cokai gol) ayolal aoalg ego yj jy jaoi jaoi
a 3
aalol alol aol alol alol alol alol alol alol alol alol alol alol
.9
4.25.100 g 1234567890
aaii iiaaii aaii iaii iaii
.8d 1 a 20000000000000000000000000000000000000000000000000
\*SYSYNC
1.2wabaaawllo gwhb
.1
a Off 1 2 1 1 1 1 1 1 1 1 1 1 1 1 1 1 1 1 1 1 1 1 1 1 1 1 1 1 1 1 1 1 1 1 1 1 1 1 1
.2
jI 15! gabg bfo gswgog yolol aolol de GRILL ddo
aJrJU 1 JyI y. aJg 200 wJLJIaJbJrJrJr
Lalalalalalalalalalalalalal
Iolg (Jtll Jauo 1a aia Iblhy) gblab glgolg oog 2 agll Jaal “2" d bcl
.
.5
.SYNC de bdo 6
.7
.200 200 200 g 200g
. ^ 加 Add" aLwJ oaiy Jywl Jywl Jywl Jywl Jywl Jywl Jywl Jywl Jywl Jywl Jywl Jywl Jywl Jywl Jywl Jywl Jywl Jywl Jywl Jywl Jywl Jywl Jywl Jywl Jywl Jywl Jywl Jywl Jywl Jywl Jywl Jywl Jywl Jywl
.1jJUg 1200000000000000000000000000000000
pabll ggoj afoa oaoo ooo. daiu uuiu wuyu aywug oggl y
G
aJ 10 d s o J g "Add" aLw o o Lue : abgdo
"START/STOP"
.8o joljol joljol jolg sall aol de palaal g 10
.11
gabla aacaa 3 gull gba j5s:abgdo
eIgllgl 3 pabll julj jjj
cbw ddoaig jolal no cgl w. yabll alil uis gao gaa laic 12
S_ OBC = 12 · CO · BC = 12 × CD × 5
.13
J 1
j0005 5 Jn6 aio o0e g cJyD1o iJy jCai 1 yabal cui : abgao
.SYNC" 1000
2wUJbJl
$$ . 2 ^ {\prime} \text {d e l a t i o n .} 2 \text {c u r l} \text {L a s s i t} \quad . 4 $$
$$ j e ^ {j a l l i s} \left[ 1 3 \right] j o l l a o g c a g g l b o g u g l b a b l j t l l g a l g a g d e b a c l. 5 $$
$$ (- g + \int_ {c} b d t \text {a l l} (z) _ {r} z) \bar {a} b g _ {r} \dot {a} \dot {b} 1 \quad | | a | | _ {d} $$
$$ . 6 $$
$$ \text {a l l} \left. \right.\left. \right.\left. \right.\left. \right.\left. \right.\left. \right.\left. \right.\left. \right.\left. \right.\left. \right.\left. \right.\left. \right.\left.\left.\left.\left.\left.\left.\left.\left.\left.\left.\left.\left.\left.\left.\left.\left.\left.\left.\left.\left.\left.\left. 1 5 1\right)\right]\right]\right]\right]\right]\right]\right]\right]\right]\right]\right]\right]\right]\right]\right]\right]\right]\right]\right]\right]\right] $$
$$ \left. \rho (\text {a b})\right) \quad \text {g} \quad \text {g} \quad \text {g} \quad \text {g} \quad \text {g} \quad \text {g} \quad \text {g} \quad \text {g} \quad \text {g} \quad \text {g} \quad \text {g} \quad \text {g} \quad \text {g} \quad \text {g} \quad \text {g} \text {l l l l l l l l l l l l l l l l l l l l l l l l l l l l l l l l l l l l l l l l l l l l l l l l l l l l l l l l l l l l l l l l} $$
$$ \left. \right.\left. \right.\left. \right.\left. \right.\left.\left.\left.\left.\left.\left.\left.\left.\left.\left.\left.\left.\left.\left.\left.\left.\left.\left.\left.\left.\left.\left.\left.\left.\left.\left.\left.\left.\left.\left.\right.\right.\right.\right.\right.\right.\right.\right.\right.\right.\right.\right.\right.\right.\right.\right.\right.\right.\right.\right.\right.\right.\right.\right.\right.\right.\right.\right.\right.\right. $$
$$ \therefore \Delta_ {a b c} \cong \frac {1}{2} \frac {1}{3} \frac {1}{2} \frac {1}{3} \frac {1}{4} \frac {1}{5} \frac {1}{6} \frac {1}{7} \frac {1}{8} \frac {1}{9} \frac {1}{1 0} \frac {1}{1 1} \frac {1}{1 2} \frac {1}{1 3} \frac {1}{1 4} \frac {1}{1 5} \frac {1}{1 6} \frac {1}{1 7} \frac {1}{1 8} \frac {1}{1 9} \frac {1}{2 0} $$
$$ \text {S T A R T / S T O P} \frac {\text {S t a r t}}{\text {S t o p}} \left{ \begin{array}{l} \text {b e l o w} \ \text {b e l o w} \end{array} \right. \quad . 8 $$
$$ . 9 $$
$$ a a b \text {b} \text {b} \text {b} \text {b} \text {b} \text {b} \text {b} \text {b} \text {b} \text {b} \text {b} \text {b} \text {b} \text {b} \text {b} \text {b} \text {b} \text {b} \text {b} \text {b} \text {b}, \quad a a b \text {a} \text {a} \text {a} \text {a} \text {a} \text {a} \text {a} \text {a} \text {a} \text {a} \text {a} \text {a} \text {a} \text {a} \text {a} \text {a} \text {a} \text {a} \text {a} \text {a} \text {a b}, \quad a a b \text {a b} \text {b b} \text {b b} \text {b b} \text {b b}, \quad a a b \text {a b} \text {b b} \text {b b}, \quad a a b \text {a b} \text {b b}, \quad a a b, $$
$$ \cdot \text {C W L} \cdot \infty $$
$$ \text {a} \text {i} \text {i} \text {i} \text {i} \text {i} \text {i} \text {i} \text {i} \text {i} \text {i} \text {i} \text {i} \text {i} \text {i} \text {i} \text {i} \text {i} \text {i} \text {i} \text {i} \text {1 0 0 0 0 0 0 0 0 0 0 0 0 0 0 0 0 0 0 0 0 0 0 0 0 0 0 0 0 0 0 0 0 0 0 0 0 0 0 0 0 0 0 0 0 0 0 0 0 0 0 2} $$
$$ a g l \int a g r e s s d. g i l d 5 L d \delta d k o l o n d o w n g e g j c l o w d l l d l l d l d l d l d l d l d l d l d l d l d l d l d l d l d l d l d l d l d l d l d l d l d l d l d l d l d l d l d l d l d l d l d l d l d l d l d l d l d l d l d l d l d l d l d l d l d l d l d l d l d l $$
$$ . ^ {\prime \prime} S Y N C ^ {\prime \prime} g o l a r y i d e f i g u r e s i n \text {o f f} ^ {\prime \prime} \text {O F F} ^ {\prime \prime} \text {i d} ^ {\prime \prime} $$
jglj jno bdo wolg jro plu
..jL Start/Stop 1
.2
OFFg 00 +00 +0 +0 +0 +0 +0 +0 +0 +0 +0 +0 +0 +0 +0 +0 +0 +0 +0 2"g1"1"jLb+alJl6 Js
$$ . \left(" 2 ^ {n} g ^ {1} " 1 ^ {n} j j l d s g ^ {j} i o d o l u o l u o l u o l u o l u o l u o l u o l u o l u o l u o l u o l u o l u o l u o l u o l u o l u o l u o l u o l u o l u o l u o l u o l u o l u o l u o l u o l u o l u o l u o l u o l u o l u o l u\right) $$
$$ \therefore \Delta_ {a b} g _ {i j} \Delta_ {b c} g _ {j i} \Delta_ {c d} g _ {i j} \Delta_ {d k} g _ {k l} \dots \Delta_ {l m} g _ {m n} \dots \Delta_ {n p} g _ {p q} \dots \Delta_ {q r} g _ {r s} \dots \Delta_ {s t} g _ {t u} \dots \Delta_ {t v} g _ {v w} \dots \Delta_ {w x} g _ {x y} \dots \Delta_ {y z} g _ {z w} \dots \Delta_ {z x} g _ {z y} $$
$$ : \hat {a} _ {i} \hat {a} _ {j} \hat {a} _ {k} \hat {a} _ {l} \hat {a} _ {m} \hat {a} _ {n} \hat {a} _ {o} \hat {a} _ {p} \hat {a} _ {q} \hat {a} _ {r} \hat {a} _ {s} \hat {a} _ {t} \hat {a} _ {u} \hat {a} _ {v} \hat {a} _ {w} $$
$$ o i a) \text {a w a l l} \text {a w a l l} \text {a g l} \text {d e} \text {d} \text {d} \text {d} \text {d} \text {d} \text {d} \text {d} \text {d} \text {d} \text {d} \text {d} \text {d} \text {d} \text {d} \text {d} \text {d} \text {d} \text {d} \text {d} \text {d} \text {g a g} \text {g a g} \text {g a g} $$
$$ . \left(\text {G a l l} \cup \cup \cup \cup \cup \cup \cup \cup \cup \cup \cup \cup \cup \cup \cup \cup \cup \cup \cup \cup \cup \cup \cup \cup \cup \cup \cup \cup \cup \cup \cup \cup \cup \cup \cup \cup \cup \cup \cup \cup \cup \cup \cup \cup \cup \cup \cup \cup \cup \cup \dots\right) $$
$$ \begin{array}{l} \text {S t a r t} \ \text {S t o p} \end{array} $$
$$ \therefore \Delta A B C \sim \Delta A D E $$
$$ \left. \right.\left. \right.\left. \right.\left.\left.\left.\left.\left.\left.\left.\left.\left.\left.\left.\left.\left.\left.\left.\left.\left.\left.\left.\left.\left.\left.\left.\left.\left.\left.\left.\left.\left.\left.\left.\right.\right.\right.\right.\right.\right.\right.\right.\right.\right.\right.\right.\right.\right.\right.\right.\right.\right.\right.\right.\right.\right.\right.\right.\right.\right.\right.\right.\right.\right.\right. $$
$$ \cdot . M A N U A L \quad g \dot {g} \dot {g} \mid d \quad b \dot {b} \dot {b} \quad \cdot $$
$$ \cdot \text {o} j _ {i} \text {o} \text {o} \text {o} \text {o} \text {o} \text {o} \text {o} \text {o} \text {o} \text {o} \text {o} \text {o} \text {o} \text {o} \text {o} \text {o} \text {o} \text {o} \text {o} \text {o} \text {a l l} \text {a l l} - g + \text {o} j _ {i} \text {o} j _ {i} \text {o} j _ {i} \text {o} j _ {i} \text {o} j _ {i} \text {o} j _ {i} \text {o} j _ {i} \text {o} j _ {i} \text {o} j _ {i} \text {o} j _ {i} $$
$$ \therefore \text {d} _ {\text {g}} = 2 0 0 g 4 0 $$
$$ \therefore \text {a} \text {s} \text {b} \text {c} \text {d} \text {e} \text {f} \text {g} \text {h} \text {i} \text {j} \text {k} \text {l} \text {m} \text {n} \text {o} \text {p} \text {q} \text {r} \text {s} \text {t} \text {u} \text {v} \text {w} \text {x} \text {y} \text {z} \text {a l l} \text {b a l l} \text {c a l l} \text {d a l l} \text {e d a l l} \text {f a l l} \text {g a l l} \text {h a l l} \text {i s} $$
$$ . \ddot {a} \dot {a} \dot {s} 6 0 g 0 \dot {u} \dot {v} \dot {g} \dot {l} \dot {u} \dot {v} \dot {g} $$
$$ \begin{array}{c} \text {a a .} \ \text {a a .} \ \text {a a .} \ \text {a a .} \ \text {a a .} \ \text {a a .} \ \text {a a .} \ \text {a a .} \ \text {a a .} \ \text {a a .} \ \text {a a .} \ \text {a a .} \ \text {a a .} \ \text {b a l l} \ \text {b a l l} \ \text {b a l l} \ \text {b a l l} \ \text {b a l l} \ \text {b a l l} \ \text {b a l l} \ \text {b a l l} \ \text {b a l l} \ \text {b a l l} \ \text {b a l l} \ \text {b a l l}. \end{array} $$
$$ \ddot {a} \dot {a} \dot {a} \dot {a} \dot {a} \dot {a} \dot {a} \dot {a} \dot {a} \dot {a} \dot {a} \dot {a} \dot {a} \dot {a} \dot {a} \dot {a} \dot {a} $$
$$ \therefore \text {C J} \text {J E} \text {E} \text {F} \text {G} \text {H} \text {I} \text {J} \text {K} \text {L} \text {M} \text {N} \text {O} \text {P} \text {Q} \text {R} \text {S} \text {T} \text {U} \text {V} \text {W} \text {X} \text {Y} \text {Z} \text {A} \text {B} \text {C} \text {D} \text {E} \text {F} \text {G} \text {H} \text {I} \text {J} \text {K} \text {L} \text {M} \text {N} \text {O} \text {P} \text {Q} \text {R} \text {S} \text {T} \text {U} \text {V} \text {W} \text {R} \text {S} \text {T} \text {U} \text {V} \text {W} \text {X} \text {Y} \text {Z} \text {A} \text {B} \text {C} \text {D} \text {E} $$
$$ \left. \left(\omega_ {a} + \frac {\omega}{2}\right) \omega_ {b} + \frac {\omega}{2} \omega_ {c}\right) \omega_ {d} = \frac {\omega}{2} \omega_ {a} + \frac {\omega}{2} \omega_ {b} + \frac {\omega}{2} \omega_ {c} $$
$$ j \dot {s} s l e c g l l u s i j p s. o j a g j a b l l j d s o j l a g l l o j l e c g l l j e r j. (“ j a b l l j d s) $$
$$ l a l l a l g a b l s o d s o l e! $$
$$ \dot {a} a \dot {a} \dot {a} \dot {a} \dot {b} b \dot {b} \dot {a} \dot {a} \dot {b} \dot {a} \dot {b} \dot {a} \dot {b} \dot {a} \dot {b} \dot {a} \dot {b} \dot {a} \dot {b} \dot {a} \dot {b} \dot {a} \dot {b} \dot {a} \dot {b} \dot {a} \dot {b} \dot {a} \dot {a} \dot {b} \dot {a} \dot {b} $$
aaiwglalilugg jollljollll 3
.aisli
a 1
y. jolwI ggljgJzjgJlqll Jaa. aaloo aolaoa 2019 jolq
J 1
JosaiyIj
1.
.2
J L 10000000000000000000000000000000000000000
Start 3
.2JUdAaLdUdJe OFF 1 1 1 JUd Ud jolj 5 AJIabI UblBbUg 4
oJb2j1,duuill (y).2g j(1)jjl Jb2aill JU. 5
.05gJgJUJgJUJgJUJgJUJgJUJgJU
Jus"gj) jglj Jlalbl JlaJgjoo jjoo
aill aaii 1 10
aB 6
(2011) 111111111111111111111
SYNC g0g jnnn Jaa aagll 1aaggl gplebl no nolnoe ng gab elge
jai 1 jol g o5l bllg o jol ljol Start Step 1e bol .1
.2wUdUdUdUdOFF
1111111111111111111111111111111 2
.111111111111111111111111111111
.3
jollll 10 0000000000000000000000000000000000000000000000000000000
.
gckuoluggaalldy
(j)bl
jssssssssssssssssssssss
JUULI JUSSA aooa oog
a000000000000
.E
(20 (_i = 1^na_ix_i)
.A
.G
( 5( 5 - 2) ( 5 - 2) ) > 32
.B
.H
三
.C
.1
a 00s g
.D
DUAL EASY FRY
.2g1 jj j 00000000000000000000000000000000000000000000000000000000000
DUAL EASY FRY & GRILL\*pUusuag
PRAHEAT
GRILL 000000000000000000000000000000000000000
Grilliprogramm (olenevalt mudelist)
ET
ENNE ESIMEST KASUTAMIST
KypbIINfbIH KONdaHfAH caBH Ta3aJAN OTbIPbIHbI3.
bIbcNeh TOpBbIH Xa6bICnabTbIH Xa6bIHbIb 6ap. Onapbl Ta3anay yuH Metann ac yI bIcIbCTabH HeMece KbpaTbIH Ta3anaFbIb MaTePnaIadpbl naJaDaHa6aHbI3, ce6e6I 6yn Xa6bICnabTbIH Xa6bIHbIb 3aKbIMdAyI MyMKH.
- Asha hbi po3eTkaadah cybipbn, KpbblfbHbCybltbn anbHb3.
EckepTne. KypbInfbHbI Te3ipeK caNkbHdaTy yWih bIDbcTb IwIFapBn aNbHbI3. - KypbIbIbIbIh CbIpTbI NdbIMKbl Ny6epeKeH cyptiH3.
- bIbI cIe IIN rPiIb hayacIbH bICTbIK CymEH, KyfblIc CytIKbIKIIeH XaHE KbIPMaITbIH ryKamEn TaanaIah3. KaIfAH JIactbI Ketipy yIsh Mm KetipetIH cyIbIKbIKTbI kondahyo 60bnai.
EckepTy! bIbIc peH Topbl bIbIC xyfblTa xyyra 6onaIbl.
Kehec. Idbic neh TOpdbI TybiH Kip TybIn Kanca, Onapdb IbCTbK CymHe XHE a3dan Jyblw cyBikTbIKneH ToTbipbHb. bIdbctbX He Topdb WamAmen 10 MHTyKaandlbipHb. OAnd KeHn Ta3anan Xbyin, KypaTbHb3. - KypbIINfbHbIH iuiH bICTbIK CymEH XHe DbIMKbI IN WybepeKeHcypTih3.
- Ke3 KenreH Tafam KaIbIbTapBbH Ketipy YuIi H Kbl3dbPfbl 3neMeHTTI KpyFAk Ta3anay YetKacbIme Ta3anaaHb3.
- KypbIJIbIbI cyfa Hemece 6aKa cyIbIKtIbKa caImaHbI3.
CAKTAY
- KypbIJIfBiHbI TOKTah aXbIpaTbIN, cyblbn aIbHbI3.
- BapJIbIK 6eIWeKTIH Ta3a epi Kpyfak EkeHiH TeKcepiji3.
KENIIJIK XOHE KbI3MET KOPCETY
Erep ciire Kbl3met Hemece aknapat kaxet 6oNca Hemece Mecene TaBihdaca, 6peHd Be6caTbHa NkpH3 Hemece eniH3eien 6peHdTIyBtHyBtApDbI KOnlay opanbfaHbHa xabapacbHb3. Tenepon Hemipin anemik Keinidk Kitanlssbnh Ta7b4 o6baNda. Erep eniH3de TybHbUbIaPbKOnlay opanbIbFb Oommaca, kepriniKt 6peHd dInnepine 6apbHbI3.
AKAYIbIKTAPDbIXO
KpybIbIba KaTbCTb MaCeenepen TybIHaca, Kki KoIbIaTH cypaTap T3iMH any yIHH 6peH Be-CAbTIbHa KpiH3 (ocb HcykaylbKtARb MykaBa 6eTIH kapaB3) Hemece enHI3deri TybHUYIbnApdbl KonJday optanbIFbHa xa6apnaCbHb3.
APRAŠAS
A. 1 stalcius (didelis dubuo)
B. 2 stalcius (jprasto dydzio dubuo)
C. Stalciu rankenelés
D. Dideles, išimamos islietos grilio greteles su silikoninialis padeliais (pagal modelj)
E. Dideles išimamos groteles su silikoninialis padeliais (pagal modelj)
F. Isimamos groteles su silikoninials padeliais
G. Skaitmeninis jutiklinis skydelis
H. Laiko / temperaturos ekranas
"Dual Easy Fry" naudotojo sāsaja
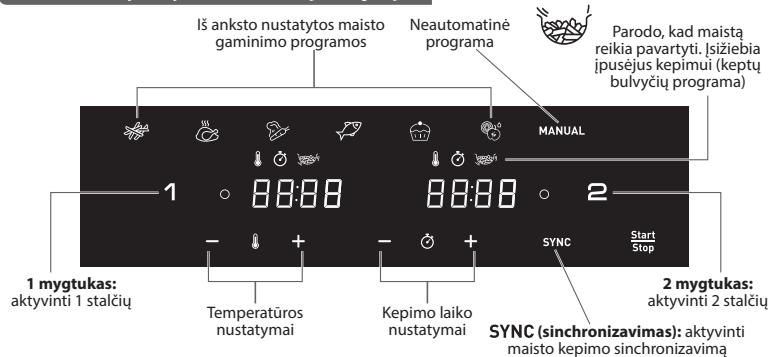
OFF (ijsjungta): nurodo, kad stalcius ijsjungtas. Noredami aktyvinti spustelekite 1 arba 2 mygtuka.