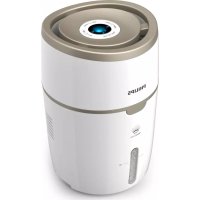
AMF220/15 - Humidifier PHILIPS - Free user manual and instructions

Find the device manual for free AMF220/15 PHILIPS in PDF.
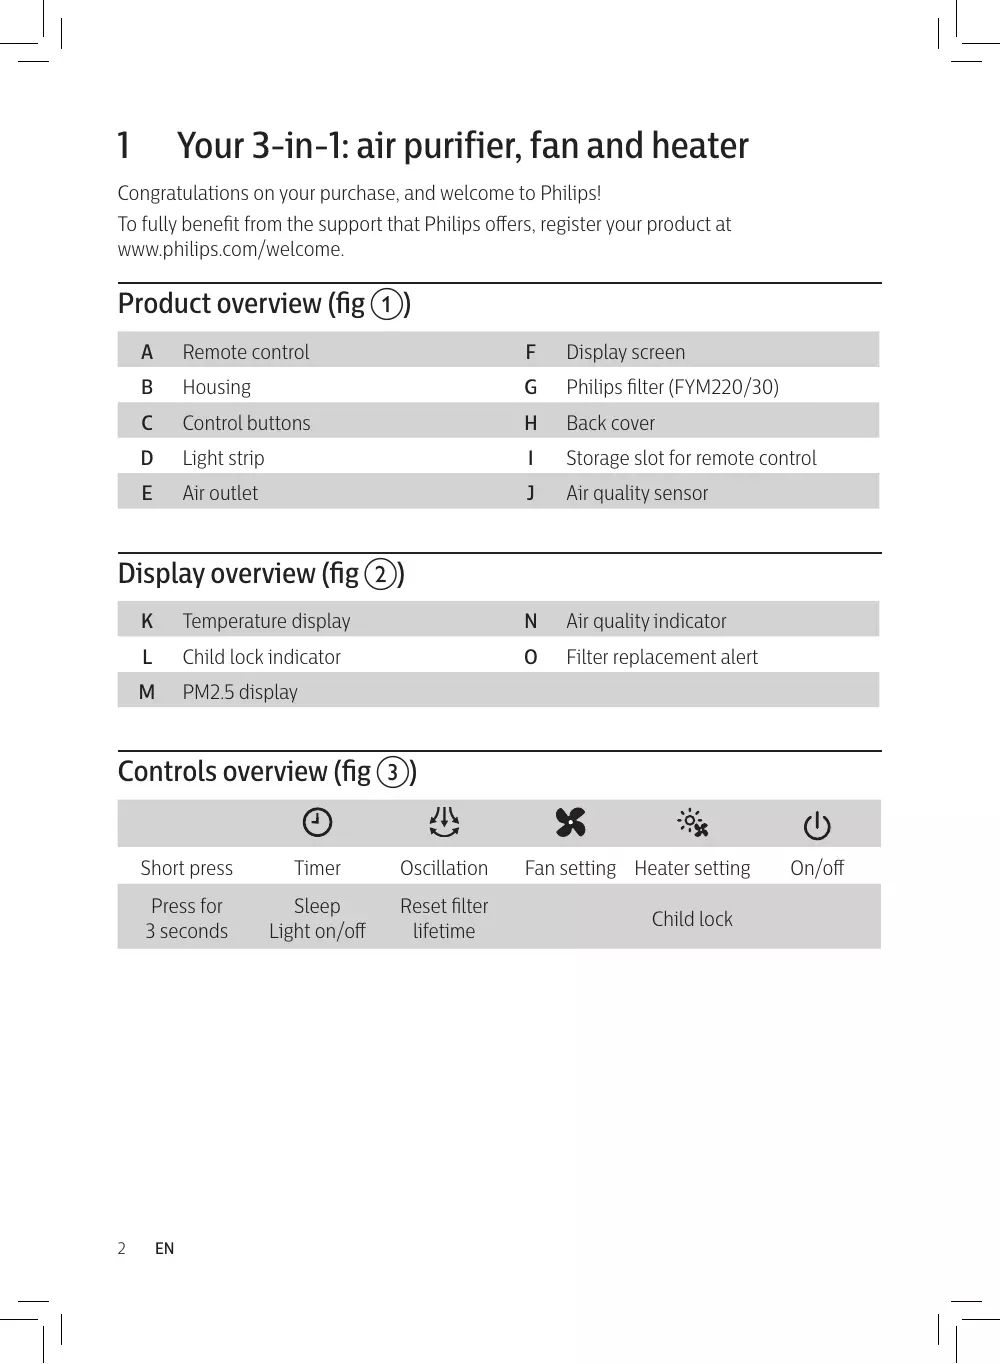
📄 290 pages PDF ⬇️ English EN 💬 AI Question 🖨️ Print
Notice PHILIPS AMF220/15 - page 6
Manual assistant
Powered by ChatGPT
Waiting for your message
Product information

Brand : PHILIPS

Model : AMF220/15

Category : Humidifier

Download the instructions for your Humidifier in PDF format for free! Find your manual AMF220/15 - PHILIPS and take your electronic device back in hand. On this page are published all the documents necessary for the use of your device. AMF220/15 by PHILIPS.

USER MANUAL AMF220/15 PHILIPS

Your 3-in-1: air purifier, fan and heater Congratulations on your purchase, and welcome to Philips! To fully benefit from the support that Philips offers, register your product at www.philips.com/welcome. Product overview (fig a)

Philips filter (FYM220/30)

Storage slot for remote control

Air quality indicator

Fan setting Heater setting Child lock On/off Getting started Eng l ish

Installing the filter Note: Make sure the appliance is unplugged from the electrical outlet before installing the filter.

To remove the back cover, hold the side of it with both hands and pull. (fig d). Pull the filter from the appliance (fig e). Remove all packaging materials from the filter (fig f). Put the filter back into the appliance (fig g). Reattach the back cover (fig h). Setting up the remote control

Pull out the plastic film on the remote control to activate the battery (fig i). Pair the remote control with the appliance if you have multiple devices in one house (see the chapter “Pairing your remote control”). Note: Place the remote control in the slot and it snaps in place automatically (fig j).

Using the 3-in-1: air purifier, fan and heater Air quality light PM2.5 level Air quality light color Air quality level ≤ 12 Blue Good 13-35 Blue-purple Fair 36-55 Purple-red Poor > 55 Red Very poor

Turning on and off Note:

  • Plug the appliance into the power outlet; do not use a power strip.
  • If the appliance is running in heating mode when you turn it off, it continues working for a few seconds to exhaust the remaining heat.

Press to switch on the appliance. The display panel lights up, and appliance shows the PM2.5 level and temperature (fig k). Press to switch off the appliance. Heater and fan Light strip Heater ( Fan (

Low Medium High Red Low Medium High Blue Oscillation Press the button, the appliance can oscillate at three angles: 60°, 120° and 350°. Setting the timer Press the button repeatedly to set operating hours of the appliance. The timer is available from 1 to 7 hours. 1 hour 2 hours 3 hours To deactivate the timer, press the 4 hours 5 hours 6 hours button repeatedly until all the hour indicators are off. Setting the child lock

Press and hold the button for 3 seconds to activate the child lock (fig l).

appears on the screen. » All the other buttons are unresponsive except on/off.

Press and hold the disappears.

7 hours button for 3 seconds to deactivate child lock.

Eng l ish Sleep, turning light on/off Press and hold the button for 3 seconds (fig m). » The display screen dims, rest lights will turn off. Press any button to turn all lights on. Pairing your remote control

Unplug the appliance from the power outlet and wait for 10 seconds. Plug in the appliance, then within 5 seconds,press the button on the appliance twice (fig n). » The 2h indicator lights up. Long press the button for 5 seconds on the remote control within 5 seconds (fig o). » The and indicator of fan button on the appliance lights up, and the appliance operates in the fan mode, indicating that the pairing is successful (fig p). Note: If the “2h” indicator is blinking, you must repeat the pairing. Replacing the battery

Push the battery bracket edge gently and pull it out of the remote control (fig q). Insert the new battery with correct polarities as indicated (fig r). Put the battery bracket back into the remote control (fig s). Cleaning and maintenance Note: Switch off the appliance and unplug it from the power outlet before continuing. Cleaning the body of the appliance Use a soft, dry cloth to clean the appliance surface, including air inlet and outlet. Clean particle sensor surface. Do not open particle sensor cover. (fig t). Cleaning the filter surface Clean the filter surface with a vacuum cleaner or brush every two weeks. 1 Pull the back cover and remove it from the appliance (fig d). 2 Pull the filter from the appliance (fig u). 3 Clean the surface of the filter with a vacuum cleaner (fig v). 4 Put the filter back into the appliance (fig g). 5 Reattach the back cover (fig h). 6 Wash your hands thoroughly after cleaning the filter (fig w).

Filter replacement When the filter replacement alert lights up Note:

  • The filter is not washable or reusable.
  • Do not smell the filter because it contains air pollutants. Replace the filter when lights up on the screen (fig x). 1 Replace the filter with Philips filter (FYM220/30). Follow the instructions in the chapter “Installing the filter”. 2 Press to switch on the appliance. 3 Press and hold the button for 3 seconds to reset the filter replacement time (fig y). » The filter replacement alert disappears from the screen. 4 Wash your hands thoroughly after replacing the filter (fig w). Before the filter replacement alert lights up You can replace the filter before the filter replacement alert ( ) lights up. If you do this, you need to reset the filter lifetime counter manually. 1 Unplug the appliance from the power outlet and wait 10 seconds. 2 Plug the appliance into the power outlet (fig z). 3 Within 15 seconds after power on, press and hold the button for 3 seconds to reset the filter lifetime counter. » The filter replacement alert blinks once after successfully resetting the filter.

Troubleshooting This chapter summarizes the most common problems you could encounter with the appliance. If you are unable to solve the problem with the information below, contact the Consumer Care Center in your country. Problem Possible solution The airflow from the air outlet is significantly weaker than before.

  • The surface of the filter is dirty. Clean the surface of the filter (see the chapter “Cleaning and maintenance”).

Possible solution The air quality does not improve even though the appliance has been operating for a long time.

  • Check whether the packing material is removed from the filter.
  • Check whether the filter is installed in the appliance.
  • Clean the sensor cover surface with mop or vacuum cleanser; Do not open sensor cover or touch inside.
  • Room size is too large, or the outdoor air quality is poor. For optimum purification performance, close the doors and windows when operating the appliance.
  • There are indoor pollution sources. Examples include cigarette smoke, cooking fumes, incense, perfume and alcohol.
  • Filter has reached end of life. Replace the filter with a new one. The appliance produces a strange smell.
  • The first few times you use the appliance, it may produce a plastic smell. This is normal.
  • If the appliance produces a burning smell, immediately unplug it and turn it upside down to check whether any foreign objects have fallen into the appliance. If nothing is found, please contact your Philips dealer or an authorized Philips service center.
  • The filter may produce an odor after being used for a while because of the absorption of indoor gases. It’s recommended that you reactivate the filter by putting it in direct sunlight for repeated use. If the odor remains, replace the filter. The appliance is too loud.
  • The noise level is higher if you select high speed.
  • If anything drops into air outlet, it may also cause abnormal loud sound. Immediate turn off the appliance and turn it upside down to remove foreign objects.
  • If there is an abnormal sound, contact the Consumer Care Center in your country. Eng l ish Problem The appliance still
  • Perhaps you did not reset the filter lifetime counter. Switch on the indicates that I need appliance. Then press and hold the button for 3 seconds. to replace a filter, but I already did. The heating function • Check whether the air inlet or air outlet is blocked. is not working.
  • Check whether the filter surface is excessively dirty and blocking airflow. If so, the heating function may stop working for protection.

Maximum continuous heat output Auxiliary electricity consumption At nominal heat output At minimum heat output In standby mode P max, C 1,8

Item Type of heat input, for electric storage local space heaters only (select one) manual heat charge control, with integrated thermostat manual heat charge control with room and/or outdoor temperature feedback electronic heat charge control with room and/or outdoor temperature feedback fan assisted heat output Unit [no] [no] [yes] [no] Type of heat output/room temperature control (select one) single stage heat output and no [no] room temperature control Two or more manualstages, no [no] room temperature control with mechanic thermostat room [no] temperature control with electronic room temperature [yes] control electronic room temperature [no] control plus day timer electronic room temperature [no] control plus week timer Other control options (multiple selections possible) room temperature control, with [no] presence detection room temperature control, with [no] open window detection with distance control option [no] with adaptive start control [no] with working time limitation [yes] with black bulb sensor [no]

Philipsi filter (FYM220/30)

Philipsov filter (FYM220/30)

Philipsov filter (FYM220/30)

Philips filter (FYM220/30)